vin DACIA DUSTER 2012 1.G Service Manual
[x] Cancel search | Manufacturer: DACIA, Model Year: 2012, Model line: DUSTER, Model: DACIA DUSTER 2012 1.GPages: 200, PDF Size: 2.4 MB
Page 88 of 200
2.20
ENG_UD24327_2
Boîte de vitesses automatique (H79 - Dacia)
ENG_NU_898-5_H79_Dacia_2
Jaune NoirNoir texte
AUTOMATIC TRANSMISSION (2/3)
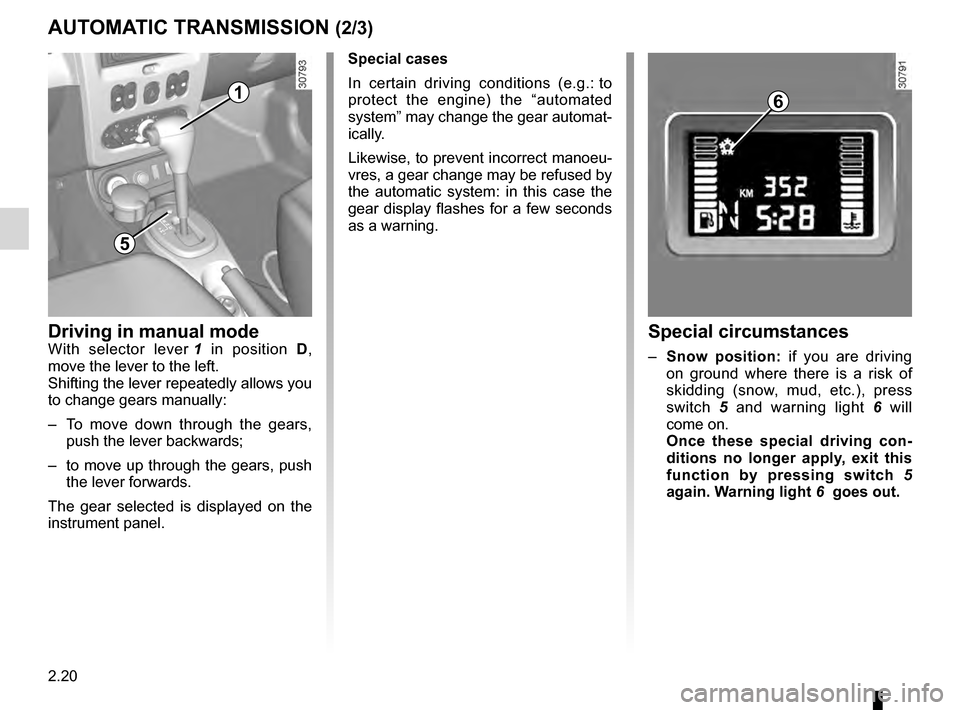
Driving in manual modeWith selector lever 1 in position D,
move the lever to the left.
Shifting the lever repeatedly allows you
to change gears manually:
–
T
o move down through the gears,
push the lever backwards;
–
to
move up through the gears, push
the lever forwards.
The gear selected is displayed on the
instrument panel.Special circumstances
– Snow position: if you are driving
on ground where there is a risk of
skidding (snow, mud, etc.), press
switch
5
and warning light
6
will
come on.
Once these special driving con-
ditions no longer apply, exit this
function by pressing switch
5
again. Warning light
6 goes out.
Special cases
In certain driving conditions (e.g.:
t
o
protect the engine) the “automated
system” may change the gear automat-
ically.
Likewise, to prevent incorrect manoeu-
vres, a gear change may be refused by
the automatic system: in this case the
gear display flashes for a few seconds
as a warning.
1
5
6
Page 89 of 200
JauneNoirNoir texte
2.21
ENG_UD24327_2
Boîte de vitesses automatique (H79 - Dacia)
ENG_NU_898-5_H79_Dacia_2
AUTOMATIC TRANSMISSION (3/3)
– If the road contour and bends in
the road do not allow you to stay in
automatic mode (e.g.: in mountain-
ous areas), it is recommended that
you switch to manual mode.
This will prevent the automatic gear-
box from changing gears repeatedly
when climbing, and permit engine
braking on long descents.
–
I
n cold weather , start the engine
and wait a few seconds before
moving the selector lever from posi-
tion P or N and engaging it in D or R
to prevent the engine stalling.
–
V
ehicles not fitted with traction
control: on a slippery surface or
surface with a low level of adhesion,
change to manual mode and select
second gear (or even third) before
starting the engine to avoid wheel-
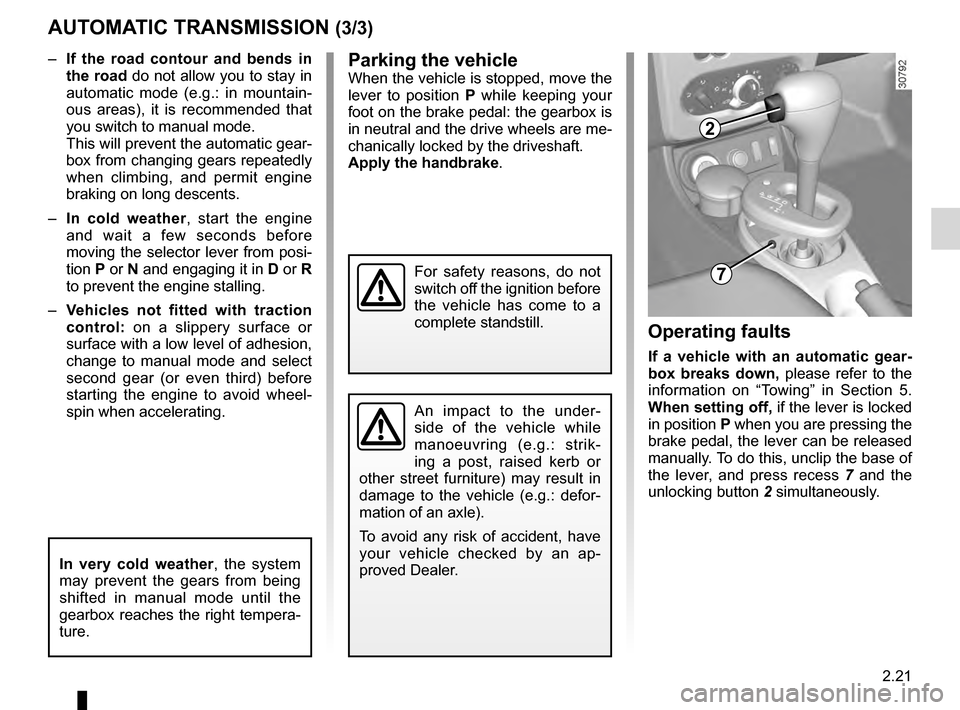
spin when accelerating.Parking the vehicleWhen the vehicle is stopped, move the
lever to position P while keeping your
foot on the brake pedal: the gearbox is
in neutral and the drive wheels are me-
chanically locked by the driveshaft.
Apply the handbrake.
Operating faults
If a vehicle with an automatic gear-
box breaks down, please refer to the
information on “Towing” in Section 5.
When setting off, if the lever is locked
in position P when you are pressing the
brake pedal, the lever can be released
manually. To do this, unclip the base of
the lever, and press recess
7
and the
unlocking button
2
simultaneously.
In very cold weather , the system
may prevent the gears from being
shifted in manual mode until the
gearbox reaches the right tempera-
ture.
An impact to the under-
side of the vehicle while
manoeuvring (e.g.: strik-
ing a post, raised kerb or
other street furniture) may result in
damage to the vehicle (e.g.: defor-
mation of an axle).
To avoid any risk of accident, have
your vehicle checked by an ap-
proved Dealer.
For safety reasons, do not
switch off the ignition before
the vehicle has come to a
complete standstill.
2
7
Page 96 of 200
3.6
ENG_UD25124_1
Chauffage - Ventilation - Air conditionné (H79 - Dacia)
ENG_NU_898-5_H79_Dacia_3
Jaune NoirNoir texte
HEATING, VENTILATION, AIR CONDITIONING (3/4)
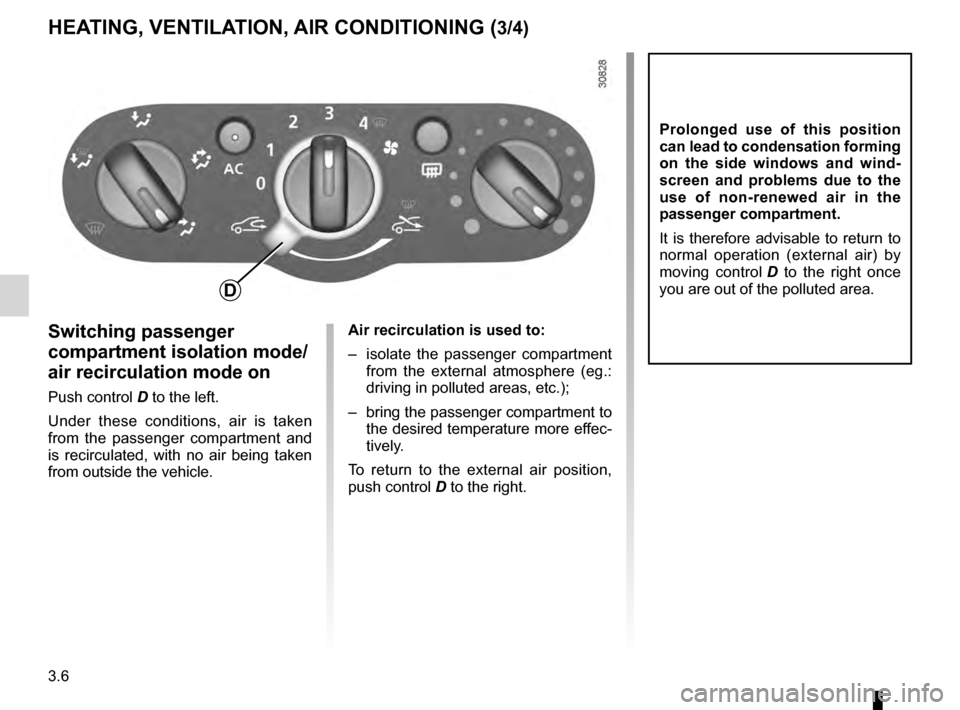
Switching passenger
compartment isolation mode/
air recirculation mode on
Push control D to the left.
U nder these conditions, air is taken
from the passenger compartment and
is recirculated, with no air being taken
from outside the vehicle. Air recirculation is used to:
–
i
solate the passenger compartment
from the external atmosphere (eg.:
driving in polluted areas, etc.);
– bring the passenger compartment to
the desired temperature more effec-
tively.
To return to the external air position,
push control
D
to the right.
Prolonged use of this position
can lead to condensation forming
on the side windows and wind-
screen and problems due to the
use of non-renewed air in the
passenger compartment.
It is therefore advisable to return to
normal operation (external air) by
moving control
D
to the right once
you are out of the polluted area.
D
Page 97 of 200
JauneNoirNoir texte
3.7
ENG_UD25124_1
Chauffage - Ventilation - Air conditionné (H79 - Dacia)
ENG_NU_898-5_H79_Dacia_3
HEATING, VENTILATION, AIR CONDITIONING (4/4)
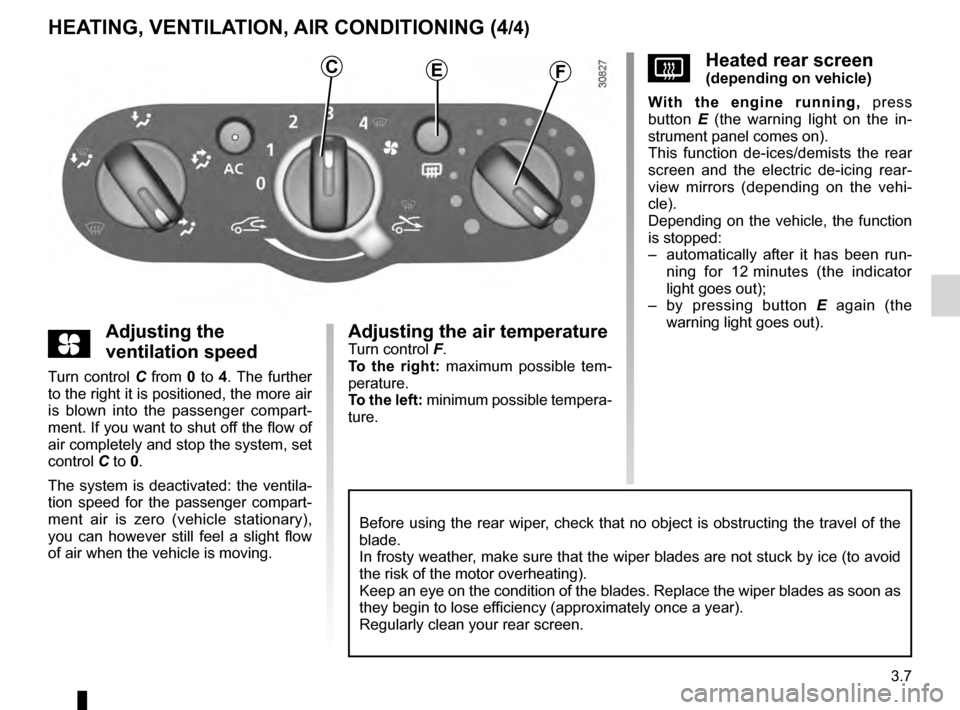
yAdjusting the
ventilation speed
Turn control C from 0 to 4. The further
to the right it is positioned, the more air
is blown into the passenger compart-
ment. If you want to shut off the flow of
air completely and stop the system, set
control
C to 0.
The system is deactivated: the ventila-
tion speed for the passenger compart-
ment air is zero (vehicle stationary),
you can however still feel a slight flow
of air when the vehicle is moving.
Adjusting the air temperatureTurn control F.
T o the right: maximum possible tem-
perature.
To the left: minimum possible tempera-
ture.
VHeated rear screen(depending on vehicle)
With the engine running, press
button
E
(the warning light on the in-
strument panel comes on).
This function de-ices/demists the rear
screen and the electric de-icing rear-
view mirrors (depending on the vehi-
cle).
Depending on the vehicle, the function
is stopped:
–
a
utomatically after it has been run-
ning for 12
m
inutes (the indicator
light goes out);
–
b
y pressing button
E
again (the
warning light goes out).CEF
Before using the rear wiper, check that no object is obstructing the travel of the
blade.
In frosty weather, make sure that the wiper blades are not stuck by ice (to avoid
the risk of the motor overheating).
Keep an eye on the condition of the blades. Replace the wiper blades as soon as
they begin to lose efficiency (approximately once a year).
Regularly clean your rear screen.
Page 98 of 200
air conditioning ..................................... (up to the end of the DU)
heating system ..................................... (up to the end of the DU)
heating and air conditioning system ..... (up to the end of the DU)
ventilation heating and air conditioning system (up to the end of the DU)
air conditioning ...................................................... (current page)
3.8
ENG_UD18246_14
Air conditionné : informations et conseils utilisation (B90 - U90 - \
L90 Ph2 - F90 Ph2 - R90 Ph2 - H79 - Dacia)
ENG_NU_898-5_H79_Dacia_3
Air conditioning: information and advice on use
AIR CONDITIONING: information and advice on use
Fuel consumption
You will normally notice an increase
in fuel consumption (especially
when driving in town) when the air
conditioning is operating.
For vehicles fitted with air condition-
ing with no automatic mode, switch
off the system when it is not re-
quired.
Advice for reducing consumption
and helping to preserve the envi-
ronment
Drive with the air vents open and
the windows closed.
If the vehicle has been parked in
the sun, open the doors for a few
moments to let the hot air escape
before starting the engine. Operating faults
As a general rule, contact your ap-
proved dealer in the event of an op-
erating fault.
–
R
eduction in de-icing, demist-
ing or air conditioning per-
formance.
This may be caused by the pas-
senger compartment filter car-
tridge becoming clogged.
–
No cold air is being produced .
C
heck that the controls are set
correctly and that the fuses are
sound. Otherwise, switch off the
system.
Do not open the refriger-
ant fluid circuit. The fluid
may damage eyes or skin.Presence of water under the ve-
hicle. After prolonged use of the air
conditioning system, it is normal for
water to be present under the vehi-
cle. This is caused by condensation.Maintenance
Refer to the Maintenance Service
Booklet for your vehicle for the in-
spection frequency.
Page 109 of 200
rear bench seat..................................... (up to the end of the DU)
rear seatsfunctions ......................................... (up to the end of the DU)
3.19
ENG_UD24693_4
Banquette arrière (H79 - Dacia)
ENG_NU_898-5_H79_Dacia_3
Rear bench seat
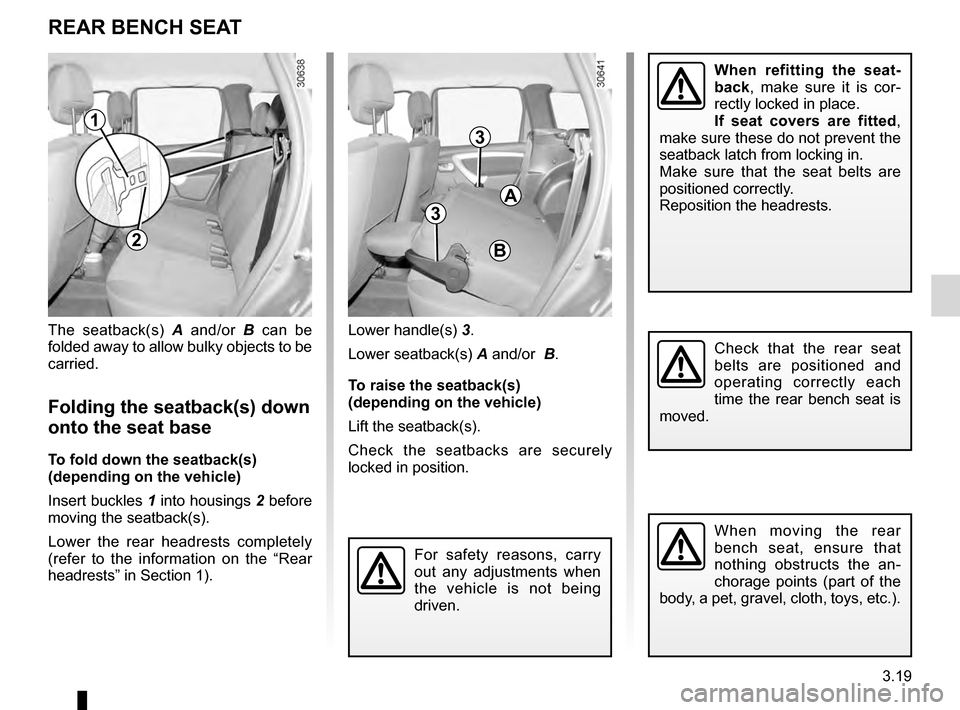
The seatback(s) A and/or B can be
folded away to allow bulky objects to be
carried.
Folding the seatback(s) down
onto the seat base
To fold down the seatback(s)
(depending on the vehicle)
Insert buckles
1
into housings
2 before
moving the seatback(s).
L
ower the rear headrests completely
(refer to the information on the “Rear
headrests” in Section 1).
For safety reasons, carry
out any adjustments when
the vehicle is not being
driven.
REAR BENCH SEAT
Lower handle(s) 3 .
Lower seatback(s)
A
and/or B.
To raise the seatback(s)
(depending on the vehicle)
Lift the seatback(s).
Check the seatbacks are securely
locked in position.
When moving the rear
bench seat, ensure that
nothing obstructs the an-
chorage points (part of the
body, a pet, gravel, cloth, toys, etc.).
When refitting the seat-
back , make sure it is cor-
rectly locked in place.
If seat covers are fitted ,
make sure these do not prevent the
seatback latch from locking in.
Make sure that the seat belts are
positioned correctly.
Reposition the headrests.
A
B
3
3
Check that the rear seat
belts are positioned and
operating correctly each
time the rear bench seat is
moved.
1
2
Page 113 of 200
JauneNoirNoir texte
3.23
ENG_UD20577_3
Cache-bagages (H79 - Dacia)
ENG_NU_898-5_H79_Dacia_3
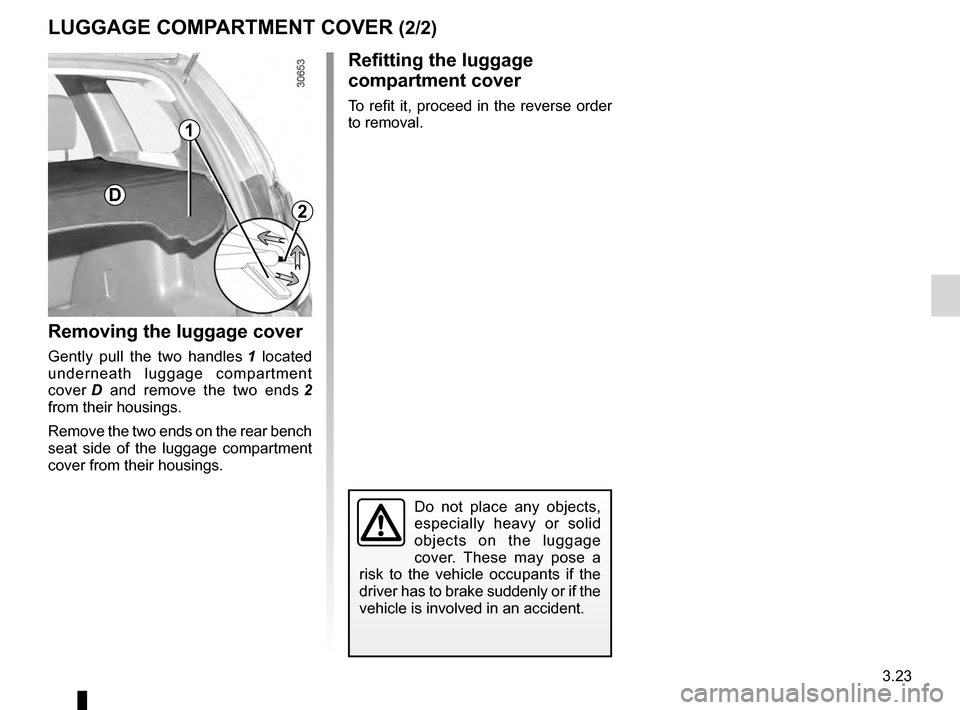
Removing the luggage cover
Gently pull the two handles 1 located
underneath luggage compartment
cover
D
and remove the two ends
2
from their housings.
Remove
the two ends on the rear bench
seat side of the luggage compartment
cover from their housings.
LuGGAGE COMPARTMENT COVER (2/2)
Refitting the luggage
compartment cover
To refit it, proceed in the reverse order
to removal.
Do not place any objects,
especially heavy or solid
objects on the luggage
cover. These may pose a
risk to the vehicle occupants if the
driver has to brake suddenly or if the
vehicle is involved in an accident.
D
1
2
Page 116 of 200
bonnet................................................... (up to the end of the DU)
4.2
ENG_UD22440_4
Capot moteur (H79 - Dacia)
ENG_NU_898-5_H79_Dacia_4
Jaune NoirNoir texte
Bonnet
BONNET (1/2)
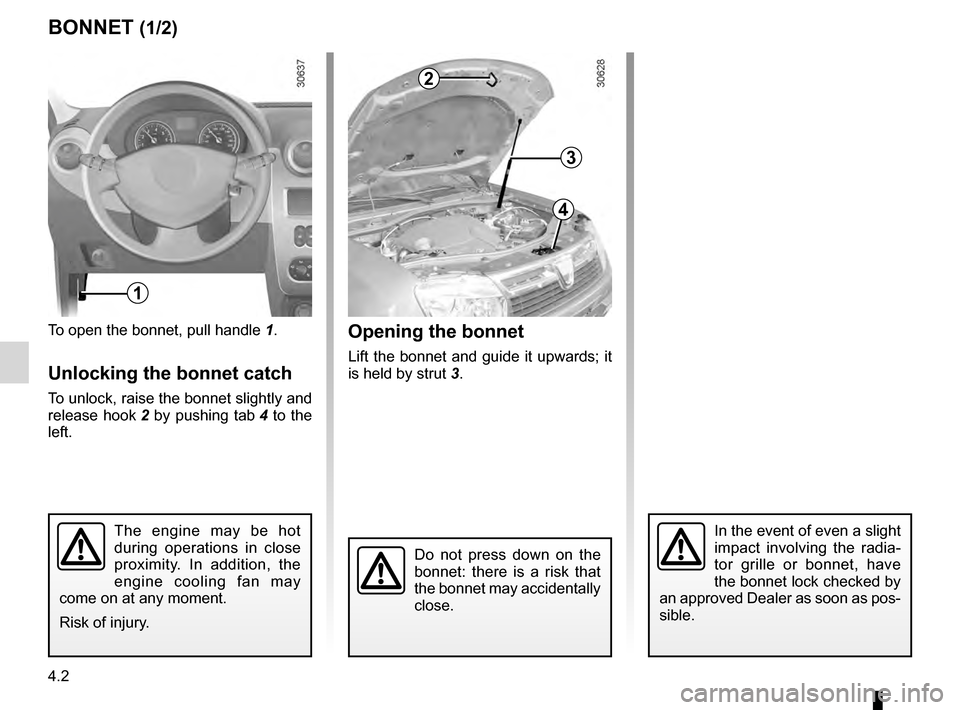
To open the bonnet, pull handle 1 .
Unlocking the bonnet catch
To unlock, raise the bonnet slightly and
release hook
2 by pushing tab 4 to the
left.
Opening the bonnet
Lift the bonnet and guide it upwards; it
is held by strut 3.
The engine may be hot
during operations in close
proximity. In addition, the
engine cooling fan may
come on at any moment.
Risk of injury.In the event of even a slight
impact involving the radia-
tor grille or bonnet, have
the bonnet lock checked by
an approved Dealer as soon as pos-
sible.
Do not press down on the
bonnet: there is a risk that
the bonnet may accidentally
close.
2
3
4
1
Page 118 of 200
capacity of mechanical components...................... (current page)
engine oil .............................................. (up to the end of the DU)
dipstick.................................................. (up to the end of the DU)
levels .................................................... (up to the end of the DU)
maintenance: mechanical ...................................... (up to the end of the DU)
4.4
ENG_UD20645_2
Niveau huile moteur : généralités (H79 - Dacia)
ENG_NU_898-5_H79_Dacia_4
It is normal for an engine to use oil for
lubrication and cooling of moving parts
and it is sometimes necessary to top up
the level between oil changes.
However, contact an approved dealer if
more than 0.5 litres is being consumed
every 600 miles (1,000 km) after the
running in period.
Oil change frequency: check the oil
level from time to time and certainly
before any long journey to avoid the
risk of damaging your engine.
The vehicle must be parked on level
ground and the engine should have
been switched off for some time before-
hand to obtain an accurate reading.
Engine oil level: general information
ENGINE OIL LEVEL: general information
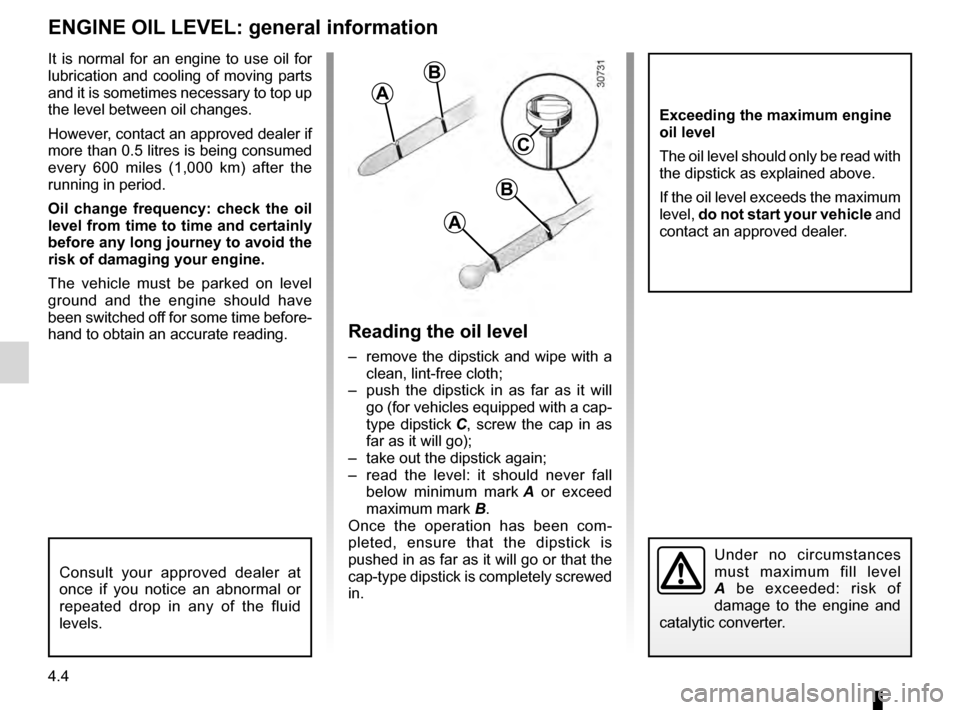
Reading the oil level
– remove the dipstick and wipe with a clean, lint-free cloth;
–
p
ush the dipstick in as far as it will
go (for vehicles equipped with a cap-
type dipstick
C, screw the cap in as
far as it will go);
–
take out the dipstick again;
–
r
ead the level: it should never fall
below minimum mark
A
or exceed
maximum mark
B.
Once the operation has been com-
pleted, ensure that the dipstick is
pushed in as far as it will go or that the
cap-type dipstick is completely screwed
in.
Under no circumstances
must maximum fill level
A be exceeded: risk of
damage to the engine and
catalytic converter.
Consult your approved dealer at
once if you notice an abnormal or
repeated drop in any of the fluid
levels.
Exceeding the maximum engine
oil level
The oil level should only be read with
the dipstick as explained above.
If the oil level exceeds the maximum
level, do not start your vehicle and
contact an approved dealer.
A
B
A
B
C
Page 128 of 200
4.14
ENG_UD20966_2
Entretien de la carrosserie / compartiment moteur (H79 - Dacia)
ENG_NU_898-5_H79_Dacia_4
Jaune NoirNoir texte
BODyWORK MAINTENANCE, ENGINE COMPARTMENT (2/3)
you should
– Respect local regulations about
washing vehicles (e.g. do not wash
your vehicle on a public highway).
–
A
lways follow the recommenda-
tions supplied with the high-pressure
cleaning equipment (jet distance and
pressure).
–
B
efore going through a roller type
car wash, return the windscreen
wiper stalk to park position (refer
to the information on “Windscreen
wash/wipe” in Section 1), check the
mounting of external accessories,
additional lights and door mirrors
and be sure to hold the wiper blades
and radio aerial in place with adhe-
sive tape. Remove the radio aerial
mast if your vehicle is fitted with this
equipment.
Remember to remove the tape and
refit the antenna after washing. –
After
driving off-road (eg. on muddy,
dusty or sandy terrain) quickly clean
the radiator from the outside of the
vehicle through the openings in the
bumper, to prevent it from becoming
blocked or clogged (risk of engine
overheating).
–
W
ash your vehicle frequently with
the engine off , using shampoo ap-
proved by our Technical Department
(never use abrasive products) and
rinse thoroughly using a warm or
cold water jet (never hot):
–
s
pots of tree resin and industrial
grime;
–
the
layer of dust or mud and any
insects;
–
b
ird droppings, which contain
chemicals that rapidly discolour
paintwork and may even cause
the paint to peel off ;
W
ash the vehicle immediately to
remove these marks since it is im-
possible to remove them by pol-
ishing; –
salt
deposited in the wheel arches
and underneath the body after
driving in areas where the roads
are chemically treated;
–
mud
in the wheel arches and un-
derneath the body which form
damp patches.
–
C
lean mud and sand from the
wheels, in particular the inside of the
wheels and the brakes, as this can:
–
reduce
the braking efficiency and
damage the components of the
braking system;
–
cause
vibrations in the bodywork
and steering column.
We have selected special products
to care for your vehicle and you can
obtain these from the manufactur-
er’s accessory outlets.