Open DACIA DUSTER 2018 User Guide
[x] Cancel search | Manufacturer: DACIA, Model Year: 2018, Model line: DUSTER, Model: DACIA DUSTER 2018Pages: 244, PDF Size: 3.57 MB
Page 61 of 244
Downloaded from www.Manualslib.com manuals search engine JauneNoir Noir texte
1.55
ENG_UD34963_2
Ordinateur de bord (H79 Ph2 - Dacia)
ENG_NU_1079-3_H79Ph2_Dacia_1
Interpreting some of the
values displayed after
resetting
The values showing average fuel
consumption, range and average
speed will become more stable and re-
liable the further you travel after pres-
sing the reset button.
For the first few miles after pressing
the reset key you will notice that the
range increases as you travel. This
range takes into account the average
fuel consumption since the last time the
reset button was pressed. Therefore,
the fuel consumption may decrease
when:
– the vehicle stops accelerating,
– the engine reaches its operating
temperature (engine cold when
reset button pressed),
– when driving from a built-up area
onto the open road.
Therefore, if the average fuel
consumption decreases, the
range will increase. – You may also notice that the ave-
rage fuel consumption increases
when the vehicle is stationary and
the engine idling.
This is normal, since the computer
takes account of fuel used during
idling.
Manually resetting the journey para-
meters: with the display showing one
of the journey parameters, press the
button 2 until the display is reset.
Automatically resetting the journey
parameters: the reset is automatic
when the capacity of one of the memo-
ries is exceeded.
ON-BOARD COMPUTER (2/6)
The display of information shown below DEPENDS ON THE VEHICLE EQUIPMENT \
AND COUNTRY.
Page 71 of 244
Downloaded from www.Manualslib.com manuals search engine JauneNoir Noir texte
1.65
ENG_UD33916_2
Éclairages et signalisations extérieures (H79 Ph2 - Dacia)
ENG_NU_1079-3_H79Ph2_Dacia_1
EXTERIOR LIGHTING AND SIGNALS (2/2)
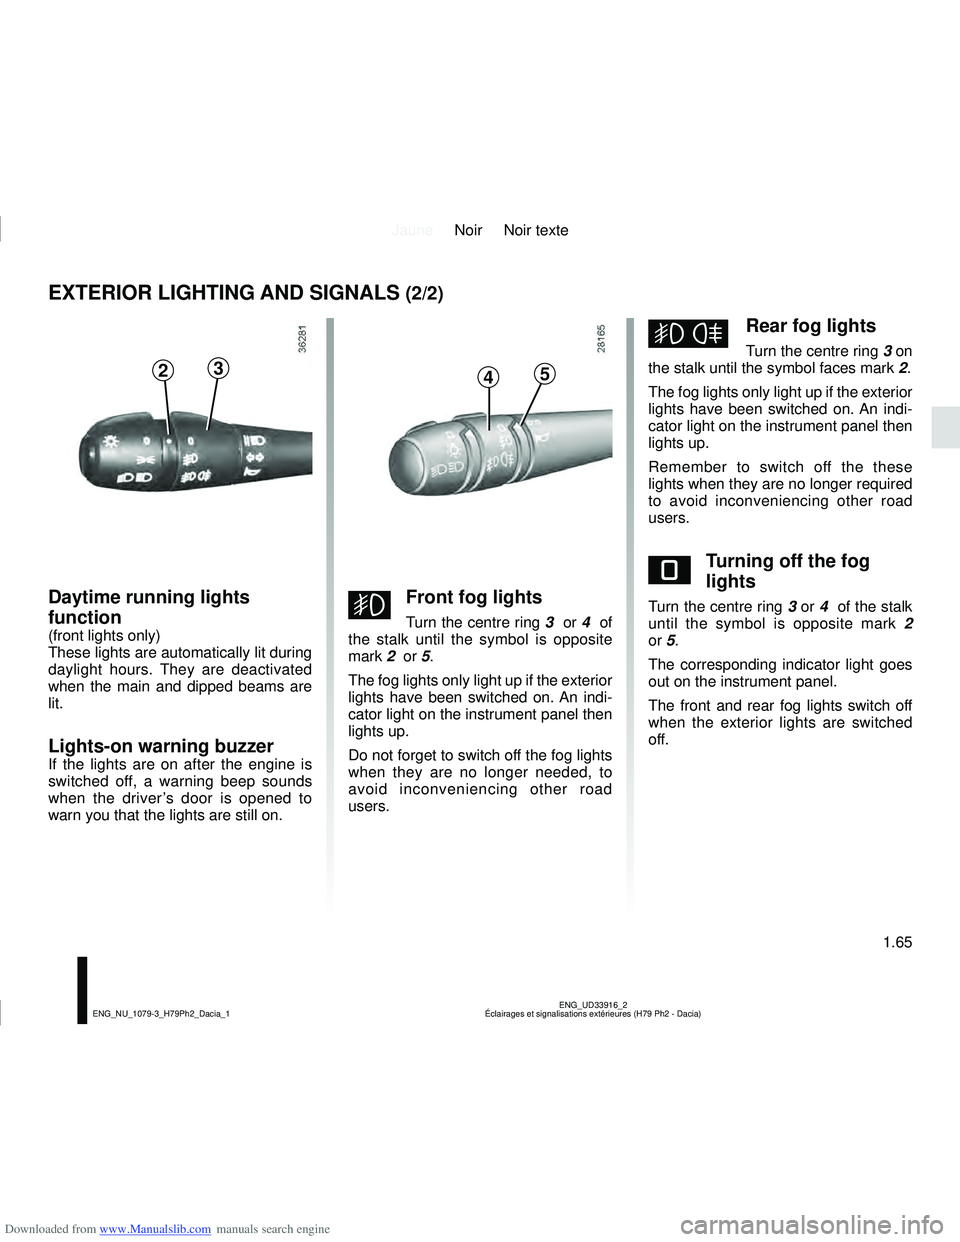
gFront fog lights
Turn the centre ring 3 or 4 of
the stalk until the symbol is opposite
mark 2 or 5.
The fog lights only light up if the exterior
lights have been switched on. An indi-
cator light on the instrument panel then
lights up.
Do not forget to switch off the fog lights
when they are no longer needed, to
avoid inconveniencing other road
users.
hRear fog lights
Turn the centre ring 3 on
the stalk until the symbol faces mark 2.
The fog lights only light up if the exterior
lights have been switched on. An indi-
cator light on the instrument panel then
lights up.
Remember to switch off the these
lights when they are no longer required
to avoid inconveniencing other road
users.
eTurning off the fog
lights
Turn the centre ring 3 or 4 of the stalk
until the symbol is opposite mark 2
or 5.
The corresponding indicator light goes
out on the instrument panel.
The front and rear fog lights switch off
when the exterior lights are switched
off.
2345
Daytime running lights
function
(front lights only)
These lights are automatically lit during
daylight hours. They are deactivated
when the main and dipped beams are
lit.
Lights-on warning buzzer
If the lights are on after the engine is
switched off, a warning beep sounds
when the driver’s door is opened to
warn you that the lights are still on.
Page 73 of 244
Downloaded from www.Manualslib.com manuals search engine JauneNoir Noir texte
1.67
ENG_UD36283_2
Réglage de la hauteur des faisceaux (H79 - H79 Ph2 - Dacia)
ENG_NU_1079-3_H79Ph2_Dacia_1
ADJUSTING THE HEADLIGHT BEAM HEIGHT (2/2)
Temporary adjustment
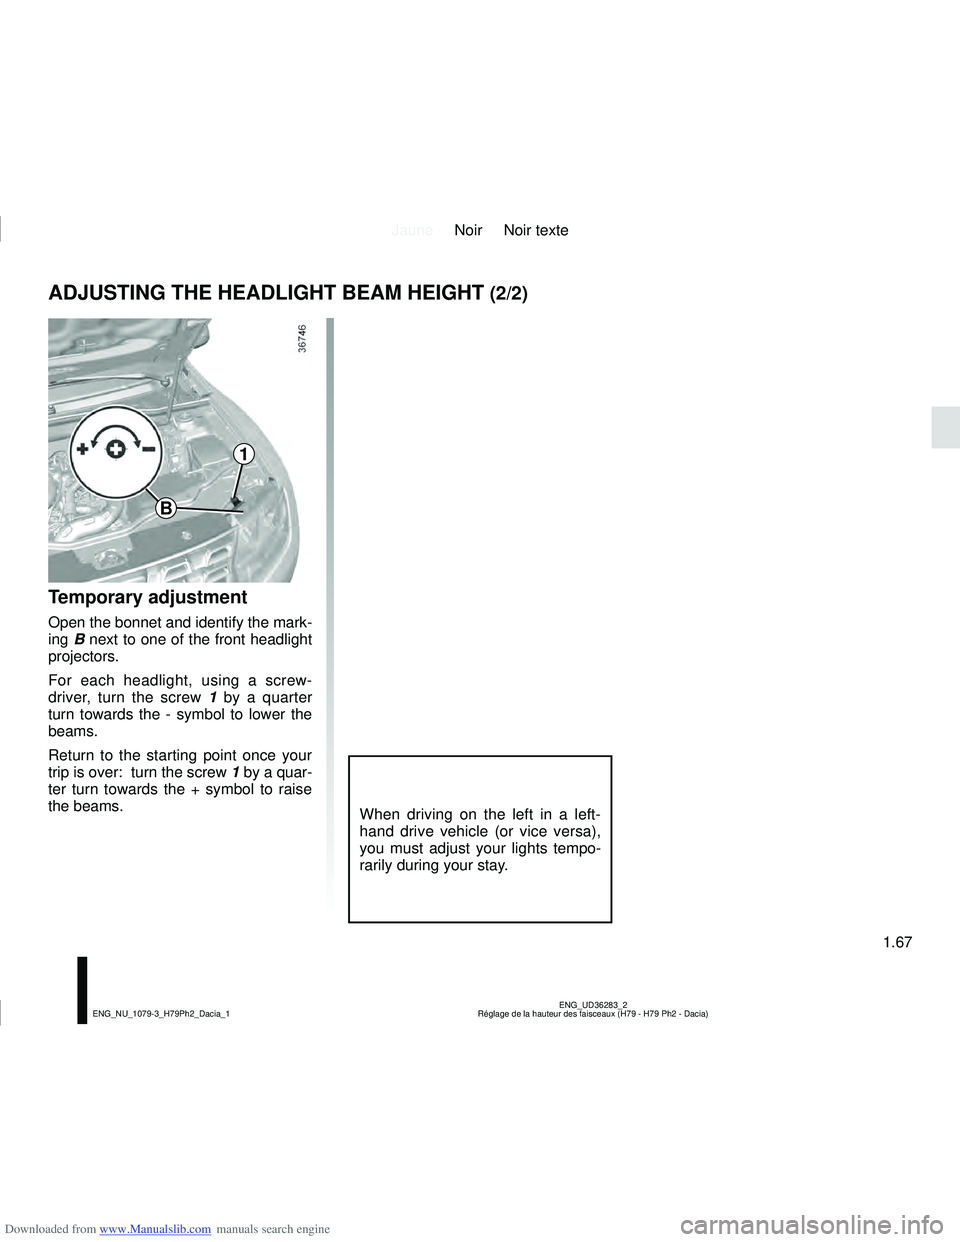
Open the bonnet and identify the mark-
ing B next to one of the front headlight
projectors.
For each headlight, using a screw-
driver, turn the screw 1 by a quarter
turn towards the - symbol to lower the
beams.
Return to the starting point once your
trip is over: turn the screw 1 by a quar-
ter turn towards the + symbol to raise
the beams.
When driving on the left in a left-
hand drive vehicle (or vice versa),
you must adjust your lights tempo-
rarily during your stay.
1
B
Page 76 of 244
Downloaded from www.Manualslib.com manuals search engine JauneNoir Noir texte
1.70
ENG_UD32134_1
Réservoir carburant (H79 - Dacia)
ENG_NU_1079-3_H79Ph2_Dacia_1
FUEL TANK (1/6)
Petrol and diesel versions
Usable capacity of the fuel tank:
50 litres approximately.
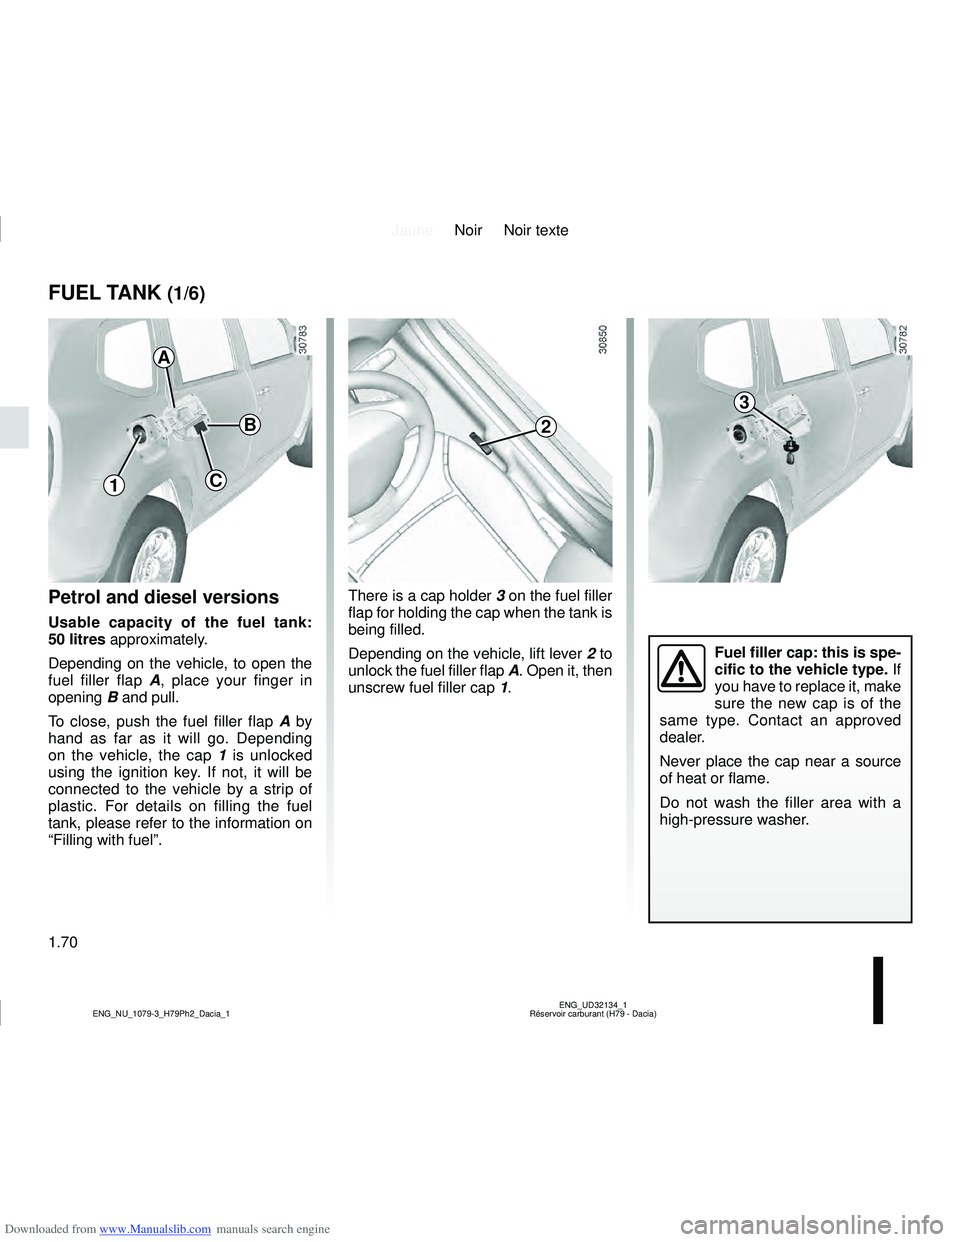
Depending on the vehicle, to open the
fuel filler flap A , place your finger in
opening B and pull.
To close, push the fuel filler flap A by
hand as far as it will go. Depending
on the vehicle, the cap 1 is unlocked
using the ignition key. If not, it will be
connected to the vehicle by a strip of
plastic. For details on filling the fuel
tank, please refer to the information on
“Filling with fuel”.
Fuel filler cap: this is spe-
cific to the vehicle type. If
you have to replace it, make
sure the new cap is of the
same type. Contact an approved
dealer.
Never place the cap near a source
of heat or flame.
Do not wash the filler area with a
high-pressure washer.
A
3
C
B
There is a cap holder 3 on the fuel filler
flap for holding the cap when the tank is
being filled.
Depending on the vehicle, lift lever 2 to
unlock the fuel filler flap A. Open it, then
unscrew fuel filler cap 1.
2
1
Page 78 of 244
Downloaded from www.Manualslib.com manuals search engine JauneNoir Noir texte
1.72
ENG_UD32134_1
Réservoir carburant (H79 - Dacia)
ENG_NU_1079-3_H79Ph2_Dacia_1
FUEL TANK (3/6)
Filling with fuel
Insert the nozzle to open the valve and
insert it fully before turning it on to fill
the fuel tank (risk of splashing).
Keep the nozzle in this position
throughout the entire filling operation.
When the pump cuts out automatically
at the end of the filling procedure, a
maximum of two further filling attempts
may be made, as there must be suffi-
cient space in the fuel tank to allow for
expansion.
Make sure that no water enters the fuel
tank during filling. The valve and its sur-
round must remain clean.
Persistent fuel odour
If you notice a persistent
smell of fuel you should:
– stop the vehicle when traffic conditions allow it and switch off
the ignition;
– switch on the hazard warning lights and ask your passengers to
leave the vehicle and stay clear
of the traffic;
– contact an authorised dealer.
Petrol versions
Using leaded petrol will damage the
antipollution system and may lead to a
loss of warranty.
To ensure that the fuel tank is not filled
with leaded petrol, the fuel tank filler
neck contains a restrictor fitted with a
foolproof system which only allows
the nozzle for unleaded petrol to be
used (at the pump).
Page 80 of 244
Downloaded from www.Manualslib.com manuals search engine JauneNoir Noir texte
1.74
ENG_UD32134_1
Réservoir carburant (H79 - Dacia)
ENG_NU_1079-3_H79Ph2_Dacia_1
FUEL TANK (5/6)
Filling stations with self-service
We recommend that you wear gloves
when handling the LPG pistol.
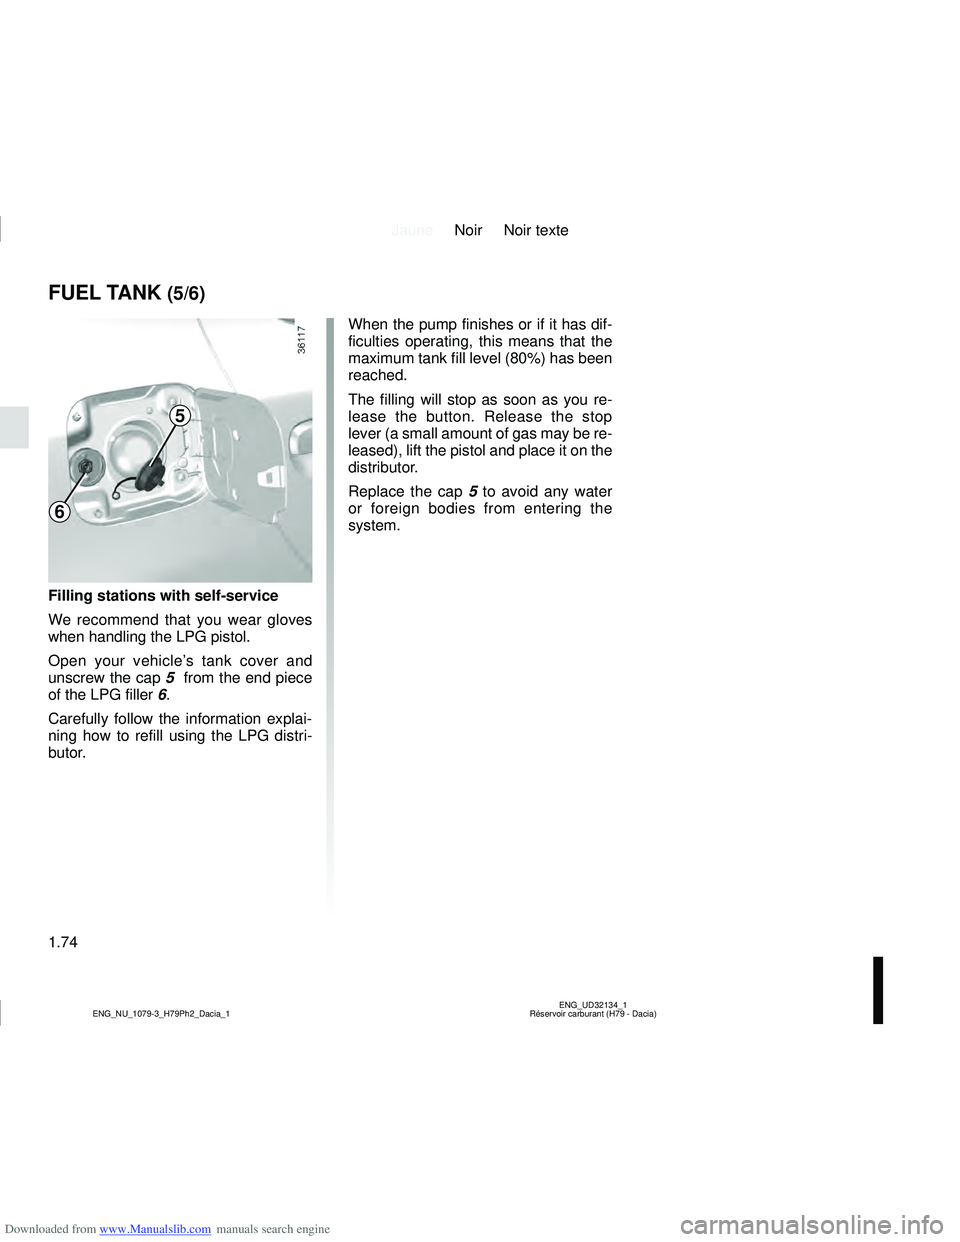
Open your vehicle’s tank cover and
unscrew the cap 5 from the end piece
of the LPG filler 6.
Carefully follow the information explai-
ning how to refill using the LPG distri-
butor. When the pump finishes or if it has dif-
ficulties operating, this means that the
maximum tank fill level (80%) has been
reached.
The filling will stop as soon as you re-
lease the button. Release the stop
lever (a small amount of gas may be re-
leased), lift the pistol and place it on the
distributor.
Replace the cap 5
to avoid any water
or foreign bodies from entering the
system.
5
6
Page 85 of 244
Downloaded from www.Manualslib.com manuals search engine JauneNoir Noir texte
2.3
ENG_UD34520_2
Mise en route / Arrêt du moteur (H79 Ph2 - Dacia)
ENG_NU_1079-3_H79Ph2_Dacia_2
Stopping the engineWith the engine idling, turn the key
back to “Stop” position St.
Special note
Depending on the vehicle, accessories
(e.g. radio) stop working either when
the engine is switched off or when the
driver’s door is opened or when the
doors are locked.LPG versionsThe engine is always started using
petrol:
– activate the starter without accelerat- ing;
– release the key as soon as the engine starts.
The system will automatically deter-
mine the switchover from petrol to LPG.
When operating on LPG, the fuel gauge
may indicate a drop in the petrol level
and the on-board computer will not op-
erate.
Every 3,000 miles driven using LPG,
drivers are recommended to drive for
around 3 to 6 miles in petrol mode.
To enable the system to operate
smoothly and to prevent any wear to
the vehicle’s electric petrol pump, the
petrol tank should always be around
1/4 full.
vehicles with an automatic
gearbox
Before starting, move the lever to posi-
tion N or P.
Refer to the information on the
“Automatic gearbox” in Section 2.
Starting the engineIn very cold conditions (temperatures
below –20°C): so that it is easier to
start the engine, switch on the ignition
for several seconds before starting the
engine.
When starting the engine, if the outdoor
temperature is very low (below -10°C):
hold down the clutch pedal until the
engine starts.
Make sure the engine immobiliser is not
activated. Refer to the information on
the “Engine immobiliser” in Section 1.
Petrol injection
– Turn the key to the start position without depressing the accelera-
tor.
– Release the key as soon as the engine starts.
ÉDiesel injection
Turn the ignition key to ignition “On” po-
sition M, and hold this position until the
preheating warning light goes out.
Turn the key to starter position D with-
out depressing the accelerator
pedal.
Release the key as soon as the engine
starts.
STARTING/STOPPING THE ENGINE
Never leave your vehicle
with the key or remote con-
trol inside and never leave
a child (or a pet) unsuper-
vised, even for a short while.
The reason for this is that the child
may endanger himself or others by
starting the engine, activating equip-
ment such as the window winders
for example, or locking the doors.
Risk of serious injury.
Never switch off the ignition
before the vehicle has stopped
completely . Once the engine has
stopped, the brake servo, power as-
sisted steering and passive safety
equipment such as air bags will no
longer operate.
The steering is locked when the key
is removed.
Page 95 of 244
Downloaded from www.Manualslib.com manuals search engine JauneNoir Noir texte
2.13
ENG_UD35353_1
Conseils de conduite, eco conduite (H79 Ph2 - Dacia)
ENG_NU_1079-3_H79Ph2_Dacia_2
DRIVING ADVICE, ECO-DRIVING (5/5)
– In vehicles fitted with air condi-
tioning, it is normal to observe an
increase in fuel consumption (es-
pecially in urban conditions) when
it is used. For vehicles fitted with
manual air conditioning, switch off
the system when it is not required.
Advice for reducing consumption
and therefore helping to preserve
the environment:
If the vehicle has been parked in the
sun, open the doors for a few mo-
ments to let the hot air escape before
starting the engine.
– Do not leave an empty roof rack fitted to the vehicle.
– It is better to fit a trailer for bulky ob- jects.
– When towing a caravan, fit a wind deflector and adjust it carefully.
– Avoid using the car for door-to-door calls (short journeys with long waits
in between) because the engine
never reaches its normal operating
temperature.
Advice on use
– Favour ECO mode.
– Electricity is fuel; switch off all the
electrical components which are
not really needed. However (safety
first), keep your lights on when the
visibility is bad (“see and be seen”).
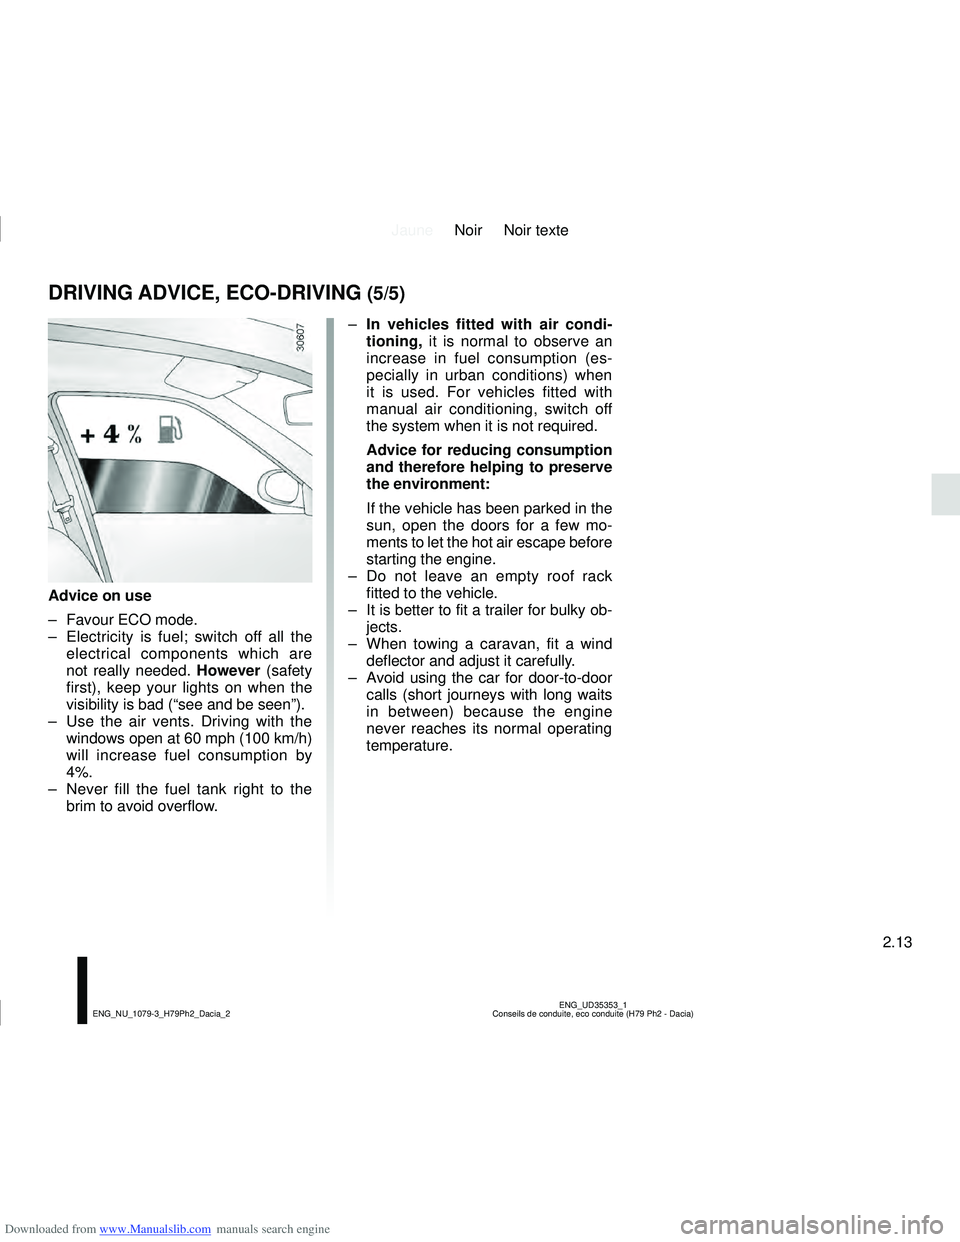
– Use the air vents. Driving with the windows open at 60 mph (100 km/h)
will increase fuel consumption by
4%.
– Never fill the fuel tank right to the brim to avoid overflow.
Page 97 of 244
Downloaded from www.Manualslib.com manuals search engine JauneNoir Noir texte
2.15
ENG_UD34481_2
Environnement (sans marque) (X35 - X44 - X45 - X77 - X81 - X85 - X90 \
- X91 - X83 - X61 - TEST - X95 - L90 Ph2 - F90 Ph2 - R90 Ph2 - X33 - X47 - X43 - X38 - H79 -
ENG_NU_1079-3_H79Ph2_Dacia_2
ENVIRONMENT
Emissions
Your vehicle has been designed to emit
fewer greenhouse gases (CO2) while in
use, and therefore to consume less fuel
(eg. 140 g/km, equivalent to 5.3 l/100
km for a diesel vehicle).
Our vehicles are also equipped with a
particle filter system including a cata-
lytic converter, an oxygen sensor and
an active carbon filter (the latter pre-
vents vapour from the fuel tank being
released into the open air).
For certain diesel vehicles, this system
also has a particle filter to reduce the
volume of soot particles emitted.
Please make your own
contribution towards
protecting the environment
too
– Worn parts replaced in the course of
routine vehicle maintenance (vehi-
cle battery, oil filter, air filter, batter-
ies, etc.) and oil containers (empty or
filled with used oil) must be disposed
of through specialist organisations. – At the end of the vehicle’s service
life, it should be sent to approved
centres to ensure that it is recycled.
– In all cases, comply with local legis- lation.
Recycling
Your vehicle is 85% recyclable and
95% recoverable.
To achieve these objectives, many of
the vehicle components have been de-
signed to enable them to be recycled.
The materials and structures have
been carefully designed to allow these
components to be easily removed and
reprocessed by specialist companies.
In order to preserve raw material re-
sources, this vehicle incorporates nu-
merous parts made from recycled plas-
tics or renewable materials (vegetable
or animal-derived materials such as
cotton or wool).
Your vehicle has been designed with
respect for the environment in mind for
its entire service life: during production,
use and at the end of its life.
This commitment is illustrated by the of
the manufacturer eco² signature.Manufacture
Your vehicle has been manufactured at
a factory which complies with a policy
to reduce the environmental impact
on the surrounding areas (reduction of
water and energy consumption, visual
and noise pollution, atmospheric emis-
sions and waste water; sorting and re-
using waste).
Page 125 of 244

Downloaded from www.Manualslib.com manuals search engine JauneNoir Noir texte
3.3
ENG_UD32150_1
Aérateurs, sorties d’air (H79 - Dacia)
ENG_NU_1079-3_H79Ph2_Dacia_3
Centre and side air vents
Air flow
To open the air vent 10, press on the
air vent (point 11 ) until it is open as far
as required. Direction
To direct the air flow, swivel side air
vent 10.To remove bad odours from your ve-
hicles, only use the systems designed
for this purpose. Consult an approved
Dealer.
Do not add anything to the
vehicle’s ventilation circuit
(for example, to remove
bad odours).
There is a risk of damage or of
fire.
AIR VENTS, air outlets (2/2)
11
10
11
1010