Open DACIA DUSTER 2018 Owner's Guide
[x] Cancel search | Manufacturer: DACIA, Model Year: 2018, Model line: DUSTER, Model: DACIA DUSTER 2018Pages: 244, PDF Size: 3.57 MB
Page 146 of 244

Downloaded from www.Manualslib.com manuals search engine JauneNoir Noir texte
3.24
ENG_UD32160_1
Coffre à bagages (H79 - Dacia)
ENG_NU_1079-3_H79Ph2_Dacia_3
TAILGATE
Manual control
To open , insert the key in the lock and
turn it (movement A).
Remove the key and press button 1.
Lift the tailgate.
To close, lower the tailgate using inte-
rior handle 2 to help at first.
Once you have lowered the tailgate
to shoulder height, release the interior
handle and finish closing the tailgate by
pressing down on the tailgate from the
outside.
Insert the key in the lock and turn it
(movement B).
Electric central locking
The tailgate is locked and unlocked at
the same time as the doors.
To open , press the button 1 and lift the
tailgate.
To close, lower the tailgate using inte-
rior handle 2 to help at first.
Once you have lowered the tailgate
to shoulder height, release the interior
handle and finish closing the tailgate by
pressing down on the tailgate from the
outside.
1
2A
B
Page 154 of 244
Downloaded from www.Manualslib.com manuals search engine JauneNoir Noir texte
4.2
ENG_UD32168_1
Capot moteur (H79 Ph2 - Dacia)
ENG_NU_1079-3_H79Ph2_Dacia_4
BONNET
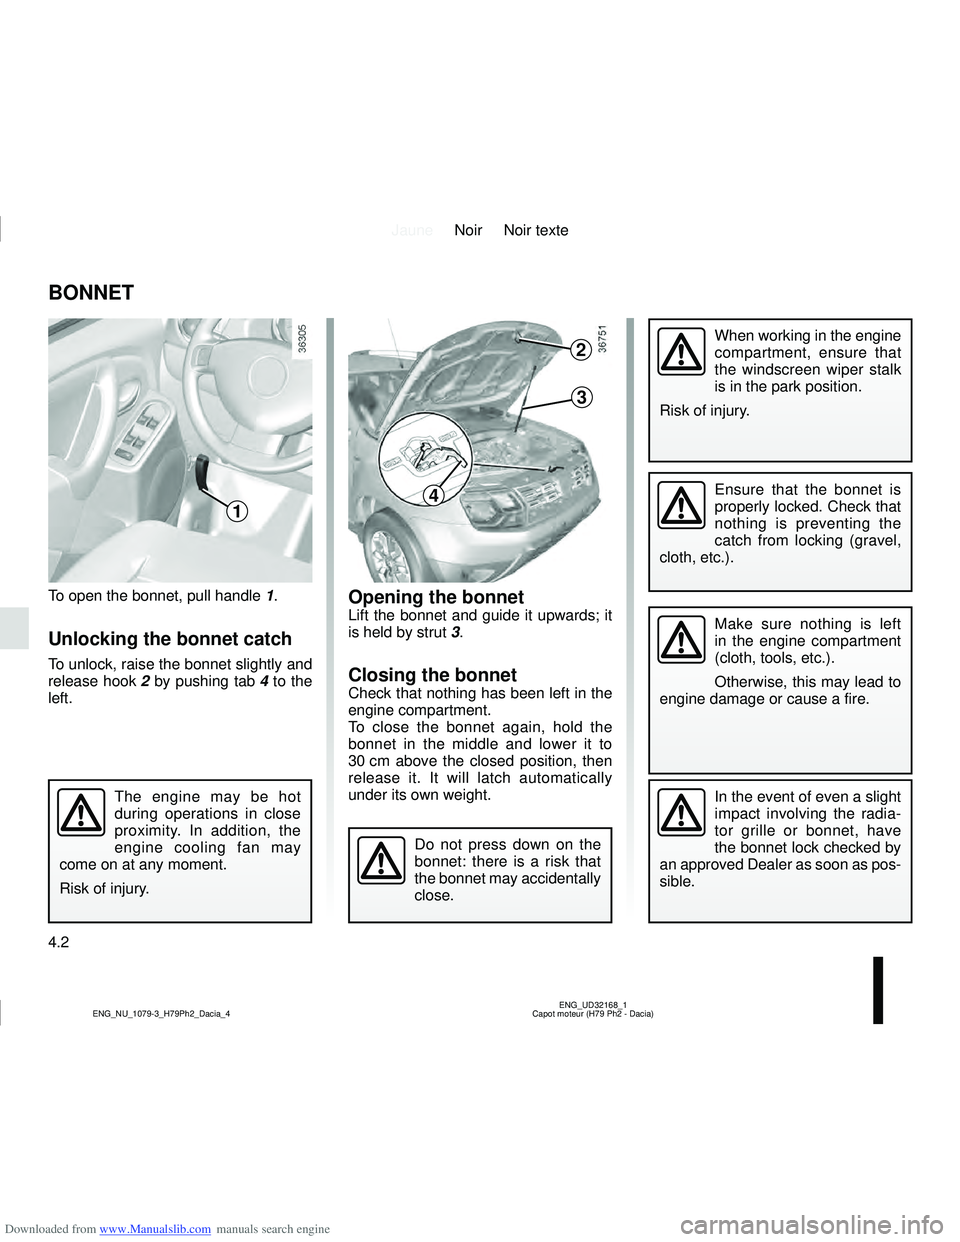
To open the bonnet, pull handle 1.
Unlocking the bonnet catch
To unlock, raise the bonnet slightly and
release hook 2 by pushing tab 4 to the
left.
Opening the bonnetLift the bonnet and guide it upwards; it
is held by strut 3.
Closing the bonnetCheck that nothing has been left in the
engine compartment.
To close the bonnet again, hold the
bonnet in the middle and lower it to
30 cm above the closed position, then
release it. It will latch automatically
under its own weight.
The engine may be hot
during operations in close
proximity. In addition, the
engine cooling fan may
come on at any moment.
Risk of injury.In the event of even a slight
impact involving the radia-
tor grille or bonnet, have
the bonnet lock checked by
an approved Dealer as soon as pos-
sible.
Do not press down on the
bonnet: there is a risk that
the bonnet may accidentally
close.
1
When working in the engine
compartment, ensure that
the windscreen wiper stalk
is in the park position.
Risk of injury.2
3
4Ensure that the bonnet is
properly locked. Check that
nothing is preventing the
catch from locking (gravel,
cloth, etc.).
Make sure nothing is left
in the engine compartment
(cloth, tools, etc.).
Otherwise, this may lead to
engine damage or cause a fire.
Page 163 of 244
Downloaded from www.Manualslib.com manuals search engine JauneNoir Noir texte
4.11
ENG_UD35428_2
Pressions de gonflage des pneumatiques à froid (H79 - Dacia)
ENG_NU_1079-3_H79Ph2_Dacia_4
TYRE PRESSURE
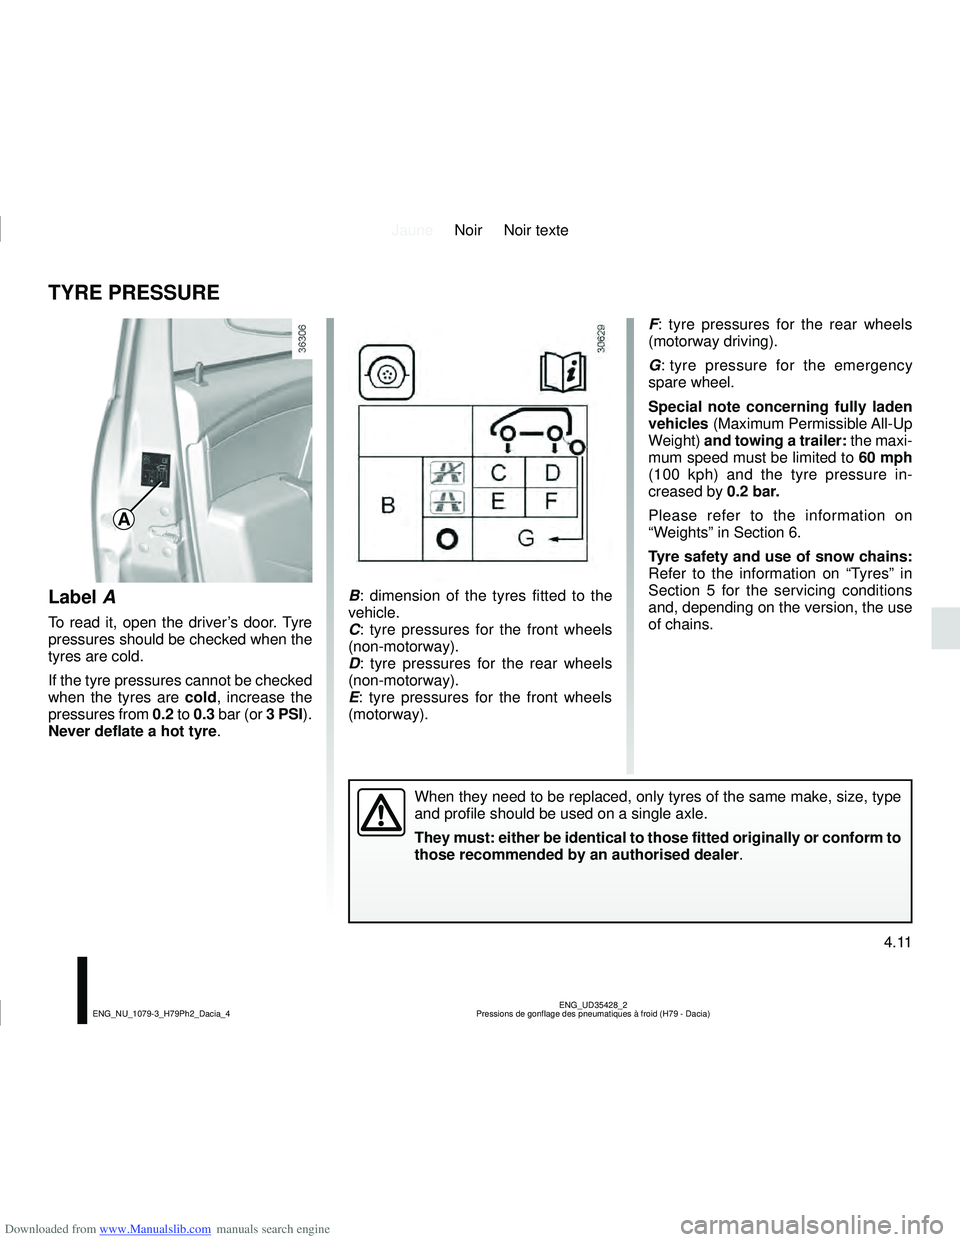
B : dimension of the tyres fitted to the
vehicle.
C : tyre pressures for the front wheels
(non-motorway).
D : tyre pressures for the rear wheels
(non-motorway).
E : tyre pressures for the front wheels
(motorway).
When they need to be replaced, only tyres of the same make, size, type
and profile should be used on a single axle.
They must: either be identical to those fitted originally or conform to \
those recommended by an authorised dealer.
F : tyre pressures for the rear wheels
(motorway driving).
G : tyre pressure for the emergency
spare wheel.
Special note concerning fully laden
vehicles (Maximum Permissible All-Up
Weight) and towing a trailer: the maxi-
mum speed must be limited to 60 mph
(100 kph) and the tyre pressure in-
creased by 0.2 bar.
Please refer to the information on
“Weights” in Section 6.
Tyre safety and use of snow chains:
Refer to the information on “Tyres” in
Section 5 for the servicing conditions
and, depending on the version, the use
of chains.
A
Label A
To read it, open the driver’s door. Tyre
pressures should be checked when the
tyres are cold.
If the tyre pressures cannot be checked
when the tyres are cold , increase the
pressures from 0.2 to 0.3 bar (or 3 PSI).
Never deflate a hot tyre .
Page 171 of 244
Downloaded from www.Manualslib.com manuals search engine JauneNoir Noir texte
5.3
ENG_UD36115_2
Crevaison (H79 Ph2 - Dacia)
ENG_NU_1079-3_H79Ph2_Dacia_5
PUNCTURE (1/2)
Emergency spare wheel 4x2
version (2WD)
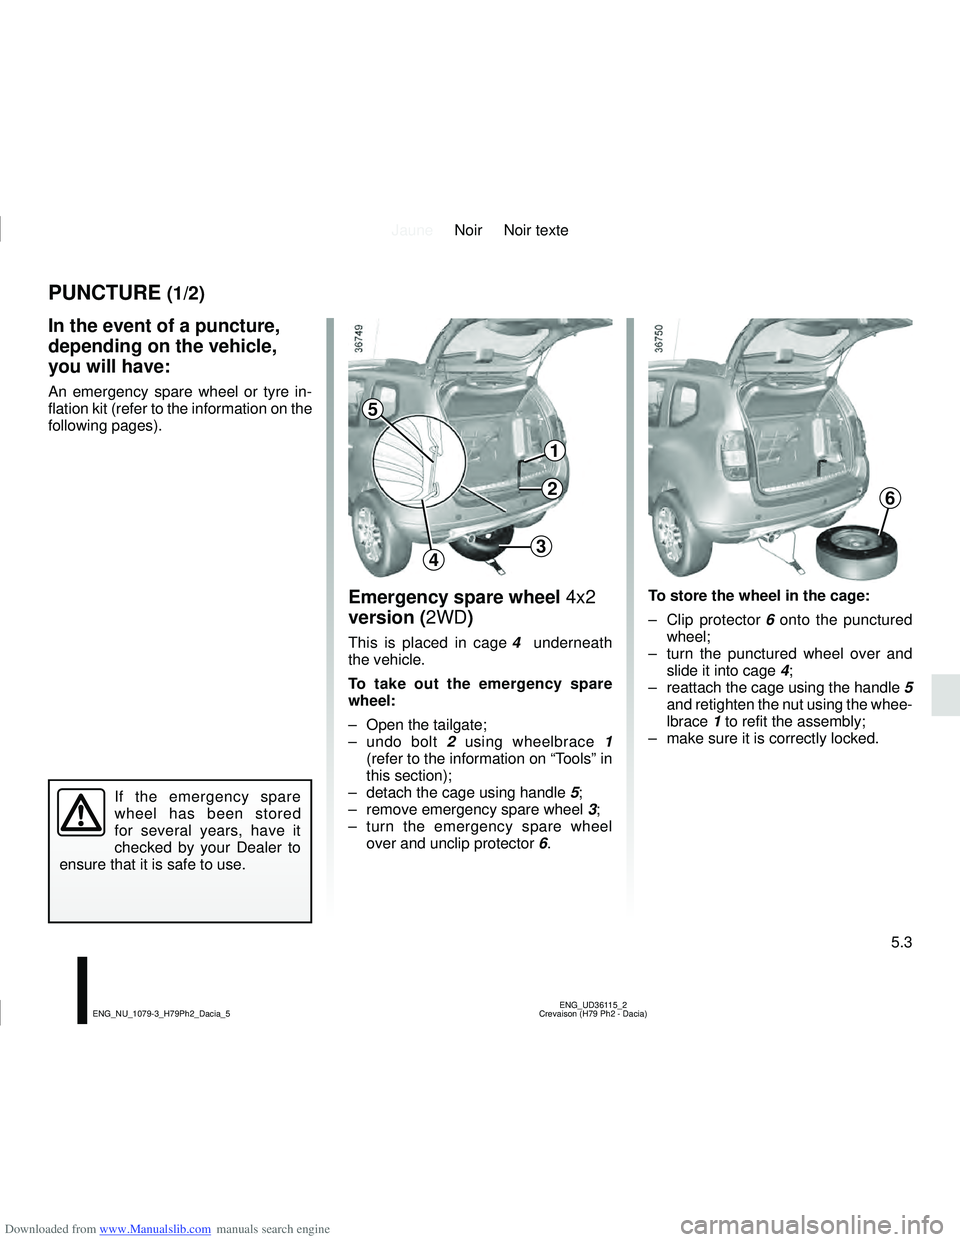
This is placed in cage 4 underneath
the vehicle.
To take out the emergency spare
wheel:
– Open the tailgate;
– undo bolt 2 using wheelbrace 1
(refer to the information on “Tools” in
this section);
– detach the cage using handle 5;
– remove emergency spare wheel 3;
– turn the emergency spare wheel over and unclip protector 6.
In the event of a puncture,
depending on the vehicle,
you will have:
An emergency spare wheel or tyre in-
flation kit (refer to the information on the
following pages).
If the emergency spare
wheel has been stored
for several years, have it
checked by your Dealer to
ensure that it is safe to use.
To store the wheel in the cage:
– Clip protector 6 onto the punctured
wheel;
– turn the punctured wheel over and slide it into cage 4;
– reattach the cage using the handle 5
and retighten the nut using the whee-
lbrace 1 to refit the assembly;
– make sure it is correctly locked.
1
2
34
5
6
Page 172 of 244
Downloaded from www.Manualslib.com manuals search engine JauneNoir Noir texte
5.4
ENG_UD36115_2
Crevaison (H79 Ph2 - Dacia)
ENG_NU_1079-3_H79Ph2_Dacia_5
PUNCTURE (2/2)
Emergency spare wheel 4x4
version (4WD)
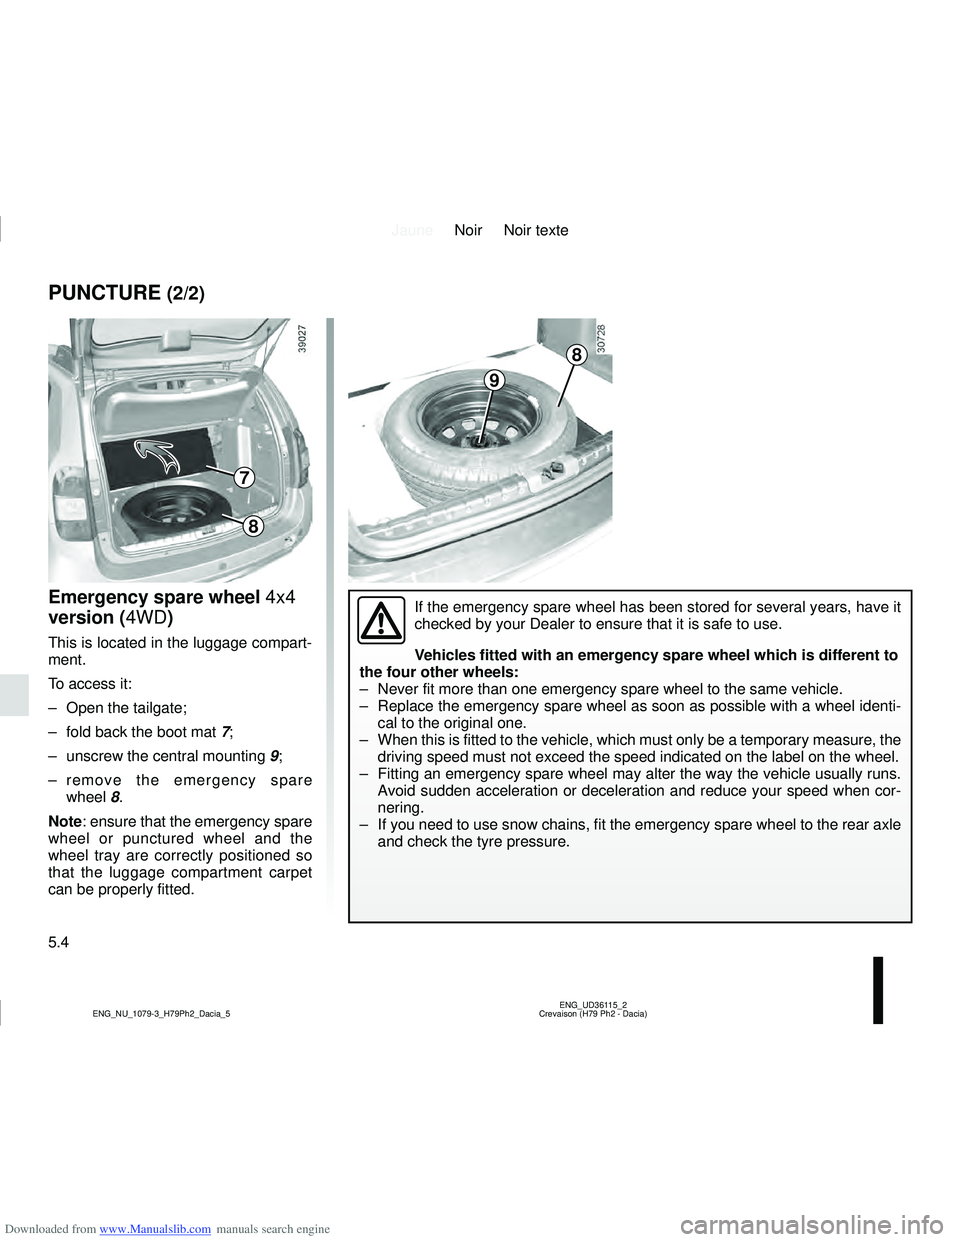
This is located in the luggage compart-
ment.
To access it:
– Open the tailgate;
– fold back the boot mat 7;
– unscrew the central mounting 9;
– remove the emergency spare wheel 8.
Note: ensure that the emergency spare
wheel or punctured wheel and the
wheel tray are correctly positioned so
that the luggage compartment carpet
can be properly fitted.
9
8
If the emergency spare wheel has been stored for several years, have it \
checked by your Dealer to ensure that it is safe to use.
Vehicles fitted with an emergency spare wheel which is different to
the four other wheels:
– Never fit more than one emergency spare wheel to the same vehicle.
– Replace the emergency spare wheel as soon as possible with a wheel ident\
i- cal to the original one.
– When this is fitted to the vehicle, which must only be a temporary measu\
re, the driving speed must not exceed the speed indicated on the label on the wh\
eel.
– Fitting an emergency spare wheel may alter the way the vehicle usually runs. Avoid sudden acceleration or deceleration and reduce your speed when cor-\
nering.
– If you need to use snow chains, fit the emergency spare wheel to the rear axle and check the tyre pressure.
7
8
Page 188 of 244
Downloaded from www.Manualslib.com manuals search engine JauneNoir Noir texte
5.20
ENG_UD34278_2
Feux arrière : remplacement des lampes (H79 Ph2 - Dacia)
ENG_NU_1079-3_H79Ph2_Dacia_5
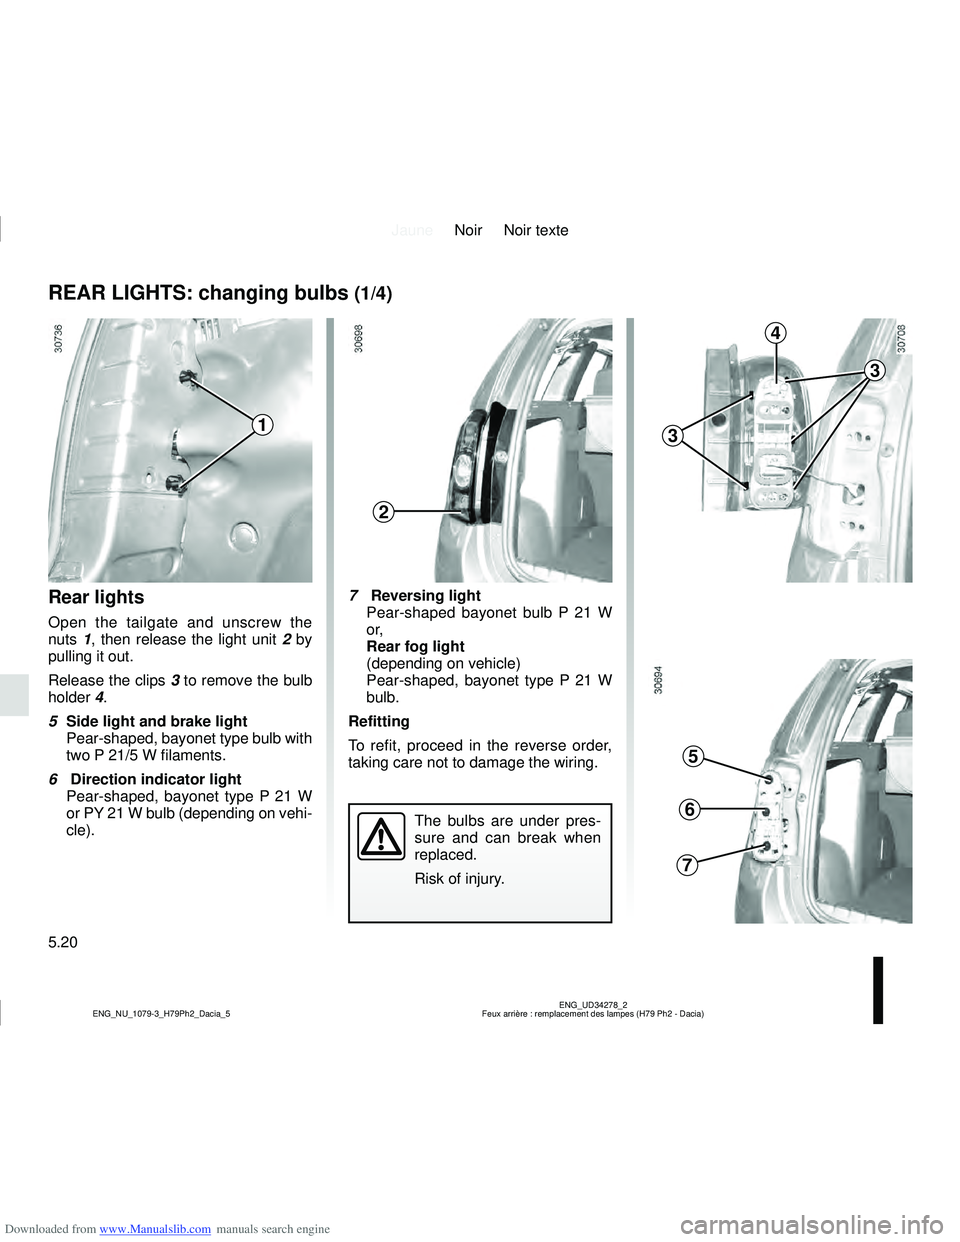
7 Reversing light
Pear-shaped bayonet bulb P 21 W
o r,
Rear fog light
(depending on vehicle)
Pear-shaped, bayonet type P 21 W
bulb.
Refitting
To refit, proceed in the reverse order,
taking care not to damage the wiring.
REAR LIGHTS: changing bulbs (1/4)
Rear lights
Open the tailgate and unscrew the
nuts 1, then release the light unit 2 by
pulling it out.
Release the clips 3 to remove the bulb
holder 4.
5 Side light and brake light
Pear-shaped, bayonet type bulb with
two P 21/5 W filaments.
6 Direction indicator light
Pear-shaped, bayonet type P 21 W
or PY 21 W bulb (depending on vehi-
cle).
The bulbs are under pres-
sure and can break when
replaced.
Risk of injury.
1
2
3
3
4
5
6
7
Page 189 of 244
Downloaded from www.Manualslib.com manuals search engine JauneNoir Noir texte
5.21
ENG_UD34278_2
Feux arrière : remplacement des lampes (H79 Ph2 - Dacia)
ENG_NU_1079-3_H79Ph2_Dacia_5
REAR LIGHTS: changing bulbs (2/4)
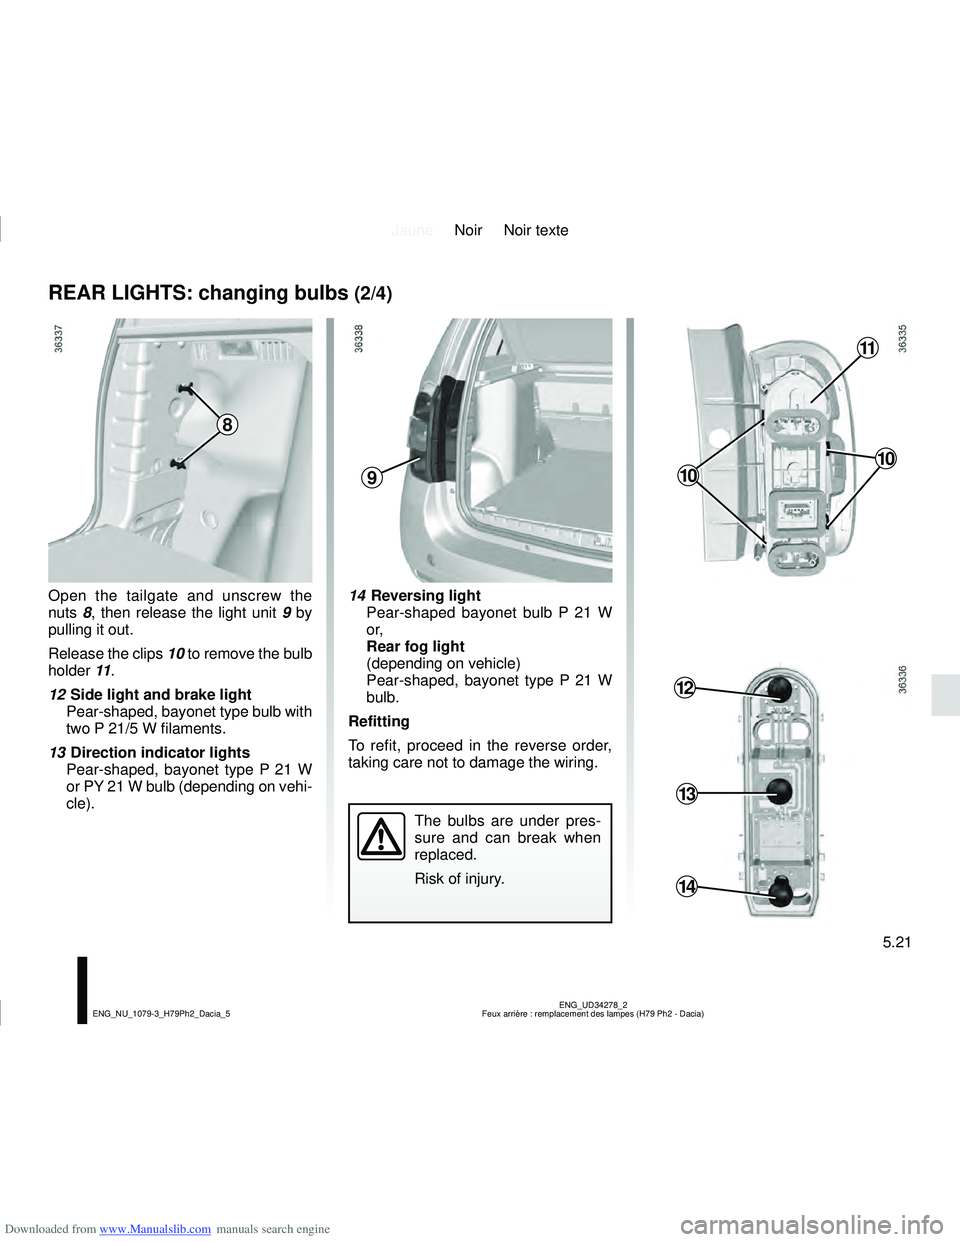
Open the tailgate and unscrew the
nuts 8, then release the light unit 9 by
pulling it out.
Release the clips 10 to remove the bulb
holder 11.
12 Side light and brake light
Pear-shaped, bayonet type bulb with
two P 21/5 W filaments.
13 Direction indicator lights
Pear-shaped, bayonet type P 21 W
or PY 21 W bulb (depending on vehi-
cle). 14
Reversing light
Pear-shaped bayonet bulb P 21 W
o r,
Rear fog light
(depending on vehicle)
Pear-shaped, bayonet type P 21 W
bulb.
Refitting
To refit, proceed in the reverse order,
taking care not to damage the wiring.
8
91010
11
12
13
14
The bulbs are under pres-
sure and can break when
replaced.
Risk of injury.
Page 239 of 244
Downloaded from www.Manualslib.com manuals search engine JauneNoir Noir texte
7.3
FRA_UD35449_5
Index (H79 - Dacia)
ENG_NU_1079-3_H79Ph2_Dacia_7
ALPHABETICAL INDEX (3/5)
K
keys ........................................................................\
.... 1.2 – 1.3
L
levels .................................................................\
.4.3, 4.7 → 4.9
levels: coolant ................................................................\
........... 4.8
windscreen washer reservoir ......................................... 4.9
lifting the vehicle changing a wheel ............................... 5.2 – 5.4, 5.9 → 5.11
lighting: exterior .........................................1.64 – 1.65, 5.15 → 5.24
interior ..........................................3.12 – 3.13, 5.25 → 5.28
lights .................................................................\
.....1.64 → 1.67
additional ..................................................................... 5.19
adjustment ........................................................ 1.66 – 1.67
lights: adjusting ........................................................... 1.66 – 1.67
brake lights ......................................................... 5.20, 5.22
daytime running lights .................................................. 5.18
dipped beam headlights ..........................1.64, 5.15 → 5.18
direction indicators .......................1.62 – 1.63, 5.15 → 5.18
fog lights ............................................................. 1.65, 5.19
hazard warning ................................................. 1.62 – 1.63
main beam headlights .............................1.64, 5.15 → 5.18
reversing lights .................................................... 5.20, 5.22
side lights ................................................1.64, 5.15 → 5.18
locking the doors ................................................................. 1.4
LPG ................. 1.73 – 1.74, 2.3, 2.6 → 2.8, 3.27, 5.29 → 5.34
M
maintenance ............................................................\
.......... 2.14
maintenance: bodywork .......................................................... 4.13 – 4.14
interior trim ........................................................ 4.15 – 4.16
mechanical ..................................4.3, 4.7, 4.12, 6.9 → 6.14map reading lights .................................................. 3.12 – 3.13
methods of restraint in addition to the front seat belts ..............
1.20 → 1.22, 1.24
mirrors ................................................................\
............... 3.14
multimedia equipment ....................................................... 3.30
N
navigation .............................................................\
............. 3.30
navigation system .............................................................. 3.30
O
oil change .................................................................\
.4.4
→ 4.6
opening the doors ..................................................... 1.9 – 1.10
operating faults ......................................................5.44 → 5.48
overspeed buzzer ................................................... 1.51 – 1.52
P
paintwork maintenance ..................................................... 4.13 – 4.14
reference ..............................................................\
.......... 6.2
parking distance control.......................................... 2.38 – 2.39
power-assisted steering.............................................. 1.60, 4.9
power-assisted steering pump............................................\
. 4.9
practical advice .....................1.75, 3.27, 5.2 – 5.4, 5.9 → 5.36,
5.38 → 5.42, 5.44 → 5.48
puncture.................................................. 5.3 – 5.4, 5.10 – 5.11
R
radio...................................................................\
................ 3.30 fitting a radio ................................................................ 5.42
radio frequency remote control/key use ....................................................................\
............. 1.2
rear bench seat......................................................3.2\
1 → 3.23
rear parcel shelf ................................................................. 3.28
rear screen de-icing/demisting ..................................3.4 → 3.6