DACIA DUSTER 2022 Owners Manual
Manufacturer: DACIA, Model Year: 2022, Model line: DUSTER, Model: DACIA DUSTER 2022Pages: 244, PDF Size: 3.57 MB
Page 181 of 244
Downloaded from www.Manualslib.com manuals search engine JauneNoir Noir texte
5.13
ENG_UD20582_3
Pneumatiques (H79 - Dacia)ENG_NU_1079-3_H79Ph2_Dacia_5
Emergency spare wheel
Refer to the information on the
“Emergency spare wheel” and
“Changing a wheel” in Section 5.
TYRES (2/3)
Tyre pressures
Adhere to the tyre pressures (including
the emergency spare wheel). The tyre
pressures should be checked at least
once a month and additionally before
any long journey (refer to the label af-
fixed to the edge of the driver’s door).
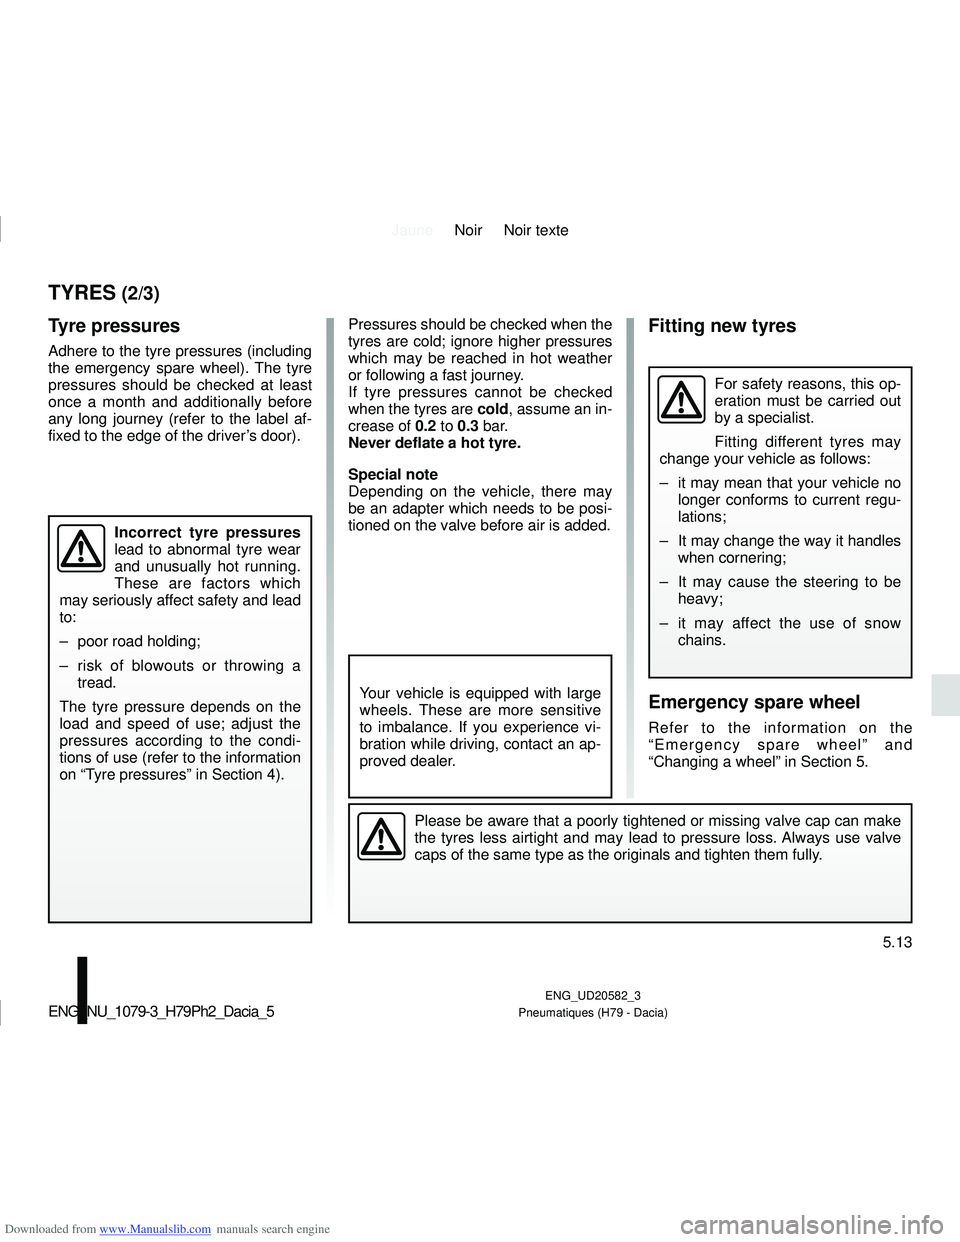
Incorrect tyre pressures
lead to abnormal tyre wear
and unusually hot running.
These are factors which
may seriously affect safety and lead
to:
– poor road holding;
– risk of blowouts or throwing a tread.
The tyre pressure depends on the
load and speed of use; adjust the
pressures according to the condi-
tions of use (refer to the information
on “Tyre pressures” in Section 4).
For safety reasons, this op-
eration must be carried out
by a specialist.
Fitting different tyres may
change your vehicle as follows:
– it may mean that your vehicle no longer conforms to current regu-
lations;
– It may change the way it handles when cornering;
– It may cause the steering to be heavy;
– it may affect the use of snow chains.
Please be aware that a poorly tightened or missing valve cap can make
the tyres less airtight and may lead to pressure loss. Always use valve
caps of the same type as the originals and tighten them fully.
Fitting new tyresPressures should be checked when the
tyres are cold; ignore higher pressures
which may be reached in hot weather
or following a fast journey.
If tyre pressures cannot be checked
when the tyres are cold, assume an in-
crease of 0.2 to 0.3 bar.
Never deflate a hot tyre.
Special note
Depending on the vehicle, there may
be an adapter which needs to be posi-
tioned on the valve before air is added.
Your vehicle is equipped with large
wheels. These are more sensitive
to imbalance. If you experience vi-
bration while driving, contact an ap-
proved dealer.
Page 182 of 244
Downloaded from www.Manualslib.com manuals search engine JauneNoir Noir texte
5.14
ENG_UD20582_3
Pneumatiques (H79 - Dacia)ENG_NU_1079-3_H79Ph2_Dacia_5
Use in winter
Chains
2-wheel drive version (2WD)
Snow chains must be fitted to the
front wheels.
4-wheel drive version (4WD)
Snow chains may be fitted to only the
front wheels, or to all four wheels.
TYRES (3/3)
It is forbidden to fit snow
chains to only the rear
wheels.
Snow chains may only be
fitted to tyres of the same size as
those originally fitted to your vehicle.
Only certain chains can be fitted to
tyres.
Consult an approved dealer.
Snow or Winter tyres
We would recommend that these be
fitted to all four wheels to ensure that
your vehicle retains maximum adhe-
sion.
Warning: These tyres sometimes
have a specific direction of rotation
and a maximum speed index which
may be lower than the maximum
speed of your vehicle.
Studded tyres
This type of equipment may only be
used for a limited period and as laid
down by local legislation.
It is necessary to observe the speed
specified by current legislation.
These tyres must, at a minimum, be
fitted to the two front wheels.
In all cases, we would recommend
that you contact your approved
dealer who will be able to advise you
on the choice of equipment which is
most suitable for your vehicle.
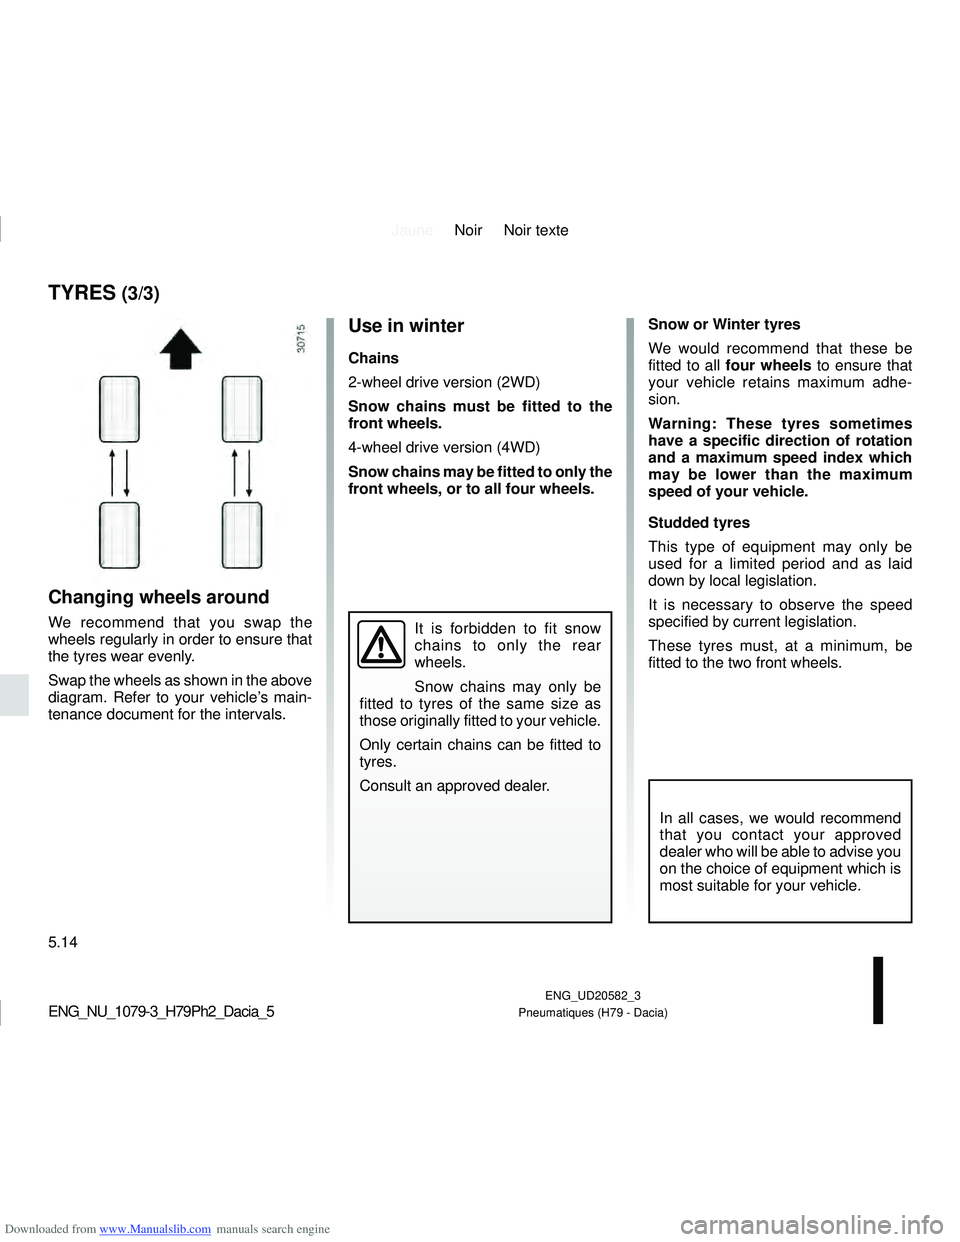
Changing wheels around
We recommend that you swap the
wheels regularly in order to ensure that
the tyres wear evenly.
Swap the wheels as shown in the above
diagram. Refer to your vehicle’s main-
tenance document for the intervals.
Page 183 of 244
Downloaded from www.Manualslib.com manuals search engine JauneNoir Noir texte
5.15
ENG_UD35430_2
Feux avant : remplacement des lampes (H79 Ph2 - Dacia)
ENG_NU_1079-3_H79Ph2_Dacia_5
The bulbs detailed below can be re-
placed. However, we recommend that
these be replaced by an approved
dealer if this proves difficult.
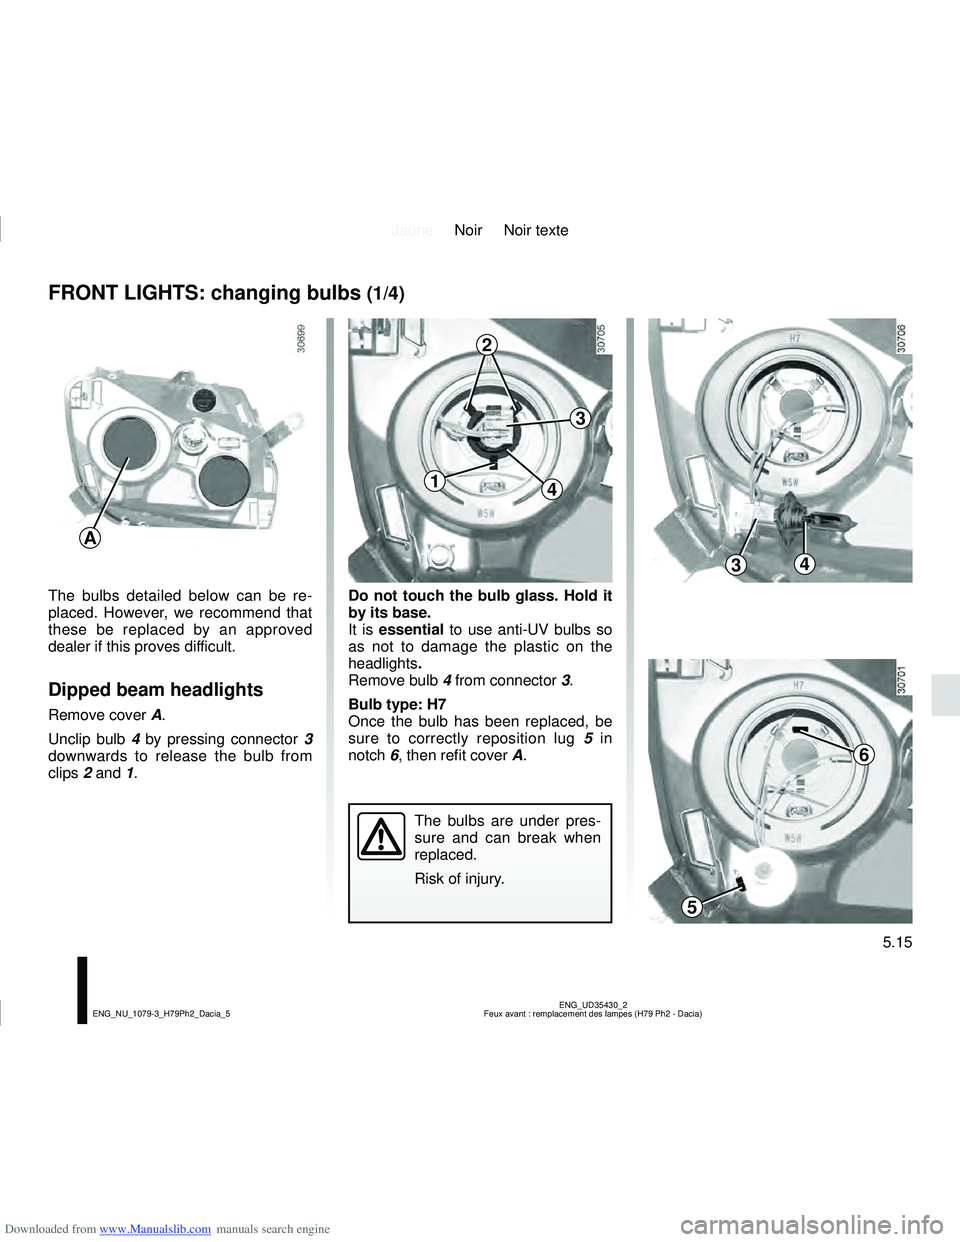
Dipped beam headlights
Remove cover A.
Unclip bulb 4 by pressing connector 3
downwards to release the bulb from
clips 2 and 1.
The bulbs are under pres-
sure and can break when
replaced.
Risk of injury.
FRONT LIGHTS: changing bulbs (1/4)
Do not touch the bulb glass. Hold it
by its base.
It is essential to use anti-UV bulbs so
as not to damage the plastic on the
headlights .
Remove bulb 4 from connector 3.
Bulb type: H7
Once the bulb has been replaced, be
sure to correctly reposition lug 5 in
notch 6, then refit cover A.
A
1
2
3
4
34
5
6
Page 184 of 244
Downloaded from www.Manualslib.com manuals search engine JauneNoir Noir texte
5.16
ENG_UD35430_2
Feux avant : remplacement des lampes (H79 Ph2 - Dacia)
ENG_NU_1079-3_H79Ph2_Dacia_5
FRONT LIGHTS: changing bulbs (2/4)
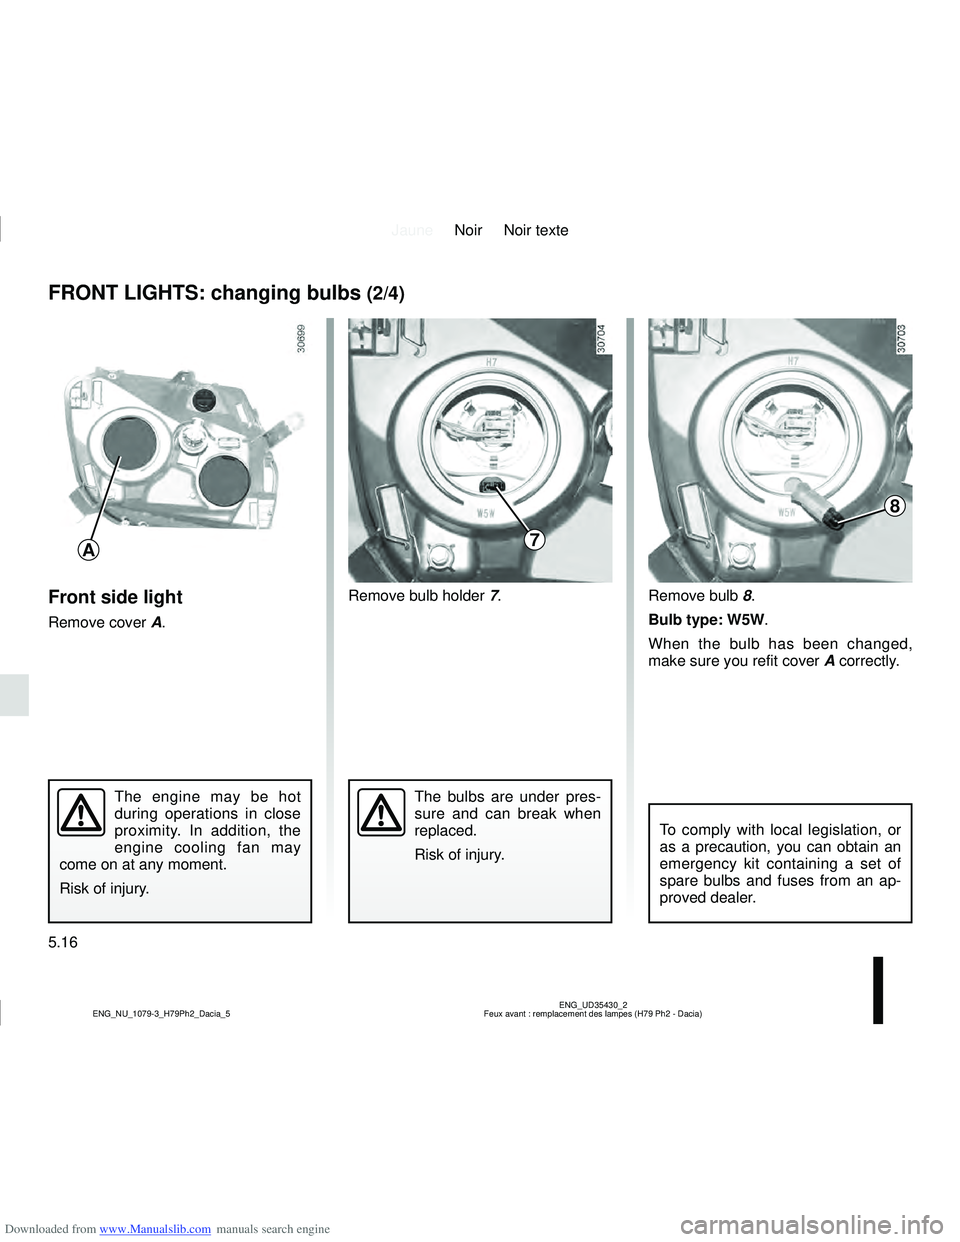
Front side light
Remove cover A.
To comply with local legislation, or
as a precaution, you can obtain an
emergency kit containing a set of
spare bulbs and fuses from an ap-
proved dealer.
The bulbs are under pres-
sure and can break when
replaced.
Risk of injury.
Remove bulb holder 7. Remove bulb 8.
Bulb type: W5W.
When the bulb has been changed,
make sure you refit cover A correctly.
The engine may be hot
during operations in close
proximity. In addition, the
engine cooling fan may
come on at any moment.
Risk of injury.
A7
8
Page 185 of 244
Downloaded from www.Manualslib.com manuals search engine JauneNoir Noir texte
5.17
ENG_UD35430_2
Feux avant : remplacement des lampes (H79 Ph2 - Dacia)
ENG_NU_1079-3_H79Ph2_Dacia_5
FRONT LIGHTS: changing bulbs (3/4)
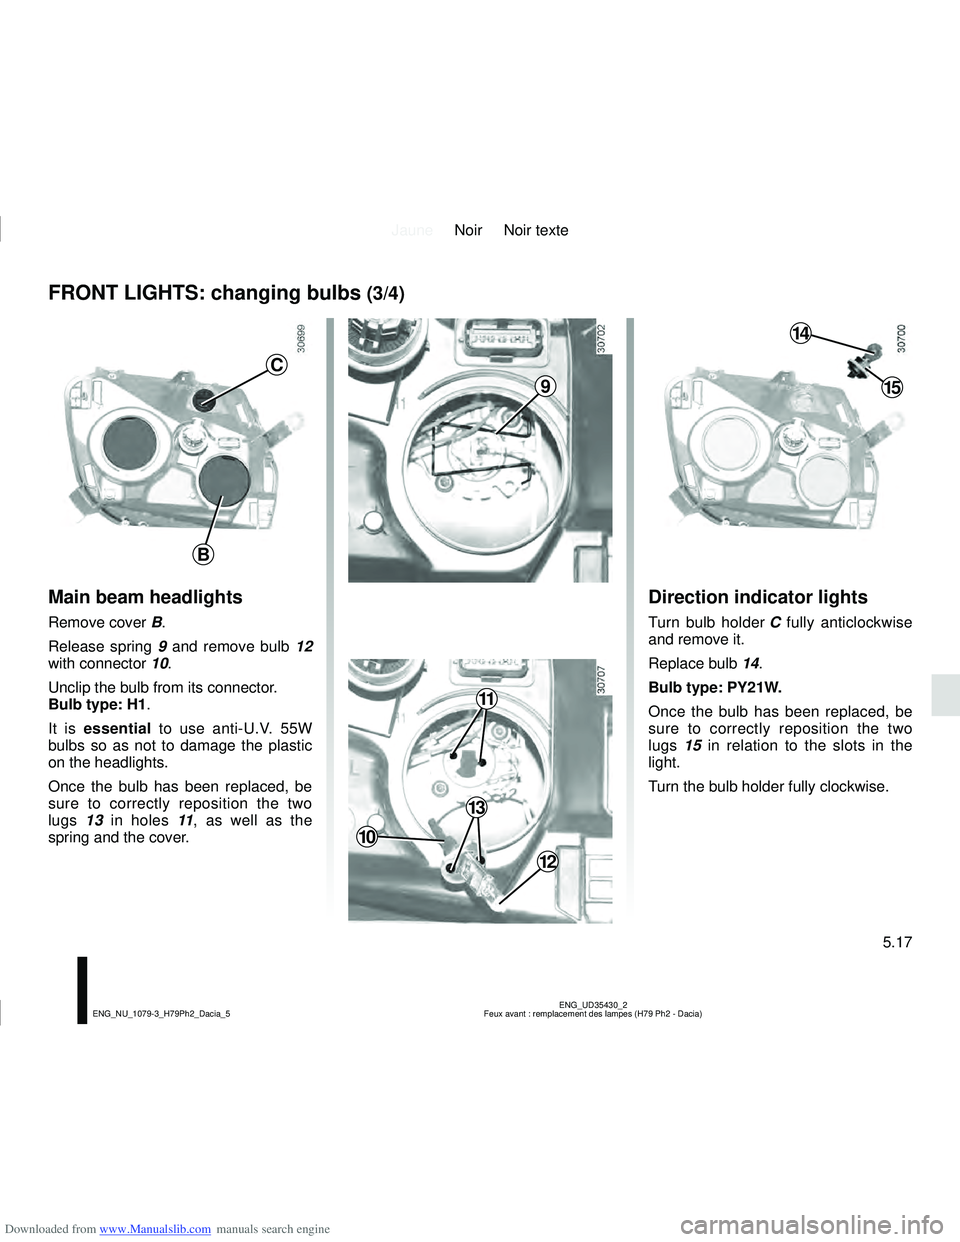
Main beam headlights
Remove cover B.
Release spring 9 and remove bulb 12
with connector 10.
Unclip the bulb from its connector.
Bulb type: H1.
It is essential to use anti-U.V. 55W
bulbs so as not to damage the plastic
on the headlights.
Once the bulb has been replaced, be
sure to correctly reposition the two
lugs 13 in holes 11 , as well as the
spring and the cover.
Direction indicator lights
Turn bulb holder C fully anticlockwise
and remove it.
Replace bulb 14.
Bulb type: PY21W.
Once the bulb has been replaced, be
sure to correctly reposition the two
lugs 15 in relation to the slots in the
light.
Turn the bulb holder fully clockwise.
B
C
9
14
15
10
11
12
13
Page 186 of 244
Downloaded from www.Manualslib.com manuals search engine JauneNoir Noir texte
5.18
ENG_UD35430_2
Feux avant : remplacement des lampes (H79 Ph2 - Dacia)
ENG_NU_1079-3_H79Ph2_Dacia_5
FRONT LIGHTS: changing bulbs (4/4)
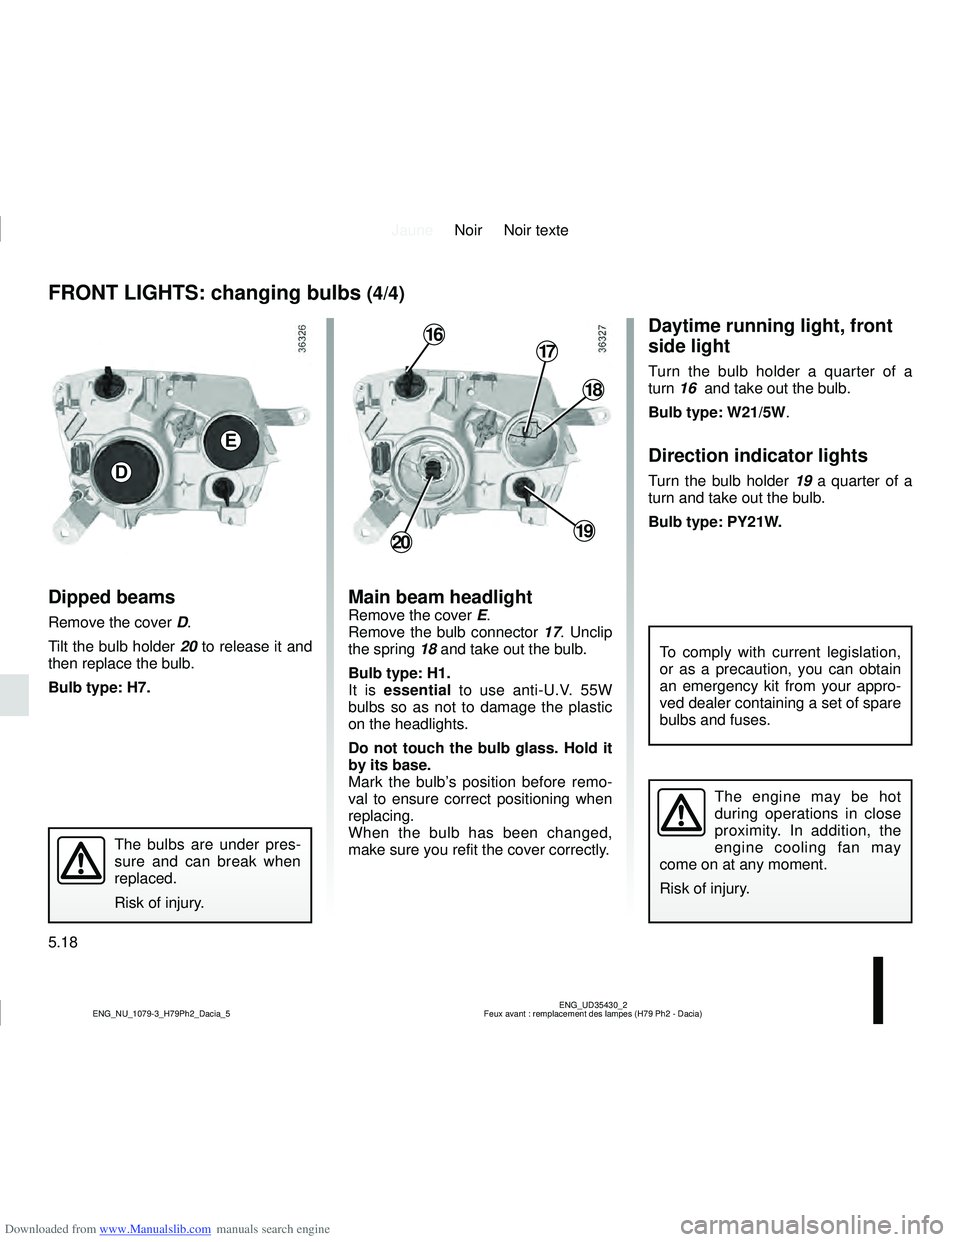
Dipped beams
Remove the cover D.
Tilt the bulb holder 20 to release it and
then replace the bulb.
Bulb type: H7.
Main beam headlightRemove the cover E.
Remove the bulb connector 17. Unclip
the spring 18 and take out the bulb.
Bulb type: H1.
It is essential to use anti-U.V. 55W
bulbs so as not to damage the plastic
on the headlights.
Do not touch the bulb glass. Hold it
by its base.
Mark the bulb’s position before remo-
val to ensure correct positioning when
replacing.
When the bulb has been changed,
make sure you refit the cover correctly.
Daytime running light, front
side light
Turn the bulb holder a quarter of a
turn 16 and take out the bulb.
Bulb type: W21/5W.
Direction indicator lights
Turn the bulb holder 19 a quarter of a
turn and take out the bulb.
Bulb type: PY21W.D
E
20
16
18
17
19
The engine may be hot
during operations in close
proximity. In addition, the
engine cooling fan may
come on at any moment.
Risk of injury.
To comply with current legislation,
or as a precaution, you can obtain
an emergency kit from your appro-
ved dealer containing a set of spare
bulbs and fuses.
The bulbs are under pres-
sure and can break when
replaced.
Risk of injury.
Page 187 of 244
Downloaded from www.Manualslib.com manuals search engine JauneNoir Noir texte
5.19
ENG_UD32185_1
Projecteurs antibrouillard : remplacement des lampes (H79 Ph2 - Dacia)\
ENG_NU_1079-3_H79Ph2_Dacia_5
Additional lights
If you wish to fit fog lights to your ve-
hicle, please see an authorised dealer.
FOG LIGHTS: changing bulbs
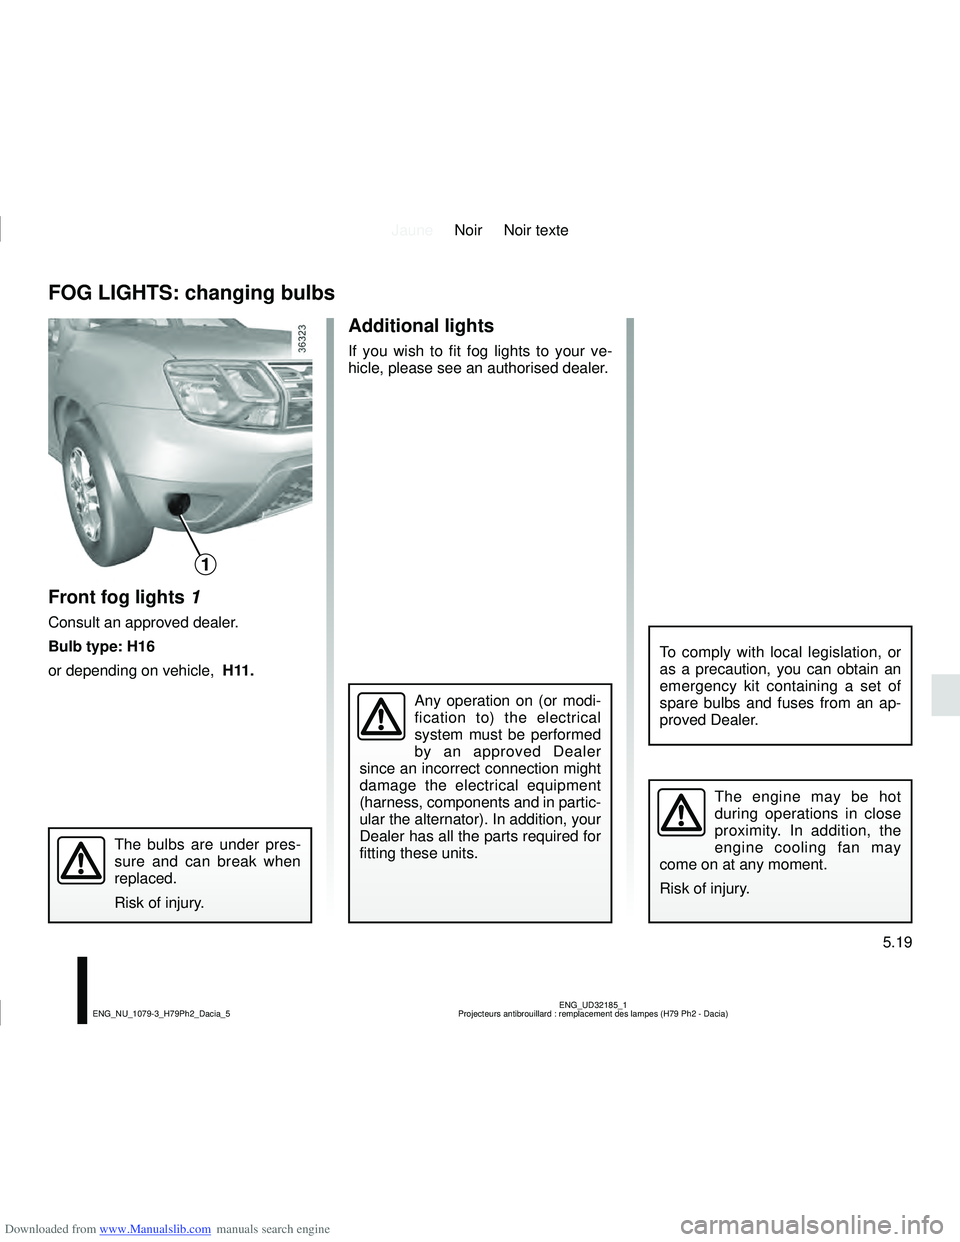
Front fog lights 1
Consult an approved dealer.
Bulb type: H16
or depending on vehicle, H11.
Any operation on (or modi-
fication to) the electrical
system must be performed
by an approved Dealer
since an incorrect connection might
damage the electrical equipment
(harness, components and in partic-
ular the alternator). In addition, your
Dealer has all the parts required for
fitting these units.
The engine may be hot
during operations in close
proximity. In addition, the
engine cooling fan may
come on at any moment.
Risk of injury.
The bulbs are under pres-
sure and can break when
replaced.
Risk of injury.
1
To comply with local legislation, or
as a precaution, you can obtain an
emergency kit containing a set of
spare bulbs and fuses from an ap-
proved Dealer.
Page 188 of 244
Downloaded from www.Manualslib.com manuals search engine JauneNoir Noir texte
5.20
ENG_UD34278_2
Feux arrière : remplacement des lampes (H79 Ph2 - Dacia)
ENG_NU_1079-3_H79Ph2_Dacia_5
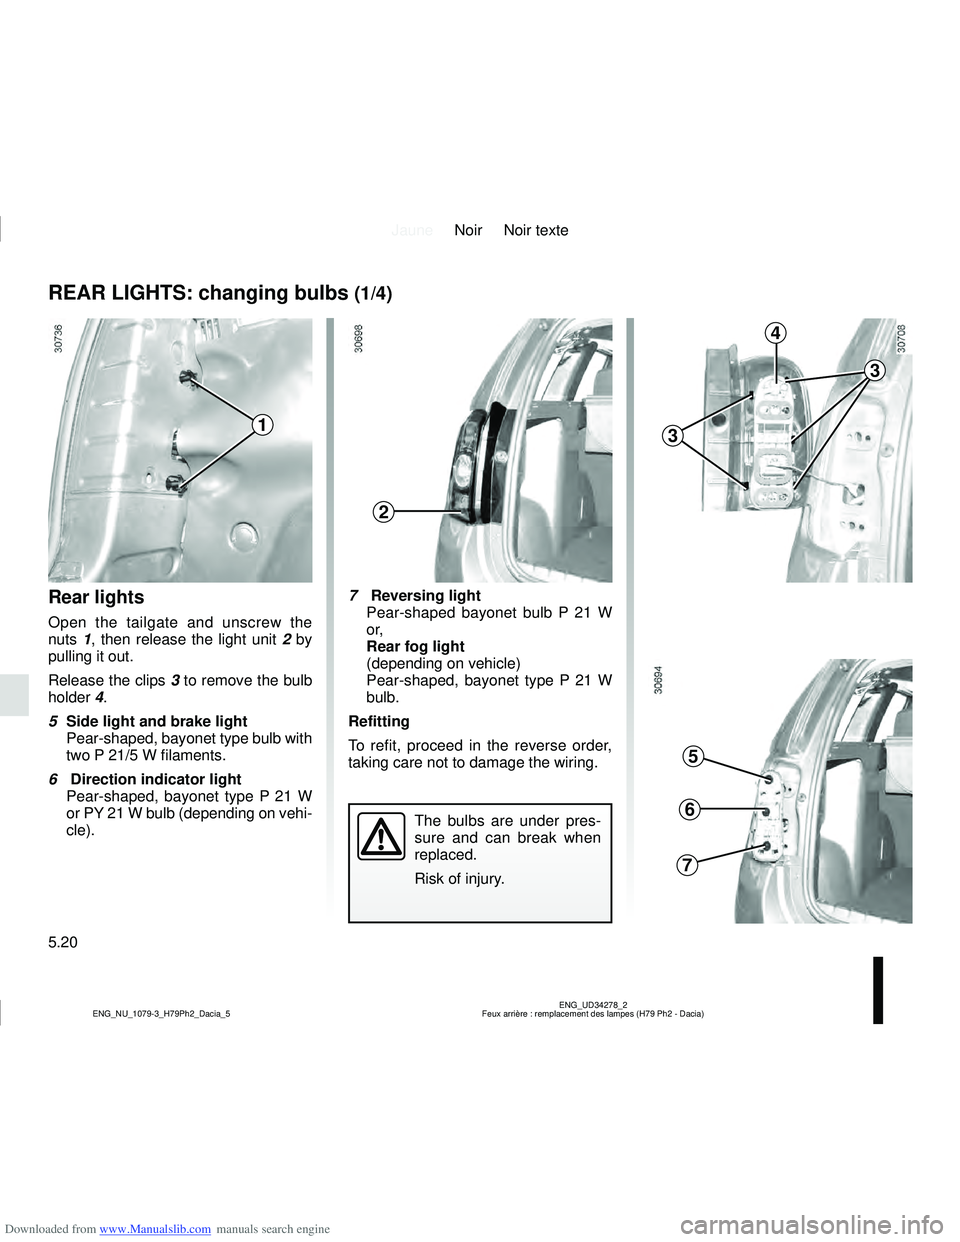
7 Reversing light
Pear-shaped bayonet bulb P 21 W
o r,
Rear fog light
(depending on vehicle)
Pear-shaped, bayonet type P 21 W
bulb.
Refitting
To refit, proceed in the reverse order,
taking care not to damage the wiring.
REAR LIGHTS: changing bulbs (1/4)
Rear lights
Open the tailgate and unscrew the
nuts 1, then release the light unit 2 by
pulling it out.
Release the clips 3 to remove the bulb
holder 4.
5 Side light and brake light
Pear-shaped, bayonet type bulb with
two P 21/5 W filaments.
6 Direction indicator light
Pear-shaped, bayonet type P 21 W
or PY 21 W bulb (depending on vehi-
cle).
The bulbs are under pres-
sure and can break when
replaced.
Risk of injury.
1
2
3
3
4
5
6
7
Page 189 of 244
Downloaded from www.Manualslib.com manuals search engine JauneNoir Noir texte
5.21
ENG_UD34278_2
Feux arrière : remplacement des lampes (H79 Ph2 - Dacia)
ENG_NU_1079-3_H79Ph2_Dacia_5
REAR LIGHTS: changing bulbs (2/4)
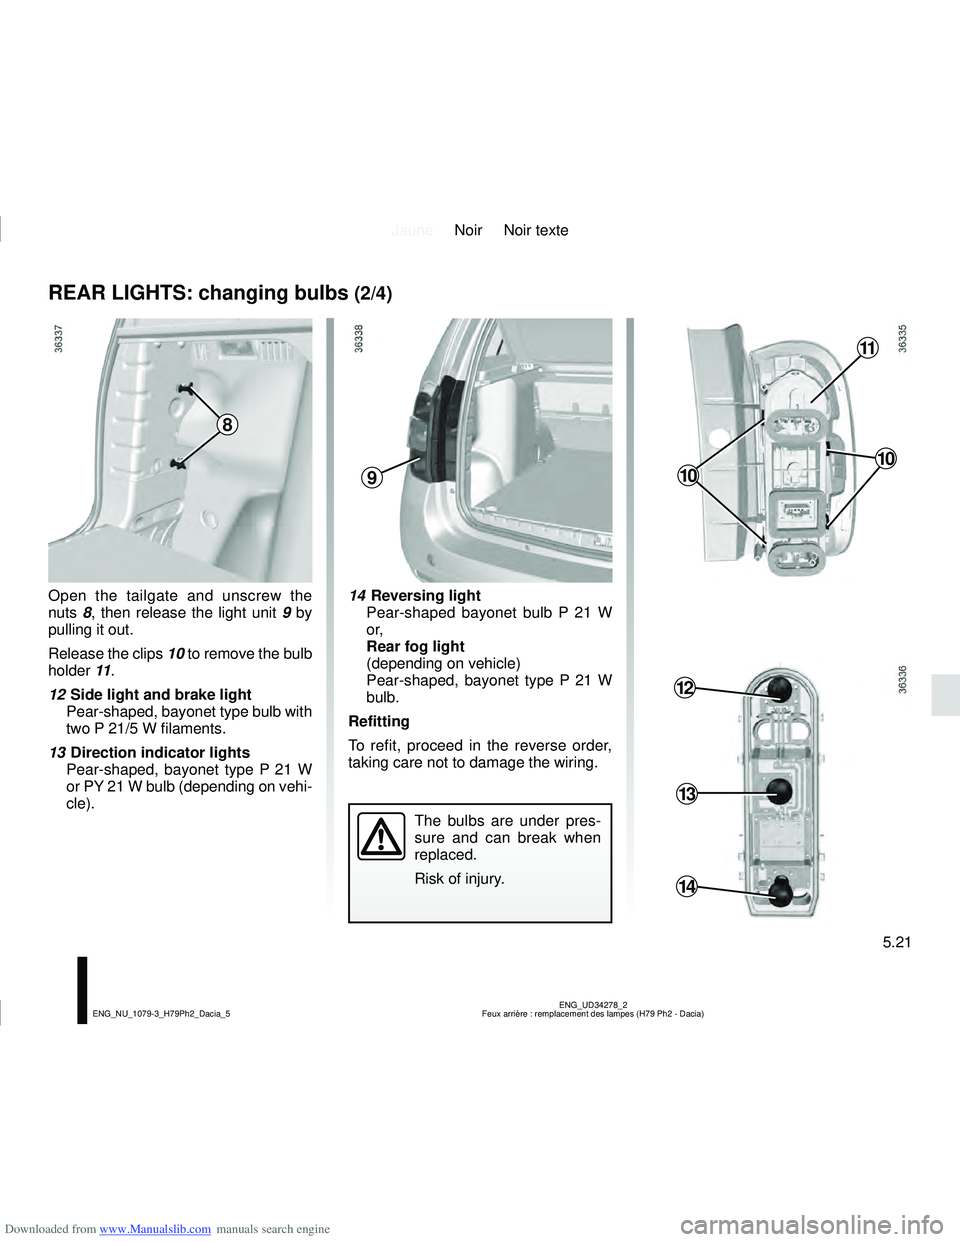
Open the tailgate and unscrew the
nuts 8, then release the light unit 9 by
pulling it out.
Release the clips 10 to remove the bulb
holder 11.
12 Side light and brake light
Pear-shaped, bayonet type bulb with
two P 21/5 W filaments.
13 Direction indicator lights
Pear-shaped, bayonet type P 21 W
or PY 21 W bulb (depending on vehi-
cle). 14
Reversing light
Pear-shaped bayonet bulb P 21 W
o r,
Rear fog light
(depending on vehicle)
Pear-shaped, bayonet type P 21 W
bulb.
Refitting
To refit, proceed in the reverse order,
taking care not to damage the wiring.
8
91010
11
12
13
14
The bulbs are under pres-
sure and can break when
replaced.
Risk of injury.
Page 190 of 244
Downloaded from www.Manualslib.com manuals search engine JauneNoir Noir texte
5.22
ENG_UD34278_2
Feux arrière : remplacement des lampes (H79 Ph2 - Dacia)
ENG_NU_1079-3_H79Ph2_Dacia_5
REAR LIGHTS: changing bulbs (3/4)
The bulbs are under pres-
sure and can break when
replaced.
Risk of injury.
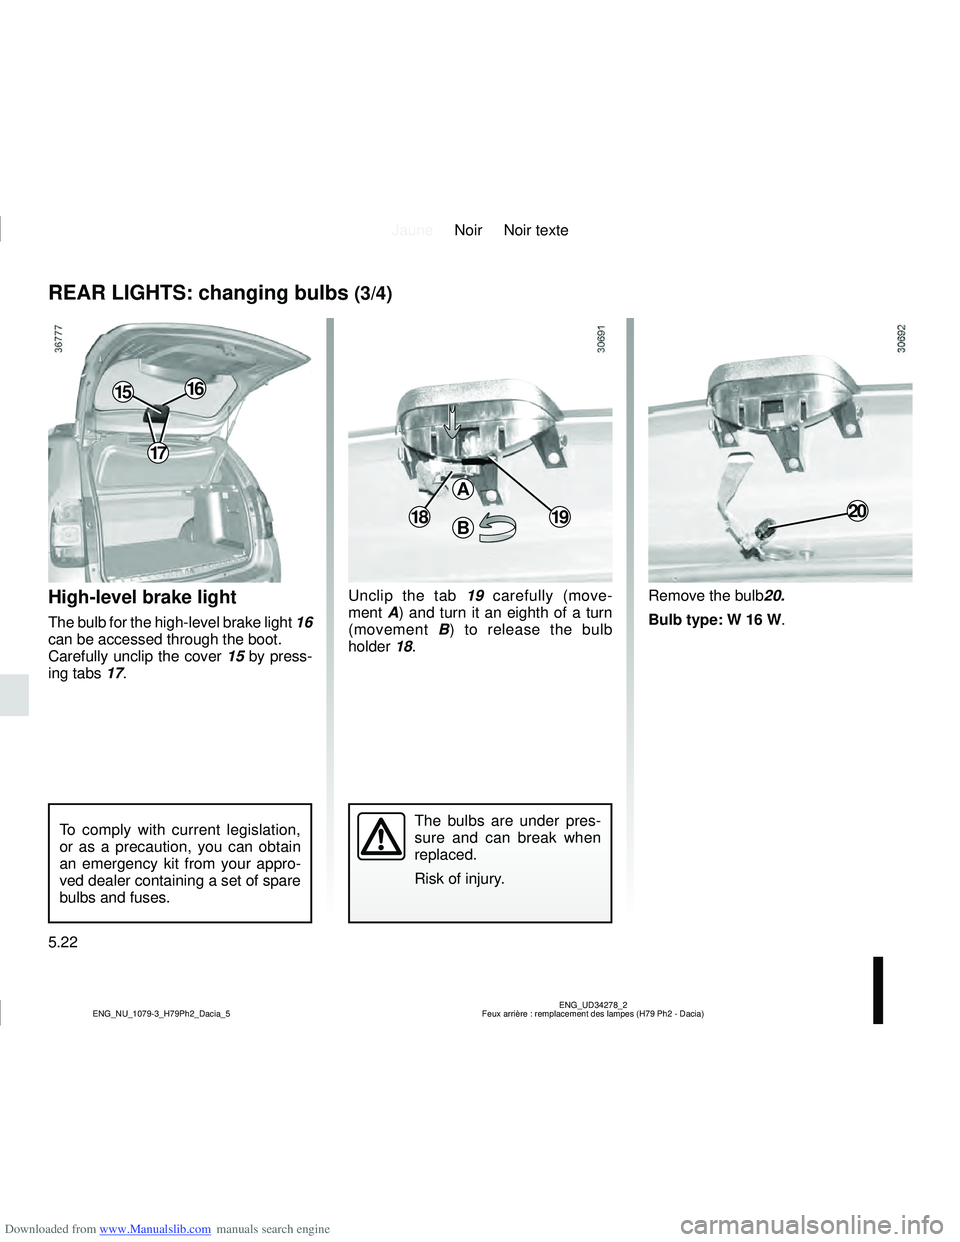
High-level brake light
The bulb for the high-level brake light 16
can be accessed through the boot.
Carefully unclip the cover 15 by press-
ing tabs 17. Remove the bulb
20.
Bulb type: W 16 W.
Unclip the tab 19
carefully (move-
ment A) and turn it an eighth of a turn
(movement B) to release the bulb
holder 18.
18
A
B1920
To comply with current legislation,
or as a precaution, you can obtain
an emergency kit from your appro-
ved dealer containing a set of spare
bulbs and fuses.
17
1516