light DACIA LODGY 2012 1.G Workshop Manual
[x] Cancel search | Manufacturer: DACIA, Model Year: 2012, Model line: LODGY, Model: DACIA LODGY 2012 1.GPages: 196, PDF Size: 5.73 MB
Page 126 of 196
Downloaded from www.Manualslib.com manuals search engine engine coolant ....................................................... (current page)
tanks and reservoirs coolant ............................................................. (current page)
tanks and reservoirs: windscreen washer .......................................... (current page)
windscreen washer ................................................ (current page)
JauneNoirNoir texte
4.7
ENG_UD28037_3
Niveaux / Filtres (X92 - Renault)
ENG_NU_975-3_X92_Dacia_4
Engine coolant
Windscreen washer reservoir
Coolant
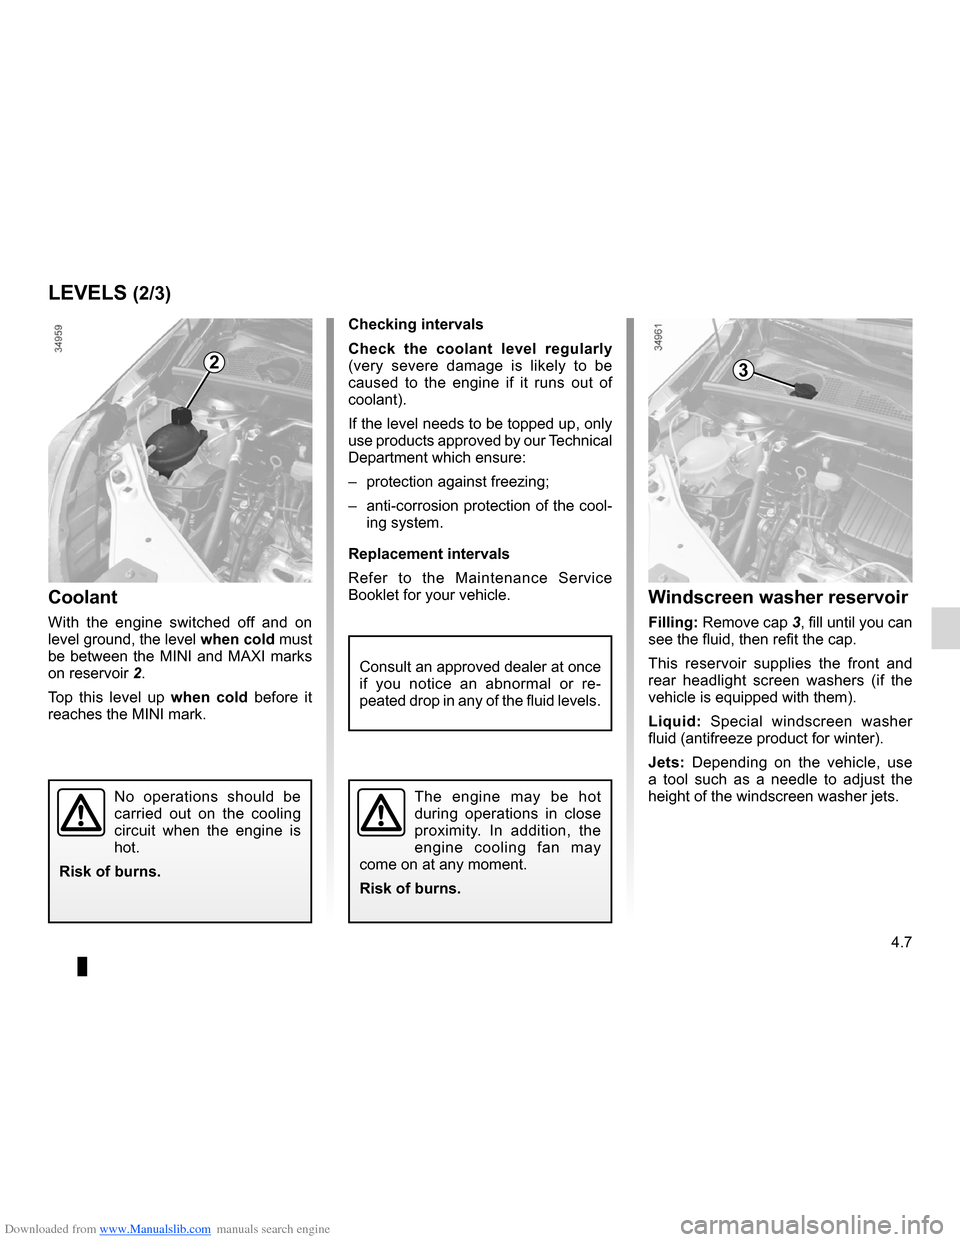
With the engine switched off and on
level ground, the level when cold must
be between the MINI and MAXI marks
on reservoir 2.
Top this level up when cold before it
reaches the MINI mark.
No operations should be
carried out on the cooling
circuit when the engine is
hot.
Risk of burns.
Checking intervals
Check the coolant level regularly
(very severe damage is likely to be
caused to the engine if it runs out of
coolant).
If the level needs to be topped up, only
use products approved by our Technical
Department which ensure:
– protection against freezing;
– anti-corrosion protection of the cool-
ing system.
Replacement intervals
Refer to the Maintenance Service
Booklet for your vehicle.
Consult an approved dealer at once
if you notice an abnormal or re -
peated drop in any of the fluid levels.
LeVeLS (2/3)
2
Windscreen washer reservoir
Filling: Remove cap 3, fill until you can
see the fluid, then refit the cap.
This reservoir supplies the front and
rear headlight screen washers (if the
vehicle is equipped with them).
Liquid: Special windscreen washer
fluid (antifreeze product for winter).
Jets: Depending on the vehicle, use
a tool such as a needle to adjust the
height of the windscreen washer jets.
3
The engine may be hot
during operations in close
proximity. In addition, the
engine cooling fan may
come on at any moment.
Risk of burns.
Page 131 of 196
Downloaded from www.Manualslib.com manuals search engine maintenance:bodywork ........................................ (up to the end of the DU)
washing ................................................ (up to the end of the DU)
paintwork maintenance ................................... (up to the end of the DU)
anti-corrosion protection ........................................ (current page)
4.12
ENG_UD26811_2
Entretien de la carrosserie (peinture mate) (X44 - X77 - J77 - X85 - \
B90 - X61 - TEST - X77 ph2 - X95 - B95 - D95 - K95 - J95 - R95 - L90 Ph2 - F90 Ph2 - R90\
Ph2 - X62
ENG_NU_975-3_X92_Dacia_4
Jaune NoirNoir texte
Bodywork maintenance
BoDYWoRK MAIntenAnCe (1/2)
You should
Wash your car frequently, with the
engine off, with cleaning products rec-
ommended by the manufacturer (never
use abrasive products). Rinse thor -
oughly beforehand with a jet:
– spots of tree resin and industrial
grime;
– mud in the wheel arches and under -
neath the body which forms damp
patches;
– bird droppings , which cause a
chemical reaction with the paint that
rapidly discolours paintwork and
may even cause the paint to peel
off;
wash the vehicle immediately to
remove these marks since it is im -
possible to remove them by polish -
ing;
– salt, particularly in the wheel arches
and underneath the body after driv -
ing in areas where the roads have
been gritted.
Remove any plant matter (resin, leaves,
etc.) from the vehicle regularly.
What you should not doDo not degrease or clean mechani -
cal components (e.g. the engine com -
partment), underneath the body, parts
with hinges (e.g. inside the doors) and
painted plastic external fittings (e.g.
bumpers) using high-pressure clean -
ing equipment or by spraying on prod-
ucts not approved by our Technical
Department. Doing this could give rise
to corrosion or operational faults.
Wash the vehicle in bright sunlight or
freezing temperatures.
Do not scrape off mud or dirt without
pre-wetting.
Allow dirt to accumulate on the exterior.
Allow rust to form following minor im -
pacts.
Do not use solvents not approved by
our Technical Department to remove
stains as this could damage the paint-
work.
Do not drive in snow or muddy condi -
tions without washing the vehicle, par-
ticularly under the wheel arches and
body.
A well-maintained vehicle will last
longer. It is therefore recommended to
maintain the exterior of the vehicle reg-
ularly.
Your vehicle has been treated with very
effective anti-corrosion products. It is
nevertheless subject to various outside
influences.
Corrosive agents in the atmosphere
–
atmospheric pollution (built-up and
industrial areas),
– saline atmospheres (near the sea,
particularly in hot weather),
– seasonal and damp weather condi -
tions (e.g. road salt in winter, water
from road cleaners, etc.).
Minor impacts
Abrasive action
Dust and sand in the air, mud, road grit
thrown up by other vehicles, etc.
You should take a number of minor pre-
cautions in order to safeguard your ve-
hicle against such risks.
Page 132 of 196
Downloaded from www.Manualslib.com manuals search engine JauneNoirNoir texte
4.13
ENG_UD26811_2
Entretien de la carrosserie (peinture mate) (X44 - X77 - J77 - X85 - \
B90 - X61 - TEST - X77 ph2 - X95 - B95 - D95 - K95 - J95 - R95 - L90 Ph2 - F90 Ph2 - R90\
Ph2 - X62
ENG_NU_975-3_X92_Dacia_4
Respect local regulations about wash -
ing vehicles (e.g. do not wash your ve-
hicle on a public highway).
Observe the vehicle stopping distances
when driving on gravelled surfaces to
prevent paint damage.
Repair, or have repaired quickly, areas
where the paint has been damaged, to
prevent corrosion spreading.
Remember to visit the body shop pe -
riodically in order to maintain your
anti-corrosion warranty. Refer to the
Maintenance Document.
If it is necessary to clean mechani -
cal components, hinges, etc., spray
them with products approved by our
Technical Department to protect them
after they have been cleaned.
BoDYWoRK MAIntenAnCe (2/2)
We have selected special products
to care for your vehicle and you can
obtain these from the manufactur -
er’s accessory outlets.
Using a roller type car wash
Return the windscreen wiper stalk to
the Park position (refer to the informa-
tion on the “Windscreen washer, wiper”
in Section 1). Check the mounting of
external accessories, additional lights
and mirrors, and ensure that the wiper
blades are secured with adhesive tape.
Remove the radio aerial mast if your
vehicle is fitted with this equipment.
Remember to remove the tape and refit
the antenna after washing.
Cleaning the headlights
As the headlights are made of plastic
“glass”, use a soft cloth or cotton wool
to clean them. If this does not clean
them properly, moisten the cloth with
soapy water, then wipe clean with a soft
damp cloth or cotton wool.
Finally, carefully dry off with a soft dry
cloth.
Cleaning products containing alco -
hol must not be used.
Vehicles with a matte paint
finish
This type of paint requires certain pre-
cautions.
Do not do the following
– use wax-based products (polishing);
– rub hard;
– wash the vehicle in a roller-type car
wash;
– wash the vehicle using a high-pres-
sure device;
– attach stickers to the paintwork (risk
of leaving marks).
You should do the following
Wash the vehicle by hand using plenty
of water, using a soft cloth or a gentle
sponge.
Page 133 of 196
Downloaded from www.Manualslib.com manuals search engine maintenance:interior trim ...................................... (up to the end of the DU)
interior trim maintenance ................................... (up to the end of the DU)
cleaning: inside the vehicle ............................ (up to the end of the DU)
4.14
ENG_UD22866_8
Entretien des garnitures intérieures (X35 - X45 - X65 - J77 - X81 - \
J81 - X85 - X91 - B91 - K91 - D91 - X83 - X61 - X77 ph2 - X95 - B95 - D9\
5 - E95 - K95 - J95 - R95 -
ENG_NU_975-3_X92_Dacia_4
Jaune NoirNoir texte
Interior trim maintenance
Glass instrument panel(e.g. instrument panel, clock, exterior
temperature display, radio display, etc.)
Use a soft cloth (or cotton wool).
If this does not clean it properly, use a
soft cloth (or cotton wool) slightly mois-
tened with soapy water and then wipe
clean with a soft damp cloth or cotton
wool.
Finally, carefully dry off with a soft dry
cloth.
Cleaning products containing alco -
hol must not be used under any cir-
cumstances.
Seat belts
These must be kept clean.
Use products selected by our Technical
Department (Approved outlets) or
warm, soapy water and a sponge and
wipe with a dry cloth.
Detergents or dyes must not be used
under any circumstances.
InteRIoR tRIM MAIntenAnCe (1/2)
textiles (seats, door trim, etc)
Vacuum-clean the textiles regularly.
Liquid stain
Use soapy water.
Dab lightly (never rub) with a soft cloth,
rinse and remove the excess.
Solid or pasty stain
Carefully remove the excess solid or
pasty material immediately with a
spatula (working from the edges to the
centre to avoid spreading the stain).
Clean as for a liquid stain.
Special instructions for sweets or
chewing gum
Put an ice cube on the stain to solidify
it, then proceed as for a solid stain.
A well-maintained vehicle will last
longer. It is therefore recommended to
maintain the interior of the vehicle regu-
larly.
A stain should always be dealt with
swiftly.
Whatever type of stain is on the trim,
use
cold (or warm) soapy water with
natural soap.
Detergents (washing-up liquid, pow -
dered products, alcohol-based prod-
ucts) should not be used.
Use a soft cloth.
Rinse and soak up the excess.
For further recommendations for
maintaining the interior, and/or for
any unsatisfactory results, please
see an authorised dealer.
Page 136 of 196
Downloaded from www.Manualslib.com manuals search engine 5.1
ENG_UD28067_3
Sommaire 5 (X92 - Renault)
ENG_NU_975-3_X92_Dacia_5
Section 5: Practical advice
Tools . . . . . . . . . . . . . . . . . . . . . . . . . . . . . . . . . . . . . . . . . . . . . . . . . . . . . . . . . . . . . . . . . . . . . . . . . 5.2
Puncture . . . . . . . . . . . . . . . . . . . . . . . . . . . . . . . . . . . . . . . . . . . . . . . . . . . . . . . . . . . . . . . . . . . . . . 5.3
Tyre inflation kit . . . . . . . . . . . . . . . . . . . . . . . . . . . . . . . . . . . . . . . . . . . . . . . . . . . . . . . . . . . . . . . . . 5.5
Wheel trim – Wheel rims . . . . . . . . . . . . . . . . . . . . . . . . . . . . . . . . . . . . . . . . . . . . . . . . . . . . . . . . . . 5.8
Changing a wheel . . . . . . . . . . . . . . . . . . . . . . . . . . . . . . . . . . . . . . . . . . . . . . . . . . . . . . . . . . . . . . . 5.9
Tyres (tyre and wheel safety, use in winter) . . . . . . . . . . . . . . . . . . . . . . . . . . . . . . . . . . . . . . . . . . . 5.11
Front lights: changing bulbs . . . . . . . . . . . . . . . . . . . . . . . . . . . . . . . . . . . . \
. . . . . . . . . . . . . . . . . . . . 5.14
Fog lights: changing bulbs . . . . . . . . . . . . . . . . . . . . . . . . . . . . . . . . . . . . . . . . . . . . . . . . . . . . . . . . . 5.15
Back and side lights: changing bulbs . . . . . . . . . . . . . . . . . . . . . . . . . . . . . . . . . . . . . . . . . . . . . . . . 5.16
Interior lights: changing bulbs . . . . . . . . . . . . . . . . . . . . . . . . . . . . . . . . . . . . . . . . . . . . . . . . . . . . . . 5.19
Fuses . . . . . . . . . . . . . . . . . . . . . . . . . . . . . . . . . . . . . . . . . . . . . . . . . . . . . . . . . . . . . . . . . . . . . . . . . 5.21
Radio frequency remote control unit: batteries . . . . . . . . . . . . . . . . . . . . . . . . . . . . . . . . . . . . . . . . . 5.24
Battery . . . . . . . . . . . . . . . . . . . . . . . . . . . . . . . . . . . . . . . . . . . . . . . . . . . . . . . . . . . . . . . . . . . . . . . . 5.25
Wiper blades . . . . . . . . . . . . . . . . . . . . . . . . . . . . . . . . . . . . . . . . . . . . . . . . . . . . . . . . . . . . . . . . . . . 5.27
Towing: troubleshooting . . . . . . . . . . . . . . . . . . . . . . . . . . . . . . . . . . . . . . . . . . . . . . . . . . . . . . . . . . . 5.28
Fitted audio equipment . . . . . . . . . . . . . . . . . . . . . . . . . . . . . . . . . . . . . . . . . . . . . . . . . . . . . . . . . . . 5.30
Accessories . . . . . . . . . . . . . . . . . . . . . . . . . . . . . . . . . . . . . . . . . . . . . . . . . . . . . . . . . . . . . . . . . . . . 5.31
Operating faults . . . . . . . . . . . . . . . . . . . . . . . . . . . . . . . . . . . . . . . . . . . . . . . . . . . . . . . . . . . . . . . . . 5.32
Page 141 of 196
Downloaded from www.Manualslib.com manuals search engine 5.6
ENG_UD28665_3
Kit de gonflage des pneumatiques (X77 - X85 - B85 - C85 - S85 - X77 ph2\
- K85 - X95 - E95 - X67 - X92 - X10 - X98 - X52 - Renault)
ENG_NU_975-3_X92_Dacia_5
Jaune NoirNoir texte
TYRE PREssURE KIT (2/3)
Depending on the vehicle, in the event
of a puncture, use the kit located in the
boot or underneath the luggage com -
partment carpet.
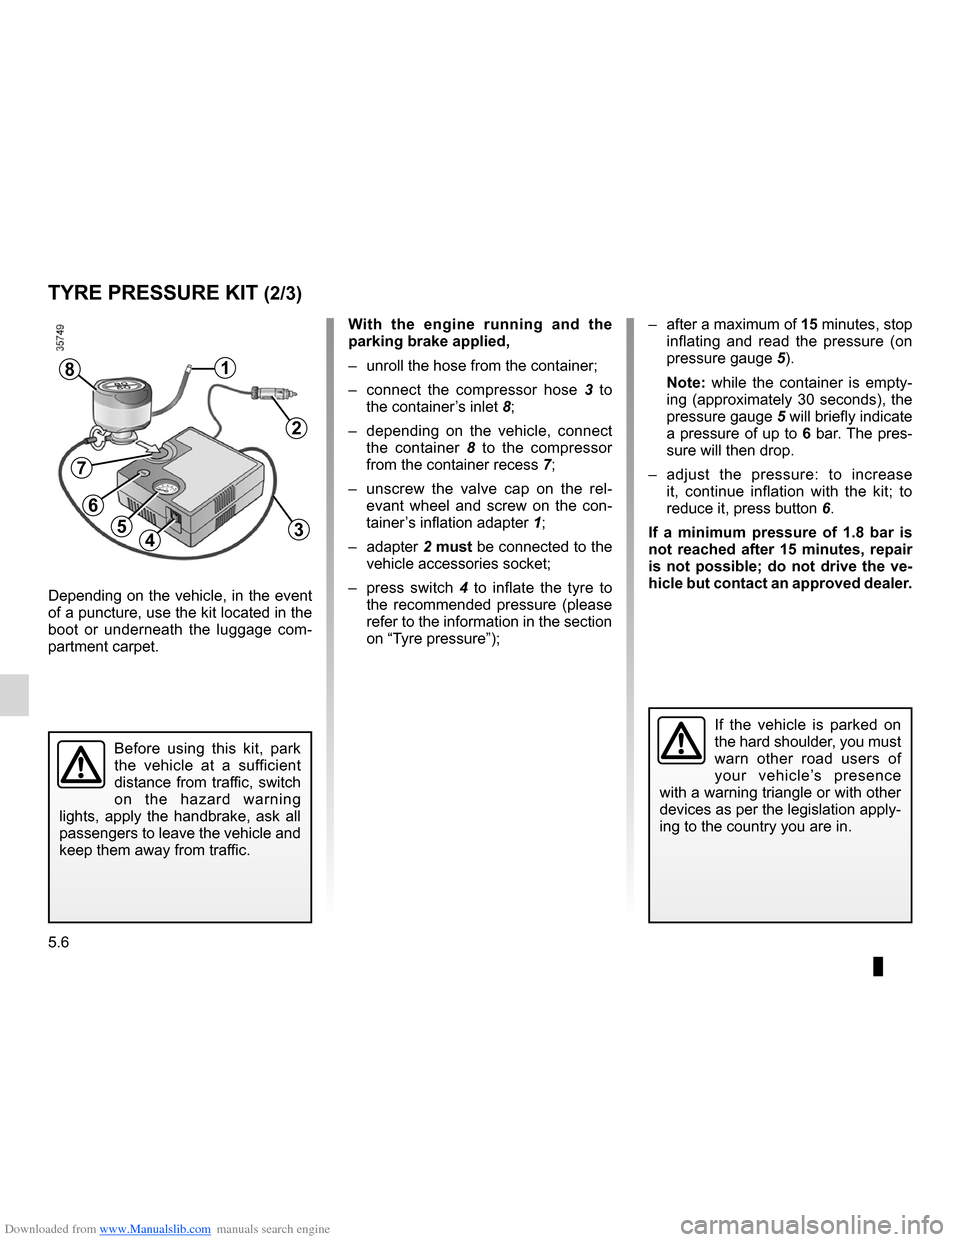
With the engine running and the
parking brake applied,
– unroll the hose from the container;
– connect the compressor hose 3 to
the container’s inlet 8;
– depending on the vehicle, connect
the container 8 to the compressor
from the container recess 7;
– unscrew the valve cap on the rel -
evant wheel and screw on the con -
tainer’s inflation adapter 1;
– adapter 2 must be connected to the
vehicle accessories socket;
– press switch 4 to inflate the tyre to
the recommended pressure (please
refer to the information in the section
on “Tyre pressure”);
45
1
Before using this kit, park
the vehicle at a sufficient
distance from traffic, switch
on the hazard warning
lights, apply the handbrake, ask all
passengers to leave the vehicle and
keep them away from traffic.
8
If the vehicle is parked on
the hard shoulder, you must
warn other road users of
your vehicle’s presence
with a warning triangle or with other
devices as per the legislation apply-
ing to the country you are in.
– after a maximum of 15 minutes, stop
inflating and read the pressure (on
pressure gauge 5).
Note: while the container is empty -
ing (approximately 30 seconds), the
pressure gauge 5 will briefly indicate
a pressure of up to 6 bar. The pres-
sure will then drop.
– adjust the pressure: to increase
it, continue inflation with the kit; to
reduce it, press button 6.
If a minimum pressure of 1.8 bar is
not reached after 15 minutes, repair
is not possible; do not drive the ve-
hicle but contact an approved dealer.
2
3
7
6
Page 144 of 196
Downloaded from www.Manualslib.com manuals search engine changing a wheel.................................. (up to the end of the DU)
jack ....................................................... (up to the end of the DU)
puncture ................................................ (up to the end of the DU)
lifting the vehicle changing a wheel ............................ (up to the end of the DU)
5.9
ENG_UD27017_2
Changement de roue (X92 - Renault)
ENG_NU_975-3_X92_Dacia_5
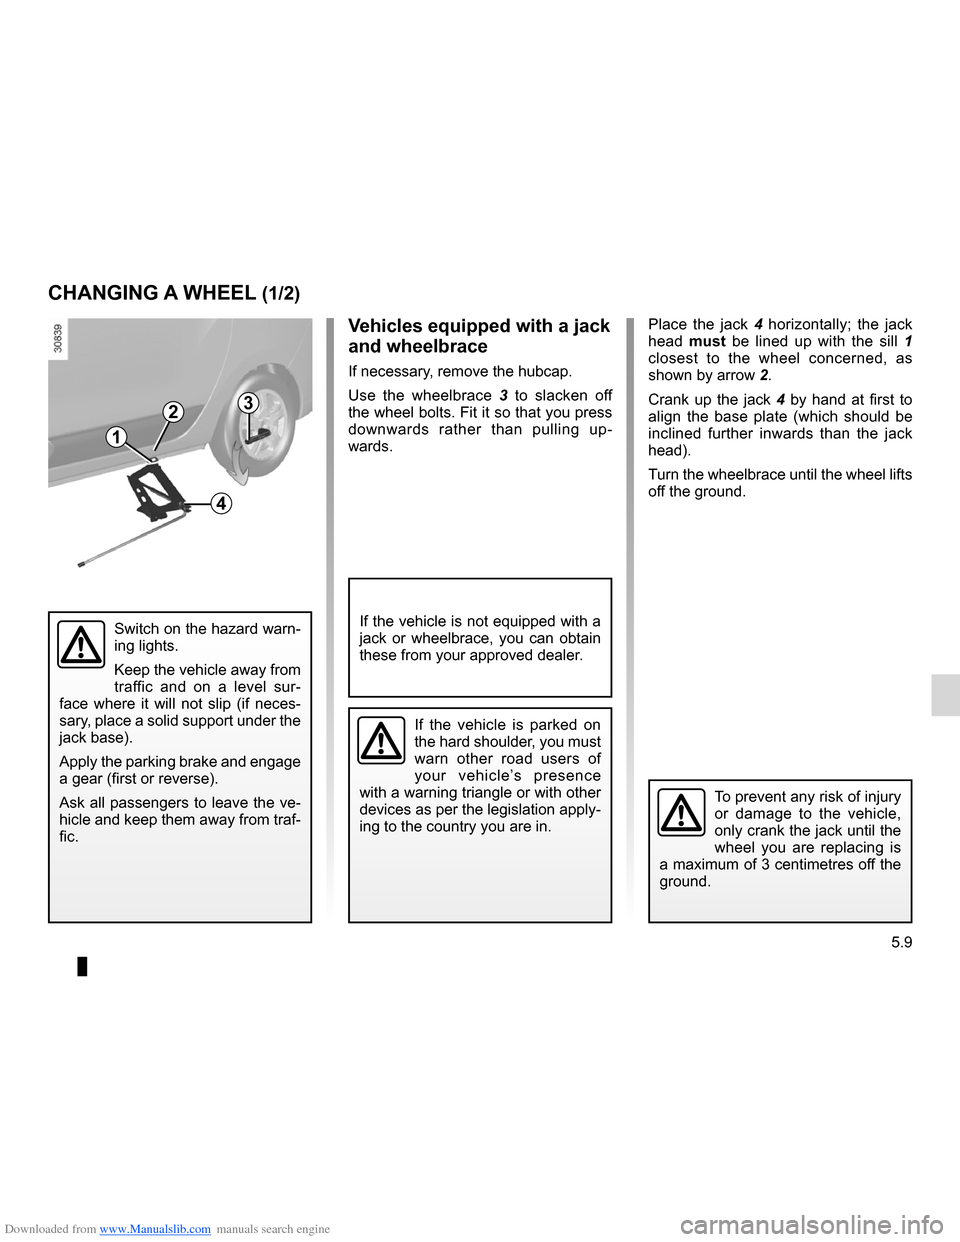
Place the jack 4 horizontally; the jack
head must be lined up with the sill 1
closest to the wheel concerned, as
shown by arrow 2.
Crank up the jack 4 by hand at first to
align the base plate (which should be
inclined further inwards than the jack
head).
Turn the wheelbrace until the wheel lifts
off the ground.
Changing a wheel
CHANGING A WHEEl (1/2)
Vehicles equipped with a jack
and wheelbrace
If necessary, remove the hubcap.
Use the wheelbrace 3 to slacken off
the wheel bolts. Fit it so that you press
downwards rather than pulling up -
wards.
If the vehicle is parked on
the hard shoulder, you must
warn other road users of
your vehicle’s presence
with a warning triangle or with other
devices as per the legislation apply-
ing to the country you are in.
To prevent any risk of injury
or damage to the vehicle,
only crank the jack until the
wheel you are replacing is
a maximum of 3 centimetres off the
ground.
If the vehicle is not equipped with a
jack or wheelbrace, you can obtain
these from your approved dealer.Switch on the hazard warn-
ing lights.
Keep the vehicle away from
traffic and on a level sur -
face where it will not slip (if neces -
sary, place a solid support under the
jack base).
Apply the parking brake and engage
a gear (first or reverse).
Ask all passengers to leave the ve-
hicle and keep them away from traf-
fic.
1
23
4
Page 149 of 196
Downloaded from www.Manualslib.com manuals search engine bulbschanging ......................................... (up to the end of the DU)
changing a bulb .................................... (up to the end of the DU)
indicators ............................................................... (current page)
practical advice ..................................... (up to the end of the DU)
lighting: exterior ............................................ (up to the end of the DU)
lights: dipped beam headlights .................. (up to the end of the DU)
lights: direction indicators .......................... (up to the end of the DU)
lights: side lights ........................................ (up to the end of the DU)
lights: main beam headlights ..................... (up to the end of the DU)
bulbs changing ......................................... (up to the end of the DU)
5.14
ENG_UD26649_2
Feux avant : remplacement des lampes (X92 - Renault)
ENG_NU_975-3_X92_Dacia_5
Front lights: changing bulbs
The following bulbs can be replaced.
However, we would advise you to have
them replaced by an approved dealer if
it proves difficult.
The engine may be hot
during operations in close
proximity. In addition, the
engine cooling fan may
come on at any moment.
Risk of injury.
The bulbs are under pres -
sure and can break when
replaced.
Risk of injury.
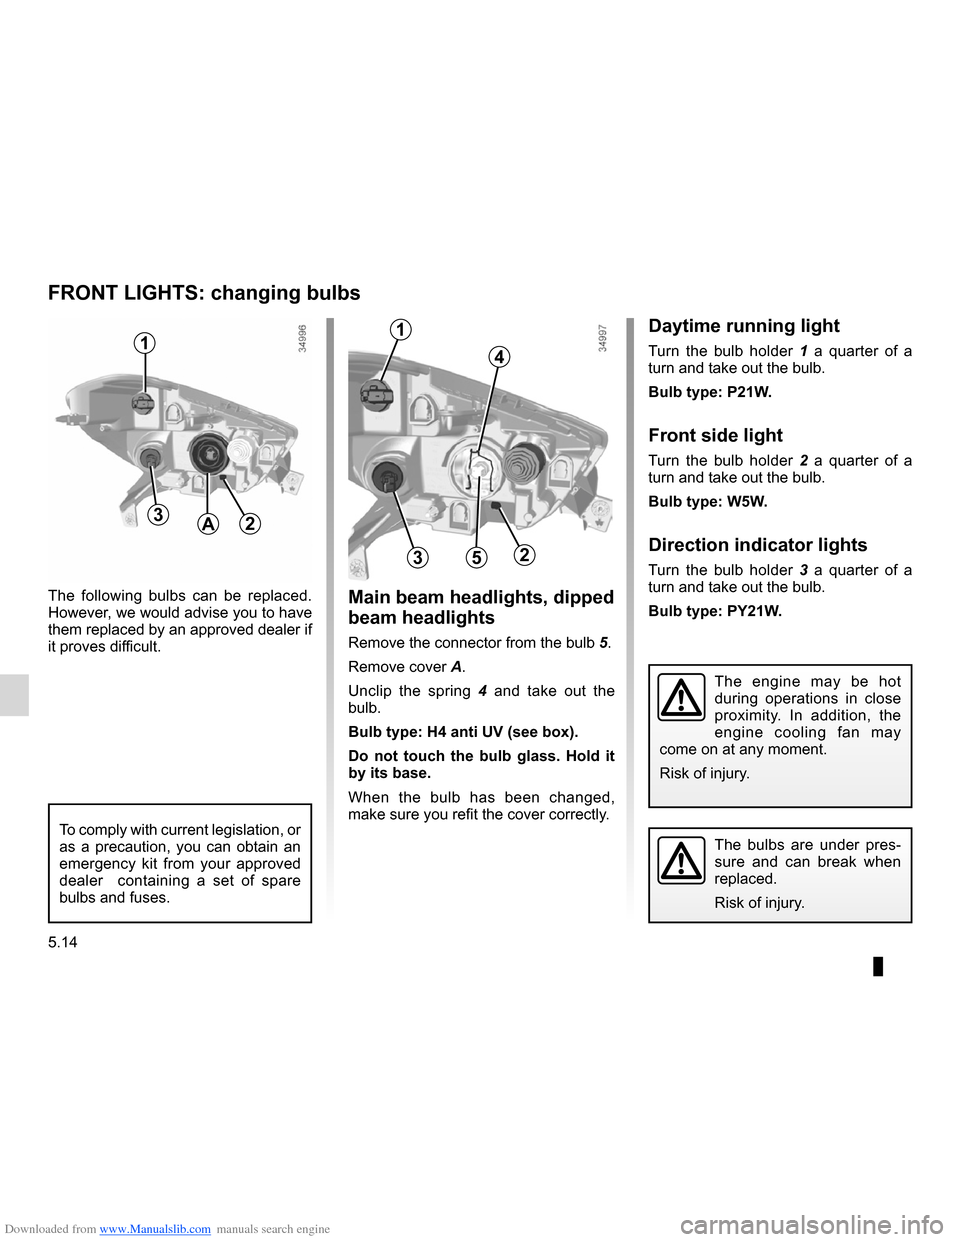
Main beam headlights, dipped
beam headlights
Remove the connector from the bulb 5.
Remove cover A.
Unclip the spring 4 and take out the
bulb.
Bulb type: H4 anti UV (see box).
Do not touch the bulb glass. Hold it
by its base.
When the bulb has been changed,
make sure you refit the cover correctly.
FRoNT lIGHTs: changing bulbs
5
4
23
A
To comply with current legislation, or
as a precaution, you can obtain an
emergency kit from your approved
dealer containing a set of spare
bulbs and fuses.
1Daytime running light
Turn the bulb holder 1 a quarter of a
turn and take out the bulb.
Bulb type: P21W.
Front side light
Turn the bulb holder 2 a quarter of a
turn and take out the bulb.
Bulb type: W5W.
Direction indicator lights
Turn the bulb holder 3 a quarter of a
turn and take out the bulb.
Bulb type: PY21W.
1
32
Page 150 of 196
Downloaded from www.Manualslib.com manuals search engine bulbschanging ......................................... (up to the end of the DU)
changing a bulb .................................... (up to the end of the DU)
practical advice ..................................... (up to the end of the DU)
lighting: exterior ............................................ (up to the end of the DU)
lights: fog lights ......................................... (up to the end of the DU)
bulbs changing ......................................... (up to the end of the DU)
lights additional ........................................ (up to the end of the DU)
5.15
ENG_UD24474_1
Feux de brouillard : remplacement des lampes (X92 - Renault)
ENG_NU_975-3_X92_Dacia_5
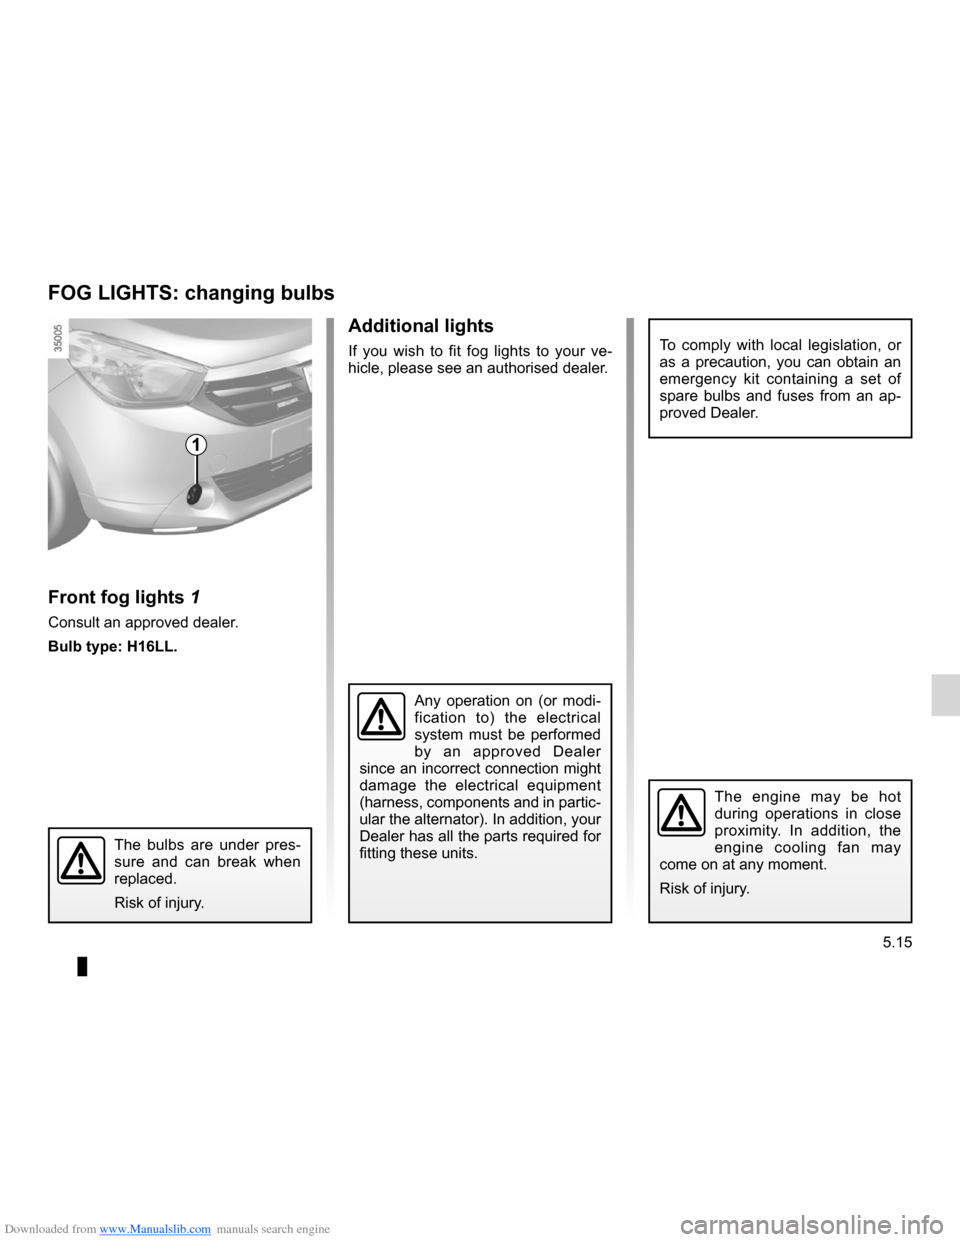
Additional lights
If you wish to fit fog lights to your ve -
hicle, please see an authorised dealer.
Fog lights: changing bulbs
FoG lIGHTs: changing bulbs
Front fog lights 1
Consult an approved dealer.
Bulb type: H16ll.
Any operation on (or modi -
fication to) the electrical
system must be performed
by an approved Dealer
since an incorrect connection might
damage the electrical equipment
(harness, components and in partic-
ular the alternator). In addition, your
Dealer has all the parts required for
fitting these units.
1
The bulbs are under pres -
sure and can break when
replaced.
Risk of injury.
The engine may be hot
during operations in close
proximity. In addition, the
engine cooling fan may
come on at any moment.
Risk of injury.
To comply with local legislation, or
as a precaution, you can obtain an
emergency kit containing a set of
spare bulbs and fuses from an ap -
proved Dealer.
Page 151 of 196
Downloaded from www.Manualslib.com manuals search engine lights:reversing lights ................................................. (current page)
lights: brake lights ...................................................... (current page)
lighting: exterior ............................................ (up to the end of the DU)
bulbs changing ......................................... (up to the end of the DU)
bulbs changing ......................................... (up to the end of the DU)
changing a bulb .................................... (up to the end of the DU)
5.16
ENG_UD26662_2
Feux arrière: remplacement des lampes (X92 - Renault)
ENG_NU_975-3_X92_Dacia_5
Jaune NoirNoir texte
Back and side lights: changing bulbs
REAR AND sIDE lIGHTs: changing bulbs (1/3)
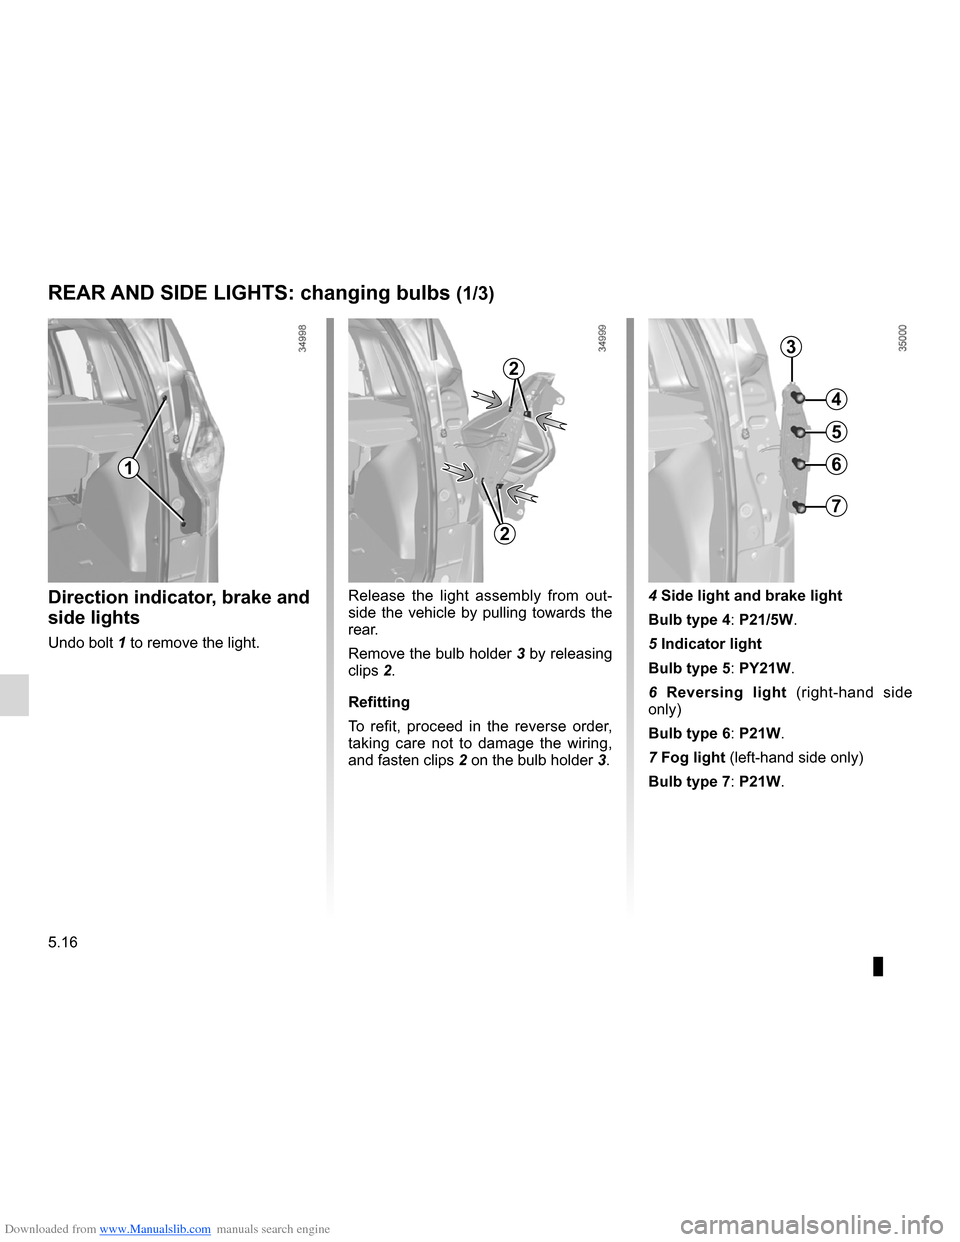
Direction indicator, brake and
side lights
Undo bolt 1 to remove the light. Release the light assembly from out
-
side the vehicle by pulling towards the
rear.
Remove the bulb holder 3 by releasing
clips 2.
Refitting
To refit, proceed in the reverse order,
taking care not to damage the wiring,
and fasten clips 2 on the bulb holder 3.4 side light and brake light
Bulb type 4: P21/5W.
5 Indicator light
Bulb type 5: PY21W.
6
Reversing light (right-hand side
only)
Bulb type 6: P21W.
7 Fog light (left-hand side only)
Bulb type 7: P21W.
3
4
5
61
7
2
2