type DACIA SANDERO 2019 User Guide
[x] Cancel search | Manufacturer: DACIA, Model Year: 2019, Model line: SANDERO, Model: DACIA SANDERO 2019Pages: 238, PDF Size: 3.19 MB
Page 152 of 238
Downloaded from www.Manualslib.com manuals search engine JauneNoir Noir texte
4.4
ENG_UD34749_4
Niveau huile moteur : appoint / remplissage (X52 - Dacia)
ENG_NU_993-5_X52_Dacia_4
ENGINE OIL LEVEL: topping up, filling (1/3)
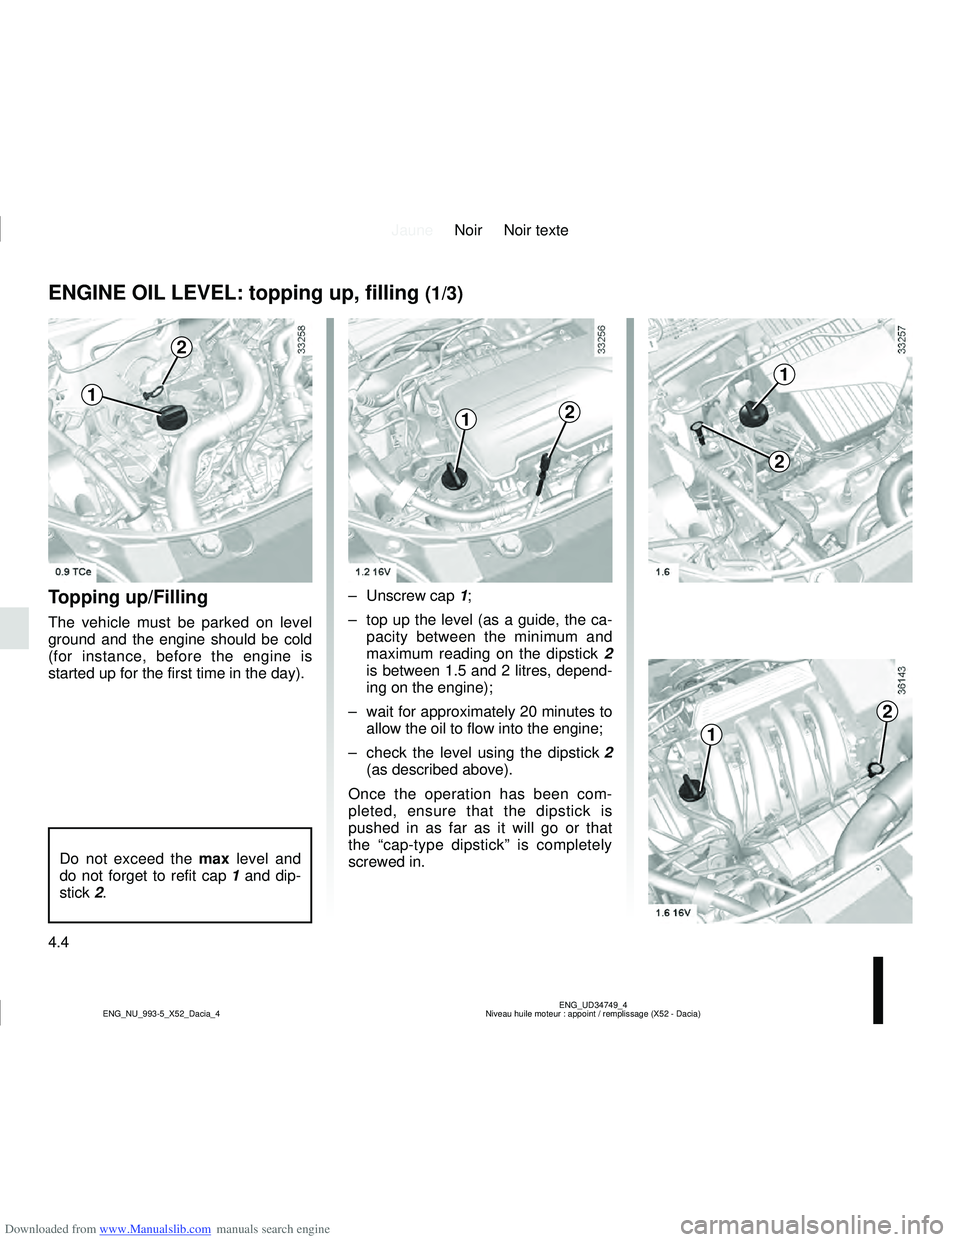
Topping up/Filling
The vehicle must be parked on level
ground and the engine should be cold
(for instance, before the engine is
started up for the first time in the day). – Unscrew cap 1;
– top up the level (as a guide, the ca-
pacity between the minimum and
maximum reading on the dipstick 2
is between 1.5 and 2 litres, depend-
ing on the engine);
– wait for approximately 20 minutes to allow the oil to flow into the engine;
– check the level using the dipstick 2
(as described above).
Once the operation has been com-
pleted, ensure that the dipstick is
pushed in as far as it will go or that
the “cap-type dipstick” is completely
screwed in.
Do not exceed the max level and
do not forget to refit cap 1 and dip-
stick 2.
12
1
2
1
2
1
2
12
Page 153 of 238
Downloaded from www.Manualslib.com manuals search engine JauneNoir Noir texte
4.5
ENG_UD34749_4
Niveau huile moteur : appoint / remplissage (X52 - Dacia)
ENG_NU_993-5_X52_Dacia_4
ENGINE OIL LEVEL: topping up, filling (2/3)
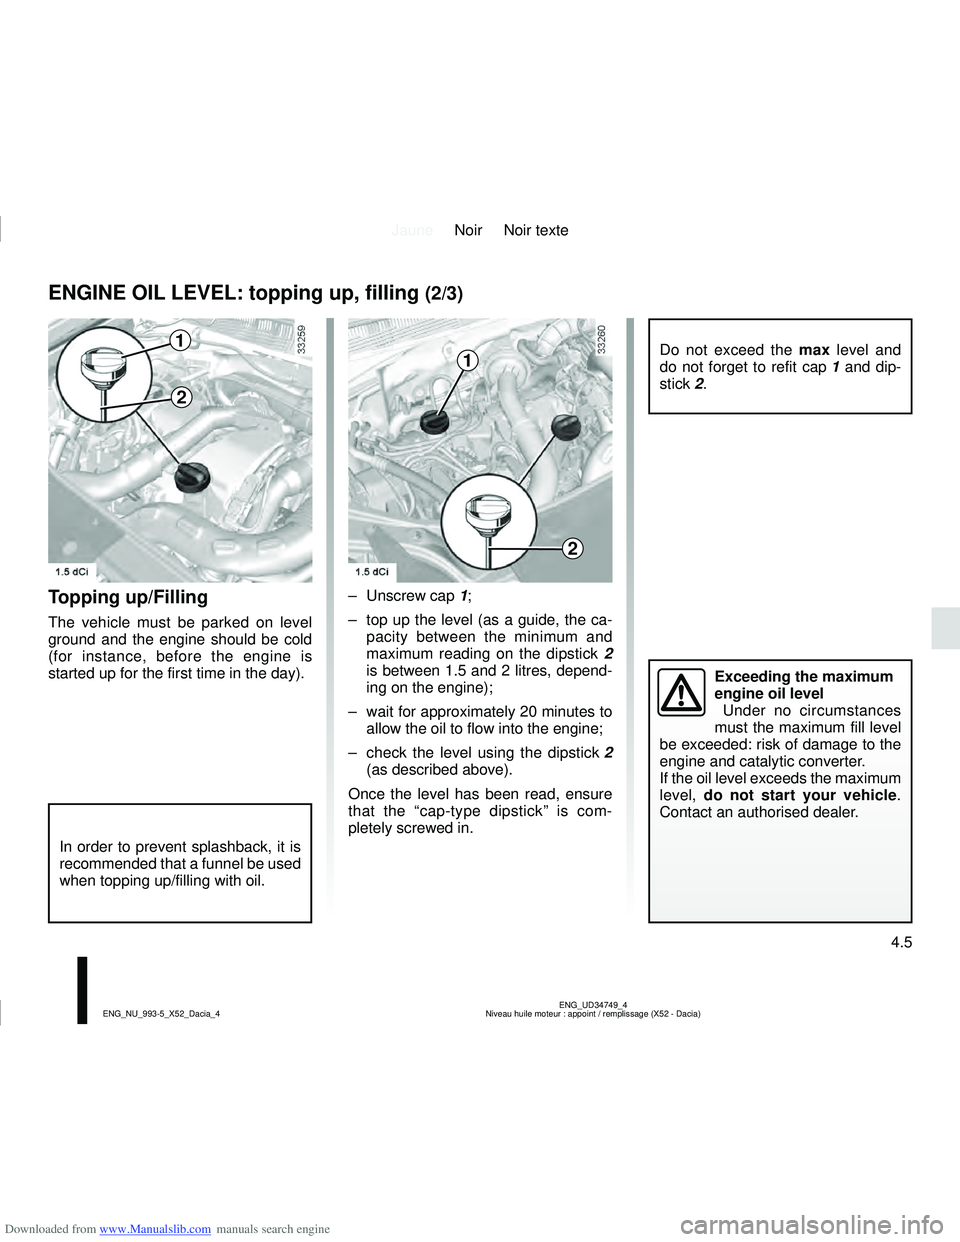
Topping up/Filling
The vehicle must be parked on level
ground and the engine should be cold
(for instance, before the engine is
started up for the first time in the day). – Unscrew cap 1;
– top up the level (as a guide, the ca-
pacity between the minimum and
maximum reading on the dipstick 2
is between 1.5 and 2 litres, depend-
ing on the engine);
– wait for approximately 20 minutes to allow the oil to flow into the engine;
– check the level using the dipstick 2
(as described above).
Once the level has been read, ensure
that the “cap-type dipstick” is com-
pletely screwed in.
1
2
Do not exceed the max level and
do not forget to refit cap 1 and dip-
stick 2.
In order to prevent splashback, it is
recommended that a funnel be used
when topping up/filling with oil.
1
2
Exceeding the maximum
engine oil level
Under no circumstances
must the maximum fill level
be exceeded: risk of damage to the
engine and catalytic converter.
If the oil level exceeds the maximum
level, do not start your vehicle .
Contact an authorised dealer.
Page 160 of 238
Downloaded from www.Manualslib.com manuals search engine JauneNoir Noir texte
4.12
ENG_UD26972_1
Pressions de gonflage des pneumatiques à froid (X52 - Dacia)
ENG_NU_993-5_X52_Dacia_4
TYRE PRESSURE
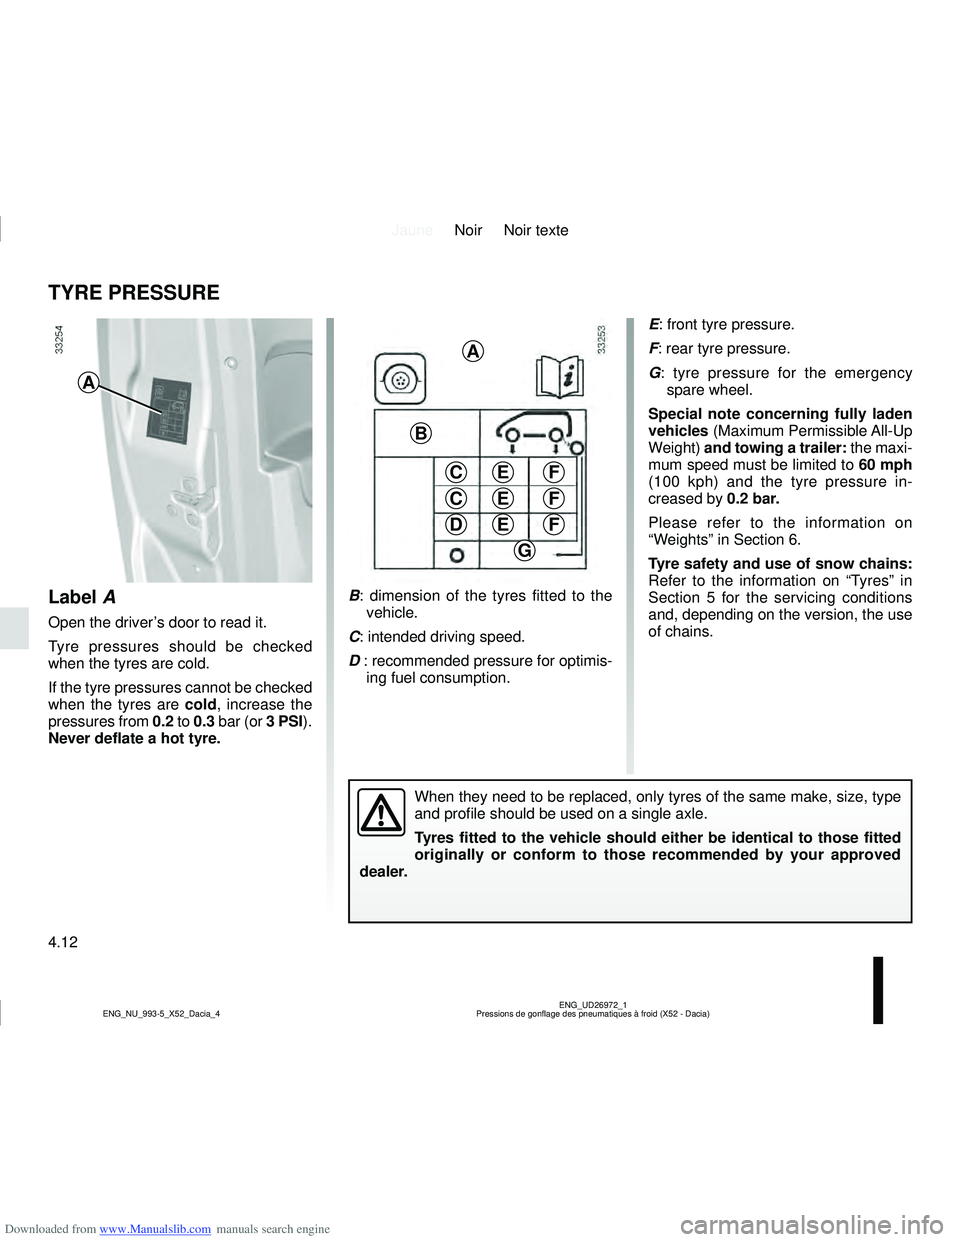
E: front tyre pressure.
F: rear tyre pressure.
G : tyre pressure for the emergency
spare wheel.
Special note concerning fully laden
vehicles (Maximum Permissible All-Up
Weight) and towing a trailer: the maxi-
mum speed must be limited to 60 mph
(100 kph) and the tyre pressure in-
creased by 0.2 bar.
Please refer to the information on
“Weights” in Section 6.
Tyre safety and use of snow chains:
Refer to the information on “Tyres” in
Section 5 for the servicing conditions
and, depending on the version, the use
of chains.
Label A
Open the driver’s door to read it.
Tyre pressures should be checked
when the tyres are cold.
If the tyre pressures cannot be checked
when the tyres are cold , increase the
pressures from 0.2 to 0.3 bar (or 3 PSI).
Never deflate a hot tyre. B
: dimension of the tyres fitted to the
vehicle.
C: intended driving speed.
D : recommended pressure for optimis- ing fuel consumption.
A
A
B
C
C
D
EF
FE
EF
G
When they need to be replaced, only tyres of the same make, size, type
and profile should be used on a single axle.
Tyres fitted to the vehicle should either be identical to those fitted
originally or conform to those recommended by your approved
dealer.
Page 162 of 238
 (X44 - X77 - J77 - X85 - \
B90 - X61 - TEST - X77 ph2 - X95")
Downloaded from www.Manualslib.com manuals search engine JauneNoir Noir texte
4.14
ENG_UD26811_2
Entretien de la carrosserie (peinture mate) (X44 - X77 - J77 - X85 - \
B90 - X61 - TEST - X77 ph2 - X95 - B95 - D95 - K95 - J95 - R95 - L90 Ph2 - F90 Ph2 - R90 Ph2 - X62
ENG_NU_993-5_X52_Dacia_4
Respect local regulations about wash-
ing vehicles (e.g. do not wash your ve-
hicle on a public highway).
Observe the vehicle stopping distances
when driving on gravelled surfaces to
prevent paint damage.
Repair, or have repaired quickly, areas
where the paint has been damaged, to
prevent corrosion spreading.
Remember to visit the body shop pe-
riodically in order to maintain your
anti-corrosion warranty. Refer to the
Maintenance Document.
If it is necessary to clean mechani-
cal components, hinges, etc., spray
them with products approved by our
Technical Department to protect them
after they have been cleaned.
BODYWORK MAINTENANCE (2/2)
We have selected special products
to care for your vehicle and you can
obtain these from the manufactur-
er’s accessory outlets.
Using a roller type car wash
Return the windscreen wiper stalk to
the Park position (refer to the informa-
tion on the “Windscreen washer, wiper”
in Section 1). Check the mounting of
external accessories, additional lights
and mirrors, and ensure that the wiper
blades are secured with adhesive tape.
Remove the radio aerial mast if your
vehicle is fitted with this equipment.
Remember to remove the tape and refit
the antenna after washing.
Cleaning the headlights
As the headlights are made of plastic
“glass”, use a soft cloth or cotton wool
to clean them. If this does not clean
them properly, moisten the cloth with
soapy water, then wipe clean with a soft
damp cloth or cotton wool.
Finally, carefully dry off with a soft dry
cloth.
Cleaning products containing alco-
hol must not be used.
Vehicles with a matte paint
finish
This type of paint requires certain pre-
cautions.
Do not do the following
– use wax-based products (polishing);
– rub hard;
– wash the vehicle in a roller-type car
wash;
– wash the vehicle using a high-pres-
sure device;
– attach stickers to the paintwork (risk
of leaving marks).
You should do the following
Wash the vehicle by hand using plenty
of water, using a soft cloth or a gentle
sponge.
Page 163 of 238

Downloaded from www.Manualslib.com manuals search engine JauneNoir Noir texte
4.15
ENG_UD22866_8
Entretien des garnitures intérieures (X35 - X45 - X65 - J77 - X81 - \
J81 - X85 - X91 - B91 - K91 - D91 - X83 - X61 - X77 ph2 - X95 - B95 - D95 - E95 - K95 - J95 - R95 -
ENG_NU_993-5_X52_Dacia_4
Glass instrument panel(e.g. instrument panel, clock, exterior
temperature display, radio display, etc.)
Use a soft cloth (or cotton wool).
If this does not clean it properly, use a
soft cloth (or cotton wool) slightly mois-
tened with soapy water and then wipe
clean with a soft damp cloth or cotton
wool.
Finally, carefully dry off with a soft dry
cloth.
Cleaning products containing alco-
hol must not be used under any cir-
cumstances.
Seat belts
These must be kept clean.
Use products selected by our Technical
Department (Approved outlets) or
warm, soapy water and a sponge and
wipe with a dry cloth.
Detergents or dyes must not be used
under any circumstances.
INTERIOR TRIM MAINTENANCE (1/2)
Textiles (seats, door trim, etc)
Vacuum-clean the textiles regularly.
Liquid stain
Use soapy water.
Dab lightly (never rub) with a soft cloth,
rinse and remove the excess.
Solid or pasty stain
Carefully remove the excess solid or
pasty material immediately with a
spatula (working from the edges to the
centre to avoid spreading the stain).
Clean as for a liquid stain.
Special instructions for sweets or
chewing gum
Put an ice cube on the stain to solidify
it, then proceed as for a solid stain.
A well-maintained vehicle will last
longer. It is therefore recommended to
maintain the interior of the vehicle regu-
larly.
A stain should always be dealt with
swiftly.
Whatever type of stain is on the trim,
use
cold (or warm) soapy water with
natural soap.
Detergents (washing-up liquid, pow-
dered products, alcohol-based prod-
ucts) should not be used.
Use a soft cloth.
Rinse and soak up the excess.
For further recommendations for
maintaining the interior, and/or for
any unsatisfactory results, please
see an authorised dealer.
Page 167 of 238

Downloaded from www.Manualslib.com manuals search engine JauneNoir Noir texte
5.3
ENG_UD28665_3
Kit de gonflage des pneumatiques (X77 - X85 - B85 - C85 - S85 - X77 ph2\
- K85 - X95 - E95 - X67 - X92 - X10 - X98 - X52 - Renault)
ENG_NU_993-5_X52_Dacia_5
TYRE PRESSURE KIT (1/3)
The kit is only approved for
inflating the tyres of the ve-
hicle originally equipped
with the kit.
It must never be used to inflate
the tyres of another vehicle, or any
other inflatable object (rubber ring,
rubber boat, etc.).
Avoid spillage on skin when han-
dling the repair liquid bottle. If drop-
lets do leak out, rinse them off with
plenty of water.
Keep the repair kit away from chil-
dren.
Do not dispose of the empty bottle
in the countryside. Return it to your
approved dealer or to a recycling or-
ganisation.
The bottle has a limited service
life which is indicated on its label.
Check the expiry date.
Contact an approved dealer to re-
place the inflation tube and repair
product bottle.
A
B
The kit repairs tyres when
tread A has been dam-
aged by objects smaller
than 4 mm. It cannot repair
all types of puncture, such as cuts
larger than 4 mm, or cuts in tyre
sidewall B.
Ensure also that the wheel rim is in
good condition.
Do not pull out the foreign body
causing the puncture if it is still in
the tyre.
Do not attempt to use the
inflation kit if the tyre has
been damaged as a result
of driving with a puncture.
You should therefore carefully check
the condition of the tyre sidewalls
before any operation.
Driving with underinflated, flat or
punctured tyres can be dangerous
and may make the tyre impossible
to repair.
This repair is temporary
A tyre which has been punctured
should always be inspected (and re-
paired, where possible) as soon as
possible by a specialist.
When taking a tyre which has been
repaired using this kit to be replaced,
you must inform the specialist.
When driving, vibration may be felt
due to the presence of the repair
product injected into the tyre.
Page 175 of 238
Downloaded from www.Manualslib.com manuals search engine JauneNoir Noir texte
5.11
ENG_UD26982_1
Pneumatiques (X52 - Dacia)ENG_NU_993-5_X52_Dacia_5
TYRES (1/3)
Tyre and wheel safety
The tyres are the only contact between
the vehicle and the road, so it is essen-
tial to keep them in good condition.
You must make sure that your tyres
conform to local road traffic regulations.
When they need to be re-
placed, only tyres of the
same make, size, type and
profile should be used.
Tyres fitted to the vehicle should
either be identical to those fitted
originally or conform to those
recommended by your approved
Dealer.
Maintaining the tyres
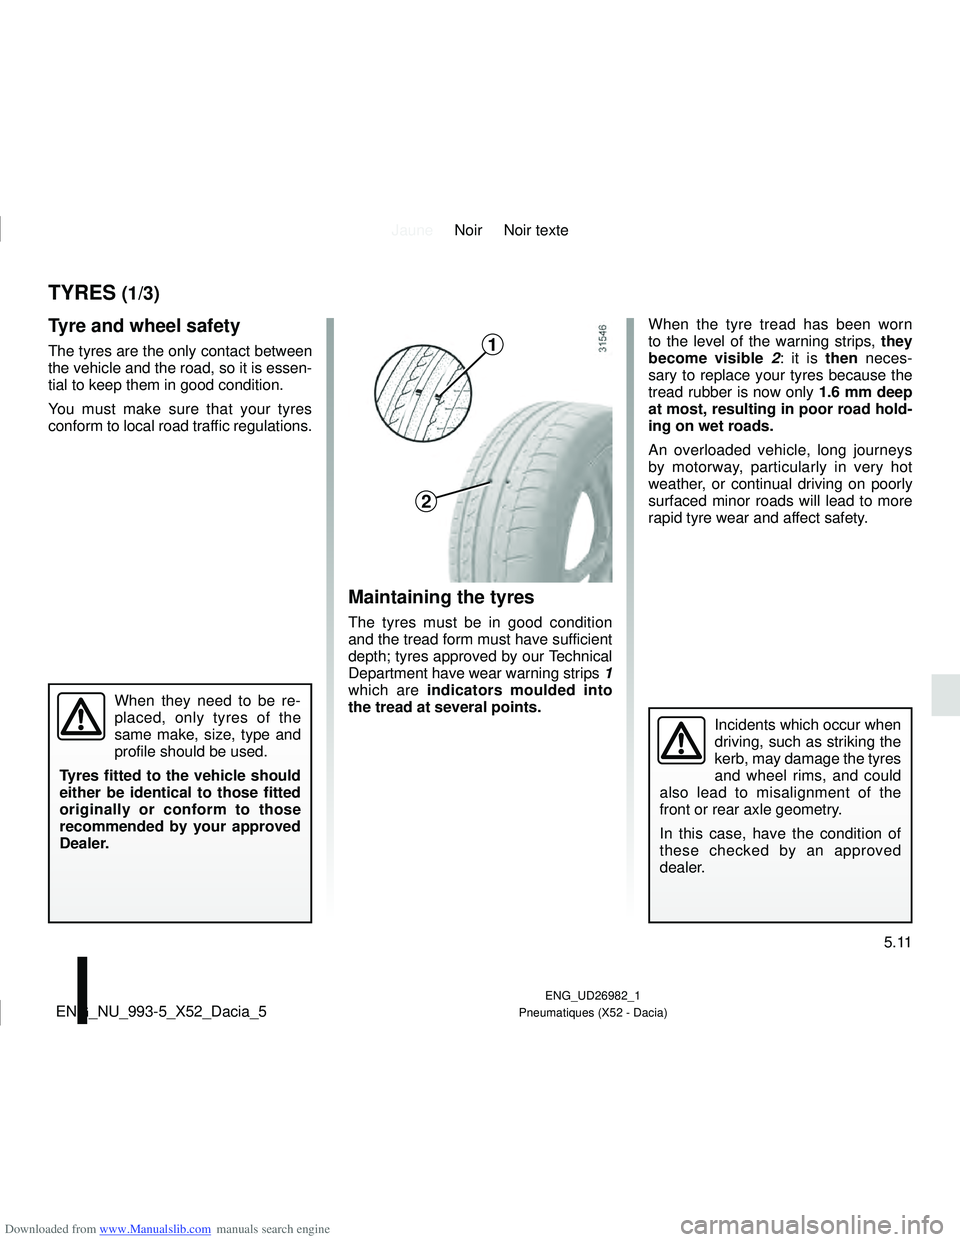
The tyres must be in good condition
and the tread form must have sufficient
depth; tyres approved by our Technical
Department have wear warning strips 1
which are indicators moulded into
the tread at several points. When the tyre tread has been worn
to the level of the warning strips, they
become visible
2: it is then neces-
sary to replace your tyres because the
tread rubber is now only 1.6 mm deep
at most, resulting in poor road hold-
ing on wet roads.
An overloaded vehicle, long journeys
by motorway, particularly in very hot
weather, or continual driving on poorly
surfaced minor roads will lead to more
rapid tyre wear and affect safety.
Incidents which occur when
driving, such as striking the
kerb, may damage the tyres
and wheel rims, and could
also lead to misalignment of the
front or rear axle geometry.
In this case, have the condition of
these checked by an approved
dealer.
1
2
Page 177 of 238
Downloaded from www.Manualslib.com manuals search engine JauneNoir Noir texte
5.13
ENG_UD26982_1
Pneumatiques (X52 - Dacia)ENG_NU_993-5_X52_Dacia_5
Use in winter
Chains
For safety reasons, fitting snow
chains to the rear axle is strictly for-
bidden.
Chains must not be fitted to tyres
which are larger than those originally
fitted to the vehicle.
TYRES (3/3)
Snow or Winter tyres
We would recommend that these be
fitted to all four wheels to ensure that
your vehicle retains maximum adhe-
sion.
Warning: These tyres sometimes
have a specific direction of rotation
and a maximum speed index which
may be lower than the maximum
speed of your vehicle.
Studded tyres
This type of equipment may only be
used for a limited period and as laid
down by local legislation.
It is necessary to observe the speed
specified by current legislation.
These tyres must, at a minimum, be
fitted to the two front wheels.
In all cases, we would recommend
that you contact your approved
Dealer who will be able to advise
you on the choice of equipment
which is most suitable for your ve-
hicle.
Chains may only be fitted
to tyres of the same size
as those originally fitted to
your vehicle.
Only certain chains can be fitted to
tyres. Please contact an authorised
dealer.
Page 178 of 238
Downloaded from www.Manualslib.com manuals search engine JauneNoir Noir texte
5.14
ENG_UD32716_2
Feux avant : remplacement des lampes (X52 - Dacia)
ENG_NU_993-5_X52_Dacia_5
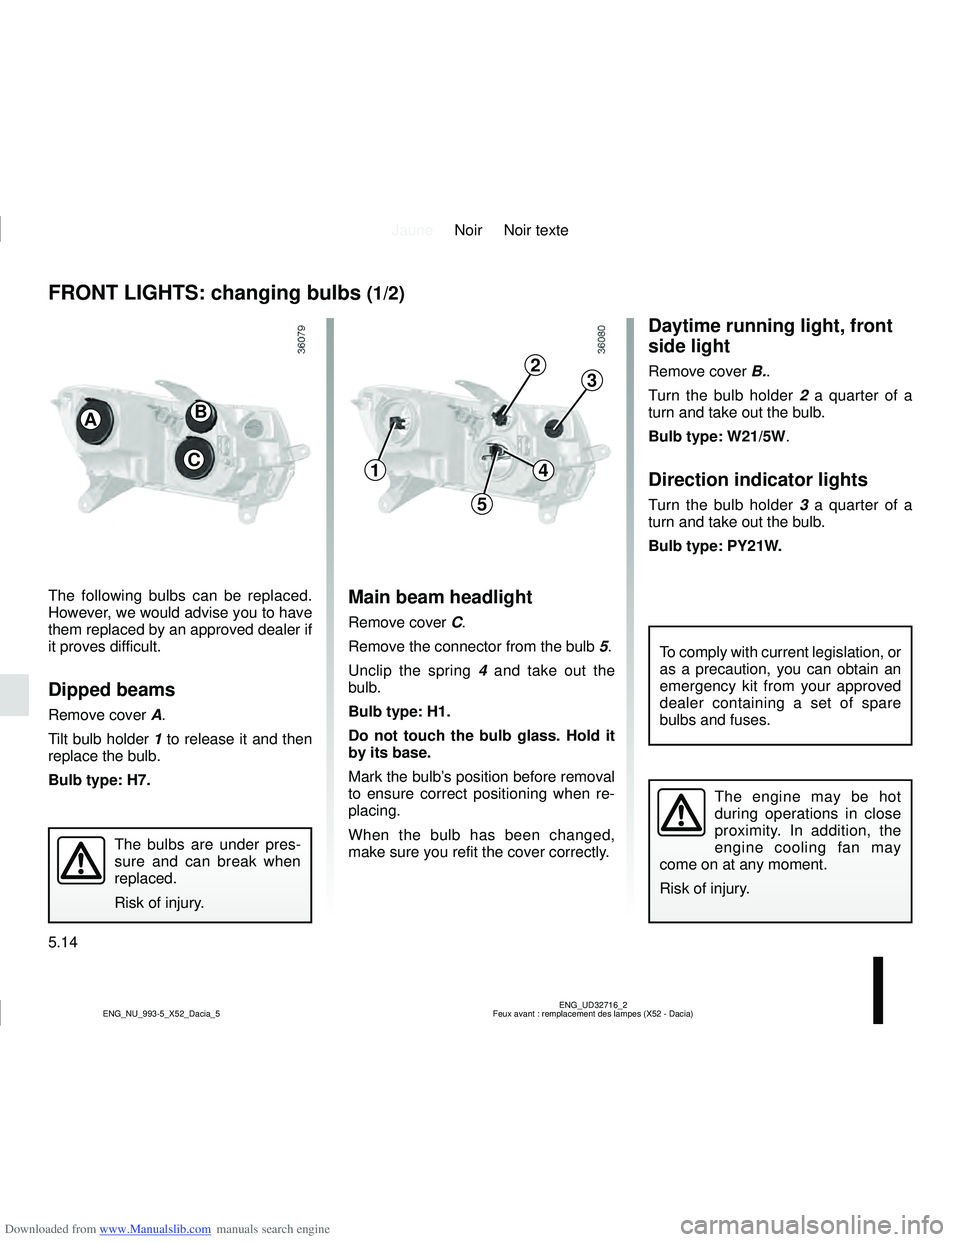
Daytime running light, front
side light
Remove cover B..
Turn the bulb holder 2 a quarter of a
turn and take out the bulb.
Bulb type: W21/5W.
Direction indicator lights
Turn the bulb holder 3 a quarter of a
turn and take out the bulb.
Bulb type: PY21W.
The following bulbs can be replaced.
However, we would advise you to have
them replaced by an approved dealer if
it proves difficult.
Dipped beams
Remove cover A.
Tilt bulb holder 1 to release it and then
replace the bulb.
Bulb type: H7.
The engine may be hot
during operations in close
proximity. In addition, the
engine cooling fan may
come on at any moment.
Risk of injury.
The bulbs are under pres-
sure and can break when
replaced.
Risk of injury.
Main beam headlight
Remove cover C.
Remove the connector from the bulb 5.
Unclip the spring 4 and take out the
bulb.
Bulb type: H1.
Do not touch the bulb glass. Hold it
by its base.
Mark the bulb’s position before removal
to ensure correct positioning when re-
placing.
When the bulb has been changed,
make sure you refit the cover correctly.
FRONT LIGHTS: changing bulbs (1/2)
4C
AB
1
5
23
To comply with current legislation, or
as a precaution, you can obtain an
emergency kit from your approved
dealer containing a set of spare
bulbs and fuses.
Page 179 of 238
Downloaded from www.Manualslib.com manuals search engine JauneNoir Noir texte
5.15
ENG_UD32716_2
Feux avant : remplacement des lampes (X52 - Dacia)
ENG_NU_993-5_X52_Dacia_5
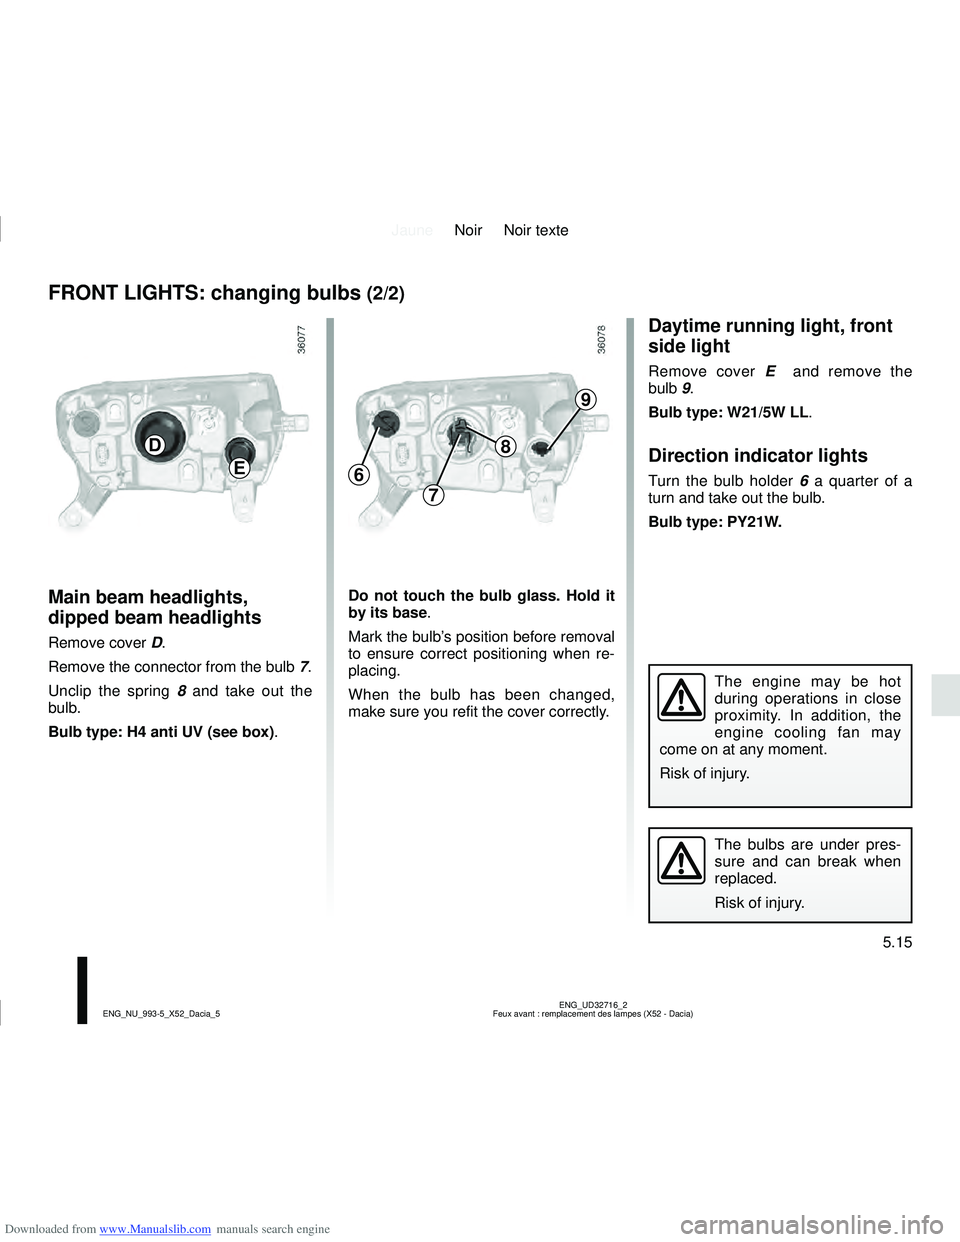
Main beam headlights,
dipped beam headlights
Remove cover D.
Remove the connector from the bulb 7.
Unclip the spring 8 and take out the
bulb.
Bulb type: H4 anti UV (see box).
The engine may be hot
during operations in close
proximity. In addition, the
engine cooling fan may
come on at any moment.
Risk of injury.
The bulbs are under pres-
sure and can break when
replaced.
Risk of injury.
Do not touch the bulb glass. Hold it
by its base.
Mark the bulb’s position before removal
to ensure correct positioning when re-
placing.
When the bulb has been changed,
make sure you refit the cover correctly.
FRONT LIGHTS: changing bulbs (2/2)
Daytime running light, front
side light
Remove cover E and remove the
bulb 9.
Bulb type: W21/5W LL .
Direction indicator lights
Turn the bulb holder 6 a quarter of a
turn and take out the bulb.
Bulb type: PY21W.
8
6
9
E
D
7