trim DACIA SANDERO STEPWAY 2016 2.G Owners Manual
[x] Cancel search | Manufacturer: DACIA, Model Year: 2016, Model line: SANDERO STEPWAY, Model: DACIA SANDERO STEPWAY 2016 2.GPages: 174, PDF Size: 2.78 MB
Page 99 of 174
4.1
ENG_UD26896_12
Sommaire 4 (B90 - Dacia)
ENG_NU_817-10_B90_Dacia_4
Section 4: Maintenance
Bonnet . . . . . . . . . . . . . . . . . . . . . . . . . . . . . . . . . . . . . . . . . . . . . . . . . . . . . . . . . . . . . . . . . . . . . . . . 4.2
Engine oil level: general information
.
. . . . . . . . . . . . . . . . . . . . . . . . . . . . . . . . . . . . . . . . . . . . . . . .
4.4
Engine oil level: topping up, filling
. . . . . . . . . . . . . . . . . . . . . . . . . . . . . . . . . . . . . . . . . . . . . . . . . . .
4.5
Engine oil change
.
. . . . . . . . . . . . . . . . . . . . . . . . . . . . . . . . . . . . . . . . . . . . . . . . . . . . . . . . . . . . . .
4.6
Levels:
.
. . . . . . . . . . . . . . . . . . . . . . . . . . . . . . . . . . . . . . . . . . . . . . . . . . . . . . . . . . . . . . . . . . . . . .
4.7
Brake fluid
.
. . . . . . . . . . . . . . . . . . . . . . . . . . . . . . . . . . . . . . . . . . . . . . . . . . . . . . . . . . . . . .
4.7
Engine coolant
. . . . . . . . . . . . . . . . . . . . . . . . . . . . . . . . . . . . . . . . . . . . . . . . . . . . . . . . . . . .
4.8
Windscreen washer reservoir
. . . . . . . . . . . . . . . . . . . . . . . . . . . . . . . . . . . . . . . . . . . . . . . . .
4.8
Power-assisted steering fluid reservoir
.
. . . . . . . . . . . . . . . . . . . . . . . . . . . . . . . . . . . . . . . .
4.9
Filters
. . . . . . . . . . . . . . . . . . . . . . . . . . . . . . . . . . . . . . . . . . . . . . . . . . . . . . . . . . . . . . . . . . . . . . . . .
4.10
T
yre pressure. . . . . . . . . . . . . . . . . . . . . . . . . . . . . . . . . . . . \
. . . . . . . . . . . . . . . . . . . . . . . . . . . . . . .
4.1
1
Battery
. . . . . . . . . . . . . . . . . . . . . . . . . . . . . . . . . . . . . . . . . . . . . . . . . . . . . . . . . . . . . . . . . . . . . . . .
4.12
Bodywork maintenance
. . . . . . . . . . . . . . . . . . . . . . . . . . . . . . . . . . . . . . . . . . . . . . . . . . . . . . . . . . .
4.13
Interior trim maintenance
. . . . . . . . . . . . . . . . . . . . . . . . . . . . . . . . . . . . . . . . . . . . . . . . . . . . . . . . . .
4.15
Page 113 of 174
maintenance:interior trim ...................................... (up to the end of the DU)
interior trim maintenance ................................... (up to the end of the DU)
4.15
ENG_UD22288_6
Entretien des garnitures intérieures (B90 - U90 - L90 Ph2 - F90 Ph2 \
- R90 Ph2 - H79 - Dacia)
ENG_NU_817-10_B90_Dacia_4
Glass instrument panel(e.g.: instrument panel, clock, exterior
temperature display, radio display).
Use a soft or cotton cloth. If this does
not clean them properly, use a soft cloth
(or cotton wool) slightly moistened with
soapy water and then wipe clean with
another damp soft or cotton cloth.
Finally, dry off carefully with a soft dry
cloth.
Cleaning products containing alco-
hol must not be used under any cir-
cumstances.
Seat belts
These must be kept clean. Use products
selected by our Technical Department
or warm, soapy water and a sponge
and wipe with a dry cloth.
d
etergents or dyes must not be used
under any circumstances.
Interior trim maintenance
INTERIOR TRIM MAINTENANCE (1/2)
A well-maintained vehicle will have a
longer service life. It is therefore ad-
visable to maintain the vehicle interior
regularly.
Stains should always be dealt with
quickly. Whatever type of stain is on
the trim, use soapy water (if possible,
warm water) containing:
do
not use detergents (washing up
liquid, powdered products, alcohol-
based products, etc.).
Use a soft cloth.
Rinse and soak up the excess.Fabrics (seats, door trim,
etc.)
Dust fabrics regularly.
Liquid stains
Use soapy water.
Dab lightly (never rub) with a soft cloth,
rinse and remove the excess.
Solid or thick stains
Remove any excess solid or thick ma-
terial immediately and carefully using
a spatula (from the edge inwards to
avoid spreading the stain).
Clean using the procedure for a liquid
stain.
Special instructions for sweets or
chewing gum
Put an ice cube on the stain to solidify
it, then proceed as for a solid stain.
For advice on interior maintenance
and/or on unsatisfactory results,
contact an approved dealer.
Page 114 of 174
4.16
ENG_UD22288_6
Entretien des garnitures intérieures (B90 - U90 - L90 Ph2 - F90 Ph2 \
- R90 Ph2 - H79 - Dacia)
ENG_NU_817-10_B90_Dacia_4
Removing/refitting factory
fitted removable equipment
in the vehicle
If you need to remove equipment to
clean the passenger compartment (e.g.
mats), always make you refit it properly
and on the correct side (driver’s side
mats must be fitted on the driver’s side,
etc.), using retaining components sup-
plied with the equipment (e.g. the driv-
er’s side mat must always be secured
using prefitted retaining devices).
In all cases, with the vehicle stationary,
ensure that nothing can hinder driving
(obstacle underneath the pedals, heel
trapped by the mat, etc.).
What you should not do
You are strongly advised not to place
items such as air fresheners, perfume
etc. near the air vents as these could
damage the dashboard fittings.
INTERIOR TRIM MAINTENANCE (2/2)
You are strongly recom-
mended not to use high-
pressure or spray cleaning
equipment inside the pas-
senger compartment: this equip-
ment could impair the correct func-
tioning of the electrical or electronic
components in the vehicle, or have
other detrimental effects.
Page 115 of 174
5.1
ENG_UD26897_12
Sommaire 5 (B90 - Dacia)
ENG_NU_817-10_B90_Dacia_5
Section 5: Practical advice
Tools .. . . . . . . . . . . . . . . . . . . . . . . . . . . . . . . . . . . . . . . . . . . . . . . . . . . . . . . . . . . . . . . . . . . . . . . . 5.2
Puncture
.
. . . . . . . . . . . . . . . . . . . . . . . . . . . . . . . . . . . . . . . . . . . . . . . . . . . . . . . . . . . . . . . . . . . . .
5.3
T
yre inflation kit
.
. . . . . . . . . . . . . . . . . . . . . . . . . . . . . . . . . . . . . . . . . . . . . . . . . . . . . . . . . . . . . . . .
5.4
Wheel trims, Wheels
. . . . . . . . . . . . . . . . . . . . . . . . . . . . . . . . . . . . . . . . . . . . . . . . . . . . . . . . . . . . .
5.7
Changing a wheel
.
. . . . . . . . . . . . . . . . . . . . . . . . . . . . . . . . . . . . . . . . . . . . . . . . . . . . . . . . . . . . . .
5.9
T
yres (tyre and wheel safety, use in winter)
.
. . . . . . . . . . . . . . . . . . . . . . . . . . . . . . . . . . . . . . . . . .
5.1
1
Changing bulbs
.
. . . . . . . . . . . . . . . . . . . . . . . . . . . . . . . . . . . . . . . . . . . . . . . . . . . . . . . . . . . . . . . .
5.14
Front lights
. . . . . . . . . . . . . . . . . . . . . . . . . . . . . . . . . . . . . . . . . . . . . . . . . . . . . . . . . . . . . . .
5.14
Fog lights
.
. . . . . . . . . . . . . . . . . . . . . . . . . . . . . . . . . . . . . . . . . . . . . . . . . . . . . . . . . . . . . . .
5.15
Rear lights
.
. . . . . . . . . . . . . . . . . . . . . . . . . . . . . . . . . . . . . . . . . . . . . . . . . . . . . . . . . . . . . .
5.16
Side indicator lights
.
. . . . . . . . . . . . . . . . . . . . . . . . . . . . . . . . . . . . . . . . . . . . . . . . . . . . . . .
5.18
Interior lights
. . . . . . . . . . . . . . . . . . . . . . . . . . . . . . . . . . . . . . . . . . . . . . . . . . . . . . . . . . . . . .
5.19
Fuses
. . . . . . . . . . . . . . . . . . . . . . . . . . . . . . . . . . . . . . . . . . . . . . . . . . . . . . . . . . . . . . . . . . . . . . . . .
5.22
Battery
. . . . . . . . . . . . . . . . . . . . . . . . . . . . . . . . . . . . . . . . . . . . . . . . . . . . . . . . . . . . . . . . . . . . . . . .
5.25
Radio frequency remote control unit: battery. . . . . . . . . . . . . . . . . . . . . . . . . . . . . . . . . . . . \
. . . . . . .
5.27
Wiper blades
.
. . . . . . . . . . . . . . . . . . . . . . . . . . . . . . . . . . . . . . . . . . . . . . . . . . . . . . . . . . . . . . . . . .
5.28
T
owing: breakdown
.
. . . . . . . . . . . . . . . . . . . . . . . . . . . . . . . . . . . . . . . . . . . . . . . . . . . . . . . . . . . . .
5.29
T
owing: towbar. . . . . . . . . . . . . . . . . . . . . . . . . . . . . . . . . . . . \
. . . . . . . . . . . . . . . . . . . . . . . . . . . . . .
5.31
Fitted audio equipment
.
. . . . . . . . . . . . . . . . . . . . . . . . . . . . . . . . . . . . . . . . . . . . . . . . . . . . . . . . . .
5.32
Accessories
. . . . . . . . . . . . . . . . . . . . . . . . . . . . . . . . . . . . . . . . . . . . . . . . . . . . . . . . . . . . . . . . . . . .
5.33
Operating faults
. . . . . . . . . . . . . . . . . . . . . . . . . . . . . . . . . . . . . . . . . . . . . . . . . . . . . . . . . . . . . . . . .
5.34
Page 116 of 174
towing hitch........................................... (up to the end of the DU)
practical advice ..................................... (up to the end of the DU)
jack ....................................................... (up to the end of the DU)
lifting the vehicle changing a wheel ............................ (up to the end of the DU)
wheelbrace ........................................... (up to the end of the DU)
5.2
ENG_UD22588_6
Outils (B90 - Dacia)
ENG_NU_817-10_B90_Dacia_5
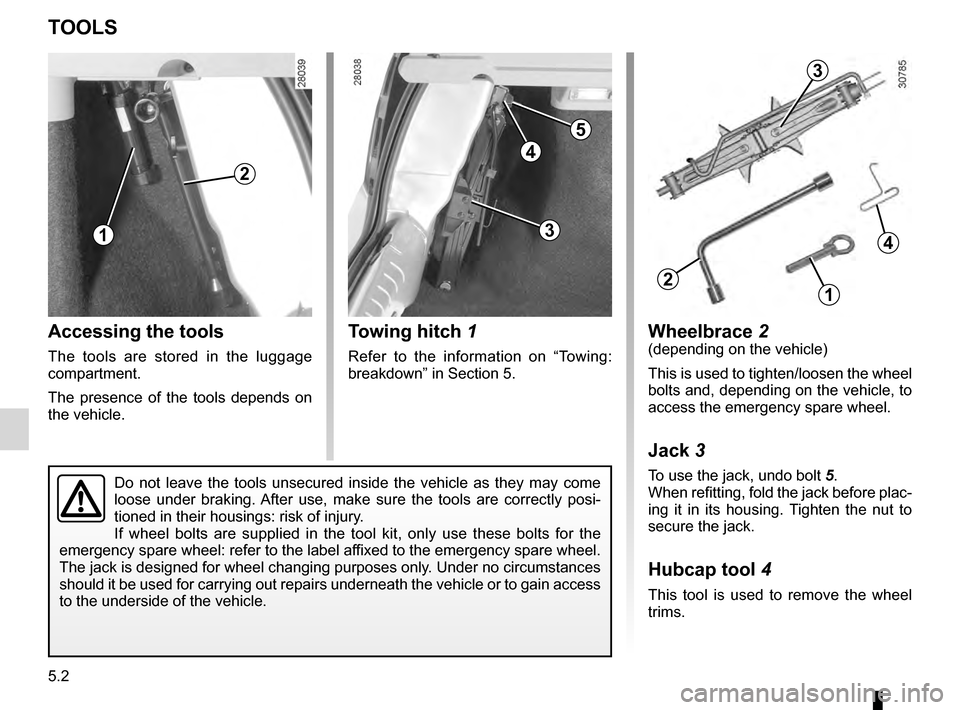
Accessing the tools
The tools are stored in the luggage
compartment.
The presence of the tools depends on
the vehicle.
Towing hitch 1
Refer to the information on “Towing:
breakdown” in Section 5.
Tools
TOOLS
Wheelbrace 2(depending on the vehicle)
This is used to tighten/loosen the wheel
bolts and, depending on the vehicle, to
access the emergency spare wheel.
Jack 3
To use the jack, undo bolt 5 .
When refitting, fold the jack before plac-
ing it in its housing. Tighten the nut to
secure the jack.
Hubcap tool 4
This tool is used to remove the wheel
trims.
2
13
5
4
Do not leave the tools unsecured inside the vehicle as they may come
loose under braking. After use, make sure the tools are correctly posi-
tioned in their housings: risk of injury.
If wheel bolts are supplied in the tool kit, only use these bolts for the
emergency spare wheel: refer to the label affixed to the emergency spare wheel.
The jack is designed for wheel changing purposes only. Under no circumstances
should it be used for carrying out repairs underneath the vehicle or to gain access
to the underside of the vehicle.
3
4
21
Page 121 of 174
practical advice ..................................... (up to the end of the DU)
trims ...................................................... (up to the end of the DU)
lifting the vehicle changing a wheel ............................ (up to the end of the DU)
5.7
ENG_UD20461_5
Enjoliveurs - Jantes (B90 - Dacia)
ENG_NU_817-10_B90_Dacia_5
Wheel trim/Wheels
WHEEL TRIM/WHEELS (1/2)
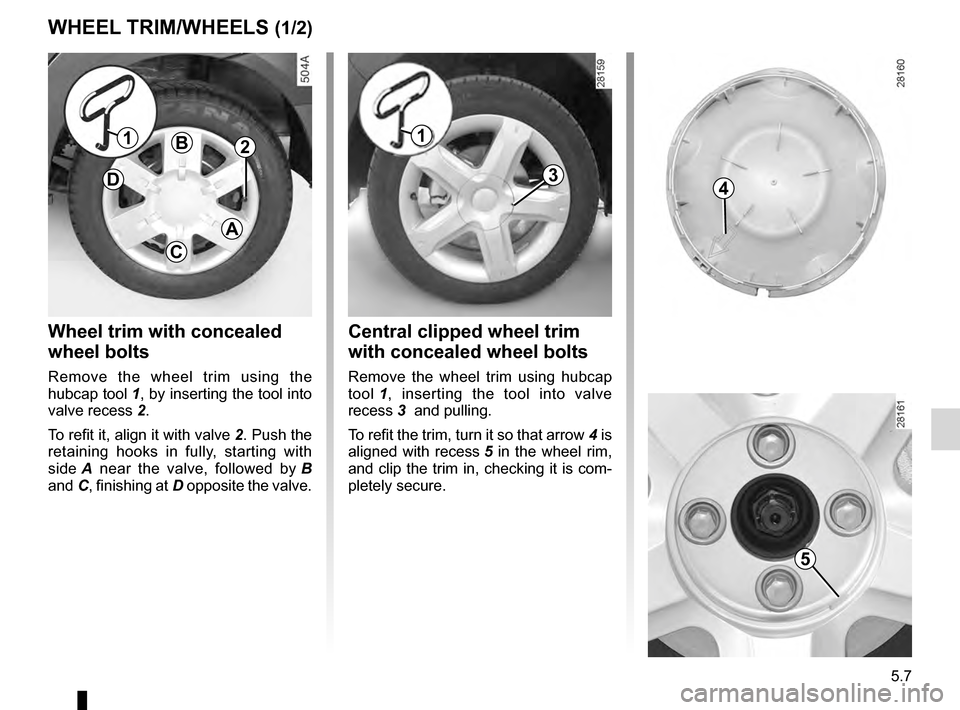
Wheel trim with concealed
wheel bolts
Remove the wheel trim using the
hubcap tool
1, by inserting the tool into
valve recess
2.
To refit it, align it with valve
2. Push the
retaining hooks in fully, starting with
side
A
near the valve, followed by
B
and
C, finishing at D opposite the valve.
B
D
C
A
121
3
Central clipped wheel trim
with concealed wheel bolts
Remove the wheel trim using hubcap
tool 1,
inserting the tool into valve
recess
3 and pulling.
To refit the trim, turn it so that arrow
4 is
aligned with recess
5 in the wheel rim,
and clip the trim in, checking it is com-
pletely secure.
5
4
Page 122 of 174
5.8
ENG_UD20461_5
Enjoliveurs - Jantes (B90 - Dacia)
ENG_NU_817-10_B90_Dacia_5
WHEEL TRIM/WHEELS (2/2)
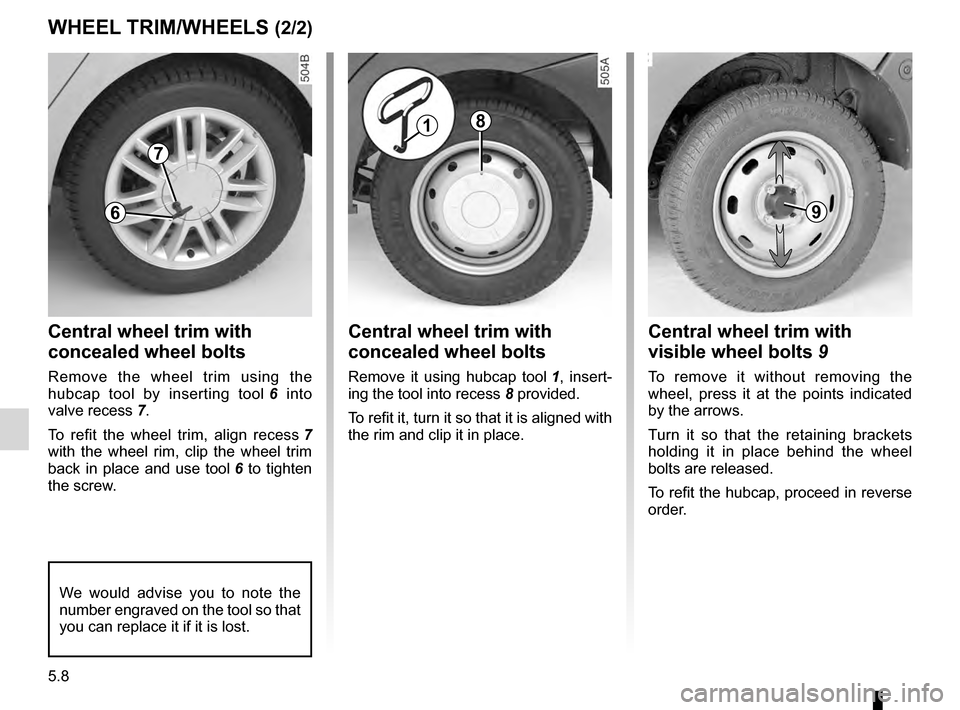
Central wheel trim with
concealed wheel bolts
Remove it using hubcap tool 1 , insert-
ing the tool into recess 8 provided.
To refit it, turn it so that it is aligned with
the rim and clip it in place.
Central wheel trim with
visible wheel bolts
9
To remove it without removing the
wheel, press it at the points indicated
by the arrows.
Turn it so that the retaining brackets
holding it in place behind the wheel
bolts are released.
To refit the hubcap, proceed in reverse
order.
18
9
Central wheel trim with
concealed wheel bolts
Remove the wheel trim using the
hubcap tool by inserting tool 6
into
valve recess
7.
To refit the wheel trim, align recess
7
with the wheel rim, clip the wheel trim
back in place and use tool
6 to tighten
the screw.
7
We would advise you to note the
number engraved on the tool so that
you can replace it if it is lost.
6
Page 123 of 174
changing a wheel.................................. (up to the end of the DU)
practical advice ..................................... (up to the end of the DU)
jack ....................................................... (up to the end of the DU)
puncture................................................ (up to the end of the DU)
lifting the vehicle changing a wheel ............................ (up to the end of the DU)
5.9
ENG_UD20462_6
Changement de roue (B90 - Dacia)
ENG_NU_817-10_B90_Dacia_5
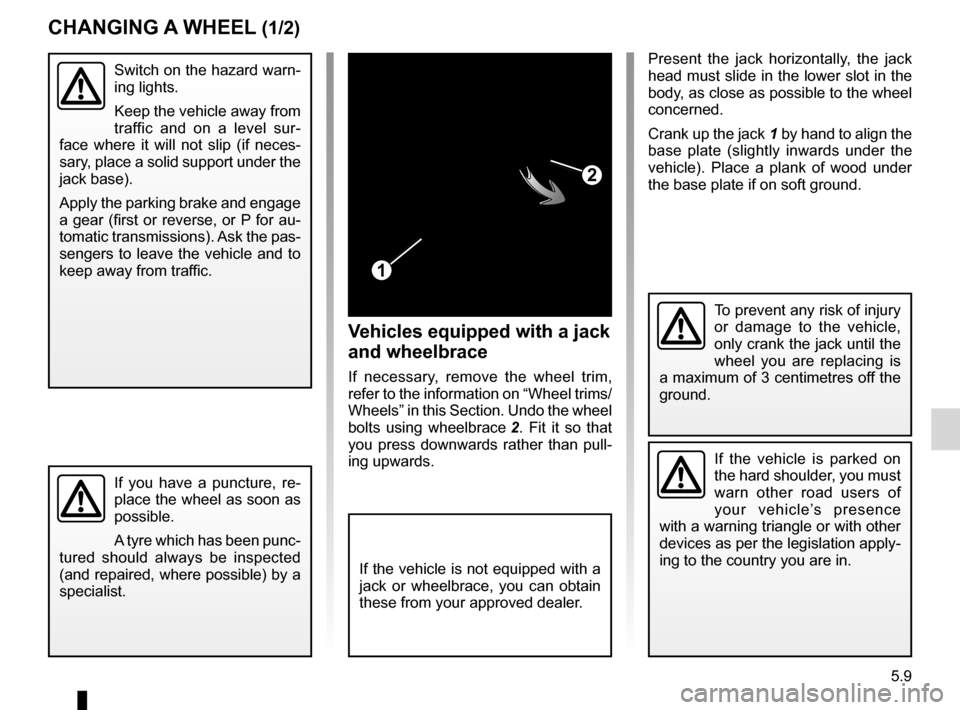
Present the jack horizontally, the jack
head must slide in the lower slot in the
body, as close as possible to the wheel
concerned.
Crank up the jack
1 by hand to align the
base plate (slightly inwards under the
vehicle). Place a plank of wood under
the base plate if on soft ground.
Changing a wheel
Switch on the hazard warn-
ing lights.
Keep the vehicle away from
traffic and on a level sur-
face where it will not slip (if neces-
sary, place a solid support under the
jack base).
Apply the parking brake and engage
a gear (first or reverse, or P for au-
tomatic transmissions). Ask the pas-
sengers to leave the vehicle and to
keep away from traffic.
If you have a puncture, re-
place the wheel as soon as
possible.
A tyre which has been punc-
tured should always be inspected
(and repaired, where possible) by a
specialist.
2
1
Vehicles equipped with a jack
and wheelbrace
If necessary, remove the wheel trim,
refer to the information on “Wheel trims/
Wheels” in this Section. Undo the wheel
bolts using wheelbrace
2 .
Fit it so that
you press downwards rather than pull-
ing upwards.
To prevent any risk of injury
or damage to the vehicle,
only crank the jack until the
wheel you are replacing is
a maximum of 3 centimetres off the
ground.
If the vehicle is parked on
the hard shoulder, you must
warn other road users of
your vehicle’s presence
with a warning triangle or with other
devices as per the legislation apply-
ing to the country you are in.
CHANGING A WHEEL (1/2)
If the vehicle is not equipped with a
jack or wheelbrace, you can obtain
these from your approved dealer.
Page 154 of 174
technical specifications ......................... (up to the end of the DU)
vehicle identification ............................. (up to the end of the DU)
paintwork reference .......................................................... (current page)
vehicle identification plates ................... (up to the end of the DU)
6.2
ENG_UD26578_7
Plaques identification (B90 - Dacia)
ENG_NU_817-10_B90_Dacia_6
Jaune NoirNoir texte
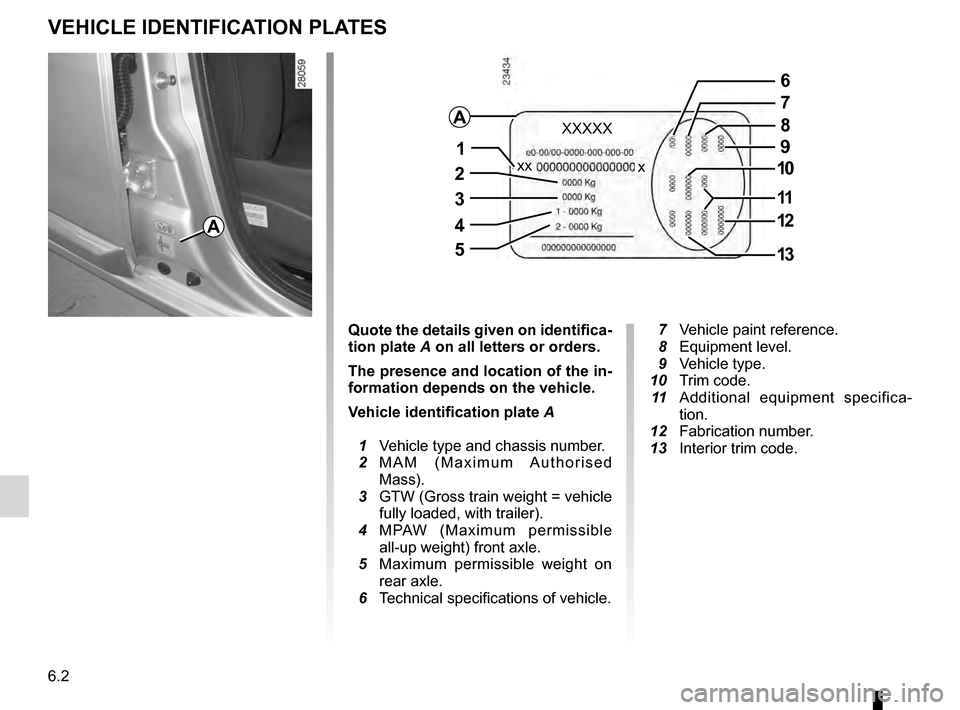
Vehicle identification plates
Quote the details given on identifica-
tion plate A on all letters or orders.
The presence and location of the in-
formation depends on the vehicle.
Vehicle identification plate
A
1
V
ehicle type and chassis number.
2
M
A M ( M a x i m u m A u t h o r i s e d
Mass).
3
GTW
(Gross train weight = vehicle
fully loaded, with trailer).
4
M
PAW (Maximum permissible
all-up weight) front axle.
5
M
aximum permissible weight on
rear axle.
6
T
echnical specifications of vehicle. 7 V ehicle paint reference. 8
Equipment l evel.
9
V
ehicle type.
10
T
rim code.
1
1
A
dditional equipment specifica-
tion.
12
Fabrication
number.
13
Interior trim code.
A
6
7
8
9
10
11
12
13
XXXXX
xxx1
2
3
4
5
A
VEHICLE IDENTIFICATION PLATES
Page 172 of 174
7.2
FRA_UD26899_12
Index (B90 - Dacia)
ENG_NU_817-10_B90_Dacia_7
Jaune NoirNoir texte
AlphAbeticAl index (2/4)
engine oil grade .......................................................... 4.5 – 4.6
engine specifications ........................................................... 6.4
environment ........................................................................\
. 2.9
F
faults operating faults
......
.......................................... 5.34 → 5.38
filter
........................................................................\
............ 4.10
air filter
......
................................................................... 4.10
diesel filter
.......
.................................................... 1.58,
4.10
oil filter
......
..................................................................... 4.6
particle filter
......
............................................................. 2.5
passenger compartment filter
......
................................ 4.10
fitting a radio
...................................................................... 5.32
fittings
..................................................................... 3.15
– 3.16
fog lights
........................................................................\
.... 1.50
front passenger air bag deactivation ................................. 1.32
front seat adjustment
........................................................... 1.9
front seats adjustment
......
............................................................... 1.9
fuel advice on fuel economy
......
.................................2.6 → 2.8
grade
.......
.............................................................. 1.56,
6.4
fuel economy
............................................................. 2.6 → 2.8
fuel filler cap ...................................................................... 1.56
fuel grade........................................................................\
... 1.56
fuel level
........................................................................\
.... 1.44
fuel priming bulb ................................................................ 1.58
fuel tank
................................................................. 1.56 → 1.58
fuel tank capacity ............................................................... 1.56
fuses
...................................................................... 5.22 → 5.24
G
gear lever........................................................................\
... 2.10
glove box
........................................................................\
... 3.15
grab handle........................................................................\
3.13
hhandbrake........................................................................\
.. 2.1 1
hands-free telephone integrated control
............................ 3.22
hazard warning lights signal .............................................. 1.52
headlight beam adjustment ............................................... 1.51
headlight flashers .............................................................. 1.52
headrest...................................................................... 1.8,
3.17
heating and air conditioning system
................... 3.2 → 3.5,
3.9
heating system
.......................................................... 3.2 → 3.9
horn
........................................................................\
........... 1.52
iignition switch ...................................................................... 2.2
indicator lights.................................................................... 5.18
indicators
.................................................................. 1.52,
5.14
indicators: direction indicators
.......
................................................ 1.52
instrument panel
.................................................... 1.40 → 1.44
interior trim maintenance
......
............................................... 4.15 – 4.16
J
jack
....................................................................5.2,
5.9 – 5.10
K
keys
........................................................................\
.... 1.2
– 1.3
replacing the battery
......
.............................................. 5.27
llevels ..................................................................4.4,
4.7 → 4.9
levels: engine oil
......
................................................................. 4.5
lifting the vehicle changing a wheel
.......
........................5.2 – 5.3,
5.7 → 5.10
lighting: exterior
.......
..................................1.49 – 1.50,
5.14 → 5.18