tailgate DAEWOO LACETTI 2004 Service Repair Manual
[x] Cancel search | Manufacturer: DAEWOO, Model Year: 2004, Model line: LACETTI, Model: DAEWOO LACETTI 2004Pages: 2643, PDF Size: 80.54 MB
Page 2299 of 2643

9D – 22IWIPERS/WASHER SYSTEMS
DAEWOO V–121 BL4
GENERAL DESCRIPTION
AND SYSTEM OPERATION
WINDSHIELD WIPER SYSTEM
The windshield wiper system consists of a wiper motor, a
linkage, a wiper arm and a blade, and a wiper/washer
switch. The windshield wiper circuit incorporates a self–
parking device which consists of a worm gear and a cam
plate in order to keep the circuit engaged temporarily when
the switch is turned off. The wiper system is driven by a
permanent magnet–type motor. The windshield wiper mo-
tor is mounted on the dash panel and is directly connected
to the windshield wiper linkage.
The windshield wiper motor has two speeds, LO and HI,
and also has intermittent wiper capability. The wiper
switch is an integral part of the wiper/washer switch. Wind-
shield wiper operation is actuated through the lever on the
right side of the steering column.
WINDSHIELD WASHER SYSTEM
The windshield washer system is equipped with a washerfluid reservoir, a washer fluid pump, hoses, nozzles, and
a wiper/washer switch. The windshield washer reservoir
is mounted behind the front left wheel well splash shield.
Attached to the reservoir is a washer pump, which pumps
fluid through the hoses to the two nozzles mounted on the
hood. The washer switch is an integral part of the wiper/
washer switch. Windshield washer operation is actuated
through the lever on the right side of the steering column.
REAR WINDOW WIPER/WASHER
SYSTEM
The rear window wiper system consists of a wiper motor,
a wiper arm, and a blade. The rear window wiper motor is
located inside the hatchback/tailgate door and is directly
connected to the rear window wiper. The rear window
washer system is equipped with a separate washer fluid
pump and hose. The hatchback has a hatch–mounted
rear window washer nozzle and on the wagon, the washer
nozzle is incorporated into the rear wiper motor. The rear
window washer reservoir is mounted behind the front left
wheel well splash shield. Attached to the reservoir is a
washer pump, which pumps fluid through a hose to the
rear washer nozzle.
Page 2401 of 2643
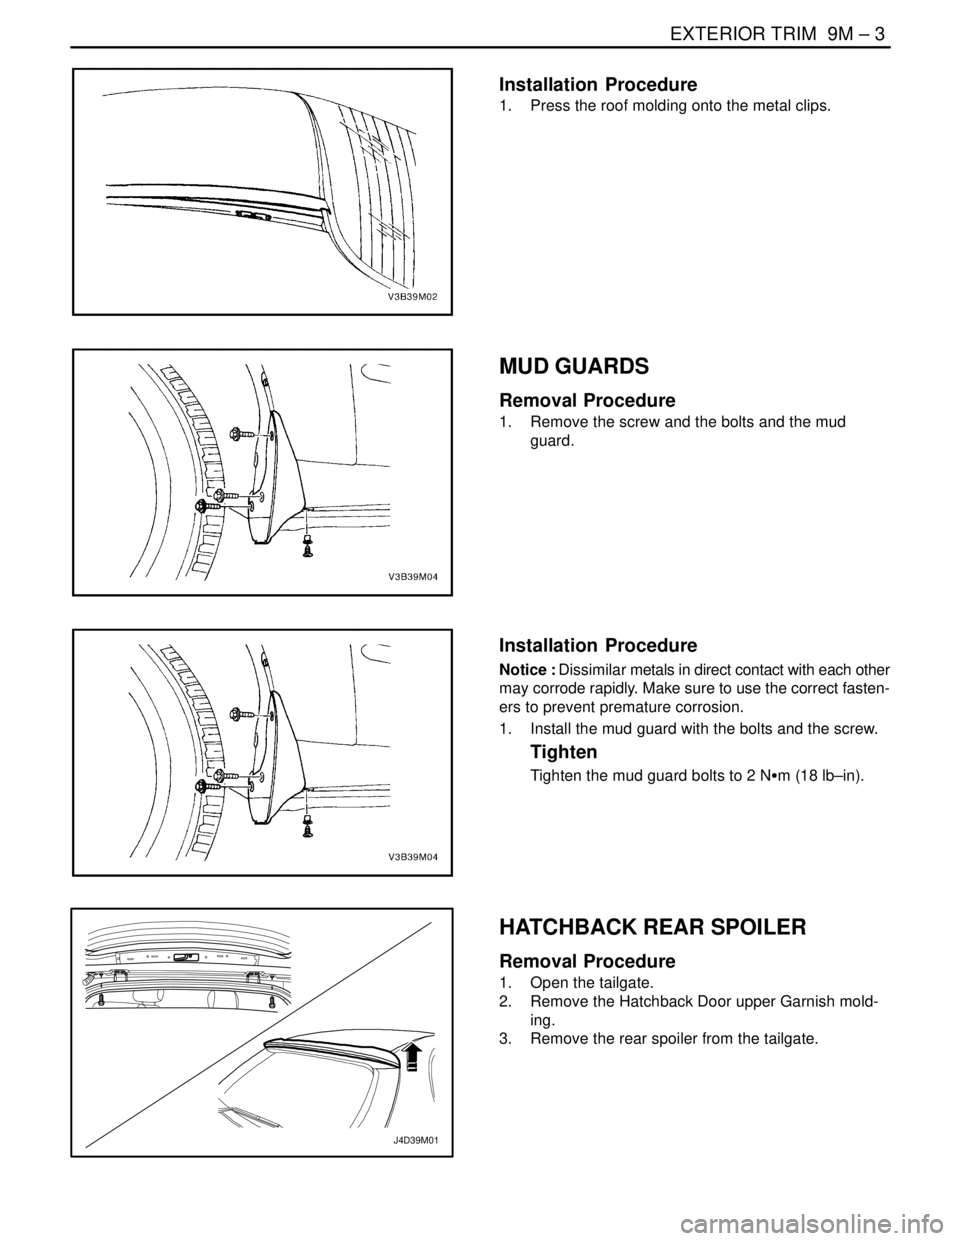
EXTERIOR TRIM 9M – 3
DAEWOO V–121 BL4
Installation Procedure
1. Press the roof molding onto the metal clips.
MUD GUARDS
Removal Procedure
1. Remove the screw and the bolts and the mud
guard.
Installation Procedure
Notice : Dissimilar metals in direct contact with each other
may corrode rapidly. Make sure to use the correct fasten-
ers to prevent premature corrosion.
1. Install the mud guard with the bolts and the screw.
Tighten
Tighten the mud guard bolts to 2 NSm (18 lb–in).
J4D39M01
HATCHBACK REAR SPOILER
Removal Procedure
1. Open the tailgate.
2. Remove the Hatchback Door upper Garnish mold-
ing.
3. Remove the rear spoiler from the tailgate.
Page 2402 of 2643

9M – 4IEXTERIOR TRIM
DAEWOO V–121 BL4
J4D39M01
Installation Procedure
1. Install the rear spoiler on the tailgate with the nuts.
Page 2578 of 2643

NUBIRA/LACETTI FENDER, HOOD, TAILGATE AND TRUNK LID 7–1
SECTION 7
FENDER, HOOD, TAILGATE AND TRUNK LID
CONTENTS
1. FENDER 7 – 2. . . . . . . . . . . . . . . . . . . . . . . . . . . . . . . . . . . . . . . . . . . . . . . . . . . . . . . . . . .
1.1.REPAIR PROCEDURE7–2 . . . . . . . . . . . . . . . . . . . . . . . . . . . . . . . . . . . . . . . . . . . . . . . . . . . . . . . . . . . . . . . . . . . . . . . . . .
2. HOOD 7 – 3. . . . . . . . . . . . . . . . . . . . . . . . . . . . . . . . . . . . . . . . . . . . . . . . . . . . . . . . . . . . .
2.1.REPAIR PROCEDURE7–3 . . . . . . . . . . . . . . . . . . . . . . . . . . . . . . . . . . . . . . . . . . . . . . . . . . . . . . . . . . . . . . . . . . . . . . . . . .
3. TAILGATE(HATCHBACK) 7 – 4. . . . . . . . . . . . . . . . . . . . . . . . . . . . . . . . . . . . . . . . . . .
3.1.REPAIR PROCEDURE7–4 . . . . . . . . . . . . . . . . . . . . . . . . . . . . . . . . . . . . . . . . . . . . . . . . . . . . . . . . . . . . . . . . . . . . . . . . . .
4. TRUNK LID (NOTCHBACK) 7 – 5. . . . . . . . . . . . . . . . . . . . . . . . . . . . . . . . . . . . . . . . .
4.1.REPAIR PROCEDURE7–5 . . . . . . . . . . . . . . . . . . . . . . . . . . . . . . . . . . . . . . . . . . . . . . . . . . . . . . . . . . . . . . . . . . . . . . . . . .
Page 2579 of 2643
7–2 FENDER, HOOD, TAILGATE AND TRUNK LID NUBIRA/LACETTI
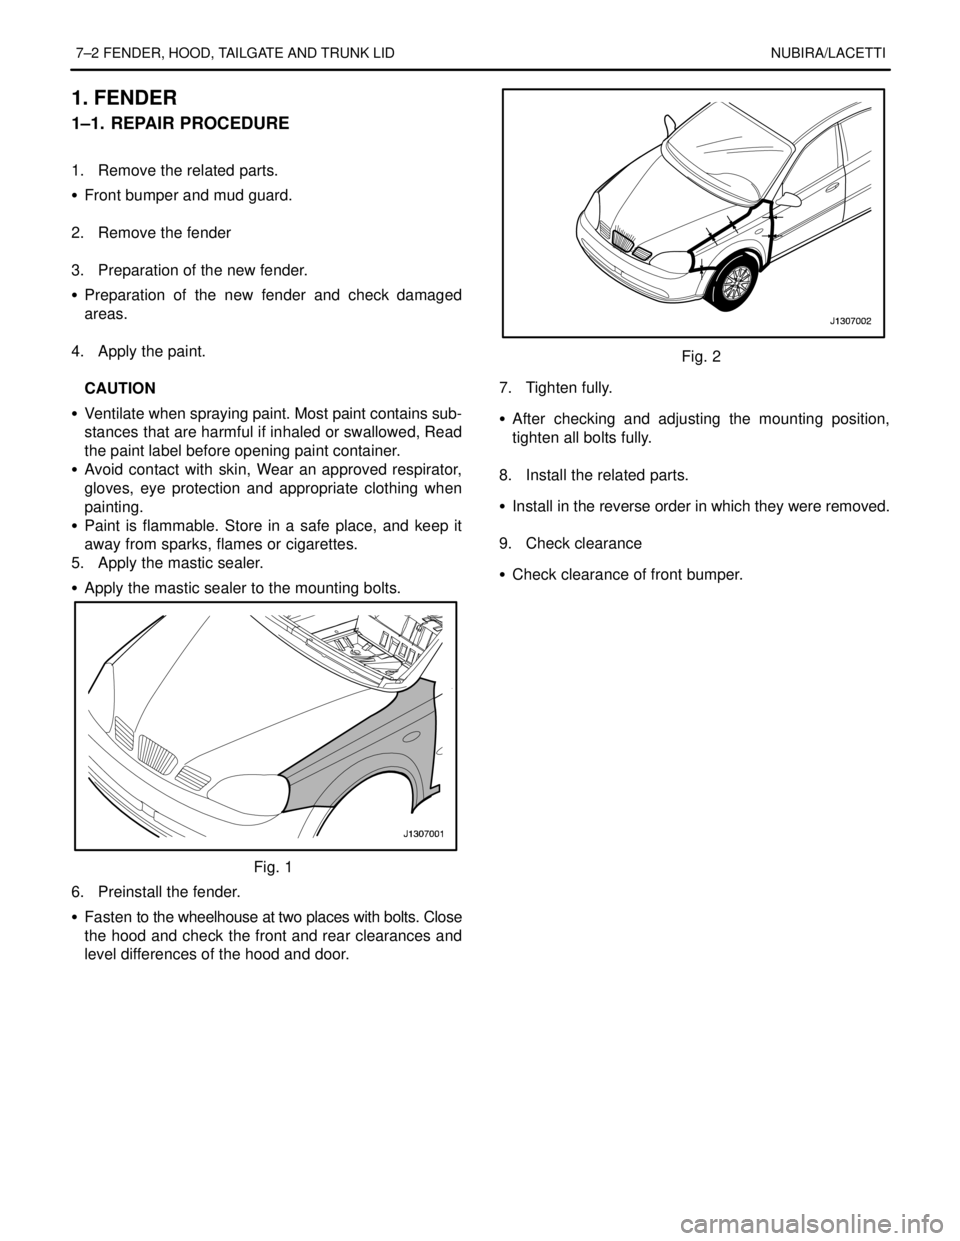
1. FENDER
1–1. REPAIR PROCEDURE
1. Remove the related parts.
S Front bumper and mud guard.
.
2. Remove the fender
.
3. Preparation of the new fender.
S Preparation of the new fender and check damaged
areas.
.
4. Apply the paint.
.
CAUTION
S Ventilate when spraying paint. Most paint contains sub-
stances that are harmful if inhaled or swallowed, Read
the paint label before opening paint container.
S Avoid contact with skin, Wear an approved respirator,
gloves, eye protection and appropriate clothing when
painting.
S Paint is flammable. Store in a safe place, and keep it
away from sparks, flames or cigarettes.
5. Apply the mastic sealer.
S Apply the mastic sealer to the mounting bolts.
Fig. 1
6. Preinstall the fender.
S Fasten to the wheelhouse at two places with bolts. Close
the hood and check the front and rear clearances and
level differences of the hood and door.
Fig. 2
7. Tighten fully.
S After checking and adjusting the mounting position,
tighten all bolts fully.
.
8. Install the related parts.
S Install in the reverse order in which they were removed.
.
9. Check clearance
S Check clearance of front bumper.
Page 2580 of 2643
NUBIRA/LACETTI FENDER, HOOD, TAILGATE AND TRUNK LID 7–3
2. HOOD
2–1. REPAIR PROCEDURE
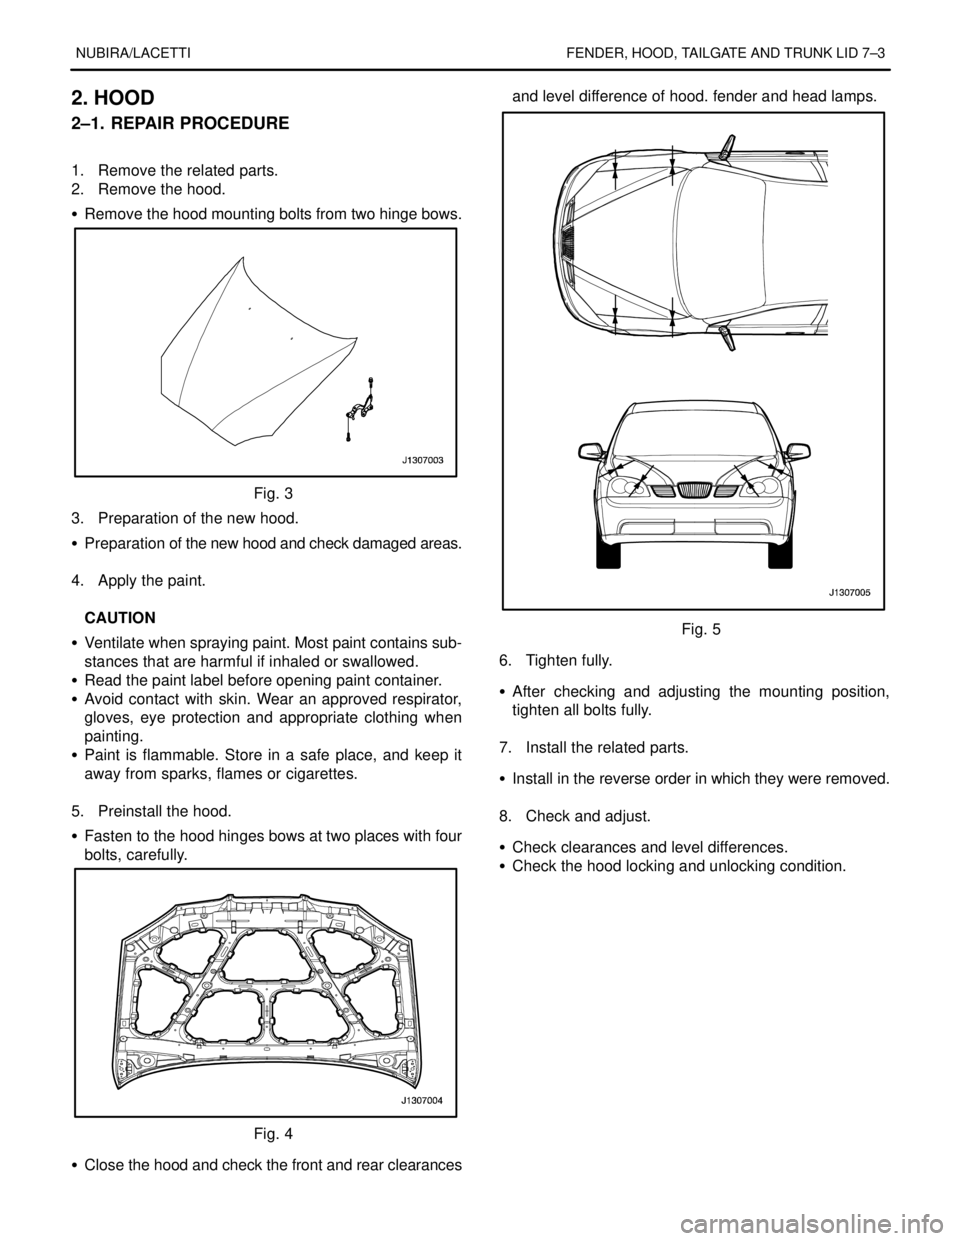
1. Remove the related parts.
2. Remove the hood.
S Remove the hood mounting bolts from two hinge bows.
Fig. 3
3. Preparation of the new hood.
S Preparation of the new hood and check damaged areas.
.
4. Apply the paint.
.
CAUTION
S Ventilate when spraying paint. Most paint contains sub-
stances that are harmful if inhaled or swallowed.
S Read the paint label before opening paint container.
S Avoid contact with skin. Wear an approved respirator,
gloves, eye protection and appropriate clothing when
painting.
S Paint is flammable. Store in a safe place, and keep it
away from sparks, flames or cigarettes.
.
5. Preinstall the hood.
S Fasten to the hood hinges bows at two places with four
bolts, carefully.
Fig. 4
S Close the hood and check the front and rear clearancesand level difference of hood. fender and head lamps.
Fig. 5
6. Tighten fully.
S After checking and adjusting the mounting position,
tighten all bolts fully.
.
7. Install the related parts.
S Install in the reverse order in which they were removed.
.
8. Check and adjust.
S Check clearances and level differences.
S Check the hood locking and unlocking condition.
Page 2581 of 2643
7–4 FENDER, HOOD, TAILGATE AND TRUNK LID NUBIRA/LACETTI
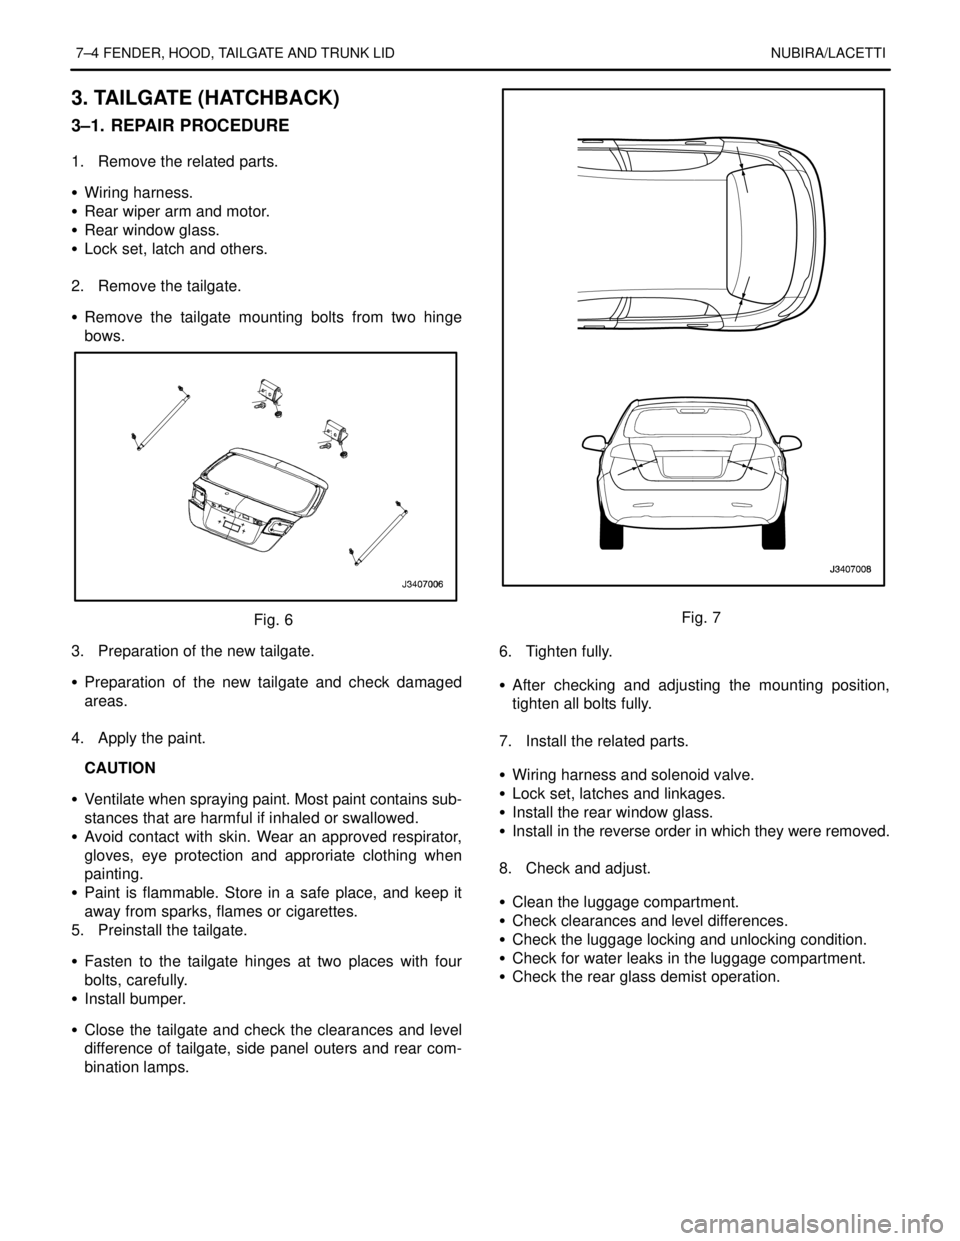
3. TAILGATE (HATCHBACK)
3–1. REPAIR PROCEDURE
1. Remove the related parts.
S Wiring harness.
S Rear wiper arm and motor.
S Rear window glass.
S Lock set, latch and others.
.
2. Remove the tailgate.
S Remove the tailgate mounting bolts from two hinge
bows.
Fig. 6
3. Preparation of the new tailgate.
S Preparation of the new tailgate and check damaged
areas.
.
4. Apply the paint.
CAUTION
S Ventilate when spraying paint. Most paint contains sub-
stances that are harmful if inhaled or swallowed.
S Avoid contact with skin. Wear an approved respirator,
gloves, eye protection and approriate clothing when
painting.
S Paint is flammable. Store in a safe place, and keep it
away from sparks, flames or cigarettes.
5. Preinstall the tailgate.
S Fasten to the tailgate hinges at two places with four
bolts, carefully.
S Install bumper.
S Close the tailgate and check the clearances and level
difference of tailgate, side panel outers and rear com-
bination lamps.Fig. 7
6. Tighten fully.
S After checking and adjusting the mounting position,
tighten all bolts fully.
.
7. Install the related parts.
S Wiring harness and solenoid valve.
S Lock set, latches and linkages.
S Install the rear window glass.
S Install in the reverse order in which they were removed.
.
8. Check and adjust.
S Clean the luggage compartment.
S Check clearances and level differences.
S Check the luggage locking and unlocking condition.
S Check for water leaks in the luggage compartment.
S Check the rear glass demist operation.
Page 2582 of 2643
NUBIRA/LACETTI FENDER, HOOD, TAILGATE AND TRUNK LID 7–5
4. TRUNK LID (NOTCHBACK)
4–1. REPAIR PROCEDURE
1. Remove the related parts.
S Wiring harness and solenoid valve.
S Lock set, latch set and others.
.
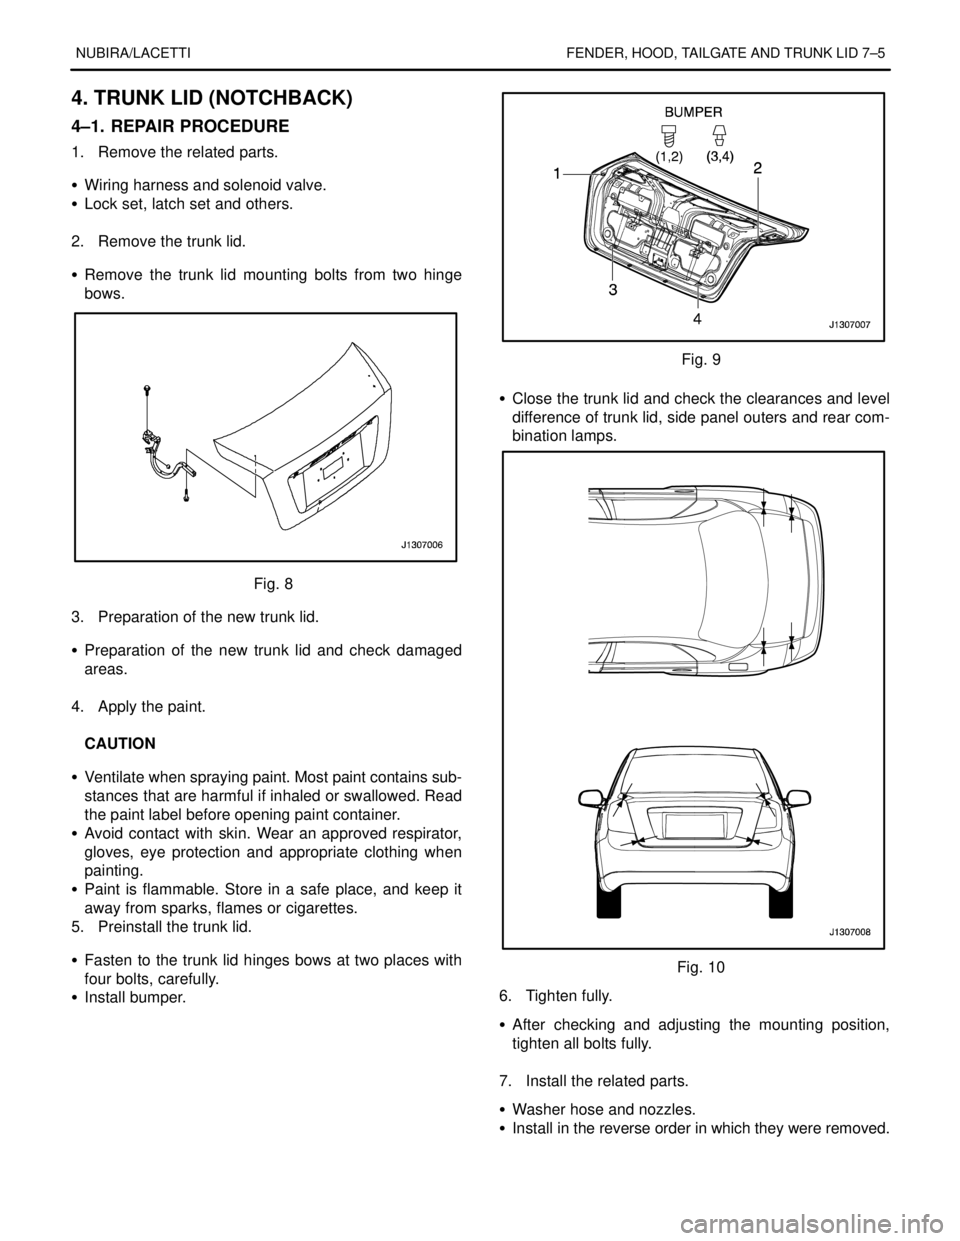
2. Remove the trunk lid.
S Remove the trunk lid mounting bolts from two hinge
bows.
Fig. 8
3. Preparation of the new trunk lid.
S Preparation of the new trunk lid and check damaged
areas.
.
4. Apply the paint.
.
CAUTION
S Ventilate when spraying paint. Most paint contains sub-
stances that are harmful if inhaled or swallowed. Read
the paint label before opening paint container.
S Avoid contact with skin. Wear an approved respirator,
gloves, eye protection and appropriate clothing when
painting.
S Paint is flammable. Store in a safe place, and keep it
away from sparks, flames or cigarettes.
5. Preinstall the trunk lid.
S Fasten to the trunk lid hinges bows at two places with
four bolts, carefully.
S Install bumper.
Fig. 9
S Close the trunk lid and check the clearances and level
difference of trunk lid, side panel outers and rear com-
bination lamps.
Fig. 10
6. Tighten fully.
S After checking and adjusting the mounting position,
tighten all bolts fully.
.
7. Install the related parts.
S Washer hose and nozzles.
S Install in the reverse order in which they were removed.
.
Page 2583 of 2643

7–6 FENDER, HOOD, TAILGATE AND TRUNK LID NUBIRA/LACETTI
8. Check and adjust.
S Check clearances and level differences.
S Check the hood locking and unlocking condition.
S Check spary conditions of washer liquid and adjust
washer spray nozzels on the hood panel.
.
Page 2615 of 2643
9–12 SEALING, CAULKING AND DEADNER NUBIRA/LACETTI
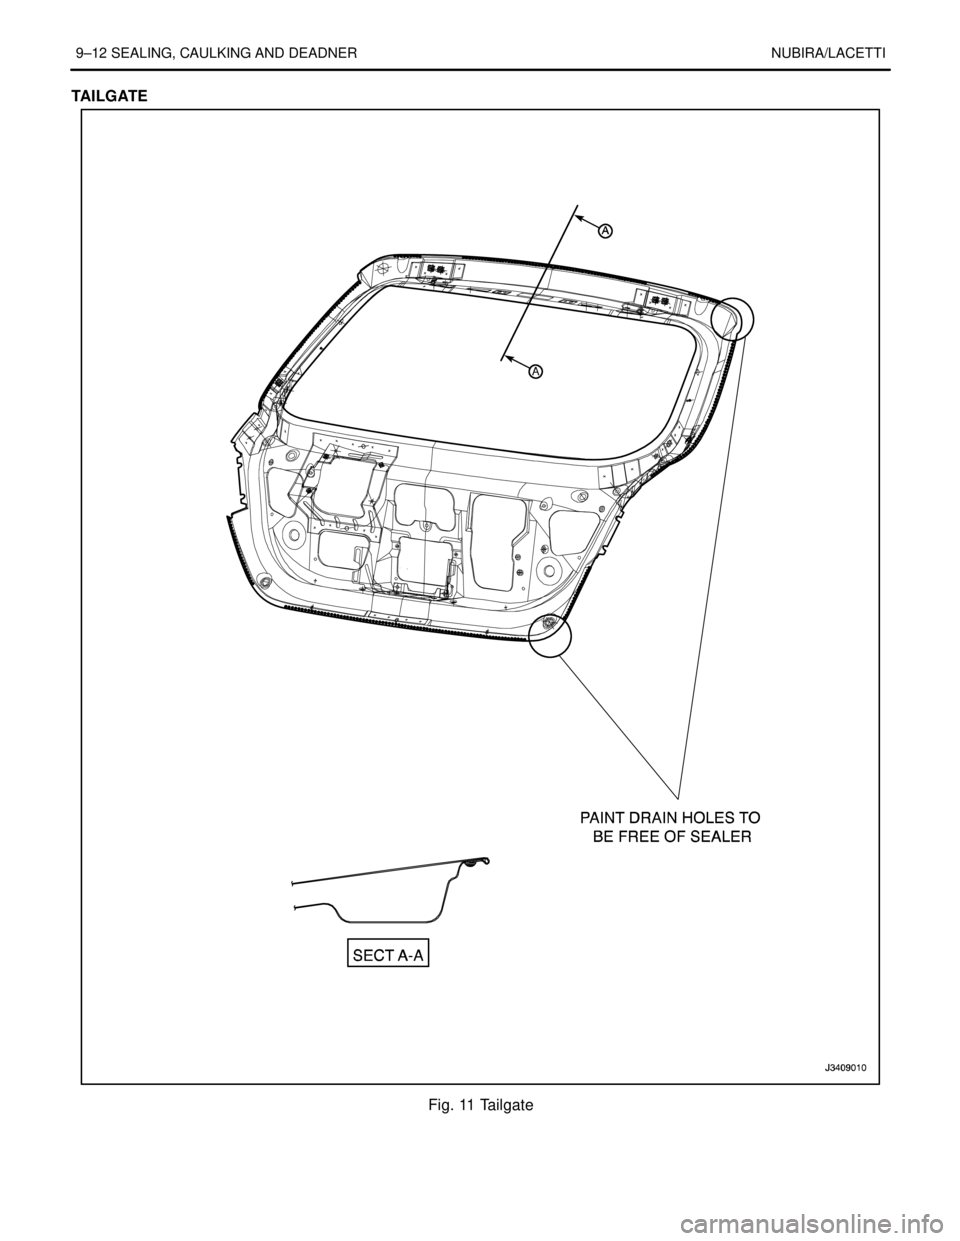
TAILGATE
Fig. 11 Tailgate