run flat DATSUN 210 1979 Service Manual
[x] Cancel search | Manufacturer: DATSUN, Model Year: 1979, Model line: 210, Model: DATSUN 210 1979Pages: 548, PDF Size: 28.66 MB
Page 374 of 548

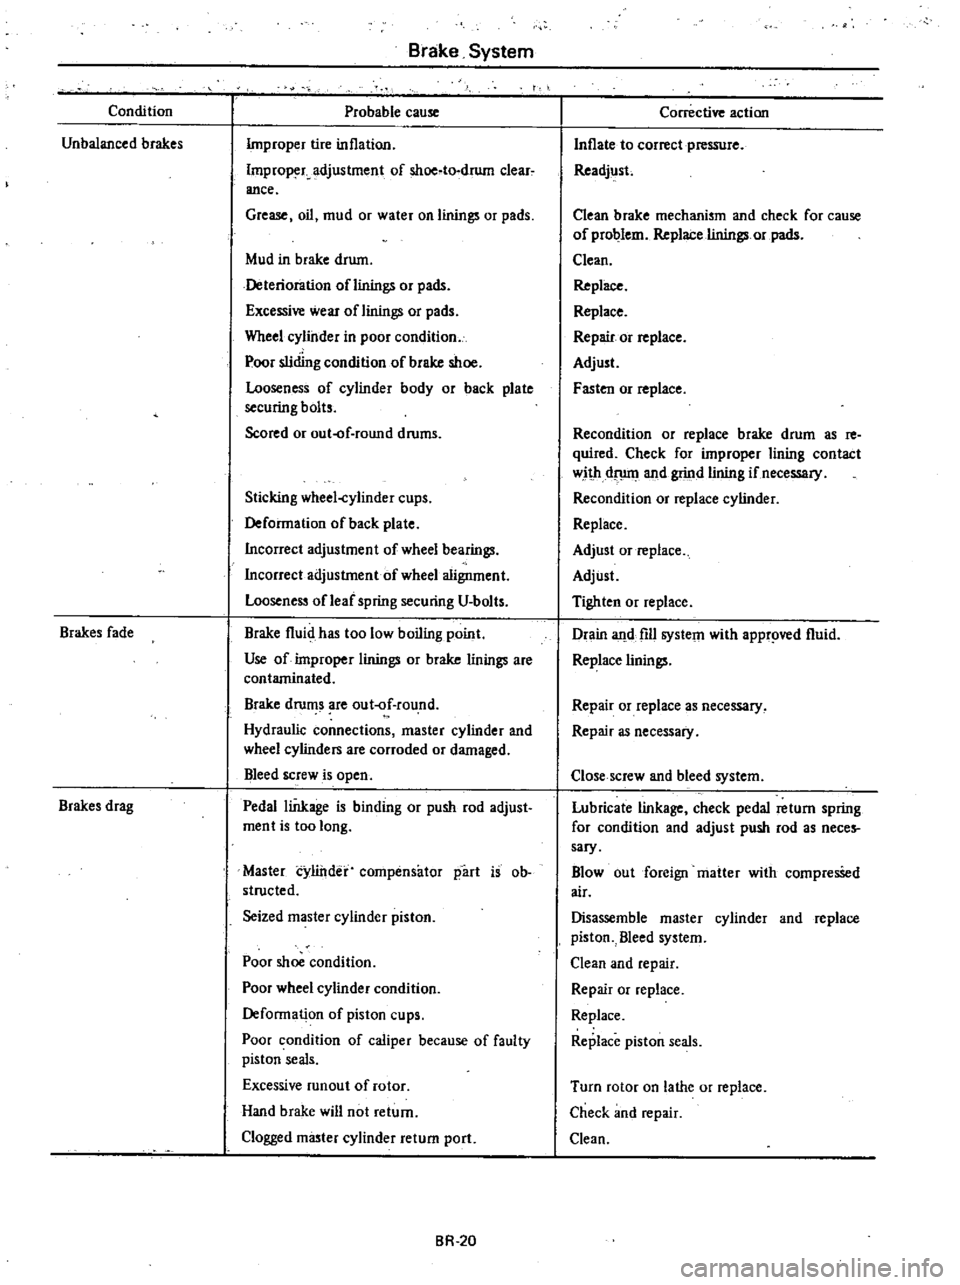
Condition
Unbalanced
brakes
Brakes
fade
Brakes
drag
Brake
System
Probable
cause
Improper
tire
inflation
Improp
r
adjustment
of
shoe
to
drum
clear
ance
Grease
oil
mud
or
water
on
linings
or
pads
Mud
in
brake
drum
Deterioration
oflinings
or
pads
Excessi
wear
of
linings
or
pads
Wheel
cylinder
in
poor
condition
Poor
sliding
condition
of
brake
shoe
Looseness
of
cylinder
body
or
back
plate
securing
bolts
Scored
or
out
f
round
drums
Sticking
wheel
cylinder
cups
Deformation
of
back
plate
Incorrect
adjustment
of
wheel
bearings
Incorrect
adjustment
of
wheel
aligoment
Looseness
of
leaf
spring
securing
U
bolts
Brake
fluid
has
too
low
boiling
point
Use
of
improper
linings
or
brake
linings
are
contaminated
Brake
drums
are
out
f
round
Hydraulic
connections
master
cylinder
and
wheel
cylinders
are
corroded
or
damaged
Bleed
screw
is
open
Pedal
linkage
is
binding
or
push
rod
adjust
ment
is
too
long
Master
cylinder
compensator
part
is
ob
structed
Seized
master
cylinder
piston
Poor
shoe
condition
Poor
wheel
cylinder
condition
Deformation
of
piston
cups
Poor
condition
of
caliper
because
of
faulty
piston
seals
Excessive
runaut
of
rotor
Hand
brake
will
not
return
Clogged
m
ter
cylinder
return
port
BR
20
Corrective
action
Inflate
to
correct
pressure
Readjust
Clean
brake
mechanism
and
check
for
cause
of
problem
Replace
linings
or
pads
Clean
Replace
Replace
Repair
or
replace
Adjust
F
ten
or
replace
Recondition
or
replace
brake
drum
as
re
quired
Check
for
improper
lining
contact
with
dflllll
and
grind
lining
if
necessary
Recondition
or
replace
cylinder
Replace
Adjust
or
replace
Adjust
Tighten
or
replace
Drain
and
fill
system
with
appr
d
fluid
Replace
linings
Repair
or
replace
as
necessary
Repair
as
necessary
Close
screw
and
bleed
system
Lubricate
linkage
check
pedal
return
spring
for
condition
and
adjust
push
rod
as
neces
sary
Blowout
foreign
matter
with
compresSed
air
Disassemble
master
cylinder
and
replace
piston
Bleed
system
Clean
and
repair
Repair
or
replace
Replace
Replace
piston
seals
Turn
rotor
on
lathe
or
replace
Check
and
repair
Clean
Page 378 of 548

t
MAINTEN
NCE
TIRE
INFLATION
Correct
tire
pressure
is
very
impor
tant
for
steering
ease
and
riding
com
fort
Correct
pressure
also
makes
for
a
quieter
ride
and
extends
tire
life
If
all
tires
are
inspected
frequently
and
maintained
at
correct
pressure
any
sharp
objects
in
tread
can
be
quickiy
detected
nd
abnormal
wear
which
invites
serious
problems
can
be
avoided
After
inflating
tires
valves
should
be
checked
for
leakage
Without
valve
caps
leakage
will
occur
due
to
dirt
and
water
resulting
in
underinflation
Ac
cordingly
whenever
tire
pressure
is
checked
be
sure
to
tighten
vaive
caps
firmly
by
hand
JW
Sri
in
1
II
I
i
I
1
I
1
1
I
I
I
II
I
I
I
i
M
I
l
1
14
nl
01
I
II
Toe
in
or
toe
out
wear
I
J
I
I
p
rt
i
Ilnl
lll
11111
IllIlI
Shoulder
wear
Toe
in
or
toe
out
wear
When
the
front
wheels
are
aligned
in
an
excessive
toe
in
or
toe
out
condi
tion
the
tires
will
tend
to
scrape
the
tread
rubber
off
and
the
tread
will
de
elop
a
feathered
edge
Center
wear
Center
wear
is
caused
by
overinfla
tion
of
the
tire
Wheel
and
Tire
WHEEL
AND
TIRE
TIRE
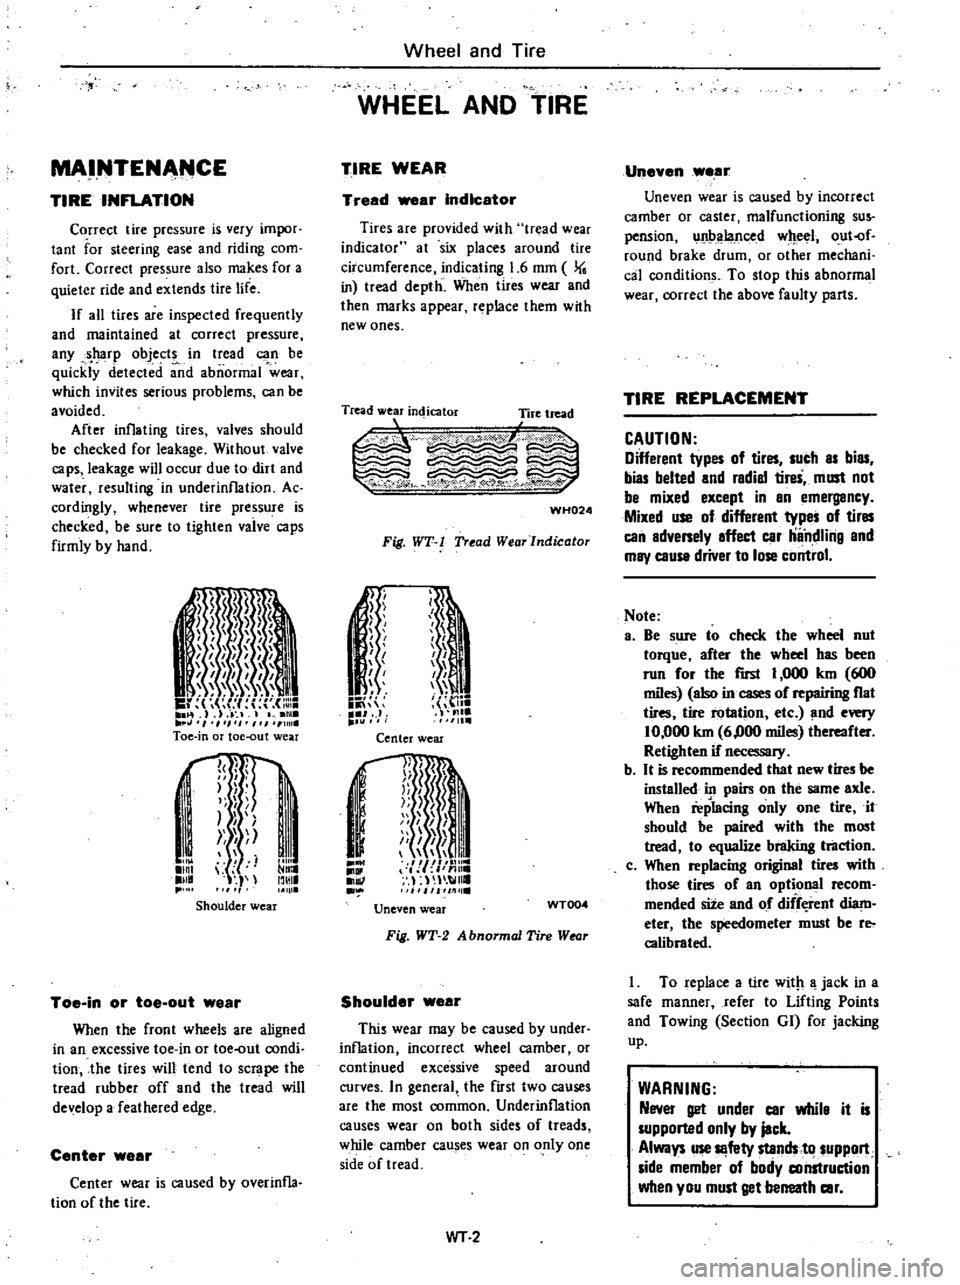
WEAR
Tread
ar
Indicator
Tires
are
provided
with
tr
lad
wear
indicator
at
six
places
around
tire
circumference
indicating
1
6
mm
J
in
tread
depth
When
tires
wear
and
then
marks
appear
replace
them
wtth
new
ones
Tread
wear
indicator
Tire
tread
L
1
c
WH024
Fig
WT
l
Tread
WearJndicator
n
1
ii
J
J
f
J
I
h
I
me
1111
Center
wear
j
I
1II
mnr
I
j
n
Ii
Ii
i
I
Jil
111
lie
Uneven
wear
WT004
Fig
WT
2
A
bnormal
Tire
Wtor
Shoulder
wear
This
wear
may
be
caused
by
under
inflation
incorrect
wheel
camber
or
continued
excessive
speed
around
curves
In
general
the
first
two
causes
are
the
most
common
Underinflation
causes
wear
on
both
sides
of
treads
while
camber
causes
wear
on
only
one
side
of
tread
WT
2
Uneven
wear
Uneven
wear
is
caused
by
incorrect
camber
or
caster
malfunctioning
sus
pension
unbalanced
wheel
out
of
round
brake
drum
or
other
mechani
cal
conditions
To
stop
this
abnormal
wear
correct
the
above
faulty
parts
TIRE
REPLACEMENT
CAUTION
Different
types
of
tires
sucb
as
bias
bias
belted
and
radial
tireS
must
not
be
mixed
except
in
an
emergancy
Mixed
use
of
different
types
of
tires
can
adversely
affect
car
ilndlilig
and
may
cause
driver
to
lose
control
Note
a
Be
sure
to
check
the
wheel
nut
torque
after
the
wheel
has
been
run
for
the
rust
I
000
km
600
miles
also
in
cases
of
repairing
fiat
tires
tire
rotation
etc
and
every
10
000
km
6
000
miles
thereafter
Retighten
if
necessary
b
It
is
recommended
that
new
tires
be
installed
in
pairs
on
the
same
axle
When
replacing
only
one
tire
it
should
be
paired
with
the
most
tread
to
equalize
braking
tl1lction
c
When
replacing
original
tires
with
those
tires
of
an
optional
recom
mended
site
and
of
diff
rent
diam
eter
the
speedometer
must
be
reo
calibrated
I
To
replace
a
tire
with
a
jack
in
a
safe
manner
refer
to
Lifting
Points
and
Towing
Section
GI
for
jacking
up
WARNING
Never
get
under
car
whila
it
is
supported
only
by
jack
Always
use
Il
fety
stands
to
suppon
side
member
of
body
construction
when
you
must
get
berreatb
car
Page 380 of 548

The
symptom
of
unbalance
appears
as
tramps
car
shake
and
steering
mal
function
To
correct
unbalance
use
proper
wheel
balancer
Maximum
allowable
unbalance
at
rim
flange
10
gr
10
35
ozl
Balance
weight
10
to
60
gr
10
35
to
2
12
ozl
at
10
gr
10
35
ozl
interval
Note
a
Be
sure
to
place
correct
balance
weights
on
inner
edge
of
rim
See
Fig
wr
6
b
Do
not
put
mOle
than
two
weights
on
each
side
c
Two
types
of
balance
weights
are
used
one
is
designed
for
use
with
steel
wheel
and
the
other
for
use
with
aluminum
wheel
Do
not
mix
different
types
of
balance
weights
WHEEL
In
order
to
ensure
satisfactory
steering
condition
as
well
as
maximum
tire
life
proceed
follows
Check
wheel
rim
especially
rim
flange
and
bead
seat
for
rust
distor
tion
cracks
or
other
faults
which
might
cause
air
leaks
Function
of
tubeless
tire
depends
on
a
good
seal
between
tire
bead
and
wheel
rim
Thoroughly
remove
rust
dust
oxi
dized
rubber
or
sa
nd
from
wheel
rim
Note
Rim
bead
seats
should
be
clean
ed
with
the
following
Steel
wheel
Wile
brush
coone
steel
wool
etc
Aluminum
wheel
Neutral
detergent
cloth
etc
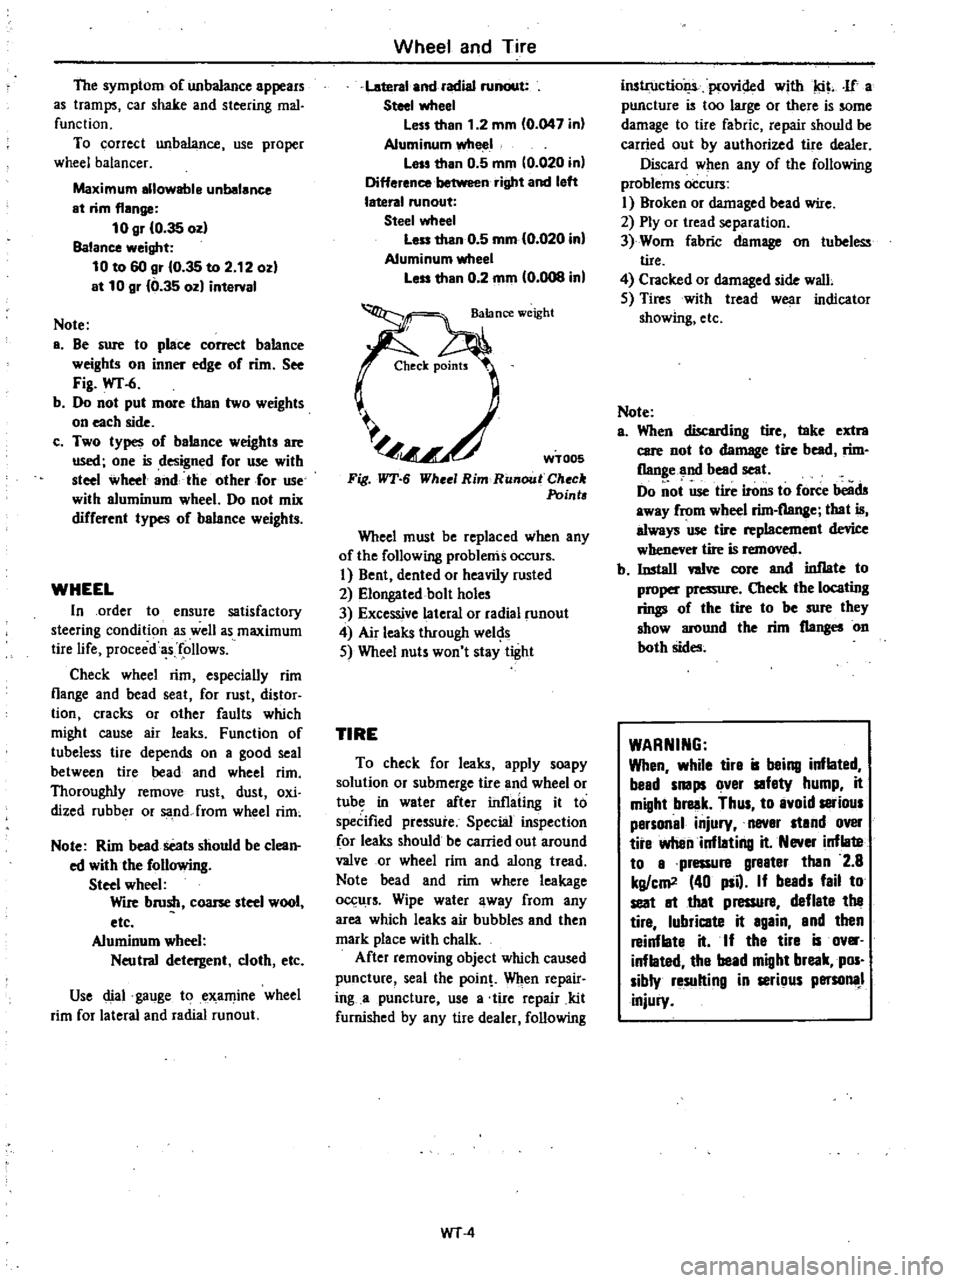
Use
dial
gauge
to
examine
wheel
rim
for
lateral
and
radial
runout
Wheel
and
Tire
Lateral
and
radial
runout
Steel
wheel
less
than
1
2
mm
0
047
in
Aluminumwlte
1
lass
than
0
5
mm
10
020
in
Difference
right
and
left
lateral
runout
Steel
wheel
leu
than
0
5
mm
10
020
in
Aluminum
wheel
less
than
0
2
mm
0
008
in
C
JeCk
points
l
Fig
WT
6
WT005
Whee
Rim
RUllout
Check
Points
Wheel
must
be
replaced
when
any
of
the
following
problems
occurs
I
Bent
dented
or
heavily
rusted
2
Elongated
bolt
holes
3
Excessive
lateral
or
radial
runout
4
Air
leaks
through
wel
s
5
Wheel
nuts
won
t
stay
tight
TIRE
To
check
for
leaks
apply
soapy
solution
or
submerge
tire
and
wheel
or
tub
in
water
after
inflating
it
to
speCified
pressure
Special
inspection
for
leaks
should
be
carried
out
around
valve
or
wheel
rim
and
along
tread
Note
bead
and
rim
where
leakage
0
11rs
Wipe
water
away
from
any
area
which
leaks
air
bubbles
and
then
mark
place
with
chalk
After
removing
object
which
caused
puncture
seal
the
pain
Wilen
repair
ing
a
puncture
use
a
tire
repair
kit
furnished
by
any
tire
dealer
following
WT
4
inslrt1ctiol
iplovided
with
tit
If
a
puncture
is
too
large
or
there
is
some
damage
to
tire
fabric
repair
should
be
carried
out
by
authorized
tire
dealer
Discard
when
any
of
the
following
problems
occurs
I
Broken
or
damaged
bead
wire
2
Ply
or
tread
separation
3
Worn
fabric
damage
on
tubeless
tire
4
Cracked
or
damaged
side
wall
5
Tires
with
tread
wear
indicator
showing
etc
Note
a
When
discarding
tire
take
extra
care
not
to
damage
tire
bead
rim
flange
and
bead
seat
Do
ot
use
tire
irons
to
foree
beads
away
from
wbeel
rim
flange
that
is
always
use
tire
replacement
device
whenever
tire
is
removed
b
Install
wive
core
and
inflate
to
proper
pressure
Check
the
locating
rings
of
the
tire
to
be
sure
they
show
around
the
rim
flanges
on
both
sides
WARNING
When
while
tire
is
being
inflated
bead
snaps
over
safety
hump
it
might
break
Thus
to
avoid
satious
personal
injury
never
stand
over
tire
when
inflating
it
Never
inflate
to
a
pressure
greater
then
2
8
kg
em
40
psQ
If
beads
fail
to
seat
It
that
pressure
deflate
the
tire
lubricate
it
again
and
then
reinflate
it
If
the
tire
is
ov
inflated
the
bead
might
break
pos
sibly
resulting
in
serious
persona
injury