wheel alignment DATSUN 210 1979 Service Manual
[x] Cancel search | Manufacturer: DATSUN, Model Year: 1979, Model line: 210, Model: DATSUN 210 1979Pages: 548, PDF Size: 28.66 MB
Page 293 of 548
with
the
pin
hole
of
the
internal
rotor
combined
with
the
manual
shaft
and
check
their
alignment
by
inserting
a
1
5
mm
0
059
in
diameter
pin
into
the
holes
If
the
alignment
is
correct
fasten
the
switch
body
with
the
bolts
pull
out
the
pin
tighten
up
the
screw
in
the
hole
and
fasten
the
selector
lever
as
before
Check
the
continuity
pin
with
the
lesler
If
Ihe
malfunc
tion
still
remains
replace
the
inhibitor
switch
STALL
TEST
The
purpose
of
this
test
is
to
check
the
transmission
and
engine
for
trou
ble
by
measuring
the
maximum
num
bers
of
revoiutions
o
the
cngine
while
vehicle
is
held
in
a
stalled
condition
The
carburetor
is
in
fullthrollle
opera
tion
with
the
selector
lever
in
ranges
1
2
and
I
respectively
Com
pale
the
measured
results
with
the
standard
values
Components
to
be
tested
and
test
itelJUl
I
Clutches
brake
and
band
in
trans
mission
for
slipping
2
Torque
converter
for
proper
func
tioning
3
Engine
for
overall
properly
STAU
TEST
PROCEDURES
Before
testing
check
the
engine
oil
and
torque
converter
oil
warm
up
the
engine
cooling
w
ter
to
suitable
tem
perature
by
running
at
1
200
rpm
with
the
selector
lever
in
the
range
P
for
sevcral
minutes
Warm
up
the
torque
converter
oil
to
suitable
temperature
60
to
lOOoC
140
to
2120F
I
Mount
the
engine
tachometer
at
a
location
that
allows
good
visibility
from
the
driver
s
seat
and
put
a
mark
on
specified
revolutions
on
the
meter
2
Secure
the
front
and
rear
wheels
with
chocks
and
apply
the
hand
brake
Be
SIIre
to
depress
the
brake
pedal
firmly
with
the
left
foot
before
de
pressing
the
accelerator
pedal
3
Throw
the
selector
lever
into
the
range
11
4
Slowly
depress
the
accelerator
pedal
until
the
throttle
valvc
is
fully
Automatic
Transmission
opened
Quickly
read
and
record
the
engine
revolution
when
the
engine
begins
to
rotate
steadily
and
then
release
the
accelerator
pedal
5
Shift
the
selector
lever
to
N
and
operate
the
engine
at
approxi
mately
1
200
rpm
for
more
than
one
minute
to
cool
down
the
torque
con
verter
oil
and
coolant
6
Make
similar
staU
tests
in
ranges
2
I
and
R
CAUTION
The
dill
test
operstion
81
specified
in
i18m
4
should
be
I118de
within
fiv
lIeonds
If
it
tBkes
too
long
the
oil
If
and
the
cluti
hn
blllke
and
b
nd
elll
ly
I
Suf
ficient
cooling
time
should
be
given
r
eech
test
for
the
four
IlInges
0
Z
1
end
R
JUDGEMENT
High
stall
revolution
more
than
staitdard
revolution
If
the
engine
levolulion
in
stall
condi
ion
is
higher
than
the
standard
values
it
indicates
that
onc
or
more
clutches
in
the
transmission
are
slipping
and
therefore
no
further
test
is
required
For
the
following
abnormalities
the
respective
causes
are
presumed
High
rpm
in
all
ranges
low
line
pr
ssure
High
rpm
in
0
2
and
I
and
normal
rpm
in
6R
Rear
clutch
slipping
High
rpm
in
D
and
2
and
normal
rpm
in
One
way
clutch
slipping
High
Ipm
in
R
only
Front
clutch
or
low
and
reverse
brake
slipping
To
determine
which
is
slipping
front
clutch
or
low
and
reverse
brake
a
road
test
is
needed
If
while
coasting
after
starting
with
the
levcr
in
I
range
engine
braking
does
not
work
properly
the
low
and
reverse
brake
is
slipping
Otherwise
the
front
clutch
is
slipping
Slipping
of
the
band
brake
is
diffi
cuJt
to
ascertain
However
jf
it
occurs
with
the
lever
in
1
range
engine
AT
41
revolution
increases
up
to
the
same
level
as
in
1st
range
It
is
impossible
to
check
it
in
the
stall
test
2
Standard
stall
rnoluiion
If
the
engine
revoluiion
in
stall
ondition
is
within
he
standard
values
the
control
elements
are
nOf
mally
operating
in
the
ranges
D
2n
I
and
R
Also
the
engine
and
one
way
clutch
of
the
torque
converter
are
norinal
in
performance
and
operation
The
one
way
clutch
of
the
torque
converter
however
sometimes
sticks
This
is
determined
in
the
road
test
3
Lower
stall
revolution
than
lIand
ard
revolution
If
the
engine
revolution
in
stall
condition
is
lower
than
the
standard
values
it
indicates
that
the
engine
is
in
abnormal
condition
or
the
torque
con
verter
s
one
way
clutch
is
slipping
4
O
hers
I
If
the
accelerating
performance
is
poor
until
vehicle
speed
of
approxi
mately
SO
kmfh
30
MPH
is
attained
and
then
normal
beyond
that
speed
it
can
be
judged
that
the
torque
con
verte
c
s
one
way
clutch
is
slipping
2
If
the
torque
converter
sane
way
dutch
sticks
vehicle
speed
can
not
exceed
approximately
80
kmfh
SO
MPH
in
the
road
tesl
In
such
a
case
the
torque
converter
oil
tem
perature
rises
abnormally
and
so
special
care
is
required
3
If
the
transmission
does
not
op
erate
properly
at
all
vehicle
speeds
it
indicates
poor
engine
performance
ROAD
TEST
An
accurate
knowledge
of
the
au
to
matic
transmission
is
required
for
an
exact
diagnosis
II
is
recommended
that
a
diagnosis
guide
chart
with
the
standard
vehicle
speeds
for
each
stage
of
the
up
and
down
shiftings
be
prepared
Measured
vehicle
speeds
are
to
be
filled
in
the
adjoining
column
after
each
testing
Also
it
is
advisable
to
mount
a
stopper
for
positioning
the
throttle
opening
Page 325 of 548
Fig
FA
3
Installing
Coller
Pin
II
Install
hub
cap
with
new
Q
ring
and
wheel
WHEEL
ALIGNMENT
Correct
front
wheel
alignment
as
sures
proper
car
handling
characteris
tics
and
minimum
steering
effort
with
the
least
amount
of
tire
wear
Before
adjusting
front
wheel
alignment
be
sure
to
make
preliminary
inspection
of
front
end
parts
Tire
pressure
and
balance
Wheel
bearings
and
wheel
bearing
nuts
Steering
gear
play
Steering
gear
housing
loose
at
frame
Steering
linkage
and
connections
Shock
absorber
operation
If
wrong
repair
or
replace
the
damaged
portion
or
parts
When
using
equipment
for
front
wheel
alignment
inspection
follow
the
instructions
furnished
with
equipment
Note
Inspection
should
be
made
with
the
car
set
Ievel
and
at
curb
weight
Cember
end
caster
Camber
and
caster
are
preset
at
factory
and
cannot
be
adjusted
The
car
requires
only
toe
in
and
car
posture
adjustment
Note
If
camber
or
caster
alignment
is
not
within
specifications
check
as
sociated
parts
Repair
or
replace
as
necessary
Front
Axle
Front
Suspension
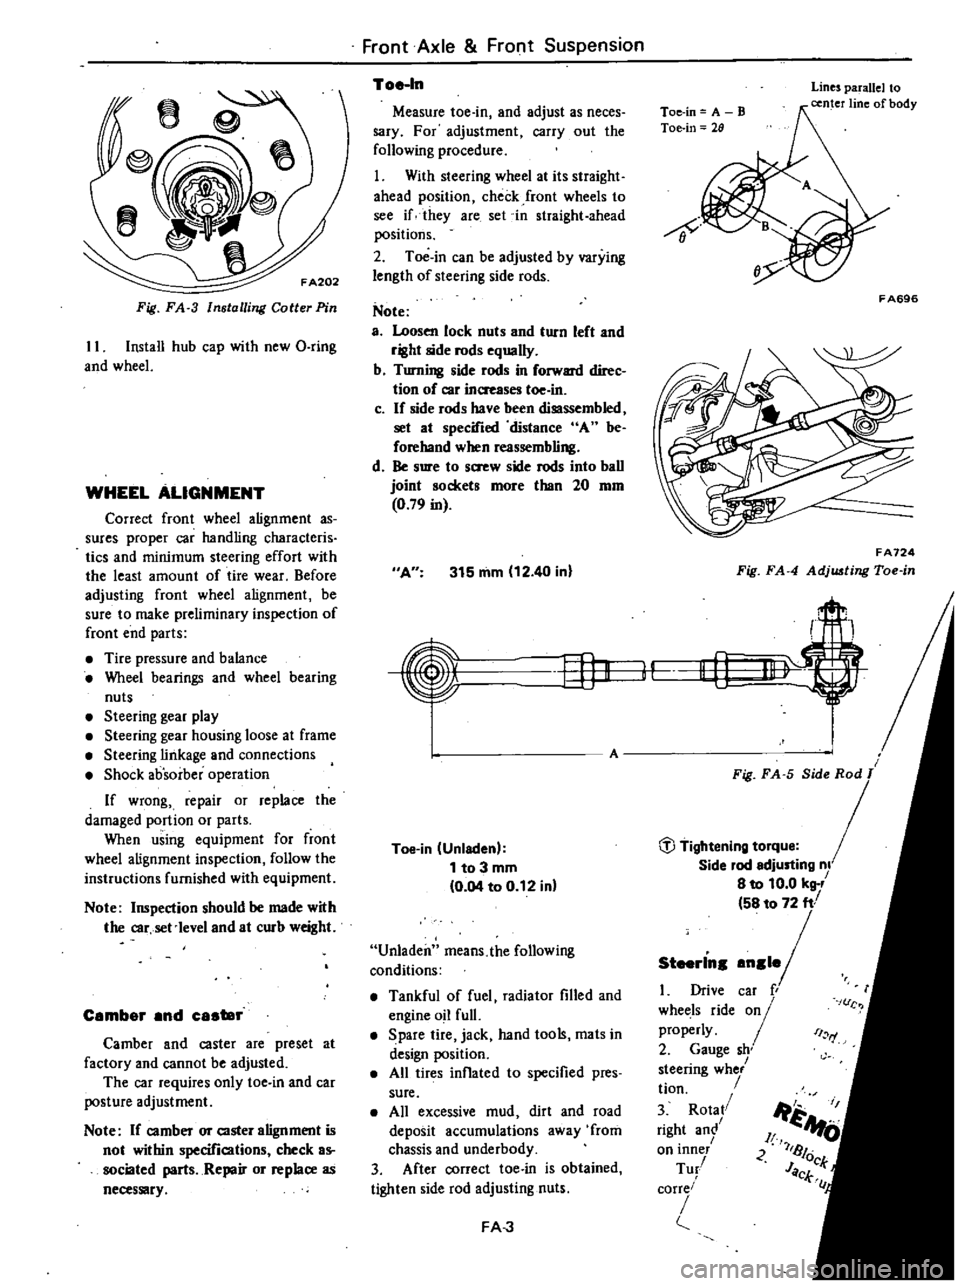
Toe
In
Measure
toe
in
and
adjust
as
neces
sary
For
adjustment
carry
out
the
following
procedure
1
With
steering
wheel
at
its
straight
ahead
position
check
front
wheels
to
see
if
they
are
set
in
straight
ahead
positions
2
Toe
in
can
be
adjusted
by
varying
length
of
steering
side
rods
Note
a
Loosen
lock
nuts
and
turn
left
and
right
side
rods
equally
b
Turning
side
rods
in
forward
direc
tion
of
car
inaeases
toe
in
c
If
side
rods
have
been
disassembled
set
at
specified
distance
A
be
forehand
when
reassembling
d
Be
sure
to
s
w
side
rods
into
ball
joint
sockets
more
than
20
mm
0
79
in
A
315
mm
12
40
in
EfJK
Toe
in
Unladen
1
to
3
mm
0
04
to
0
12
in
Unladen
means
the
following
conditions
Tankful
of
fuel
radiator
filled
and
engine
oil
full
Spare
tire
jack
hand
tools
mats
in
design
position
All
tires
inflated
to
specified
pres
sure
All
excessive
mud
dirt
and
road
deposit
accumulations
away
from
chassis
and
underbody
3
After
correct
toe
in
is
obtained
tighten
side
rod
adjusting
nuts
FA
J
Toe
in
A
B
Toe
in
28
Lines
parallel
to
center
line
of
body
8
F
A696
FA724
Fig
FA
4
Adj
ting
Toe
in
r
II
Li
1
t
Fig
FA
5
Side
Rod
T
Side
lod
edjusting
nl
8
to
10
0
kg
58
to
72
ft
1
Drive
caf
r
whet
ls
ride
01
properly
2
Gauge
sh
steenng
whe
tion
3
Rota
right
an
on
lOner
Tu
corre
i
I
rf
c
Ji
1
A
JI
U
2
7181
JOck
CL
C
Page 335 of 548
Front
Axle
Front
Suspension
SERVICE
DATA
AND
SPECIFICATIONS
GENERAL
SPECIFICATIONS
COIL
SPRING
Models
equipped
with
air
conditioning
Models
not
equipped
with
air
conditioning
10
5
x
100
x
375
0
413
x
3
94
x
1476
1
62
90
7
Spring
constant
kg
mm
Ib
in
10
8
x
100
x
375
0
425
x
3
94
x
1476
1
65
92
4
Dimension
A
x
C
x
L
AxCxL
Wire
diameter
mm
in
x
Coil
diameter
mm
in
x
Free
length
mm
in
STRUT
ASSEMBLY
Shock
absorber
type
Piston
rod
diameter
mm
in
Piston
diameter
mm
in
Stroke
nun
in
Damping
force
at
0
3
m
1
0
ft
sec
Expansion
kg
Ib
Compression
kg
Ib
Double
acting
hydraulic
20
0
79
30
1
18
164
6
46
30
to
40
66
to
88
17
to
23
37
to
51
STABILIZER
BAR
Bar
diameter
Identification
mark
mm
in
20
0
79
Red
INSPECTION
AND
ADJUSTMENT
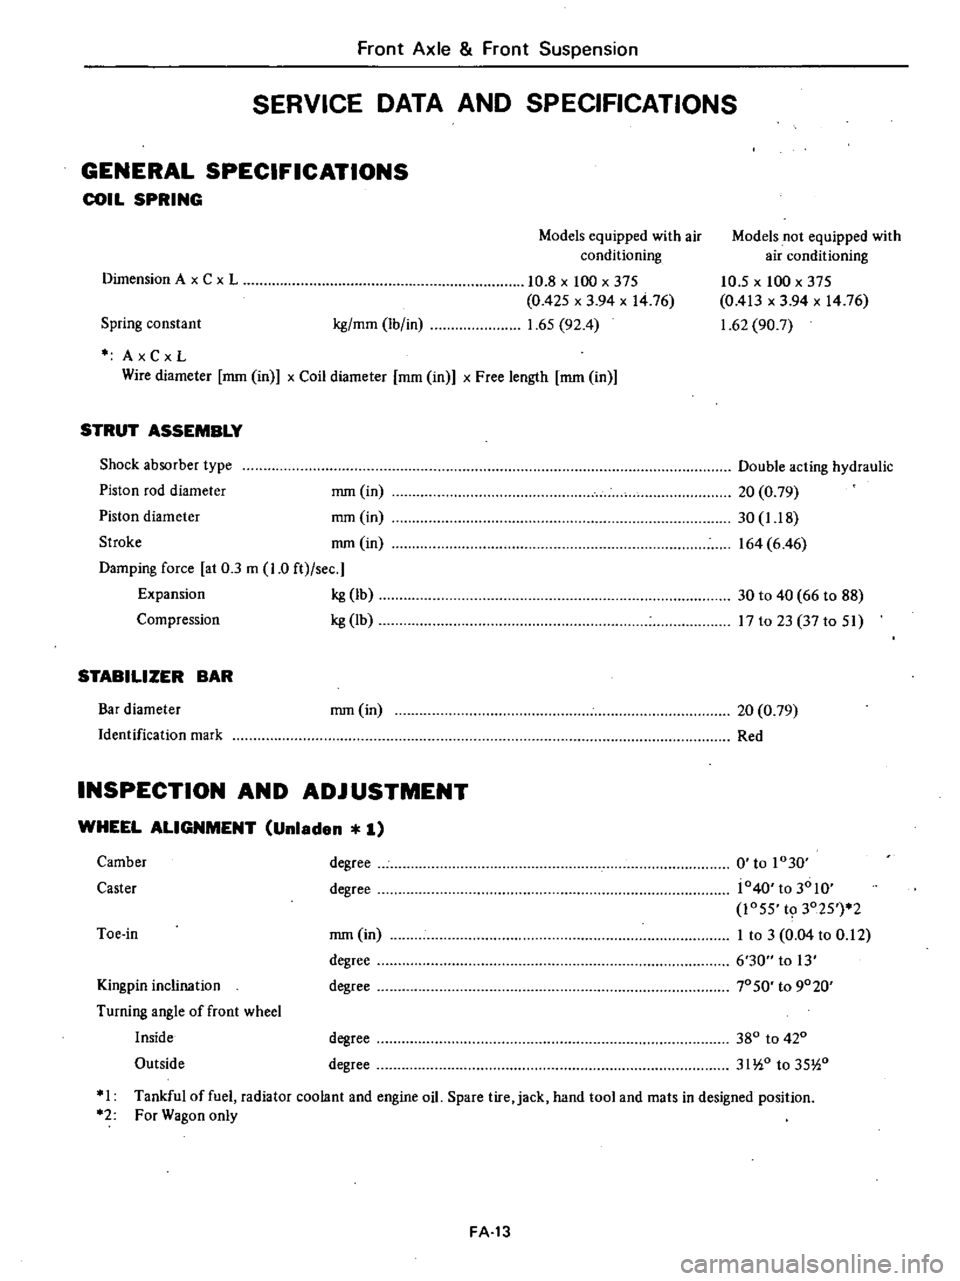
WHEEL
ALIGNMENT
Unladen
1
Kingpin
inclination
Turning
angle
of
front
wheel
Inside
Outside
mm
in
degree
degree
0
to
1030
j040
to
3010
1055
t9
3025
2
I
to
3
0
04
to
0
12
6
30
to
13
70
SO
to
9020
Camber
Caster
degree
degree
Toe
in
degree
degree
380
to
420
31
io
to
35
i0
I
Tankful
of
fuel
radiator
coolant
and
engine
oil
Spare
tire
jack
hand
tool
and
mats
in
designed
position
2
For
Wagon
only
FA
13
Page 338 of 548
Front
Axle
Front
Suspension
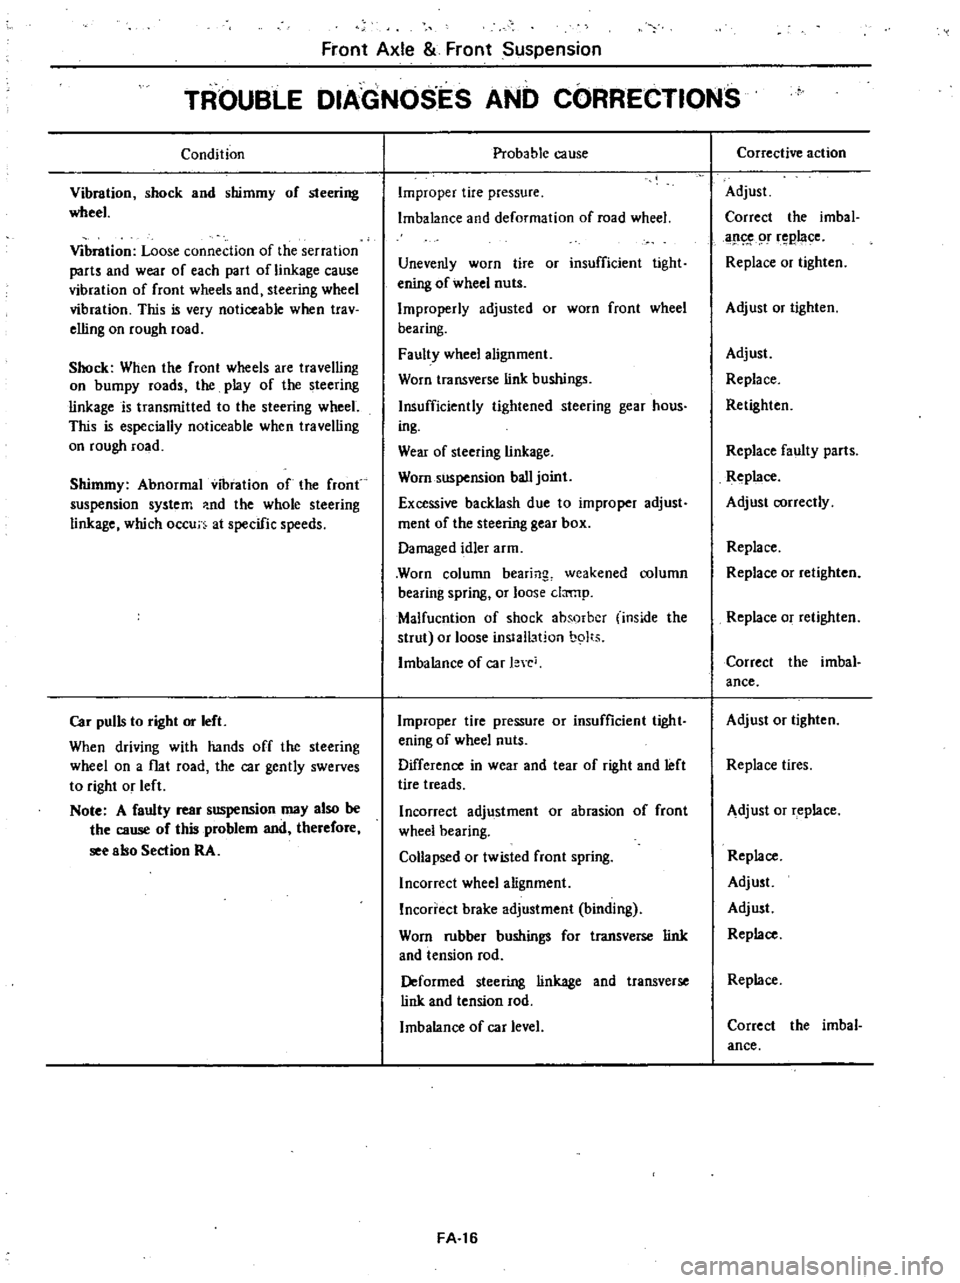
TROUBLE
DIAGNOSES
AND
CORRECTIONS
Condition
Vibration
shock
and
shimmy
of
steering
wheel
Vibration
Loose
connection
of
the
serration
parts
and
wear
of
each
part
of
linkage
cause
vibration
of
front
wheels
and
steering
wheel
vibration
This
is
very
noticeable
when
trav
elling
on
rough
road
Shock
When
the
front
wheels
are
travelling
on
bumpy
roads
the
play
of
the
steering
linkage
is
transmitted
to
the
steering
wheel
This
is
especially
noticeable
when
travelling
on
rough
road
Shimmy
Abnormal
vibration
of
the
front
suspension
system
nd
the
whole
steering
linkage
which
occu
at
specific
speeds
Car
pulls
to
right
or
left
When
driving
with
hands
off
the
steering
wheel
on
a
flat
road
the
car
gently
swerves
to
right
or
left
Note
A
faulty
rear
suspension
may
also
be
the
cause
of
this
problem
and
therefore
see
ebo
Section
RA
Proba
b
Ie
ca
use
Improper
tire
pressure
Imbalance
and
deformation
of
road
wheel
Unevenly
worn
tire
or
insufficient
tight
ening
of
wheel
nuts
Improperly
adjusted
or
worn
front
wheel
bearing
Faulty
wheel
alignment
Worn
transverse
link
bushings
Insufficiently
tightened
steering
gear
hous
ing
Wear
of
steering
linkage
Worn
suspension
ball
joint
Excessive
backlash
due
to
improper
adjust
ment
of
the
steering
gear
box
Damaged
idler
arm
Worn
column
bearing
weakened
column
bearing
spring
or
loose
drmp
Malfucntion
of
shock
absorber
inside
the
strut
or
loose
install3t
on
b9
t5
Imbalance
of
car
l
e
Improper
tire
pressure
or
insufficient
tight
ening
of
wheel
nuts
Difference
in
wear
and
tear
of
right
and
left
tire
treads
Incorrect
adjustment
or
abrasion
of
front
wheel
bearing
Collapsed
or
twisted
front
spring
Incorrect
wheel
alignment
Incorrect
brake
adjustment
binding
Worn
rubber
bushings
for
transverse
link
and
tension
rod
Deformed
steering
linkage
and
transverse
link
and
tension
rod
Imbalance
of
car
level
FA
16
Corrective
action
Adjust
Correct
the
imbal
ap
9f
r
B4I
e
Replace
or
tighten
Adjust
or
tighten
Adjust
Replace
Retighten
Replace
faulty
parts
Replace
Adjust
correctly
Replace
Replace
or
retighten
Replace
or
retighten
Correct
the
imbal
ance
Adjust
or
tighten
Replace
tires
Adjust
or
replace
Replace
Adjust
Adjust
Replace
Replace
Correct
the
imbal
ance
Page 339 of 548
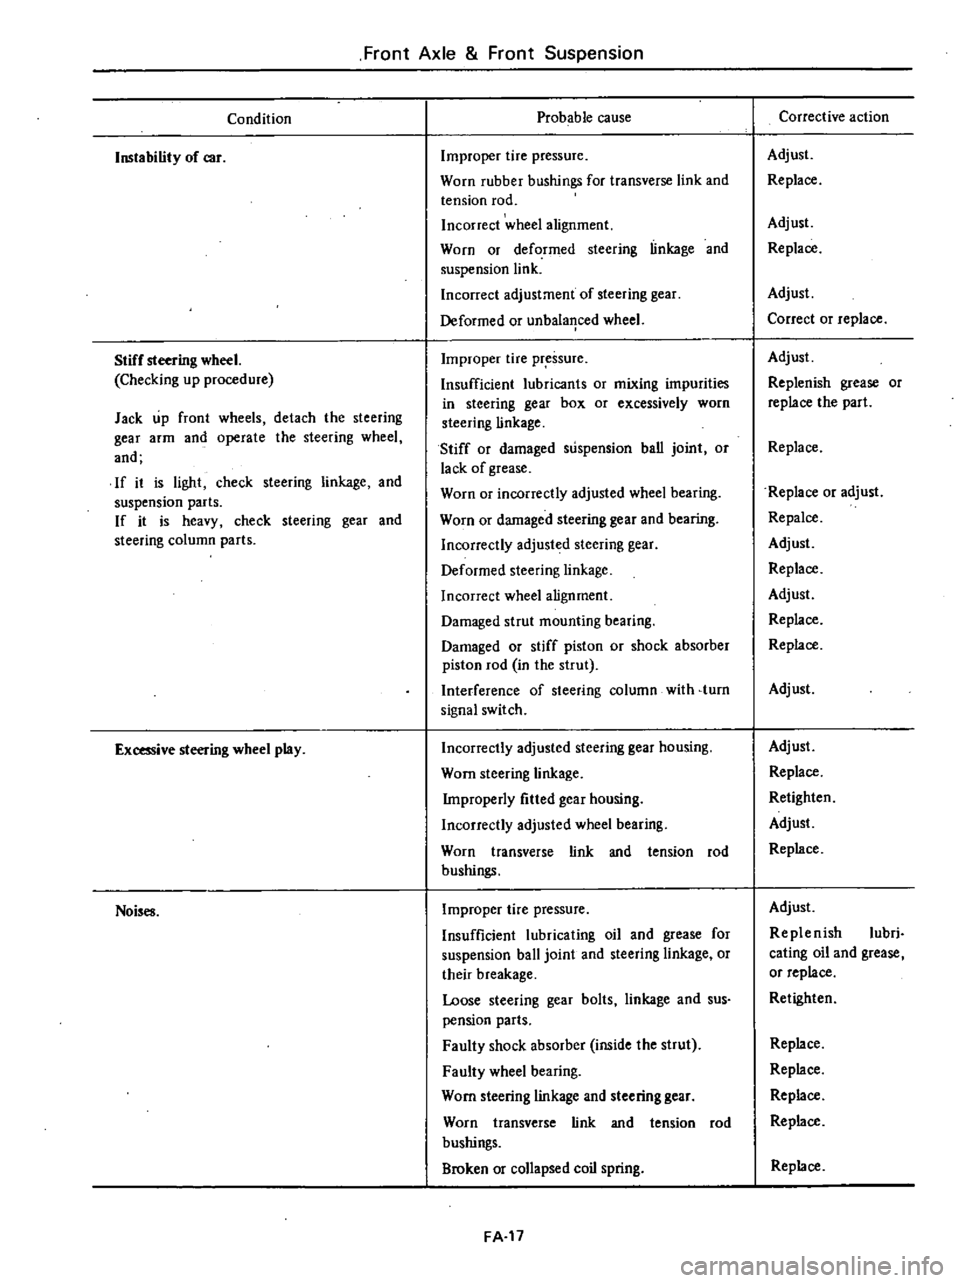
Front
Axle
Front
Suspension
Condition
Instability
of
car
Stiff
steering
wheel
Checking
up
procedure
Jack
up
front
wheels
detach
the
steering
gear
arm
and
operate
the
steering
wheel
and
If
it
is
light
check
steering
linkage
and
suspension
parts
If
it
is
heavy
check
steering
gear
and
steering
column
parts
Excessive
steering
wheel
play
Noises
Probable
cause
Improper
tire
pressure
Worn
rubber
bushings
for
transverse
link
and
tension
rod
Incorrect
wheel
alignment
Worn
or
deformed
steering
linkage
and
suspension
link
Incorrect
adjustment
of
steering
gear
Deformed
or
unbala
1ced
wheel
Improper
tire
pressure
Insufficient
lubricants
or
mixing
impurities
in
steering
gear
box
or
excessively
worn
steering
linkage
Stiff
or
damaged
suspension
ban
joint
or
lack
of
grease
Worn
or
incorrectly
adjusted
wheel
bearing
Worn
or
damaged
steering
gear
and
bearing
Incorrectly
adjusted
steering
gear
Deformed
steering
linkage
Incorrect
wheel
alignment
Damaged
strut
mounting
bearing
Damaged
or
stiff
piston
or
shock
absorber
piston
rod
in
the
strut
Interference
of
steering
column
with
turn
signal
switch
Incorrectly
adjusted
steering
gear
housing
Worn
steering
linkage
Improperly
fitted
gear
housing
Incorrectly
adjusted
wheel
bearing
Worn
transverse
link
and
tension
rod
bushings
Improper
tire
pressure
Insufficient
lubricating
oil
and
grease
for
suspension
ball
joint
and
steering
linkage
or
their
breakage
Loose
steering
gear
bolts
linkage
and
sus
pension
parts
Faulty
shock
absorber
inside
the
strut
Faulty
wheel
bearing
Worn
steering
linkage
and
steering
gear
Worn
transverse
link
and
tension
rod
bushings
Broken
or
collapsed
coil
spring
FA
17
Corrective
action
Adjust
Replace
Adjust
Replace
Adjust
Correct
or
replace
Adjust
Replenish
grease
or
replace
the
part
Replace
Replace
or
adjust
Repalce
Adjust
Replace
Adjust
Replace
Replace
Adjust
Adjust
Replace
Retighten
Adjust
Replace
Adjust
Replenish
lubri
cating
oil
and
grease
or
replace
Retighten
Replace
Replace
Replace
Replace
Replace
Page 340 of 548
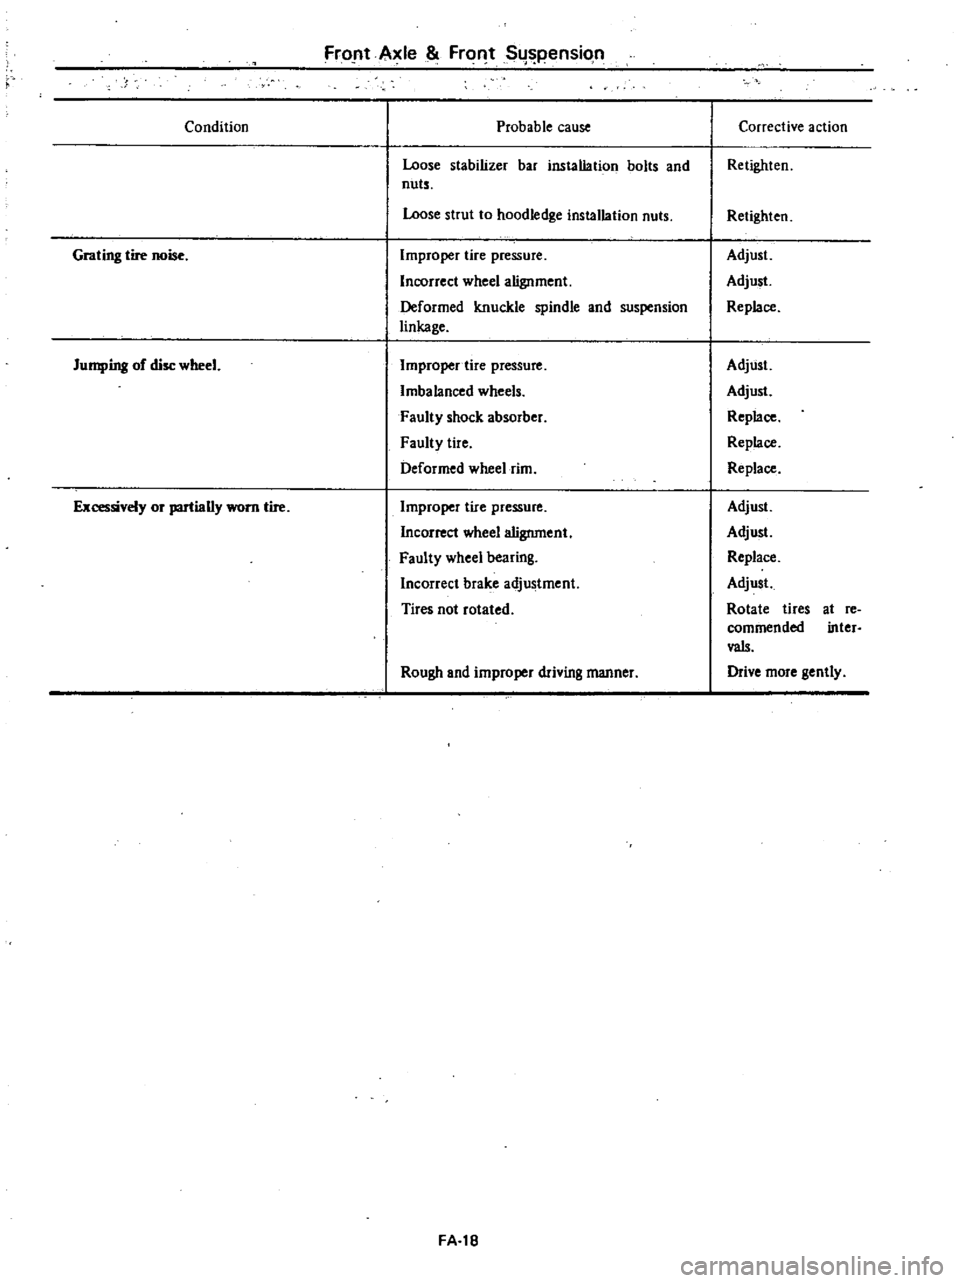
Front
Axle
Front
Suspension
Condition
Probable
cause
Loose
stabilizer
bar
installation
bolts
and
nuts
Loose
strut
to
hoodledge
installation
nuts
Grating
tire
noise
Improper
tire
pressure
Incorrect
wheel
alignment
Deformed
knuckle
spindle
and
suspension
linkage
Jumping
of
disc
wheel
Improper
tire
pressure
Imbalanced
wheels
Faulty
shock
absorber
Faulty
tire
Deformed
wheel
rim
Ex
t
J1
or
partially
worn
tire
Improper
tire
pressure
Incorrect
wheel
alignment
Faulty
wheel
bearing
Incorrect
brake
adjustment
Tires
not
rotated
Rough
and
improper
driving
manner
FA
18
Corrective
action
Retighten
Retighten
Adjust
Adjust
Replace
Adjust
Adjust
Replace
Replace
Replace
Adjust
Adjust
Replace
Adjust
Rotate
tires
commended
vaIs
Drive
more
gently
at
re
inter
Page 351 of 548
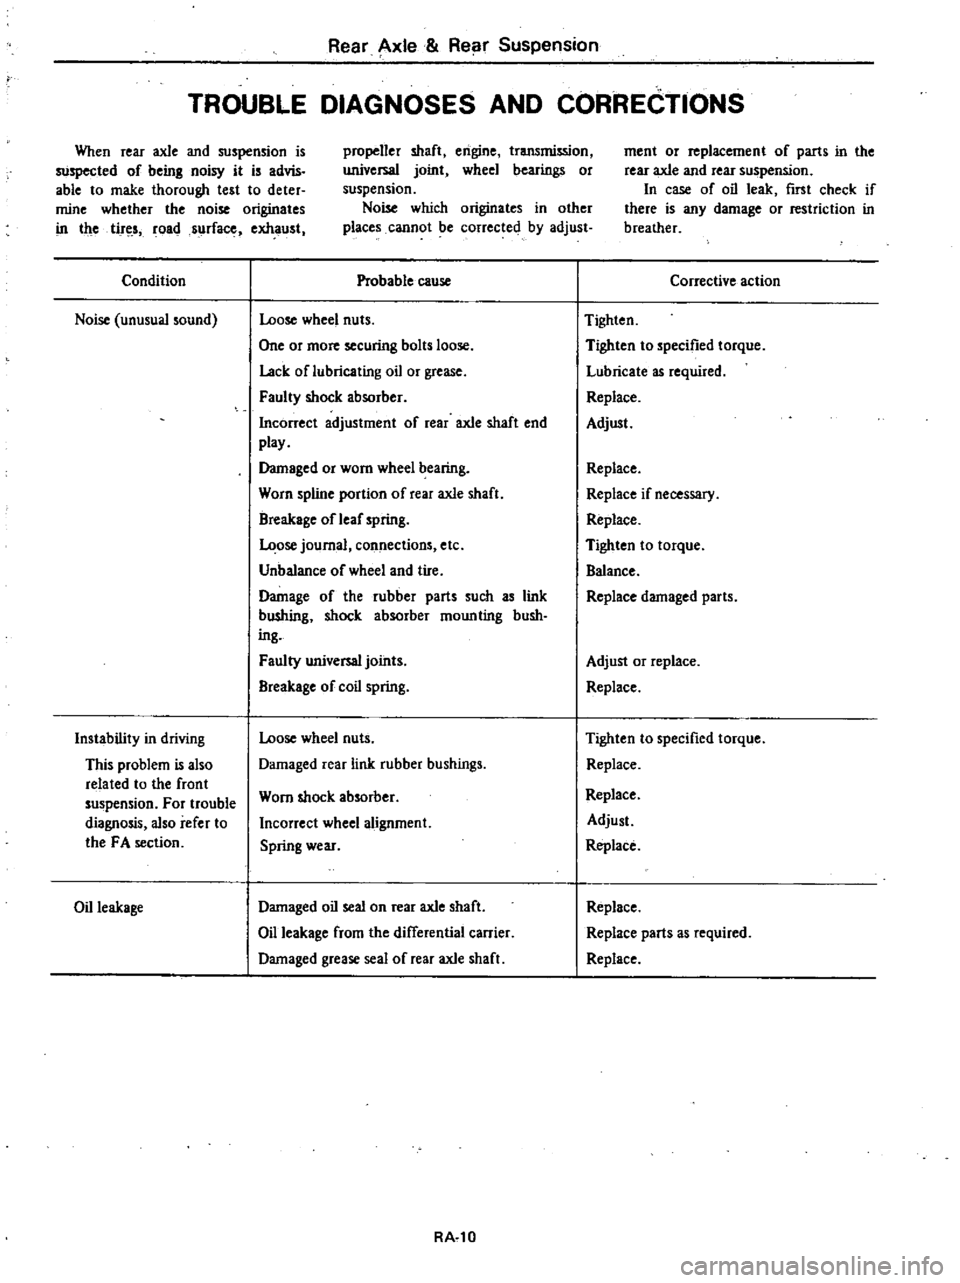
Rear
Axle
Rear
Suspension
TROUBLE
DIAGNOSES
AND
CORRECTIONS
When
rear
axle
and
suspension
is
suspected
of
being
noisy
it
is
advis
able
to
make
thorough
test
to
deter
mine
whether
the
noise
originates
in
the
tir
s
roads
rfac
exhaust
propeller
shaft
engine
transmission
universal
joint
wheel
bearings
or
suspension
Noise
which
originates
in
other
places
cannot
be
corrected
by
adjust
Condition
Noise
unusual
sound
Instability
in
driving
This
problem
is
also
related
to
the
front
suspension
For
trouble
diagnosis
also
refer
to
the
FA
section
Oil
leakage
Probable
cause
Loose
wheel
nuts
One
or
more
securing
bolts
loose
Lack
oflubricating
oil
or
grease
Faulty
shock
absorber
Incorrect
adjustment
of
rear
axle
shaft
end
play
Damaged
or
worn
wheel
bearing
Worn
spline
portion
of
rear
axle
shaft
Breakage
of
leaf
spring
ose
journal
connections
etc
Unbalance
of
wheel
and
tire
Damage
of
the
rubber
parts
such
as
link
bU
hing
shock
absorber
moun
ting
bush
ing
Faulty
universal
joints
Breakage
of
coil
spring
Loose
wheel
nuts
Damaged
rear
link
rubber
bushings
Worn
shock
absorber
Incorrect
wheel
alignment
Spring
wear
Damaged
oil
seal
on
rear
axle
shaft
Oil
leakage
from
the
differential
carrier
Damaged
grease
seal
of
rear
axle
shaft
RA
l0
ment
or
replacement
of
parts
in
the
rear
axle
and
rear
suspension
In
case
of
oil
leak
first
check
if
there
is
any
damage
or
restriction
in
breather
Corrective
action
Tighten
Tighten
to
specified
torque
Lubricate
as
required
Replace
Adjust
Replace
Replace
if
necessary
Replace
Tighten
to
torque
Balance
Replace
damaged
parts
Adjust
or
replace
Replace
Tighten
to
specified
torque
Replace
Replace
Adjust
Replace
Replace
Replace
parts
as
required
Replace
Page 383 of 548
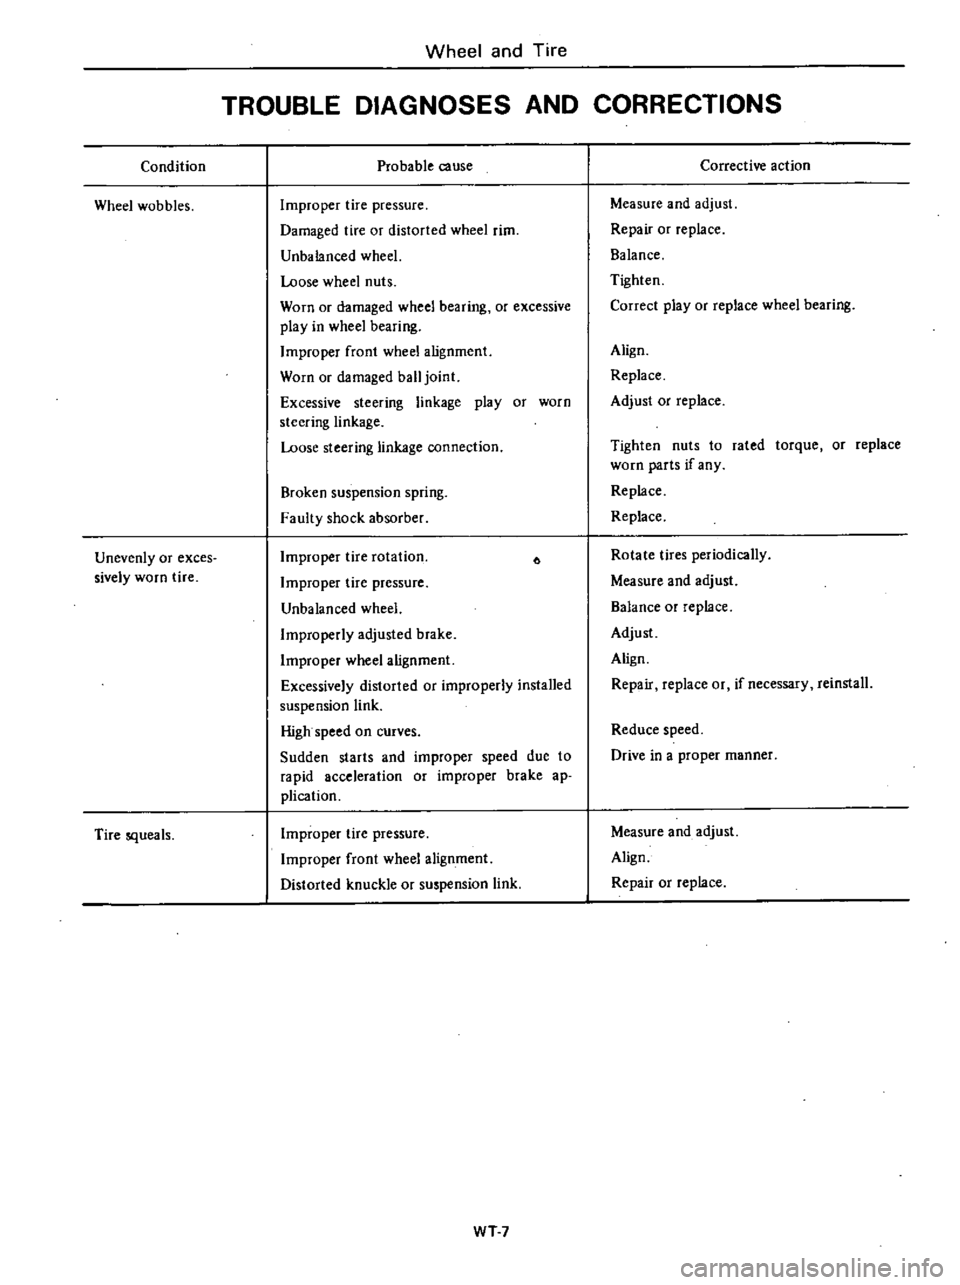
Condition
Wheel
wobbles
Unevenly
or
exces
sively
worn
tire
Tire
squeals
Wheel
and
Tire
TROUBLE
DIAGNOSES
AND
CORRECTIONS
Probable
cause
Improper
tire
pressure
Damaged
tire
or
distorted
wheel
rim
Unbalanced
wheel
Loose
wheel
nuts
Worn
or
damaged
wheel
bearing
or
excessive
play
in
wheel
bearing
Improper
front
wheel
alignment
Worn
or
damaged
ball
joint
Excessive
steering
linkage
play
or
worn
steering
linkage
Loose
steering
linkage
connection
Broken
suspension
spring
Faulty
shock
absorber
Improper
tire
rotation
Improper
tire
pressure
Unbalanced
wheel
Improperly
adjusted
brake
Improper
wheel
alignment
Excessively
distorted
or
improperly
installed
suspension
link
High
speed
on
curves
Sudden
starts
and
improper
speed
due
to
rapid
acceleration
or
improper
brake
ap
plication
Improper
tire
pressure
Improper
front
wheel
alignment
Distorted
knuckle
or
suspension
link
WT7
Corrective
action
Measure
and
adjust
Repair
or
replace
Balance
Tighten
Correct
play
or
replace
wheel
bearing
Align
Replace
Adjust
or
replace
Tighten
nuts
to
rated
torque
or
replace
worn
parts
if
any
Replace
Replace
Rotate
tires
periodically
Measure
and
adjust
Balance
or
replace
Adjust
Align
Repair
replace
or
if
necessary
reinstall
Reduce
speed
Drive
in
a
proper
manner
Measure
and
adjust
Align
Repair
or
replace
Page 393 of 548
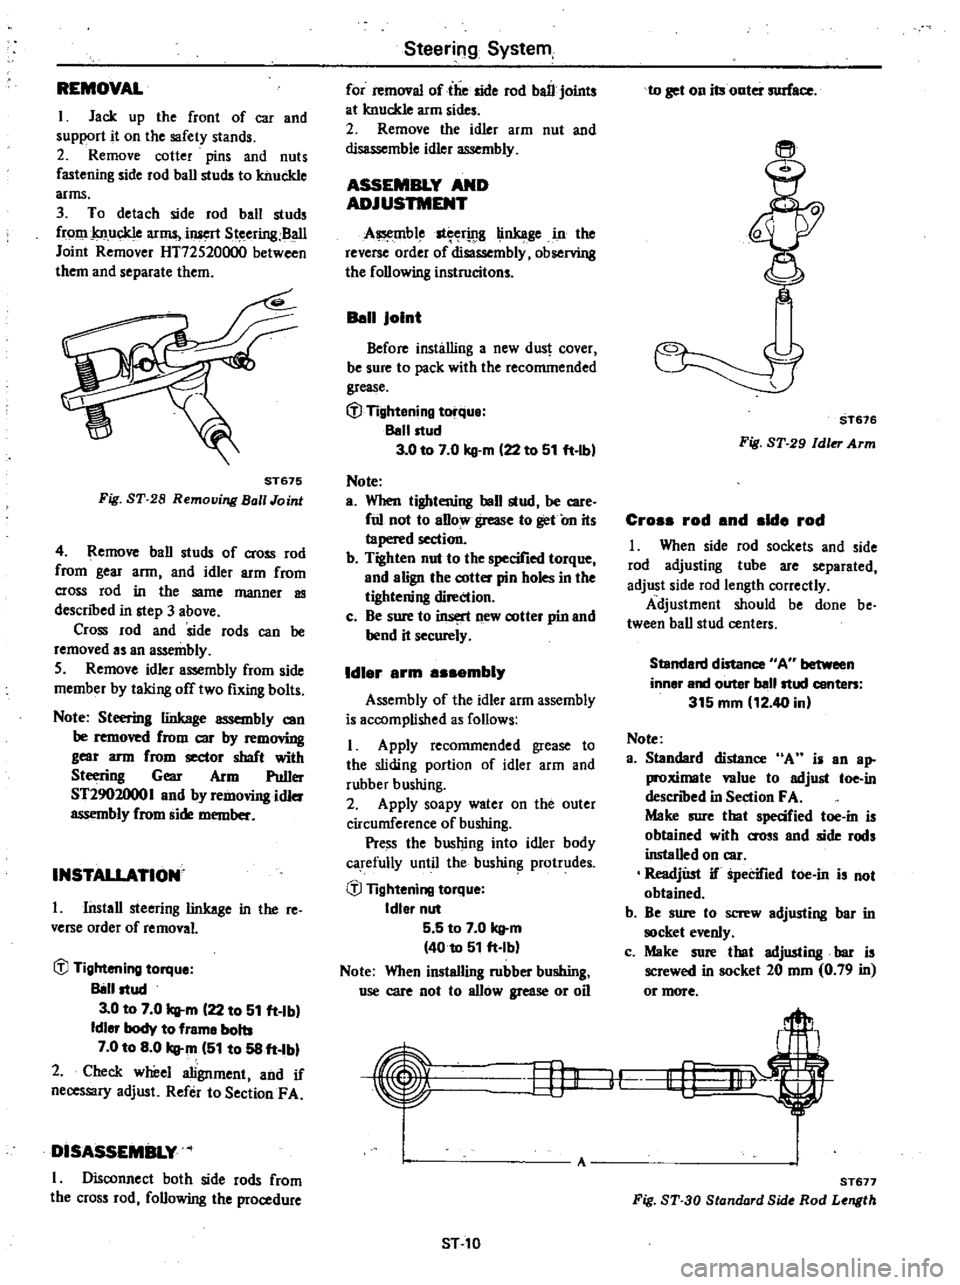
REMOVAL
I
Jack
up
the
front
of
car
and
support
it
on
the
safety
stands
2
Remove
cotter
pins
and
nuts
fastening
side
rod
ball
studs
to
knuckle
arms
3
To
detach
side
rod
ball
studs
from
knuckle
arms
iJuert
Steering
BaII
Joint
Remover
HT72520000
between
them
and
separate
them
ST675
Fig
ST
28
Remouing
Ball
Joint
4
Remove
ball
studs
of
cross
rod
from
gear
arm
and
idler
arm
from
cross
rod
in
the
same
manner
as
descnbed
in
step
3
above
Cross
rod
and
side
rods
can
be
removed
as
an
assembly
5
Remove
idler
assembly
from
side
member
by
taking
off
two
fixing
bolts
Note
Steering
linkage
assembly
can
be
removed
from
CIC
by
rem
mng
gear
arm
from
sector
shaft
with
Steering
Gear
Arm
Puller
ST2902000
I
and
by
removing
idler
assembly
from
side
member
INSTAllATION
I
Install
steering
linkage
in
the
re
verse
order
of
removal
iJJ
Tightening
torque
Il8l1ltud
3
0
to
7
0
q
m
122
to
51
ft
Ibl
Idler
body
to
frame
bolts
7
0
to
8
0
q
m
151
to
58
ft
Ibl
2
Check
wheel
alignment
and
if
necessary
adjust
Refer
to
SectionF
A
DISASSEMBLY
I
Disconnect
both
side
rods
from
the
cross
rod
following
the
procedure
Steering
System
for
removal
of
the
side
rod
ball
joints
at
knuckle
arm
sides
2
Remove
the
idler
arm
nut
and
disassemble
idler
assembly
ASSEMBLY
AND
ADJUSTMENT
A
mble
st
rwg
linkage
in
the
reverse
order
of
disassembly
observing
the
following
instrucitons
Ban
Joint
Before
installing
a
new
dus
cover
be
sure
to
pack
with
the
recommended
grease
t
J
Tightening
torque
Ballltud
3
0
to
7
0
kg
m
122
to
51
ft
lbl
Note
a
When
tightening
ball
stud
be
care
ful
not
to
aBow
grease
to
get
On
its
tapered
section
b
Tighten
nut
to
the
specified
torque
and
align
the
cotter
pin
holes
in
the
tightening
direction
c
Be
sure
to
insert
new
cotter
pin
and
bend
it
securely
Idl
r
rm
mbl
Assembly
of
the
idler
arm
assembly
is
accomplished
as
follows
I
Apply
recommended
grease
to
the
sliding
portion
of
idler
arm
and
rubber
bushing
2
Apply
soapy
water
on
the
outer
circumference
of
bushing
Pre
ss
the
bushing
into
idler
body
carefully
until
the
bushin
protrudes
iJJ
Tightening
torque
Idler
nut
5
5
to
7
0
q
m
4010
51
ft
Ib
Note
When
installing
rubber
bushing
use
care
not
to
allow
grease
or
oil
Hj1
ST
10
to
get
on
its
onter
surface
ST676
Fig
ST
29
Idler
Arm
Cro
rod
nd
Id
rod
I
When
side
rod
sockets
and
side
rod
adjusting
tube
are
separated
adjust
side
rod
length
correctly
Adjustment
should
be
done
be
tween
ball
stud
centers
Standard
distance
AU
between
inner
and
outer
ballltud
conte
315
mm
12
40
in
Note
a
Standard
distance
A
i
an
ap
proximale
value
to
adjust
toe
in
descnbed
in
Section
FA
Maire
sure
tbat
specified
toe
in
is
obtained
with
O
OSs
and
side
rods
installed
on
car
ReadjUst
if
Specified
toe
in
is
not
obtained
b
Be
sure
to
screw
adjusting
bar
in
clret
evenly
c
Make
sure
that
adjusting
bar
is
screwed
in
socket
20
mm
0
79
in
or
more
I
lf
A
ST
77
Fig
ST
30
Standard
Side
Rod
Length