remote control DATSUN 610 1969 Workshop Manual
[x] Cancel search | Manufacturer: DATSUN, Model Year: 1969, Model line: 610, Model: DATSUN 610 1969Pages: 171, PDF Size: 10.63 MB
Page 53 of 171

VP
F
rr
l
I
lip
J
I
I
ii
iI
a
l
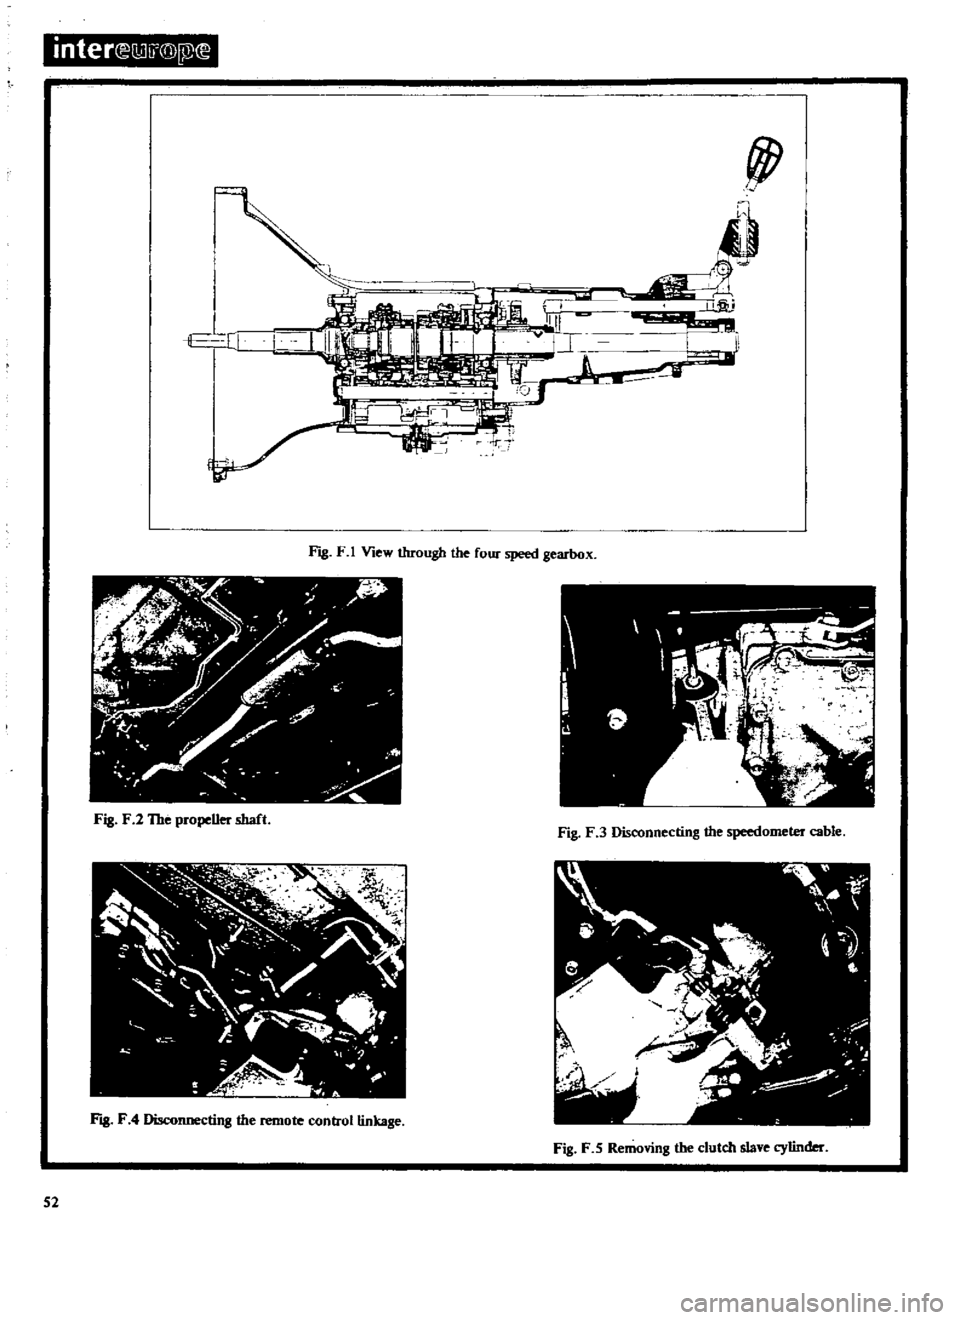
Fig
F
1
View
through
the
four
speed
gearbox
It
j
j
4
C
J
f
e
V
tJ
J
I
P
Fig
F
2
The
propeUer
shaft
Fig
F
3
Disconnecting
the
speedometer
cable
Fig
F
4
Disconnecting
the
remote
control
linkage
Fig
F
5
Removing
the
clutch
slave
cylinder
52
Page 156 of 171

Remove
the
road
wheel
and
disconnect
the
brake
hose
at
the
connector
as
shown
in
Fig
C
4
of
this
section
Remove
the
brake
calliper
assembly
and
hub
cap
Withdraw
the
cotter
pin
and
remove
the
wheel
bearing
locknut
Remove
the
wheel
bearing
washer
and
take
off
the
hub
and
brake
disc
Fig
C
5
Remove
the
bearing
collar
take
out
the
outer
bearing
cage
and
prise
out
the
hub
grease
seal
Remove
the
inner
bearing
cage
and
drive
out
the
outer
races
of
the
inner
and
outer
bearings
using
the
special
drift
ST49120000
if
avail
able
Separate
the
brake
disc
from
the
hub
by
taking
out
the
retaining
bolts
as
shown
in
Fig
C
6
Installation
is
a
reversal
of
the
removal
procedure
Adjust
the
wheel
bearings
as
previously
described
taking
care
to
tighten
the
wheel
bearing
locknut
to
the
specified
torque
read
ing
of
3
0
to
3
5
kgm
21
7
to
25
3lb
ft
Turn
the
hub
several
times
to
settle
the
bearing
then
retighten
the
nut
to
the
same
figure
Slacken
the
locknut
by
a
quarter
turn
900
and
insert
the
cotter
pin
when
the
hole
in
the
spindle
is
aligned
with
the
hole
in
the
nut
Check
that
the
force
required
to
turn
the
hub
is
less
than
7
0
kg
cm
97
2
in
oz
STABILIZER
Removal
and
Installation
Remove
the
splash
board
and
take
off
the
bolts
I
in
Fig
C
7
which
attach
the
stabilizer
at
the
transverse
link
sides
Remove
the
bolts
attaching
the
stabilizer
bracket
2
to
the
frame
then
withdraw
the
stabilizer
Check
the
bar
and
rubber
components
for
signs
of
deforma
tion
or
damage
and
renew
as
necessary
Installation
is
a
reversal
of
the
removal
procedures
Tighten
the
fixing
bolts
to
a
torque
reading
of
1
2
to
I
7
kgm
8
7
to
12
3
lb
ft
at
the
transverse
link
side
and
1
9
to
2
5
kgm
13
7
to
18
llb
ft
at
the
frame
bracket
SPRING
AND
STRUT
ASSEMBLY
The
spring
and
strut
assembly
can
be
serviced
by
following
the
instructions
previously
given
for
the
assemblies
on
vehicles
fitted
with
the
L14
L16
and
Ll8engines
When
reassembling
make
sure
that
the
parts
shown
in
Fig
C
8
are
thomughly
greased
Installation
of
the
assembly
will
be
accomplished
more
easily
if
the
dust
cover
on
the
bonnet
ledge
is
removed
Tighten
the
nuts
and
bolts
to
a
torque
figures
given
in
TIGHTENING
TORQUES
TRANSVERSE
LINK
AND
LOWER
BALL
JOINT
The
transverse
link
and
lower
ball
joint
can
be
removed
in
a
similar
manner
to
the
parts
on
vehicles
fitted
with
L
14
L
16
and
L
18
engines
Renew
the
link
if
cracked
or
damaged
in
any
way
Check
the
measurement
A
in
Fig
C
9
The
measurement
between
front
and
rear
transverse
link
bushes
should
be
less
than
1
0
mm
0
039
in
Replace
the
bushes
if
necessary
The
lower
ball
joint
should
be
replaced
if
the
axial
play
of
the
joint
exceeds
0
03
to
0
6
mm
0
0012
to
0
0136
in
A
grease
nipple
must
be
installed
in
place
of
the
ball
joint
plug
so
that
the
joint
can
be
lubricated
with
multi
purpose
grease
as
previously
described
SUSPENSION
MEMBER
Removing
and
Installing
Jack
up
the
vehicle
and
support
it
on
stands
2
Remove
the
splash
board
Refer
to
Fig
C
I
0
and
detach
the
compression
rod
I
the
stabilizer
2
from
the
trans
verse
link
3
Detach
the
steering
linkage
from
the
suspen
sion
crossmember
4
3
Take
out
the
nuts
attaching
the
transverse
links
and
remove
the
links
at
both
sides
of
the
vehicle
4
Support
the
engine
with
a
hoist
as
shown
in
Fig
C
II
taking
care
not
to
damage
the
throttle
and
remote
control
linkages
and
then
remove
the
engine
mounting
bolts
at
both
sides
5
Remove
the
bolts
shown
arrowed
in
Fig
C
12
and
lift
the
suspension
member
away
Renew
the
suspension
member
if
it
is
cracked
or
deformed
in
any
way
Installation
is
a
reversal
of
the
removal
procedure
FRONT
WHEEL
ALIGNMENT
As
previously
stated
the
castor
and
camber
angles
are
preset
and
cannot
be
adjusted
A
thorough
check
should
be
made
of
the
steering
and
suspension
system
and
all
defective
parts
renewed
if
the
angles
are
incorrect
See
Technical
Data
The
front
wheels
should
toe
in
12
to
15
mm
0
4
7
to
0
59
in
Adjustment
can
be
carried
out
by
slackening
the
locknuts
1
in
Fig
C
13
and
then
turning
the
tie
rods
by
an
equal
amount
until
the
correct
toe
in
is
achieved
A
toe
in
gauge
will
of
course
be
required
for
this
operation
STEERING
WHEEL
AND
COLUMN
Removal
Disconnect
the
horn
wire
and
remove
the
horn
bar
Remove
the
steering
wheel
nut
and
pull
off
the
steering
wheel
2
Remove
the
turn
signal
and
lighting
switch
assembly
followed
by
the
steering
column
shell
covers
3
Remove
the
bolts
from
the
rubber
coupling
to
disconnect
the
lower
joint
See
Figs
C
14
and
C
I
5
if
the
car
is
fitted
with
right
hand
drive
The
lower
joint
upper
bolt
should
be
removed
to
disconnect
the
joint
if
the
car
is
fitted
with
left
hand
drive
4
Remove
the
cotter
pin
from
the
trunnion
and
disconnect
the
gearchange
rod
and
selector
rod
5
Remove
the
steering
column
upper
clamp
and
take
out
the
bolts
securing
the
lower
plate
STEERING
COLUMN
Dismantling
and
Assembling
Remove
the
C
washer
socket
screw
and
upper
bracket
bolt
Remove
the
lower
bracket
bolts
and
detach
the
remote
control
linkage
from
the
column
assembly
Remove
the
snap
ring
at
the
top
of
the
column
and
extract
the
column
shaft
from
the
jacket
Disconnect
the
rubber
coupling
from
the
lower
joint
then
remove
the
snap
ring
and
dismantle
the
lower
joint
S25
Page 158 of 171

Gean
all
parts
thoroughly
and
renew
if
damaged
If
the
column
shaft
or
jacket
is
excessively
damaged
the
steering
gear
housing
must
be
checked
A
damaged
bearing
must
be
replaced
together
with
the
column
jacket
assembly
Assembly
is
a
reversal
of
the
dismantling
procedures
The
column
shaft
journal
should
be
lubricated
with
multipurpose
grease
which
can
also
be
used
to
fill
up
the
dust
cover
Grease
the
needle
bearing
when
assembling
the
universal
joint
Use
the
tightest
snap
ring
available
when
fitting
the
needle
bearing
Snap
rings
are
supplied
in
oversizes
of
0
95
mm
05
mm
and
1
5
mm
0
0374
0
0413
and
0
0453
in
Installation
of
the
column
assembly
is
a
reversal
of
the
removal
procedures
Tighten
the
rubber
coupling
bolts
to
a
torque
reading
of
I
S
to
1
8
kgm
I
0
8
to
13
0
Ib
ft
Refit
the
steering
wheel
and
tighten
the
nut
to
a
reading
of
4
0
to
5
0
kgm
28
9
to
36
2Ib
ft
RACK
AND
PINION
AND
TIE
ROD
Removing
and
Dismantling
1
Jack
up
the
vehicle
and
support
it
on
stands
Remove
the
road
wheels
2
Slacken
the
bolts
connecting
the
pinion
to
the
steering
lower
joint
See
Figs
C
16
3
Remove
the
bolts
from
the
steering
column
rubber
coupl
ing
See
Fig
C
15
and
remove
the
splash
board
Fig
C
17
4
Remove
the
tie
rod
ball
stud
nut
and
disconnect
the
tie
rod
from
the
knuckle
arm
Fig
C
I8
5
Lift
the
engine
slightly
with
suitable
tackle
but
take
care
not
to
damage
the
accelerator
or
remote
control
linkage
Remove
the
bolts
securing
the
steering
gear
housing
to
the
suspension
member
Withdraw
the
rack
and
pinion
assem
bly
Dismantle
as
follows
Detach
the
steering
lower
joint
from
the
rack
and
pinion
assembly
Clamp
the
unit
in
a
vice
taking
care
not
to
damage
the
steering
gear
housing
Refer
to
Fig
C
16
and
take
off
the
dust
cover
and
boot
clamps
at
both
sides
Slacken
the
stopper
nut
remove
the
tie
rod
inner
socket
and
disconnect
the
tie
rods
from
the
rack
Withdraw
the
spring
seat
and
tie
rod
spring
Take
off
the
steering
gear
boots
at
both
sides
Slacken
the
locknut
and
disconnect
the
tie
rod
outer
socket
from
the
ball
Slacken
the
locknut
remove
the
retainer
adjusting
screw
and
withdraw
the
steering
gear
retainer
See
Fig
C
19
Take
off
the
oil
seal
remove
the
snap
ring
and
withdraw
the
pinion
Remove
the
snap
ring
and
withdraw
the
bearing
from
the
pinion
Remove
the
filler
plug
and
take
out
the
rack
Remove
the
grease
reservoir
Clcan
all
parts
thoroughly
and
replace
any
which
show
signs
of
wear
or
damage
Check
the
axial
play
of
the
inner
and
outer
ball
joints
The
play
should
be
0
06
mm
0
0024
in
for
the
inner
ball
joint
and
from
0
1
to
0
5
mm
0
0039
to
0
0197
in
for
the
outer
joints
Use
a
spring
balance
to
check
the
force
required
to
swing
the
ball
joints
this
should
be
between
0
8
to
LS
kgm
5
8
to
10
8Ib
ft
Renew
the
oil
seal
Examine
the
retainer
and
tie
rod
springs
and
compare
them
with
the
values
given
in
Figs
C
20
and
c
n
RACK
AND
PINION
AND
TIE
ROD
Assembling
and
Adjusting
Press
the
bearing
on
to
the
pinion
gear
and
fi
t
the
tigh
test
snap
ring
available
Snap
rings
are
supplied
in
the
following
over
sizes
Snap
Ring
Thicknesses
1
04
to
1
09
mm
0
0409
to
0
0429
in
1
09
to
I
14
mm
0
0429
to
0
0449
in
1
14toI19mm
0
0449toO
0469in
Ll9
to
1
24
mm
0
0469
to
0
0488
in
1
24
to
1
29
mm
0
0488
to
0
0502
in
Clamp
the
steering
gear
housing
in
a
vice
Grease
the
teeth
and
friction
surfaces
of
the
rack
with
multipurpose
grease
Lubricate
the
gear
housing
from
the
pinion
housing
side
Ensure
that
the
rack
projects
by
an
equal
amount
of
96
mm
3
8
in
in
both
ends
of
the
housing
with
the
rack
teeth
directed
towards
the
pinion
shaft
Grease
the
pinion
teeth
end
bushing
and
pinion
bearing
Engage
the
tccth
of
the
pinion
with
the
rack
and
insert
the
pinion
Make
sure
that
the
bushing
does
not
become
damaged
The
rack
must
project
from
the
housing
by
an
equal
amount
at
each
side
with
the
groove
on
the
pinion
serration
facing
upwards
Fit
the
snap
ring
into
the
housing
groove
to
hold
the
bearing
outer
race
in
position
The
snap
ring
must
fit
tightly
and
can
be
selected
from
the
following
oversizes
Snap
Ring
Thicknesses
LS5
to
1
60
mm
0
0610
to
0
0630
in
1
60
to
1
65
mm
0
0630
to
0
0650
in
1
65
to
I
70
mm
0
0650
to
0
0669
in
1
70
to
I
75
mm
0
0669
to
0
0689
in
Fit
the
oil
seal
Use
a
dial
gauge
as
shown
in
Fig
C
22
to
check
the
thrust
play
of
the
pinion
The
play
should
be
less
than
0
09mm
0
0035
in
Grease
the
retainer
and
insert
it
with
the
spring
Tighten
the
retainer
adjusting
screw
fully
then
back
it
off
by
20
to
25
degrees
Tighten
the
locknut
to
a
torque
reading
of
4
0
to
6
0
kgm
28
9
to
43
4lb
ft
Coat
the
locknut
with
liquid
pack
ing
Three
Bond
When
the
rack
and
pinion
is
assembled
measure
the
force
required
to
rotate
the
pinion
and
also
the
preload
of
the
rack
Use
a
spring
balance
as
shown
in
Figs
C
23
and
C
24
and
check
that
the
pinion
torque
is
8
to
20
kg
cm
7
to
17
Ib
in
and
the
rack
preload
is
from
8
to
18
kg
17
6
to
39
7Ibs
Take
care
to
slide
the
assembly
over
the
complete
range
of
the
stroke
Fit
a
dust
cover
clamp
at
each
end
of
the
housing
Install
the
stop
nut
on
the
threads
of
the
rack
Liberally
grease
the
ball
joint
friction
area
of
the
tie
rod
assembly
Assemble
the
spring
and
ball
seat
and
fit
the
inner
socket
part
of
the
tie
rod
assembly
to
the
rack
Make
sure
the
boot
is
positioned
at
the
ball
stud
end
Note
that
the
left
hand
tie
rod
is
marked
with
an
L
the
right
hand
rod
is
not
marked
527