steering wheel adjustment DATSUN 610 1969 Workshop Manual
[x] Cancel search | Manufacturer: DATSUN, Model Year: 1969, Model line: 610, Model: DATSUN 610 1969Pages: 171, PDF Size: 10.63 MB
Page 60 of 171
THREE
SPEED
GEARBOX
GEARCHANGE
CONTROL
LINKAGE
Fig
F
35
As
previously
described
the
three
speed
gearbox
is
equipped
with
a
steering
column
gearchange
linkage
system
which
incorporates
a
collapsible
control
rod
when
combined
with
the
collapsible
type
of
steering
column
assembly
The
gearchange
linkage
can
be
removed
and
inspected
in
the
following
manner
Remove
the
steering
wheel
Fig
F
36
and
take
off
the
steering
column
shell
cover
Remove
the
turn
signal
and
lighting
switch
Fig
F
37
These
removal
details
can
also
be
found
in
the
section
STEERING
Remove
the
C
washer
I
in
Fig
F
38
and
the
washer
then
remove
the
upper
support
bracket
by
releasing
the
locating
bolt
and
screw
The
control
rod
insert
with
bush
and
return
spring
can
now
be
removed
Remove
the
snap
and
gear
lever
pivot
pin
and
withdraw
the
gearlever
Remove
the
cotter
pin
plain
washer
and
spring
washer
and
disconnect
the
shift
rods
from
the
gear
selector
levers
Fig
F
39
Unscrew
the
bolts
securing
the
lower
support
bracket
and
the
clamp
Remove
the
clamp
and
gear
change
lever
retainer
Remove
the
second
third
speed
selector
lever
the
lower
support
bracket
and
the
first
reverse
selector
lever
from
the
control
rod
Withdraw
the
control
rod
Disconnect
the
gear
change
rods
by
removing
the
cotter
pins
and
remove
the
cross
shaft
bracket
from
the
side
member
Withdraw
the
cross
shaft
assembly
Fig
F
40
Examine
the
components
for
signs
of
wear
and
damage
and
replace
if
necessary
Installation
is
a
reversal
of
the
removal
procedure
noting
the
following
points
Take
care
not
to
strike
or
apply
a
load
to
the
collapsible
type
of
control
rod
or
the
rod
may
be
damaged
The
rod
should
not
be
slack
in
the
axial
direction
when
installed
and
must
be
removed
if
slackness
is
detected
Coat
the
sliding
surfaces
with
grease
before
assembling
them
Acijusting
Set
the
gear
lever
to
the
neutral
position
and
temporarily
connect
the
trunnion
on
the
lower
support
bracket
to
each
rod
Fig
F41
Set
the
rod
on
the
lever
so
that
the
neutral
adjustment
grooves
on
the
upper
surface
of
the
lower
support
bracket
are
aligned
with
the
grooves
on
each
lever
When
the
adjustment
is
completed
operate
the
gear
lever
to
select
each
gear
and
make
sure
that
the
lever
can
be
moved
smoothly
and
positively
AUTOMATIC
TRANSMISSION
Gearchange
control
linkage
The
automatic
transmission
gear
change
control
linkage
can
be
removed
in
a
similar
manner
to
the
three
speed
gearbox
linkage
Carry
out
the
operations
previously
described
under
the
relevant
heading
as
far
as
the
removal
of
the
gear
lever
and
proceed
as
follows
Disconnect
the
upper
selector
rod
from
the
selector
lever
by
removing
the
cotter
pin
plain
washer
and
lock
washer
See
Fig
F
42
Remove
the
speed
range
position
plate
the
snap
ring
at
the
lower
end
of
the
control
rod
and
unscrew
and
remove
the
lower
support
bracket
Release
the
locking
screw
and
with
draw
the
selector
lever
assembly
Withdraw
the
control
rod
disconnect
the
selector
rods
and
remove
the
cross
shaft
bracket
and
cross
shaft
assembly
Clean
all
parts
and
repair
or
renew
any
part
which
is
worn
or
damaged
Installation
is
a
reversal
of
the
removal
procedure
noting
the
following
points
Coat
all
the
sliding
surfaces
with
chassis
grease
prior
to
assembling
Set
the
converter
side
lever
and
the
gear
lever
in
the
neutral
position
Install
the
upper
selector
rod
to
the
selector
lever
and
adjust
the
gear
position
plate
to
give
a
clearance
of
0
5
I
Omm
0
02
0
04
in
between
the
selector
lever
stop
pin
and
the
position
plate
The
adjustment
can
be
obtained
by
turning
the
selector
rod
adjusting
nuts
Finally
tighten
the
nuts
on
each
side
of
the
trunnion
S9
Page 89 of 171
Removal
from
the
vehicle
can
be
carried
out
in
the
following
manner
Jack
up
the
front
of
the
vehicle
and
support
it
on
stands
2
Remove
the
stabilizer
bar
and
tension
rod
from
the
transverse
link
as
previously
described
Remove
the
knuckle
arm
fixing
bolts
and
separate
the
ball
joint
from
the
strut
asse
m
bly
3
Remove
the
transverse
link
mounting
bolt
Fig
J
16
and
detach
the
transverse
link
from
the
suspension
member
Remove
the
cotter
pin
from
the
knuckle
arm
castle
nut
and
remove
the
knuckle
arm
from
the
ban
joint
Unfasten
the
ball
joint
securing
nut
and
withdraw
the
ball
joint
from
the
transverse
link
r
The
bushing
can
be
withdrawn
from
the
transverse
link
using
a
press
and
the
special
tools
shown
in
Fig
J
17
TRANSVERSE
LINK
AND
LOWER
BALL
JOINT
Inspection
The
transverse
link
bushing
is
shown
in
Fig
J
18
If
the
rubber
and
inner
tube
joints
are
melted
or
cracked
the
complete
transverse
link
assembly
must
be
replaced
The
ban
joint
cannot
be
dismantled
and
should
be
replaced
if
the
dust
cover
is
split
or
if
the
axial
play
of
the
joint
exceeds
1
0
mm
0
039
in
Oleck
the
axial
play
with
a
spring
balance
The
force
required
at
the
cotterpin
hole
pOsition
is
between
6
6
1
I
3
kg
15
25
lb
Lubricate
the
ball
joint
with
multi
purpose
grease
every
50
000
km
30
000
miles
or
two
year
whichever
comes
first
A
grease
nipple
must
be
installed
in
place
of
the
plug
See
Fig
J
19
and
the
old
grease
completely
replaced
If
a
high
pressure
grease
gun
j
used
make
sure
that
the
grease
is
injected
slowly
and
is
not
forced
out
through
the
joint
clamp
Remove
the
grease
nipple
and
replace
the
plug
TRANSVERSE
LINK
AND
BALL
JOINT
Installation
Installation
is
a
reversal
of
the
removal
procedure
noting
the
following
points
Remove
all
rust
from
the
transverse
link
bushing
interior
with
a
piece
of
emery
cloth
The
bushing
and
transverse
link
bore
should
be
wetted
with
soapy
water
so
that
the
bushing
can
be
more
easily
inserted
Fit
the
bushing
into
the
transverse
link
using
the
special
tool
ST
36700000
Adjust
the
bushing
inner
tubes
so
that
the
distances
from
the
transverse
link
collar
ends
are
equal
at
both
sides
88
Install
the
lower
ball
joint
on
the
transverse
link
and
tighten
the
installation
bolt
to
a
torque
reading
of
1
9
5kgm
14
18Ib
ft
Oean
the
knuckle
arm
and
the
ball
joint
stud
install
the
knuckle
arm
on
the
ball
joint
and
tighten
the
castle
nut
to
a
torque
reading
of
5
5
74
kgm
4o
53Ib
ft
fit
the
cotterpin
and
bend
it
over
Apply
sealing
agent
over
the
ball
joint
castle
nut
to
prevent
the
formation
of
rust
Locate
the
knuckle
arm
beneath
the
strut
assembly
and
tighten
the
mounting
bolts
to
a
torque
reading
of
4
9
63kgm
35
46Ib
ft
Make
sure
that
the
shorter
of
the
bolts
is
fitted
at
the
front
Install
the
transverse
link
on
the
suspension
crossrnember
and
temporarily
tighten
the
mounting
bolts
Make
sure
that
the
nut
faces
the
front
of
the
car
and
not
the
bolt
head
Fit
the
tension
rod
and
stabilizer
bar
Lower
the
vehicle
and
remove
the
jack
Tighten
the
trans
verse
link
mounting
bolts
to
a
torque
reading
of
9
0
10
0
kgm
65
72
Ib
ft
with
the
vehicle
unladen
FRONT
WHEEL
ALIGNMENT
The
castor
and
camber
angles
are
preset
and
cannot
be
adjusted
If
the
angles
do
not
conform
with
the
fIgures
in
Techni
al
Data
then
a
check
must
be
made
for
damage
to
the
uspenSlon
system
Wheel
alignment
is
carried
out
with
the
tyres
mflated
to
the
correct
pressures
and
with
the
vehicle
on
a
level
surface
The
toe
in
should
be
checked
and
adjusted
if
necessary
by
slackening
the
locknuts
FigJ
20
and
turning
the
track
rods
by
an
equal
amount
until
the
correct
toe
in
is
achieved
The
standard
length
between
the
ball
joints
is
309
5
mm
12
19
in
for
the
1400
and
1600
cc
models
and
105
5
mm
4
14
in
for
the
1800
cc
models
ADJ
USTING
THE
STEERING
ANGLE
The
steering
angle
at
the
full
lock
positions
must
be
checked
with
the
front
wheels
placed
on
a
turntable
Adjust
ment
can
be
made
changing
the
length
of
the
stopper
bolt
shown
arrowed
in
FigJ
21
The
clearance
between
the
tyre
and
tension
rod
should
be
30
mm
1
181
in
or
more
and
can
be
increased
if
necessary
by
extending
the
length
of
the
stopper
bolt
The
bolt
length
should
not
exceed
27
5
mm
1
083
in
when
the
adjustment
is
completed
Steering
angle
figures
are
given
in
Technical
Data
at
the
end
of
this
section
Page 92 of 171
SteerIng
DEsn
IPTION
S
i
EERlNG
MaintenaDce
STEERING
WHEEL
AND
STEERING
GEAR
Removal
and
Installation
STEERING
GEAR
Dismantling
STEERING
GEAR
Inspection
and
Adjustment
DESCRIPTION
A
worm
and
recirculating
ball
type
steering
system
is
fitted
to
the
vehicle
the
component
parts
of
the
steering
gear
are
shown
in
Fig
K
I
The
steering
linkage
consists
of
the
centre
tie
rod
pitman
ann
idler
arm
outer
tie
rods
and
the
knuckle
arms
as
shown
in
Fig
K
2
A
collapsible
steering
column
assembly
can
be
fitted
to
the
vehicle
to
protect
the
driver
from
injury
in
a
head
on
collision
Details
of
this
type
of
assembly
are
given
under
the
appropriate
heading
STEERING
Maintenance
O1eck
the
oil
level
in
the
steering
box
every
10
000
km
6
000
miles
and
top
up
with
recommended
lubricant
if
necessary
Grease
the
steering
linkage
every
50
000
km
30
OOO
miles
It
will
be
necessary
to
replace
the
plug
in
the
tie
rod
ball
joints
with
a
grease
nipple
for
this
operation
as
previously
described
in
the
section
FRONT
SUSPENSION
Use
a
grease
gun
to
completely
replace
the
old
grease
with
new
grease
making
SUfe
that
the
grease
is
not
forced
from
under
the
cover
clamp
if
a
high
pressure
gun
is
used
STEERING
WHEEL
AND
STEERING
GEAR
Removal
1
Take
out
the
retaining
bolts
and
remove
the
horn
ring
remove
the
steering
wheel
nut
Fig
K
3
and
pull
off
the
steering
wheel
The
special
tool
ST
27180000
should
be
used
if
available
2
Disconnect
the
battery
leads
remove
the
steering
column
shell
covers
and
the
turn
signal
and
lighting
switch
assembly
3
On
vehicles
fitted
with
steering
column
gear
change
assemblies
the
gear
lever
must
be
removed
from
the
control
rod
assembly
Unscrew
the
retaining
boltg
and
disconnect
the
gear
lever
4
Remove
the
bolts
from
the
steering
column
upper
clamp
Fig
K
4
and
the
bolts
holding
the
lower
plate
Fig
K
5
5
If
the
vehicle
is
fitted
with
steering
column
gear
change
remove
the
cotterpin
from
the
trunnion
and
detach
the
gearchange
rod
and
selector
rod
from
the
change
lever
and
selector
lever
STEERING
GEAR
Assembly
and
Adjustment
COLLAPSIBLE
STEERING
COLLAPSIBLE
STEERING
Removal
and
Inspection
COLLAPSIBLE
STEERING
Installation
STEERING
LINKAGE
6
Remove
the
bolts
securing
the
steering
gear
housing
to
the
car
body
Fig
K
6
and
pull
the
steering
gear
towards
the
engine
compartment
Remove
the
gearchange
control
from
the
steering
gear
assembly
as
described
in
the
section
GEARBOX
STEERING
WHEEL
AND
STEERING
GEAR
Installation
Installation
is
a
reversal
of
the
removal
procedure
When
the
installation
has
been
completed
make
sure
that
the
steering
wheel
can
be
turned
smoothly
and
is
correctly
aligned
The
free
travel
of
the
steering
wheel
should
be
between
2S
30mm
0
9B
1
18
in
Tighten
the
steering
wheel
locknut
to
a
torque
reading
of
4
0
5
0
kgm
29
36Ib
ft
and
the
steering
column
upper
clamp
and
plate
bolts
to
a
torque
reading
of
1
3
1
8
kgm
94
1
3
Ib
ft
Ensure
that
the
steering
box
is
topped
up
to
the
correct
level
with
recommended
lubricant
STEERING
GEAR
Dismantling
Remove
the
pitman
arm
retaining
nut
and
pull
out
the
arm
The
special
puller
ST
27140000
should
be
used
if
available
Remove
the
drain
plug
from
the
steering
gear
housing
and
drain
the
oil
Slacken
the
adjusting
screw
nut
and
turn
the
sector
shaft
adjusting
screw
a
few
turns
in
the
anti
clockwise
direction
Remove
the
sector
shaft
cover
retaining
bolts
and
pull
the
sector
shaft
cover
and
sector
shaft
from
the
gear
housing
Fig
K
7
Remove
the
bolts
securing
the
column
jacket
to
the
gear
housing
and
carefully
withdraw
the
main
column
jacket
assembly
from
the
gear
housing
Fig
K
B
NOTE
The
ball
must
not
be
allowed
to
run
to
either
end
of
the
worm
or
the
ends
of
the
ball
guides
will
be
damaged
Pull
the
column
assembly
from
the
column
jacket
Remove
the
sector
shaft
oil
seal
and
take
out
the
rear
bearing
outer
race
from
the
column
jacket
with
a
suitable
puller
Withdraw
the
bearing
inner
races
from
the
front
and
fear
worm
bearings
Remove
the
column
shaft
bearing
91
Page 94 of 171
STEERING
GEAR
Inspection
and
Adjustment
Thoroughly
clean
all
parts
and
examine
them
for
signs
of
wear
or
damage
Replace
any
comIK
nent
found
to
be
un
satisfactory
It
is
advisable
to
renew
the
assemblies
if
the
steering
column
or
ball
nut
assembly
is
defective
as
the
adjustment
procedures
required
to
overhaul
the
units
are
rather
involved
The
dismantling
and
adjustment
procedures
for
the
ball
nut
assembly
can
be
carried
out
in
the
following
manner
if
it
is
decided
that
overhaul
procedures
are
to
be
carried
out
Ball
nut
Remove
the
ball
guide
tube
clamp
withdraw
the
guide
tubes
from
the
ball
nut
and
collect
the
steel
balls
Turn
the
nut
upside
down
and
rotate
the
steering
column
backwards
and
forwards
until
all
36
steel
balls
have
dropped
out
of
the
ball
nut
Pull
the
ball
nut
from
the
column
Inspect
the
ball
guide
tubes
and
make
sure
that
they
are
not
damaged
Pay
particular
attention
to
the
ends
of
the
tubes
that
pick
up
the
balls
from
the
helical
path
Renew
the
tubes
if
they
are
unsatisfactory
Check
the
steel
balls
and
the
ball
nut
for
wear
and
replace
the
complete
unit
if
necessary
Assemble
the
ball
nut
on
the
worm
with
the
ball
guide
holes
upwards
Drop
18
balls
into
each
of
the
two
holes
on
the
same
side
of
the
ball
nut
until
all
36
balls
are
installed
The
column
should
be
gradually
turned
away
from
the
hole
being
filled
and
if
the
balls
are
stopped
by
the
end
of
the
column
hold
down
those
already
installed
with
a
clean
rod
or
punch
while
turning
the
column
several
times
in
the
reverse
direction
The
filling
of
the
circuit
can
then
be
continued
but
it
may
be
necessary
to
turn
the
column
backwards
and
forwards
holding
the
balls
down
first
in
one
hole
and
then
the
other
to
close
the
spaces
and
completely
fill
the
circuit
Place
the
remaining
22
balls
in
the
ball
guide
halves
11
balls
for
each
half
Fit
the
other
half
of
the
guide
tube
to
each
f11led
half
hold
the
two
halves
together
a
ld
plug
each
open
end
with
vaseline
to
prevent
the
balls
falling
out
Push
the
guide
tubes
into
the
ball
nut
guide
holes
and
assemble
the
guide
tube
clamp
Inspection
Oteck
the
axial
clearance
between
the
ball
nut
and
the
balls
If
the
clearance
exceeds
0
08
mrn
0
003
in
the
complete
unit
must
be
replaced
Inspect
the
gear
teeth
of
the
sector
shaft
for
wear
or
damage
Replace
any
worn
or
imperfect
bearings
Examine
the
steering
column
shaft
for
straightness
and
check
that
the
maximum
deflection
does
not
exceed
0
2mm
0
008
in
at
point
C
in
Fig
K
9
when
the
shaft
is
supported
at
points
A
and
B
Check
the
sector
shaft
and
steering
column
shaft
serrations
for
wear
Renew
the
parts
as
necessary
STEERING
GEAR
Assembly
and
Adjustment
Grease
the
lip
of
the
oil
seal
and
press
it
into
the
housing
Insert
the
column
assembly
into
the
column
jacket
and
fit
the
worm
bearing
shims
to
the
gear
housing
Install
the
flange
securing
bolts
and
tighten
them
to
a
torque
reading
of
1
8
2
5
kgm
13
18lb
ft
If
a
new
column
bearing
assembly
is
fitted
it
must
be
filled
with
bearing
grease
and
cemented
to
the
column
The
preload
of
the
worm
bearing
can
be
adjusted
by
altering
the
thickness
of
the
worm
bearing
shim
Four
shim
thicknesses
are
available
in
sizes
of
0
76
0
254
0
127
0
050mm
0
0300
0
100
0
005
in
0
002
in
This
adjustment
check
is
carried
out
without
the
sector
shaft
fitted
and
with
the
worm
bearings
oiled
Install
the
steering
wheel
as
shown
in
Fig
K
9
use
a
spring
balance
as
indicated
to
check
that
the
force
required
to
turn
the
wheel
is
between
4
0
8
0
kg
cm
56
l120z
inch
Select
a
suitable
shim
from
the
sizes
given
Assemble
the
selector
shaft
adjuster
with
a
shim
into
the
sector
shaft
Measure
the
end
clearance
of
the
adjuster
with
a
feeler
gauge
as
shown
in
Fig
K
1
O
The
correct
clearance
is
0
01
0
03mm
0
0004
O
0012in
and
can
be
adjusted
by
varying
the
thickness
of
shim
Four
thicknesses
of
shim
are
available
as
follows
1
57
mm
0
0618
in
1
55
mm
0
0610
in
1
52
mm
0
0598
in
1
50
mm
0
0591
in
To
assemble
the
sector
shaft
into
the
gear
housing
rotate
the
column
by
hand
until
the
ball
nut
is
at
the
central
position
of
its
travel
so
that
the
centre
tooth
of
the
sector
shaft
enters
the
centre
tooth
space
of
the
ball
nut
Fit
a
new
gasket
and
push
the
sector
shaft
cover
and
sector
shaft
into
place
Ensure
that
a
certain
amount
of
play
is
present
between
the
rack
and
sector
teeth
before
tightening
the
cover
bolts
to
a
torque
reading
of
1
5
2
5
kgm
10
9
18
llb
ft
Temporarily
lock
the
adjusting
screw
with
the
locknut
Move
the
sector
shaft
several
times
from
the
pitman
arm
side
to
make
sure
that
it
turns
smoothly
Connect
the
pitman
arm
to
the
sector
shaft
taking
care
that
the
alignment
marks
on
the
arm
and
shaft
coincide
Adjust
the
backlash
with
the
steering
in
the
central
position
using
a
dial
gauge
as
shown
in
Fig
K
II
Turn
the
adjusting
screw
with
a
screwdriver
until
the
amount
of
free
movement
at
the
top
of
the
pitman
arm
is
within
O
lmm
0
0039
in
at
a
radius
of
127
mm
5
0
in
Lock
the
adjusting
screw
with
the
locknut
Fig
K
12
and
recheck
the
free
move
ment
Fill
the
steering
gear
housing
with
the
correct
amount
of
recommended
lubricant
Refit
the
steering
gear
to
the
vehicle
as
previously
described
Make
sure
that
the
steering
wheel
is
correctly
aligned
and
that
93
Page 156 of 171
Remove
the
road
wheel
and
disconnect
the
brake
hose
at
the
connector
as
shown
in
Fig
C
4
of
this
section
Remove
the
brake
calliper
assembly
and
hub
cap
Withdraw
the
cotter
pin
and
remove
the
wheel
bearing
locknut
Remove
the
wheel
bearing
washer
and
take
off
the
hub
and
brake
disc
Fig
C
5
Remove
the
bearing
collar
take
out
the
outer
bearing
cage
and
prise
out
the
hub
grease
seal
Remove
the
inner
bearing
cage
and
drive
out
the
outer
races
of
the
inner
and
outer
bearings
using
the
special
drift
ST49120000
if
avail
able
Separate
the
brake
disc
from
the
hub
by
taking
out
the
retaining
bolts
as
shown
in
Fig
C
6
Installation
is
a
reversal
of
the
removal
procedure
Adjust
the
wheel
bearings
as
previously
described
taking
care
to
tighten
the
wheel
bearing
locknut
to
the
specified
torque
read
ing
of
3
0
to
3
5
kgm
21
7
to
25
3lb
ft
Turn
the
hub
several
times
to
settle
the
bearing
then
retighten
the
nut
to
the
same
figure
Slacken
the
locknut
by
a
quarter
turn
900
and
insert
the
cotter
pin
when
the
hole
in
the
spindle
is
aligned
with
the
hole
in
the
nut
Check
that
the
force
required
to
turn
the
hub
is
less
than
7
0
kg
cm
97
2
in
oz
STABILIZER
Removal
and
Installation
Remove
the
splash
board
and
take
off
the
bolts
I
in
Fig
C
7
which
attach
the
stabilizer
at
the
transverse
link
sides
Remove
the
bolts
attaching
the
stabilizer
bracket
2
to
the
frame
then
withdraw
the
stabilizer
Check
the
bar
and
rubber
components
for
signs
of
deforma
tion
or
damage
and
renew
as
necessary
Installation
is
a
reversal
of
the
removal
procedures
Tighten
the
fixing
bolts
to
a
torque
reading
of
1
2
to
I
7
kgm
8
7
to
12
3
lb
ft
at
the
transverse
link
side
and
1
9
to
2
5
kgm
13
7
to
18
llb
ft
at
the
frame
bracket
SPRING
AND
STRUT
ASSEMBLY
The
spring
and
strut
assembly
can
be
serviced
by
following
the
instructions
previously
given
for
the
assemblies
on
vehicles
fitted
with
the
L14
L16
and
Ll8engines
When
reassembling
make
sure
that
the
parts
shown
in
Fig
C
8
are
thomughly
greased
Installation
of
the
assembly
will
be
accomplished
more
easily
if
the
dust
cover
on
the
bonnet
ledge
is
removed
Tighten
the
nuts
and
bolts
to
a
torque
figures
given
in
TIGHTENING
TORQUES
TRANSVERSE
LINK
AND
LOWER
BALL
JOINT
The
transverse
link
and
lower
ball
joint
can
be
removed
in
a
similar
manner
to
the
parts
on
vehicles
fitted
with
L
14
L
16
and
L
18
engines
Renew
the
link
if
cracked
or
damaged
in
any
way
Check
the
measurement
A
in
Fig
C
9
The
measurement
between
front
and
rear
transverse
link
bushes
should
be
less
than
1
0
mm
0
039
in
Replace
the
bushes
if
necessary
The
lower
ball
joint
should
be
replaced
if
the
axial
play
of
the
joint
exceeds
0
03
to
0
6
mm
0
0012
to
0
0136
in
A
grease
nipple
must
be
installed
in
place
of
the
ball
joint
plug
so
that
the
joint
can
be
lubricated
with
multi
purpose
grease
as
previously
described
SUSPENSION
MEMBER
Removing
and
Installing
Jack
up
the
vehicle
and
support
it
on
stands
2
Remove
the
splash
board
Refer
to
Fig
C
I
0
and
detach
the
compression
rod
I
the
stabilizer
2
from
the
trans
verse
link
3
Detach
the
steering
linkage
from
the
suspen
sion
crossmember
4
3
Take
out
the
nuts
attaching
the
transverse
links
and
remove
the
links
at
both
sides
of
the
vehicle
4
Support
the
engine
with
a
hoist
as
shown
in
Fig
C
II
taking
care
not
to
damage
the
throttle
and
remote
control
linkages
and
then
remove
the
engine
mounting
bolts
at
both
sides
5
Remove
the
bolts
shown
arrowed
in
Fig
C
12
and
lift
the
suspension
member
away
Renew
the
suspension
member
if
it
is
cracked
or
deformed
in
any
way
Installation
is
a
reversal
of
the
removal
procedure
FRONT
WHEEL
ALIGNMENT
As
previously
stated
the
castor
and
camber
angles
are
preset
and
cannot
be
adjusted
A
thorough
check
should
be
made
of
the
steering
and
suspension
system
and
all
defective
parts
renewed
if
the
angles
are
incorrect
See
Technical
Data
The
front
wheels
should
toe
in
12
to
15
mm
0
4
7
to
0
59
in
Adjustment
can
be
carried
out
by
slackening
the
locknuts
1
in
Fig
C
13
and
then
turning
the
tie
rods
by
an
equal
amount
until
the
correct
toe
in
is
achieved
A
toe
in
gauge
will
of
course
be
required
for
this
operation
STEERING
WHEEL
AND
COLUMN
Removal
Disconnect
the
horn
wire
and
remove
the
horn
bar
Remove
the
steering
wheel
nut
and
pull
off
the
steering
wheel
2
Remove
the
turn
signal
and
lighting
switch
assembly
followed
by
the
steering
column
shell
covers
3
Remove
the
bolts
from
the
rubber
coupling
to
disconnect
the
lower
joint
See
Figs
C
14
and
C
I
5
if
the
car
is
fitted
with
right
hand
drive
The
lower
joint
upper
bolt
should
be
removed
to
disconnect
the
joint
if
the
car
is
fitted
with
left
hand
drive
4
Remove
the
cotter
pin
from
the
trunnion
and
disconnect
the
gearchange
rod
and
selector
rod
5
Remove
the
steering
column
upper
clamp
and
take
out
the
bolts
securing
the
lower
plate
STEERING
COLUMN
Dismantling
and
Assembling
Remove
the
C
washer
socket
screw
and
upper
bracket
bolt
Remove
the
lower
bracket
bolts
and
detach
the
remote
control
linkage
from
the
column
assembly
Remove
the
snap
ring
at
the
top
of
the
column
and
extract
the
column
shaft
from
the
jacket
Disconnect
the
rubber
coupling
from
the
lower
joint
then
remove
the
snap
ring
and
dismantle
the
lower
joint
S25
Page 170 of 171
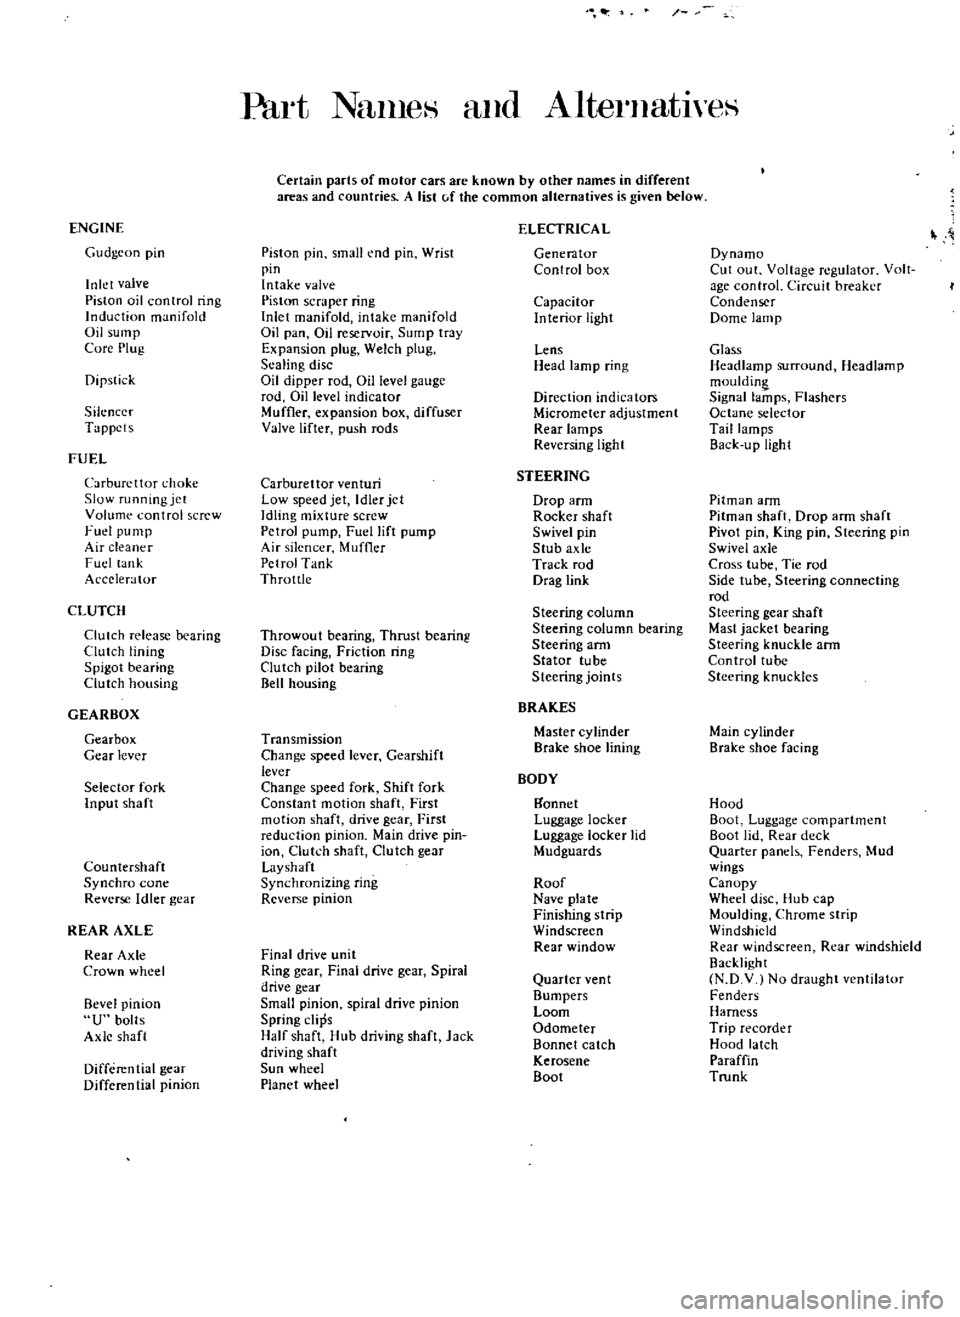
Part
NanleH
and
AlternatlyeS
Certain
parts
of
motor
cars
are
known
by
other
names
in
different
areas
and
countries
A
list
c
f
the
common
alternatives
is
given
below
ENGINE
ELECTRICA
L
Gudgeon
pin
Piston
pin
small
end
pin
Wrist
Generator
Dynamo
pin
Control
box
Cut
out
Voltage
regulator
Volt
Inlet
valve
Intake
valve
age
control
Circuit
breaker
Piston
oil
control
ring
Piston
scraper
ring
Capacitor
Condenser
Induction
manifold
Inlet
manifold
intake
manifold
Interior
light
Dome
lamp
Oil
sump
Oil
pan
Oil
reservoir
Sump
tray
Core
Plug
Expansion
plug
Welch
plug
Lens
Glass
Sealing
disc
Head
lamp
ring
Headlamp
surround
Headlamp
Dipstick
Oil
dipper
rod
Oil
level
gauge
mouldin
rod
Dillevel
indicator
Direction
indicators
Signal
lamps
Flashers
Silencer
Muffler
expansion
box
diffuser
Micrometer
adjustment
Octane
selector
Tappets
Valve
lifter
push
rods
Rear
lamps
Tail
lamps
Reversing
light
Back
u
pUgh
t
FUEL
Carburettor
choke
Carburettor
venturi
STEERING
Slow
running
jet
Low
speed
jet
Idler
jet
Drop
arm
Pitman
ann
Volume
control
screw
Idling
mixture
screw
Rocker
shaft
Pitman
shaft
Drop
ann
shaft
Fuel
pump
Petrol
pump
Fuel
lift
pump
Swivel
pin
Pivot
pin
King
pin
Steering
pin
Air
cleaner
Air
silencer
Muffler
Stub
axle
Swivel
axle
Fuel
lank
Petrol
Tank
Track
rod
Cross
tube
Tie
rod
Accelerator
Throttle
Drag
link
Side
tube
Steering
connecting
rod
CLUTCH
Steering
column
Steering
gear
shaft
Clutch
release
bearing
Throwout
bearing
Thrust
bearing
Steering
column
bearing
Mast
jacket
bearing
Clutch
lining
Disc
facing
Friction
ring
Steering
arm
Steering
knuckle
ann
Spigot
bearing
Clutch
pilot
bearing
Stator
tube
Control
tube
Clutch
housing
Bell
housing
Steering
joints
Steering
knuckles
GEARBOX
BRAKES
Gearbox
Transmission
Master
cylinder
Main
cylinder
Gear
lever
Change
speed
lever
Gearshift
Brake
shoe
lining
Brake
shoe
facing
lever
BODY
Selector
fork
Change
speed
fork
Shift
fork
Input
shaft
Constant
motion
shaft
First
gannet
Hood
motion
shaft
drive
gear
First
Luggage
locker
Boot
Luggage
compartment
reduction
pinion
Main
drive
pin
Luggage
locker
lid
Boot
lid
Rear
deck
ion
Clutch
shaft
Clutch
gear
Mudguards
Quarter
panels
Fenders
Mud
Countershaft
Layshaft
wings
Synchro
cone
Synchronizing
ring
Roof
Canopy
Reverse
Idler
gear
Reverse
pinion
Nave
plate
Wheel
disc
Hub
cap
Finishing
strip
Moulding
Chrome
strip
REAR
AXLE
Windscreen
Windshield
Rear
Axle
Final
drive
unit
Rear
window
Rear
windscreen
Rear
windshield
Crown
wheel
Ring
gear
Final
drive
gear
Spiral
Backlight
drive
gear
Quarter
ven
t
N
D
V
No
draught
ventilator
Bevel
pinion
Small
pinion
spiral
drive
pinion
Bumpers
Fenders
Loom
Harness
U
bolts
Spring
clips
Odometer
Trip
recorder
Axle
shaft
Half
shaft
Hub
driving
shaft
Jack
Bonnet
catch
Hood
latch
driving
shaft
Kerosene
Paraffin
Differential
gear
Sun
wheel
Boot
Trunk
Differential
pinion
Planet
wheel