fuse DATSUN B110 1973 Service Repair Manual
[x] Cancel search | Manufacturer: DATSUN, Model Year: 1973, Model line: B110, Model: DATSUN B110 1973Pages: 513, PDF Size: 28.74 MB
Page 48 of 513
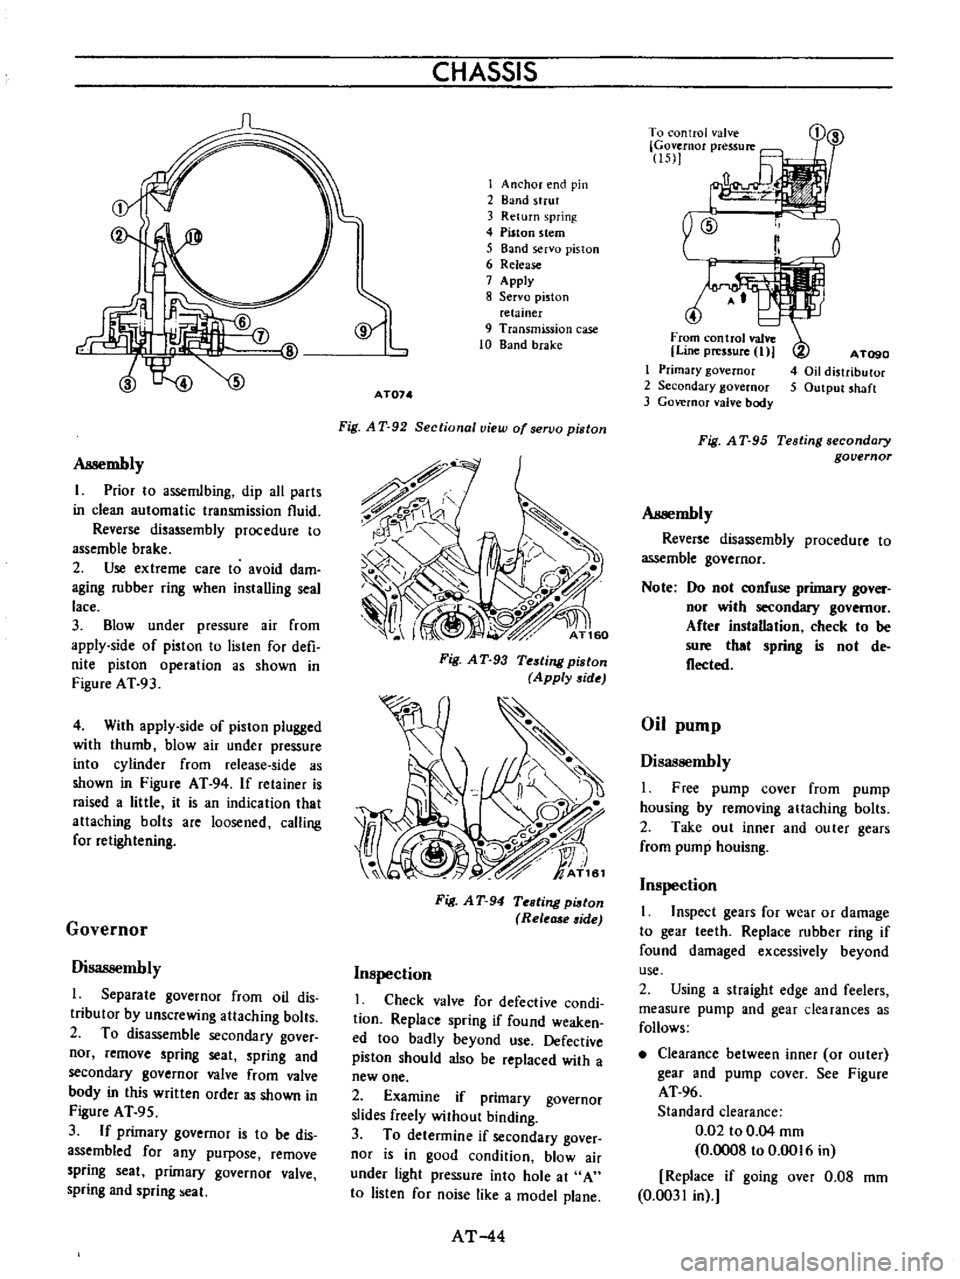
Assembly
I
Prior
10
assemlbing
dip
all
parts
in
clean
automatic
transmission
fluid
Reverse
disassembly
procedure
to
assemble
brake
2
Use
extreme
care
to
avoid
dam
aging
rubber
ring
when
installing
seal
lace
3
Blow
under
pressure
air
from
apply
side
of
piston
to
lislen
for
defi
nite
piston
operation
as
shown
in
Figure
AT
93
4
With
appIy
side
of
piston
plugged
with
thumb
blow
air
under
pressure
into
cylinder
from
release
side
as
shown
in
Figure
AT
94
If
retainer
is
raised
a
little
it
is
an
indication
that
attaching
bolts
are
loosened
calling
for
retightening
Governor
Disassembly
l
Separate
governor
from
oil
dis
tributor
by
unscrewing
attaching
bolts
2
To
disassemble
secondary
gover
nor
remove
spring
seat
spring
and
secondary
governor
valve
from
valve
body
in
this
written
order
as
shown
in
Figure
AT
95
3
If
primary
governor
is
to
be
dis
assembled
for
any
purpose
remove
spring
seat
primary
governor
valve
spring
and
spring
eal
CHASSIS
I
Anchor
end
pin
2
Band
strut
3
Return
spring
4
Piston
stem
5
Band
servo
piston
6
Release
7
Apply
8
Servo
piston
relainer
9
Transmission
case
10
Band
brake
AT074
Fig
A
T
92
Sectional
view
of
servo
piston
Fig
A
T
93
Testing
piston
Apply
side
Fig
A
T
94
Testing
pi8ton
Rele
side
Inspection
I
Check
valve
for
defective
condi
tion
Replace
spring
if
found
weaken
ed
too
badly
beyond
use
Defective
piston
should
also
be
replaced
with
a
new
one
2
Examine
if
primary
governor
slides
freely
without
binding
3
To
determine
if
secondary
gover
nor
is
in
good
condition
blow
air
under
light
pressure
into
hole
at
A
to
listen
for
noise
like
a
model
plane
AT
44
r
To
control
valve
Governor
pressure
15
1
4
From
control
valve
Line
pressure
I
I
Primary
governor
2
Secondary
governor
3
Governor
valve
body
A
TogO
4
Oil
distributor
5
Output
shaft
Fig
A
T
95
Testing
secondary
governor
Assembly
Reverse
disassembly
procedure
to
assemble
governor
Note
Do
nol
confuse
primary
gover
nor
wilh
secondary
governor
After
instaDation
check
to
be
sure
that
spring
is
nol
de
flecled
Oil
pump
Disassembly
I
Free
pump
cover
from
pump
housing
by
removing
attaching
bolts
2
Take
out
inner
and
outer
gears
from
pump
houisng
Inspection
1
Inspect
gears
for
wear
or
damage
to
gear
leeth
Replace
rubber
ring
if
found
damaged
excessively
beyond
use
2
Using
a
straight
edge
and
feelers
measure
pump
and
gear
clearances
as
follows
Clearance
between
inner
or
outer
gear
and
pump
cover
See
Figure
AT
96
Standard
clearance
0
02
to
0
04
mm
0
0008
to
0
0016
in
Replace
if
going
over
0
08
mm
0
0031
in
Page 73 of 513
CHASSIS
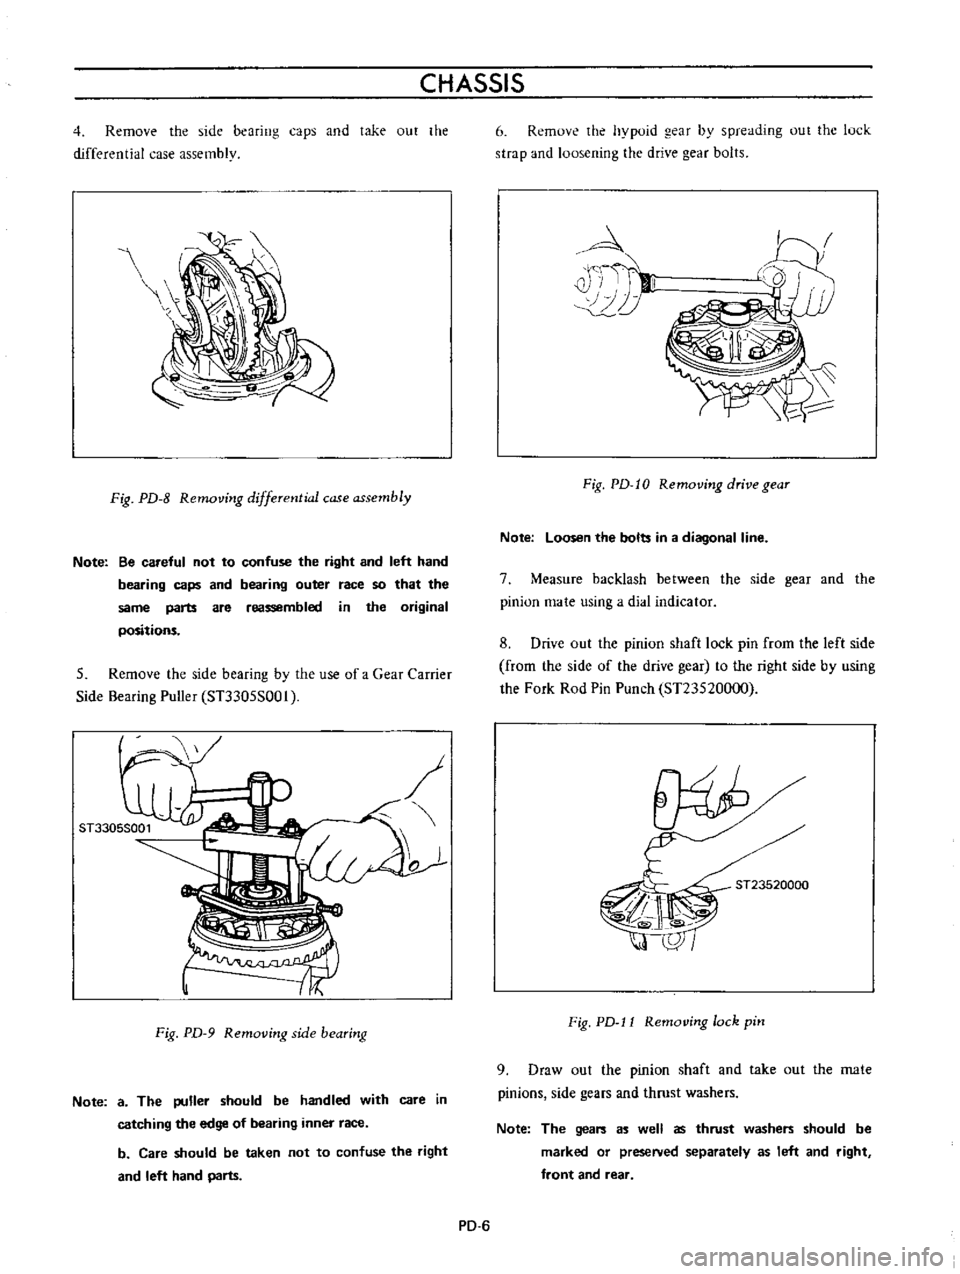
4
Remove
the
side
bearing
caps
and
take
out
the
differential
case
assembly
Fig
PD
8
Removing
differential
case
assembly
Note
Be
careful
not
to
confuse
the
right
and
left
hand
bearing
caps
and
bearing
outer
race
so
that
the
same
parts
are
reassembled
in
the
original
positions
5
Remove
the
side
bearing
by
the
use
of
a
Gear
Carrier
Side
Bearing
Puller
ST3305S001
o
Fig
PD
9
Removing
side
bearing
Note
a
The
puller
should
be
handled
with
care
in
catching
the
edge
of
bearing
inner
race
b
Care
should
be
taken
not
to
confuse
the
right
and
left
hand
parts
6
Remove
the
hypoid
gear
by
spreading
out
the
luck
strap
and
loosening
the
drive
gear
bolts
4
i
T
II
10
Fig
PD
I0
Removing
drive
gear
Note
Loosen
the
bolts
in
a
diagonal
line
7
Measure
backlash
between
the
side
gear
and
the
pinion
mate
using
a
dial
indicator
8
Drive
out
the
pinion
shaft
lock
pin
from
the
left
side
from
the
side
of
the
drive
gear
to
the
right
side
by
using
the
Fork
Rod
Pin
Punch
ST23520000
ST23520000
Fig
PD
l1
Removing
lock
pin
9
Draw
out
the
pinion
shaft
and
take
out
the
mate
pinions
side
gears
and
thrust
washers
Note
The
gears
as
well
as
thrust
washers
should
be
marked
or
preseNed
separately
as
left
and
right
front
and
rear
PD
6
Page 80 of 513
PROPELLER
SHAFT
DIFFERENTIAL
CARRIER
C
DMark
Unit
mm
in
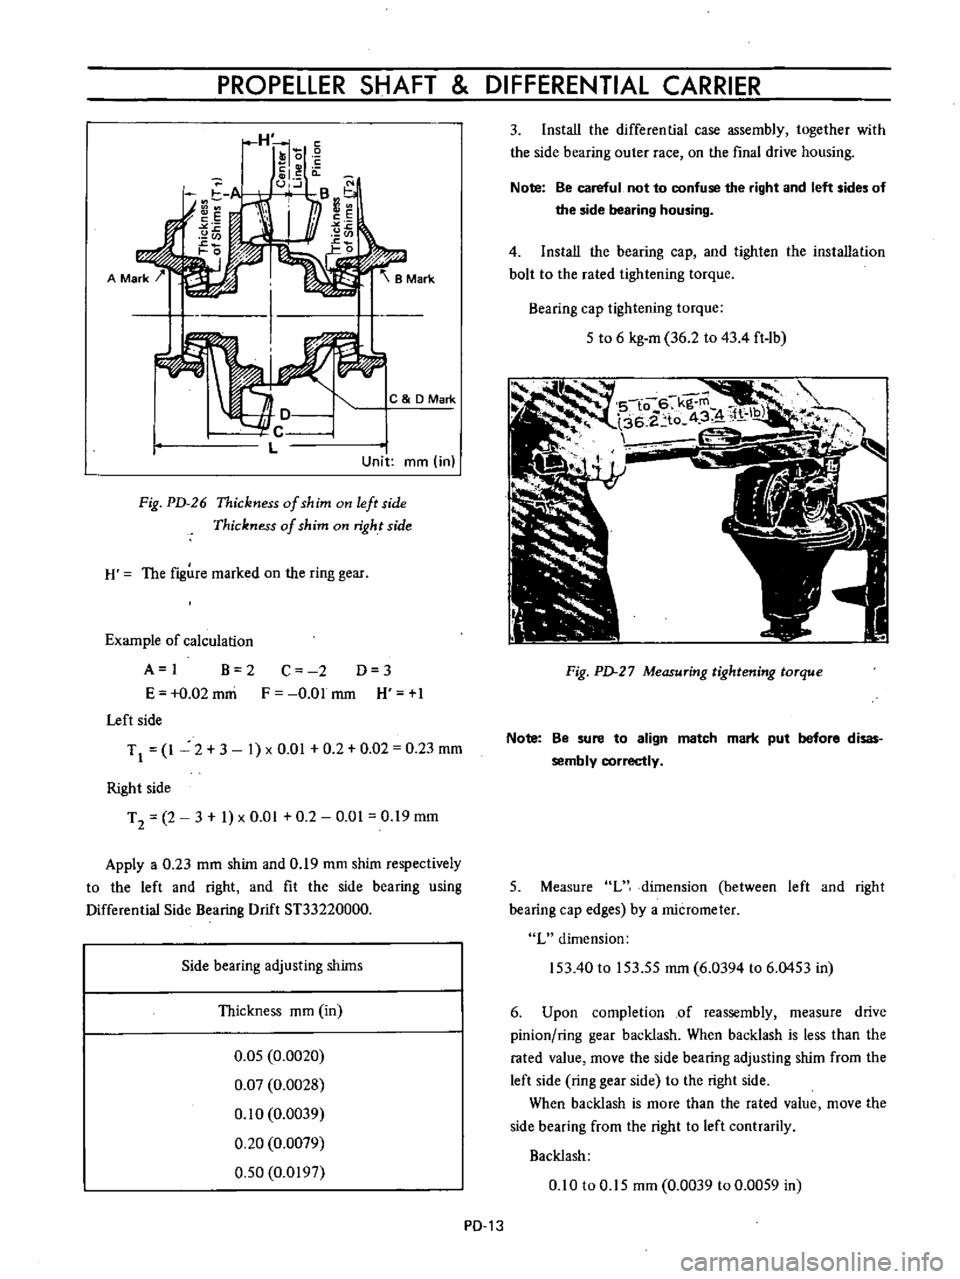
Fig
PD
26
Thickness
of
shim
on
left
side
Thickness
of
shim
on
right
side
H
The
figure
marked
on
the
ring
gear
Example
of
calculation
A
I
B
2
E
0
02
mni
Left
side
C
2
D
3
F
O
Olmm
H
1
TJ
1
2
3
1
xO
01
0
2
0
02
0
23
mm
Right
side
T
2
2
3
1
x
0
01
0
2
0
01
0
19
mm
Apply
a
0
23
mm
shim
and
0
19
mm
shim
respectively
to
the
left
and
right
and
fit
the
side
bearing
using
Differential
Side
Bearing
Drift
ST33220000
Side
bearing
adjusting
shims
Thickness
mm
in
0
05
0
0020
0
07
0
0028
0
10
0
0039
0
20
0
0079
0
50
0
0197
PD
13
3
Install
the
differential
case
assembly
together
with
the
side
bearing
outer
race
on
the
final
drive
housing
Note
Be
careful
not
to
confuse
the
right
and
left
sides
of
the
side
bearing
housing
4
Install
the
bearing
cap
and
tighten
the
installation
bolt
to
the
rated
tightening
torque
Bearing
cap
tightening
torque
5
to
6
kg
m
36
2
to
43
4
ft
1b
Fig
PD
27
Measuring
tightening
torque
Note
Be
sure
to
align
match
mark
put
before
disas
sembly
correctly
5
Measure
L
dimension
between
left
and
right
bearing
cap
edges
by
a
micrometer
L
dimension
153
40
to
153
55
mm
6
0394
to
6
0453
in
6
Upon
completion
of
reassembly
measure
drive
pinion
ring
gear
backlash
When
backlash
is
less
than
the
rated
value
move
the
side
bearing
adjusting
shim
from
the
left
side
ring
gear
side
to
the
right
side
When
backlash
is
more
than
the
rated
value
move
the
side
bearing
from
the
right
to
left
contrarily
Backlash
0
10
to
0
15
mm
0
0039
to
0
0059
in
Page 138 of 513
CHASSIS
Note
When
cleaning
rubber
parts
use
alcohol
or
brake
fluid
If
rubber
parts
are
cleaned
with
mineral
oil
they
will
be
deteriorated
1
Calipers
If
the
cylinder
wall
is
damaged
or
worn
replace
If
the
cylinder
wall
is
rusted
or
foreign
matters
are
accumu
lated
on
the
cylinder
wall
carefully
polish
with
fine
emery
paper
so
that
the
cylinder
wall
is
not
damaged
If
rusted
or
roughened
excessively
replace
2
Pad
See
paragraph
covering
replacement
of
pad
3
Piston
Replace
if
unevenly
worn
damaged
and
or
rusted
Note
The
piston
sliding
surface
is
plated
Thus
do
not
use
emery
paper
although
rusted
or
foreign
matters
are
Slicked
on
the
sliding
surface
4
Seals
Primarily
replace
both
piston
and
dust
seals
whenever
overhauling
Note
The
piston
seal
affects
not
only
leaking
but
also
piston
return
For
this
reason
replace
the
piston
seal
even
if
the
damage
is
minor
S
Rotor
Check
the
rotor
and
if
it
shows
score
excessively
out
of
round
and
so
forth
reconditioning
by
machining
is
required
If
any
abnormal
conditions
such
as
crack
distortion
and
excessive
deflection
replace
the
rotor
Standard
rotor
thickness
9
5
mm
0
3740
in
Limit
of
reconditionillg
rotor
in
thkkn
8
4
mm
0
3307
in
Deflection
of
the
rotor
Below
0
03
mm
0
0012
in
I
I
I
I
ri
U
h
J
r
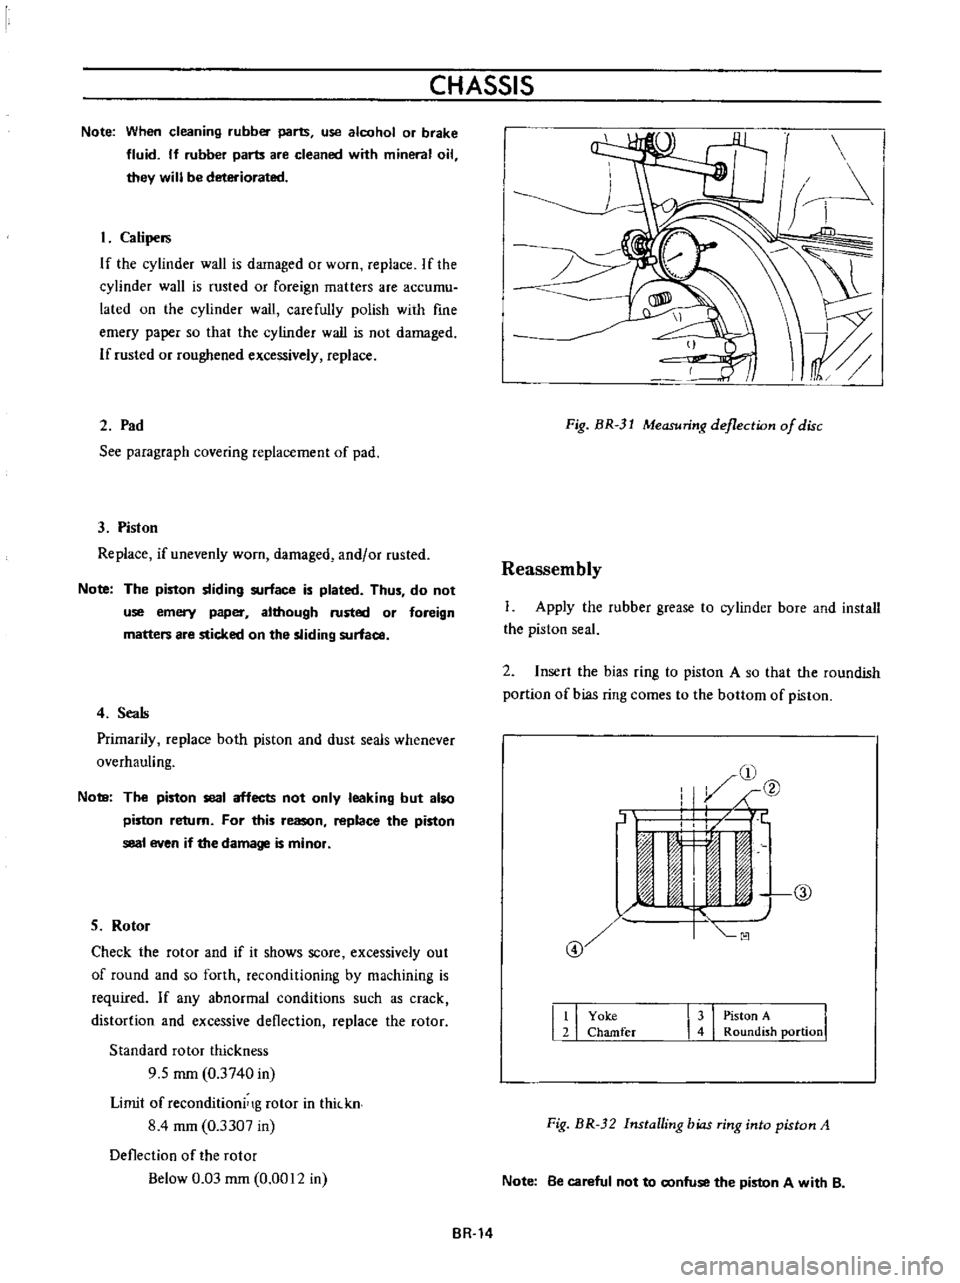
Fig
BR
1
Measuring
deflection
of
disc
Reassembly
Apply
the
rubber
grease
to
cylinder
bore
and
install
the
piston
seal
2
Insert
the
bias
ring
to
piston
A
so
that
the
roundish
portion
of
bias
ring
comes
to
the
bottom
of
piston
1
ilY
f@
I
I
C
I
1
n
tL
c
ffi
1
1
fJ
u
IZ
@
I
I
Yoke
Chamfer
13
PistonA
I
4
Roundish
portion
Fig
BR
32
Installing
bias
ring
into
piston
A
Note
Be
careful
not
to
confuse
the
piston
A
with
B
BR
14
Page 200 of 513
pointer
used
at
the
rearward
lut
atiol1
With
the
proper
scttings
the
tram
bar
will
be
on
a
piane
parallel
to
that
of
the
body
The
exception
to
this
would
be
wht
n
one
of
the
reterence
locations
is
induded
in
the
misaligned
area
then
the
parallel
plane
between
the
body
and
the
tram
bar
may
not
prevail
After
completiun
of
the
repairs
the
tram
gauge
should
be
set
at
the
specitled
dimension
to
check
the
accuracy
of
the
repair
operation
CAR
PREPARATION
Preparing
the
car
for
the
underbody
alignment
check
involves
the
following
Place
the
car
on
a
level
surface
2
The
weight
of
the
car
should
be
supported
at
the
wheel
locations
3
A
visual
damage
inspection
should
be
made
to
eliminate
unnecessary
measuring
Obviously
damaged
or
misaligned
areas
may
often
be
located
visually
BODY
TRAMMING
SEQUENCE
The
tramming
sequence
will
varv
depending
upon
the
nature
and
IOl
atiun
uf
the
misaligned
area
Priur
to
performing
any
tramming
uperation
the
h
uracy
of
refereJlce
points
to
be
used
must
be
determined
A
measurement
that
originates
from
a
reference
point
included
in
a
damaged
area
will
produce
untrue
results
and
confuse
the
evaluation
of
the
underbody
condition
Unlike
the
conventional
type
of
frame
design
the
unitized
type
of
body
construction
seldom
develops
the
condition
of
diamond
in
the
floor
pan
area
as
a
result
of
front
or
rear
end
collision
Therefore
underbody
alignment
checking
can
usually
originate
from
the
body
floor
pan
area
If
inspection
indicates
that
these
locations
have
been
disturbed
and
are
not
suitable
for
measuring
one
of
the
undamaged
suspension
locations
should
be
used
as
an
initial
reference
point
If
a
rare
situation
should
exist
where
all
of
these
lucalions
are
not
suitable
as
reference
points
repair
operations
should
begin
with
the
body
floor
pan
area
All
other
underbody
components
should
be
aligned
progressively
from
this
area
MEMO
BF
10
Page 235 of 513
DATSUN
1200
MODEL
B
11
0
SERIES
I
NISSAN
I
NISSAN
MOTOR
CO
LTD
TOKYO
JAPAN
SECTION
BE
BODY
ELECTRICAL
WIRING
FUSE
LIGHTING
SYSTEM
HORN
METERS
AND
GAUGES
WINDSHIELD
WIPER
AND
WASHER
IGNITION
SWITCH
AND
STEERING
LOCK
CLOCK
RADIO
HEATER
BE
1
BE
6
BE
7
BE
15
BE
18
BE
26
BE
29
BE
31
BE
32
BE
34
Page 241 of 513
INSPECTION
Referring
to
the
wiring
diagram
check
the
wiring
harness
for
connection
with
electrical
equipment
and
connector
for
conned
ion
and
installation
When
checking
the
wiring
harness
note
the
following
matters
Connected
unit
should
not
be
loose
rusted
or
contaminated
2
Cable
insulator
cover
should
not
be
damaged
crack
ed
or
insulating
material
should
not
be
deteriorated
3
For
those
parts
which
are
grounded
through
the
installation
bolts
the
bolts
should
be
in
contact
with
the
body
completely
so
that
continuity
is
provided
in
between
the
body
and
bolts
4
Terminals
of
unit
through
which
current
flows
should
not
come
into
contact
with
other
metal
parts
5
No
erroneous
connection
should
be
present
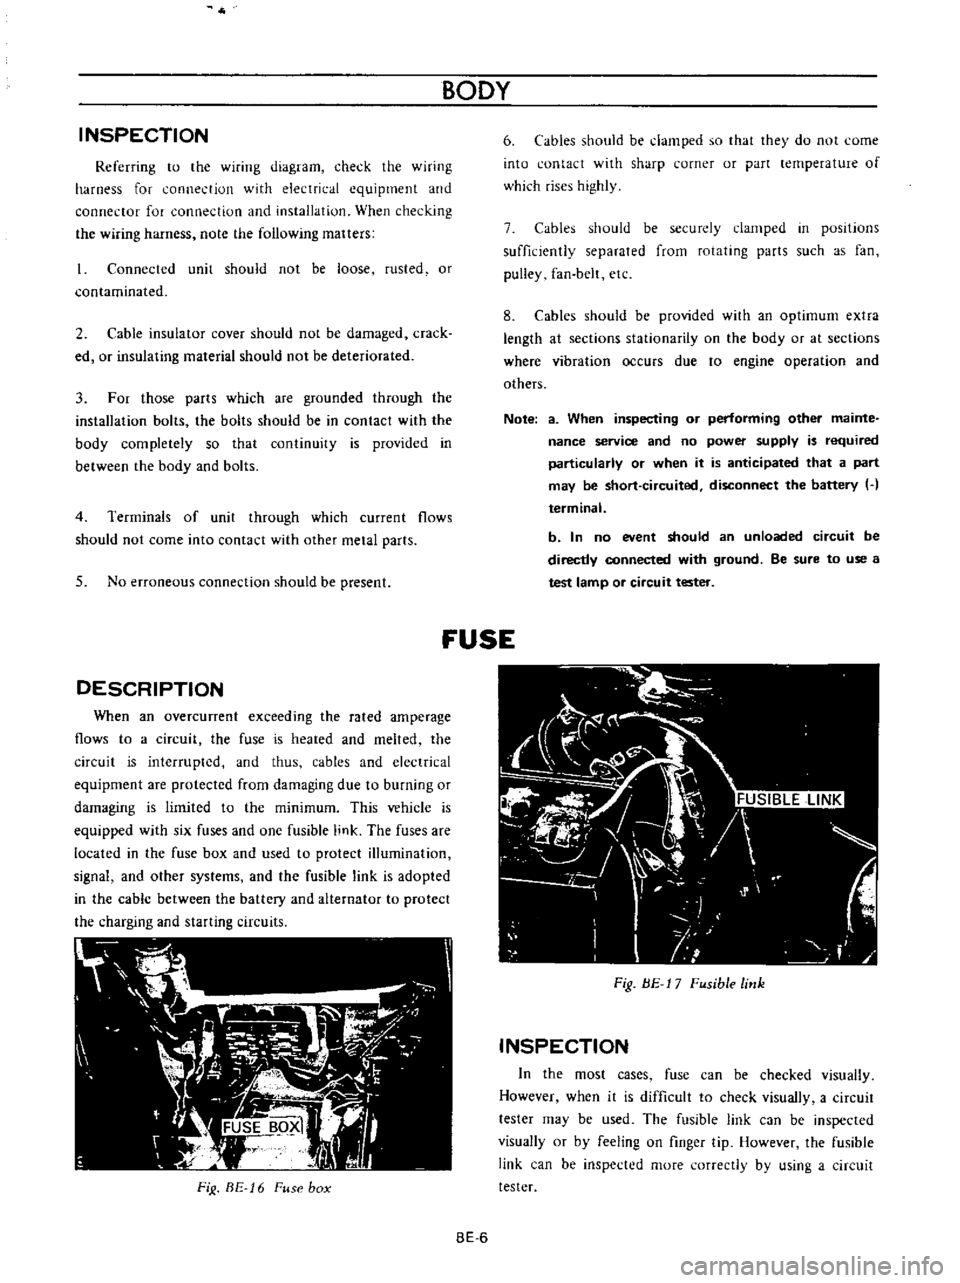
DESCRIPTION
When
an
overcunent
exceeding
the
rated
amperage
flows
to
a
circuit
the
fuse
is
heated
and
melted
the
circuit
is
interrupted
and
thus
cables
and
electrical
equipment
are
protected
from
damaging
due
to
burning
or
damaging
is
limited
to
the
minimum
This
vehicle
is
equipped
with
six
fuses
and
one
fusible
link
The
fuses
are
located
in
the
fuse
box
and
used
to
protect
illumination
signal
and
other
systems
and
the
fusible
link
is
adopted
in
the
cable
between
the
battery
and
alternator
to
protect
the
charging
and
starting
circuits
FiJ
BE
16
Fuse
box
BODY
6
Cables
should
be
damped
so
that
they
do
not
come
into
contact
with
sharp
corner
or
part
lernperature
of
which
rises
highly
7
Cables
should
be
securely
clamped
in
posItions
sufficiently
separated
from
rotating
parts
such
as
fan
pulley
fan
belt
etc
8
Cables
should
be
provided
with
an
optimum
extra
length
at
sections
stationarity
on
the
body
or
at
sections
where
vibration
occurs
due
to
engine
operation
and
others
Note
a
When
inspecting
or
performing
other
mainte
nance
service
and
no
power
supply
is
required
particularly
or
when
it
is
anticipated
that
a
part
may
be
short
circuited
disconnect
the
battery
H
terminal
b
In
no
event
should
an
unloaded
circuit
be
directly
connected
with
ground
Be
sure
to
use
a
test
lamp
or
circuit
tester
fUSE
Fig
BE
17
Fusible
link
INSPECTION
In
the
most
cases
fuse
can
be
checked
visually
However
when
it
is
difficult
to
check
visually
a
circuit
tester
may
be
used
The
fusible
link
can
be
inspected
visually
or
by
feeling
on
finger
tip
However
the
fusible
link
can
be
inspected
more
correctly
by
using
a
circuit
tester
BE
6
Page 242 of 513
BODY
ELECTRICAL
Note
8
When
a
fuse
is
blown
off
be
sure
to
correct
the
cause
before
installing
new
fuse
b
Be
sure
to
use
fuse
having
the
rated
capacity
Do
not
use
fuse
having
larger
capacity
i
e
20A
JOA
etc
c
Particularly
when
the
fusible
link
is
fused
replace
with
a
designated
fusible
link
Green
color
link
for
model
8110
In
comparison
with
fuse
much
higher
current
flows
through
the
fusible
link
Moreover
it
is
important
to
eliminate
the
cause
of
blown
off
fusible
link
before
replacing
d
When
fuse
is
connected
incorrectly
and
the
contact
is
loose
voltage
drops
and
heat
are
gener
ated
resulting
abnormally
operated
electrical
equip
ment
Remove
dust
or
when
oxidized
polish
with
a
fine
emery
paper
so
that
the
contact
is
improved
LlGHTING
SYSTEM
CONTENTS
HEAD
LAMP
Descri
ption
Sealed
beam
replacement
Aiming
adjustment
FRONT
PARKING
AND
TURN
SIGNAL
SIDE
FLASHER
IMARKER
LAMP
AN
D
LICENSE
LAMP
REAR
COMBINATION
LAMPS
BULB
SPECIFICATIONS
TURN
SIGNAL
AND
DIMMER
COMBINATION
SWITCH
BE
7
BE
7
BE
7
BE
8
LAMP
BE
8
BE
9
BE10
BE10
HEAD
LAMP
Description
All
weather
type
sealed
beam
2
light
system
front
lamps
are
adopted
Each
lamp
of
both
side
head
lamps
is
provided
with
high
beam
filament
for
long
range
SOW
and
low
beam
filarnent
for
dipping
40W
In
other
words
the
lamp
is
of
a
double
filament
type
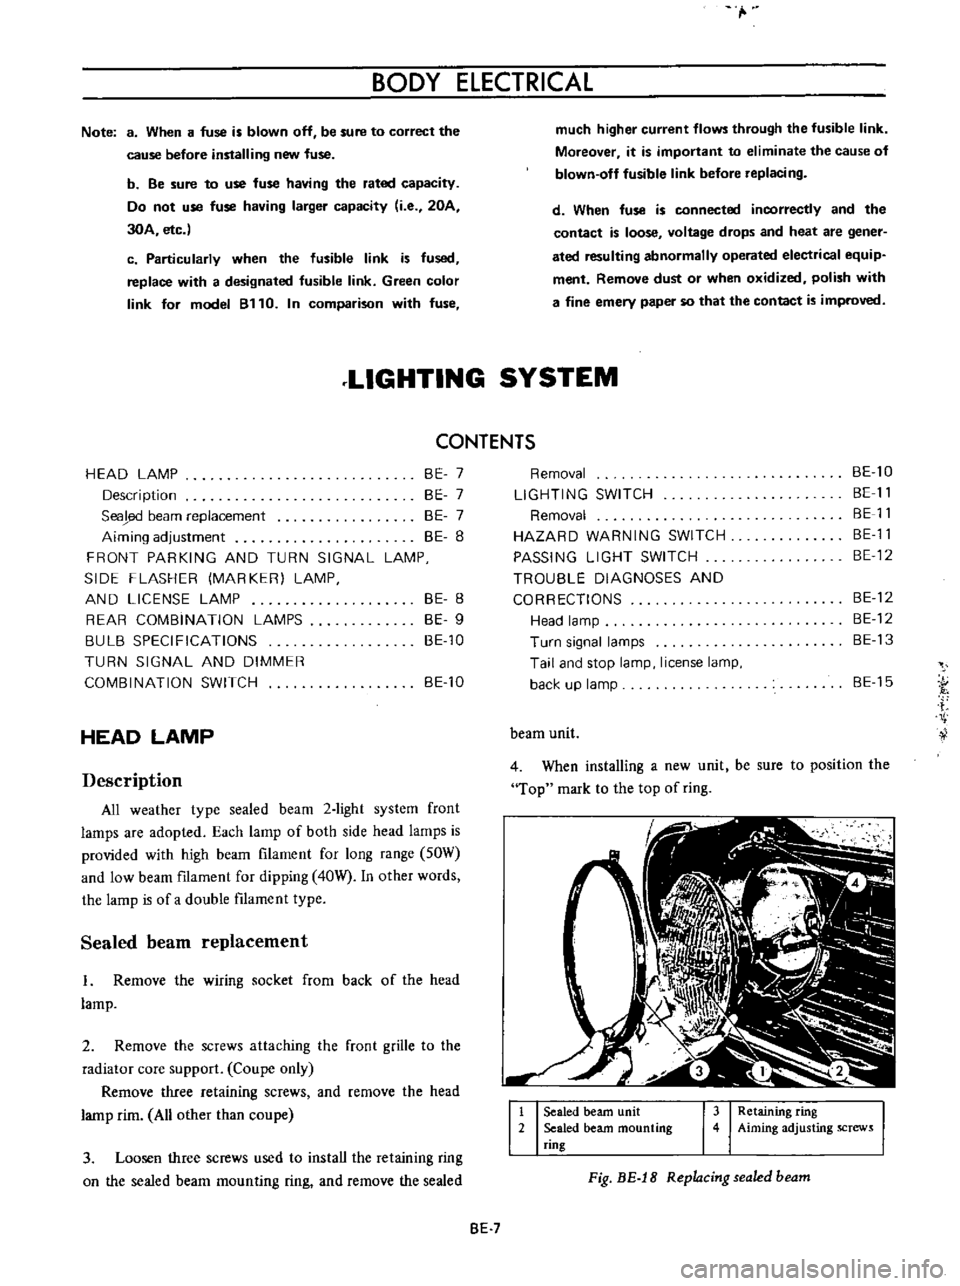
Sealed
beam
replacement
I
Rernove
the
wiring
socket
from
back
of
the
head
lamp
2
Remove
the
screws
attaching
the
front
grille
to
the
radiator
core
support
Coupe
only
Remove
three
retaining
screws
and
remove
the
head
lamp
rim
All
other
than
coupe
3
Loosen
three
screws
used
to
install
the
retaining
ring
on
the
sealed
bearn
mounting
ring
and
remove
the
sealed
Removal
LIGHTING
SWITCH
Removal
HAZARD
WARNING
SWITCH
PASSING
LIGHT
SWITCH
TROUBLE
DIAGNOSES
AND
CORRECTIONS
Head
lamp
Turn
signal
lamps
Tail
and
stop
lamp
license
lamp
back
up
lamp
BE
10
BE
11
BE
11
BE
11
BE
12
BE
12
BE
12
BE
13
BE
15
i
Ii
beam
unit
4
When
installing
a
new
unit
be
sure
to
position
the
Top
mark
to
the
top
of
ring
1
2
Sealed
beam
unit
Sealed
beam
mounting
ring
3
Retaining
ring
4
Aiming
adjusting
screws
Fig
BE
18
Replacing
sealed
beam
BE
7
Page 247 of 513
BODY
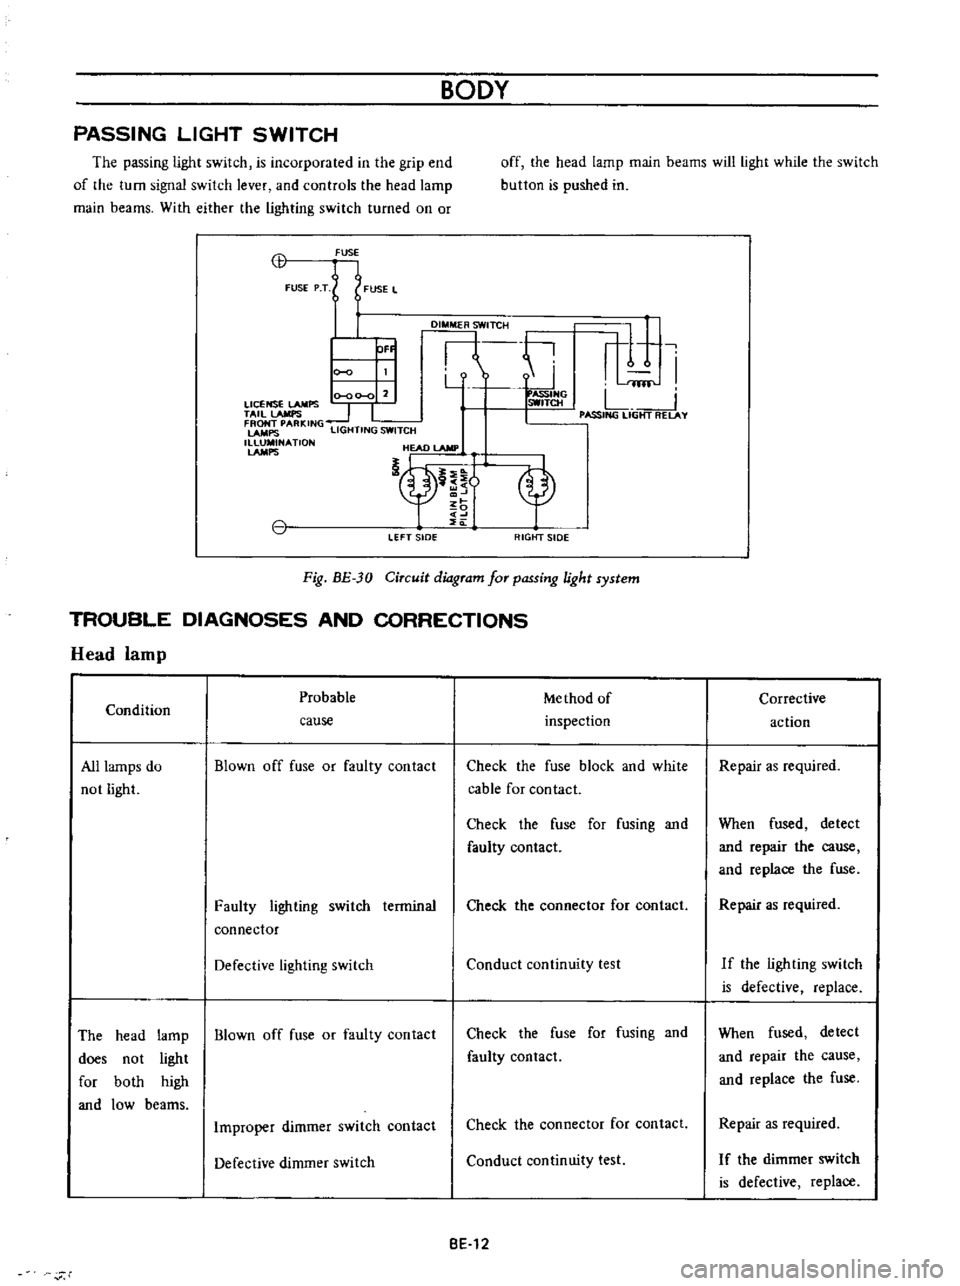
PASSING
LIGHT
SWITCH
The
passing
light
switch
is
incorporated
in
the
grip
end
of
the
turn
signal
switch
lever
and
controls
the
head
lamp
main
beams
With
either
the
lighting
switch
turned
on
or
off
the
head
lamp
main
beams
will
light
while
the
switch
button
is
pushed
in
CB
FUSE
FUSE
P
T
FUSE
L
DI
TCH
ti
r
1
I
Y
fflf
0
00
0
2
ASSIHG
LICENSE
LAMPS
SWITCH
L
TAil
lAMPS
1
I
I
PASSING
LIGHT
RELAY
FRONT
PARKING
LAMPS
LIGHTING
SWITCH
1
NATlON
HEAD
lAMP
nt
OF
LEFT
sIDe
RIGtfT
SIDE
Fig
BE
30
Circuit
diagram
for
passing
light
system
TROUBLE
DIAGNOSES
AND
CORRECTIONS
Head
lamp
Probable
Me
thod
of
Condition
inspection
cause
All
lamps
do
not
light
Blown
off
fuse
or
faulty
contact
Check
the
fuse
block
and
white
cable
for
contact
Check
the
fuse
for
fusing
and
faulty
contact
Faulty
lighting
switch
terminal
connector
Check
the
connector
for
contact
Defective
lighting
switch
Conduct
continuity
test
The
head
lamp
Blown
off
fuse
or
faulty
contact
does
not
light
for
both
high
and
low
beams
Check
the
fuse
for
fusing
and
faulty
contact
Improper
dimmer
switch
contact
Check
the
connector
for
contact
Defective
dimmer
switch
Conduct
continuity
test
BE
12
r
Corrective
action
Repair
as
required
When
fused
detect
and
repair
the
cause
and
replace
the
fuse
Repair
as
required
If
the
ligh
ting
swi
tch
is
defective
replace
When
fused
detect
and
repair
the
cause
and
replace
the
fuse
Repair
as
required
I
f
the
dimmer
switch
is
defective
replace
Page 248 of 513
BODY
ELECTRICAL
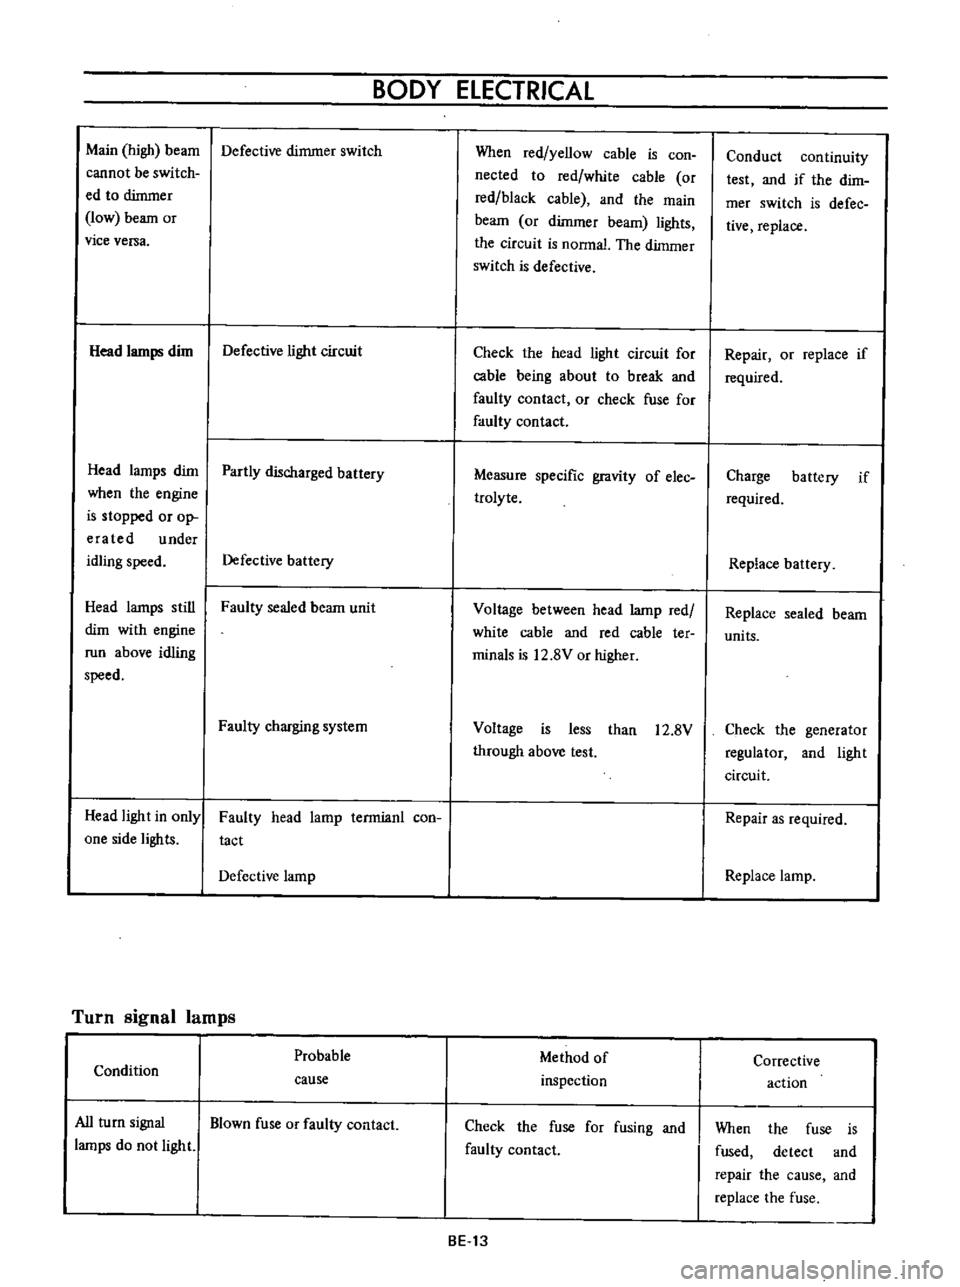
Main
high
beam
Defective
dimmer
switch
cannot
be
switch
ed
to
dimmer
low
beam
or
vice
versa
Head
lamps
dim
Defective
light
circuit
Head
lamps
dim
Partly
discharged
battery
when
the
engine
is
stopped
or
op
era
ted
under
idling
speed
Defective
battery
Head
lamps
still
Faulty
sealed
beam
unit
dim
with
engine
run
above
idling
speed
Faulty
charging
system
Head
light
in
only
one
side
lights
Faulty
head
lamp
terrnianl
con
tact
Defective
lamp
Turn
signal
lamps
Probable
Condition
cause
All
turn
signal
Blown
fuse
or
faulty
contact
lamps
do
not
light
When
red
yellow
cable
is
con
nected
to
red
white
cable
or
red
black
cable
and
the
main
beam
or
dimmer
beam
lights
the
circuit
is
nonnal
The
dimmer
switch
is
defective
Check
the
head
light
circuit
for
cable
being
about
to
break
and
faulty
contact
or
check
fuse
for
faulty
contact
Measure
specific
gravity
of
elec
trolyte
Voltage
between
head
lamp
red
white
cable
and
red
cable
ter
minals
is
12
8V
or
higher
Voltage
is
less
than
12
8V
through
above
test
Method
of
inspection
Check
the
fuse
for
fusing
and
faulty
contact
BE
13
Conduct
continuity
test
and
if
the
dirn
mer
switch
is
defec
tive
replace
Repair
or
replace
if
required
Charge
battery
if
required
Replace
battery
Replace
sealed
beam
units
Check
the
generator
regulator
and
light
circuit
Repair
as
required
Replace
lamp
Corrective
action
When
the
fuse
is
fused
detect
and
repair
the
cause
and
replace
the
fuse