tires DATSUN B110 1973 Service Repair Manual
[x] Cancel search | Manufacturer: DATSUN, Model Year: 1973, Model line: B110, Model: DATSUN B110 1973Pages: 513, PDF Size: 28.74 MB
Page 83 of 513
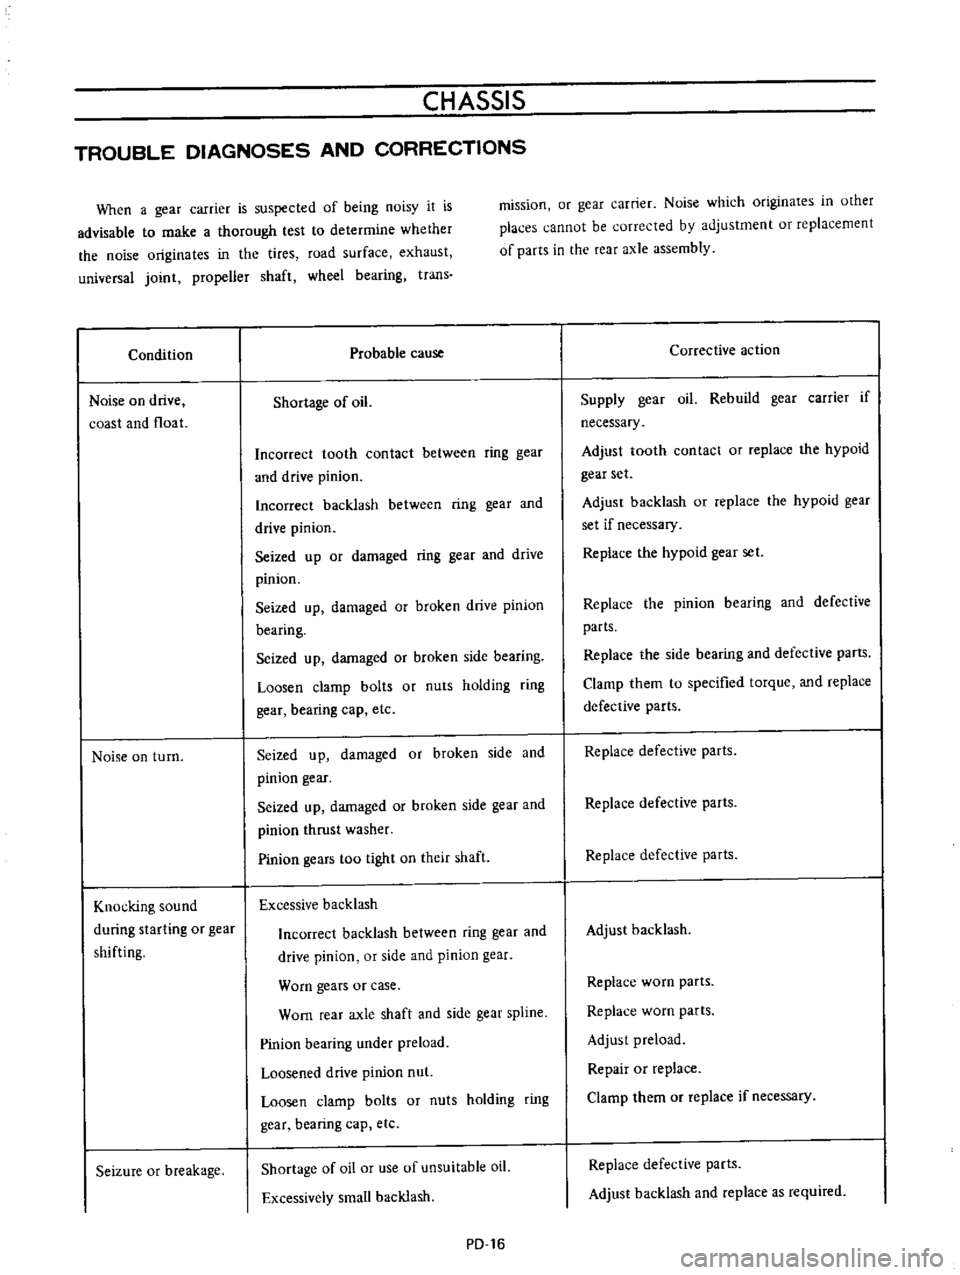
CHASSIS
TROUBLE
DIAGNOSES
AND
CORRECTIONS
When
a
gear
carrier
is
suspected
of
being
noisy
it
is
advisable
to
make
a
thorough
test
to
determine
whether
the
noise
originates
in
the
tires
road
surface
exhaust
universal
joint
propeller
shaft
wheel
bearing
trans
Condition
Noise
on
drive
coast
and
float
Noise
on
turn
Knocking
sound
during
starting
or
gear
shifting
Seizure
or
breakage
mission
or
gear
carrier
Noise
which
originates
in
other
places
cannot
be
corrected
by
adjustment
or
replacement
of
parts
in
the
rear
axle
assembly
Probable
cause
Shortage
of
oil
Incorrect
tooth
contact
between
ring
gear
and
drive
pinion
Incorrect
backlash
between
ring
gear
and
drive
pinion
Seized
up
or
damaged
ring
gear
and
drive
pinion
Seized
up
damaged
or
broken
drive
pinion
bearing
Seized
up
damaged
or
broken
side
bearing
Loosen
clamp
bolts
or
nuts
holding
ring
gear
bearing
cap
etc
Seized
up
damaged
or
broken
side
and
pinion
gear
I
Seized
up
damaged
or
broken
side
gear
and
pinion
thrust
washer
Pinion
gears
too
tight
on
their
shaft
Excessive
backlash
Incorrect
backlash
between
ring
gear
and
drive
pinion
or
side
and
pinion
gear
Worn
gears
or
case
Worn
rear
axle
shaft
and
side
gear
spline
Pinion
bearing
under
preload
Loosened
drive
pinion
nut
Loosen
clamp
bolts
or
nuts
holding
ring
gear
bearing
cap
etc
Shortage
of
oil
or
use
of
unsuitable
oil
Excessively
small
backlash
PD
16
Corrective
action
Supply
gear
oil
Rebuild
gear
carrier
if
necessary
Adjust
tooth
contact
or
replace
the
hypoid
gear
set
Adjust
backlash
or
replace
the
hypoid
gear
set
if
necessary
Replace
the
hypoid
gear
set
Replace
the
pinion
bearing
and
defective
parts
Replace
the
side
bearing
and
defective
parts
Clamp
them
to
specified
torque
and
replace
defective
parts
Replace
defective
parts
Replace
defective
parts
Replace
defective
parts
Adjust
backlash
Replace
worn
parts
Replace
worn
parts
Adjust
preload
Repair
or
replace
Clamp
them
or
replace
if
necessary
Replace
defective
parts
Adjust
backlash
and
replace
as
required
Page 107 of 513
FRONT
AXLE
FRONT
SUSPENSION
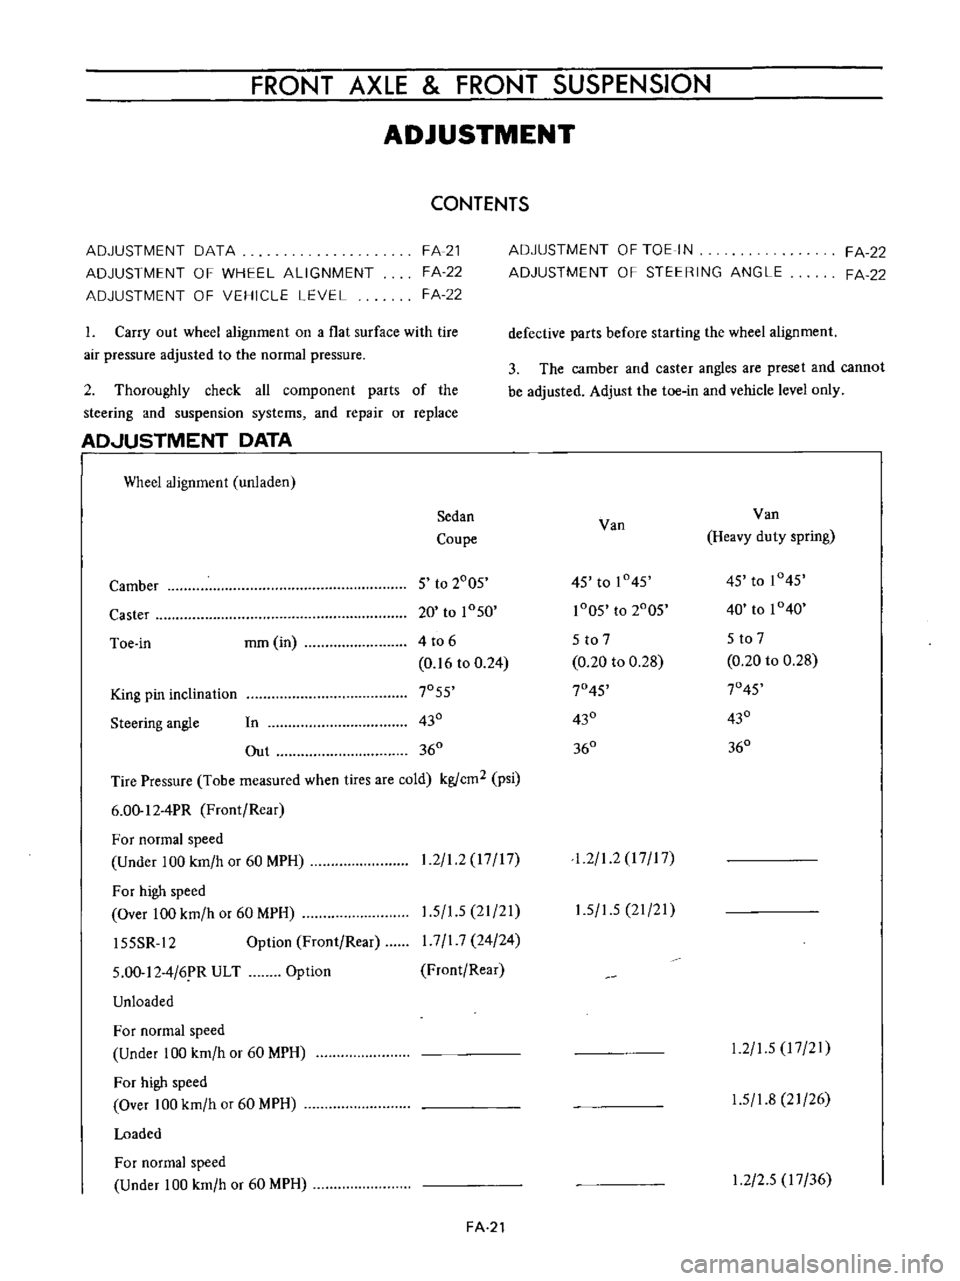
ADJUSTMENT
CONTENTS
ADJUSTMENT
DATA
ADJUSTMENT
OF
WHEEL
ALIGNMENT
ADJUSTMENT
OF
VEHICLE
LEVEL
FA
21
FA
22
FA
22
1
Carry
out
wheel
alignment
on
a
flat
surface
with
tire
air
pressure
adjusted
to
the
normal
pressure
2
Thoroughly
check
all
component
parts
of
the
steering
and
suspension
systems
and
repair
or
replace
AD
JUSTMENT
DATA
I
Wheel
alignment
unladen
Sedan
Coupe
Camber
5
to
2005
Caster
20
to
1050
Toe
in
mm
in
4
to
6
0
16
to
0
24
King
pin
inclination
7055
Steering
angle
In
430
Out
360
Tire
Pressure
Tobe
measured
when
tires
are
cold
kgfcm2
psi
6
00
12
4PR
Front
Rear
For
normal
speed
Under
100
km
h
or
60
MPH
For
high
speed
Over
100
km
h
or
60
MPH
15SSR
12
Option
Front
Rear
1
2
1
2
17
17
1
5
1
5
21
21
I
7
I
7
24
24
Front
Rear
5
00
12
4
6
R
ULT
Unloaded
Option
For
normal
speed
Under
100
km
h
or
60
MPH
For
high
speed
Over
100
km
h
or
60
MPH
Loaded
For
normal
speed
Under
100
km
h
or
60
MPH
FA
21
ADJUSTMENT
OF
TOE
IN
ADJUSTMENT
OF
STEERING
ANGLE
FA
22
FA
22
defective
parts
before
starting
the
wheel
alignment
3
The
camber
and
caster
angles
are
preset
and
cannot
be
adjusted
Adjust
the
toe
in
and
vehicle
level
only
Van
Van
Heavy
duty
spring
45
to
1045
45
to
1045
1005
to
2005
40
to
1040
5
to
7
5
to
7
0
20
to
0
28
0
20
to
0
28
7045
7045
430
430
360
360
1
2
1
2
I
7
I
7
1
5
1
5
21
21
1
2
1
5
17
21
1
5
1
8
21
26
1
2
2
5
17
36
Page 109 of 513
FRONT
AXLE
FRONT
SUSPENSION
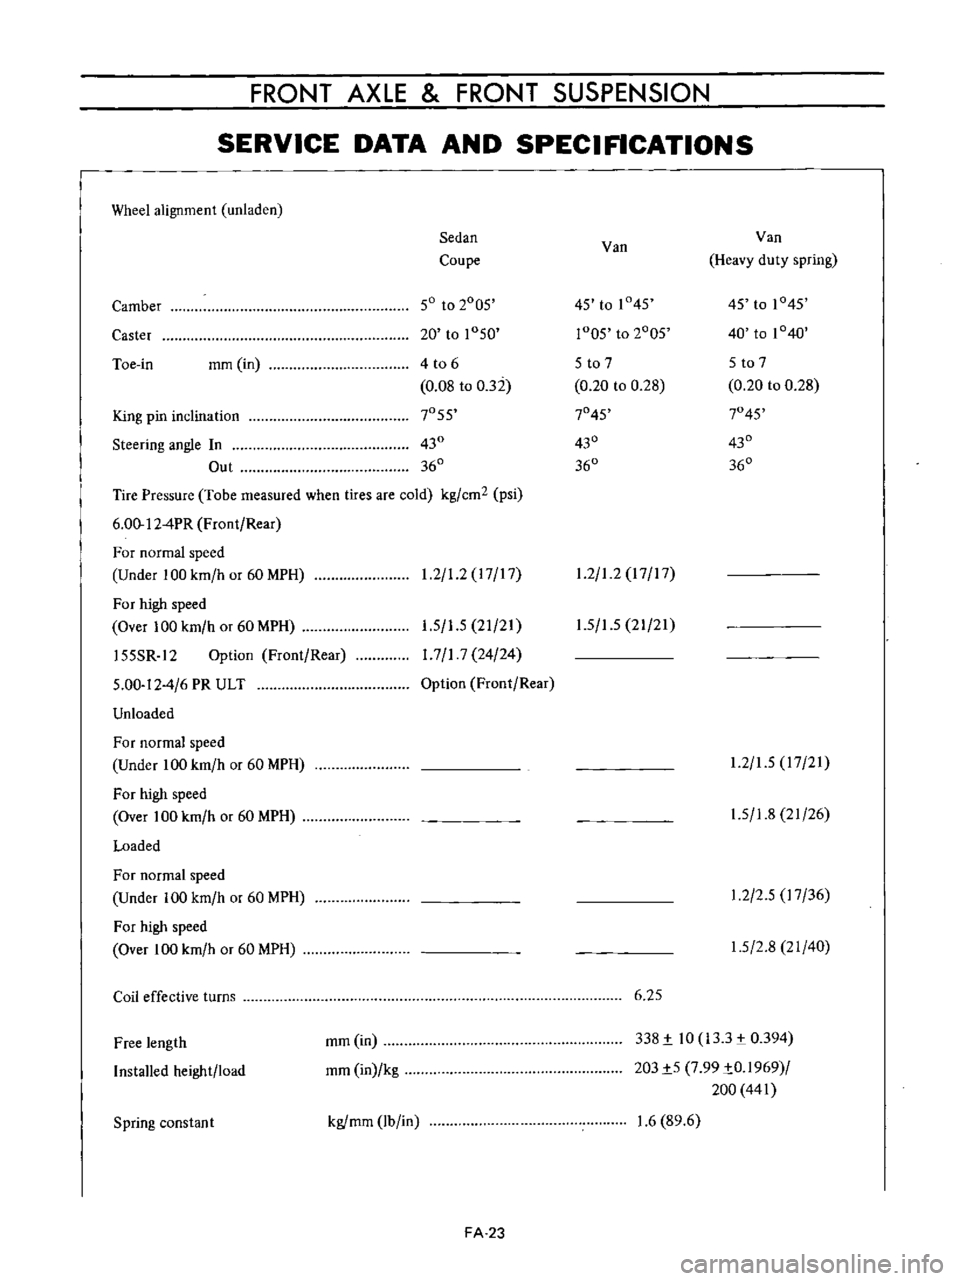
SERVICE
DATA
AND
SPECIFICATIONS
Wheel
alignment
unladen
Sedan
Van
Van
Coupe
Heavy
duty
spring
Camber
50
to
2005
45
to
1
45
45
to
1045
Caster
20
to
1050
r005
to
2005
40
to
1040
Toe
in
mm
in
4
t06
5
to
7
5
to
7
0
08
to
032
0
20
to
0
28
0
20
to
0
28
King
pin
inclination
7055
7045
7045
Steering
angle
In
430
430
430
Out
360
360
360
Tire
Pressure
Tobe
measured
when
tires
are
cold
kg
cm2
psi
6
00
12
4PR
Front
Rear
For
normal
speed
Under
100
km
h
or
60
MPH
1
2
1
2
17
17
1
2
1
2
17
17
For
high
speed
Over
100
km
h
or
60
MPH
155SR
12
Option
Front
Rear
5
00
12
4
6
PR
ULT
Unloaded
1
5
1
5
21
21
1
7
1
7
24
24
Option
Front
Rear
1
5
1
5
21
21
For
normal
speed
Under
100
km
h
or
60
MPH
For
high
speed
Over
100
km
h
or
60
MPH
Loaded
1
2
1
5
17
21
1
5
1
8
21
26
For
normal
speed
Under
100
km
h
or
60
MPH
For
high
speed
Over
100
km
h
or
60
MPH
1
2
2
5
17
36
1
5
2
8
21
40
Coil
effective
turns
6
25
Free
length
Installed
height
load
mm
in
mm
in
kg
338
i
10
133
0394
203i5
7
99
iO
1969
200
441
Spring
constan
t
kgfmm
lb
in
1
6
89
6
FA
23
Page 112 of 513
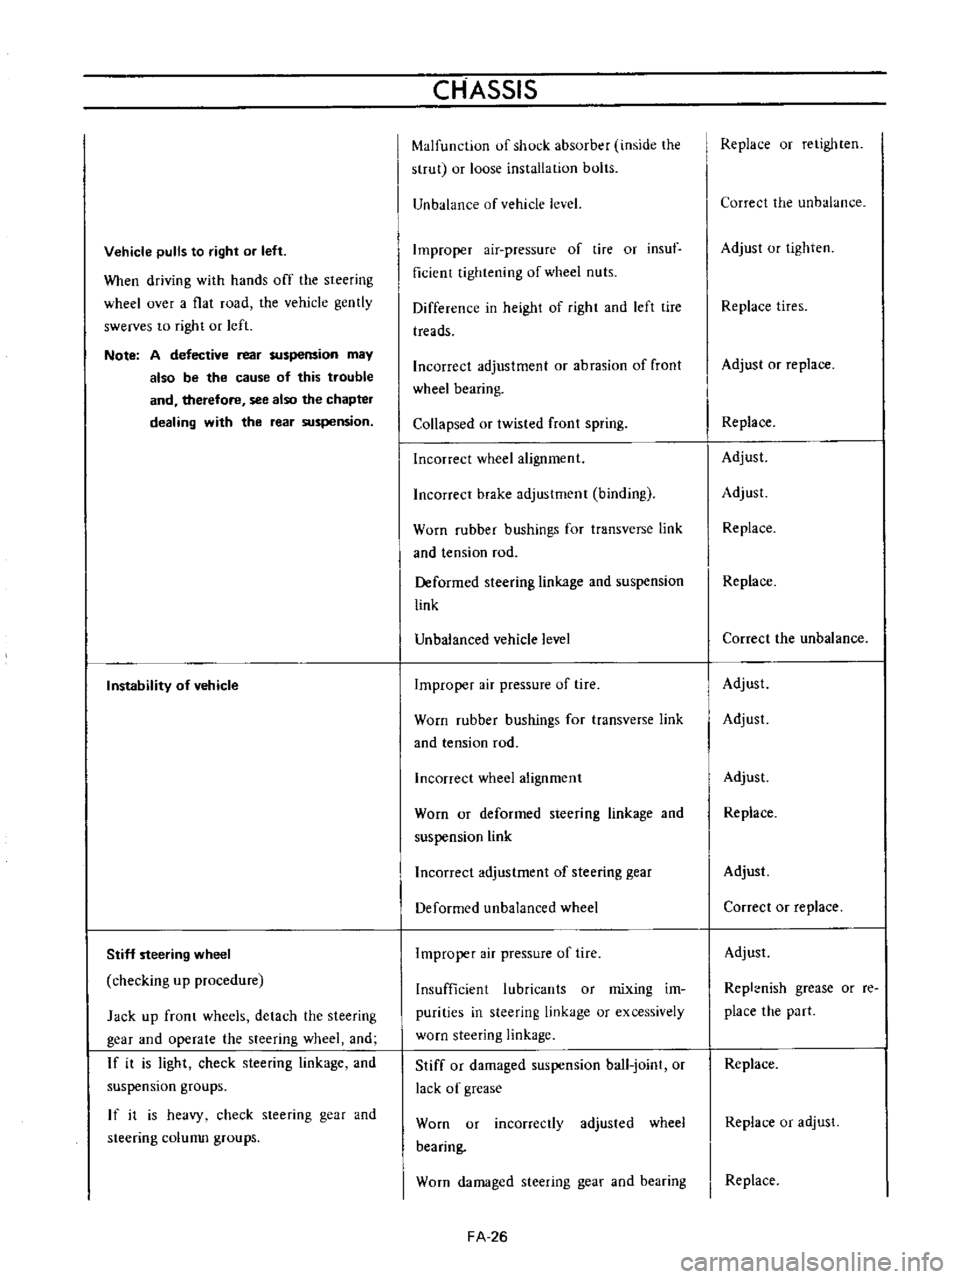
Vehicle
pulls
to
right
or
left
When
driving
with
hands
off
the
steering
wheel
over
a
flat
road
the
vehicle
gently
swerves
to
right
or
left
Note
A
defective
rear
suspension
may
also
be
the
cause
of
this
trouble
and
therefore
see
also
the
chapter
dealing
with
the
rear
suspension
Instability
of
vehicle
Stiff
steering
wheel
checking
up
procedure
Jack
up
front
wheels
detach
the
steering
gear
and
operate
the
steering
wheel
and
If
it
is
light
check
steering
linkage
and
suspension
groups
If
it
is
heavy
check
steering
gear
and
steering
colunm
groups
CHASSIS
Malfunction
of
shock
absorber
inside
the
strut
or
loose
installation
bolts
Unbalance
of
vehicle
level
Improper
air
pressure
of
tire
or
insuf
ficient
tightening
of
wheel
nuts
Difference
in
height
of
right
and
left
tire
treads
Incorrect
adjustment
or
abrasion
of
front
wheel
bearing
Collapsed
or
twisted
front
spring
Incorrect
wheel
alignment
Incorrect
brake
adjustment
binding
Worn
rubber
bushings
for
transverse
link
and
tension
rod
Deformed
steering
linkage
and
suspension
link
Unbalanced
vehicle
level
Improper
air
pressure
of
tire
Worn
rubber
bushings
for
transverse
link
and
tension
rod
Incorrect
wheel
alignment
Worn
or
deformed
steering
linkage
and
suspension
link
Incorrect
adjustment
of
steering
gear
Deformed
unbalanced
wheel
Improper
air
pressure
of
tire
Insufficient
lubricants
or
mixing
im
purities
in
steering
linkage
or
excessively
worn
steering
linkage
Stiff
or
damaged
suspension
ball
joint
or
lack
of
grease
Worn
or
incorrectly
adjusted
wheel
bearing
Worn
damaged
steering
gear
and
bearing
FA
26
Replace
or
retighten
Correct
the
unbalance
Adjust
or
tighten
Replace
tires
Adjust
or
replace
Replace
Adjust
Adjust
Replace
Replace
Correct
the
unbalance
Adjust
Adjust
Adjust
Replace
Adjust
Correct
or
replace
Adjust
Repl
nish
grease
or
re
place
the
part
Replace
Replace
or
adjust
Replace
Page 130 of 513
CHASSIS
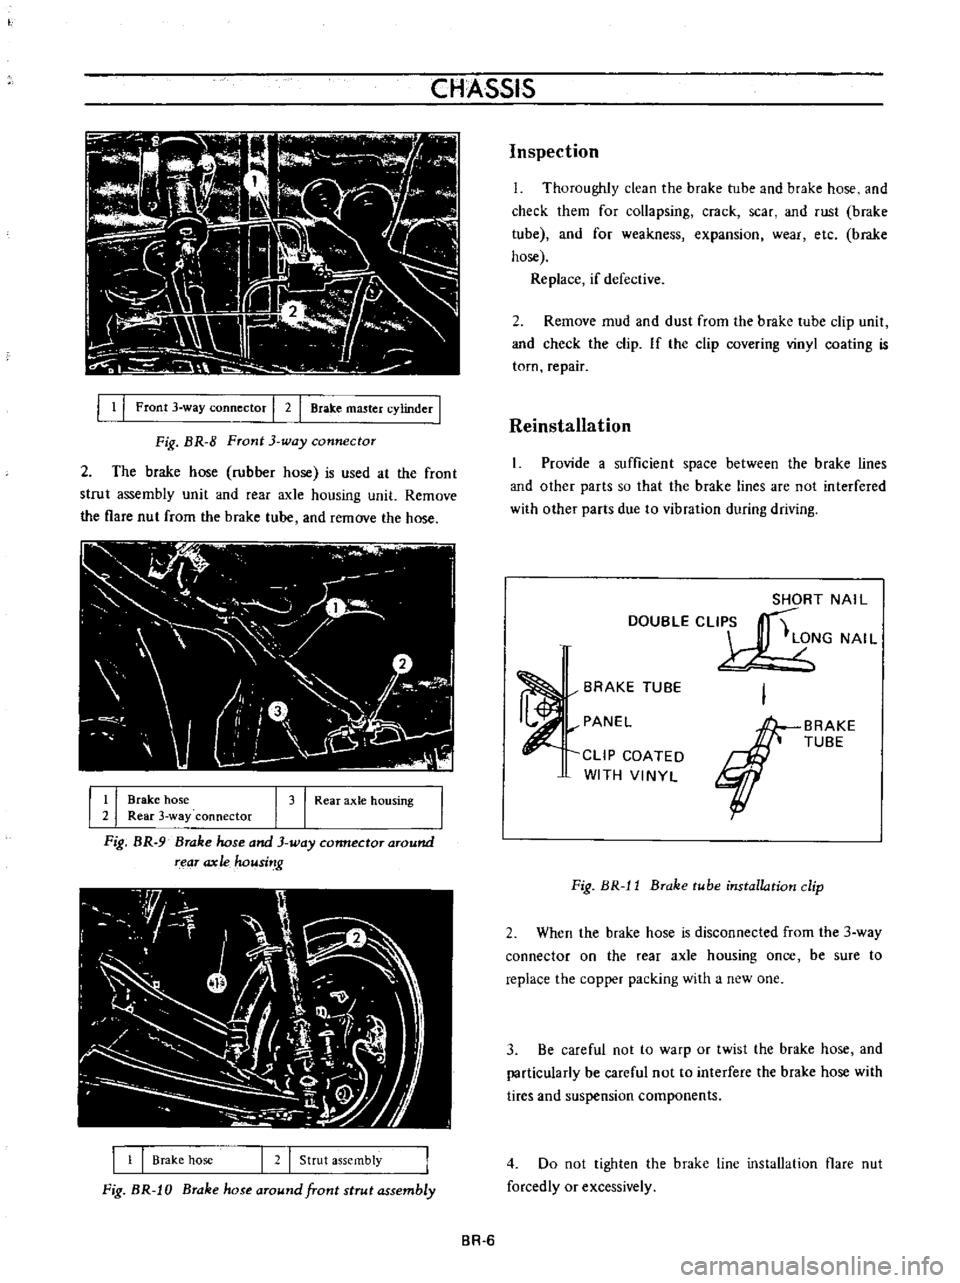
1
I
Front
3
way
connector
I
2
I
Brake
master
cylinder
I
Fig
BR
8
Front
3
way
connector
2
The
brake
hose
rubber
hose
is
used
at
the
front
strut
assembly
unit
and
fear
axle
housing
unit
Remove
the
flare
nut
from
the
brake
tube
and
remove
the
hose
I
r
I
I
l
j
u
l
I
J
II
V
r
1
0
l
I
l
I
I
Brake
hose
I
3
I
Rear
axle
hOUSing
2
Rear
3
way
connector
Fig
BR
9
Brake
hose
and
3
way
connector
around
rear
ax
Ie
housi
g
1
1
Brake
hose
I
2
I
Strut
assembly
Fig
BR
J
0
Brake
hose
around
front
strut
assembly
Inspection
L
Thoroughly
clean
the
brake
tube
and
brake
hose
and
check
them
for
collapsing
crack
scar
and
rust
brake
tube
and
for
weakness
expansion
wear
etc
brake
hose
Replace
if
defective
2
Remove
mud
and
dust
from
the
brake
tube
clip
unit
and
check
the
clip
If
the
clip
covering
vinyl
coating
is
torn
repair
Reinstallation
1
Provide
a
sufficient
space
between
the
brake
lines
and
other
parts
so
that
the
brake
lines
are
not
interfered
with
other
parts
due
to
vibration
during
driving
SHORT
NAIL
DOUBLECLI
S
t
LONG
NAI
L
BRAKE
TUBE
PANEL
CLIP
COATED
WITH
VINYL
BRAKE
TUBE
Fig
BR
l1
Brake
tube
installation
clip
2
When
the
brake
hose
is
disconnected
from
the
3
way
connector
on
the
rear
axle
housing
once
be
sure
to
replace
the
copper
packing
with
a
new
one
3
Be
careful
not
to
warp
or
twist
the
brake
hose
and
particularly
be
careful
not
to
interfere
the
brake
hose
with
tires
and
suspension
components
4
Do
not
tighten
the
brake
line
installation
flare
nut
forcedly
or
excessively
BR
6
Page 149 of 513
Pedal
yields
under
slight
pressure
Excessive
pedal
travel
All
brakes
drag
One
brake
drags
Unbalanced
brakes
BRAKE
Use
of
a
brake
fluid
with
a
boiling
point
which
is
too
low
Reservoir
filler
cap
ven
t
hole
clogged
This
promotes
a
vacuum
in
master
cylinder
that
sucks
in
air
through
rear
seal
Deteriorated
check
valve
External
leaks
Master
cylinder
leaks
through
primary
cap
System
has
not
been
bled
Improperly
adjusted
clearance
Fluid
level
in
master
cylinder
is
too
low
Thermal
expansion
of
drums
due
to
over
heating
Insufficient
shoe
tlrdrum
clearance
Weak
shoe
return
springs
Brake
shoe
return
no
free
travel
Seized
master
cylinder
piston
Loose
or
damaged
wheel
bearings
Weak
broken
or
unhooked
brake
shoe
return
springs
Insufficient
clearance
between
brake
shoe
and
drum
Grease
or
oil
on
linings
Seized
piston
in
wheel
cylinder
Tires
improperly
inflated
Loose
wheel
bearing
BR
25
Change
with
the
specified
brake
fluid
and
bleed
system
Clean
reservoir
filler
cap
and
bleed
the
system
Fit
a
new
check
valve
and
bleed
the
system
Check
master
cylinder
piping
and
wheel
cylinder
for
leaks
and
make
necessary
re
pairs
Overhaul
master
cylinder
Bleed
the
system
Adjust
shoe
to
drum
clearance
Full
up
with
specified
brake
fluid
Bleed
the
system
if
required
Allow
drums
to
cool
off
Check
brake
shoe
linings
and
drums
Replace
damaged
parts
Adjust
clearance
Replace
the
springs
Adjust
pedal
height
Service
the
master
cylinder
replace
the
piston
and
bleed
the
system
Adjust
or
replace
wheel
bearings
Replace
spring
Adjust
brakes
Clean
brake
mechanism
replace
lining
and
correct
cause
of
grease
or
oil
getting
on
lining
Service
the
wheel
cylinder
and
bleed
the
system
Inflate
tires
to
correct
pressure
Adjust
wheel
bearing
Page 154 of 513
DESCRIPTION
MAINTENANCE
AND
SERVICE
Tire
inflation
Tubeless
tire
repair
Wheel
repair
Wear
DESCRIPTION
TIRE
SIZE
in
Standard
Optional
WHEEL
AND
TIRE
WHEEL
AND
TIRE
CONTENTS
WTl
WT2
WT2
WT2
WT2
WT2
Radial
tire
Tire
rotation
INSPECTION
Wheel
balance
Wheel
and
tire
6
00
12
4PR
Tubeless
6
00
12
4PR
with
tube
6
00
12
4PR
Snow
tire
6
00S
12
4PR
Sports
Tubeless
155SR
12
Radial
with
tube
except
for
Van
use
5
00
12
4PRULT
with
lube
front
for
Van
use
5
00
12
jPRULT
with
tube
rear
TIRE
INFLATION
PRESSURE
To
be
measured
when
tires
are
cold
kg
cm2
psi
6
00
I
2
4PR
Front
Rear
For
normal
speed
Under
100
km
h
or
60
mph
For
high
speed
Over
100
km
h
or
60
mph
155SR
12
Optional
Front
Rear
5
00
I
2
4
6PR
ULT
Optional
Front
Rear
Sedan
Coupe
1
2
1
2
17
17
1
5
1
5
22
22
1
7
1
7
24
24
Van
Van
Heavy
duty
spring
1
2
1
2
I
7
17
1
5
1
5
22
22
WTl
WT
3
WT
4
WT
4
WT
4
WT
4
Page 155 of 513
CHASSIS
Unloaded
For
normal
speed
U
nder
100
km
h
or
60
mph
F
or
high
speed
Over
100
km
h
or
60
mph
Loaded
For
normal
speed
Under
100
kmlh
or
60
mph
For
high
speed
Over
100
kmlh
or
60
mph
MAINTENANCE
AND
SERVICE
Tire
inflation
Correct
tire
pressure
is
very
importan
t
to
ease
of
steering
and
riding
comfort
This
also
reduces
driving
sound
to
a
minimum
resulting
in
longer
tire
that
is
overinfla
lion
or
underinflation
promotes
wear
at
center
tread
or
shoulder
of
tire
If
all
tires
are
inspected
frequently
and
maintained
correct
tire
pressure
it
is
possible
to
detect
sharp
material
in
the
tread
Also
the
above
check
avoids
abnormal
wear
which
invites
serious
trouble
If
tires
indicate
abnormal
or
uneven
wear
the
cause
of
trouble
should
be
detected
and
eliminated
After
inflating
tices
leakage
in
valve
should
be
check
cd
Without
valve
caps
leakage
will
occur
due
to
dirt
and
water
resulting
in
underinOation
Accordingly
whenever
tire
pressure
is
checked
be
sure
to
secure
valve
caps
and
tighten
firmly
by
hand
Tubeless
tire
repair
In
urder
to
inspect
a
leak
apply
soapy
solution
to
tire
or
submerge
tire
and
wheel
in
the
water
after
inflating
tire
to
specified
pressure
Special
inspection
for
leaks
should
12
15
17
22
1
5
1
8
22
25
1
2
2
5
I
7
36
1
5
2
8
22
40
be
carried
out
around
the
valve
wheel
rim
and
along
the
tread
Exercise
care
to
bead
and
rim
where
leakage
occurs
Wipe
out
water
from
area
which
leaks
air
bubbles
and
then
mark
the
place
with
chalk
After
remuving
the
materials
caused
puncture
seal
the
point
to
avoid
damage
to
the
tire
due
to
entrance
of
dirt
and
water
When
repairing
the
puncture
use
the
tire
repair
kits
which
are
furnished
from
tire
dealers
following
the
instructions
provided
with
the
kits
In
case
that
a
puncture
becomes
large
or
there
is
any
other
damage
on
the
tire
fabric
repair
must
be
carried
out
by
authorized
tire
dealers
Wheel
repair
Inspect
wheel
rim
flange
for
bend
or
dents
If
any
of
the
above
deterioration
is
detected
repair
should
be
made
to
secure
complete
sealing
The
flange
should
be
cleaned
by
a
wire
brush
when
rust
is
found
on
the
flange
Furthermore
if
excessive
pitting
occurs
on
the
rim
eliminate
it
with
a
file
Wear
Misalignment
When
the
front
wheels
align
in
excessive
toe
in
or
WT
2
Page 156 of 513
WHEEL
AND
TIRE
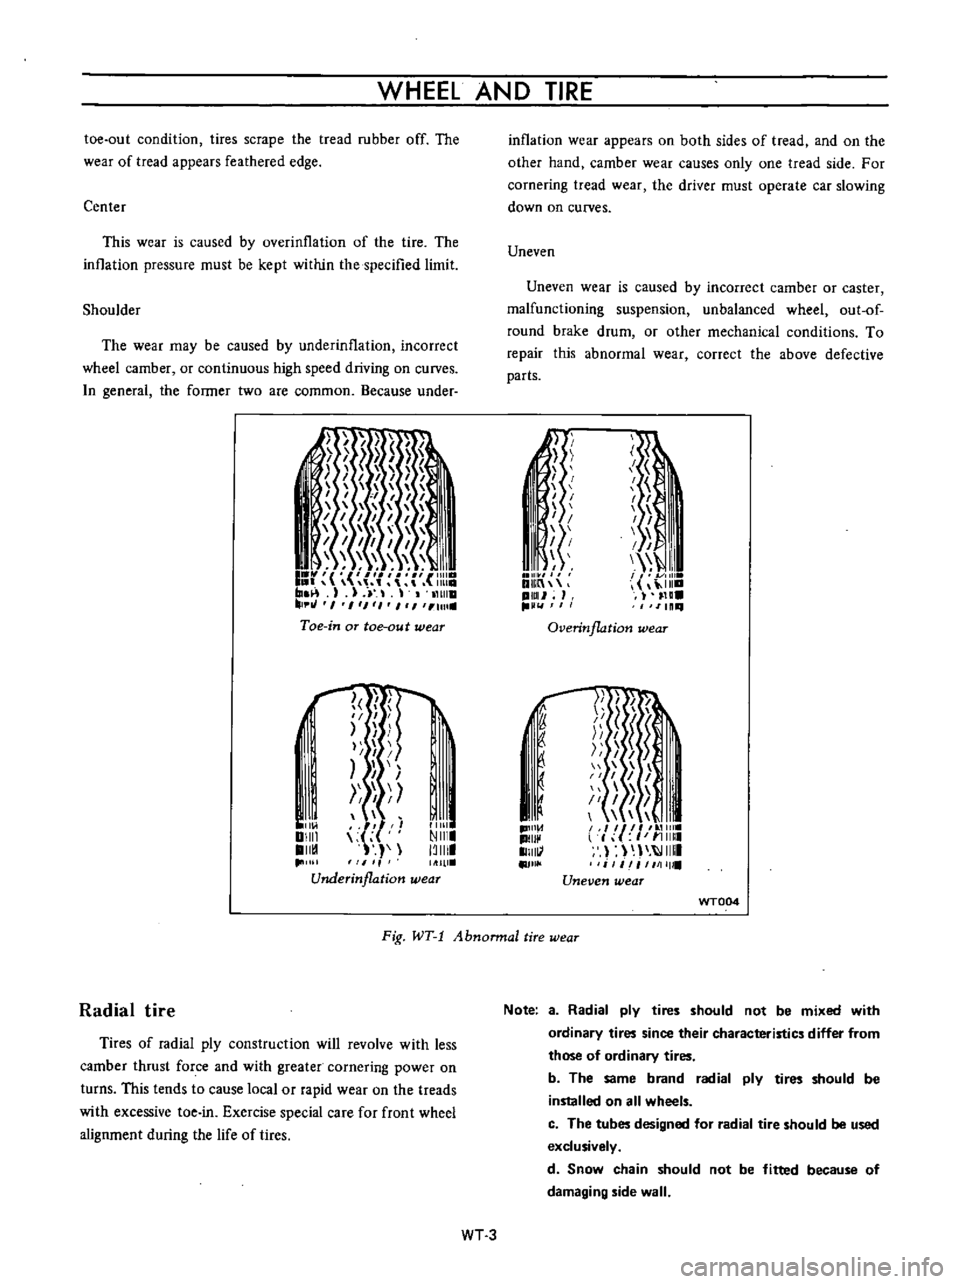
toe
out
condition
tires
scrape
the
tread
rubber
off
The
wear
of
tread
appears
feathered
edge
Center
This
wear
is
caused
by
overinllation
of
the
tire
The
inllation
pressure
must
be
kept
within
the
specified
limit
Shoulder
The
wear
may
be
caused
by
underinflation
incorrect
wheel
camber
or
continuous
high
speed
driving
on
curves
n
general
the
former
two
are
common
Because
under
I
I
I
I
1
1111
I
r
r
m
1
J
11
tHlla
tJ
I
1
1
1
I
1
Ull
Toe
in
aT
toe
au
t
wear
l
f
I
II
I
I
I
I
Ill
Ill
Underinflation
wear
I
11
01
DIIII
II
1
11111
NIII
13111
inflation
wear
appears
on
both
sides
of
tread
and
on
the
other
hand
camber
wear
causes
only
one
tread
side
For
cornering
tread
wear
the
driver
must
operate
car
slowing
down
on
curves
Uneven
Uneven
wear
is
caused
by
incorrect
camber
or
caster
malfunctioning
suspension
unbalanced
wheel
out
of
round
brake
drum
or
other
mechanical
conditions
To
repair
this
abnormal
wear
correct
the
above
defective
parts
Ii
I
I
I
I
1
i
f
I
I
I
I
I
III
I
I
11
DlIIn
ilia
pml
H
IlLl
11111
Overinflation
wear
1D1I1
d
II
1I111
II
j
J
1
51
I
I
I
1
il
I
I
II
l
f
I
11
11111
I
IIIII
i
1
iI
1111111
Uneven
wear
f
I
I
u
WT004
Fig
WT
1
Abnonnal
tire
wear
Radial
tire
Tires
of
radial
ply
construction
will
revolve
with
less
camber
thrust
force
and
with
greater
cornering
power
on
turns
This
tends
to
cause
local
or
rapid
wear
on
the
treads
with
excessive
toe
in
Exercise
special
care
for
front
wheel
alignment
during
the
life
of
tires
Note
a
Radial
ply
tires
should
not
be
mixed
with
ordinary
tires
since
their
characteristics
differ
from
those
of
ordinary
tires
b
The
same
brand
radial
ply
tires
should
be
installed
on
all
wheels
c
The
tubes
designed
for
radial
tire
should
be
used
exclusively
d
Snow
chain
should
not
be
fitted
because
of
damaging
side
wall
WT3
Page 157 of 513
CHASSIS
Tire
rotation
Tires
wear
unevenly
and
become
unbalanced
according
to
running
distance
Uneven
tire
wear
often
results
in
tire
noise
whkh
is
attributed
to
rear
axle
gears
bearing
ell
Meanwhile
the
front
tires
tend
to
wear
unevenly
because
of
front
wheel
alignment
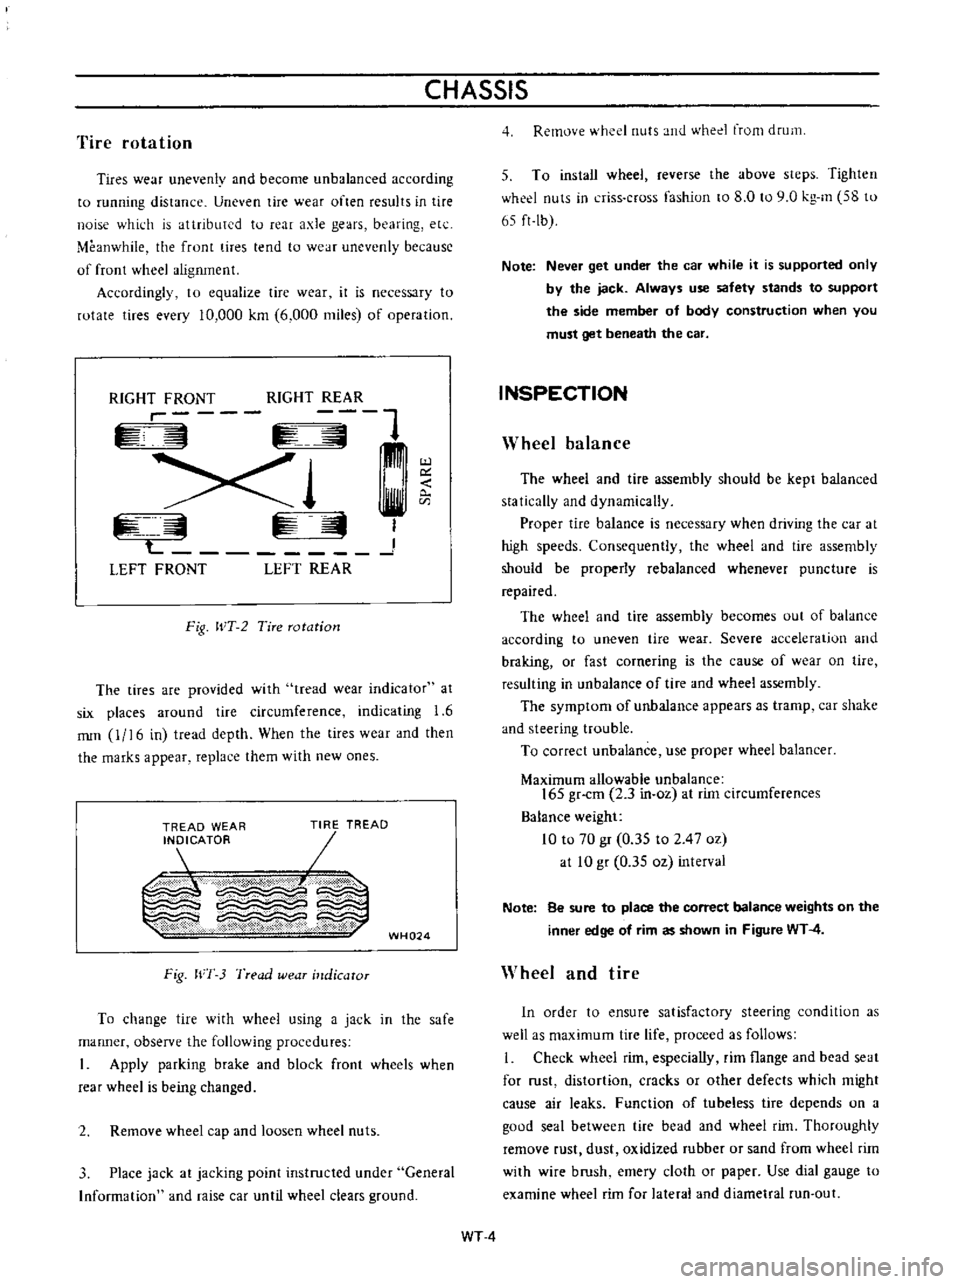
Accordingly
to
equalize
tire
wear
it
is
necessary
to
rotate
tires
every
10
000
km
6
000
miles
of
operation
RIGHT
FRONT
RIGHT
REAR
r
1
Xl
L
J
LEFT
FRONT
LEFT
REAR
Fig
WT
2
Tire
rotation
The
tires
are
provided
with
tread
wear
indicator
at
six
places
around
tire
circumference
indicating
1
6
nun
0
16
in
tread
depth
When
the
tires
wear
and
then
the
marks
a
ppear
replace
them
with
new
ones
TREAD
WEAR
INDICATOR
7
TREAD
m
Y
X
W
X
v
w
WH024
Fig
WI
3
Tread
wear
illdicator
To
change
tire
with
wheel
using
a
jack
in
the
safe
manner
observe
the
following
procedures
I
Apply
parking
brake
and
block
front
wheels
when
rear
wheel
is
being
changed
2
Remove
wheel
cap
and
loosen
wheel
nuts
3
Place
jack
at
jacking
point
instructed
under
General
Information
and
raise
car
until
wheel
clears
ground
4
Remove
wheel
nuts
and
whed
from
drum
5
To
install
wheel
reverse
the
above
steps
Tighten
whed
nuts
in
criss
cross
fashion
to
8
0
to
9
0
kg
m
58
to
65
ft
lb
Note
Never
get
under
the
car
while
it
is
supported
only
by
the
jack
Always
use
safety
stands
to
support
the
side
member
of
body
construction
when
you
must
get
beneath
the
car
INSPECTION
Wheel
balance
The
wheel
and
tire
assembly
should
be
kept
balanced
statically
and
dynamically
Proper
tire
balance
is
necessary
when
driving
the
car
at
high
speeds
Consequently
the
wheel
and
tire
assembly
should
be
properly
rebalanced
whenever
puncture
is
repaired
The
wheel
and
tire
assembly
becomes
out
of
balance
according
to
uneven
tire
wear
Severe
acceleration
and
braking
or
fast
cornering
is
the
cause
of
wear
on
tire
resulting
in
unbalance
of
tire
and
wheel
assembly
The
symptom
of
unbalance
appears
as
tramp
car
shake
and
steering
trouble
To
correct
unbalance
use
proper
wheel
balancer
Maximum
allowable
unbalance
165
gr
cm
2
3
in
ol
at
rim
circumferences
Balance
weight
10
to
70
gr
0
35
to
2
47
Ol
at
10
gr
0
35
Ol
interval
Note
Be
sure
to
place
the
correct
balance
weights
on
the
inner
edge
of
rim
as
shown
in
Figure
WT
4
Wheel
and
tire
In
order
to
ensure
satisfactory
steering
condition
as
well
as
maximum
tire
life
proceed
as
follows
I
Check
wheel
rim
especially
rim
flange
and
bead
seat
for
rust
distortion
cracks
or
other
defects
which
might
cause
air
leaks
Function
of
tubeless
tire
depends
on
a
good
seal
between
tire
bead
and
wheel
rim
Thoroughly
remove
rust
dust
oxidized
rubber
or
sand
from
wheel
rim
with
wire
brush
emery
cloth
or
paper
Use
dial
gauge
to
examine
wheel
rim
for
lateral
and
diametral
run
out
WT
4