wheel bolts DATSUN B110 1973 Service Repair Manual
[x] Cancel search | Manufacturer: DATSUN, Model Year: 1973, Model line: B110, Model: DATSUN B110 1973Pages: 513, PDF Size: 28.74 MB
Page 55 of 513
c
Inspection
and
adJu
Stmenf
trouble
first
check
the
linhge
f
no
1
i
jI
fect
is
found
in
the
lin1
age
check
of
manu
a
l
liiiJ
i
the
inhibitor
switch
Th
d
1F
aI
S
t
th
I
I
f
e
a
JU
i
J
u
epara
e
e
range
se
eet
ever
rom
Iy
important
ii
s3
ns
etion
of
oil
the
lower
shift
rod
and
turn
the
range
1
level
for
the
automatiC
tran
smission
select
lever
to
N
Therefore
great
care
should
be
exer
Note
In
the
position
N
the
slot
of
cised
because
defective
adjustment
will
the
manual
shaft
is
vertical
result
in
the
breakdown
of
the
trans
By
the
use
of
the
tester
check
the
two
bIack
yellow
BY
wires
from
the
inhibitor
switch
in
the
ranges
N
and
P
and
the
two
red
bIack
RB
wires
in
the
range
R
for
continuity
Turn
range
select
lever
to
both
directions
from
each
lever
set
position
and
check
each
continuity
range
It
is
normal
if
the
electricity
is
on
while
the
lever
is
within
an
angle
of
about
3
0
on
both
sides
from
each
lever
set
line
How
ever
if
its
continuity
range
is
obvi
ously
unequal
on
both
sides
the
adjustment
is
required
f
any
malfunction
is
found
un
screw
the
fastening
nut
of
the
range
selector
lever
and
two
fastening
bolts
of
the
switch
body
and
then
remove
the
machine
screw
under
the
switch
body
Adjust
the
manual
shaft
correct
ly
to
the
position
N
by
means
of
the
selector
lever
When
the
slot
of
the
shaft
becomes
vertical
the
detent
works
to
position
the
shaft
correctly
with
a
click
sound
Move
the
switch
slightly
aside
so
that
the
screw
hole
will
be
aligned
with
the
pin
hole
of
the
internal
rotor
combined
with
the
manual
shaft
and
check
their
alignment
by
inserting
a
1
5
0101
0
0591
in
diameter
pin
into
the
holes
If
the
alignment
is
made
correct
1
5ten
the
switch
body
with
the
bolts
pull
out
the
pin
and
tighten
up
the
screw
again
into
the
hole
and
fasten
the
selector
lever
as
before
Check
over
again
the
continuity
with
the
tester
If
the
malfunction
still
remains
replace
the
inhibitor
switch
mission
Inspection
Pull
the
selector
lever
toward
you
and
turn
it
so
far
as
p
to
1
range
where
clicks
will
be
felt
by
hand
This
is
the
detent
of
manual
valve
in
the
body
and
indicates
the
correct
posi
tion
of
the
lever
Inspect
whether
the
pointer
of
selector
dial
corresponds
to
this
point
and
also
whether
the
lever
comes
in
alignment
with
the
stepping
of
posi
tion
plate
when
it
is
released
Adjustment
This
procedure
can
be
accom
plished
by
referring
to
Removal
and
nstallation
Checking
and
adjusting
inhibitor
switch
The
inhibitor
switch
serves
to
light
the
reverse
lamp
in
the
range
R
of
the
transmission
operation
and
also
to
rotate
the
starter
motor
in
the
ranges
N
and
P
j
r@
I
If
r
f
B
@
I
Jt
@
@
c
v@
i
r
fji
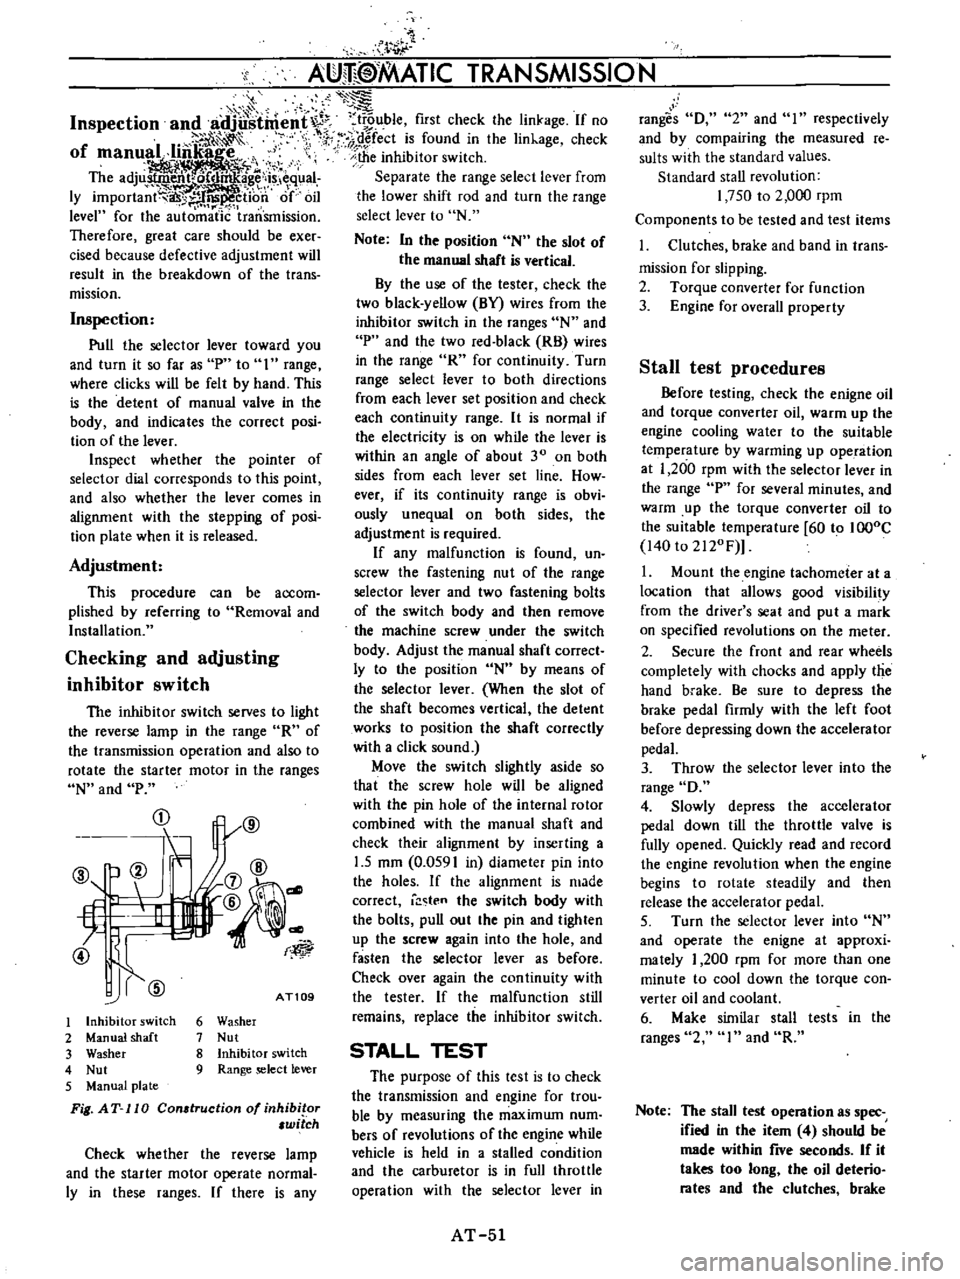
AT109
1
Inhibitor
switch
2
Manual
shaft
3
Washer
4
Nut
5
Manual
plate
Fig
AT
II
0
Con
truction
of
inhibitor
witch
6
Washer
7
Nut
8
Inhibitor
switch
9
Range
select
lever
Check
whether
the
reverse
lamp
and
the
starter
motor
operate
normal
ly
in
these
ranges
If
there
is
any
t
ki
A
mm
ATIC
TRANSMISSION
STALL
TEST
The
purpose
of
this
test
is
to
check
the
transmission
and
engine
for
trou
ble
by
measuring
the
maximwn
num
bers
of
revolutions
of
the
engine
while
vehicle
is
held
in
a
stalled
condition
and
the
carburetor
is
in
full
throttle
operation
with
the
selector
lever
in
AT
51
rang
s
D
2
and
I
respectively
and
by
com
pairing
the
measured
re
sults
with
the
standard
values
Standard
stall
revolution
1
750
to
2
000
rpm
Components
to
be
tested
and
test
items
1
Clutches
brake
and
band
in
trans
mission
for
slipping
2
Torque
converter
for
function
3
Engine
for
overall
property
Stall
test
procedures
Before
testing
check
the
enigne
oil
and
torque
converter
oil
warm
up
the
engine
cooling
water
to
the
suitable
temperature
by
warming
up
ope
ration
at
1
200
rpm
with
the
selector
lever
in
the
range
P
for
several
minutes
and
warm
up
the
torque
converter
oil
to
the
suitable
temperature
60
to
IOOoC
140
to
2120F
1
Mount
the
engine
tachometer
at
a
location
that
allows
good
visibility
from
the
driver
s
seat
and
put
a
mark
on
specified
revolutions
on
the
meter
2
Secure
the
front
and
rear
wheels
completely
with
chocks
and
apply
the
hand
brake
Be
sure
to
depress
the
brake
pedal
firmly
with
the
left
foot
before
depressing
down
the
accelerator
pedal
3
Throw
the
selector
lever
into
the
range
D
4
Slowly
depress
the
accelerator
pedal
down
till
the
throttle
valve
is
fully
opened
Quickly
read
and
record
the
engine
revolution
when
the
engine
begins
to
rotate
steadily
and
then
release
the
accelerator
pedal
5
Turn
the
selector
lever
into
N
and
operate
the
enigne
at
approxi
mately
1
200
rpm
for
more
than
one
minute
to
cool
down
the
torque
con
verter
oil
and
coolant
6
Make
similar
stall
tests
in
the
ranges
2
I
and
R
Note
The
stall
test
operation
as
spec
ified
in
the
item
4
should
be
made
within
five
seconds
If
it
takes
too
long
the
oil
deterio
rates
and
the
clutches
brake
Page 83 of 513
CHASSIS
TROUBLE
DIAGNOSES
AND
CORRECTIONS
When
a
gear
carrier
is
suspected
of
being
noisy
it
is
advisable
to
make
a
thorough
test
to
determine
whether
the
noise
originates
in
the
tires
road
surface
exhaust
universal
joint
propeller
shaft
wheel
bearing
trans
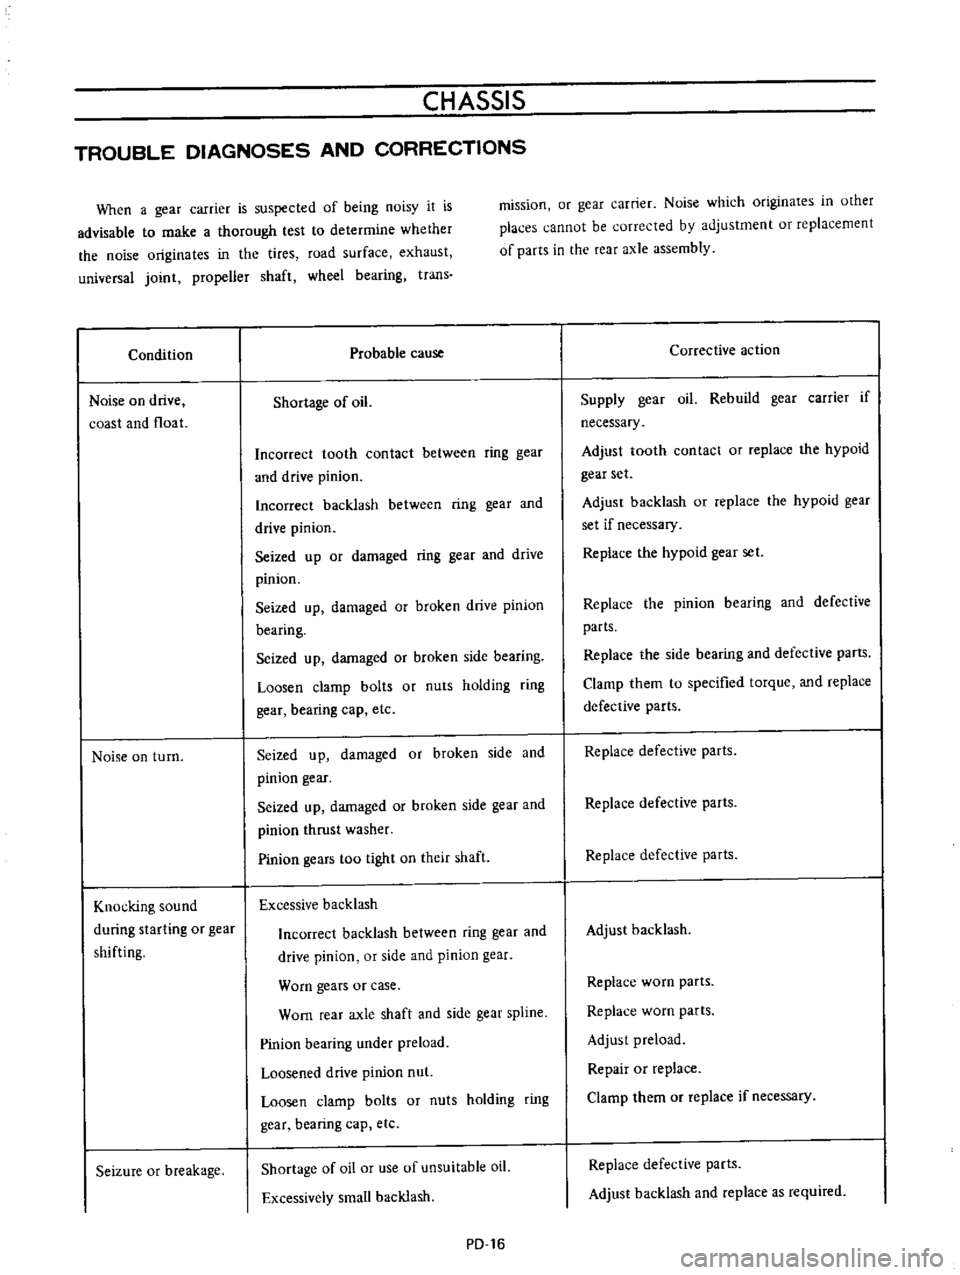
Condition
Noise
on
drive
coast
and
float
Noise
on
turn
Knocking
sound
during
starting
or
gear
shifting
Seizure
or
breakage
mission
or
gear
carrier
Noise
which
originates
in
other
places
cannot
be
corrected
by
adjustment
or
replacement
of
parts
in
the
rear
axle
assembly
Probable
cause
Shortage
of
oil
Incorrect
tooth
contact
between
ring
gear
and
drive
pinion
Incorrect
backlash
between
ring
gear
and
drive
pinion
Seized
up
or
damaged
ring
gear
and
drive
pinion
Seized
up
damaged
or
broken
drive
pinion
bearing
Seized
up
damaged
or
broken
side
bearing
Loosen
clamp
bolts
or
nuts
holding
ring
gear
bearing
cap
etc
Seized
up
damaged
or
broken
side
and
pinion
gear
I
Seized
up
damaged
or
broken
side
gear
and
pinion
thrust
washer
Pinion
gears
too
tight
on
their
shaft
Excessive
backlash
Incorrect
backlash
between
ring
gear
and
drive
pinion
or
side
and
pinion
gear
Worn
gears
or
case
Worn
rear
axle
shaft
and
side
gear
spline
Pinion
bearing
under
preload
Loosened
drive
pinion
nut
Loosen
clamp
bolts
or
nuts
holding
ring
gear
bearing
cap
etc
Shortage
of
oil
or
use
of
unsuitable
oil
Excessively
small
backlash
PD
16
Corrective
action
Supply
gear
oil
Rebuild
gear
carrier
if
necessary
Adjust
tooth
contact
or
replace
the
hypoid
gear
set
Adjust
backlash
or
replace
the
hypoid
gear
set
if
necessary
Replace
the
hypoid
gear
set
Replace
the
pinion
bearing
and
defective
parts
Replace
the
side
bearing
and
defective
parts
Clamp
them
to
specified
torque
and
replace
defective
parts
Replace
defective
parts
Replace
defective
parts
Replace
defective
parts
Adjust
backlash
Replace
worn
parts
Replace
worn
parts
Adjust
preload
Repair
or
replace
Clamp
them
or
replace
if
necessary
Replace
defective
parts
Adjust
backlash
and
replace
as
required
Page 89 of 513
FRONT
AXLE
FRONT
SUSPENSION
FRONT
AXLE
AND
SUSPENSION
ASSEMBLY
Removal
1
Jack
up
the
vehicle
and
support
the
vehicle
with
stands
See
the
Section
GL
2
Remove
the
hub
nuts
and
remOve
the
wheel
3
Remove
the
splash
board
4
Loosen
the
brake
tube
connecting
nut
remove
the
brake
hose
locking
spring
withdraw
the
plate
and
remOve
the
brake
hose
from
the
strul
assembly
bracket
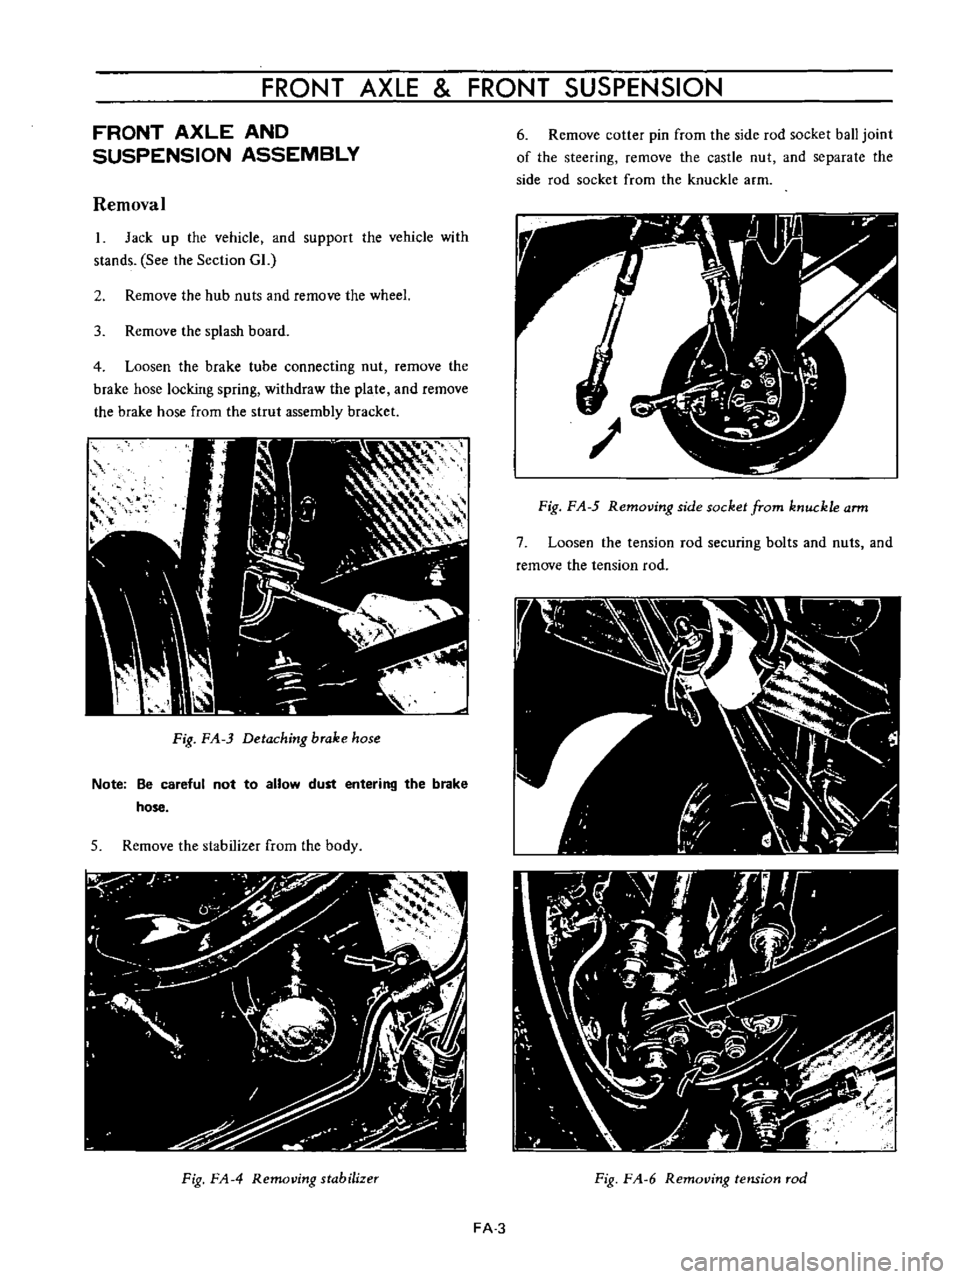
Fig
FA
3
Detaching
brake
hose
Note
Be
careful
not
to
allow
dust
entering
the
brake
hose
5
Remove
the
stabilizer
from
the
body
Fig
FA
4
Removing
stabilizer
6
Remove
cotter
pin
from
the
side
rod
socket
ball
joint
of
the
steering
remove
the
castle
nut
and
separate
the
side
rod
socket
from
the
knuckle
arm
Fig
F
A
5
Removing
side
socket
from
knuckle
arm
7
Loosen
the
tension
rod
securing
bolts
and
nuts
and
remove
the
tension
rod
Fig
F
A
6
RemotJing
tension
rod
FA
3
Page 92 of 513
CHASSIS
Tightening
torque
of
front
suspension
cross
member
and
body
is
3
2
to
4
0
kg
m
23
1
to
28
9
ft
Ib
5
Tightening
torque
of
bolt
used
to
secure
the
upper
portion
of
the
strut
assembly
on
the
body
is
1
6
to
2
1
kg
m
11
6
to
15
2ft
lb
FRONT
AXLE
Removal
I
Jack
up
the
vehicle
remove
the
wheel
and
discon
nect
the
brake
hose
at
the
strut
outer
casing
bracket
unit
For
details
see
Removal
of
front
axle
and
suspension
assembly
2
Remove
the
brake
caliper
installation
bolts
and
remove
the
caliper
assembly
Disc
type
brake
3
Remove
the
brake
druOL
Drum
type
brake
4
Remove
the
hub
cap
with
a
flal
headed
screwdriver
or
other
proper
tool
and
hammer
Be
sure
to
tap
lightly
5
Remove
cotter
pin
from
the
wheel
bearing
lock
nut
and
remove
the
lock
nut
6
With
the
wheel
bearing
washer
and
wheel
bearing
installed
on
the
wheel
hub
remove
the
wheel
hub
from
the
spindle
In
the
case
of
a
disc
type
brake
the
wheel
hub
may
be
removed
with
the
disc
rotor
installed
on
the
wheel
hub
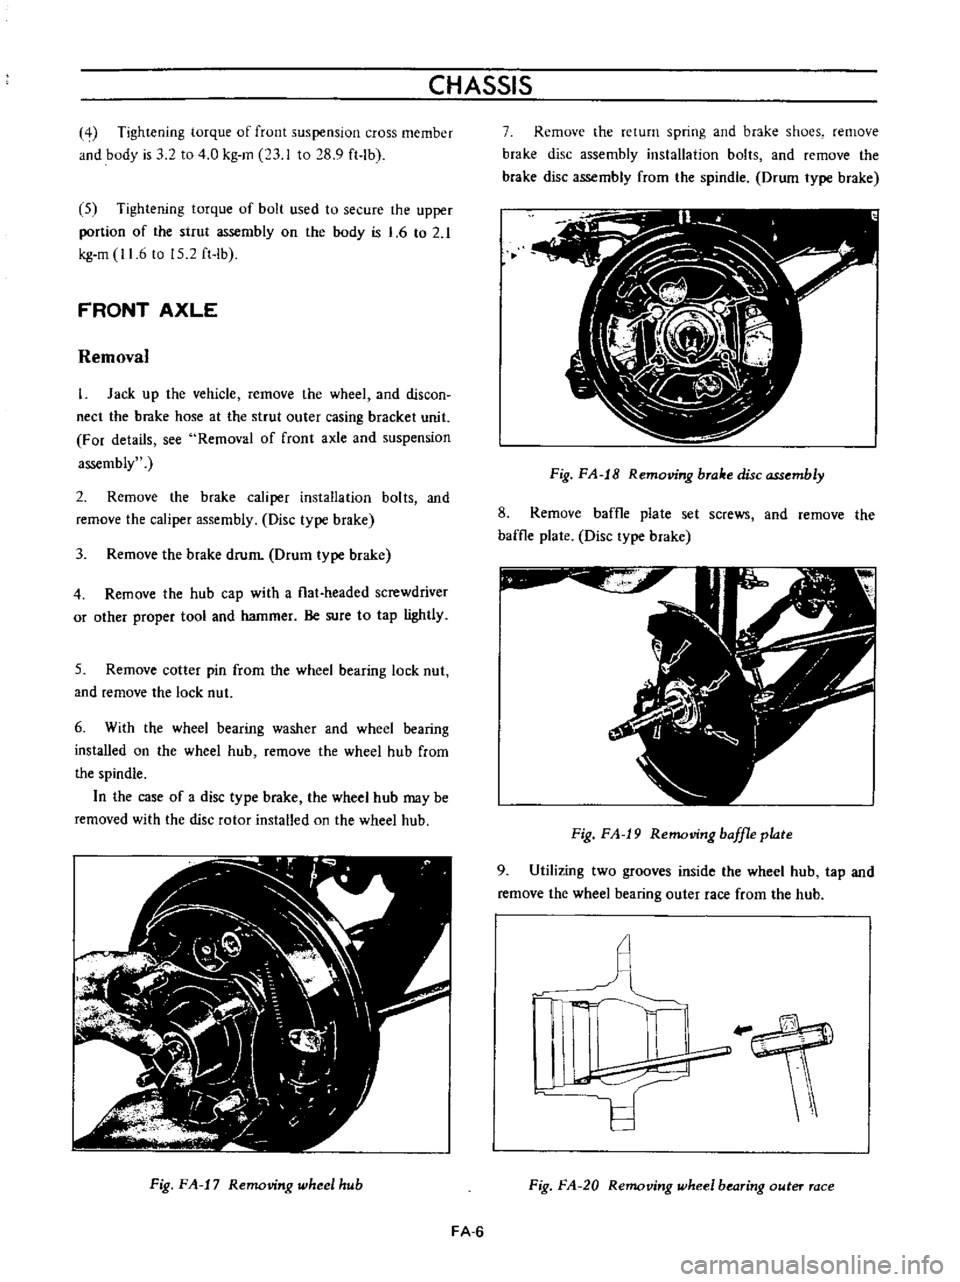
Fig
FA
17
Removing
wheel
hub
7
Remove
the
return
spring
and
brake
shoes
remove
brake
disc
assembly
installation
bolts
and
remove
the
brake
disc
assembly
from
the
spindle
Drum
type
brake
Fig
FA
IS
Removing
brake
disc
a
ssembly
8
Remove
baffle
plate
set
screws
and
remove
the
baffle
plate
Disc
type
brake
Fig
FA
19
Removingbaffleplate
9
Utilizing
two
grooves
inside
the
wheel
hub
tap
and
remove
the
wheel
bearing
outer
race
from
the
hub
Fig
FA
20
Removing
wheel
bearing
outer
race
FA
6
Page 93 of 513
FRONT
AXLE
FRONT
SUSPENSION
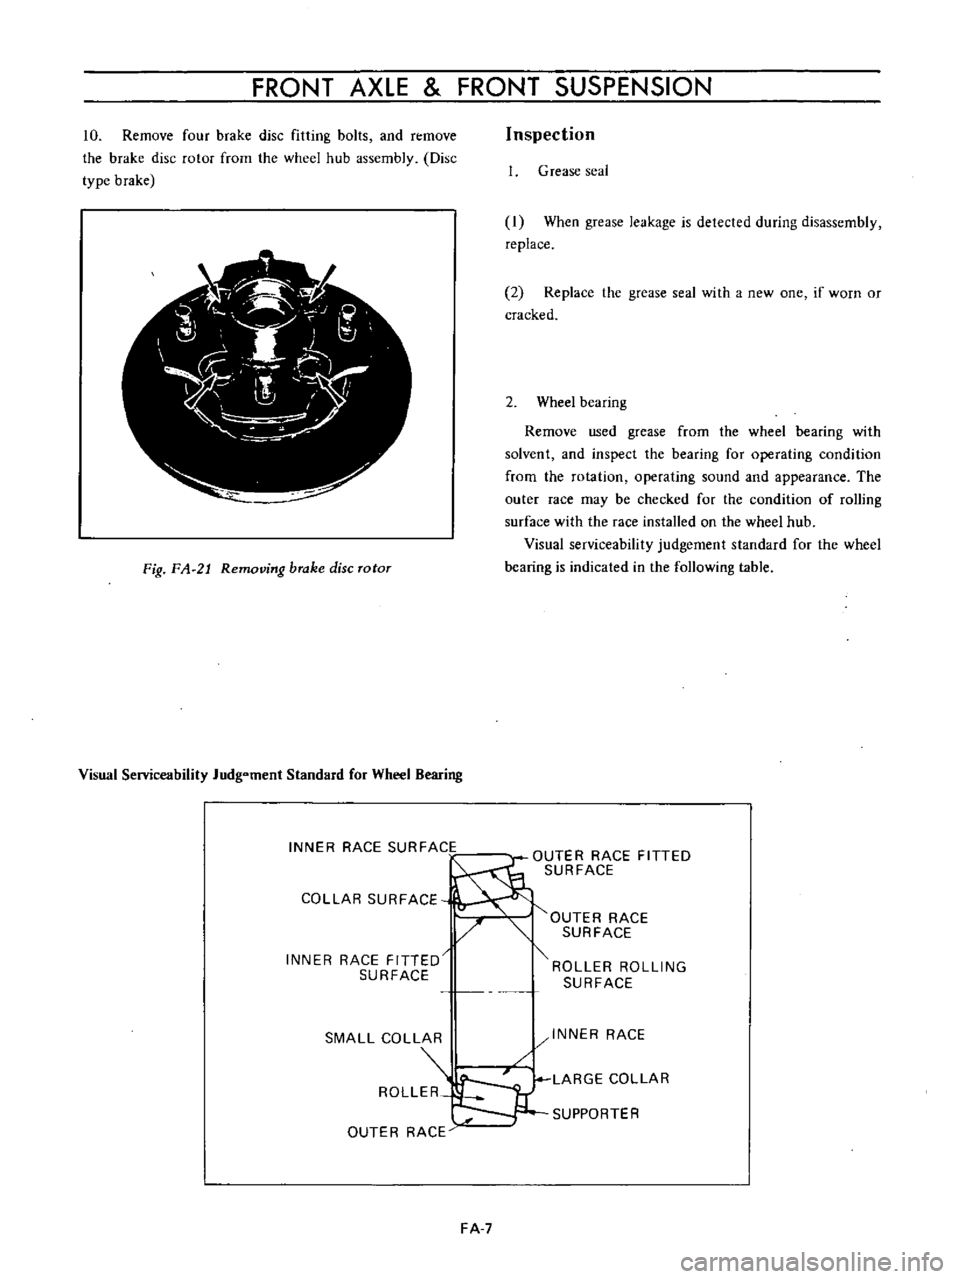
10
Remove
four
brake
disc
fitting
bolts
and
remove
the
brake
disc
rotor
from
the
wheel
hub
assembly
Disc
type
b
rake
Inspection
1
Grease
seal
I
ycQ
r
A
1
r
j
t
I
I
i
I
When
grease
leakage
is
delected
during
disassembly
replace
2
Replace
the
grease
seal
with
a
new
one
if
worn
or
cracked
Fig
FA
21
Removing
brake
disc
rotor
2
Wheel
bearing
Remove
used
grease
from
the
wheel
bearing
with
solvent
and
inspect
the
bearing
for
operating
condition
from
the
rotation
operating
sound
and
appearance
The
outer
race
may
be
checked
for
the
condition
of
rolling
surface
with
the
race
installed
on
the
wheel
hub
Visual
serviceability
judgement
standard
for
the
wheel
bearing
is
indicated
in
the
following
table
Visual
Serviceability
Judg
ment
Standard
for
Wheel
Bearing
INNER
RACE
SURFACE
OUTER
RACE
FITTED
SURFACE
COLLAR
SURFACE
OUTER
RACE
SURFACE
INNER
RACE
FITTED
ROLLER
ROLLING
SURFACE
SURFACE
SMALL
COLLAR
INNER
RACE
LARGE
COLLAR
ROLLER
SUPPORTER
OUTER
RACE
FA
7
Page 98 of 513
fl
i
i
I
1
I
I
i
2
4
L
thi7
lrr
I
1
1
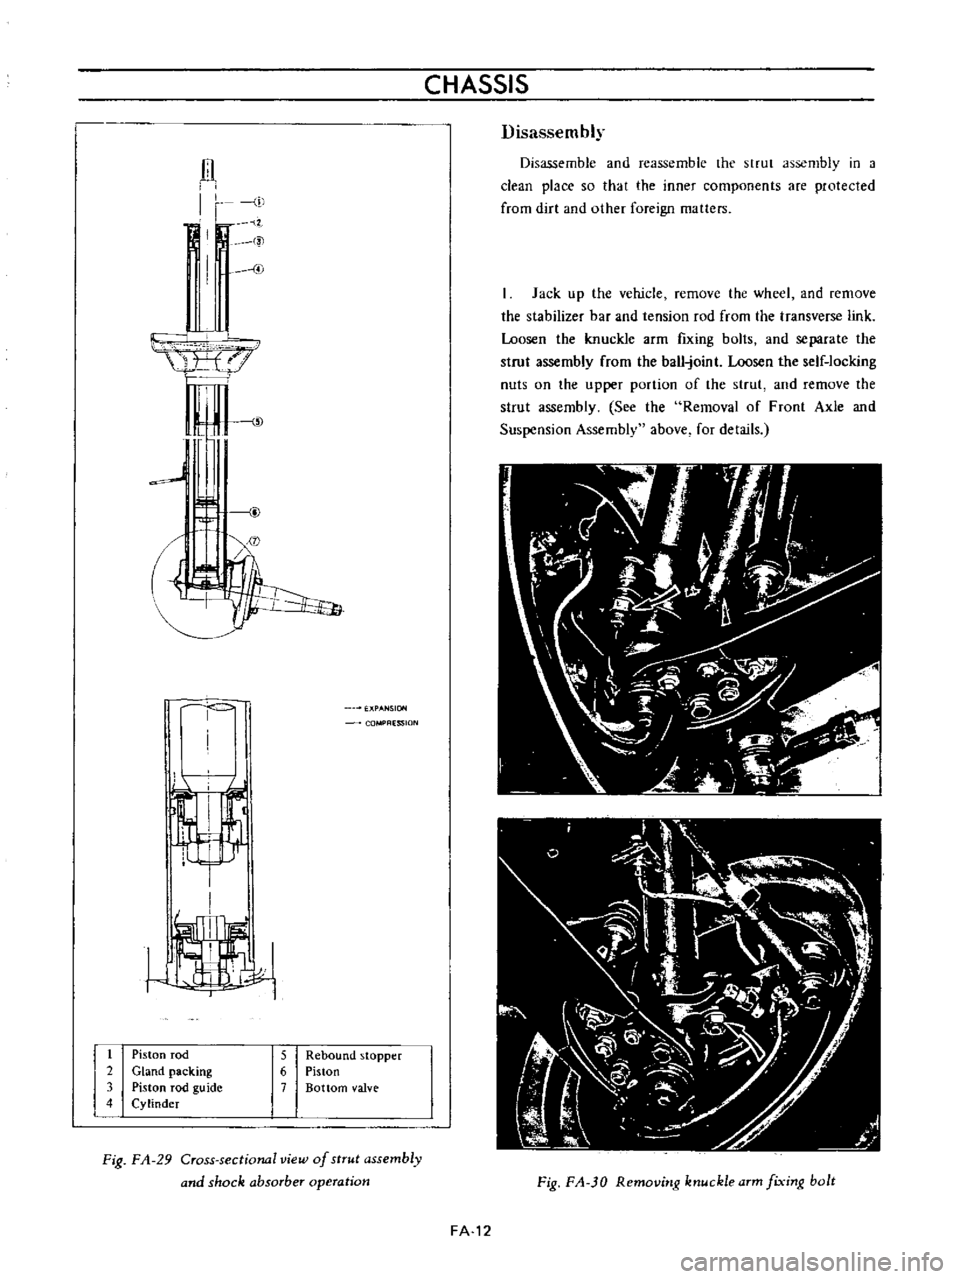
Piston
rod
2
Gland
packing
3
Piston
rod
guide
4
Cylinder
CHASSIS
ESSION
5
Rebound
stopper
6
Piston
7
Bottom
valve
Fig
FA
29
Cross
sectional
view
of
strut
assembly
and
shock
absorber
operation
Disassembly
Disassemble
and
reassemble
the
strut
assembly
in
a
clean
place
so
that
the
inner
components
are
protected
from
dirt
and
other
foreign
matters
Jack
up
the
vehicle
remove
the
wheel
and
remove
the
stabilizer
bar
and
tension
rod
from
the
transverse
link
Loosen
the
knuckle
arm
fIxing
bolts
and
separate
the
strut
assembly
from
the
ball
joint
Loosen
the
self
locking
nuts
on
the
upper
portion
of
the
strut
and
remove
the
strut
assembly
See
the
Removal
of
Front
Axle
and
Suspension
Assembly
above
for
details
Fig
FA
JO
Removitlg
ktluckle
arm
fixitlg
bolt
FA
12
Page 104 of 513
CHASSIS
r
I
El
0
3
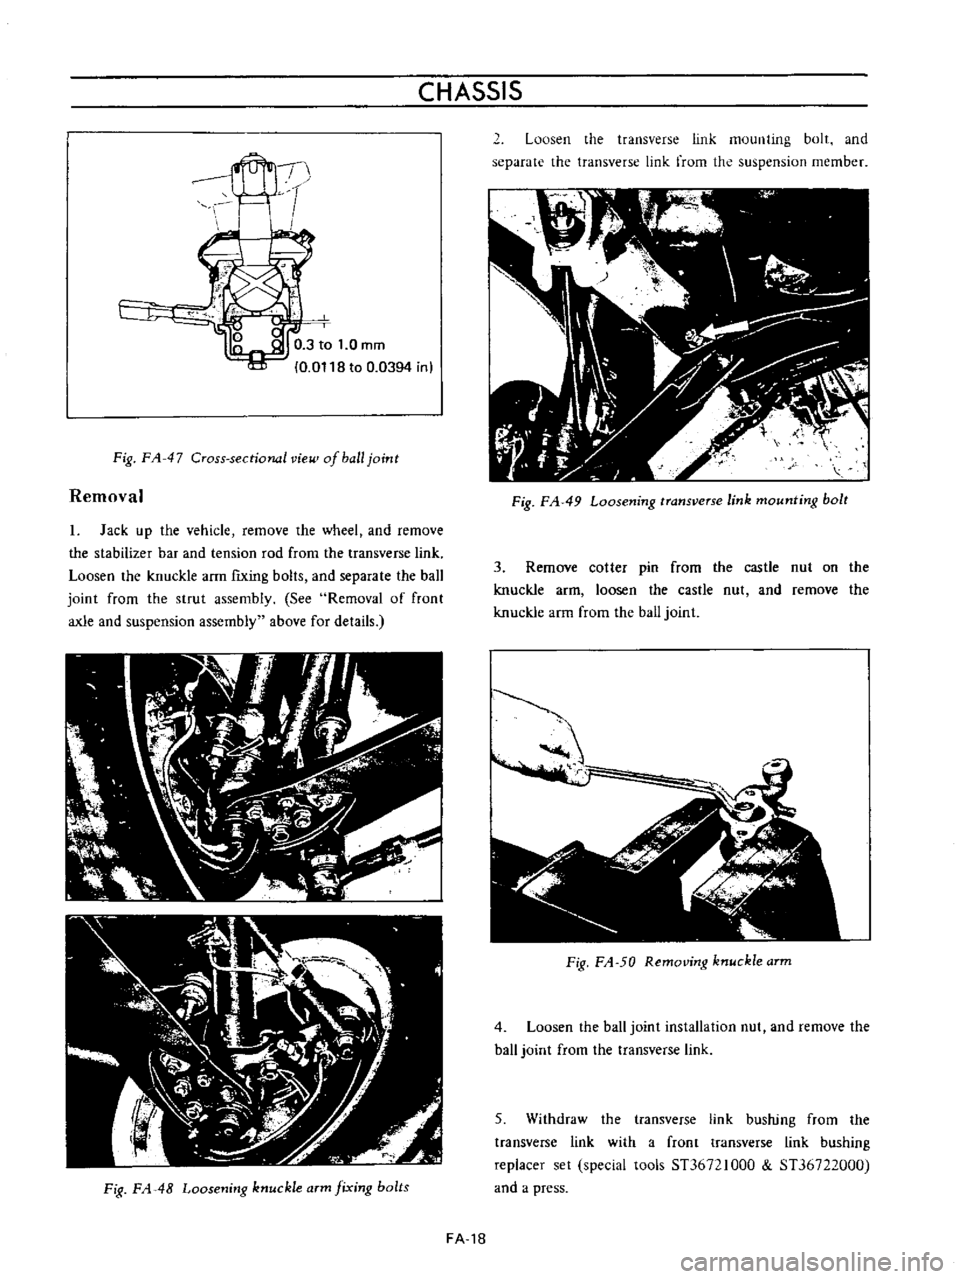
to
1
0
mm
0
0118
to
0
0394
in
Fig
FA
47
Cross
sectional
vie
of
ball
joint
Removal
1
Jack
up
the
vehicle
remove
the
wheel
and
remove
the
stabilizer
bar
and
tension
rod
from
the
transverse
link
Loosen
the
knuckle
arm
fiXing
bolts
and
separate
the
ball
joint
from
the
strut
assembly
See
Removal
of
front
axle
and
suspension
assembly
above
for
details
Fig
FA
48
Loosening
knuckle
arm
fixing
bolts
2
Loosen
the
transverse
link
mounting
bolt
and
separate
the
transverse
link
from
the
suspension
member
Fig
FA
49
Loosening
transverse
link
mounting
bolt
3
Remove
cotter
pin
from
the
castle
nut
on
the
knuckle
arm
loosen
the
castle
nut
and
remove
the
knuckle
arm
from
the
ball
joint
J
iIP
A
i
Fig
FA
50
Removing
knuckle
arm
4
Loosen
the
ball
joint
installation
nut
and
remove
the
haJJ
joint
from
the
transverse
Jink
5
Withdraw
the
transverse
link
bushing
from
the
transverse
link
with
a
front
transverse
link
bushing
replacer
set
special
tools
ST36721000
ST36722000
and
a
press
FA
18
Page 108 of 513
CHASSIS
For
high
speed
Over
100
km
h
or
60
MPH
ADJUSTMENT
OF
WHEEL
ALIGNMENT
Use
a
turning
radius
gauge
and
alignment
gauge
for
the
measurement
2
Carry
out
wheel
alignment
on
a
flat
surface
with
tire
air
pressure
adjusted
to
the
normal
pressure
ADJUSTMENT
OF
VEHICLE
LEVEL
Vehicle
level
is
adjusted
by
changing
springs
ADJUSTMENT
OF
TOE
IN
Measure
toe
in
with
a
toe
in
gauge
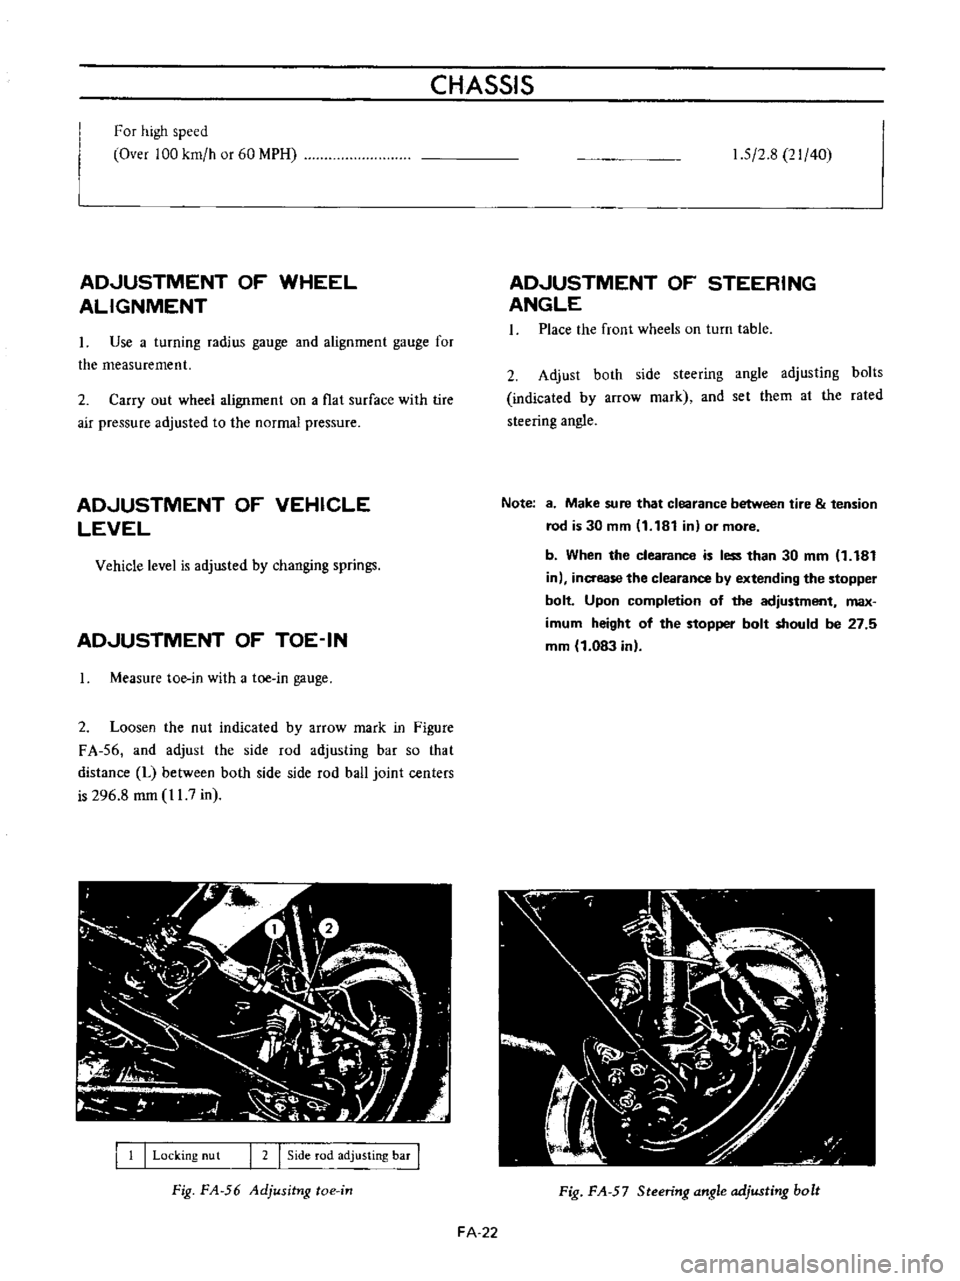
2
Loosen
the
nut
indicated
by
arrow
mark
in
Figure
FA
56
and
adjust
the
side
rod
adjusting
bar
so
that
distance
L
between
both
side
side
rod
ball
joint
centers
is
296
8
mm
11
7
in
I
1
I
Locking
nu
t
I
2
I
Side
rod
adjusting
bar
I
Fig
FA
56
Adjusitng
toe
in
1
5
2
8
21
40
ADJUSTMENT
OF
STEERING
ANGLE
1
Place
the
front
wheels
on
turn
table
2
Adjust
both
side
steering
angle
adjusting
bolts
indicated
by
arrow
mark
and
set
them
al
the
rated
steering
angle
Note
8
Make
sure
that
clearance
between
tire
tension
rod
is
30
mm
11
181
in
or
more
b
When
the
clearance
is
less
than
30
mm
1
181
in
inaease
the
clearance
by
extending
the
stopper
bolt
Upon
completion
of
the
adjustment
max
imum
height
of
the
stopper
bolt
should
be
27
5
mm
1
083
in
Fig
FA
57
Steering
angle
adjusting
bolt
FA
22
Page 110 of 513
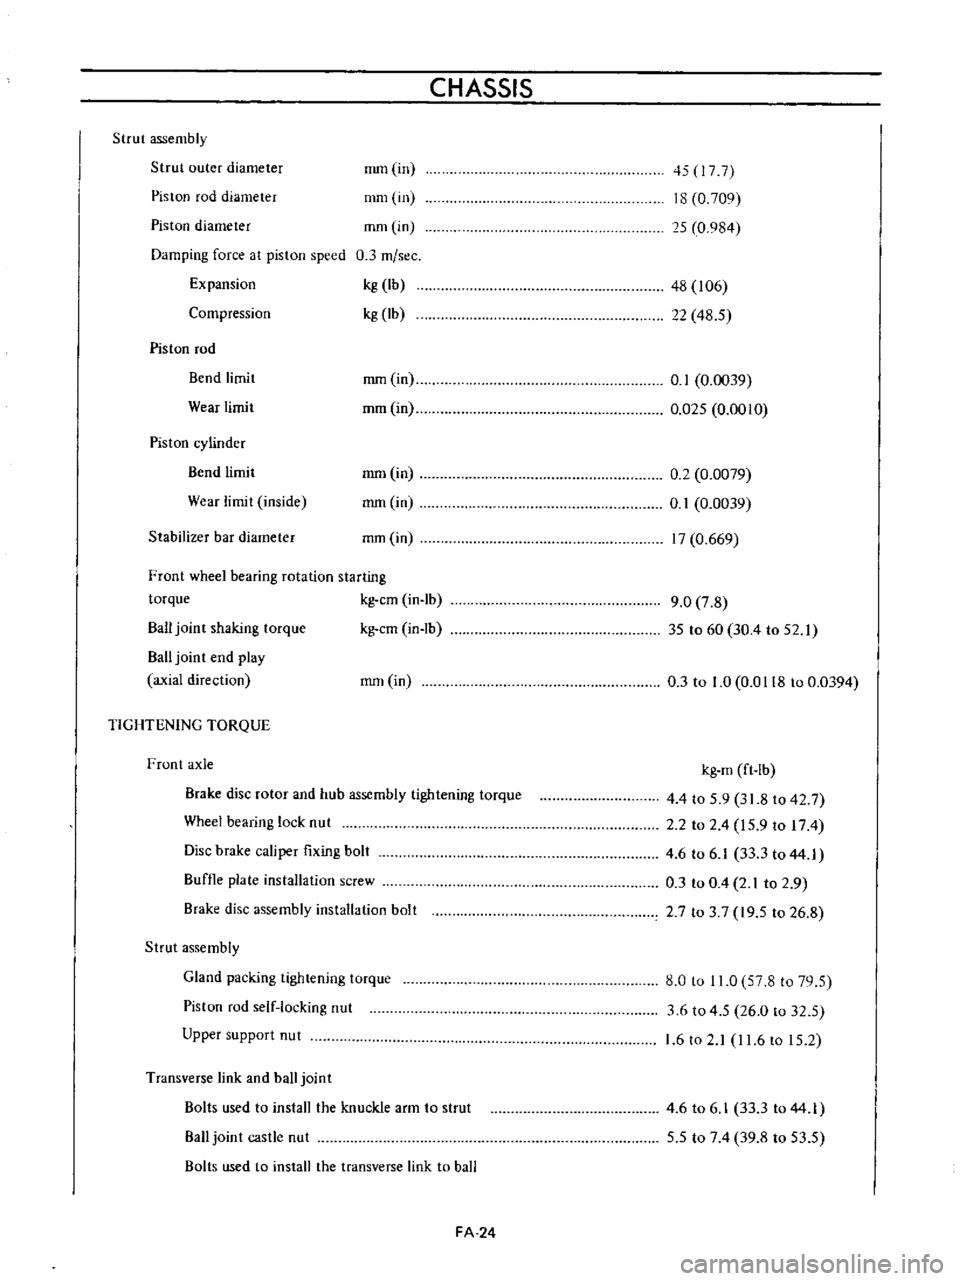
CHASSIS
Strut
assembly
Strut
outer
diameter
Piston
rod
diameter
mmlin
nml
in
45
17
7
18
0
709
15
0
984
Piston
diameter
mmlin
Damping
force
at
piston
speed
0
3
m
sec
Expansion
kg
Ib
Compression
kg
lb
48
106
22
48
5
Piston
rod
Bend
limit
Wear
limit
mm
in
0
1
0
0039
mm
in
0
025
0
0010
Piston
cylinder
Bend
limit
Wear
limit
inside
mm
in
mm
in
0
2
0
0079
0
1
0
0039
17
0
669
Stabilizer
bar
diameter
mm
in
Front
wheel
bearing
rotation
starting
torque
kg
cm
in
lb
Ball
joint
shaking
torque
kg
cm
in
lb
Ball
joint
end
play
axial
direction
mm
in
9
0
7
8
35
to
60
30
4
to
52
1
0
3
to
1
0
0
0118
to
0
0394
TIGHTENING
TORQUE
Front
axle
Brake
disc
rotor
and
hub
assembly
tightening
torque
Wheel
bearing
lock
nut
Disc
brake
caliper
fixing
bolt
Buffle
plate
installation
screw
Brake
disc
assembly
installation
bolt
kg
m
ft
lb
4
4
to
5
9
31
8
to
42
7
2
2
to
2
4
15
9
to
174
4
6
to
6
1
33
3
to
44
1
0
3
to
0
4
2
1
to
2
9
2
7
to
3
7
19
5
to
26
8
Strut
assembly
Gland
packing
tightening
torque
Piston
rod
self
locking
nut
Upper
support
nut
8
0
to
11
0
57
8
to
79
5
3
6
to
4
5
26
0
to
32
5
1
6
to
2
1
I
1
6
to
15
2
Transverse
link
and
ball
joint
Bolts
used
to
install
the
knuckle
arm
to
strut
Ball
joint
castle
nut
Bolts
used
to
install
the
transverse
link
to
ball
4
6
to
6
1
33
3
to
44
1
5
5
to
7
4
39
8
to
53
5
FA
24
Page 112 of 513
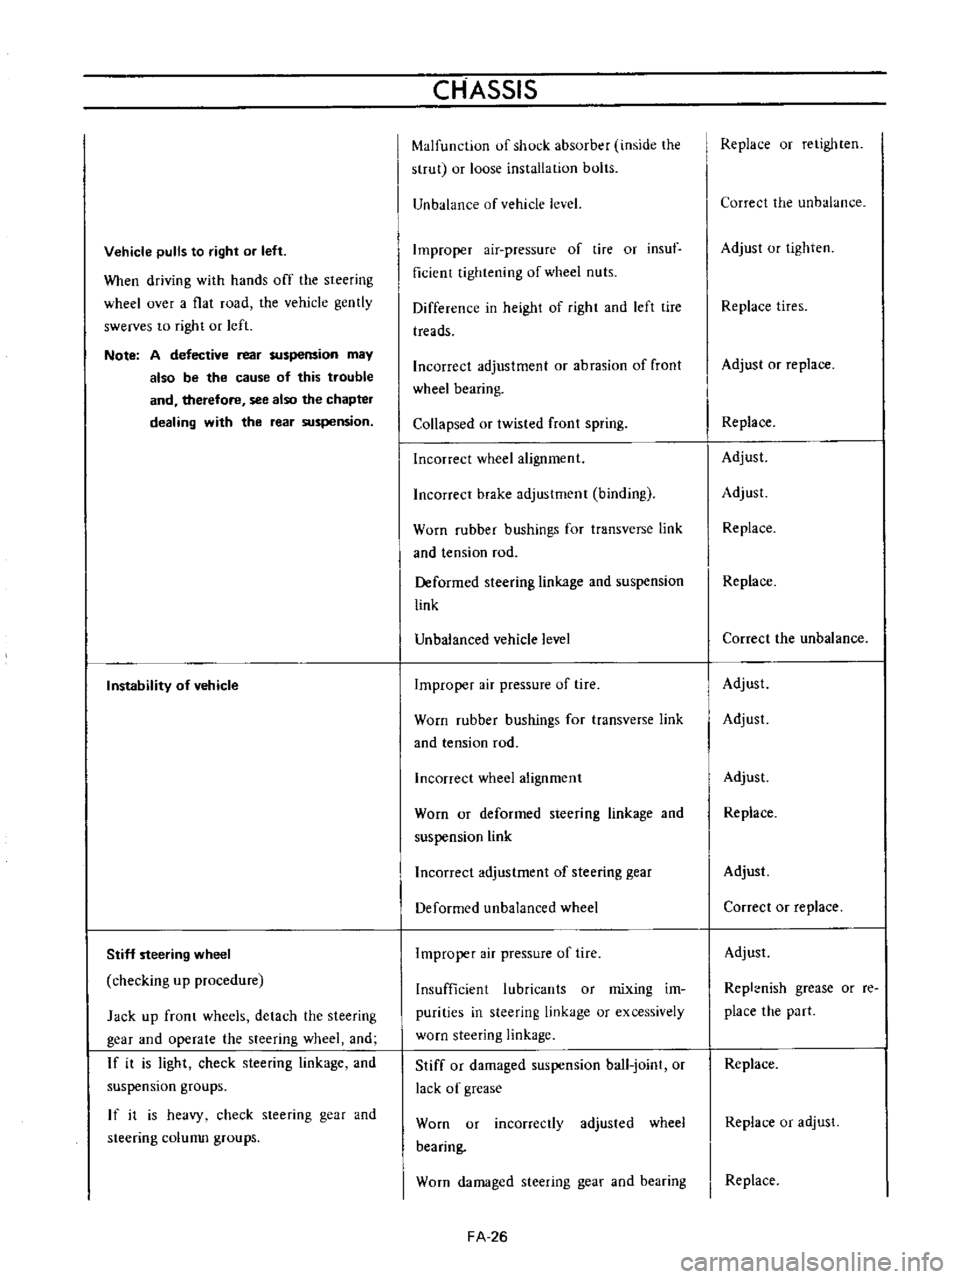
Vehicle
pulls
to
right
or
left
When
driving
with
hands
off
the
steering
wheel
over
a
flat
road
the
vehicle
gently
swerves
to
right
or
left
Note
A
defective
rear
suspension
may
also
be
the
cause
of
this
trouble
and
therefore
see
also
the
chapter
dealing
with
the
rear
suspension
Instability
of
vehicle
Stiff
steering
wheel
checking
up
procedure
Jack
up
front
wheels
detach
the
steering
gear
and
operate
the
steering
wheel
and
If
it
is
light
check
steering
linkage
and
suspension
groups
If
it
is
heavy
check
steering
gear
and
steering
colunm
groups
CHASSIS
Malfunction
of
shock
absorber
inside
the
strut
or
loose
installation
bolts
Unbalance
of
vehicle
level
Improper
air
pressure
of
tire
or
insuf
ficient
tightening
of
wheel
nuts
Difference
in
height
of
right
and
left
tire
treads
Incorrect
adjustment
or
abrasion
of
front
wheel
bearing
Collapsed
or
twisted
front
spring
Incorrect
wheel
alignment
Incorrect
brake
adjustment
binding
Worn
rubber
bushings
for
transverse
link
and
tension
rod
Deformed
steering
linkage
and
suspension
link
Unbalanced
vehicle
level
Improper
air
pressure
of
tire
Worn
rubber
bushings
for
transverse
link
and
tension
rod
Incorrect
wheel
alignment
Worn
or
deformed
steering
linkage
and
suspension
link
Incorrect
adjustment
of
steering
gear
Deformed
unbalanced
wheel
Improper
air
pressure
of
tire
Insufficient
lubricants
or
mixing
im
purities
in
steering
linkage
or
excessively
worn
steering
linkage
Stiff
or
damaged
suspension
ball
joint
or
lack
of
grease
Worn
or
incorrectly
adjusted
wheel
bearing
Worn
damaged
steering
gear
and
bearing
FA
26
Replace
or
retighten
Correct
the
unbalance
Adjust
or
tighten
Replace
tires
Adjust
or
replace
Replace
Adjust
Adjust
Replace
Replace
Correct
the
unbalance
Adjust
Adjust
Adjust
Replace
Adjust
Correct
or
replace
Adjust
Repl
nish
grease
or
re
place
the
part
Replace
Replace
or
adjust
Replace