parking brake DODGE AVENGER 2008 Owners Manual
[x] Cancel search | Manufacturer: DODGE, Model Year: 2008, Model line: AVENGER, Model: DODGE AVENGER 2008Pages: 467, PDF Size: 7.16 MB
Page 69 of 467
Data Parameters that May Be Recorded:
² Diagnostic trouble code(s) and warning light status for
electronically-controlled safety systems, including the
airbag system
² Airbag disable light status (if equipped)
² 9 Time 9 of airbag deployment (in terms of ignition
cycles and vehicle mileage)
² Airbag deployment level (if applicable)
² Impact acceleration and angle
² Seatbelt status
² Brake status (service and parking brakes)
² Accelerator status (including vehicle speed)
² Engine control status (including engine speed) ² Transmission gear selection
² Cruise control status
² Traction/Stability Control status
² Tire Pressure Monitoring System status ± If Equipped
CHILD RESTRAINT
Everyone in your vehicle needs to be buckled up at all
times Ð babies and children, too. Every state in the
United States and all Canadian provinces require that
small children ride in proper restraint systems. This is the
law, and you can be prosecuted for ignoring it.
Children 12 years and under should ride properly buck-
led up in a rear seat, if available. According to crash
statistics, children are safer when properly restrained in
the rear seats, rather than in the front. THINGS TO KNOW BEFORE STARTING YOUR VEHICLE 67
2
Page 82 of 467
Defroster
Check operation by selecting the defrost mode and place
the blower control on high speed. You should be able to
feel the air directed against the windshield.
NOTE: If the defrost feature is not functioning, the
cause should be located and corrected immediately by an
authorized service center. The windshield could fog up
while driving and obscure your visibility.
Periodic Safety Checks You Should Make Outside
The Vehicle
Tires
Examine tires for excessive tread wear or uneven wear
patterns. Check for stones, nails, glass, or other objects
lodged in the tread. Inspect tread and sidewall for cuts or
cracks. Check wheel nuts for tightness, and tires (includ-
ing spare) for proper pressure. Lights
Have someone observe the operation of exterior lights
while you work the controls. Check turn signal and high
beam indicator lights on the instrument panel.
Fluid Leaks
Check area under vehicle after overnight parking for fuel,
engine coolant, oil, or other fluid leaks. In addition, if
gasoline fumes are detected or fuel, power steering fluid,
transmission fluid, or brake fluid leaks are suspected, the
cause should be located and corrected immediately.80 THINGS TO KNOW BEFORE STARTING YOUR VEHICLE
Page 134 of 467
NOTE: If the Multi-Function Control Lever is held in
the flash to pass position for more than 15 seconds, the
high beams will shut off. If this occurs, wait 30 seconds
for the next flash to pass operation.
DAYTIME RUNNING LIGHTS (DRL) Ð IF
EQUIPPED
The high beam lights will come on as Daytime Running
Lights (DRL) at DRL intensity (lower), whenever the
ignition is on, the engine is running, the headlight switch
is off, the parking brake is off, the turn signal is off, and
the gearshift lever is in any position except park.
NOTE: On this vehicle, the daytime running light will
automatically turn off when the turn signal is in opera-
tion and automatically turn back on when the turn signal
is not operating. LIGHTS ON REMINDER
If the headlights or parking lights are on after the ignition
is turned OFF, a chime will sound to alert the driver
when the driver's door is opened.
FOG LIGHTS Ð IF EQUIPPED
The front fog light switch is on the Multi-Function
Control Lever. To activate the front fog lights, turn
on the parking lights or the low beam headlights
and pull out the end of the control lever.132 UNDERSTANDING THE FEATURES OF YOUR VEHICLE
Page 181 of 467
could lead to immediate loss of power or severe catalytic
converter damage. The vehicle should be serviced as
soon as possible if this occurs.
26. Anti-Lock Warning Light (ABS)
This light monitors the ABS. This light will
come on when the ignition key is turned to the
ON position and may stay on for as long as
four seconds.
If the ABS light remains on or comes on during driving,
it indicates that the Anti-Lock portion of the brake system
is not functioning and that service is required, however,
the conventional brake system will continue to operate
normally provided that the BRAKE warning light is not
on.
If the ABS light is on, the brake system should be serviced
as soon as possible to restore the benefit of Anti-Lock
Brakes. The ABS warning light should be checked frequently to
assure that it is operating properly. Turn the ignition key
to the on position, but do not start the vehicle. The light
should come on. If the light does not come on, have the
system checked by an authorized dealer.
27. High Beam Indicator
This light shows that the headlights are on high
beam. Push the turn signal lever away from the
steering wheel to switch the headlights from high or low
beam.
28. Brake System Warning Light
This light monitors various brake functions,
including brake fluid level and parking brake
application. If the brake light turns on, it may
indicate that the parking brake is applied, that
the brake fluid level is low, or that there is a problem with
the anti-lock brake system (if equipped). UNDERSTANDING YOUR INSTRUMENT PANEL 179
4
Page 183 of 467
the parking brake is applied or a brake fault is detected.
If the light does not illuminate, have the light inspected
by an authorized dealer.
The light also will turn on when the parking brake is
applied with the ignition switch in the ON position.
NOTE: This light shows only that the parking brake is
applied. It does not show the degree of brake application.
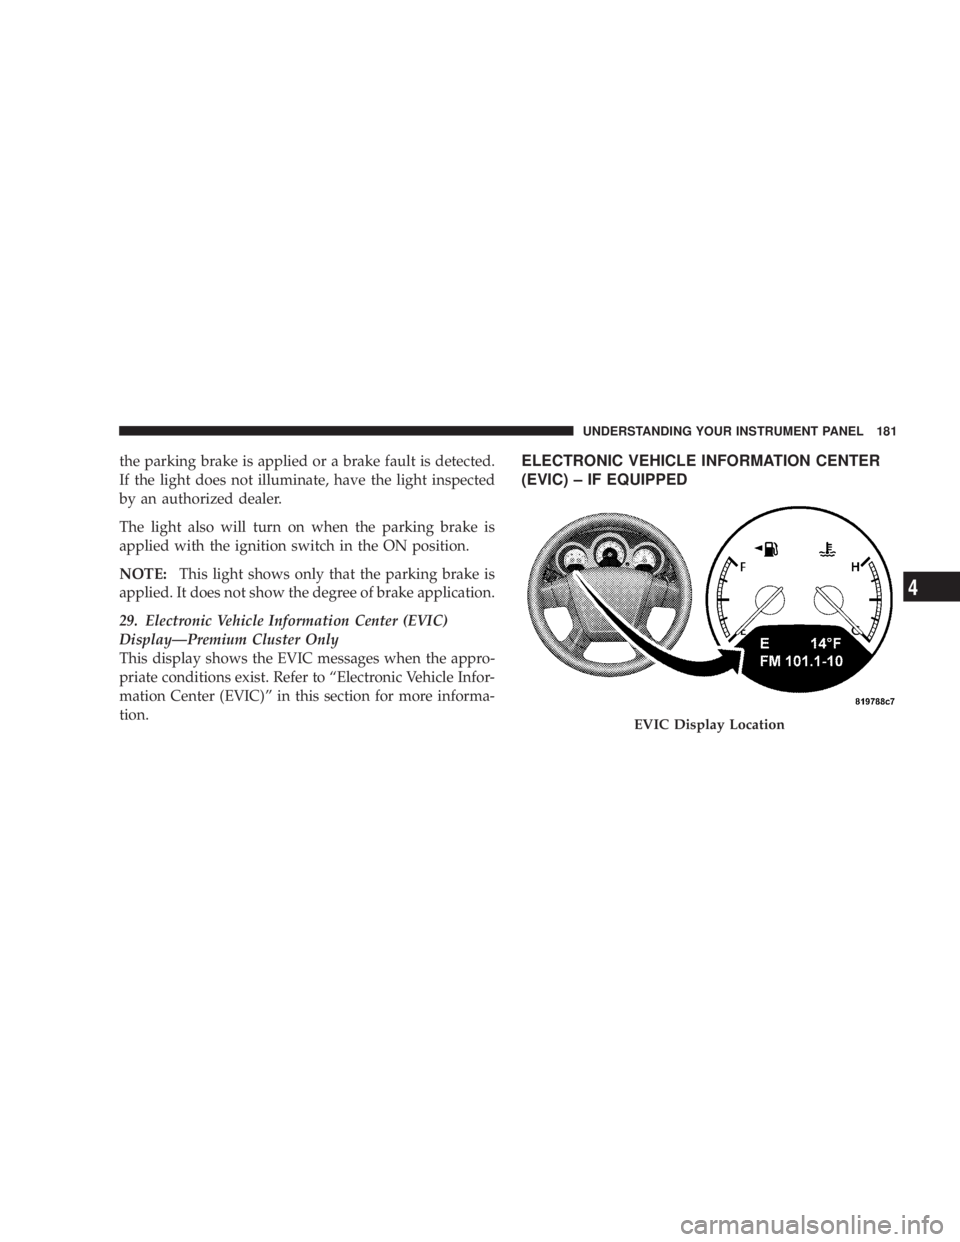
29. Electronic Vehicle Information Center (EVIC)
DisplayÐPremium Cluster Only
This display shows the EVIC messages when the appro-
priate conditions exist. Refer to ªElectronic Vehicle Infor-
mation Center (EVIC)º in this section for more informa-
tion. ELECTRONIC VEHICLE INFORMATION CENTER
(EVIC) ± IF EQUIPPED
EVIC Display Location UNDERSTANDING YOUR INSTRUMENT PANEL 181
4
Page 260 of 467
m All Wheel Drive Ð If Equipped ............275
m Parking Brake .........................276
m Brake System ..........................278
N Anit-Lock Brake System (ABS) ............279
m Electronic Brake Control Systems ±
ABS/TCS/BAS/ESP .....................281
N Anti-Lock Brake System (ABS) ............281
N Traction Control System (TCS) ............282
N Brake Assist System (BAS) ...............282
N Electronic Stability Program (ESP) .........283
m Power Steering ........................287
m Driving On Slippery Surfaces ..............288
N Acceleration .........................288 N Traction ............................288
m Driving Through Water ..................289
N Flowing/Rising Water ..................289
m Tire Safety Information ...................291
N Tire Markings ........................291
N Tire Loading And Tire Pressure ...........295
m Tires Ð General Information ...............299
N Tire Pressure .........................299
N Tire Inflation Pressures .................300
N Radial-Ply Tires ......................302
N Compact Spare Tire Ð If Equipped .........303
N Limited Use Spare Ð If Equipped .........304
N Tire Spinning ........................305258 STARTING AND OPERATING
Page 270 of 467
WARNING!It is dangerous to shift the gear selector lever out of
PARK or NEUTRAL if the engine speed is higher
than idle speed. If your foot is not firmly on the
brake pedal, the vehicle could accelerate quickly
forward or in reverse. You could lose control of the
vehicle and hit someone or something. Only shift
into gear when the engine is idling normally and
when your right foot is firmly on the brake pedal. WARNING!Unintended movement of a vehicle could injure
those in and near the vehicle. As with all vehicles,
you should never exit a vehicle while the engine is
running. Before exiting a vehicle, you should always
shift the vehicle into PARK, remove the key from the
ignition, and apply the parking brake. Once the key
is removed from the ignition, the gear selector lever
is locked in the PARK position, securing the vehicle
against unwanted movement. Furthermore, you
should never leave children unattended inside a
vehicle.268 STARTING AND OPERATING
Page 271 of 467
Brake/Transaxle Interlock System
This system prevents you from moving the gear selector
lever out of PARK and into any gear unless the brake
pedal is pressed. This system is active only while the
ignition switch is in the ON position. Always press the
brake pedal first, before moving the gear selector out of
PARK.
NOTE: If a malfunction occurs, the transaxle will not
shift out of park. Battery power is required to release the
brake/transaxle interlock system. However, there is an
override system that allows you to shift out of Park in
case of loss of power. To activate the override system:
² Firmly apply the parking brake
² Insert the ignition key and rotate it to the ON position
² Remove the cup holder liner ² Insert a key, screwdriver, or finger into the front hole
then push and hold the manual override release lever
forward.
² While holding the release lever forward, move the
gear selector lever from PARK to NEUTRAL. Release
the override
NOTE: If this occurs, even if the override is successful,
it is recommended that you visit a dealer at your earliest
possible convenience. Your dealer has diagnostic equip-
ment to determine if the problem could recur.
Automatic Transaxle Ignition Interlock System
This system prevents the key from being removed unless
the shift lever is in PARK. It also prevents shifting out of
PARK unless the key is in the ON position and the brake
pedal is applied.
NOTE: If a malfunction occurs, the system will trap the
key in the ignition cylinder to warn you that this safety STARTING AND OPERATING 269
5
Page 272 of 467
feature is inoperable. The engine can be started and
stopped, but the key cannot be removed until you obtain
service.
4 Speed / 6 Speed Automatic Transaxle /
AutoStick T Ð If Equipped
The electronically controlled transaxle provides a precise
shift schedule. The transaxle electronics are self-
calibrating; therefore, the first few shifts on a new vehicle
may be somewhat abrupt. This is a normal condition, and
precision shifts will develop within a few hundred miles.
Gear Ranges
PARK
Supplement to the parking brake by locking the trans-
axle. The engine can be started in this range. Never
attempt to use PARK while vehicle is in motion. Apply
parking brake when leaving vehicle in this range. When parking on a flat surface, place the gear selector
lever in the PARK position first, and then apply the
parking brake.
When parking on a hill, it is important to set the parking
brake before placing the gear selector lever in PARK,
otherwise the load on the transaxle locking mechanism
may make it difficult to move the selector out of PARK.
As an added precaution, turn the front wheels toward the
curb on a downhill grade and away from the curb on an
uphill grade.
WARNING!Never use PARK position on an Automatic Transaxle
as a substitute for the parking brake. Always apply
parking brake fully when parked to guard against
vehicle movement and possible injury or damage.270 STARTING AND OPERATING
Page 278 of 467
CAUTION!All wheels must have the same size and type tires.
Unequal tire sizes must not be used. Unequal tire
size may cause failure of the power transfer unit.
PARKING BRAKE
When the parking brake is applied with the
ignition on, the Brake Light in the instrument
cluster will come on.
NOTE:
² This light, when illuminated with parking brake ap-
plication, shows only that the parking brake is on. It
does not show the degree of brake application. ² If the light remains on with the parking brake released,
a brake system malfunction is indicated. Have the
brake system serviced by an authorized dealer imme-
diately.
² If the parking brake is applied while the vehicle is
moving, a chime will sound to alert the driver. The
chime will sound up to 10 times or until the vehicle
has returned to a stop.
Before leaving the vehicle, make sure that the parking
brake is fully applied and the gear selector is in the PARK
position.
To release the parking brake, slightly pull up the handle
while pushing the lock button, and guide the lever
downward to its stop. The brake warning light in the
instrument cluster should go out.
NOTE: The parking brake lever will not release unless
the lever is pulled up slightly past its applied position.276 STARTING AND OPERATING