roof DODGE AVENGER 2008 Owners Manual
[x] Cancel search | Manufacturer: DODGE, Model Year: 2008, Model line: AVENGER, Model: DODGE AVENGER 2008Pages: 467, PDF Size: 7.16 MB
Page 40 of 467
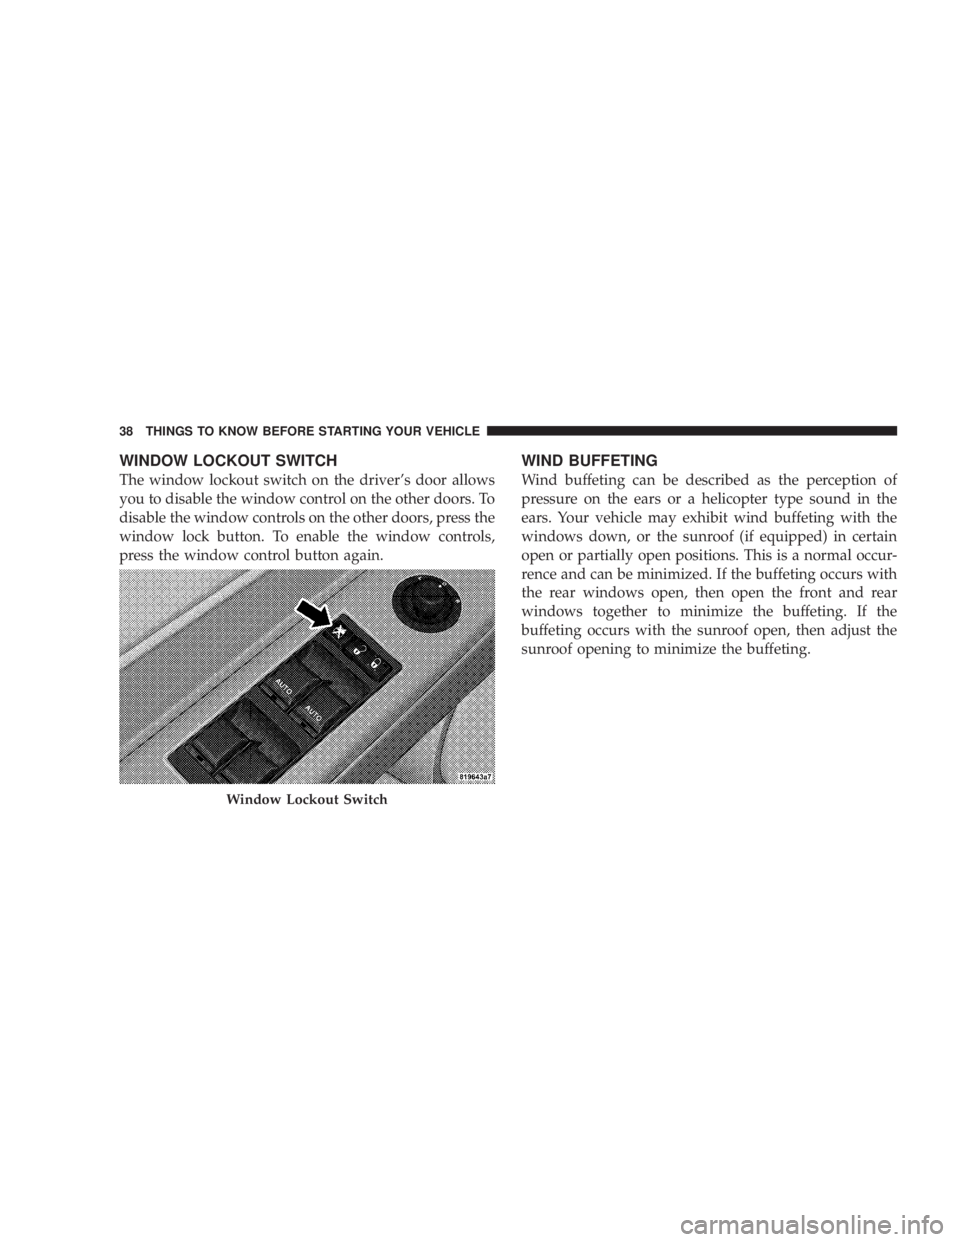
WINDOW LOCKOUT SWITCH
The window lockout switch on the driver's door allows
you to disable the window control on the other doors. To
disable the window controls on the other doors, press the
window lock button. To enable the window controls,
press the window control button again. WIND BUFFETING
Wind buffeting can be described as the perception of
pressure on the ears or a helicopter type sound in the
ears. Your vehicle may exhibit wind buffeting with the
windows down, or the sunroof (if equipped) in certain
open or partially open positions. This is a normal occur-
rence and can be minimized. If the buffeting occurs with
the rear windows open, then open the front and rear
windows together to minimize the buffeting. If the
buffeting occurs with the sunroof open, then adjust the
sunroof opening to minimize the buffeting.
Window Lockout Switch38 THINGS TO KNOW BEFORE STARTING YOUR VEHICLE
Page 85 of 467
N Headlights With Wipers Feature
(Available With Auto Headlights Only) ......137
N Windshield Washers ...................138
N Adding Washer Fluid ..................138
m Tilt/Telescoping Steering Column ...........139
m Electronic Speed Control Ð If Equipped ......140
N To Activate ..........................140
N To Set Desired Speed ...................141
N To Deactivate ........................141
N To Resume Speed .....................141
N To Vary Speed Setting ..................142
N To Accelerate For Passing ...............142
m Garage Door Opener Ð If Equipped .........143 N Programming HomeLink t ...............144
N Gate Operator/Canadian Programming .....148
N Security ............................148
N Troubleshooting Tips ...................149
N General Information ...................149
m Power Sunroof Ð If Equipped .............150
N Sunroof Operation ....................151
N Auto Sunroof Express With Anti-Pinch
Protection Ð If Equipped ...............151
N Sunshade Operation ...................152
N Wind Buffeting .......................152
N Sunroof Maintenance ...................152
N Ignition Off Operation ..................152UNDERSTANDING THE FEATURES OF YOUR VEHICLE 83
3
Page 152 of 467
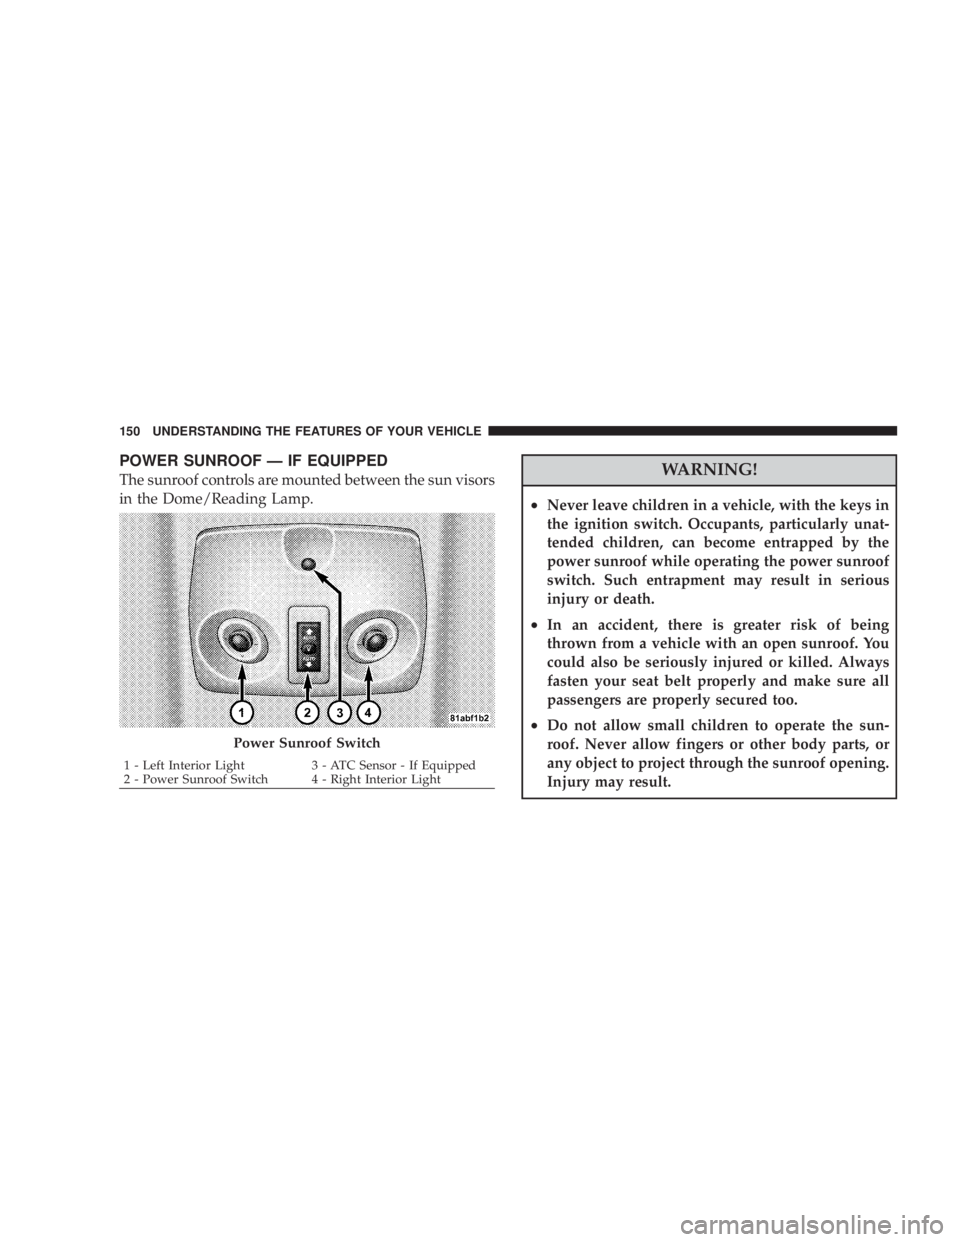
POWER SUNROOF Ð IF EQUIPPED
The sunroof controls are mounted between the sun visors
in the Dome/Reading Lamp.
WARNING!² Never leave children in a vehicle, with the keys in
the ignition switch. Occupants, particularly unat-
tended children, can become entrapped by the
power sunroof while operating the power sunroof
switch. Such entrapment may result in serious
injury or death.
² In an accident, there is greater risk of being
thrown from a vehicle with an open sunroof. You
could also be seriously injured or killed. Always
fasten your seat belt properly and make sure all
passengers are properly secured too.
² Do not allow small children to operate the sun-
roof. Never allow fingers or other body parts, or
any object to project through the sunroof opening.
Injury may result.Power Sunroof Switch1 - Left Interior Light 3 - ATC Sensor - If Equipped
2 - Power Sunroof Switch 4 - Right Interior Light150 UNDERSTANDING THE FEATURES OF YOUR VEHICLE
Page 153 of 467
SUNROOF OPERATION
Opening Sunroof Manually
Press the switch rearward and hold, and the sunroof will
open automatically from any position. The sunroof will
open fully, then stop automatically. During this opera-
tion, any release of the sunroof switch will stop the
sunroof.
Opening Sunroof - Express
Press the switch rearward and release, and the sunroof
will open automatically from any position. The sunroof
will open fully, then stop automatically. This is called
Express Open. During Express Open operation, any
movement of the sunroof switch will stop the sunroof.
Closing Sunroof Manually
To close the sunroof from an open or vent position, press
and hold the switch forward. The sunroof will close fully
and stop automatically. Release the switch to stop sun-
roof travel at any point. Venting Sunroof - Express
Press and release the 9 V 9 button, and the sunroof will
open to the vent position. This is called Express Vent.
Closing Sunroof - Express
Press the switch forward and release, and the sunroof
will close automatically from any position. The sunroof
will close fully, then stop automatically. This is called
Express Close. During Express Close operation, any
movement of the sunroof switch will stop the sunroof.
AUTO SUNROOF EXPRESS WITH ANTI-PINCH
PROTECTION Ð IF EQUIPPED
During express closing, anytime an obstacle that restricts
glass movement is detected, the motor will stop and
reverse travel to avoid pinching the object. UNDERSTANDING THE FEATURES OF YOUR VEHICLE 151
3
Page 154 of 467
SUNSHADE OPERATION
The sunshade can be opened manually. However, the
sunshade will open automatically as the sunroof opens.
NOTE: The sunshade cannot be closed if the sunroof is
open.
WIND BUFFETING
Wind buffeting can be described as the perception of
pressure on the ears or a helicopter type sound in the
ears. Your vehicle may exhibit wind buffeting with the
windows down, or the sunroof (if so equipped) in certain
open or partially open positions. This is a normal occur-
rence and can be minimized. If the buffeting occurs with
the rear windows open, then open the front and rear
windows together to minimize the buffeting. If the
buffeting occurs with the sunroof open, adjust the sun-
roof opening to minimize the buffeting. SUNROOF MAINTENANCE
Use only a non-abrasive cleaner and a soft cloth to clean
the glass panel.
IGNITION OFF OPERATION
For vehicles not equipped with the Electronic Vehicle
Information Center (EVIC), the power sunroof switch
will remain active for 45 seconds after the ignition switch
is turned off. Opening either front door will cancel this
feature.
For vehicles equipped with the EVIC, the power sunroof
switch will remain active for up to 10 minutes after the
ignition switch is turned off. Opening either front door
will cancel this feature. The time is programmable. For
details, refer to ªKey-Off Power Delay,º under ªPersonal
Settings (Customer Programmable Features)º under
ªElectronic Vehicle Information Center (EVIC)º in Sec-
tion 4 of this manual.152 UNDERSTANDING THE FEATURES OF YOUR VEHICLE
Page 235 of 467
Selecting Satellite Mode
Press the SAT button until 9 SAT 9 appears in the display. A
CD may remain in the radio while in the Satellite radio
mode.
Satellite Antenna
To ensure optimum reception, do not place items on the
roof around the rooftop antenna location or strap items to
the trunk lid around the trunk lid antenna (if equipped).
Metal objects placed within the line of sight of the
antenna will cause decreased performance. Larger lug-
gage items such as bikes should be placed as far rearward
as possible, within the loading design of the rack. Do not
place items directly on or above the antenna.
Reception Quality
Satellite reception may be interrupted due to one of the
following reasons:
² The vehicle is parked in an underground parking
structure or under a physical obstacle. ² Dense tree coverage may interrupt reception in the
form of short audio mutes.
² Driving under wide bridges or along tall buildings can
cause intermittent reception.
² Placing objects over or too close to the antenna can
cause signal blockage.
Operating Instructions - Satellite Mode
NOTE: The ignition switch must be in the ON or ACC
position to operate the radio.
SEEK Buttons
Press and release the SEEK buttons to search for the next
channel in Satellite mode. Press the right switch to seek
up and the left switch to seek down. The radio will
remain tuned to the new channel until you make another
selection. Holding either button will bypass channels
without stopping until you release it. UNDERSTANDING YOUR INSTRUMENT PANEL 233
4
Page 267 of 467
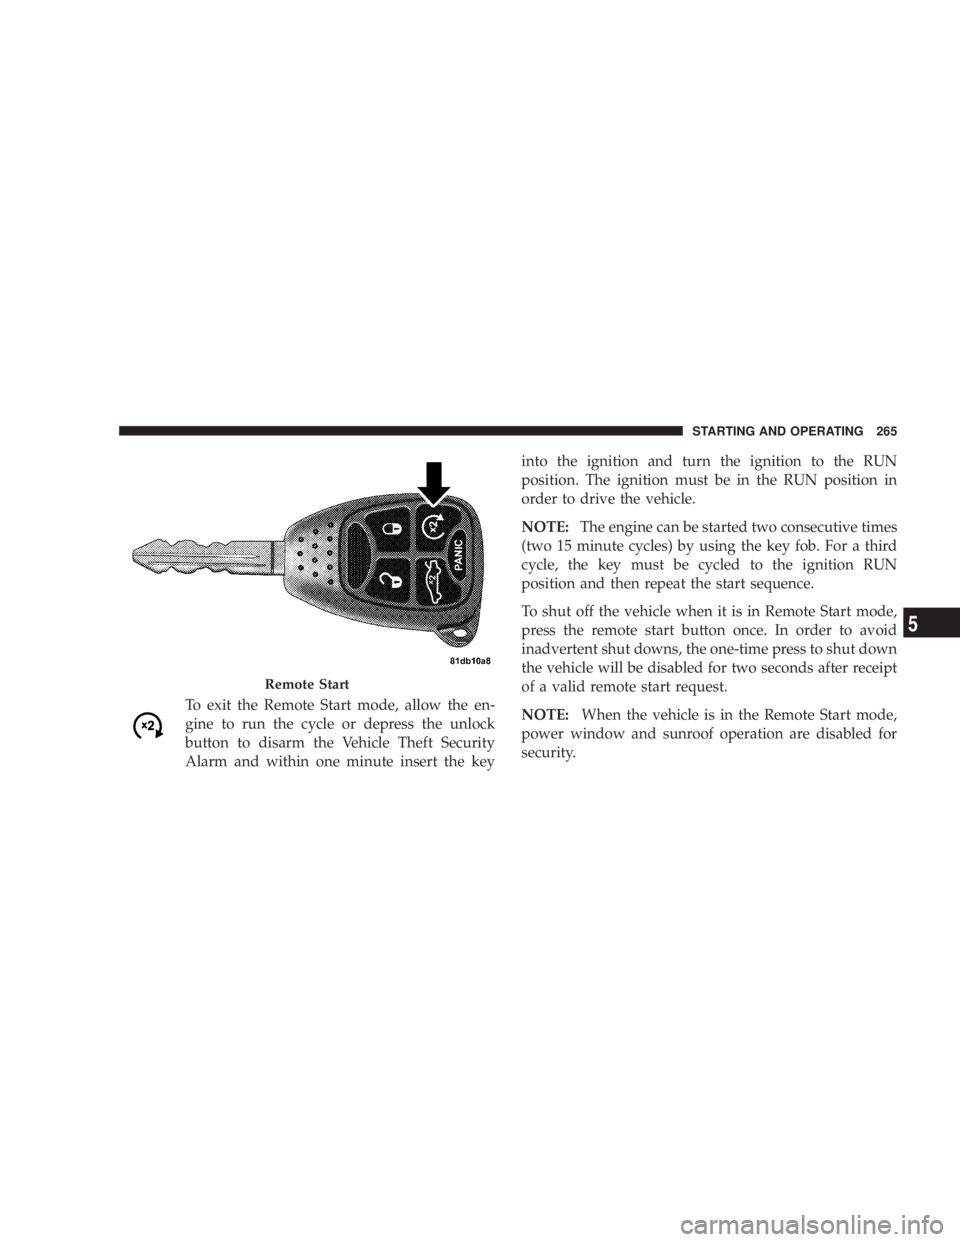
To exit the Remote Start mode, allow the en-
gine to run the cycle or depress the unlock
button to disarm the Vehicle Theft Security
Alarm and within one minute insert the key into the ignition and turn the ignition to the RUN
position. The ignition must be in the RUN position in
order to drive the vehicle.
NOTE: The engine can be started two consecutive times
(two 15 minute cycles) by using the key fob. For a third
cycle, the key must be cycled to the ignition RUN
position and then repeat the start sequence.
To shut off the vehicle when it is in Remote Start mode,
press the remote start button once. In order to avoid
inadvertent shut downs, the one-time press to shut down
the vehicle will be disabled for two seconds after receipt
of a valid remote start request.
NOTE: When the vehicle is in the Remote Start mode,
power window and sunroof operation are disabled for
security.Remote Start STARTING AND OPERATING 265
5
Page 410 of 467
Cavity Car-
tridge
Fuse Mini
Fuse Description
14 Ð 10 Amp
Red Ignition Off Draw
(IOD) Ð Cabin Com-
partment Node
(CCN)/ Interior
Lighting
15 40 Amp
Green Ð Battery Feed Ð Ra-
diator Fan Relay
16 Ð 15 Amp
Lt. Blue IGN Run/ACC Ð
Cigar Lighter/PWR
Sunroof Mod
17 Ð 10 Amp
Red Ignition Off Draw
(IOD) Ð Wireless
Control Module
(WCM)/Clock/
Steering Control
Module (SCM) Cavity Car-
tridge
Fuse Mini
Fuse Description
18 40 Amp
Green Ð Battery Feed Ð Auto
Shutdown (ASD) Re-
lay
19 Ð 20 Amp
Yellow Ignition Off Draw
(IOD) Ð Power Amp
Feed2-if equipped
20 Ð 15 Amp
Lt. Blue Ignition Off Draw
(IOD) Ð Radio
21 Ð 10 Amp
Red Ð
22 Ð 10 Amp
Red Ignition Run Ð Cli-
mate Controls/Hot
Cupholder - if
equipped
23 Ð 15 Amp
Lt. Blue Auto Shutdown
(ASD) Relay Feed 3408 MAINTAINING YOUR VEHICLE
Page 411 of 467
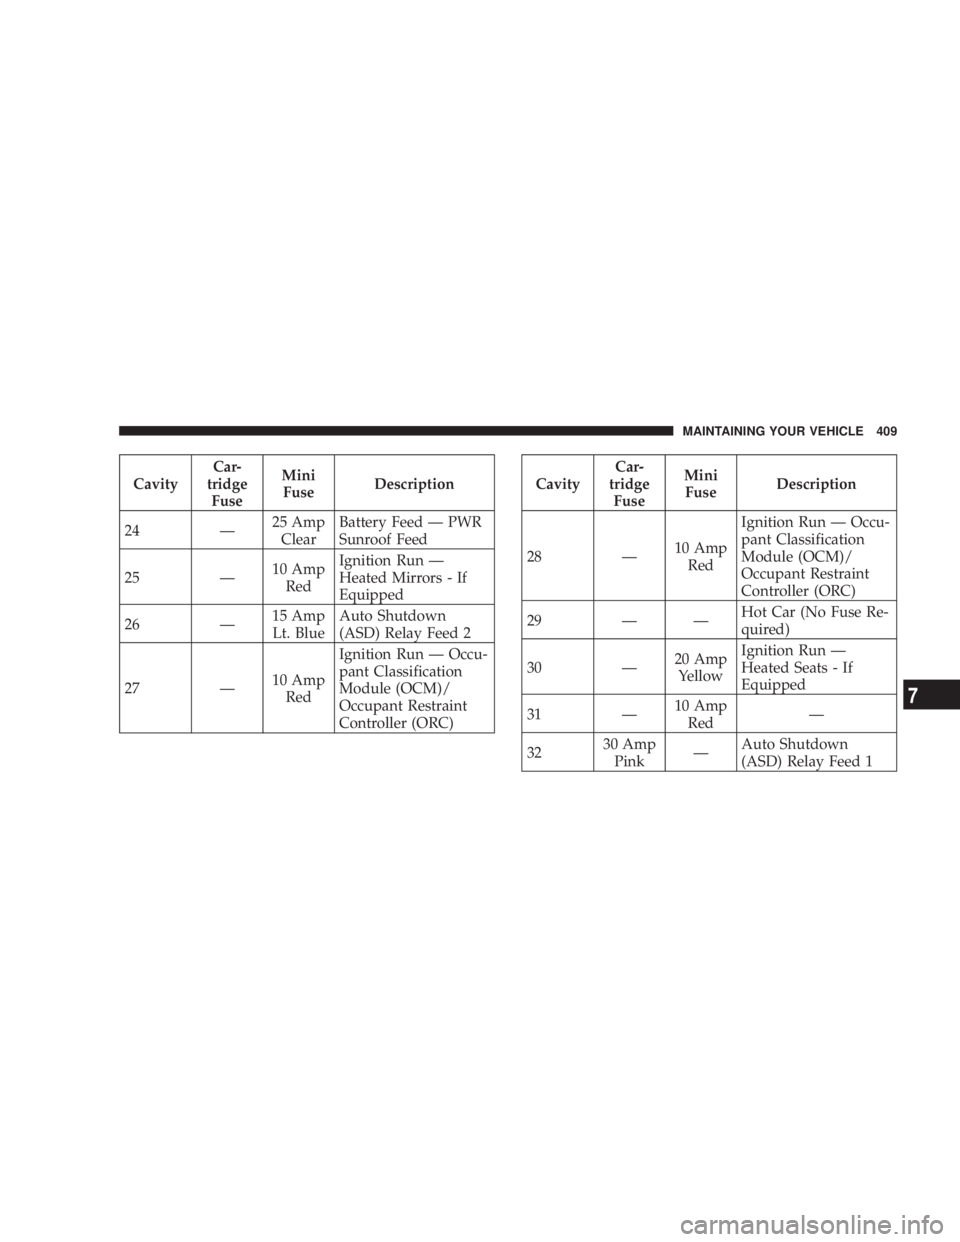
Cavity Car-
tridge
Fuse Mini
Fuse Description
24 Ð 25 Amp
Clear Battery Feed Ð PWR
Sunroof Feed
25 Ð 10 Amp
Red Ignition Run Ð
Heated Mirrors - If
Equipped
26 Ð 15 Amp
Lt. Blue Auto Shutdown
(ASD) Relay Feed 2
27 Ð 10 Amp
Red Ignition Run Ð Occu-
pant Classification
Module (OCM)/
Occupant Restraint
Controller (ORC) Cavity Car-
tridge
Fuse Mini
Fuse Description
28 Ð 10 Amp
Red Ignition Run Ð Occu-
pant Classification
Module (OCM)/
Occupant Restraint
Controller (ORC)
29 Ð Ð Hot Car (No Fuse Re-
quired)
30 Ð 20 Amp
Yellow Ignition Run Ð
Heated Seats - If
Equipped
31 Ð 10 Amp
Red Ð
32 30 Amp
Pink Ð Auto Shutdown
(ASD) Relay Feed 1 MAINTAINING YOUR VEHICLE 409
7
Page 458 of 467
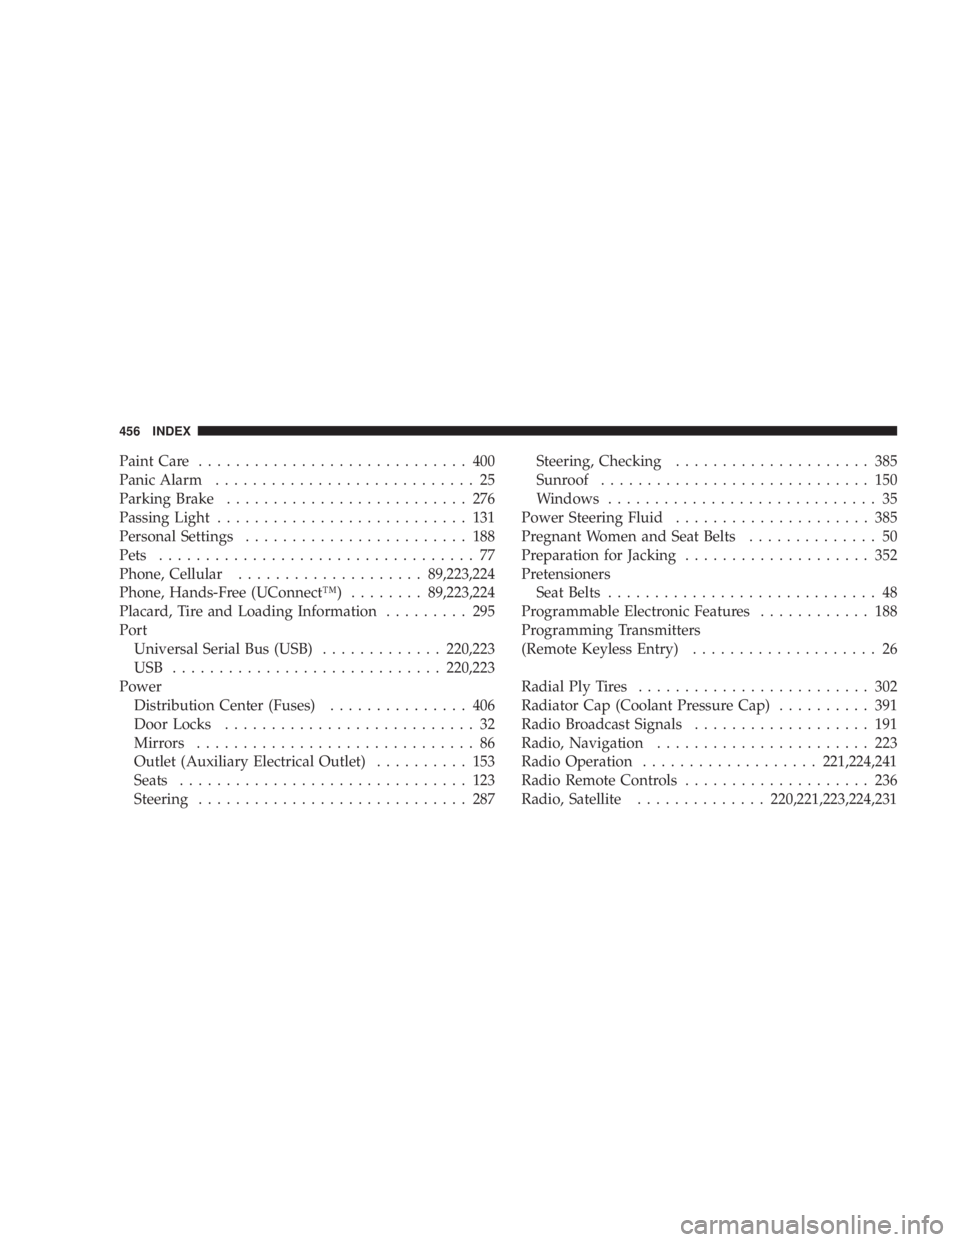
Paint Care ............................. 400
Panic Alarm ............................ 25
Parking Brake .......................... 276
Passing Light ........................... 131
Personal Settings ........................ 188
Pets .................................. 77
Phone, Cellular .................... 89,223,224
Phone, Hands-Free (UConnectŸ) ........ 89,223,224
Placard, Tire and Loading Information ......... 295
Port
Universal Serial Bus (USB) ............. 220,223
USB ............................. 220,223
Power
Distribution Center (Fuses) ............... 406
Door Locks ........................... 32
Mirrors .............................. 86
Outlet (Auxiliary Electrical Outlet) .......... 153
Seats ............................... 123
Steering ............................. 287 Steering, Checking ..................... 385
Sunroof ............................. 150
Windows ............................. 35
Power Steering Fluid ..................... 385
Pregnant Women and Seat Belts .............. 50
Preparation for Jacking .................... 352
Pretensioners
Seat Belts ............................. 48
Programmable Electronic Features ............ 188
Programming Transmitters
(Remote Keyless Entry) .................... 26
Radial Ply Tires ......................... 302
Radiator Cap (Coolant Pressure Cap) .......... 391
Radio Broadcast Signals ................... 191
Radio, Navigation ....................... 223
Radio Operation ................... 221,224,241
Radio Remote Controls .................... 236
Radio, Satellite .............. 220,221,223,224,231456 INDEX