clock DODGE AVENGER 2010 2.G User Guide
[x] Cancel search | Manufacturer: DODGE, Model Year: 2010, Model line: AVENGER, Model: DODGE AVENGER 2010 2.GPages: 76, PDF Size: 11.78 MB
Page 27 of 76
Auxiliary Mode
• The auxiliary (AUX) jack allows a portable device, such as an MP3 player or a cassetteplayer, to be plugged into the radio and uti lize the vehicle’s audio system to amplify
the source and play through the vehicle speakers.
• Pressing the AUX button will change the mode to auxiliary device if the AUX jack is connected.
• The control of the external device cannot be provided by the radio; use the device controls instead.
Clock Setting
• Press and hold the TIME button until the hours blink; turn the TUNE/SCROLL controlknob to set the hours.
• Press the TUNE/SCROLL control knob until the minutes begin to blink; turn the TUNE/SCROLL control knob to set the minutes.
• Press the TUNE/SCROLL control knob to save the time change.
• To exit, press any button/knob or wait five seconds.
Station Presets
• Press the SET/RND button once and SET 1 will show in the display. Then select the button (1–6).
• A second station may be added to each push button. Press the SET/RND button twice and SET 2 will show in the display, then select button (1–6).
How To Load Multiple CDs/DVDs
REQ Radio Only
• Press the LOAD button and then press the button with the corresponding number
(1–6) where the CD is being loaded. The radio will display PLEASE WAIT and prompt
when to INSERT DISC.
• After the radio displays INSERT DISC, insert the CD into the player. The radio display will show LOADING DISC when the disc is loading and “READING DISC” when the radio
is reading the disc.
• Press the eject button and then the cor responding number (1–6) to eject the desired
disc.
25
ELECTRONICS
Page 30 of 76
• The display will switch automatically to the AUX mode when a 3.5 mm stereo mini-jackcable has been connected.
• To change radio modes while the cable is connected to the unit, press the RADIO/MEDIA (RER and REN) or MEDIA (RBZ) hard-key until the AUX tab is displayed
on the top of the screen. Touch the AUX tab to return to the AUX mode.
• The control of the external device cannot be provided by the radio; use the device controls instead.
Clock Setting
• Turn the radio on, then touch the screen where the time is displayed.
• Touch the USER CLOCK soft-key (Navigation radio only).
• To adjust the hours, touch either the HOUR FORWARD or HOUR BACKWARD soft-key.
• To adjust the minutes, touch either the MINUTE FORWARD or MINUTE BACKWARDsoft-key.
• To save the new time setting, touch the scr een where the word “Save” is displayed.
Store Radio Presets
• For REN and RER: Press the RADIO/MEDIA hard-key repeatedly until AM FM SAT is
displayed in the upper left corner of the screen.
• For RBZ: Press the RADIO hard-key to display AM FM SAT in the upper left corner of the screen.
• Select the radio band by touching either the AM, FM, or SAT soft-key.
• Find the station to store by either pressing the SEEK UP/DOWN hard-key (REN and RER), touching the right and left arrow soft-keys (RBZ), touching the SCAN soft-key, or
by using the DIRECT TUNE soft-key.
• Once the station is found, touch and hold one of the PRESET soft-keys in the list to the right, until you hear a confirmation beep.
Hard Disc Drive Operation
Copy Complete Audio Disc To Hard-Drive
• Press the OPEN/CLOSE hard-key (REN and RER) or LOAD hard-key (RBZ) and insert adisc, then press the MENU hard-key.
• Touch the MY FILES soft-key, then select MY MUSIC.
• Touch the IMPORT MUSIC soft-key, then touch the FROM DISC soft-key in the next screen to start the process.
Copying From USB
• Insert a USB device, then select MY MUSIC.
• Touch the IMPORT MUSIC FILES soft-key, then touch the FROM USB soft-key in the nextscreen.
• Select the folders or titles you would like to copy, then touch the DONE soft-key to start the copy process.
ELECTRONICS
28
Page 47 of 76
• Set the parking brake and shiftthe automatic transmissioninto PARK.
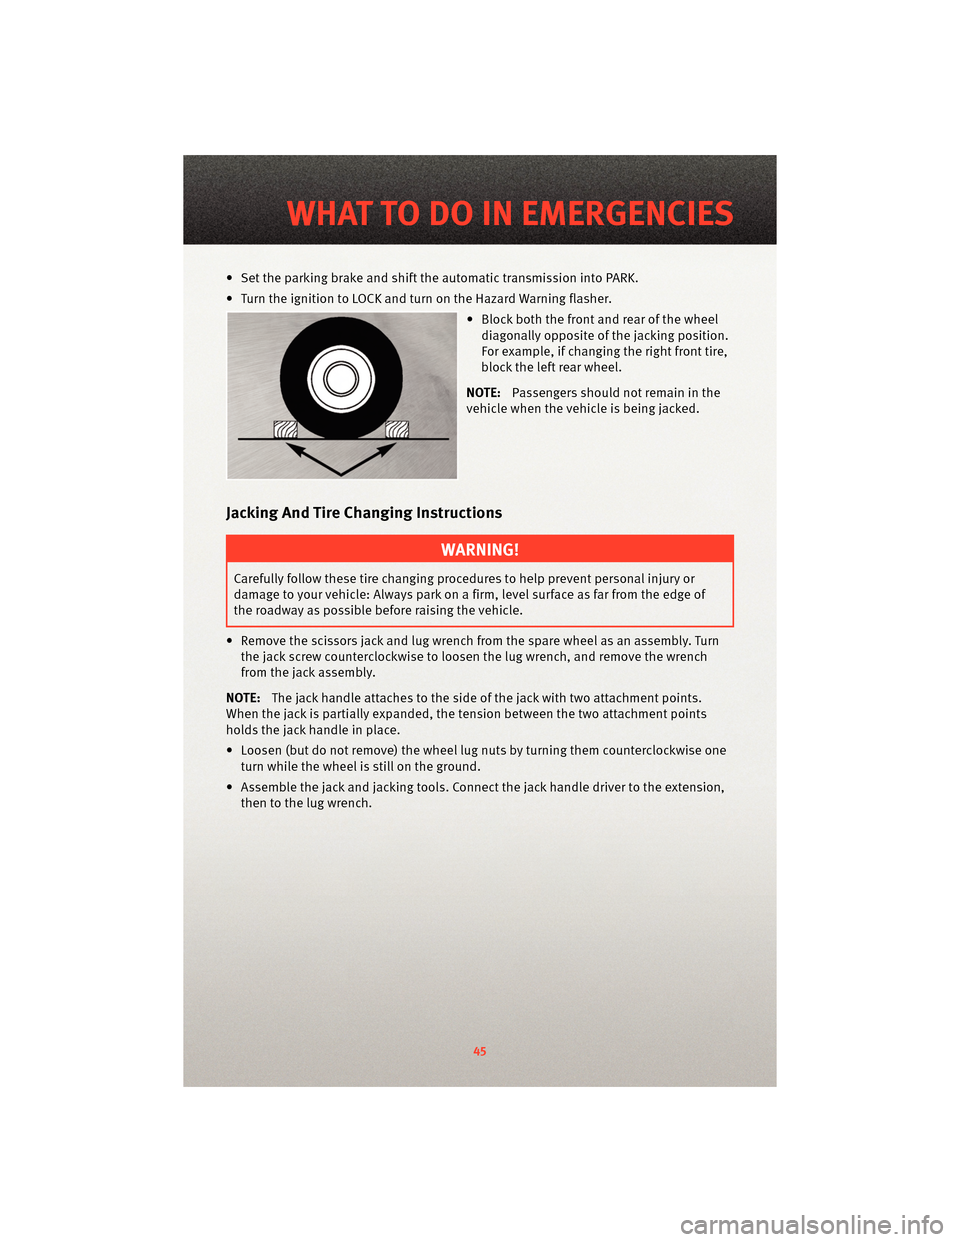
• Turn the ignition to LOCK and turn on the Hazard Warning flasher. • Block both the front and rear of the wheeldiagonally opposite of the jacking position.
For example, if changing the right front tire,
block the left rear wheel.
NOTE: Passengers should not remain in the
vehicle when the vehicle is being jacked.
Jacking And Tire Changing Instructions
WARNING!
Carefully follow these tire changing p rocedures to help prevent personal injury or
damage to your vehicle: Always park on a firm, level surface as far from the edge of
the roadway as possible before raising the vehicle.
• Remove the scissors jack and lug wrench from the spare wheel as an assembly. Turn the jack screw countercloc kwise to loosen the lug wrench, and remove the wrench
from the jack assembly.
NOTE: The jack handle attaches to the side of the jack with two attachment points.
When the jack is partially expanded, the tension between the two attachment points
holds the jack handle in place.
• Loosen (but do not remove) the wheel lug nuts by turning them counterclockwise one
turn while the wheel is still on the ground.
• Assemble the jack and jacking tools. Connect the jack handle driver to the extension, then to the lug wrench.
45
WHAT TO DO IN EMERGENCIES
Page 48 of 76
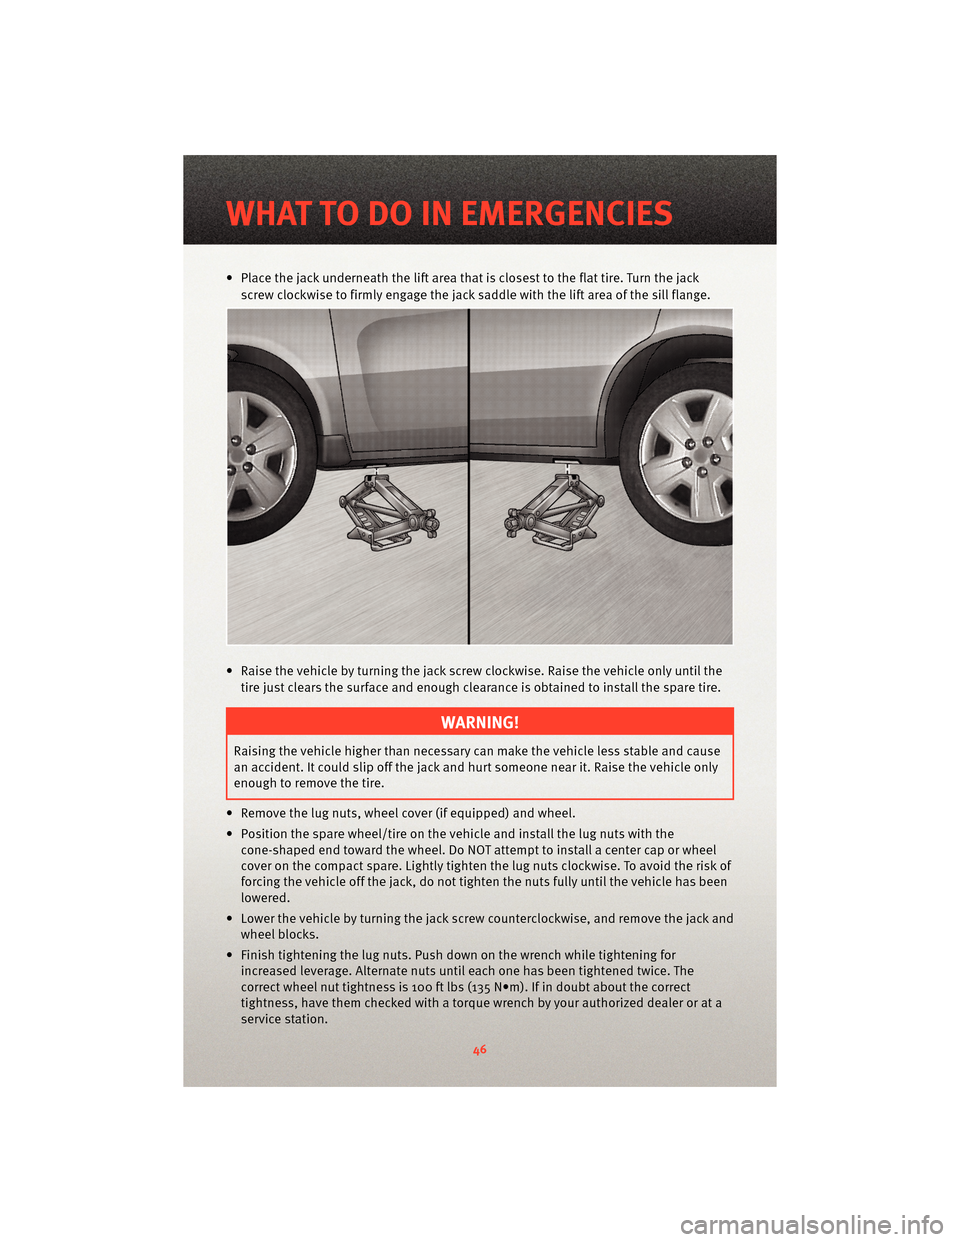
• Place the jack underneath the lift area that is closest to the flat tire. Turn the jackscrew clockwise to firmly engage the jack saddle with the lift area of the sill flange.
• Raise the vehicle by turning the jack screw clockwise. Raise the vehicle only until the tire just clears the surface and enough clearance is obtained to install the spare tire.
WARNING!
Raising the vehicle higher than necessary can make the vehicle less stable and cause
an accident. It could slip off the jack and hurt someone near it. Raise the vehicle only
enough to remove the tire.
• Remove the lug nuts, wheel cover (if equipped) and wheel.
• Position the spare wheel/tire on the vehicle and install the lug nuts with the cone-shaped end toward the wheel. Do NOT attempt to install a center cap or wheel
cover on the compact spare. Lightly tighten the lug nuts clockwise. To avoid the risk of
forcing the vehicle off the jack, do not tighten the nuts fully until the vehicle has been
lowered.
• Lower the vehicle by turning the jack screw counterclockwise, and remove the jack and wheel blocks.
• Finish tightening the lug nuts. Push do wn on the wrench while tightening for
increased leverage. Alternate nuts until each one has been tightened twice. The
correct wheel nut tightness is 100 ft lbs (135 N•m). If in doubt about the correct
tightness, have them checked with a tor que wrench by your authorized dealer or at a
service station.
WHAT TO DO IN EMERGENCIES
46
Page 65 of 76
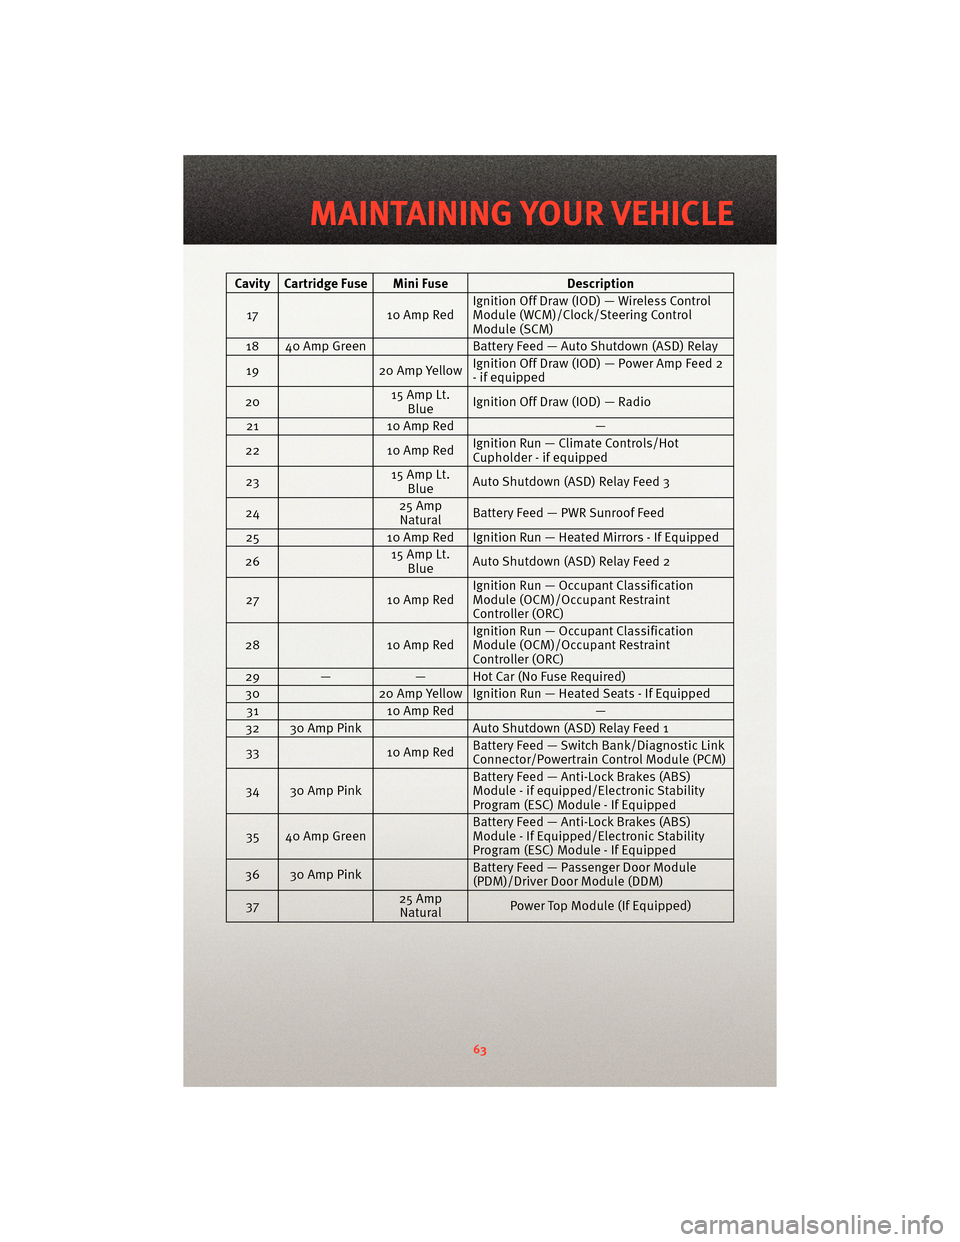
Cavity Cartridge Fuse Mini FuseDescription
17 10 Amp RedIgnition Off Draw (IOD) — Wireless Control
Module (WCM)/Clock/Steering Control
Module (SCM)
18 40 Amp Green Battery Feed — Auto Shutdown (ASD) Relay
19 20 Amp YellowIgnition Off Draw (IOD) — Power Amp Feed 2
- if equipped
20 15 Amp Lt.
Blue Ignition Off Draw (IOD) — Radio
21 10 Amp Red —
22 10 Amp RedIgnition Run — Climate Controls/Hot
Cupholder - if equipped
23 15 Amp Lt.
Blue Auto Shutdown (ASD) Relay Feed 3
24 25 Amp
Natural Battery Feed — PWR Sunroof Feed
25 10 Amp Red Ignition Run — Heated Mirrors - If Equipped
26 15 Amp Lt.
Blue Auto Shutdown (ASD) Relay Feed 2
27 10 Amp RedIgnition Run — Occup
ant Classification
Module (OCM)/Occupant Restraint
Controller (ORC)
28 10 Amp RedIgnition Run — Occup
ant Classification
Module (OCM)/Occupant Restraint
Controller (ORC)
29 — — Hot Car (No Fuse Required)
30 20 Amp Yellow Ignition Run — Heated Seats - If Equipped
31 10 Amp Red —
32 30 Amp Pink Auto Shutdown (ASD) Relay Feed 1
33 10 Amp RedBattery Feed — Switch Bank/Diagnostic Link
Connector/Powertrain Control Module (PCM)
34 30 Amp Pink Battery Feed — Anti-Lock Brakes (ABS)
Module - if equipped/Electronic Stability
Program (ESC) Module - If Equipped
35 40 Amp Green Battery Feed — Anti-Lock Brakes (ABS)
Module - If Equipped/Electronic Stability
Program (ESC) Module - If Equipped
36 30 Amp Pink Battery Feed — Passenger Door Module
(PDM)/Driver Door Module (DDM)
37 25 Amp
Natural Power Top Module (If Equipped)
63
MAINTAINING YOUR VEHICLE