transmission DODGE CALIBER 2012 1.G Owner's Manual
[x] Cancel search | Manufacturer: DODGE, Model Year: 2012, Model line: CALIBER, Model: DODGE CALIBER 2012 1.GPages: 100, PDF Size: 2.63 MB
Page 64 of 100
IF YOUR ENGINE OVERHEATS
• In any of the following situations, you can reduce the potential for overheating bytaking the appropriate action.
• On the highways — slow down.
• In city traffic — while stopped, place the transmission in NEUTRAL, but do not increase engine idle speed.
NOTE: There are steps that you can take to slow down an impending overheat
condition:
• If your air conditioner (A/C) is on, turn it off. The A/C system adds heat to the engine cooling system and turning the A/C off can help remove this heat.
• You can also turn the temperature control to maximum heat, the mode control to floor and the blower control to high. This allows the heater core to act as a
supplement to the radiator and aids in removing heat from the engine cooling
system.
CAUTION!
Driving with a hot cooling system could damage your vehicle. If the temperature
gauge reads 240°F (116 °C) or greater pull over and stop the vehicle. Idle the
vehicle with the air conditioner turned off until the pointer drops back into the
normal range 200–230°F (93–110°C). If the pointer remains at 240°F (116°C)
or greater and you hear a chime, turn the engine off immediately and call for
service.
WARNING!
You or others can be badly burned by hot engine coolant (antifreeze) or steam
from your radiator. If you see or hear steam coming from under the hood, do not
open the hood until the radiator has had time to cool. Never try to open a
cooling system pressure cap when the radiator or coolant bottle is hot.
AUTOMATIC TRANSMISSION OVERHEATING
• During sustained high speed driving or trailer towing up long grades on hot days,the automatic transmission oil may become too hot.
• When the transmission overheat warning light
turns on, you will experience
reduced performance until the automatic transmission cools down. Once the
transmission has cooled down and the light turns off, you may continue to drive
normally. If the high speed is maintained, the overheating will continue to occur.
• If the overheating continues, it may become necessary to stop the vehicle and run the engine at idle with the transmission in NEUTRAL until the light turns off.
WHAT TO DO IN EMERGENCIES
62
Page 65 of 100
JACKING AND TIRE CHANGING
Jack Location
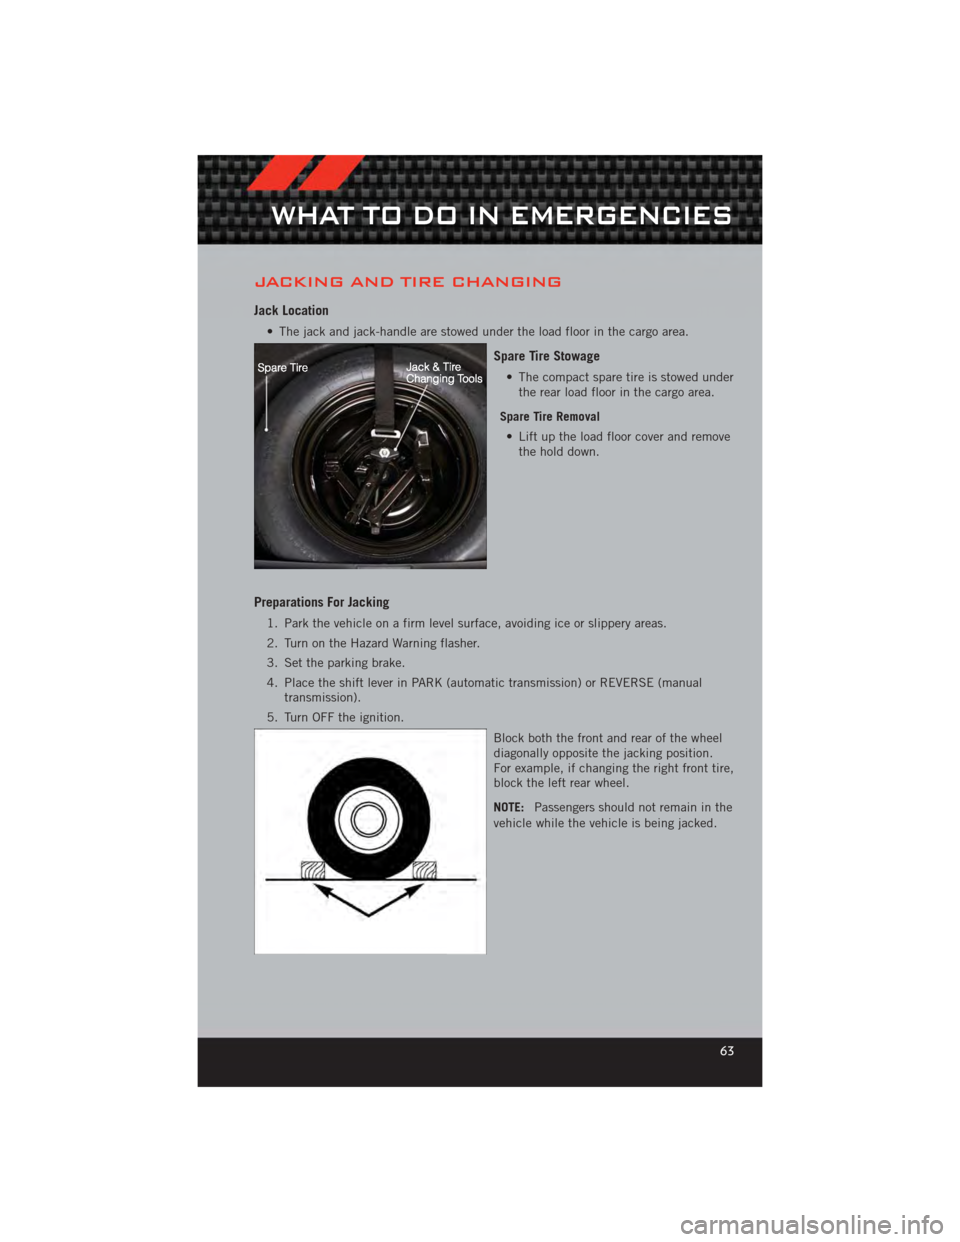
• The jack and jack-handle are stowed under the load floor in the cargo area.
Spare Tire Stowage
• The compact spare tire is stowed underthe rear load floor in the cargo area.
Spare Tire Removal • Lift up the load floor cover and remove the hold down.
Preparations For Jacking
1. Park the vehicle on a firm level surface, avoiding ice or slippery areas.
2. Turn on the Hazard Warning flasher.
3. Set the parking brake.
4. Place the shift lever in PARK (automatic transmission) or REVERSE (manual transmission).
5. Turn OFF the ignition.
Block both the front and rear of the wheel
diagonally opposite the jacking position.
For example, if changing the right front tire,
block the left rear wheel.
NOTE:Passengers should not remain in the
vehicle while the vehicle is being jacked.
WHAT TO DO IN EMERGENCIES
63
Page 69 of 100
4. Finish tightening the lug nuts. Push down on the wrench while at the end of thehandle for increased leverage. Tighten the lug nuts in a star pattern until each nut
has been tightened twice. The correct tightness of each lug nut is 100 ft/lbs
(135 N·m). If in doubt about the correct tightness, have them checked with a
torque wrench by your authorized dealer or service station.
5. After 25 miles (40 km) check the lug nut torque with a torque wrench to ensure that all lug nuts are properly seated against the wheel.
CAUTION!
• Do not attempt to raise the vehicle by jacking on locations other than thoseindicated in the Jacking Instructions for this vehicle.
• Be sure to mount the spare tire with the valve stem facing outward. The vehicle could be damaged if the spare tire is mounted incorrectly.
WARNING!
• Do not attempt to change a tire on the side of the vehicle close to movingtraffic. Pull far enough off the road to avoid the danger of being hit when
operating the jack or changing the wheel.
• Being under a jacked-up vehicle is dangerous. The vehicle could slip off the jack and fall on you. You could be crushed. Never put any part of your body
under a vehicle that is on a jack. If you need to get under a raised vehicle,
take it to a service center where it can be raised on a lift.
• Never start or run the engine while the vehicle is on a jack.
• The jack is designed to be used as a tool for changing tires only. The jack should not be used to lift the vehicle for service purposes. The vehicle should
be jacked on a firm level surface only. Avoid ice or slippery areas.
• Carefully follow these tire changing warnings to help prevent personal injury or damage to your vehicle:
• Always park on a firm, level surface as far from the edge of the roadway as possible before raising the vehicle.
• Turn on the Hazard Warning flasher.
• Block the wheel diagonally opposite the wheel to be raised.
• Set the parking brake firmly and set an automatic transmission in PARK; a manual transmission in REVERSE.
• Never start or run the engine with the vehicle on a jack.
• Do not let anyone sit in the vehicle when it is on a jack.
• Do not get under the vehicle when it is on a jack.
• Only use the jack in the positions indicated and for lifting this vehicle during a tire change.
• If working on or near a roadway, be extremely careful of motor traffic.
(Continued)
WHAT TO DO IN EMERGENCIES
67
Page 71 of 100
1. Set the parking brake, shift the automatic transmission into PARK and turn theignition to LOCK.
2. Turn off the heater, radio, and all unnecessary electrical accessories.
3. If using another vehicle to jump-start the battery, park the vehicle within the jumper cables reach, set the parking brake and make sure the ignition is OFF.
Jump-Starting Procedure
NOTE: Remove Air Intake before proceeding with this Jump-Starting procedure.
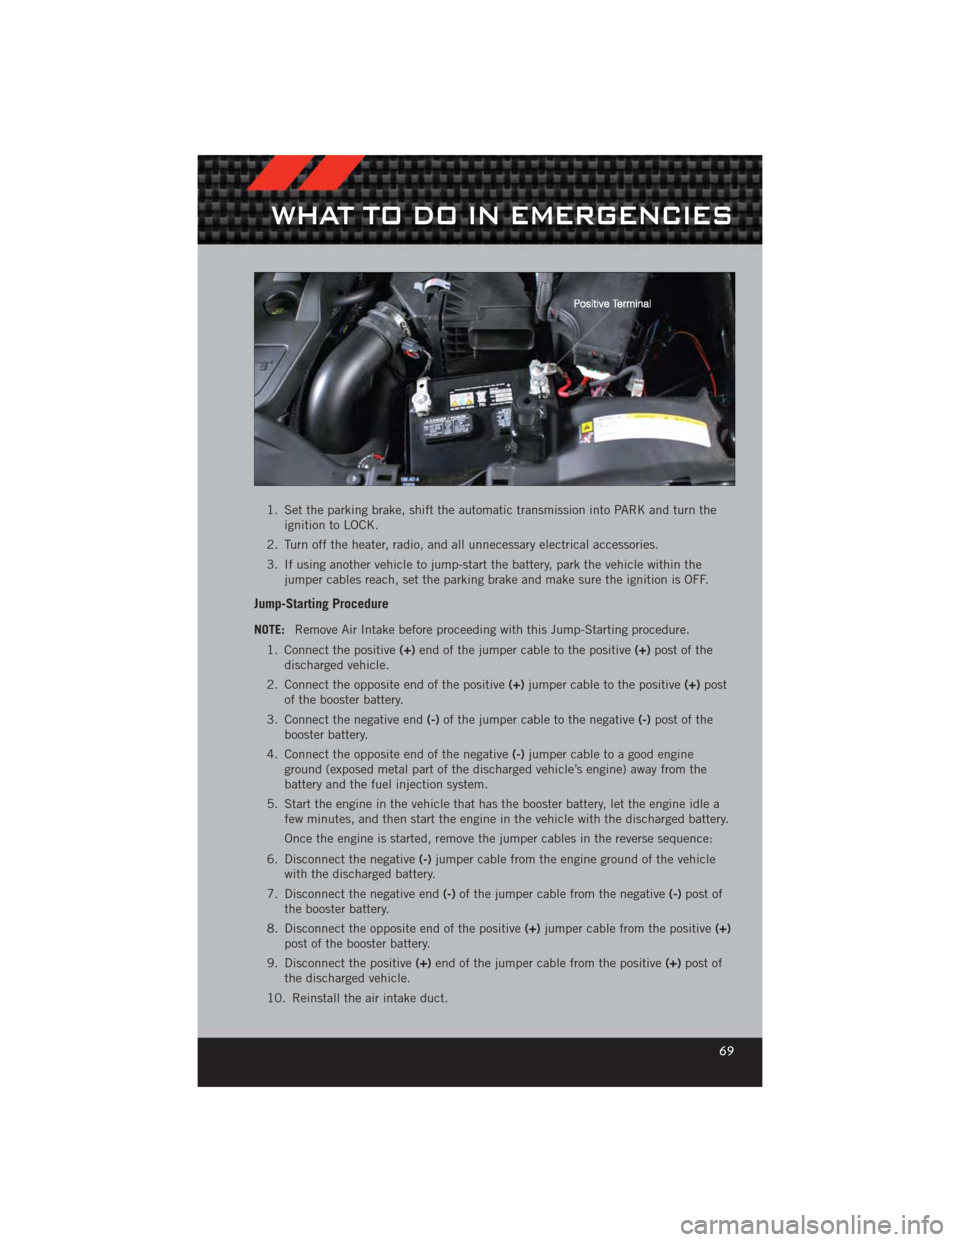
1. Connect the positive (+)end of the jumper cable to the positive (+)post of the
discharged vehicle.
2. Connect the opposite end of the positive (+)jumper cable to the positive (+)post
of the booster battery.
3. Connect the negative end (-)of the jumper cable to the negative (-)post of the
booster battery.
4. Connect the opposite end of the negative (-)jumper cable to a good engine
ground (exposed metal part of the discharged vehicle’s engine) away from the
battery and the fuel injection system.
5. Start the engine in the vehicle that has the booster battery, let the engine idle a few minutes, and then start the engine in the vehicle with the discharged battery.
Once the engine is started, remove the jumper cables in the reverse sequence:
6. Disconnect the negative (-)jumper cable from the engine ground of the vehicle
with the discharged battery.
7. Disconnect the negative end (-)of the jumper cable from the negative (-)post of
the booster battery.
8. Disconnect the opposite end of the positive (+)jumper cable from the positive (+)
post of the booster battery.
9. Disconnect the positive (+)end of the jumper cable from the positive (+)post of
the discharged vehicle.
10. Reinstall the air intake duct.
WHAT TO DO IN EMERGENCIES
69
Page 74 of 100
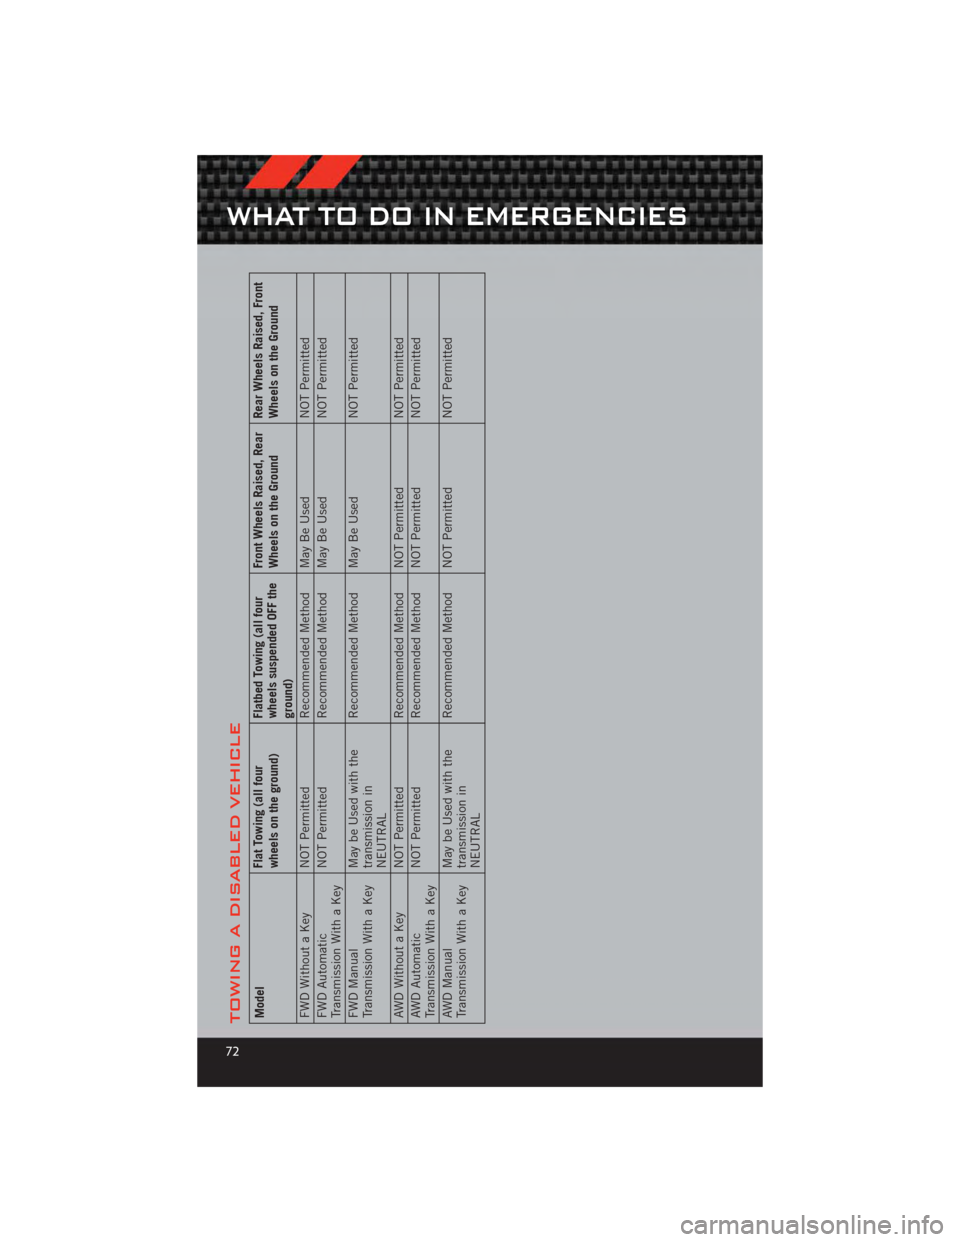
TOWING A DISABLED VEHICLEModelFlat Towing (all four
wheels on the ground)Flatbed Towing (all four
wheels suspended OFF the
ground)Front Wheels Raised, Rear
Wheels on the Ground
Rear Wheels Raised, Front
Wheels on the Ground
FWD Without a Key NOT Permitted Recommended Method May Be UsedNOT Permitted
FWD Automatic
Transmission With a Key NOT Permitted
Recommended Method May Be Used NOT Permitted
FWD Manual
Transmission With a Key May be Used with the
transmission in
NEUTRALRecommended Method May Be Used
NOT Permitted
AWD Without a Key NOT Permitted Recommended Method NOT PermittedNOT Permitted
AWD Automatic
Transmission With a Key NOT Permitted
Recommended Method NOT Permitted NOT Permitted
AWD Manual
Transmission With a Key May be Used with the
transmission in
NEUTRALRecommended Method NOT Permitted
NOT Permitted
WHAT TO DO IN EMERGENCIES
72
Page 75 of 100
FREEING A STUCK VEHICLE
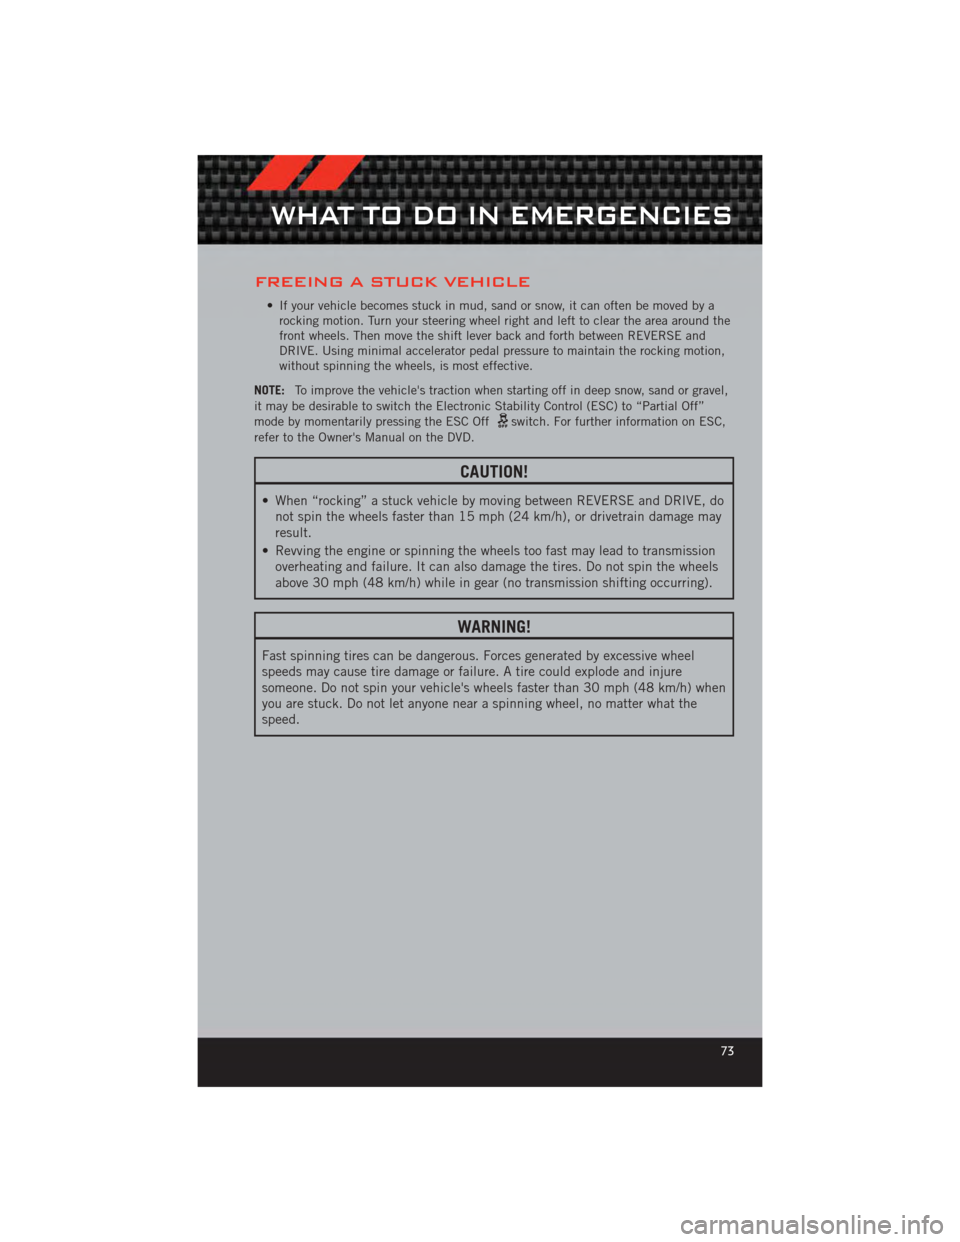
• If your vehicle becomes stuck in mud, sand or snow, it can often be moved by arocking motion. Turn your steering wheel right and left to clear the area around the
front wheels. Then move the shift lever back and forth between REVERSE and
DRIVE. Using minimal accelerator pedal pressure to maintain the rocking motion,
without spinning the wheels, is most effective.
NOTE: To improve the vehicle's traction when starting off in deep snow, sand or gravel,
it may be desirable to switch the Electronic Stability Control (ESC) to “Partial Off”
mode by momentarily pressing the ESC Off
switch. For further information on ESC,
refer to the Owner's Manual on the DVD.
CAUTION!
• When “rocking” a stuck vehicle by moving between REVERSE and DRIVE, do not spin the wheels faster than 15 mph (24 km/h), or drivetrain damage may
result.
• Revving the engine or spinning the wheels too fast may lead to transmission overheating and failure. It can also damage the tires. Do not spin the wheels
above 30 mph (48 km/h) while in gear (no transmission shifting occurring).
WARNING!
Fast spinning tires can be dangerous. Forces generated by excessive wheel
speeds may cause tire damage or failure. A tire could explode and injure
someone. Do not spin your vehicle's wheels faster than 30 mph (48 km/h) when
you are stuck. Do not let anyone near a spinning wheel, no matter what the
speed.
WHAT TO DO IN EMERGENCIES
73
Page 80 of 100
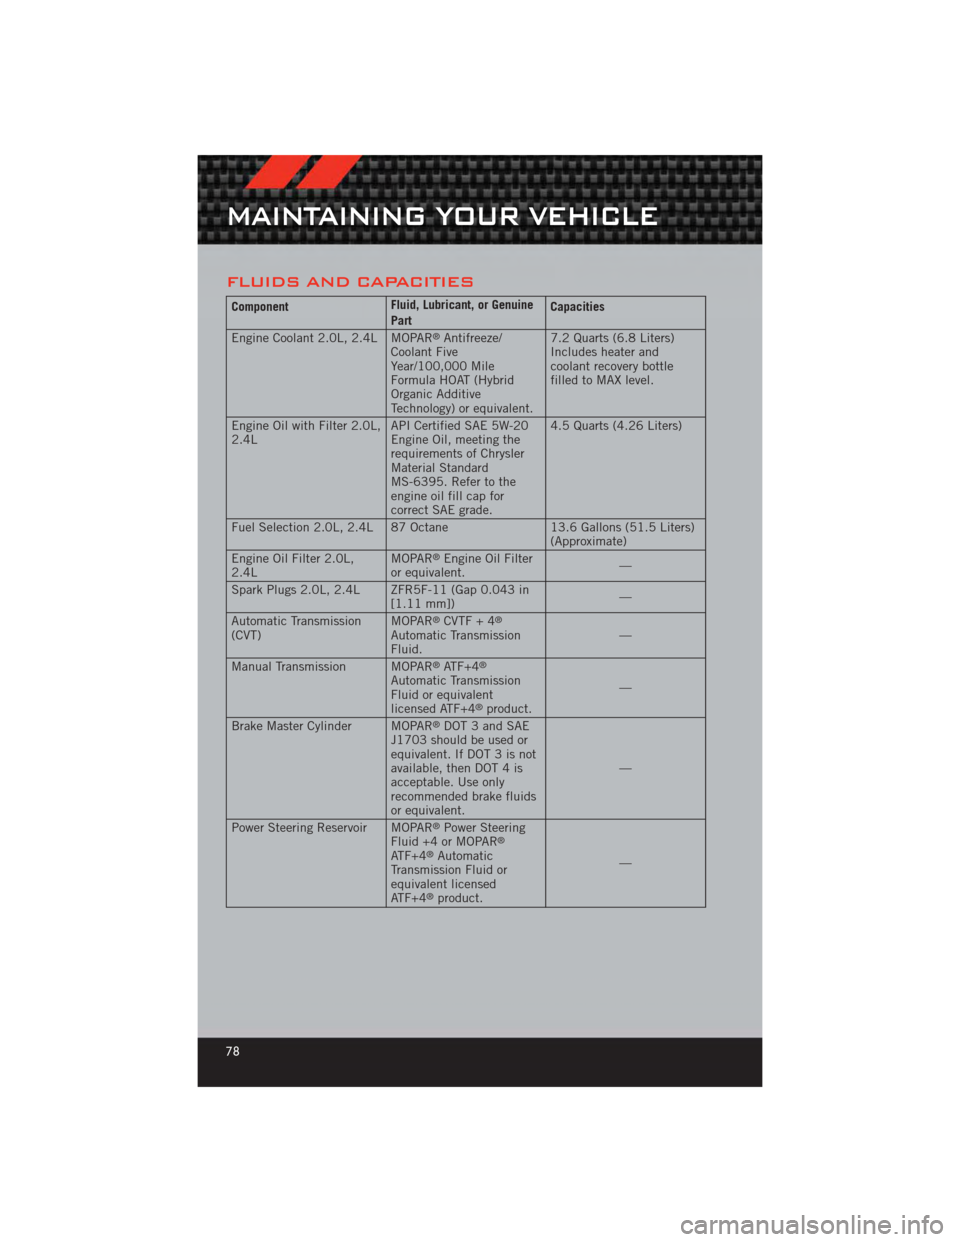
FLUIDS AND CAPACITIES
ComponentFluid, Lubricant, or Genuine
PartCapacities
Engine Coolant 2.0L, 2.4L MOPAR
®Antifreeze/
Coolant Five
Year/100,000 Mile
Formula HOAT (Hybrid
Organic Additive
Technology) or equivalent. 7.2 Quarts (6.8 Liters)
Includes heater and
coolant recovery bottle
filled to MAX level.
Engine Oil with Filter 2.0L,
2.4L API Certified SAE 5W-20
Engine Oil, meeting the
requirements of Chrysler
Material Standard
MS-6395. Refer to the
engine oil fill cap for
correct SAE grade.4.5 Quarts (4.26 Liters)
Fuel Selection 2.0L, 2.4L 87 Octane 13.6 Gallons (51.5 Liters)
(Approximate)
Engine Oil Filter 2.0L,
2.4L MOPAR
®Engine Oil Filter
or equivalent. —
Spark Plugs 2.0L, 2.4L ZFR5F-11 (Gap 0.043 in [1.11 mm]) —
Automatic Transmission
(CVT) MOPAR
®CVTF + 4®
Automatic Transmission
Fluid. —
Manual Transmission MOPAR
®ATF+4®
Automatic Transmission
Fluid or equivalent
licensed ATF+4
®product. —
Brake Master Cylinder MOPAR®DOT 3 and SAE
J1703 should be used or
equivalent. If DOT 3 is not
available, then DOT 4 is
acceptable. Use only
recommended brake fluids
or equivalent. —
Power Steering Reservoir MOPAR
®Power Steering
Fluid +4 or MOPAR®
ATF+4®Automatic
Transmission Fluid or
equivalent licensed
ATF+4
®product. —
MAINTAINING YOUR VEHICLE
78
Page 81 of 100
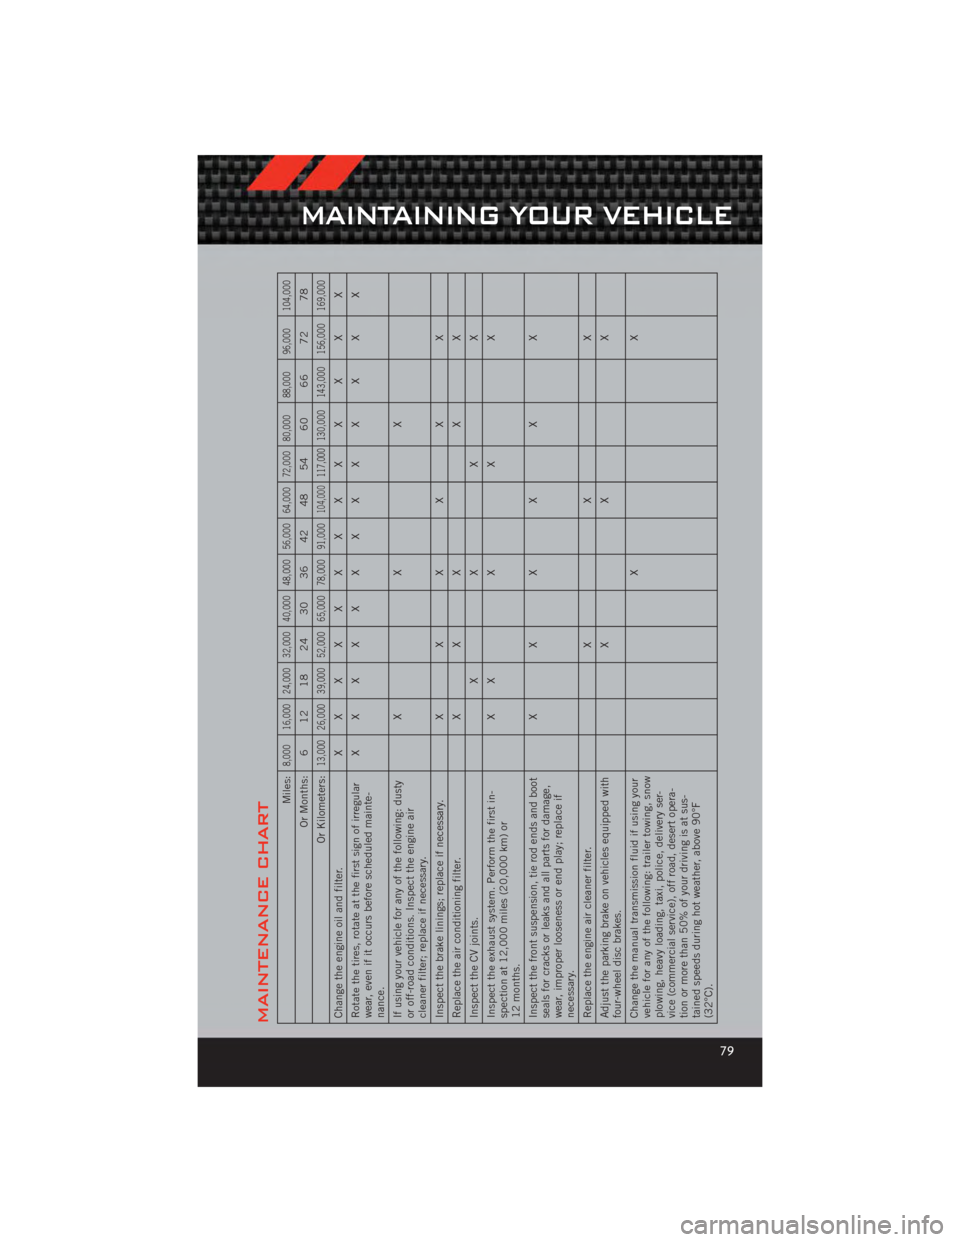
MAINTENANCE CHART
Miles:
8,000 16,000 24,000 32,000 40,000 48,000 56,000 64,000 72,000 80,000 88,000 96,000 104,000
Or Months: 6 12 18 24 30 36 42 48 54 60 66 72 78
Or Kilometers:
13,000 26,000 39,000 52,000 65,000 78,000 91,000
104,000
117,000
130,000 143,000 156,000 169,000
Change the engine oil and filter. X XXXXXXXX X X X X
Rotate the tires, rotate at the first sign of irregular
wear, even if it occurs before scheduled mainte-
nance. XXXXXXXXX X X X X
If using your vehicle for any of the following: dusty
or off-road conditions. Inspect the engine air
cleaner filter; replace if necessary. XX X
Inspect the brake linings; replace if necessary. XXXX X X
Replace the air conditioning filter. XXX XX
Inspect the CV joints. XXX X
Inspect the exhaust system. Perform the first in-
spection at 12,000 miles (20,000 km) or
12 months. X
XXX X
Inspect the front suspension, tie rod ends and boot
seals for cracks or leaks and all parts for damage,
wear, improper looseness or end play; replace if
necessary. XXXX X X
Replace the engine air cleaner filter. XX X
Adjust the parking brake on vehicles equipped with
four-wheel disc brakes. XX X
Change the manual transmission fluid if using your
vehicle for any of the following: trailer towing, snow
plowing, heavy loading, taxi, police, delivery ser-
vice (commercial service), off road, desert opera-
tion or more than 50% of your driving is at sus-
tained speeds during hot weather, above 90°F
(32°C). XX
MAINTAINING YOUR VEHICLE
79
Page 82 of 100
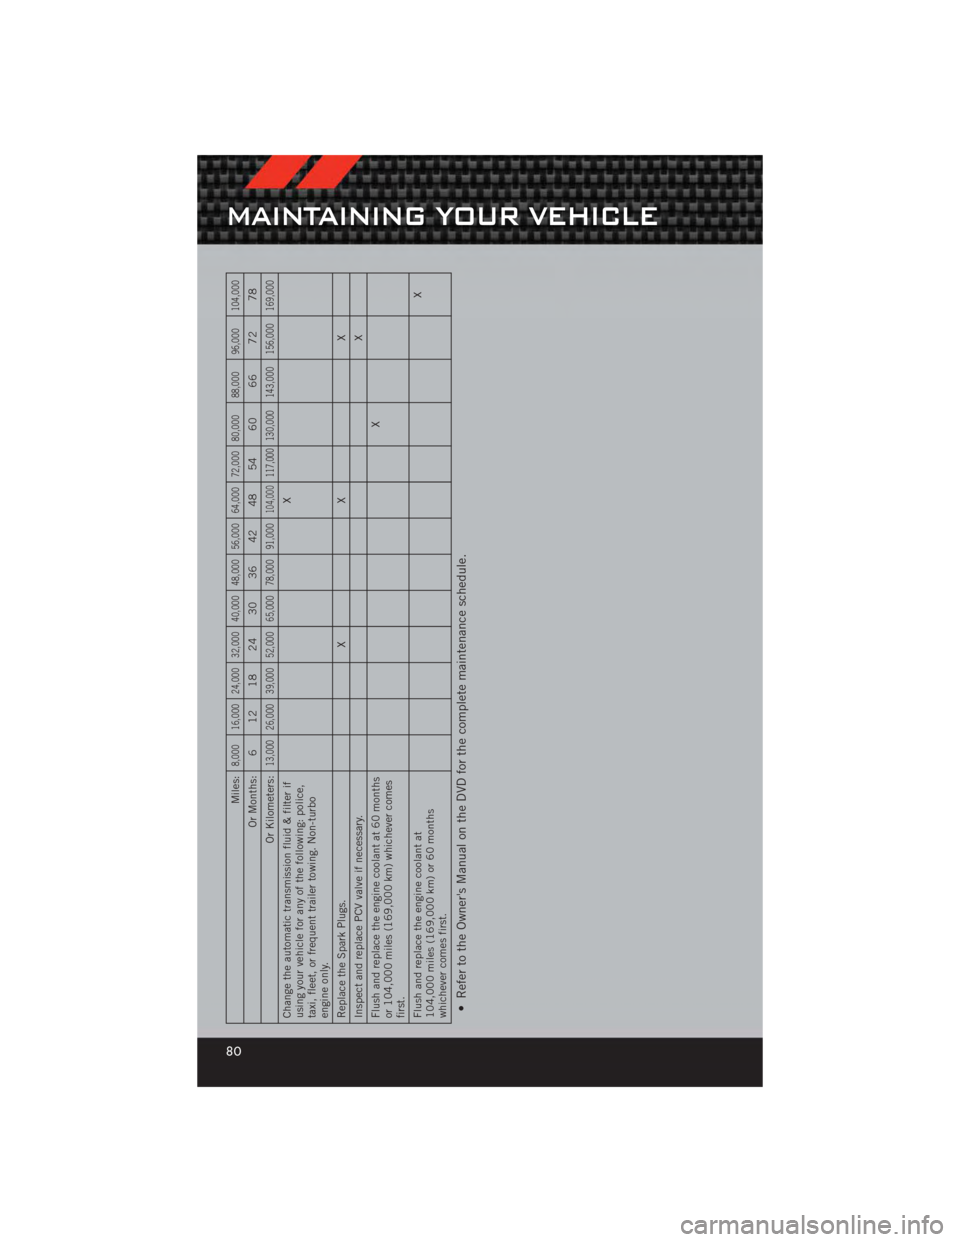
Miles:
8,000 16,000 24,000 32,000 40,000 48,000 56,000 64,000 72,000 80,000 88,000 96,000 104,000
Or Months: 6 12 18 24 30 36 42 48 54 60 66 72 78
Or Kilometers:
13,000 26,000 39,000 52,000 65,000 78,000 91,000
104,000
117,000
130,000 143,000 156,000 169,000
Change the automatic transmission fluid & filter if
using your vehicle for any of the following: police,
taxi, fleet, or frequent trailer towing. Non-turbo
engine only. X
Replace the Spark Plugs. X X X
Inspect and replace PCV valve if necessary. X
Flush and replace the engine coolant at 60 months
or 104,000 miles (169,000 km) whichever comes
first. X
Flush and replace the engine coolant at
104,000 miles (169,000 km) or 60 months
whichever comes first. X• Refer to the Owner's Manual on the DVD for the complete maintenance schedule.
MAINTAINING YOUR VEHICLE
80
Page 90 of 100
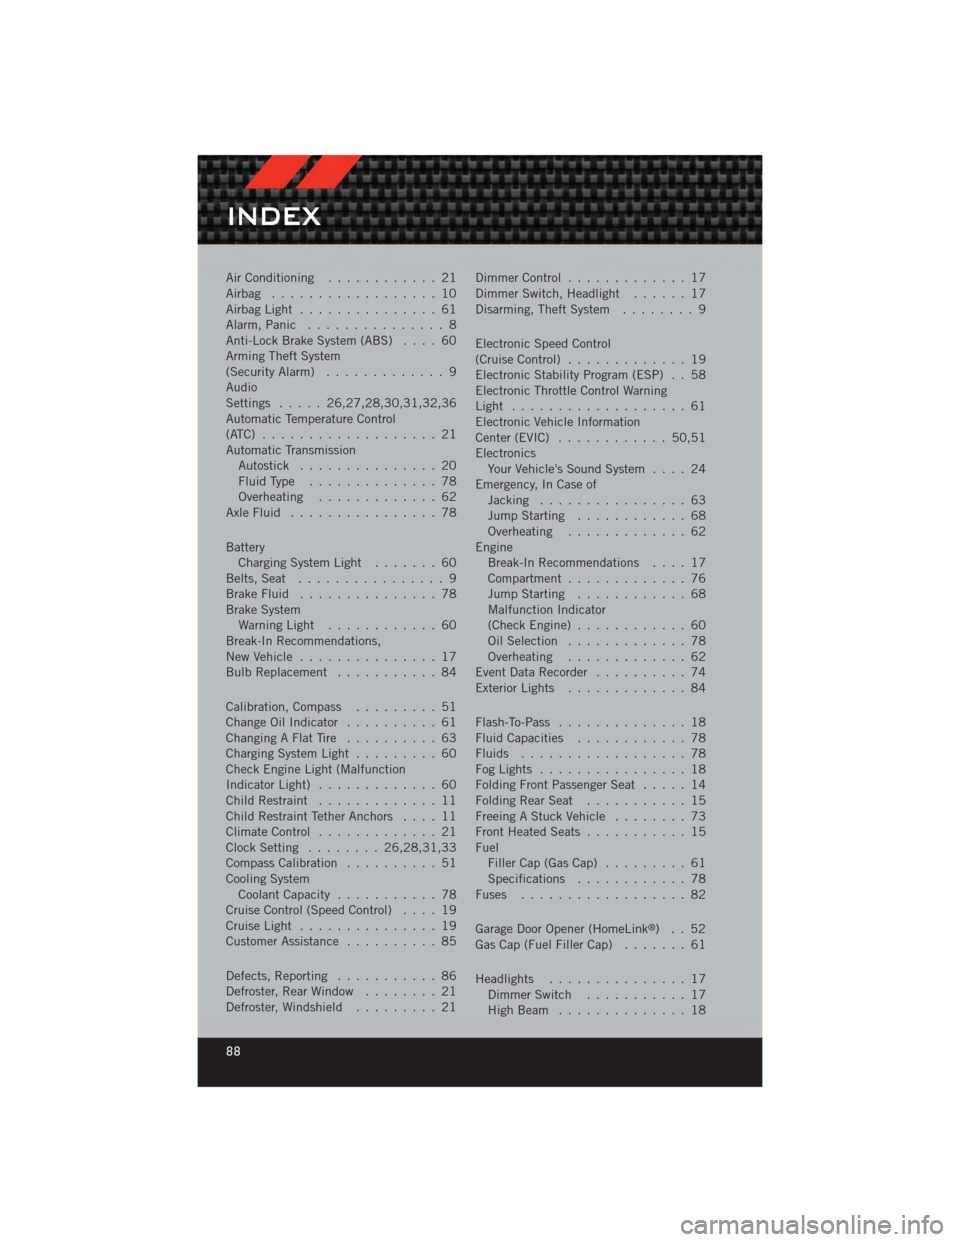
Air Conditioning............ 21
Airbag .................. 10
AirbagLight ............... 61
Alarm, Panic ............... 8
Anti-Lock Brake System (ABS) .... 60
Arming Theft System
(Security Alarm) ............. 9
Audio
Settings ..... 26,27,28,30,31,32,36
Automatic Temperature Control
(ATC) ................... 21
Automatic Transmission Autostick ............... 20
FluidType .............. 78
Overheating ............. 62
AxleFluid ................ 78
Battery Charging System Light ....... 60
Belts, Seat ................ 9
BrakeFluid ............... 78
Brake System WarningLight ............ 60
Break-In Recommendations,
New Vehicle ............... 17
Bulb Replacement ........... 84
Calibration, Compass ......... 51
Change Oil Indicator .......... 61
Changing A Flat Tire .......... 63
Charging System Light ......... 60
Check Engine Light (Malfunction
Indicator Light) ............. 60
Child Restraint ............. 11
Child Restraint Tether Anchors .... 11
ClimateControl ............. 21
Clock Setting ........ 26,28,31,33
Compass Calibration .......... 51
Cooling System Coolant Capacity ........... 78
Cruise Control (Speed Control) .... 19
CruiseLight ............... 19
Customer Assistance .......... 85
Defects, Reporting ........... 86
Defroster, Rear Window ........ 21
Defroster, Windshield ......... 21Dimmer Control
............. 17
Dimmer Switch, Headlight ...... 17
Disarming, Theft System ........ 9
Electronic Speed Control
(CruiseControl) ............. 19
Electronic Stability Program (ESP) . . 58
Electronic Throttle Control Warning
Light ................... 61
Electronic Vehicle Information
Center(EVIC) ............ 50,51
Electronics Your Vehicle's Sound System .... 24
Emergency, In Case of Jacking ................ 63
Jump Starting ............ 68
Overheating ............. 62
Engine Break-In Recommendations .... 17
Compartment ............. 76
Jump Starting ............ 68
Malfunction Indicator
(CheckEngine) ............ 60
Oil Selection ............. 78
Overheating ............. 62
EventDataRecorder .......... 74
Exterior Lights ............. 84
Flash-To-Pass .............. 18
Fluid Capacities ............ 78
Fluids .................. 78
FogLights ................ 18
Folding Front Passenger Seat ..... 14
FoldingRearSeat ........... 15
Freeing A Stuck Vehicle ........ 73
Front Heated Seats ........... 15
Fuel Filler Cap (Gas Cap) ......... 61
Specifications ............ 78
Fuses .................. 82
Garage
Door Opener (HomeLink
®)..52
Gas Cap (Fuel Filler Cap) ....... 61
Headlights ............... 17 Dimmer Switch ........... 17
HighBeam .............. 18
INDEX
88