key DODGE CALIBER 2012 1.G Owner's Manual
[x] Cancel search | Manufacturer: DODGE, Model Year: 2012, Model line: CALIBER, Model: DODGE CALIBER 2012 1.GPages: 100, PDF Size: 2.63 MB
Page 48 of 100
Uconnect™ Phone
• To determine if your vehicle is equipped with Uconnect™ Phone, press the“Uconnect™ Phone” button. If your vehicle has this feature, after a couple
seconds you will hear a voice prompt. If not, you will see a message on the radio
“Uconnect phone not available”.
• The Uconnect™ Phone is a voice-activated, hands-free, in-vehicle communications system with Voice Command Capability (see Voice Command section).
NOTE: To access the tutorial, press the “Uconnect™ Phone” button
. After the
BEEP, say “tutorial”. Press any hard-key/button or touch the display (Touch-Screen
radio) to cancel the tutorial.
• The Uconnect™ Phone allows you to dial a phone number with your mobile phoneusing simple voice commands.
• Refer to your vehicle Owner's Manual on the DVD for further details.
NOTE: The Uconnect™ Phone requires a mobile phone equipped with the Bluetooth
®
Hands-Free Profile, Version 1.0 or higher. For Uconnect™ customer support, call
1–877–855–8400 or visit www.dodge.com/uconnect.
Phone Pairing
NOTE:Pairing is a one-time initial setup before using the phone.
• Press the “Phone” button
to begin.
• Wait for the “ready” prompt and BEEP.
• (After the BEEP), say ”setup” or “Uconnect device setup”.
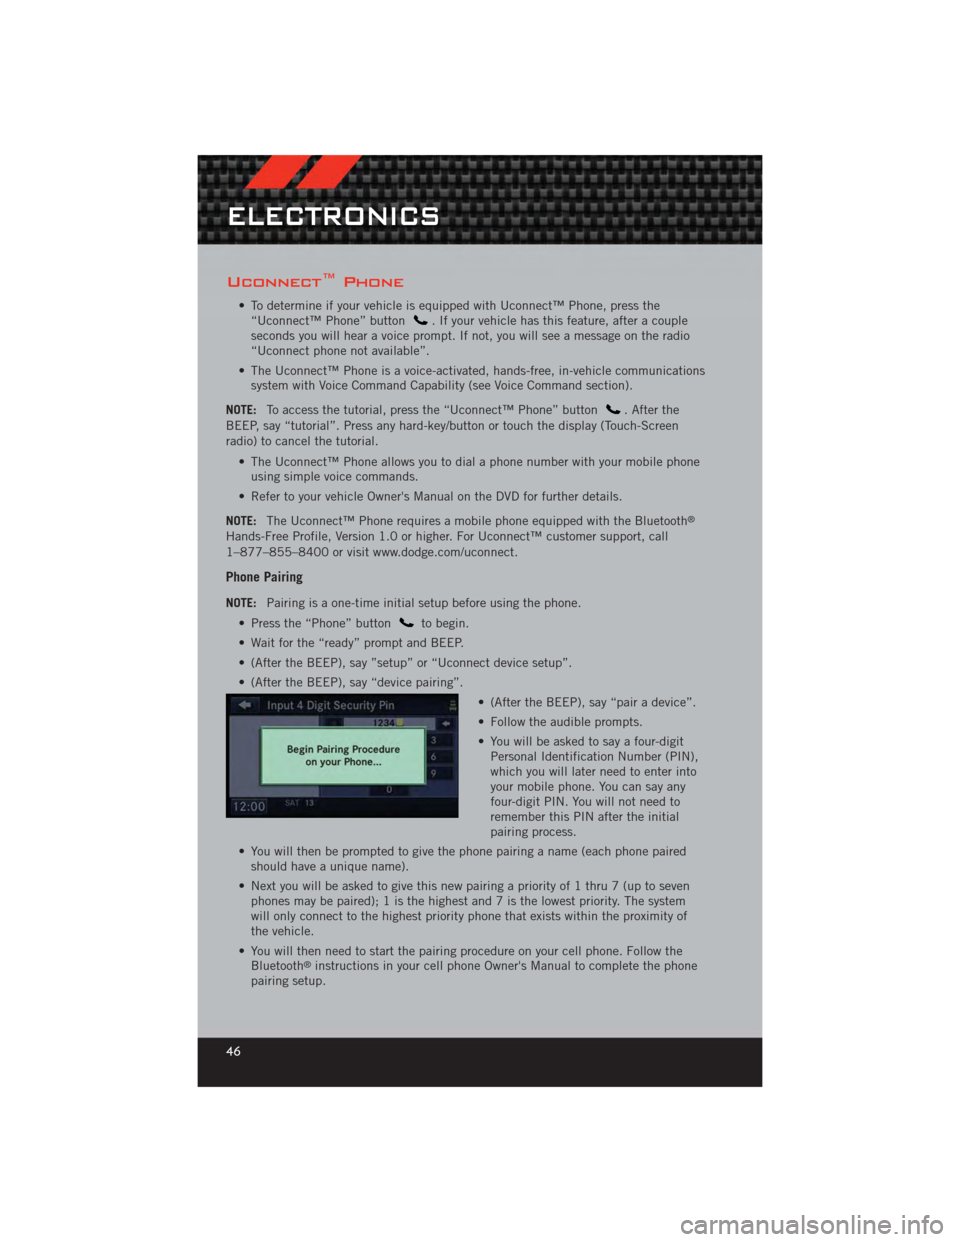
• (After the BEEP), say “device pairing”. • (After the BEEP), say “pair a device”.
• Follow the audible prompts.
• You will be asked to say a four-digitPersonal Identification Number (PIN),
which you will later need to enter into
your mobile phone. You can say any
four-digit PIN. You will not need to
remember this PIN after the initial
pairing process.
• You will then be prompted to give the phone pairing a name (each phone paired should have a unique name).
• Next you will be asked to give this new pairing a priority of 1 thru 7 (up to seven phones may be paired); 1 is the highest and 7 is the lowest priority. The system
will only connect to the highest priority phone that exists within the proximity of
the vehicle.
• You will then need to start the pairing procedure on your cell phone. Follow the Bluetooth
®instructions in your cell phone Owner's Manual to complete the phone
pairing setup.
ELECTRONICS
46
Page 52 of 100
• Press the “Voice Command” buttonand after the BEEP, say “SMS” to get
started.
NOTE: To access the tutorial, press the “Voice Command” button
. After the
BEEP, say “tutorial”. Press any hard-key/button or touch the display (Touch-Screen
radio) to cancel the tutorial.
WARNING!
Any voice commanded system should be used only in safe driving conditions
following local laws and phone use. All attention should be kept on the roadway
ahead. Failure to do so may result in a collision causing you and others to be
severely injured or killed.
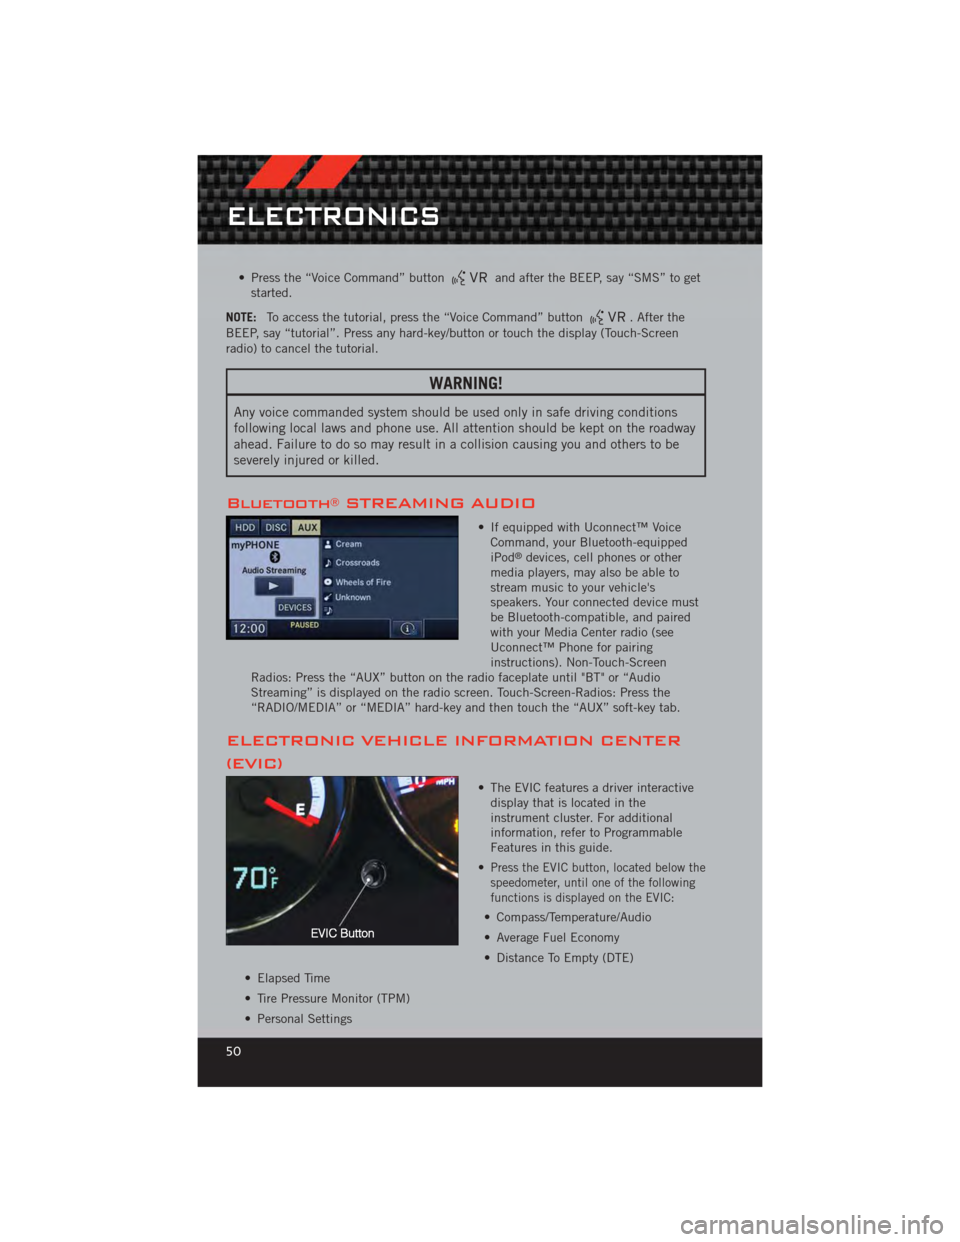
Bluetooth®STREAMING AUDIO
• If equipped with Uconnect™ Voice Command, your Bluetooth-equipped
iPod
®devices, cell phones or other
media players, may also be able to
stream music to your vehicle's
speakers. Your connected device must
be Bluetooth-compatible, and paired
with your Media Center radio (see
Uconnect™ Phone for pairing
instructions). Non-Touch-Screen
Radios: Press the “AUX” button on the radio faceplate until "BT" or “Audio
Streaming” is displayed on the radio screen. Touch-Screen-Radios: Press the
“RADIO/MEDIA” or “MEDIA” hard-key and then touch the “AUX” soft-key tab.
ELECTRONIC VEHICLE INFORMATION CENTER
(EVIC)
• The EVIC features a driver interactive display that is located in the
instrument cluster. For additional
information, refer to Programmable
Features in this guide.
•
Press the EVIC button, located below the
speedometer, until one of the following
functions is displayed on the EVIC:
• Compass/Temperature/Audio
• Average Fuel Economy
• Distance To Empty (DTE)
• Elapsed Time
• Tire Pressure Monitor (TPM)
• Personal Settings
ELECTRONICS
50
Page 53 of 100
• Pressing and holding the EVIC button once will clear the function currently beingdisplayed.
• To reset all resettable functions, press and release the EVIC button a second time within three seconds of resetting the currently displayed function. Reset ALL will
be displayed during this three-second window.
Compass Calibration
• This compass is self-calibrating, which eliminates the need to set the compassmanually. When the vehicle is new, the compass may appear erratic and the EVIC
will display “CAL” until the compass is calibrated.
• You may also calibrate the compass by completing one or more 360 degree turns (in an area free from large metal or metallic objects) until the “CAL” message
displayed in the EVIC turns off. The compass will now function normally.
PROGRAMMABLE FEATURES
Electronic Vehicle Information Center (EVIC)
• Press the EVIC button, located below the speedometer, until Personal Settings isdisplayed on the EVIC. Use the EVIC button to select one of the following, then
press and hold the EVIC button to select either “ON” or “OFF.”
• Language • Key-Off Power Delay
• Auto Unlock On Exit • Illuminated Approach
• RKE Unlock • Hill Start Assist (HSA)
• Sound Horn With Lock • Display Units In
• Flash Lamps Lock • Automatic Compass Calibration
• Headlamp Off Delay • Compass Variance
Key Fob Programmable Features
• The following features may also be programmed by using the Key Fob transmitter or the ignition switch and driver's door lock switch.
NOTE: Pressing the LOCK button while you are inside the vehicle will activate the
Vehicle Security Alarm. Opening a door with the Vehicle Security Alarm activated will
cause the alarm to sound. Press the UNLOCK button to deactivate the Vehicle Security
Alarm.
Unlock On First Press• To unlock either the driver's side or all doors on the first press of the UNLOCK button:
• Press and hold the LOCK button for at least 4 seconds, but no longer than 10 seconds. Then, press and hold the UNLOCK button while still holding the
LOCK button.
• Release both buttons at the same time.
ELECTRONICS
51
Page 59 of 100
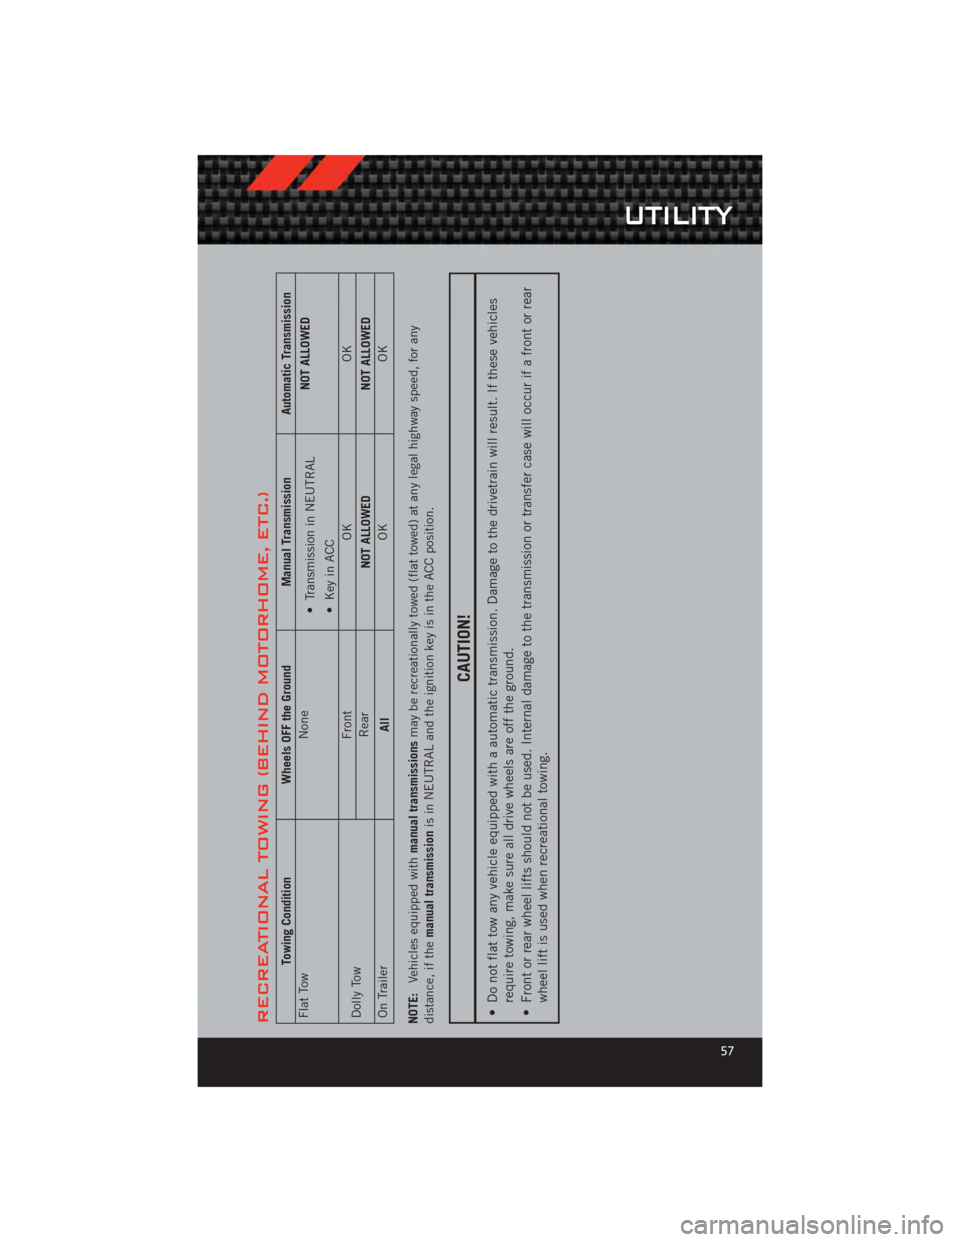
RECREATIONAL TOWING (BEHIND MOTORHOME, ETC.)
Towing ConditionWheels OFF the Ground Manual TransmissionAutomatic Transmission
Flat Tow None
• Transmission in NEUTRAL
• Key in ACC NOT ALLOWED
Dolly Tow Front
OKOK
Rear NOT ALLOWED NOT ALLOWED
On Trailer AllOK
OK
NOTE: Vehicles equipped with manual transmissionsmay be recreationally towed (flat towed) at any legal highway speed, for any
distance, if the manual transmission is in NEUTRAL and the ignition key is in the ACC position.
CAUTION!
• Do not flat tow any vehicle equipped with a automatic transmission. Damage to the drivetrain will result. If these vehicles
require towing, make sure all drive wheels are off the ground.
• Front or rear wheel lifts should not be used. Internal damage to the transmission or transfer case will occur if a front or rear wheel lift is used when recreational towing.
UTILITY
57
Page 74 of 100
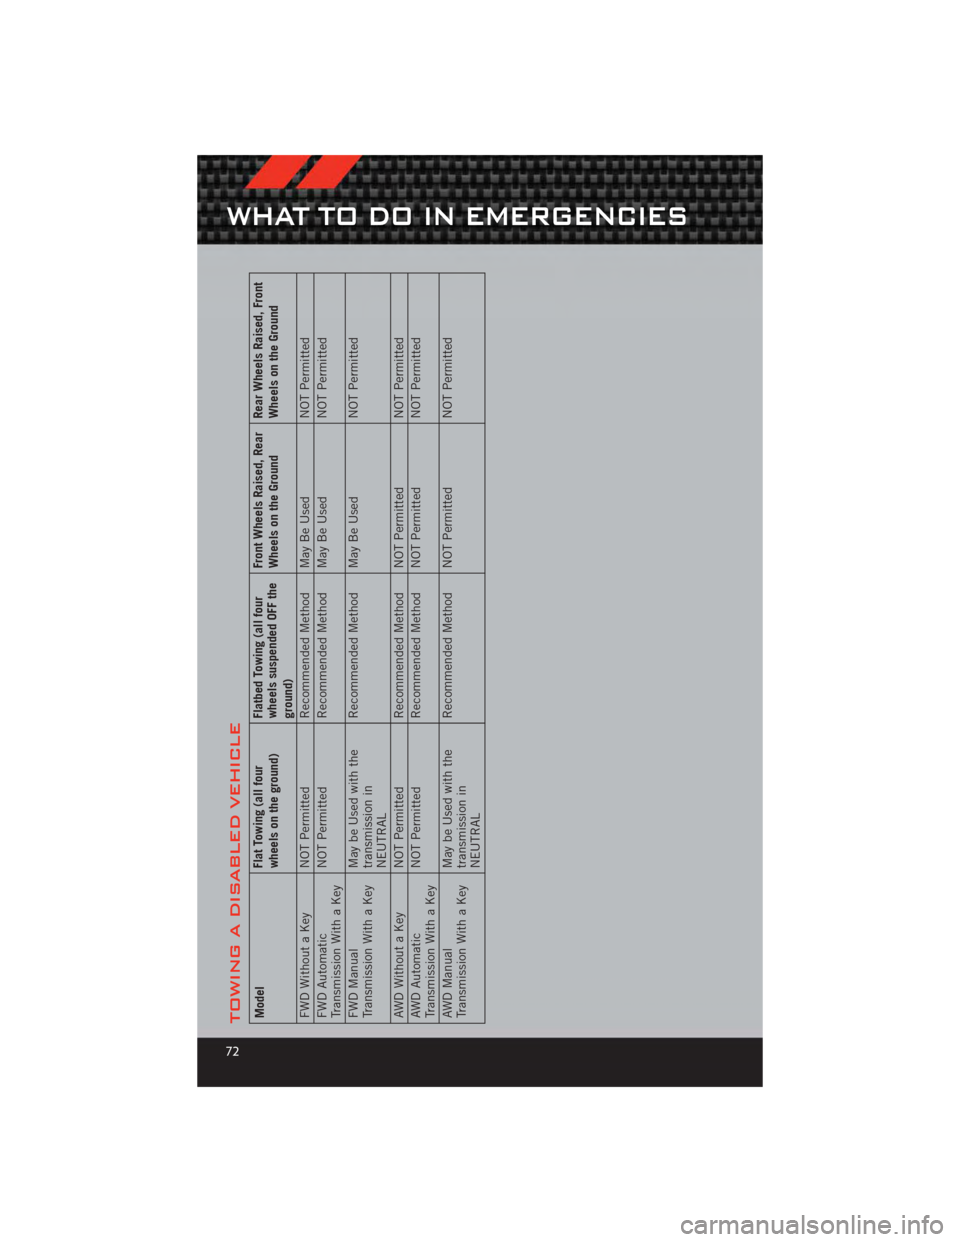
TOWING A DISABLED VEHICLEModelFlat Towing (all four
wheels on the ground)Flatbed Towing (all four
wheels suspended OFF the
ground)Front Wheels Raised, Rear
Wheels on the Ground
Rear Wheels Raised, Front
Wheels on the Ground
FWD Without a Key NOT Permitted Recommended Method May Be UsedNOT Permitted
FWD Automatic
Transmission With a Key NOT Permitted
Recommended Method May Be Used NOT Permitted
FWD Manual
Transmission With a Key May be Used with the
transmission in
NEUTRALRecommended Method May Be Used
NOT Permitted
AWD Without a Key NOT Permitted Recommended Method NOT PermittedNOT Permitted
AWD Automatic
Transmission With a Key NOT Permitted
Recommended Method NOT Permitted NOT Permitted
AWD Manual
Transmission With a Key May be Used with the
transmission in
NEUTRALRecommended Method NOT Permitted
NOT Permitted
WHAT TO DO IN EMERGENCIES
72
Page 91 of 100
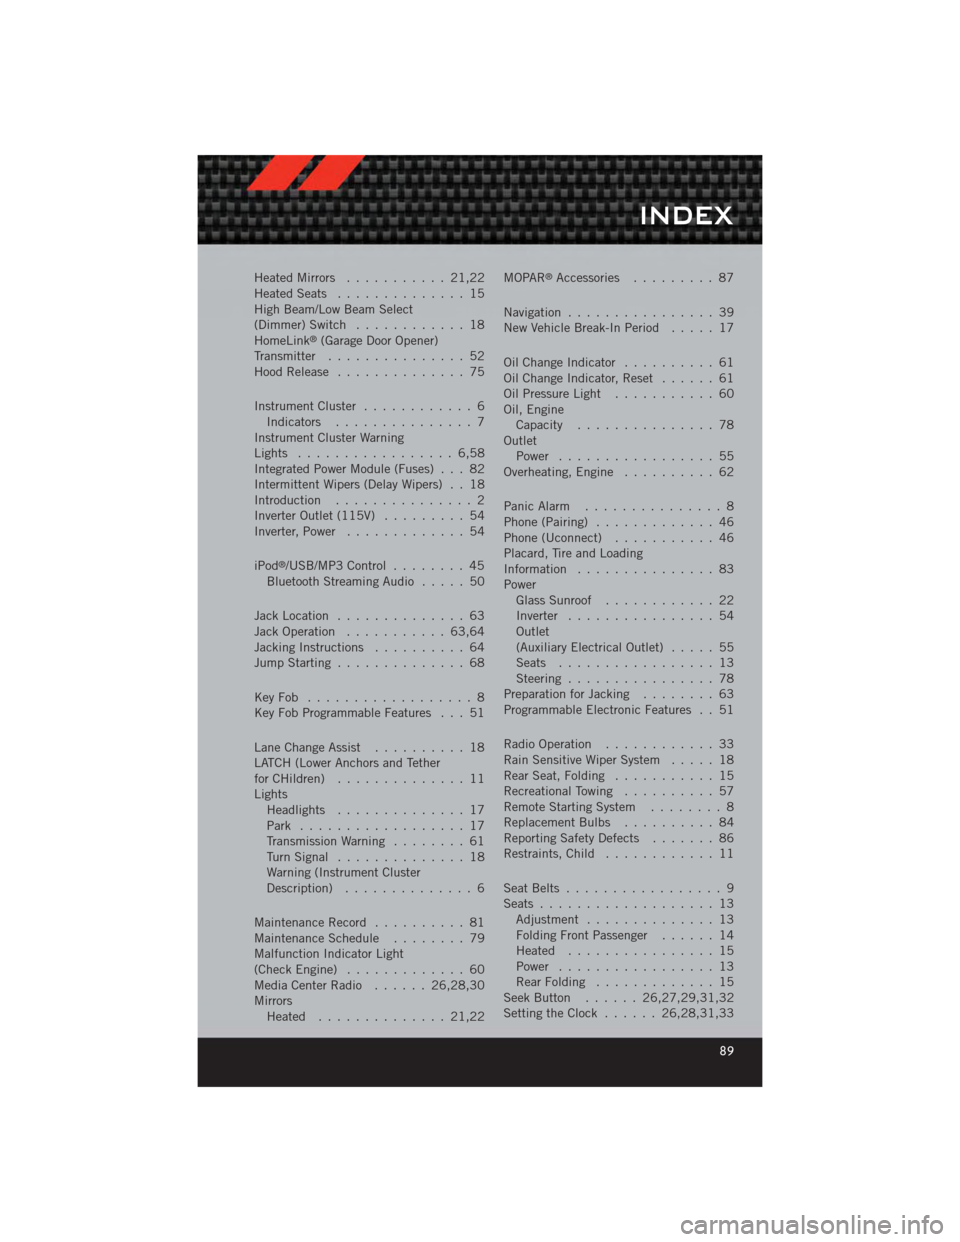
Heated Mirrors........... 21,22
Heated Seats .............. 15
High Beam/Low Beam Select
(Dimmer) Switch ............ 18
HomeLink
®(Garage Door Opener)
Transmitter ............... 52
Hood Release .............. 75
Instrument Cluster ............ 6
Indicators ............... 7
Instrument Cluster Warning
Lights ................. 6,58
Integrated Power Module (Fuses) . . . 82
Intermittent Wipers (Delay Wipers) . . 18
Introduction ............... 2
Inverter Outlet (115V) ......... 54
Inverter, Power ............. 54
iPod
®/USB/MP3 Control ........ 45
Bluetooth Streaming Audio ..... 50
Jack Location .............. 63
Jack Operation ........... 63,64
Jacking Instructions .......... 64
Jump Starting .............. 68
KeyFob .................. 8
Key Fob Programmable Features . . . 51
Lane Change Assist .......... 18
LATCH (Lower Anchors and Tether
forCHildren) .............. 11
Lights Headlights .............. 17
Park .................. 17
Transmission Warning ........ 61
TurnSignal .............. 18
Warning (Instrument Cluster
Description) .............. 6
Maintenance Record .......... 81
MaintenanceSchedule ........ 79
Malfunction Indicator Light
(CheckEngine) ............. 60
MediaCenterRadio ...... 26,28,30
Mirrors Heated .............. 21,22 MOPAR
®Accessories
......... 87
Navigation ................ 39
New Vehicle Break-In Period ..... 17
Oil Change Indicator .......... 61
Oil Change Indicator, Reset ...... 61
Oil Pressure Light ........... 60
Oil, Engine Capacity ............... 78
Outlet Power ................. 55
Overheating, Engine .......... 62
Panic Alarm ............... 8
Phone (Pairing) ............. 46
Phone (Uconnect) ........... 46
Placard, Tire and Loading
Information ............... 83
Power Glass Sunroof ............ 22
Inverter ................ 54
Outlet
(Auxiliary Electrical Outlet) ..... 55
Seats ................. 13
Steering ................ 78
Preparation for Jacking ........ 63
Programmable Electronic Features . . 51
Radio Operation ............ 33
Rain Sensitive Wiper System ..... 18
Rear Seat, Folding ........... 15
Recreational Towing .......... 57
Remote Starting System ........ 8
ReplacementBulbs .......... 84
Reporting Safety Defects ....... 86
Restraints, Child ............ 11
Seat Belts ................. 9
Seats ................... 13
Adjustment .............. 13
Folding Front Passenger ...... 14
Heated ................ 15
Power ................. 13
RearFolding ............. 15
Seek Button ...... 26,27,29,31,32
Setting the Clock ...... 26,28,31,33
INDEX
89
Page 100 of 100
12PM491-926-AA
CaliberThird Edition
User Guide
guide
user
Download a free Vehicle Information App by visiting your
application store, Keyword (Dodge), or scanning the Microsoft Tag. To
put Microsoft Tags to work for you, use your mobile phone’s browser or App store to download a Microsoft Tag reader, like the free one
at www.gettag.mobi. Then follow the directions to scan the code.
Download a FREE electronic copy
of the Owner’s Manual or Warranty Booklet
by visiting the For Owner's tab at:
www.dodge.com (U.S.)
www.dodge.ca (Canada)
Ge tthe free mo bile appf or your phone
http:/ /getta g.mo bi
918918_12c_Dodge_Caliber_UserGuide_101811.indd 110/18/11 9:37 AM