lock DODGE CHALLENGER 2011 3.G User Guide
[x] Cancel search | Manufacturer: DODGE, Model Year: 2011, Model line: CHALLENGER, Model: DODGE CHALLENGER 2011 3.GPages: 88, PDF Size: 4.02 MB
Page 8 of 88
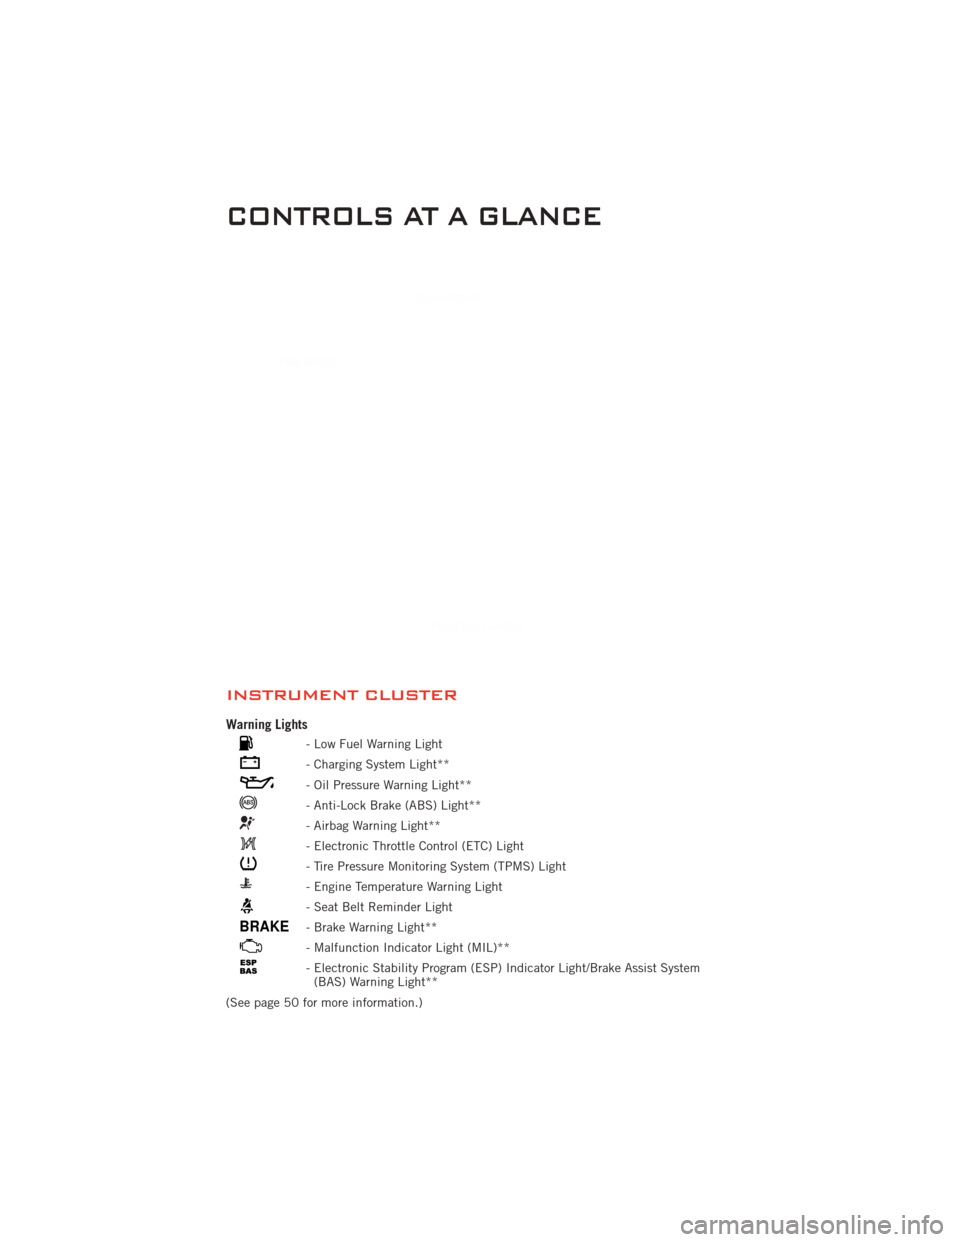
INSTRUMENT CLUSTER
Warning Lights
- Low Fuel Warning Light
- Charging System Light**
- Oil Pressure Warning Light**
- Anti-Lock Brake (ABS) Light**
- Airbag Warning Light**
- Electronic Throttle Control (ETC) Light
- Tire Pressure Monitoring System (TPMS) Light
- Engine Temperature Warning Light
- Seat Belt Reminder Light
BRAKE- Brake Warning Light**
- Malfunction Indicator Light (MIL)**
- Electronic Stability Program (ESP) Indicator Light/Brake Assist System(BAS) Warning Light**
(See page 50 for more information.)
CONTROLS AT A GLANCE
6
Page 10 of 88
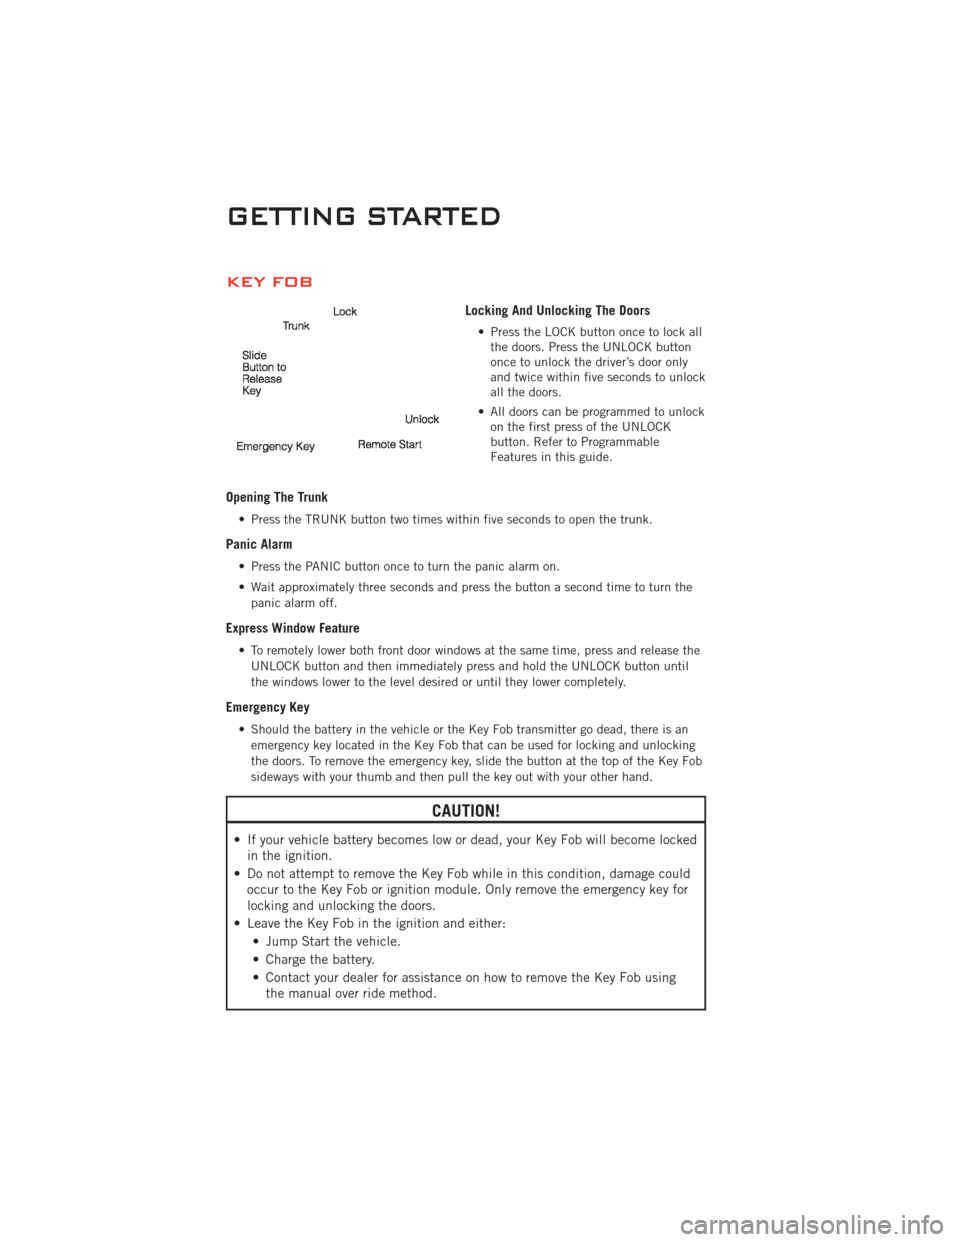
KEY FOB
Locking And Unlocking The Doors
• Press the LOCK button once to lock allthe doors. Press the UNLOCK button
once to unlock the driver’s door only
and twice within five seconds to unlock
all the doors.
• All doors can be programmed to unlock on the first press of the UNLOCK
button. Refer to Programmable
Features in this guide.
Opening The Trunk
• Press the TRUNK button two times within five seconds to open the trunk.
Panic Alarm
• Press the PANIC button once to turn the panic alarm on.
• Wait approximately three seconds and press the button a second time to turn the
panic alarm off.
Express Window Feature
• To remotely lower both front door windows at the same time, press and release theUNLOCK button and then immediately press and hold the UNLOCK button until
the windows lower to the level desired or until they lower completely.
Emergency Key
• Should the battery in the vehicle or the Key Fob transmitter go dead, there is anemergency key located in the Key Fob that can be used for locking and unlocking
the doors. To remove the emergency key, slide the button at the top of the Key Fob
sideways with your thumb and then pull the key out with your other hand.
CAUTION!
• If your vehicle battery becomes low or dead, your Key Fob will become lockedin the ignition.
• Do not attempt to remove the Key Fob while in this condition, damage could occur to the Key Fob or ignition module. Only remove the emergency key for
locking and unlocking the doors.
• Leave the Key Fob in the ignition and either: • Jump Start the vehicle.
• Charge the battery.
• Contact your dealer for assistance on how to remove the Key Fob usingthe manual over ride method.
GETTING STARTED
8
Page 11 of 88
WARNING!
• Leaving unattended children in a vehicle is dangerous for a number ofreasons. A child or others could be severely injured or killed. Children should
be warned not to touch the parking brake, brake pedal, or the shift lever. Do
not leave the Key Fob inside the vehicle or in the ignition. A child could start
the vehicle, operate power windows, other controls, or move the vehicle.
• Do not leave children or animals inside parked vehicles in hot weather. Interior heat build-up may cause them to be severely injured or killed.
• Keep Key Fob transmitters away from children. Operation of the Remote Start System, windows, door locks or other controls could cause serious injury or
death.
REMOTE START
• Press the REMOTE START buttonx2twice within five seconds. Pressing the
REMOTE START button a third time shuts the engine off.
• To drive the vehicle, press the UNLOCK button, insert the Key Fob in the ignition and turn to the ON/RUN position.
• With remote start, the engine will only run for 15 minutes (timeout) unless the ignition Key Fob is placed in the ON/RUN position.
• The vehicle must be started with the Key Fob after two consecutive timeouts.
WARNING!
• Do not start or run an engine in a closed garage or confined area. Exhaust gas contains Carbon Monoxide (CO) which is odorless and colorless. Carbon
Monoxide is poisonous and can cause you or others to be severely injured or
killed when inhaled.
• Keep Key Fob transmitters away from children. Operation of the Remote Start System, windows, door locks or other controls could cause you and others to
be severely injured or killed.
KEYLESS ENTER-N-GO
• The Keyless Enter-N-Go system is an enhancement to the vehicle's Key Fob. This
feature allows you to lock and unlock the vehicle's door(s) and trunk without
having to press the Key Fob lock or unlock buttons, as well as starting and
stopping the vehicle with the press of a button.
To Unlock From The Driver or Passenger Side:
• With a valid Keyless Enter-N-Go Key Fob located outside the vehicle and within5 ft (1.5m) of the driver or passenger side door handle, grab either front door
handle to unlock the door automatically.
GETTING STARTED
9
Page 12 of 88
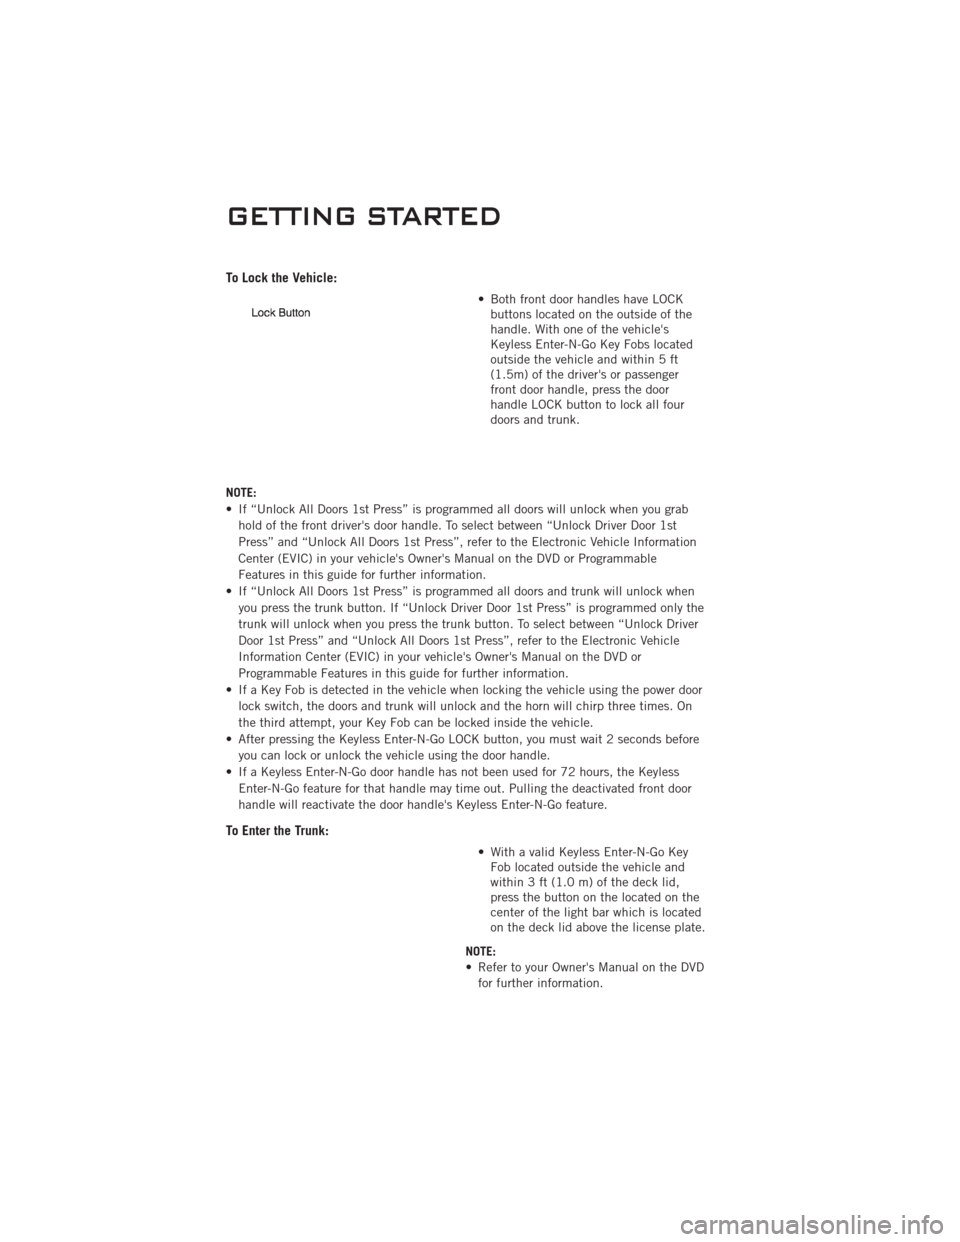
To Lock the Vehicle:
• Both front door handles have LOCKbuttons located on the outside of the
handle. With one of the vehicle's
Keyless Enter-N-Go Key Fobs located
outside the vehicle and within 5 ft
(1.5m) of the driver's or passenger
front door handle, press the door
handle LOCK button to lock all four
doors and trunk.
NOTE:
• If “Unlock All Doors 1st Press” is programmed all doors will unlock when you grab hold of the front driver's door handle. To select between “Unlock Driver Door 1st
Press” and “Unlock All Doors 1st Press”, refer to the Electronic Vehicle Information
Center (EVIC) in your vehicle's Owner's Manual on the DVD or Programmable
Features in this guide for further information.
• If “Unlock All Doors 1st Press” is programmed all doors and trunk will unlock when you press the trunk button. If “Unlock Driver Door 1st Press” is programmed only the
trunk will unlock when you press the trunk button. To select between “Unlock Driver
Door 1st Press” and “Unlock All Doors 1st Press”, refer to the Electronic Vehicle
Information Center (EVIC) in your vehicle's Owner's Manual on the DVD or
Programmable Features in this guide for further information.
• If a Key Fob is detected in the vehicle when locking the vehicle using the power door lock switch, the doors and trunk will unlock and the horn will chirp three times. On
the third attempt, your Key Fob can be locked inside the vehicle.
• After pressing the Keyless Enter-N-Go LOCK button, you must wait 2 seconds before you can lock or unlock the vehicle using the door handle.
• If a Keyless Enter-N-Go door handle has not been used for 72 hours, the Keyless Enter-N-Go feature for that handle may time out. Pulling the deactivated front door
handle will reactivate the door handle's Keyless Enter-N-Go feature.
To Enter the Trunk:
• With a valid Keyless Enter-N-Go KeyFob located outside the vehicle and
within 3 ft (1.0 m) of the deck lid,
press the button on the located on the
center of the light bar which is located
on the deck lid above the license plate.
NOTE:
• Refer to your Owner's Manual on the DVD for further information.
GETTING STARTED
10
Page 14 of 88
Additional Functions
NOTE:The following functions are with the driver’s foot OFF the Brake Pedal/Clutch
Pedal (Transmission in PARK or NEUTRAL Position).
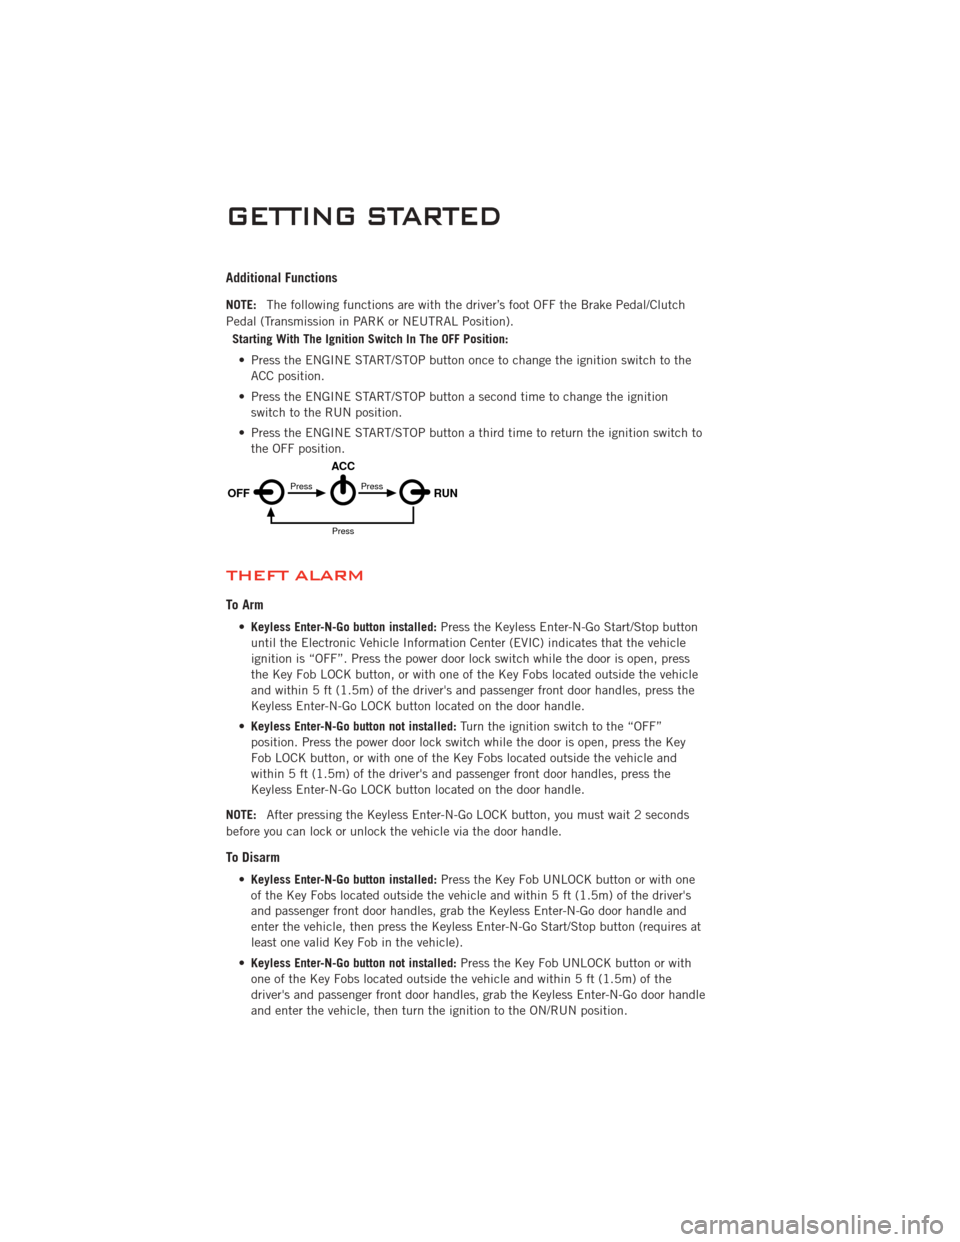
Starting With The Ignition Switch In The OFF Position:
• Press the ENGINE START/STOP button once to change the ignition switch to the ACC position.
• Press the ENGINE START/STOP button a second time to change the ignition switch to the RUN position.
• Press the ENGINE START/STOP button a third time to return the ignition switch to the OFF position.
THEFT ALARM
To Arm
•Keyless Enter-N-Go button installed: Press the Keyless Enter-N-Go Start/Stop button
until the Electronic Vehicle Information Center (EVIC) indicates that the vehicle
ignition is “OFF”. Press the power door lock switch while the door is open, press
the Key Fob LOCK button, or with one of the Key Fobs located outside the vehicle
and within 5 ft (1.5m) of the driver's and passenger front door handles, press the
Keyless Enter-N-Go LOCK button located on the door handle.
• Keyless Enter-N-Go button not installed: Turn the ignition switch to the “OFF”
position. Press the power door lock switch while the door is open, press the Key
Fob LOCK button, or with one of the Key Fobs located outside the vehicle and
within 5 ft (1.5m) of the driver's and passenger front door handles, press the
Keyless Enter-N-Go LOCK button located on the door handle.
NOTE: After pressing the Keyless Enter-N-Go LOCK button, you must wait 2 seconds
before you can lock or unlock the vehicle via the door handle.
To Disarm
• Keyless Enter-N-Go button installed: Press the Key Fob UNLOCK button or with one
of the Key Fobs located outside the vehicle and within 5 ft (1.5m) of the driver's
and passenger front door handles, grab the Keyless Enter-N-Go door handle and
enter the vehicle, then press the Keyless Enter-N-Go Start/Stop button (requires at
least one valid Key Fob in the vehicle).
• Keyless Enter-N-Go button not installed: Press the Key Fob UNLOCK button or with
one of the Key Fobs located outside the vehicle and within 5 ft (1.5m) of the
driver's and passenger front door handles, grab the Keyless Enter-N-Go door handle
and enter the vehicle, then turn the ignition to the ON/RUN position.
OFF RUN
ACCPress
Press
Press
GETTING STARTED
12
Page 21 of 88
WARNING!
• Be certain that the seatback is securely locked into position. If the seatbackis not securely locked into position, the seat will not provide the proper
stability for child seats and/or passengers. An improperly latched seat could
cause serious injury.
• The cargo area in the rear of the vehicle (with the rear seatbacks in the locked-up or folded-down position) should not be used as a play area by
children when the vehicle is in motion. They could be seriously injured in a
collision. Children should be seated and using the proper restraint system.
HEATED SEATS
Front Heated Seats
• The controls for front heated seats arelocated on the center instrument panel
below the climate controls.
• Press the switch once to select High-level heating. Press the switch a
second time to select Low-level
heating. Press the switch a third time
to shut the heating elements Off.
• If the High-level setting is selected, the system will automatically switch to Low-level after approximately 60 minutes. The Low-level setting will turn Off
automatically after approximately 45 minutes.
WARNING!
• Persons who are unable to feel pain to the skin because of advanced age,chronic illness, diabetes, spinal cord injury, medication, alcohol use,
exhaustion or other physical conditions must exercise care when using the
seat heater. It may cause burns even at low temperatures, especially if used
for long periods of time.
• Do not place anything on the seat that insulates against heat, such as a blanket or cushion. This may cause the seat heater to overheat. Sitting in a
seat that has been overheated could cause serious burns due to the increased
surface temperature of the seat.
GETTING STARTED
19
Page 22 of 88
TILT / TELESCOPING STEERING COLUMN
• The tilt/telescoping control handle islocated below the steering wheel at the
end of the steering column.
• To unlock the steering column, push the lever downward (toward the floor).
• To tilt the steering column, move the steering wheel upward or downward as
desired. To lengthen or shorten the
steering column, pull the steering
wheel outward or push it inward as
desired.
• To lock the steering column in position, push the lever upward until fully engaged.
WARNING!
Do not adjust the steering wheel while driving. The tilt/telescoping adjustment
must be locked while driving. Adjusting the steering wheel while driving or
driving without the tilt/telescoping adjustment locked could cause the driver to
lose control of the vehicle. Failure to follow this warning may result in you and
others being severely injured or killed.
GETTING STARTED
20
Page 33 of 88
NOTE:Your radio may not be equipped with the Uconnect™ Voice Command and
Uconnect™ Phone features. To determine if your radio has these features, press the
Voice Command button on the radio. You will hear a voice prompt if you have the
feature, or see a message on the radio stating “Uconnect Phone not available” if you do
not.
• Your radio has many features that add to the comfort and convenience of you andyour passengers. Some of these radio features should not be used when driving
because they take your eyes from the road or your attention from driving.
• The radio sales code is located on the lower right side of the radio faceplate.
Seek Up/Down Buttons
• Press to seek through radio stations in AM, FM, or SAT bands. Seek through tracks in CD mode.
• Hold either button to bypass stations without stopping.
Audio Settings
• Press the TUNE/SCROLL control knob and BASS, MID, TREBLE, BALANCE and FADE will display. Rotate the TUNE/SCROLL control knob to select the desired
setting.
Audio Jack
• The Audio Jack allows a portable device, such as an MP3 player or a cassetteplayer, to be plugged into the radio and utilize the vehicle’s audio system, using a
3.5 mm audio cable, to amplify the source and play through the vehicle speakers.
• Pressing the AUX button will change the mode to auxiliary device if the Audio Jack is connected, allowing the music from your portable device to be heard through the
vehicle's speakers.
• The functions of the portable device are controlled using the device buttons. The volume may be controlled using the radio or portable device.
Clock Setting
• Press and hold the TIME button until the hours blink; turn the TUNE/SCROLLcontrol knob to set the hours.
• Press the TUNE/SCROLL control knob until the minutes begin to blink; turn the TUNE/SCROLL control knob to set the minutes.
• Press the TUNE/SCROLL control knob to save the time change.
• To exit, press any button/knob or wait five seconds.
Store Radio Presets
• Press the SET/RND button once and SET 1 will show in the display. Then select the button (1–6).
• A second station may be added to each push button. Press the SET/RND button twice and SET 2 will show in the display, then select button (1–6).
ELECTRONICS
31
Page 35 of 88
NOTE:Your radio may not be equipped with the Uconnect™ Voice Command and
Uconnect™ Phone features. To determine if your radio has these features, press the
Voice Command button on the radio. You will hear a voice prompt if you have the
feature, or see a message on the radio stating “Uconnect Phone not available” if you do
not.
• Your radio has many features that add to the comfort and convenience of you andyour passengers. Some of these radio features should not be used when driving
because they take your eyes from the road or your attention from driving.
• The radio sales code is located on the lower right side of the radio faceplate.
Seek Up/Down
• Media Center 730N: Press the SEEK hard-key to seek through radio stations in AM, FM, or SAT bands. Seek through tracks in CD or iPod®modes or through
songs in the HDD playlist.
• Media Center 430/430N: Press the SEEK up/down arrow soft-keys to change the currently playing station in AM, FM or SAT bands. Seek through tracks in CD or
iPod
®modes or through songs in the HDD playlist.
Audio Jack
• The Audio Jack allows a portable device, such as an MP3 player or a cassetteplayer, to be plugged into the radio and utilize the vehicle’s audio system, using a
3.5 mm audio cable, to amplify the source and play through the vehicle speakers.
• Pressing the AUX button will change the mode to auxiliary device if the Audio Jack is connected, allowing the music from your portable device to be heard through the
vehicle's speakers.
• The functions of the portable device are controlled using the device buttons. The volume may be controlled using the radio or portable device.
Clock Setting
• Turn the radio on, then touch the screen where the time is displayed.
• Touch the USER CLOCK soft-key (Navigation radio only).
• To adjust the hours, touch either the HOUR FORWARD or HOUR BACKWARDsoft-key.
• To adjust the minutes, touch either the MINUTE FORWARD or MINUTE BACKWARD soft-key.
• To save the new time setting, touch the screen where the word “Save” is displayed.
Store Radio Presets
• Media Center 730N: Press the RADIO/MEDIA hard-key until AM FM SAT is displayed in the upper left corner of the screen.
• Media Center 430/430N: Press the RADIO hard-key to display AM FM SAT in the upper left corner of the screen.
• Select the radio band by touching either the AM, FM, or SAT soft-key.
• Find the station to store by either pressing the SEEK UP/DOWN hard-keys (Media Center 730N), touching the right and left arrow soft-keys (Media Center
430/430N), touching the SCAN soft-key, or by using the DIRECT TUNE soft-key.
ELECTRONICS
33
Page 46 of 88
PROGRAMMABLE FEATURES
Electronic Vehicle Information Center (EVIC) – If Equipped
• The EVIC can be used to program the following Personal Settings. Press andrelease the MENUbutton until Personal Settings displays, then press the
UP
or DOWNbuttons to scroll through the settings. Press the
SELECT
button to change the setting.
• Language • Hill Start Assist (HSA)
• Unlock Doors Automatically on Exit • Turn Headlights On with Remote Key Unlock
• Lock Door Automatically at 15 MPH (24 km/h) • Delay Power Off to Accessories Until
Exit
• Remote Key Unlock • Turn-by-Turn Navigation
• Sound Horn with Remote Key Lock • Display ECO
• Flash Lights with Remote Key Lock • Keyless Enter-N-Go
• Headlamps On with Wipers (Available with Auto Headlamps Only) • Display Units of Measure In
• Delay Turning Headlights Off
Key Fob Programmable Features
• The following features may also be programmed by using the Key Fob transmitter or the ignition switch and driver's door lock switch.
NOTE: Pressing the LOCK button while you are inside the vehicle will activate the
Vehicle Security Alarm. Opening a door with the Vehicle Security Alarm activated will
cause the alarm to sound. Press the UNLOCK button to deactivate the Vehicle Security
Alarm.
Unlock On First Press• To unlock either the driver's side, or all doors, on the first press of the UNLOCK button:
• Press and hold the LOCK button for at least 4 seconds, but no longer than
10 seconds. Then, press and hold the UNLOCK button while still holding the
LOCK button.
• Release both buttons at the same time.
Auto Unlock Doors On Exit • To have all of the vehicle doors unlock when any door is opened: • Enter your vehicle and close all the doors.
• Cycle the ignition switch between LOCK and ON and then back to LOCK fourtimes, ending up in the LOCK position (do not start the engine).
• Press the power door UNLOCK switch to unlock the doors. A single chime will indicate that programming is complete.
ELECTRONICS
44