stop start DODGE CHALLENGER 2012 3.G User Guide
[x] Cancel search | Manufacturer: DODGE, Model Year: 2012, Model line: CHALLENGER, Model: DODGE CHALLENGER 2012 3.GPages: 124, PDF Size: 4.99 MB
Page 11 of 124
WARNING!
• Leaving unattended children in a vehicle is dangerous for a number ofreasons. A child or others could be severely injured or killed. Children should
be warned not to touch the parking brake, brake pedal, or the shift lever. Do
not leave the Key Fob inside the vehicle or in the ignition. A child could start
the vehicle, operate power windows, other controls, or move the vehicle.
• Do not leave children or animals inside parked vehicles in hot weather. Interior heat build-up may cause them to be severely injured or killed.
• Keep Key Fob transmitters away from children. Operation of the Remote Start System, windows, door locks or other controls could cause serious injury or
death.
REMOTE START
• Press the REMOTE START buttonx2on the Key Fob twice within five seconds.
Pressing the REMOTE START button a third time shuts the engine off.
• To drive the vehicle, press the UNLOCK button, insert the Key Fob in the ignition and turn to the ON/RUN position.
• With remote start, the engine will only run for 15 minutes (timeout) unless the ignition Key Fob is placed in the ON/RUN position.
• The vehicle must be started with the Key Fob after two consecutive timeouts.
WARNING!
• Do not start or run an engine in a closed garage or confined area. Exhaust gas contains Carbon Monoxide (CO) which is odorless and colorless. Carbon
Monoxide is poisonous and can cause you or others to be severely injured or
killed when inhaled.
• Keep Key Fob transmitters away from children. Operation of the Remote Start System, windows, door locks or other controls could cause you and others to
be severely injured or killed.
KEYLESS ENTER-N-GO™
• The Keyless Enter-N-Go™ system is an enhancement to the vehicle's Key Fob.This feature allows you to lock and unlock the vehicle's door(s) and trunk without
having to press the Key Fob lock or unlock buttons, as well as starting and
stopping the vehicle with the press of a button.
GETTING STARTED
9
Page 13 of 124
• If a Keyless Enter-N-Go™ door handle has not been used for 72 hours, the KeylessEnter-N-Go™ feature for that handle may time out. Pulling the deactivated front door
handle will reactivate the door handle's Keyless Enter-N-Go™ feature.
To Enter the Trunk:
• With a valid Keyless Enter-N-Go™ KeyFob located outside the vehicle and
within 3 ft (1.0 m) of the deck lid,
press the button located on the center
of the light bar which is located on the
deck lid above the license plate.
NOTE:
• Refer to your Owner's Manual on the DVD for further information.
Engine Starting/Stopping - Automatic Transmission
Starting
• Place the shift lever in PARK orNEUTRAL.
• While pressing the brake pedal, press the ENGINE START/STOP button once.
If the engine fails to start, the starter
will disengage automatically after
10 seconds.
• To stop the cranking of the engine prior to the engine starting, press the button
again.
Stopping • Place the shift lever in PARK.
• Press the ENGINE START/STOP button once. The ignition switch will return to theOFF position.
• If the shift lever is not in PARK, the ENGINE START/STOP button must be held for two
seconds and vehicle speed must be above 5 mph (8 km/h) before the engine will shut
off.
NOTE:
• If the ignition switch is left in the ACC or RUN (engine not running) position and the transmission is in PARK, the system will automatically time out after 30 minutes of
inactivity and the ignition will switch to the OFF position.
GETTING STARTED
11
Page 14 of 124
Engine Starting/Stopping - Manual Transmission
Starting• Press and hold the clutch pedal while pressing and holding the ENGINESTART/STOP button. Release the button when the engine starts. If the engine fails
to start within 15 seconds, release the button, wait 10 to 15 seconds, then repeat.
• To stop the cranking of the engine prior to the engine starting, release the button.
Stopping • With the vehicle stopped, place the shift lever in NEUTRAL.
• Press the ENGINE START/STOP button once. The ignition switch will return to theOFF position.
• If the vehicle speed is above 5 mph (8 km/h), the ENGINE START/STOP button must be
held for two seconds before the engine will shut off. The ignition switch position will
remain in the ACC position until the vehicle is stopped and the button is pressed twice
to the OFF position.
NOTE:
• If the ignition switch is left in the ACC position, the system will automatically time out after 60 minutes of inactivity and the ignition will switch to the OFF position.
Additional Functions
NOTE:
• The following functions are with the driver’s foot OFF the Brake Pedal/Clutch Pedal(Transmission in PARK or NEUTRAL Position).
Starting With The Ignition Switch In The OFF Position:
• Press the ENGINE START/STOP button once to change the ignition switch to theACC position.
• Press the ENGINE START/STOP button a second time to change the ignition switch to the RUN position.
• Press the ENGINE START/STOP button a third time to return the ignition switch to the OFF position.
OFF RUN
ACCPress
Press
Press
GETTING STARTED
12
Page 15 of 124
THEFT ALARM
To Arm
•Keyless Enter-N-Go™ button installed: Press the Keyless Enter-N-Go™ Start/Stop
button until the Electronic Vehicle Information Center (EVIC) indicates that the
vehicle ignition is “OFF”. Press the power door lock switch while the door is open,
press the Key Fob LOCK button, or with one of the Key Fobs located outside the
vehicle and within 5 ft (1.5 m) of the driver's and passenger front door handles,
press the Keyless Enter-N-Go™ LOCK button located on the door handle.
• Keyless Enter-N-Go™ button not installed: Turn the ignition switch to the “OFF”
position. Press the power door lock switch while the door is open, press the Key
Fob LOCK button, or with one of the Key Fobs located outside the vehicle and
within 5 ft (1.5 m) of the driver's and passenger front door handles, press the
Keyless Enter-N-Go™ LOCK button located on the door handle.
NOTE: After pressing the Keyless Enter-N-Go™ LOCK button, you must wait two
seconds before you can lock or unlock the vehicle via the door handle.
To Disarm
• Keyless Enter-N-Go™ button installed: Press the Key Fob UNLOCK button or with
one of the Key Fobs located outside the vehicle and within 5 ft (1.5 m) of the
driver's and passenger front door handles, grab the Keyless Enter-N-Go™ door
handle and enter the vehicle, then press the Keyless Enter-N-Go™ Start/Stop
button (requires at least one valid Key Fob in the vehicle).
• Keyless Enter-N-Go™ button not installed: Press the Key Fob UNLOCK button or with
one of the Key Fobs located outside the vehicle and within 5 ft (1.5 m) of the
driver's and passenger front door handles, grab the Keyless Enter-N-Go™ door
handle and enter the vehicle, then turn the ignition to the ON/RUN position.
SEAT BELT
• Be sure everyone in your vehicle is in a seat and using a seat belt properly.
• Position the lap belt across your thighs, below your abdomen. To remove slack in the lap portion, pull up a bit on the shoulder belt. To loosen the lap belt if it is too
tight, tilt the latch plate and pull on the lap belt. A snug belt reduces the risk of
sliding under the belt in a collision.
• Position the shoulder belt on your chest so that it is comfortable and not resting on your neck. The retractor will withdraw any slack in the belt.
• A shoulder belt placed behind you will not protect you from injury during a collision. You are more likely to hit your head in a collision if you do not wear your
shoulder belt. The lap and shoulder belt are meant to be used together.
• A belt that is too loose will not protect you properly. In a sudden stop you could move too far forward, increasing the possibility of injury. Wear your seat belt
snugly.
GETTING STARTED
13
Page 21 of 124
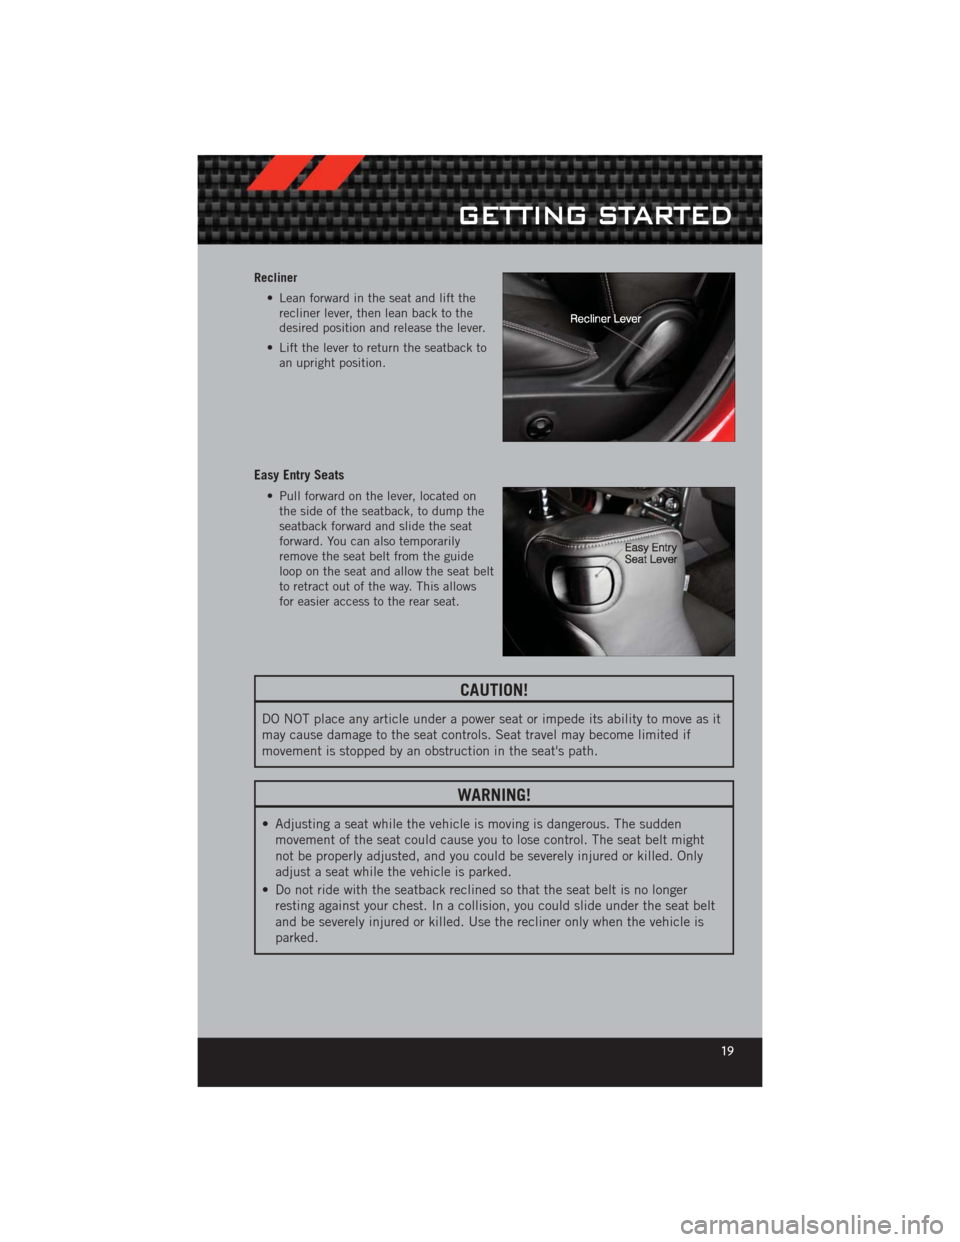
Recliner• Lean forward in the seat and lift therecliner lever, then lean back to the
desired position and release the lever.
• Lift the lever to return the seatback to an upright position.
Easy Entry Seats
• Pull forward on the lever, located onthe side of the seatback, to dump the
seatback forward and slide the seat
forward. You can also temporarily
remove the seat belt from the guide
loop on the seat and allow the seat belt
to retract out of the way. This allows
for easier access to the rear seat.
CAUTION!
DO NOT place any article under a power seat or impede its ability to move as it
may cause damage to the seat controls. Seat travel may become limited if
movement is stopped by an obstruction in the seat's path.
WARNING!
• Adjusting a seat while the vehicle is moving is dangerous. The suddenmovement of the seat could cause you to lose control. The seat belt might
not be properly adjusted, and you could be severely injured or killed. Only
adjust a seat while the vehicle is parked.
• Do not ride with the seatback reclined so that the seat belt is no longer resting against your chest. In a collision, you could slide under the seat belt
and be severely injured or killed. Use the recliner only when the vehicle is
parked.
GETTING STARTED
19
Page 39 of 124
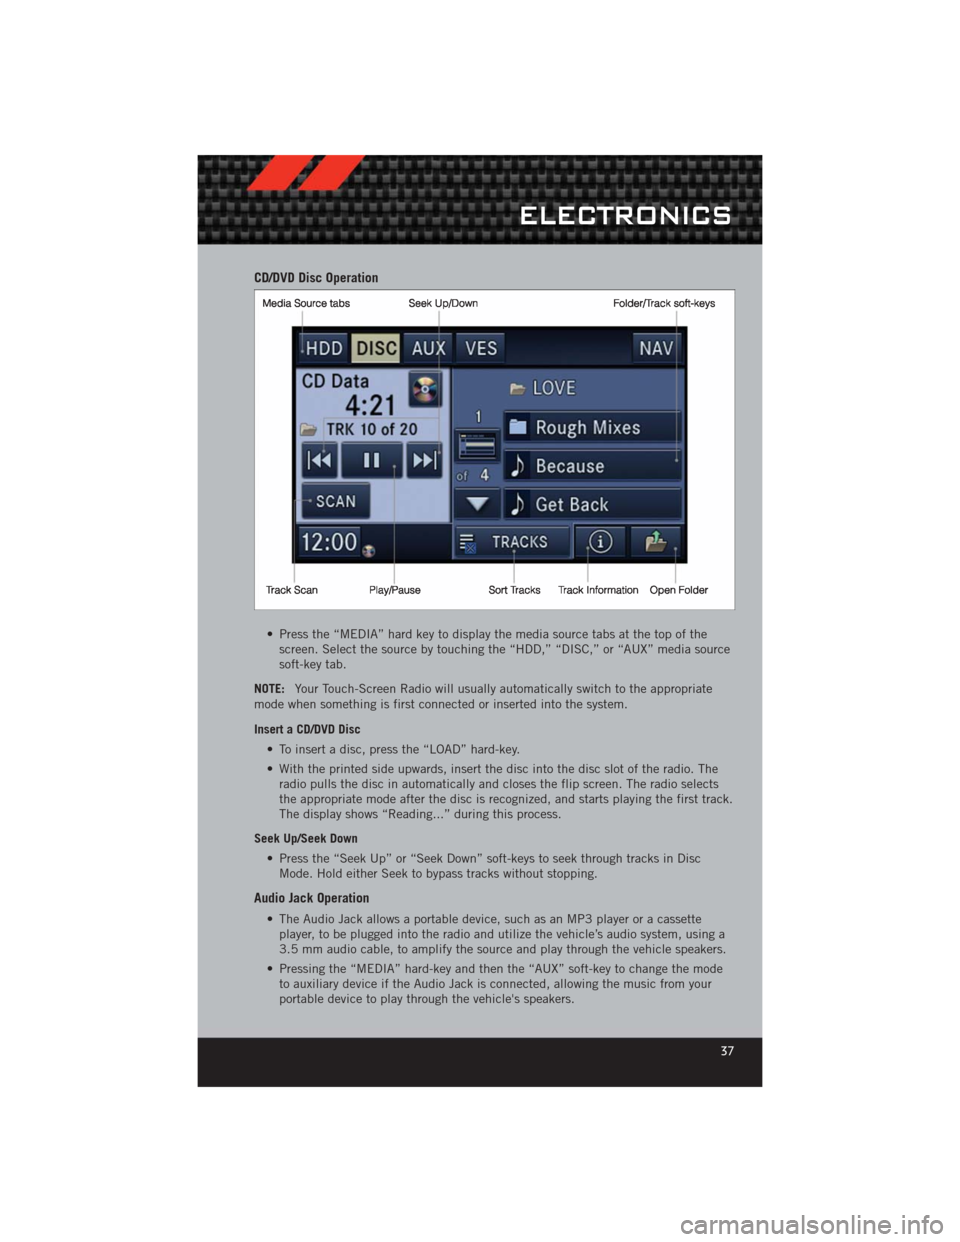
CD/DVD Disc Operation
• Press the “MEDIA” hard key to display the media source tabs at the top of thescreen. Select the source by touching the “HDD,” “DISC,” or “AUX” media source
soft-key tab.
NOTE: Your Touch-Screen Radio will usually automatically switch to the appropriate
mode when something is first connected or inserted into the system.
Insert a CD/DVD Disc
• To insert a disc, press the “LOAD” hard-key.
• With the printed side upwards, insert the disc into the disc slot of the radio. Theradio pulls the disc in automatically and closes the flip screen. The radio selects
the appropriate mode after the disc is recognized, and starts playing the first track.
The display shows “Reading...” during this process.
Seek Up/Seek Down • Press the “Seek Up” or “Seek Down” soft-keys to seek through tracks in DiscMode. Hold either Seek to bypass tracks without stopping.
Audio Jack Operation
• The Audio Jack allows a portable device, such as an MP3 player or a cassetteplayer, to be plugged into the radio and utilize the vehicle’s audio system, using a
3.5 mm audio cable, to amplify the source and play through the vehicle speakers.
• Pressing the “MEDIA” hard-key and then the “AUX” soft-key to change the mode to auxiliary device if the Audio Jack is connected, allowing the music from your
portable device to play through the vehicle's speakers.
ELECTRONICS
37
Page 48 of 124
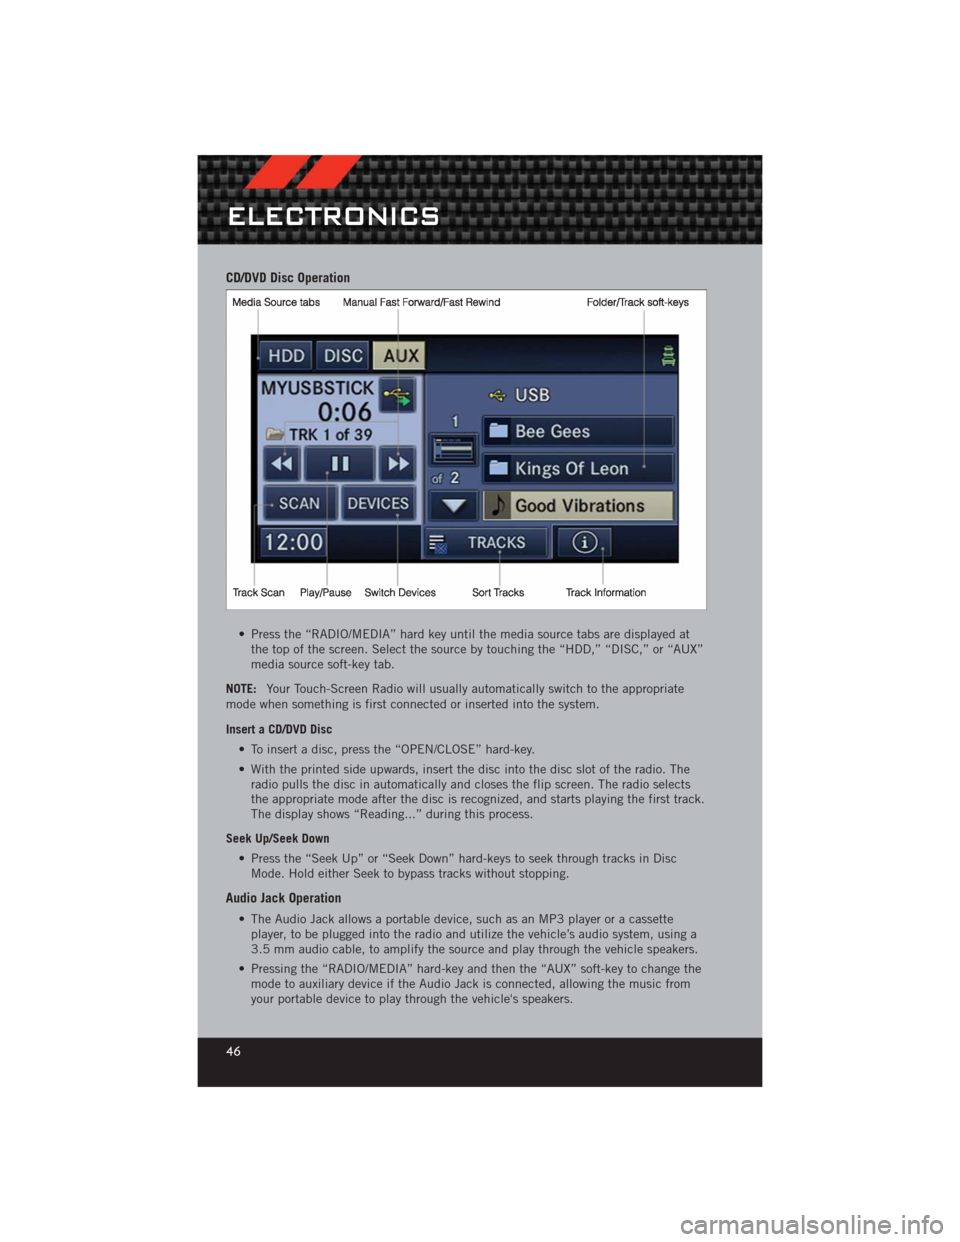
CD/DVD Disc Operation
• Press the “RADIO/MEDIA” hard key until the media source tabs are displayed atthe top of the screen. Select the source by touching the “HDD,” “DISC,” or “AUX”
media source soft-key tab.
NOTE: Your Touch-Screen Radio will usually automatically switch to the appropriate
mode when something is first connected or inserted into the system.
Insert a CD/DVD Disc
• To insert a disc, press the “OPEN/CLOSE” hard-key.
• With the printed side upwards, insert the disc into the disc slot of the radio. Theradio pulls the disc in automatically and closes the flip screen. The radio selects
the appropriate mode after the disc is recognized, and starts playing the first track.
The display shows “Reading...” during this process.
Seek Up/Seek Down • Press the “Seek Up” or “Seek Down” hard-keys to seek through tracks in DiscMode. Hold either Seek to bypass tracks without stopping.
Audio Jack Operation
• The Audio Jack allows a portable device, such as an MP3 player or a cassetteplayer, to be plugged into the radio and utilize the vehicle’s audio system, using a
3.5 mm audio cable, to amplify the source and play through the vehicle speakers.
• Pressing the “RADIO/MEDIA” hard-key and then the “AUX” soft-key to change the mode to auxiliary device if the Audio Jack is connected, allowing the music from
your portable device to play through the vehicle's speakers.
ELECTRONICS
46
Page 62 of 124
Memo Mode To switch to the voice recorder mode, say “Memo”. Thefollowing are common voice commands for this mode:
“New Memo” (to record a new memo) — During the recording,
you may press the Voice Command button
to stop recording. You proceed by saying one of the
following commands:
— “Save” (to save the memo)
— “Continue” (to continue recording)
— “Delete” (to delete the recording)
— “Play Memos” (to play previously recorded memos) — During
the playback you may press the Voice Command button
to stop playing memos. You proceed by saying one of the
following commands:
— “Repeat” (to repeat a memo)
— “Next” (to play the next memo)
— “Previous” (to play the previous memo)
— “Delete” (to delete a memo)
— “Delete All” (to delete all memos)
SMS (Text Messaging)
• If equipped with Uconnect™ Voice Command, your Media Center 430N & 730N radios may be able to play incoming Short Message Service (SMS) messages (text
messages) through the vehicle's sound system.
• It also allows you to respond by selecting from various pre-defined phrases.
• Not all phones are compatible with this feature. Refer to the phone compatibility list at www.UconnectPhone.com. Connected mobile phones must be
bluetooth-compatible, and paired with your radio.
• Press the “Voice Command” button
and after the BEEP, say “SMS” to get
started.
NOTE: To access the tutorial, press the “Voice Command” button
. After the
BEEP, say “tutorial”. Press any hard-key/button or touch the display (Touch-Screen
radio) to cancel the tutorial.
WARNING!
Any voice commanded system should be used only in safe driving conditions
following local laws and phone use. All attention should be kept on the roadway
ahead. Failure to do so may result in a collision causing you and others to be
severely injured or killed.
ELECTRONICS
60
Page 72 of 124
AUTOSTICK®
Steering Wheel Mounted Paddle Shifters Or Console Mounted Shifter
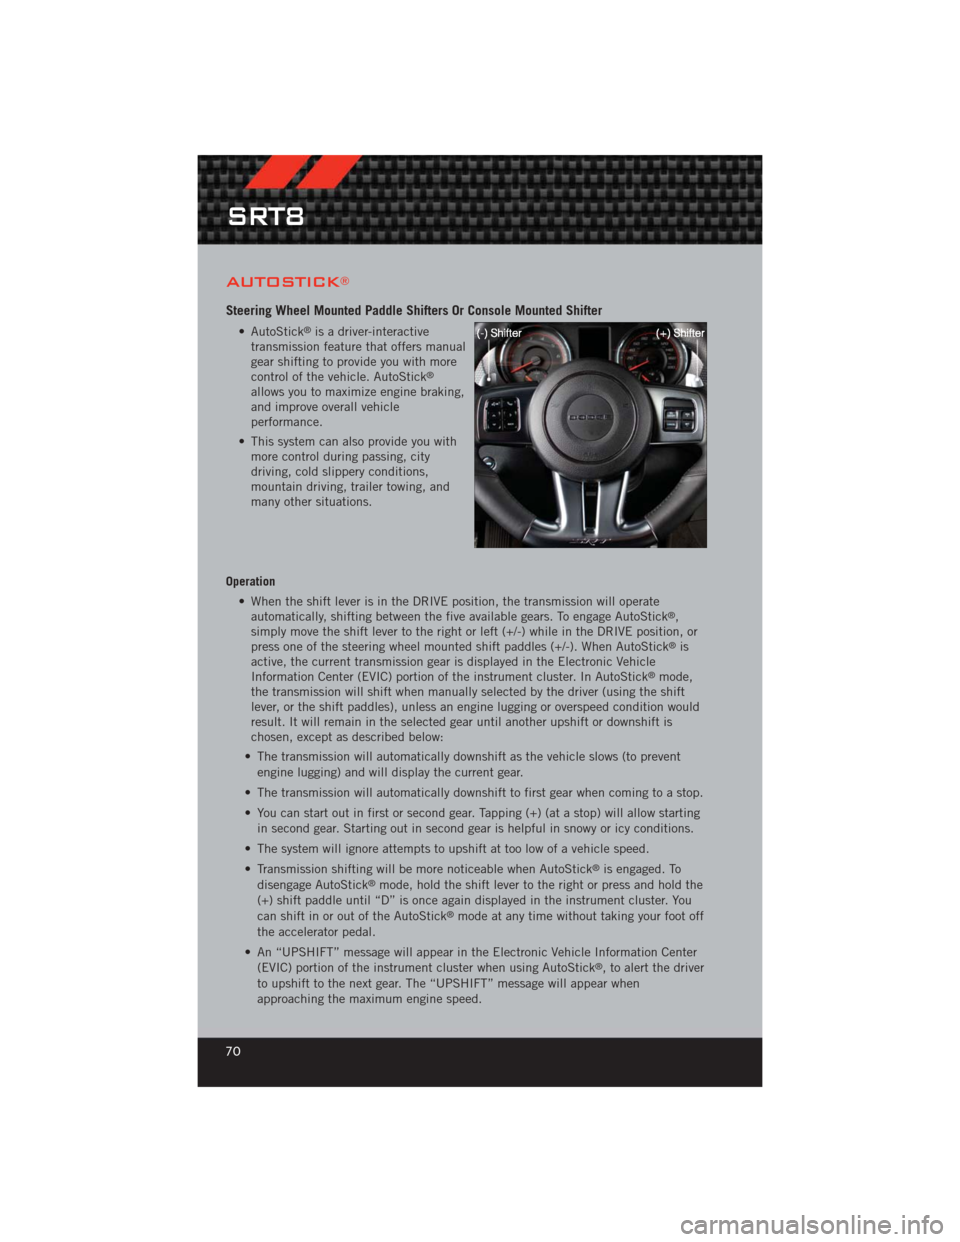
• AutoStick®is a driver-interactive
transmission feature that offers manual
gear shifting to provide you with more
control of the vehicle. AutoStick
®
allows you to maximize engine braking,
and improve overall vehicle
performance.
• This system can also provide you with more control during passing, city
driving, cold slippery conditions,
mountain driving, trailer towing, and
many other situations.
Operation • When the shift lever is in the DRIVE position, the transmission will operateautomatically, shifting between the five available gears. To engage AutoStick
®,
simply move the shift lever to the right or left (+/-) while in the DRIVE position, or
press one of the steering wheel mounted shift paddles (+/-). When AutoStick
®is
active, the current transmission gear is displayed in the Electronic Vehicle
Information Center (EVIC) portion of the instrument cluster. In AutoStick
®mode,
the transmission will shift when manually selected by the driver (using the shift
lever, or the shift paddles), unless an engine lugging or overspeed condition would
result. It will remain in the selected gear until another upshift or downshift is
chosen, except as described below:
• The transmission will automatically downshift as the vehicle slows (to prevent engine lugging) and will display the current gear.
• The transmission will automatically downshift to first gear when coming to a stop.
• You can start out in first or second gear. Tapping (+) (at a stop) will allow starting in second gear. Starting out in second gear is helpful in snowy or icy conditions.
• The system will ignore attempts to upshift at too low of a vehicle speed.
• Transmission shifting will be more noticeable when AutoStick
®is engaged. To
disengage AutoStick®mode, hold the shift lever to the right or press and hold the
(+) shift paddle until “D” is once again displayed in the instrument cluster. You
can shift in or out of the AutoStick
®mode at any time without taking your foot off
the accelerator pedal.
• An “UPSHIFT” message will appear in the Electronic Vehicle Information Center (EVIC) portion of the instrument cluster when using AutoStick
®, to alert the driver
to upshift to the next gear. The “UPSHIFT” message will appear when
approaching the maximum engine speed.
SRT8
70
Page 76 of 124
24-HOUR TOWING ASSISTANCE
• Dial toll-free 1-800-521-2779 or 1-800-363-4869 for Canadian residents.
• Provide your name, vehicle identification number and license plate number.
• Provide your location, including telephone number, from which you are calling.
• Briefly describe the nature of the problem and answer a few simple questions.
• You will be given the name of the service provider and an estimated time of arrival.If you feel you are in an “unsafe situation”, please let us know. With your consent,
we will contact local police or safety authorities.
INSTRUMENT CLUSTER WARNING LIGHTS
- Electronic Stability Control (ESC) Activation/Malfunction Indicator Light
• The “ESC Activation/Malfunction Indicator Light” in the instrument cluster willcome on when the ignition switch is turned to the ON/RUN position. It should go
out with the engine running. If the “ESC Activation/Malfunction Indicator Light”
comes on continuously with the engine running, a malfunction has been detected
in the ESC system.
• If this light remains on after several ignition cycles, and the vehicle has been driven several miles (kilometers) at speeds greater than 30 mph (48 km/h), we
recommend you drive to the nearest service center and have the vehicle serviced
immediately.
- Tire Pressure Monitoring System (TPMS) Light
• Each tire, including the spare (if provided), should be checked monthly, when coldand inflated to the inflation pressure recommended by the vehicle manufacturer on
the vehicle placard or tire inflation pressure label. (If your vehicle has tires of a
different size than the size indicated on the vehicle placard or tire inflation
pressure label, you should determine the proper tire inflation pressure for those
tires.)
• As an added safety feature, your vehicle has been equipped with a Tire Pressure Monitoring System (TPMS) that illuminates a low tire pressure telltale when one or
more of your tires is significantly under-inflated. Accordingly, when the low tire
pressure telltale illuminates, you should stop and check your tires as soon as
possible, and inflate them to the proper pressure. Driving on a significantly
under-inflated tire causes the tire to overheat and can lead to tire failure.
Under-inflation also reduces fuel efficiency and tire tread life, and may affect the
vehicle’s handling and stopping ability.
• IF THE LIGHT STARTS FLASHING INDICATING A LOW TIRE PRESSURE, ADJUST THE AIR
PRESSURE IN THE LOW TIRE TO THE AIR PRESSURE SHOWN ON THE VEHICLE PLACARD
OR TIRE INFLATION PRESSURE LABEL LOCATED ON THE DRIVER'S DOOR. NOTE: AFTER
INFLATION, THE VEHICLE MAY NEED TO BE DRIVEN FOR 20 MINUTES BEFORE THE
FLASHING LIGHT WILL TURN OFF.
• Please note that the TPMS is not a substitute for proper tire maintenance, and it is the driver’s responsibility to maintain correct tire pressure, even if under-inflation
has not reached the level to trigger illumination of the TPMS low tire pressure
telltale.
WHAT TO DO IN EMERGENCIES
74