steering DODGE CHALLENGER 2013 3.G Owner's Manual
[x] Cancel search | Manufacturer: DODGE, Model Year: 2013, Model line: CHALLENGER, Model: DODGE CHALLENGER 2013 3.GPages: 140, PDF Size: 5.35 MB
Page 76 of 140
AUTOSTICK®
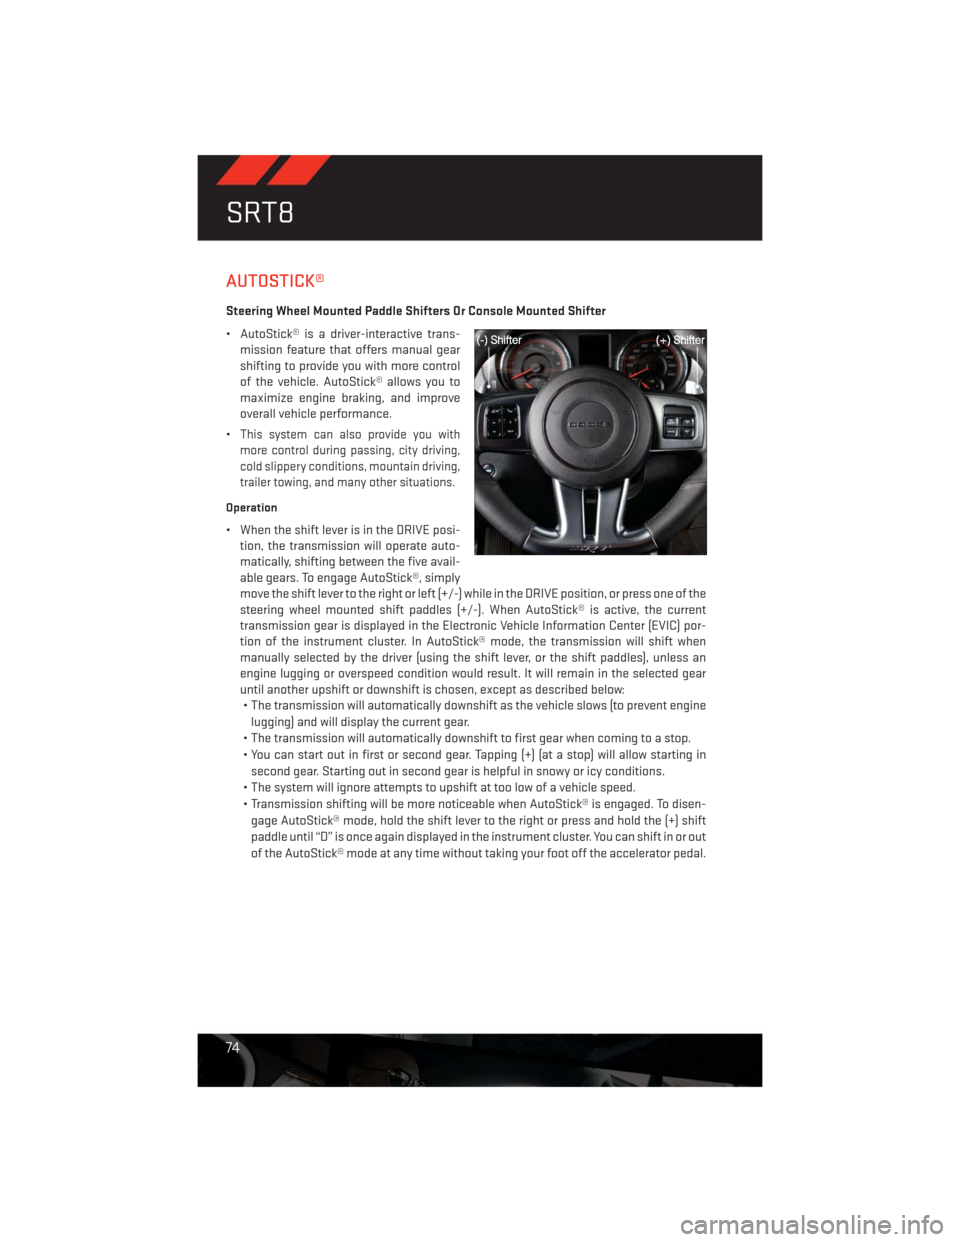
Steering Wheel Mounted Paddle Shifters Or Console Mounted Shifter
• AutoStick® is a driver-interactive trans-
mission feature that offers manual gear
shifting to provide you with more control
of the vehicle. AutoStick® allows you to
maximize engine braking, and improve
overall vehicle performance.
•
This system can also provide you with
more control during passing, city driving,
cold slippery conditions, mountain driving,
trailer towing, and many other situations.
Operation
• When the shift lever is in the DRIVE posi-
tion, the transmission will operate auto-
matically, shifting between the five avail-
able gears. To engage AutoStick®, simply
move the shift lever to the right or left (+/-) while in the DRIVE position, or press one of the
steering wheel mounted shift paddles (+/-). When AutoStick® is active, the current
transmission gear is displayed in the Electronic Vehicle Information Center (EVIC) por-
tion of the instrument cluster. In AutoStick® mode, the transmission will shift when
manually selected by the driver (using the shift lever, or the shift paddles), unless an
engine lugging or overspeed condition would result. It will remain in the selected gear
until another upshift or downshift is chosen, except as described below:
• The transmission will automatically downshift as the vehicle slows (to prevent engine
lugging) and will display the current gear.
• The transmission will automatically downshift to first gear when coming to a stop.
• You can start out in first or second gear. Tapping (+) (at a stop) will allow starting in
second gear. Starting out in second gear is helpful in snowy or icy conditions.
• The system will ignore attempts to upshift at too low of a vehicle speed.
• Transmission shifting will be more noticeable when AutoStick® is engaged. To disen-
gage AutoStick® mode, hold the shift lever to the right or press and hold the (+) shift
paddle until “D” is once again displayed in the instrument cluster. You can shift in or out
of the AutoStick® mode at any time without taking your foot off the accelerator pedal.
SRT8
74
Page 77 of 140
ELECTRONIC CONTROL DAMPING SYSTEM
•This vehicle may be equipped with an electronic controlled dampening system. This system
reduces body roll and pitch in many driving situations including cornering, acceleration and
braking. There are three modes of operation:
Automatic (Auto) Mode
•
This is the default position when vehicle ignition is first turned on. Auto mode will give a
sporty, but comfortable ride. Within this mode, the suspension will adapt to the vehicle
inputs, including road surfaces, vehicle speed, steering inputs, braking, and acceleration.
• If AutoStick® is engaged while in “Auto” mode, the transmission will automatically shift
up if maximum engine speed is reached.
• Heavily pressing the accelerator pedal may generate an automatic downshift for im-
proved acceleration.
• This mode should be used for most driving situations.
Sport Mode
SPORT
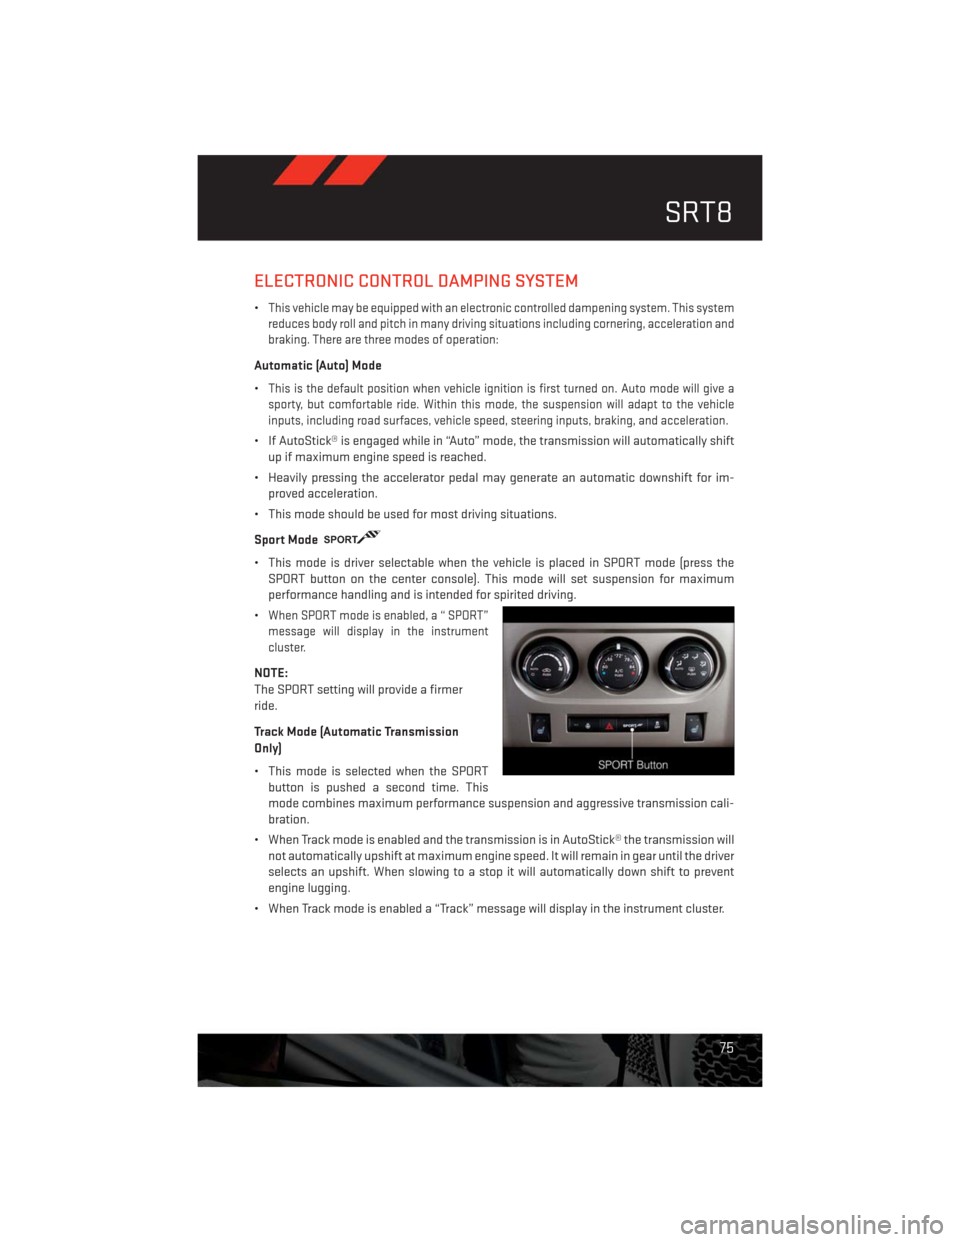
• This mode is driver selectable when the vehicle is placed in SPORT mode (press the
SPORT button on the center console). This mode will set suspension for maximum
performance handling and is intended for spirited driving.
•
When SPORT mode is enabled, a “ SPORT”
message will display in the instrument
cluster.
NOTE:
The SPORT setting will provide a firmer
ride.
Track Mode (Automatic Transmission
Only)
• This mode is selected when the SPORT
button is pushed a second time. This
mode combines maximum performance suspension and aggressive transmission cali-
bration.
• When Track mode is enabled and the transmission is in AutoStick® the transmission will
not automatically upshift at maximum engine speed. It will remain in gear until the driver
selects an upshift. When slowing to a stop it will automatically down shift to prevent
engine lugging.
• When Track mode is enabled a “Track” message will display in the instrument cluster.
SRT8
75
Page 102 of 140
FREEING A STUCK VEHICLE
• If your vehicle becomes stuck in mud, sand or snow, it can often be moved using a
rocking motion. Turn your steering wheel right and left to clear the area around the front
wheels. Then shift back and forth between DRIVE and REVERSE (with automatic trans-
mission) or 2nd gear and REVERSE (with manual transmission) while gently pressing the
accelerator. Use the least amount of accelerator pedal pressure that will maintain the
rocking motion, without spinning the wheels or racing the engine.
NOTE:
Press the "ESC Off" switch, to place the Electronic Stability Control (ESC) system in "Partial
Off" mode before rocking the vehicle. Once the vehicle has been freed, press the "ESC Off"
switch again to restore "ESC On" mode.
CAUTION!
• Racing the engine or spinning the wheels may lead to transmission overheating and
failure. Allow the engine to idle with the shift lever in NEUTRAL for at least one minute
after every five rocking-motion cycles. This will minimize overheating and reduce the
risk of transmission failure during prolonged efforts to free a stuck vehicle.
• When “rocking” a stuck vehicle by moving between DRIVE/2nd and REVERSE, do not
spin the wheels faster than 15 mph (24 km/h), or drivetrain damage may result.
• Revving the engine or spinning the wheels too fast may lead to transmission over-
heating and failure. It can also damage the tires. Do not spin the wheels above
30 mph (48 km/h) while in gear (no transmission shifting occurring).
WHAT TO DO IN EMERGENCIES
100
Page 104 of 140
OPENING THE HOOD
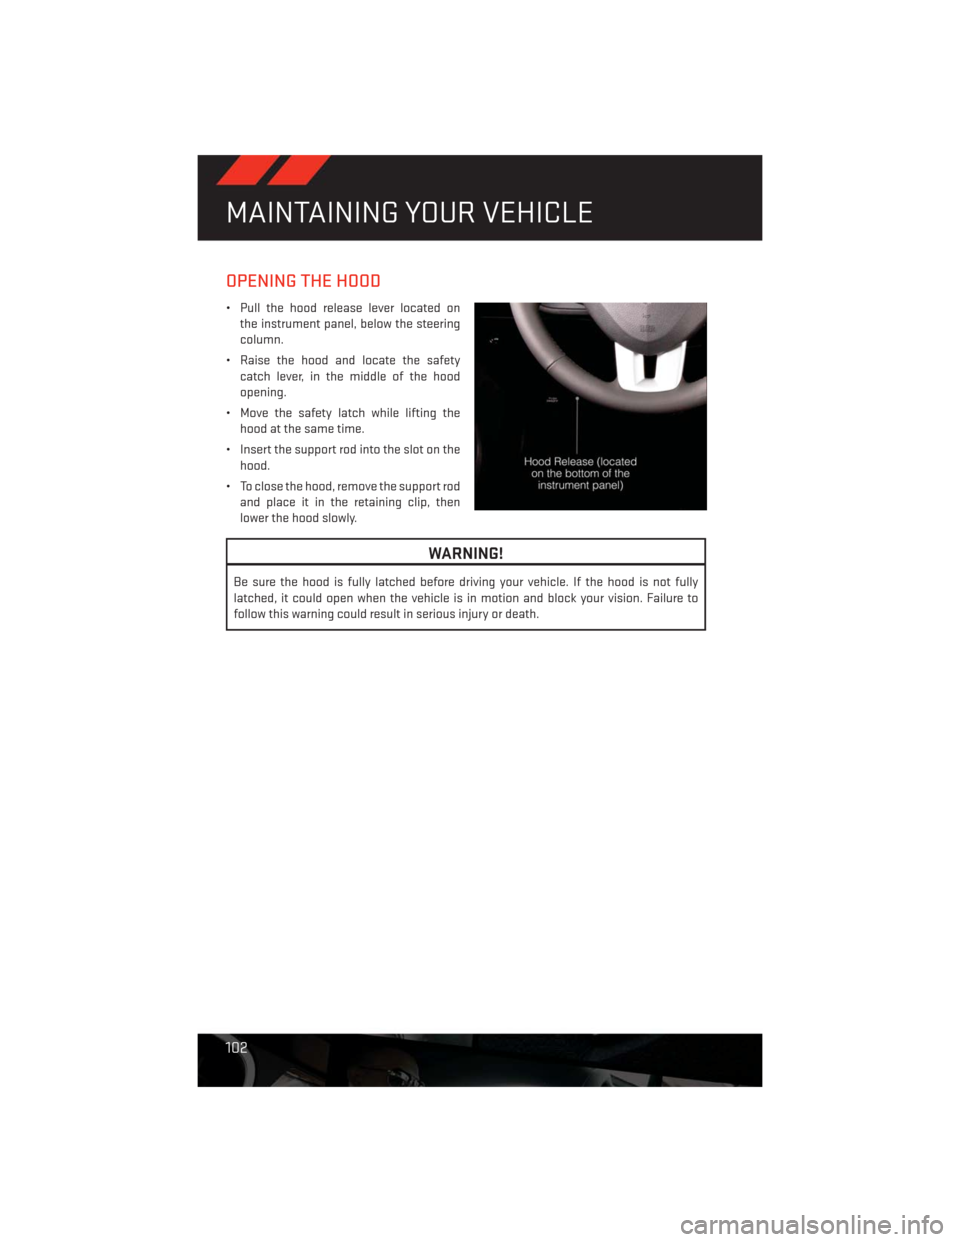
• Pull the hood release lever located on
the instrument panel, below the steering
column.
• Raise the hood and locate the safety
catch lever, in the middle of the hood
opening.
• Move the safety latch while lifting the
hood at the same time.
• Insert the support rod into the slot on the
hood.
• To close the hood, remove the support rod
and place it in the retaining clip, then
lower the hood slowly.
WARNING!
Be sure the hood is fully latched before driving your vehicle. If the hood is not fully
latched, it could open when the vehicle is in motion and block your vision. Failure to
follow this warning could result in serious injury or death.
MAINTAINING YOUR VEHICLE
102
Page 109 of 140
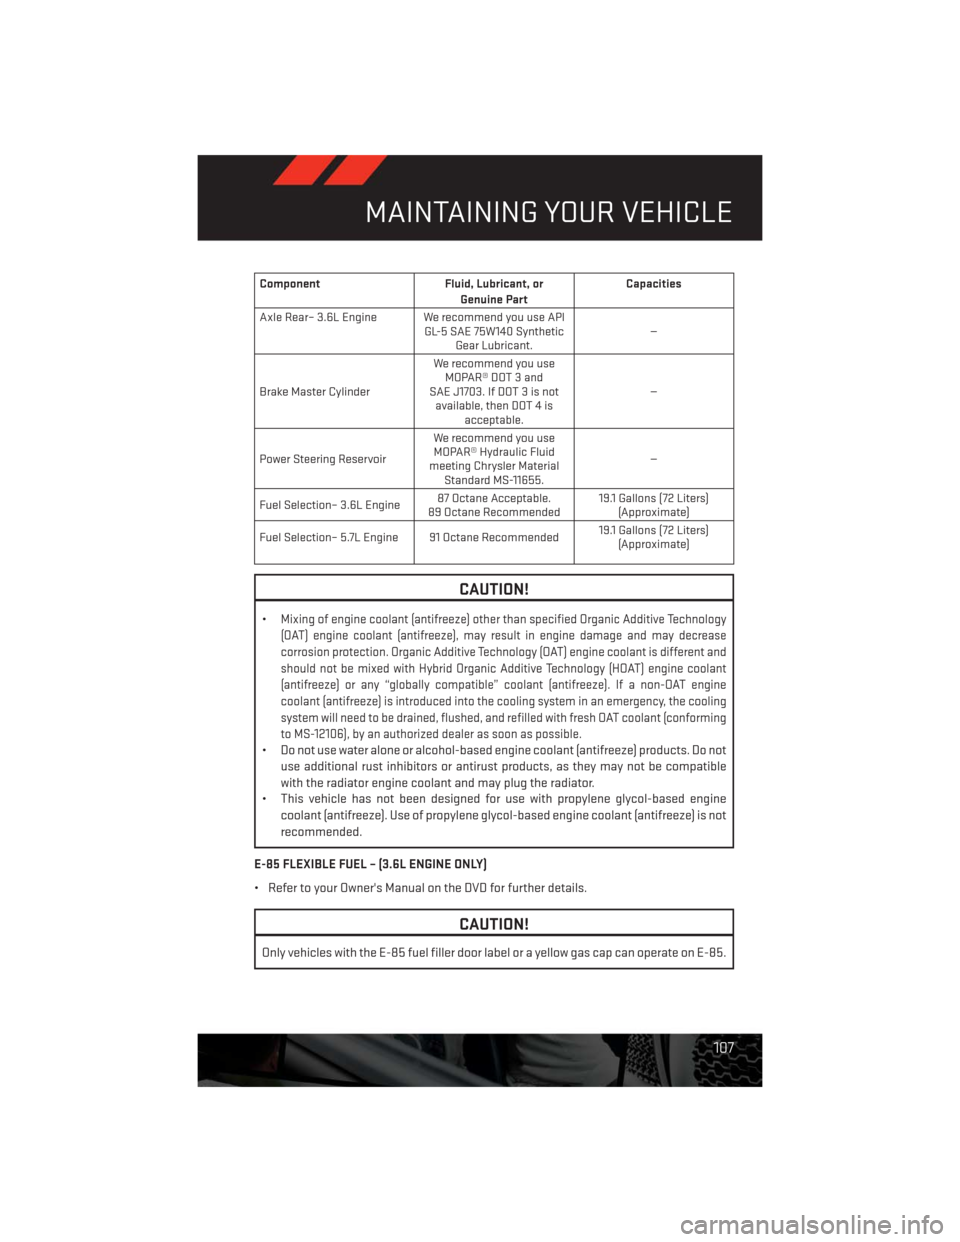
Component Fluid, Lubricant, or
Genuine PartCapacities
Axle Rear– 3.6L Engine We recommend you use API
GL-5 SAE 75W140 Synthetic
Gear Lubricant.—
Brake Master CylinderWe recommend you use
MOPAR® DOT 3 and
SAE J1703. If DOT 3 is not
available, then DOT 4 is
acceptable.—
Power Steering ReservoirWe recommend you use
MOPAR® Hydraulic Fluid
meeting Chrysler Material
Standard MS-11655.—
Fuel Selection– 3.6L Engine87 Octane Acceptable.
89 Octane Recommended19.1 Gallons (72 Liters)
(Approximate)
Fuel Selection– 5.7L Engine 91 Octane Recommended19.1 Gallons (72 Liters)
(Approximate)
CAUTION!
•Mixing of engine coolant (antifreeze) other than specified Organic Additive Technology
(OAT) engine coolant (antifreeze), may result in engine damage and may decrease
corrosion protection. Organic Additive Technology (OAT) engine coolant is different and
should not be mixed with Hybrid Organic Additive Technology (HOAT) engine coolant
(antifreeze) or any “globally compatible” coolant (antifreeze). If a non-OAT engine
coolant (antifreeze) is introduced into the cooling system in an emergency, the cooling
system will need to be drained, flushed, and refilled with fresh OAT coolant (conforming
to MS-12106), by an authorized dealer as soon as possible.
• Do not use water alone or alcohol-based engine coolant (antifreeze) products. Do not
use additional rust inhibitors or antirust products, as they may not be compatible
with the radiator engine coolant and may plug the radiator.
• This vehicle has not been designed for use with propylene glycol-based engine
coolant (antifreeze). Use of propylene glycol-based engine coolant (antifreeze) is not
recommended.
E-85 FLEXIBLE FUEL – (3.6L ENGINE ONLY)
• Refer to your Owner's Manual on the DVD for further details.
CAUTION!
Only vehicles with the E-85 fuel filler door label or a yellow gas cap can operate on E-85.
MAINTAINING YOUR VEHICLE
107
Page 110 of 140
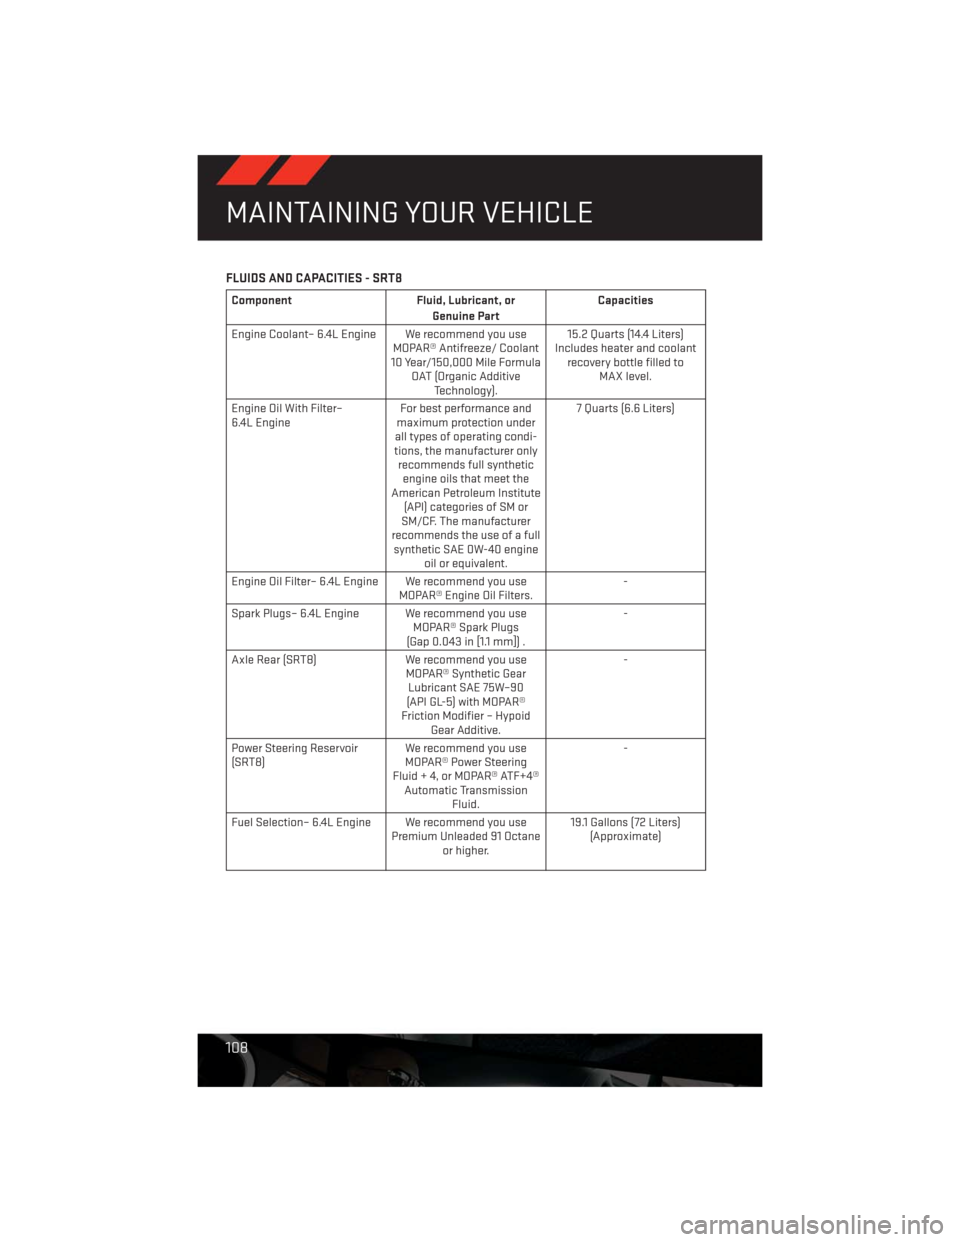
FLUIDS AND CAPACITIES - SRT8
Component Fluid, Lubricant, or
Genuine PartCapacities
Engine Coolant– 6.4L Engine We recommend you use
MOPAR® Antifreeze/ Coolant
10 Year/150,000 Mile Formula
OAT (Organic Additive
Technology).15.2 Quarts (14.4 Liters)
Includes heater and coolant
recovery bottle filled to
MAX level.
Engine Oil With Filter–
6.4L EngineFor best performance and
maximum protection under
all types of operating condi-
tions, the manufacturer only
recommends full synthetic
engine oils that meet the
American Petroleum Institute
(API) categories of SM or
SM/CF. The manufacturer
recommends the use of a full
synthetic SAE 0W-40 engine
oil or equivalent.7 Quarts (6.6 Liters)
Engine Oil Filter– 6.4L Engine We recommend you use
MOPAR® Engine Oil Filters.-
Spark Plugs– 6.4L Engine We recommend you use
MOPAR® Spark Plugs
(Gap 0.043 in [1.1 mm]) .-
Axle Rear (SRT8) We recommend you use
MOPAR® Synthetic Gear
Lubricant SAE 75W–90
(API GL-5) with MOPAR®
Friction Modifier – Hypoid
Gear Additive.-
Power Steering Reservoir
(SRT8)We recommend you use
MOPAR® Power Steering
Fluid + 4, or MOPAR® ATF+4®
Automatic Transmission
Fluid.-
Fuel Selection– 6.4L Engine We recommend you use
Premium Unleaded 91 Octane
or higher.19.1 Gallons (72 Liters)
(Approximate)
MAINTAINING YOUR VEHICLE
108
Page 113 of 140
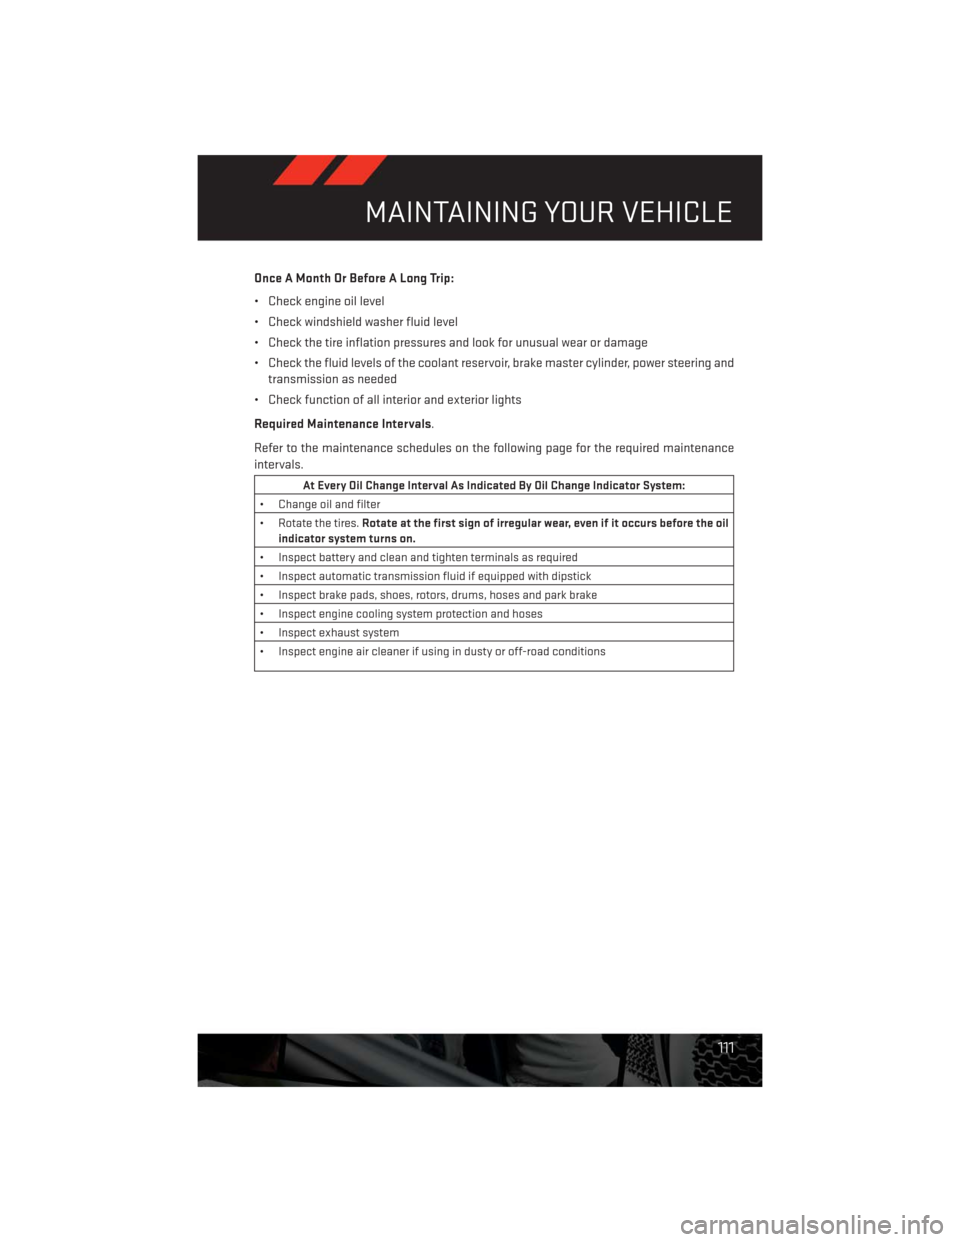
Once A Month Or Before A Long Trip:
• Check engine oil level
• Check windshield washer fluid level
• Check the tire inflation pressures and look for unusual wear or damage
• Check the fluid levels of the coolant reservoir, brake master cylinder, power steering and
transmission as needed
• Check function of all interior and exterior lights
Required Maintenance Intervals.
Refer to the maintenance schedules on the following page for the required maintenance
intervals.
At Every Oil Change Interval As Indicated By Oil Change Indicator System:
• Change oil and filter
• Rotate the tires.Rotate at the first sign of irregular wear, even if it occurs before the oil
indicator system turns on.
• Inspect battery and clean and tighten terminals as required
• Inspect automatic transmission fluid if equipped with dipstick
• Inspect brake pads, shoes, rotors, drums, hoses and park brake
• Inspect engine cooling system protection and hoses
• Inspect exhaust system
• Inspect engine air cleaner if using in dusty or off-road conditions
MAINTAINING YOUR VEHICLE
111
Page 122 of 140
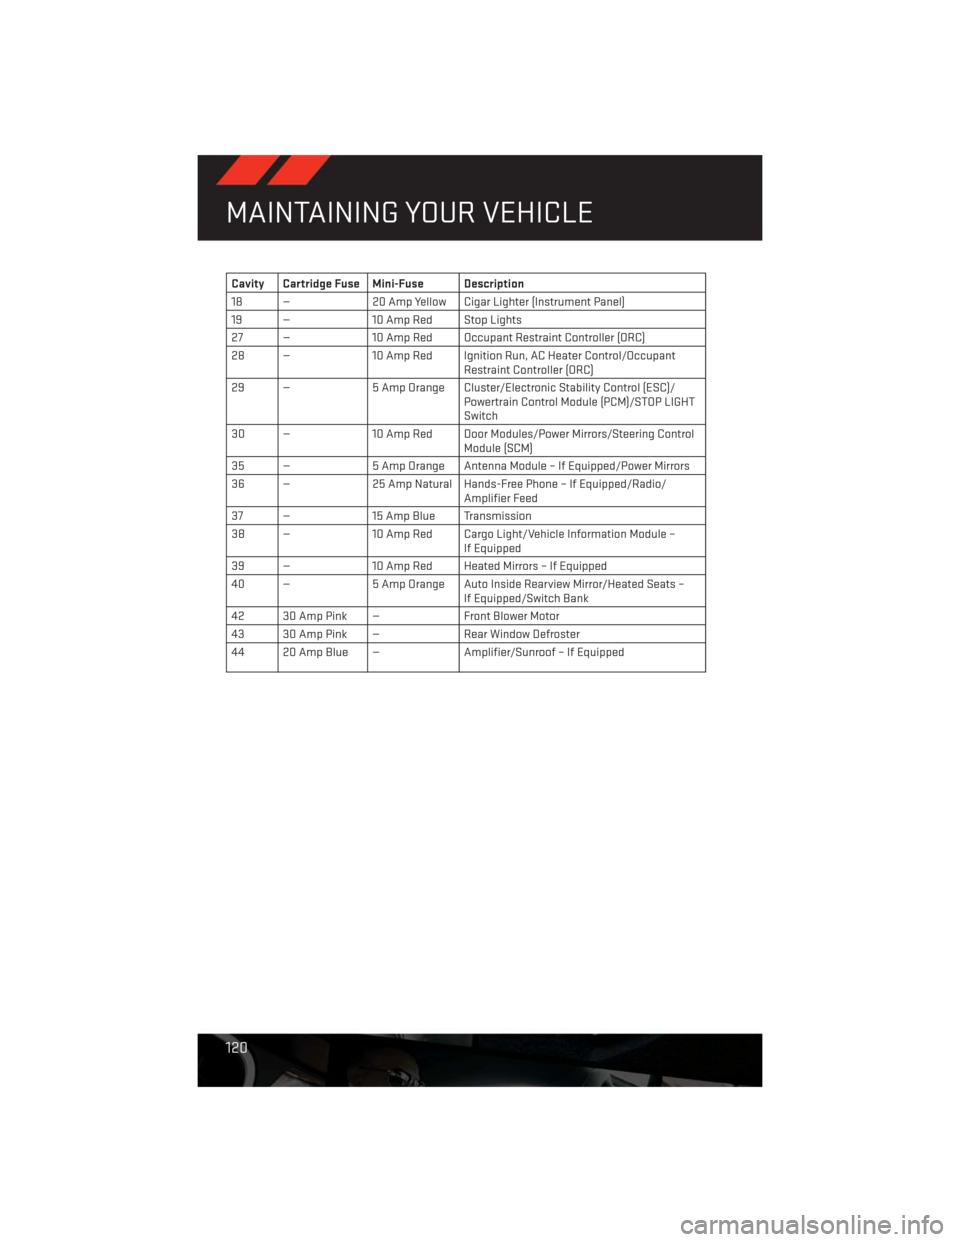
Cavity Cartridge Fuse Mini-Fuse Description
18 — 20 Amp Yellow Cigar Lighter (Instrument Panel)
19 — 10 Amp Red Stop Lights
27 — 10 Amp Red Occupant Restraint Controller (ORC)
28 — 10 Amp Red Ignition Run, AC Heater Control/Occupant
Restraint Controller (ORC)
29 — 5 Amp Orange Cluster/Electronic Stability Control (ESC)/
Powertrain Control Module (PCM)/STOP LIGHT
Switch
30 — 10 Amp Red Door Modules/Power Mirrors/Steering Control
Module (SCM)
35 — 5 Amp Orange Antenna Module – If Equipped/Power Mirrors
36 — 25 Amp Natural Hands-Free Phone – If Equipped/Radio/
Amplifier Feed
37 — 15 Amp Blue Transmission
38 — 10 Amp Red Cargo Light/Vehicle Information Module –
If Equipped
39 — 10 Amp Red Heated Mirrors – If Equipped
40 — 5 Amp Orange Auto Inside Rearview Mirror/Heated Seats –
If Equipped/Switch Bank
42 30 Amp Pink — Front Blower Motor
43 30 Amp Pink — Rear Window Defroster
44 20 Amp Blue — Amplifier/Sunroof – If Equipped
MAINTAINING YOUR VEHICLE
120
Page 123 of 140
TIRE PRESSURES
• Check the inflation pressure of each tire, including the spare tire, at least monthly and
inflate to the recommended pressure for your vehicle.
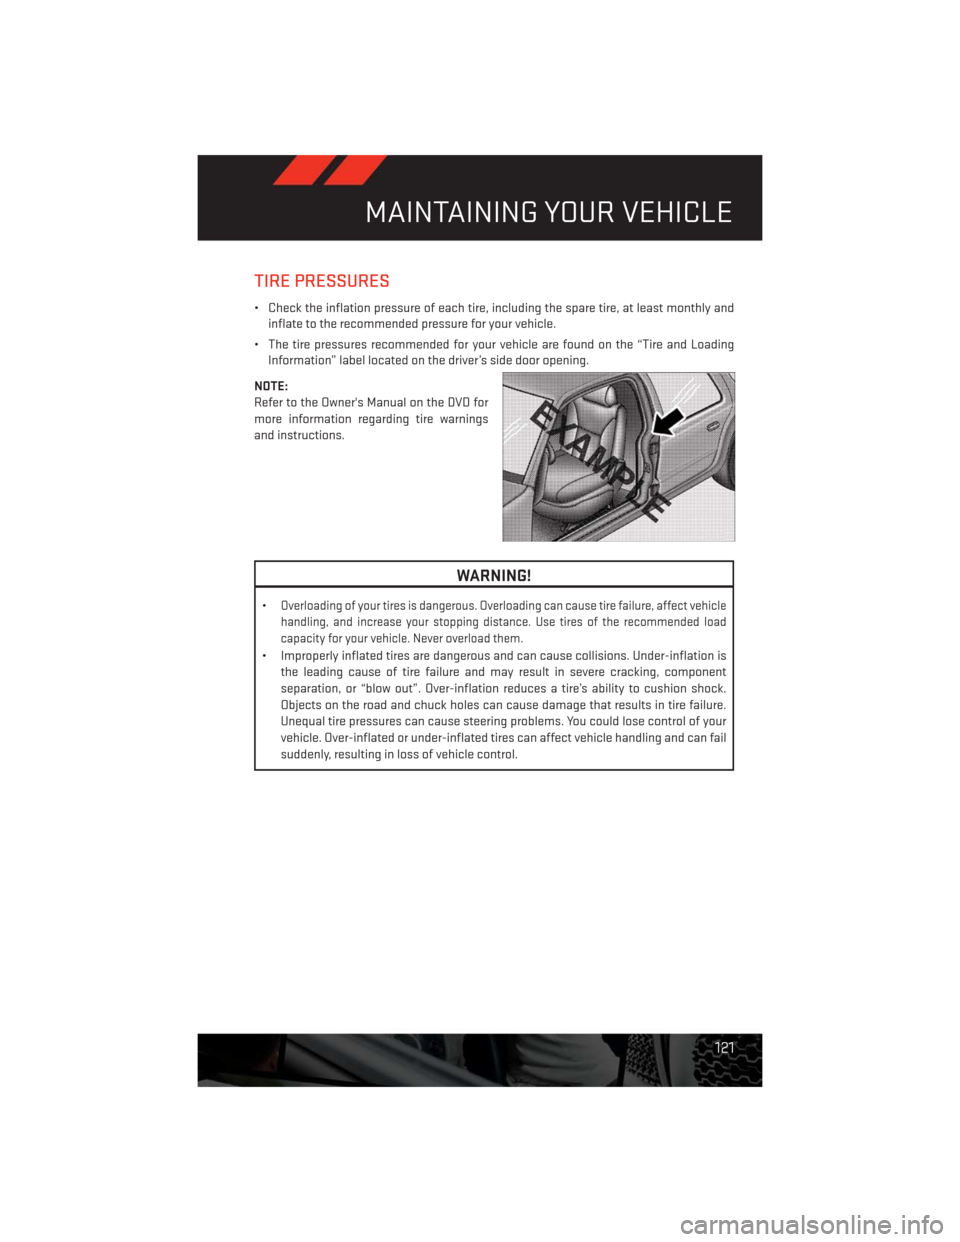
• The tire pressures recommended for your vehicle are found on the “Tire and Loading
Information” label located on the driver’s side door opening.
NOTE:
Refer to the Owner's Manual on the DVD for
more information regarding tire warnings
and instructions.
WARNING!
•Overloading of your tires is dangerous. Overloading can cause tire failure, affect vehicle
handling, and increase your stopping distance. Use tires of the recommended load
capacity for your vehicle. Never overload them.
• Improperly inflated tires are dangerous and can cause collisions. Under-inflation is
the leading cause of tire failure and may result in severe cracking, component
separation, or “blow out”. Over-inflation reduces a tire’s ability to cushion shock.
Objects on the road and chuck holes can cause damage that results in tire failure.
Unequal tire pressures can cause steering problems. You could lose control of your
vehicle. Over-inflated or under-inflated tires can affect vehicle handling and can fail
suddenly, resulting in loss of vehicle control.
MAINTAINING YOUR VEHICLE
121
Page 129 of 140
Jacking Instructions...........86
Jack Location..............84
Jack Operation..............86
JumpStarting ..............96
KeyFob...................8
Key Fob Programmable Features.....68
Keyless Enter-N-Go............9
Lock/Unlock.............10
Starting/Stopping .........11, 12
Lane Change Assist...........23
Lap/Shoulder Belts............13
LATCH (Lower Anchors and Tether
for CHildren)..............15
Lights
Tire Pressure Monitoring (TPMS) . . .78
Warning (Instrument Cluster
Description)..............6
Maintenance Record.........114, 117
Maintenance Schedule.......110, 115
Malfunction Indicator Light
(CheckEngine) ............80
MOPAR® Accessories..........125
Navigation Voice Prompt Volume. . .44, 54
New Vehicle Break-In Period.......22
OilChangeIndicator ...........81
Oil Change Indicator, Reset........81
Oil, Engine
Capacity...............106
Outlet
Power .................72
Overheating, Engine...........83
Placard, Tire and Loading Information. .121
Power
Outlet (Auxiliary Electrical Outlet)...72
Seats .................18
Steering...............106
Power Sunroof..............30
Preparation for Jacking.........86
Programmable Electronic
Features..............68,76Rain Sensitive Wiper System.......23
Rear Seat, Folding............20
Recreational Towing...........73
Remote Starting System..........9
Replacement Bulbs...........122
Reporting Safety Defects........124
Rocking Vehicle When Stuck......100
Schedule, Maintenance.........110
Seat Belts.................13
Seats...................18
Adjustment..............18
Heated................20
Power .................18
Rear Folding.............20
Security Against Theft..........13
Shift Lever Override............98
Signals, Turn...............23
SpareTire.................84
Spark Plugs...............106
Speed Control
Accel/Decel.............25
Cancel................25
Resume ...............25
Set ..................25
Starting
Remote ................9
Steering
Tilt Column..............21
Steering Wheel Audio Controls......60
Stuck, Freeing..............100
Temperature Control, Automatic (ATC) . .29
Theft System Arming...........13
Theft System Disarming.........13
Tilt Steering Column...........21
TIREFIT..................90
Tires
Air Pressure.............121
Changing.............84,86
Flat Changing............84
Jacking................86
SpareTire ..............84
Towing...................73
Disabled Vehicle...........99
Recreational.............73
INDEX
127