clock DODGE CHALLENGER 2013 3.G User Guide
[x] Cancel search | Manufacturer: DODGE, Model Year: 2013, Model line: CHALLENGER, Model: DODGE CHALLENGER 2013 3.GPages: 140, PDF Size: 5.35 MB
Page 36 of 140
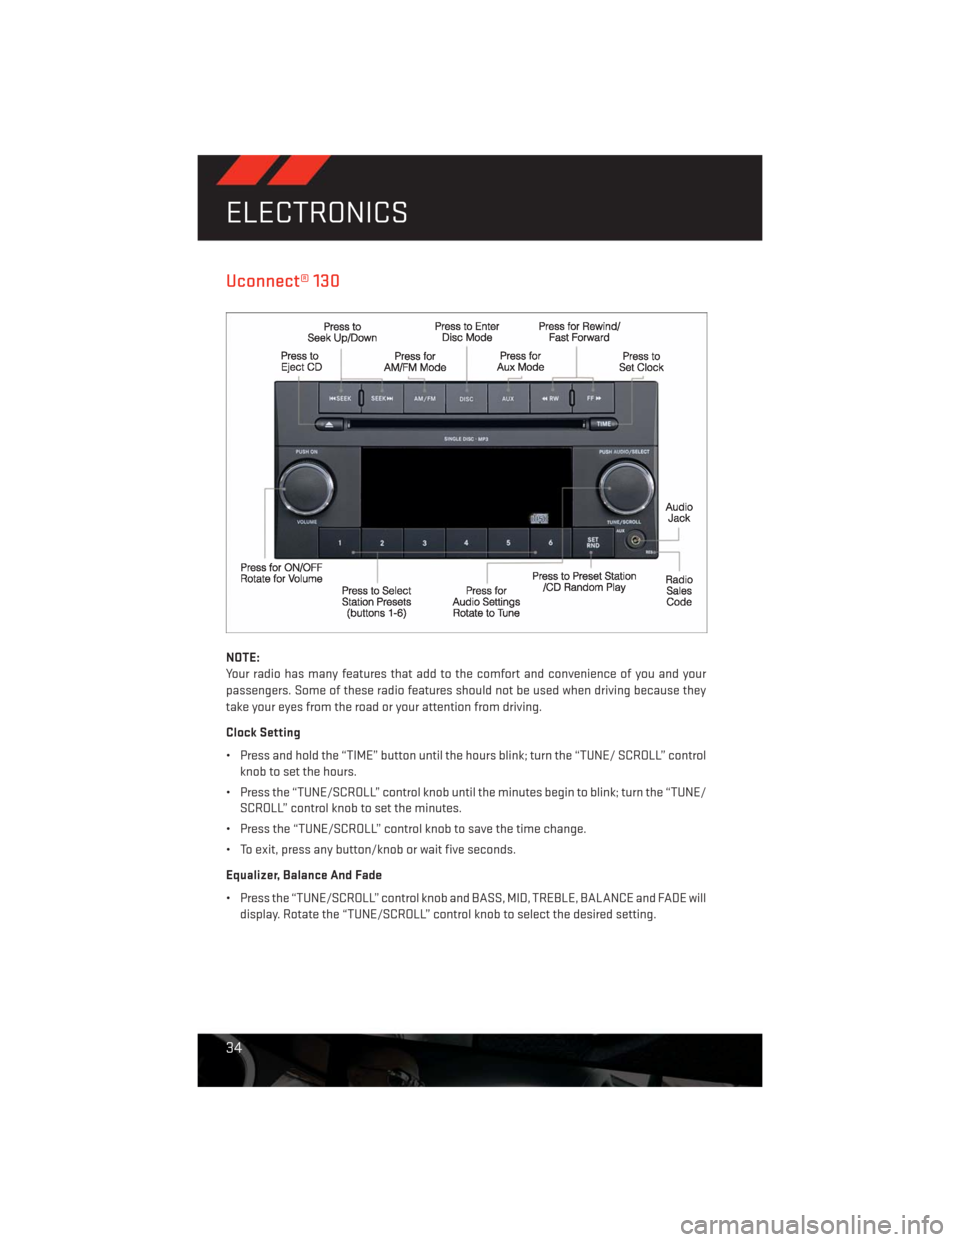
Uconnect® 130
NOTE:
Your radio has many features that add to the comfort and convenience of you and your
passengers. Some of these radio features should not be used when driving because they
take your eyes from the road or your attention from driving.
Clock Setting
• Press and hold the “TIME” button until the hours blink; turn the “TUNE/ SCROLL” control
knob to set the hours.
• Press the “TUNE/SCROLL” control knob until the minutes begin to blink; turn the “TUNE/
SCROLL” control knob to set the minutes.
• Press the “TUNE/SCROLL” control knob to save the time change.
• To exit, press any button/knob or wait five seconds.
Equalizer, Balance And Fade
• Press the “TUNE/SCROLL” control knob and BASS, MID, TREBLE, BALANCE and FADE will
display. Rotate the “TUNE/SCROLL” control knob to select the desired setting.
ELECTRONICS
34
Page 38 of 140
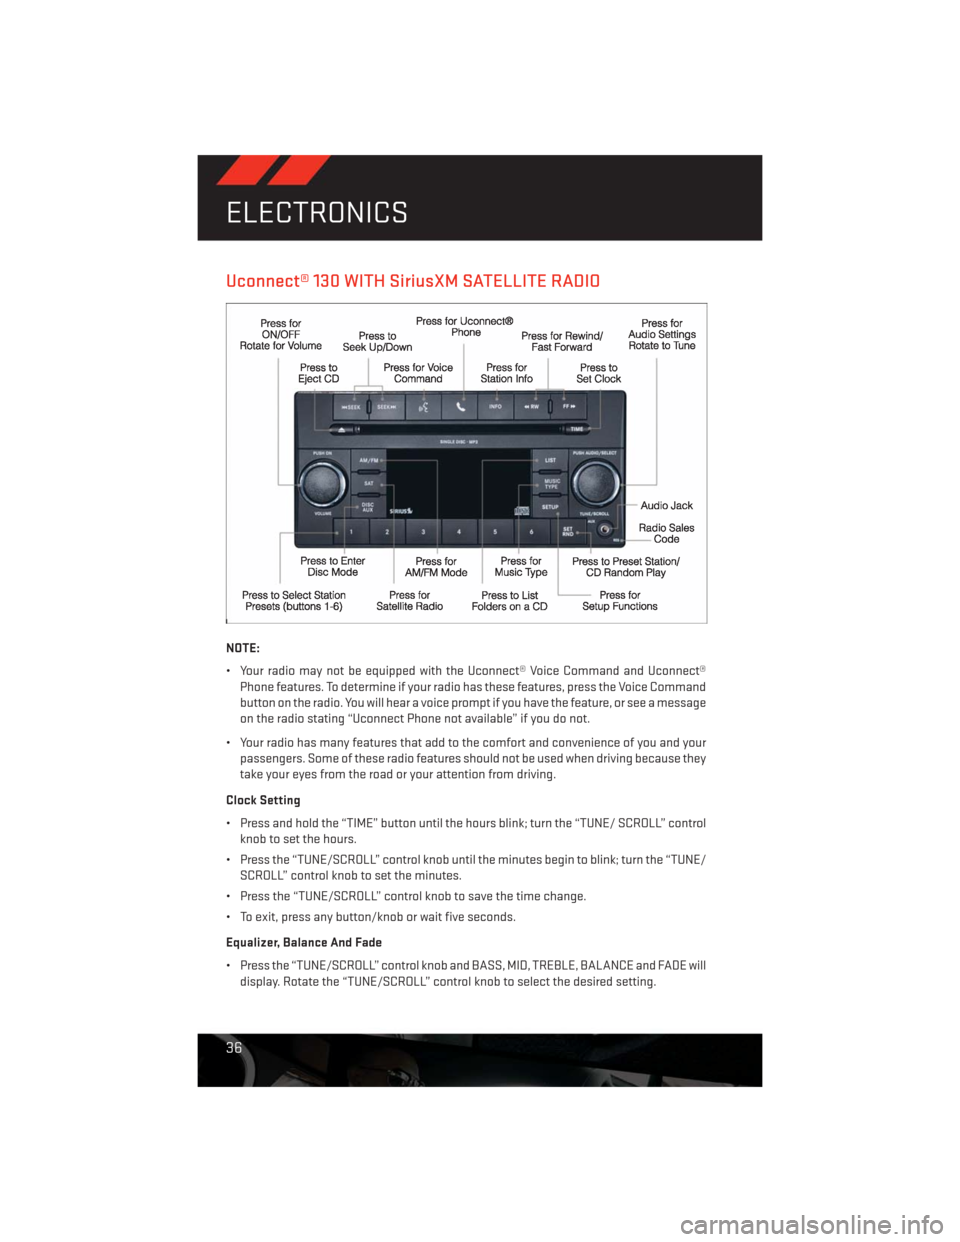
Uconnect® 130 WITH SiriusXM SATELLITE RADIO
NOTE:
• Your radio may not be equipped with the Uconnect® Voice Command and Uconnect®
Phone features. To determine if your radio has these features, press the Voice Command
button on the radio. You will hear a voice prompt if you have the feature, or see a message
on the radio stating “Uconnect Phone not available” if you do not.
• Your radio has many features that add to the comfort and convenience of you and your
passengers. Some of these radio features should not be used when driving because they
take your eyes from the road or your attention from driving.
Clock Setting
• Press and hold the “TIME” button until the hours blink; turn the “TUNE/ SCROLL” control
knob to set the hours.
• Press the “TUNE/SCROLL” control knob until the minutes begin to blink; turn the “TUNE/
SCROLL” control knob to set the minutes.
• Press the “TUNE/SCROLL” control knob to save the time change.
• To exit, press any button/knob or wait five seconds.
Equalizer, Balance And Fade
• Press the “TUNE/SCROLL” control knob and BASS, MID, TREBLE, BALANCE and FADE will
display. Rotate the “TUNE/SCROLL” control knob to select the desired setting.
ELECTRONICS
36
Page 41 of 140
• Your radio has many features that add to the comfort and convenience of you and your
passengers. Some of these radio features should not be used when driving because they
take your eyes from the road or your attention from driving.
Clock Setting
• Turn the radio on, then touch the screen where the time is displayed.
• Touch the “USER CLOCK” soft-key (Navigation radio only).
• To adjust the hours, touch either the “HOUR FORWARD” or “HOUR BACKWARD” soft-key.
• To adjust the minutes, touch either the “MINUTE FORWARD” or “MINUTE BACKWARD”
soft-key.
• To save the new time setting, touch the screen where the word “Save” is displayed.
Menu
• Press the “MENU” hard-key to access the System Setup menu and the My Files menu.
•
Press the “MENU” hard-key in an active mode (SAT, CD, AUX, etc.) to change mode specific
settings.
Equalizer, Balance And Fade
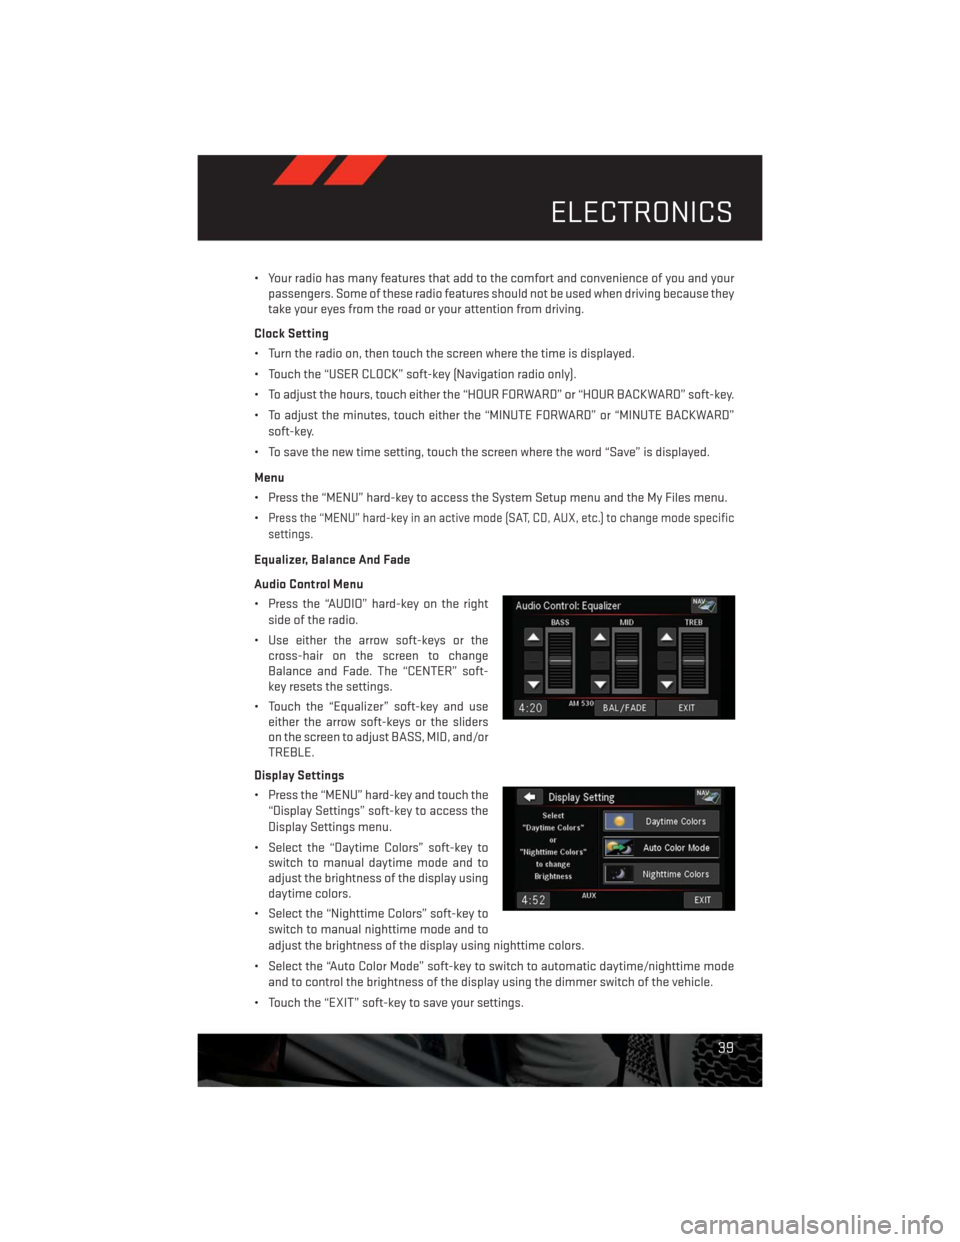
Audio Control Menu
• Press the “AUDIO” hard-key on the right
side of the radio.
• Use either the arrow soft-keys or the
cross-hair on the screen to change
Balance and Fade. The “CENTER” soft-
key resets the settings.
• Touch the “Equalizer” soft-key and use
either the arrow soft-keys or the sliders
on the screen to adjust BASS, MID, and/or
TREBLE.
Display Settings
• Press the “MENU” hard-key and touch the
“Display Settings” soft-key to access the
Display Settings menu.
• Select the “Daytime Colors” soft-key to
switch to manual daytime mode and to
adjust the brightness of the display using
daytime colors.
• Select the “Nighttime Colors” soft-key to
switch to manual nighttime mode and to
adjust the brightness of the display using nighttime colors.
• Select the “Auto Color Mode” soft-key to switch to automatic daytime/nighttime mode
and to control the brightness of the display using the dimmer switch of the vehicle.
• Touch the “EXIT” soft-key to save your settings.
ELECTRONICS
39
Page 49 of 140
Acquiring Satellites
• The GPS Satellite strength bars indicate the strength of your satellite reception.
• Acquiring satellite signals can take a few minutes. When at least one of the bars is green,
your device has acquired satellite signals.
• You may experience delays receiving satellite signals when in areas with an obstructed
view to the sky, such as garages, tunnels, or large cities with tall buildings.
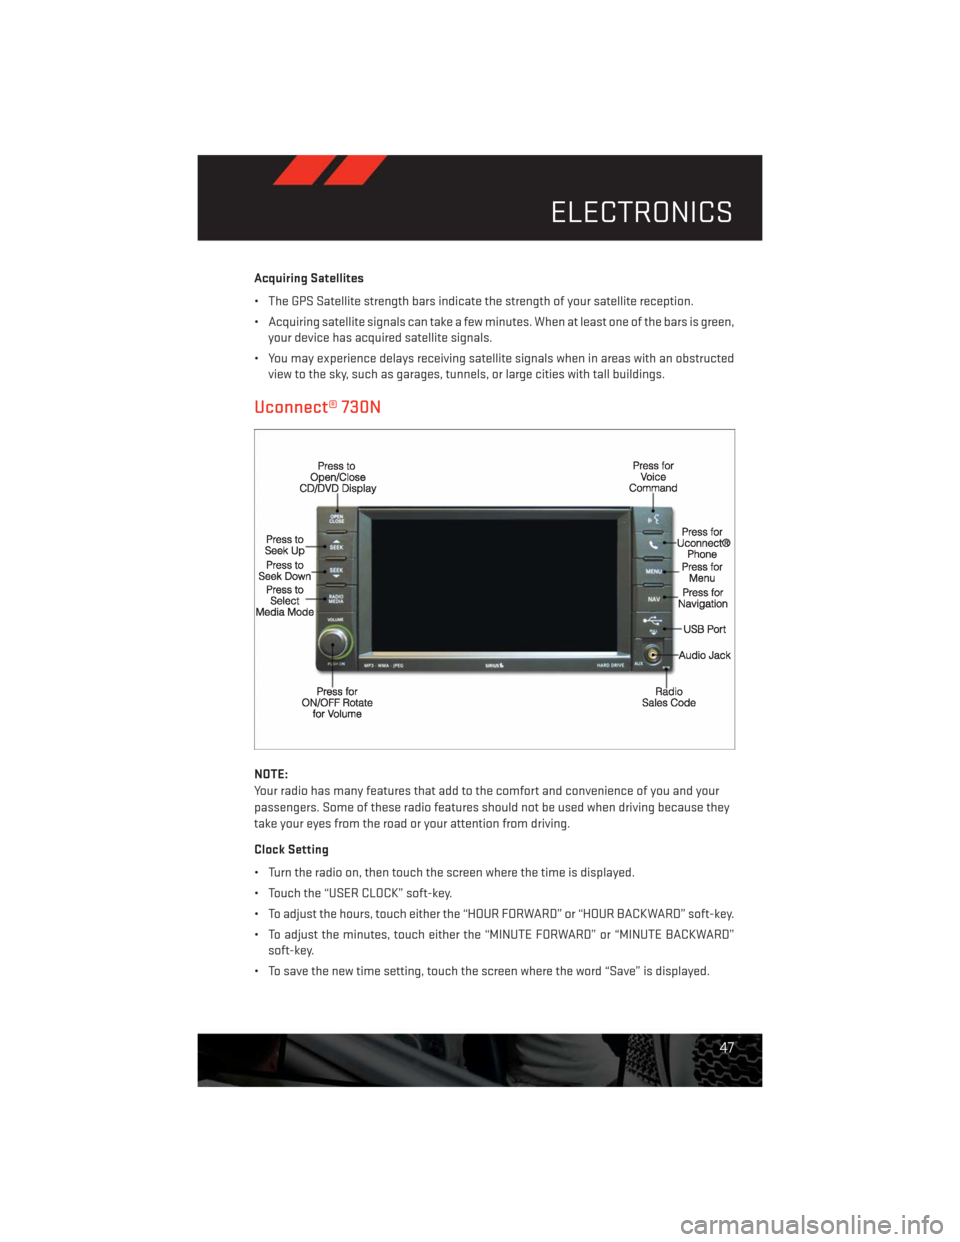
Uconnect® 730N
NOTE:
Your radio has many features that add to the comfort and convenience of you and your
passengers. Some of these radio features should not be used when driving because they
take your eyes from the road or your attention from driving.
Clock Setting
• Turn the radio on, then touch the screen where the time is displayed.
• Touch the “USER CLOCK” soft-key.
• To adjust the hours, touch either the “HOUR FORWARD” or “HOUR BACKWARD” soft-key.
• To adjust the minutes, touch either the “MINUTE FORWARD” or “MINUTE BACKWARD”
soft-key.
• To save the new time setting, touch the screen where the word “Save” is displayed.
ELECTRONICS
47
Page 88 of 140
Preparations For Jacking
1. Park the vehicle on a firm, level surface as far from the edge of the roadway as possible.
Avoid icy or slippery areas.
2. Turn on the Hazard Warning flasher.
3. Set the parking brake.
4. Place the shift lever into PARK.
5. Turn OFF the ignition.
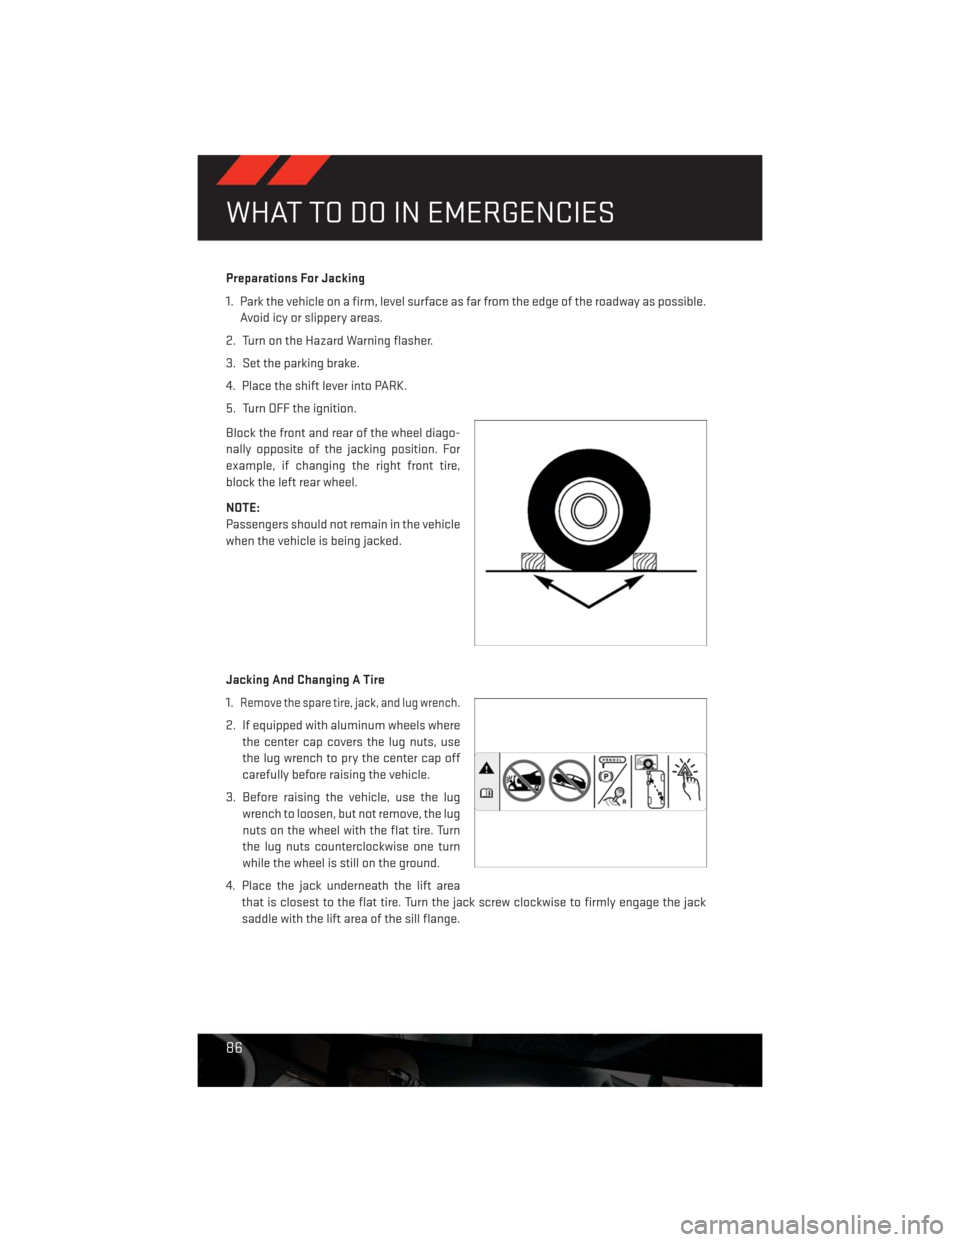
Block the front and rear of the wheel diago-
nally opposite of the jacking position. For
example, if changing the right front tire,
block the left rear wheel.
NOTE:
Passengers should not remain in the vehicle
when the vehicle is being jacked.
Jacking And Changing A Tire
1.
Remove the spare tire, jack, and lug wrench.
2. If equipped with aluminum wheels where
the center cap covers the lug nuts, use
the lug wrench to pry the center cap off
carefully before raising the vehicle.
3. Before raising the vehicle, use the lug
wrench to loosen, but not remove, the lug
nuts on the wheel with the flat tire. Turn
the lug nuts counterclockwise one turn
while the wheel is still on the ground.
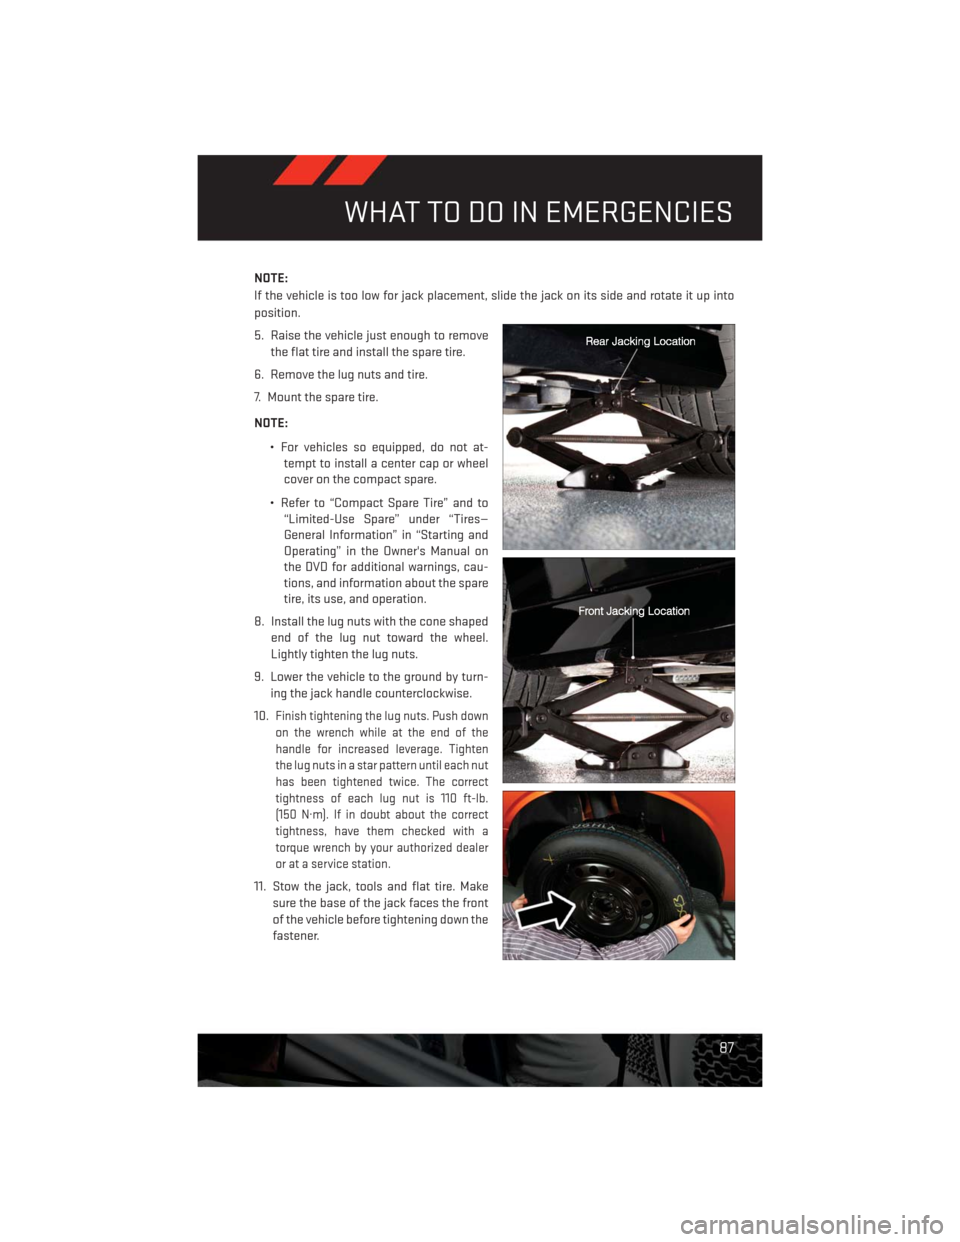
4. Place the jack underneath the lift area
that is closest to the flat tire. Turn the jack screw clockwise to firmly engage the jack
saddle with the lift area of the sill flange.
WHAT TO DO IN EMERGENCIES
86
Page 89 of 140
NOTE:
If the vehicle is too low for jack placement, slide the jack on its side and rotate it up into
position.
5. Raise the vehicle just enough to remove
the flat tire and install the spare tire.
6. Remove the lug nuts and tire.
7. Mount the spare tire.
NOTE:
• For vehicles so equipped, do not at-
tempt to install a center cap or wheel
cover on the compact spare.
• Refer to “Compact Spare Tire” and to
“Limited-Use Spare” under “Tires—
General Information” in “Starting and
Operating” in the Owner's Manual on
the DVD for additional warnings, cau-
tions, and information about the spare
tire, its use, and operation.
8. Install the lug nuts with the cone shaped
end of the lug nut toward the wheel.
Lightly tighten the lug nuts.
9. Lower the vehicle to the ground by turn-
ing the jack handle counterclockwise.
10.
Finish tightening the lug nuts. Push down
on the wrench while at the end of the
handle for increased leverage. Tighten
the lug nuts in a star pattern until each nut
has been tightened twice. The correct
tightness of each lug nut is 110 ft-lb.
(150 N·m). If in doubt about the correct
tightness, have them checked with a
torque wrench by your authorized dealer
or at a service station.
11. Stow the jack, tools and flat tire. Make
sure the base of the jack faces the front
of the vehicle before tightening down the
fastener.
WHAT TO DO IN EMERGENCIES
87
Page 90 of 140
Road Tire Installation
1. Mount the road tire on the axle.
2. Install the remaining lug nuts with the cone shaped end of the nut toward the wheel.
Lightly tighten the lug nuts.
3. Lower the vehicle to the ground by turning the jack handle counterclockwise.
4. Finish tightening the lug nuts. Push down on the wrench while at the end of the handle for
increased leverage. Tighten the lug nuts in a star pattern until each nut has been
tightened twice. The correct tightness of each lug nut is 110 ft-lbs (150 N·m). If in doubt
about the correct tightness, have them checked with a torque wrench by your authorized
dealer or service station.
5. After 25 miles (40 km) check the lug nut torque with a torque wrench to ensure that all lug
nuts are properly seated against the wheel.
CAUTION!
Do not attempt to raise the vehicle by jacking on locations other than those indicated in
the Jacking Instructions for this vehicle.
WHAT TO DO IN EMERGENCIES
88
Page 131 of 140
FREQUENTLY ASKED QUESTIONS
GETTING STARTED
• How do I install my LATCH Equipped Child Seat? pg. 15
OPERATION YOUR VEHICLE
• What is my engine break-in recommendation?
• Non SRT Version pg. 22
• SRT Version pg. 22
ELECTRONICS
• Which radio is in my vehicle?
• Uconnect® 130 pg. 34
• Uconnect® 130 WITH SiriusXM™ pg. 36
• Uconnect® 430/430N pg. 38
• Uconnect® 730N pg. 47
• How do I activate the Audio Jack?
• Uconnect® 130 pg. 38
• Uconnect® 130 WITH SiriusXM™ pg. 38
• Uconnect® 430/430N pg. 42
• Uconnect® 730N pg. 50
• How do I set the clock on my radio?
• Uconnect® 130 pg. 36
• Uconnect® 130 WITH SiriusXM™ pg. 36
• Uconnect® 430/430N pg. 39
• Uconnect® 730N pg. 47
• How do I use the Navigation feature?
• Uconnect® 430/430N pg. 44
• Uconnect® 730N pg. 53
• How do I pair my cell phone via Bluetooth® with the Uconnect® Hands-Free Voice
Activation System? pg. 61
• How do I use my USB port to listen to audio through my touch-screen radio? pg. 66
• What does the ECO message mean on the EVIC display? pg. 67
• How do I configure my Universal Garage Door Opener (HomeLink)? pg. 69
FAQ (How To?)
129