key fob DODGE CHALLENGER 2013 3.G User Guide
[x] Cancel search | Manufacturer: DODGE, Model Year: 2013, Model line: CHALLENGER, Model: DODGE CHALLENGER 2013 3.GPages: 140, PDF Size: 5.35 MB
Page 3 of 140
INTRODUCTION/WELCOME
WELCOME FROM CHRYSLER GROUP LLC . . . 2
CONTROLS AT A GLANCE
DRIVER COCKPIT................4
INSTRUMENT CLUSTER.............6
GETTING STARTED
KEYFOB .....................8
REMOTE START.................9
KEYLESS ENTER-N-GO™............9
THEFT ALARM.................13
SEATBELT ...................13
SUPPLEMENTAL RESTRAINT SYSTEM
(SRS)—AIRBAGS ................14
CHILD RESTRAINTS..............15
FRONT SEATS.................18
REARSEAT ...................20
HEATEDSEATS ................20
TILT/TELESCOPING STEERING COLUMN . . . 21
OPERATING YOUR VEHICLE
ENGINE BREAK-IN RECOMMENDATIONS . . . 22
TURN SIGNAL/WIPER/WASHER/HIGH
BEAM LEVER..................23
HEADLIGHT SWITCH..............24
SPEED CONTROL................25
AUTOSTICK®..................26
SPORT MODE – IF EQUIPPED..........27
MANUAL TRANSMISSION 1 TO 4 SKIP SHIFT . . 27MANUAL CLIMATE CONTROLS........28
AUTOMATIC TEMPERATURE
CONTROLS (ATC)...............29
POWER SUNROOF...............30
WIND BUFFETING...............31
ELECTRONICS
YOUR VEHICLE'S SOUND SYSTEM......32
Uconnect® 130.................34
Uconnect® 130 WITH SiriusXM
SATELLITE RADIO...............36
Uconnect® 430/430N.............38
Uconnect® 730N................47
SiriusXM SATELLITE RADIO/TRAVEL LINK . . 57
STEERING WHEEL AUDIO CONTROLS....60
Uconnect® Phone...............60
Uconnect® VOICE COMMAND.........63
Bluetooth® STREAMING AUDIO........66
iPod®/USB/MP3 CONTROL..........66
ELECTRONIC VEHICLE INFORMATION
CENTER (EVIC).................67
PROGRAMMABLE FEATURES.........68
UNIVERSAL GARAGE DOOR OPENER
(HomeLink®)..................69
POWER OUTLETS...............72
UTILITY
TRAILER TOWING WEIGHTS
(MAXIMUM TRAILER WEIGHT RATINGS) . . . 73
RECREATIONAL TOWING
(BEHIND MOTORHOME, ETC.).........73
SRT8
AUTOSTICK®..................74ELECTRONIC CONTROL DAMPING SYSTEM . . 75PERFORMANCE FEATURES..........76
SUMMER/THREE-SEASON TIRES.......77
WHAT TO DO IN EMERGENCIES
ROADSIDE ASSISTANCE............78INSTRUMENT CLUSTER WARNING LIGHTS . . 78IF YOUR ENGINE OVERHEATS.........83
JACKING AND TIRE CHANGING........84
BATTERY LOCATION..............90
TIREFIT KIT..................90
JUMP-STARTING...............96
SHIFT LEVER OVERRIDE...........98
TOWING A DISABLED VEHICLE........99
FREEING A STUCK VEHICLE.........100
EVENT DATA RECORDER (EDR)........101
MAINTAINING YOUR VEHICLE
OPENING THE HOOD.............102
ENGINE COMPARTMENT...........103
FLUIDS AND CAPACITIES - NON SRT8....106
MAINTENANCE SCHEDULE..........110
FUSES.....................118
TIRE PRESSURES...............121
WHEEL AND WHEEL TRIM CARE......122
EXTERIOR BULBS..............122
CONSUMER ASSISTANCE
CHRYSLER GROUP LLC
CUSTOMER CENTER.............123
CHRYSLER CANADA INC.
CUSTOMER CENTER.............123
ASSISTANCE FOR THE HEARING
IMPAIRED ...................123
PUBLICATIONS ORDERING..........123
REPORTING SAFETY DEFECTS IN THE
UNITEDSTATES ................124
MOPAR ACCESSORIES
AUTHENTIC ACCESSORIES BY MOPAR® . . 125
INDEX....................126
FAQ (How To?)
FREQUENTLY ASKED QUESTIONS......129
TABLE OF CONTENTS
Page 10 of 140
KEY FOB
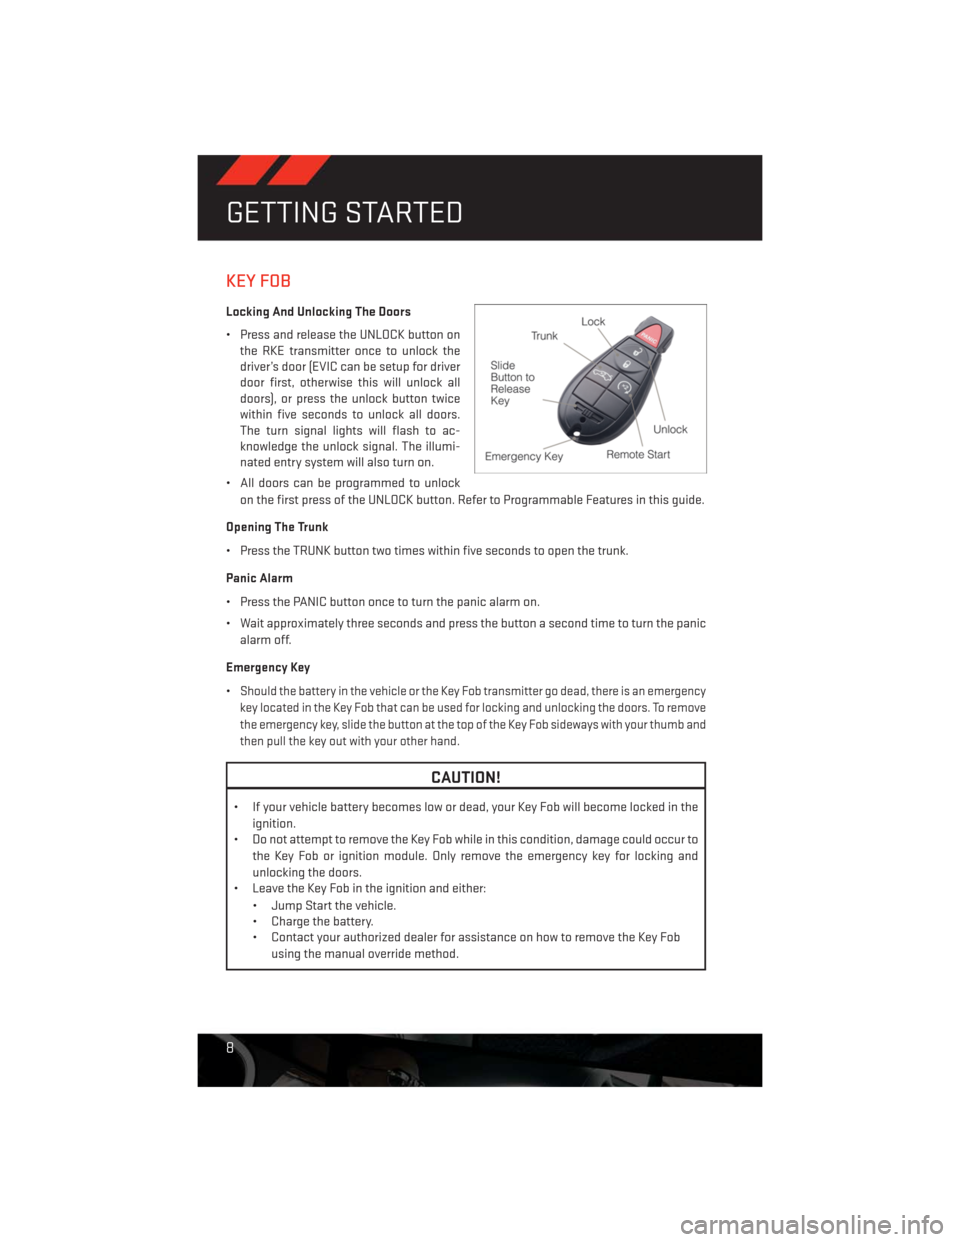
Locking And Unlocking The Doors
• Press and release the UNLOCK button on
the RKE transmitter once to unlock the
driver’s door (EVIC can be setup for driver
door first, otherwise this will unlock all
doors), or press the unlock button twice
within five seconds to unlock all doors.
The turn signal lights will flash to ac-
knowledge the unlock signal. The illumi-
nated entry system will also turn on.
• All doors can be programmed to unlock
on the first press of the UNLOCK button. Refer to Programmable Features in this guide.
Opening The Trunk
• Press the TRUNK button two times within five seconds to open the trunk.
Panic Alarm
• Press the PANIC button once to turn the panic alarm on.
• Wait approximately three seconds and press the button a second time to turn the panic
alarm off.
Emergency Key
•
Should the battery in the vehicle or the Key Fob transmitter go dead, there is an emergency
key located in the Key Fob that can be used for locking and unlocking the doors. To remove
the emergency key, slide the button at the top of the Key Fob sideways with your thumb and
then pull the key out with your other hand.
CAUTION!
• If your vehicle battery becomes low or dead, your Key Fob will become locked in the
ignition.
• Do not attempt to remove the Key Fob while in this condition, damage could occur to
the Key Fob or ignition module. Only remove the emergency key for locking and
unlocking the doors.
• Leave the Key Fob in the ignition and either:
• Jump Start the vehicle.
• Charge the battery.
• Contact your authorized dealer for assistance on how to remove the Key Fob
using the manual override method.
GETTING STARTED
8
Page 11 of 140
WARNING!
• Never leave children alone in a vehicle, or with access to an unlocked vehicle.
Allowing children to be in a vehicle unattended is dangerous for a number of reasons.
A child or others could be severely injured or killed. Children should be warned not to
touch the parking brake, brake pedal, or the shift lever. Do not leave the Key Fob inside
the vehicle, or in a location accessible to children. A child could start the vehicle,
operate power windows, other controls, or move the vehicle.
• Do not leave children or animals inside parked vehicles in hot weather. Interior heat
build-up may cause them to be severely injured or killed.
• Keep Key Fob transmitters away from children. Operation of the Remote Start
System, windows, door locks or other controls could cause serious injury or death.
REMOTE START
• Press the REMOTE START buttonx2on the Key Fob twice within five seconds. Pressing
the REMOTE START button a third time shuts the engine off.
• To drive the vehicle, press the UNLOCK button, insert the Key Fob in the ignition and turn
to the ON/RUN position.
• With remote start, the engine will only run for 15 minutes (timeout) unless the ignition Key
Fob is placed in the ON/RUN position.
• The vehicle must be started with the Key Fob after two consecutive timeouts.
WARNING!
• Do not start or run an engine in a closed garage or confined area. Exhaust gas
contains Carbon Monoxide (CO) which is odorless and colorless. Carbon Monoxide is
poisonous and can cause you or others to be severely injured or killed when inhaled.
• Keep Key Fob transmitters away from children. Operation of the Remote Start
System, windows, door locks or other controls could cause you and others to be
severely injured or killed.
KEYLESS ENTER-N-GO™
• The Keyless Enter-N-Go™ system is an enhancement to the vehicle's Key Fob. This
feature allows you to lock and unlock the vehicle's door(s) and trunk without having to
press the Key Fob lock or unlock buttons, as well as starting and stopping the vehicle with
the press of a button.
GETTING STARTED
9
Page 12 of 140
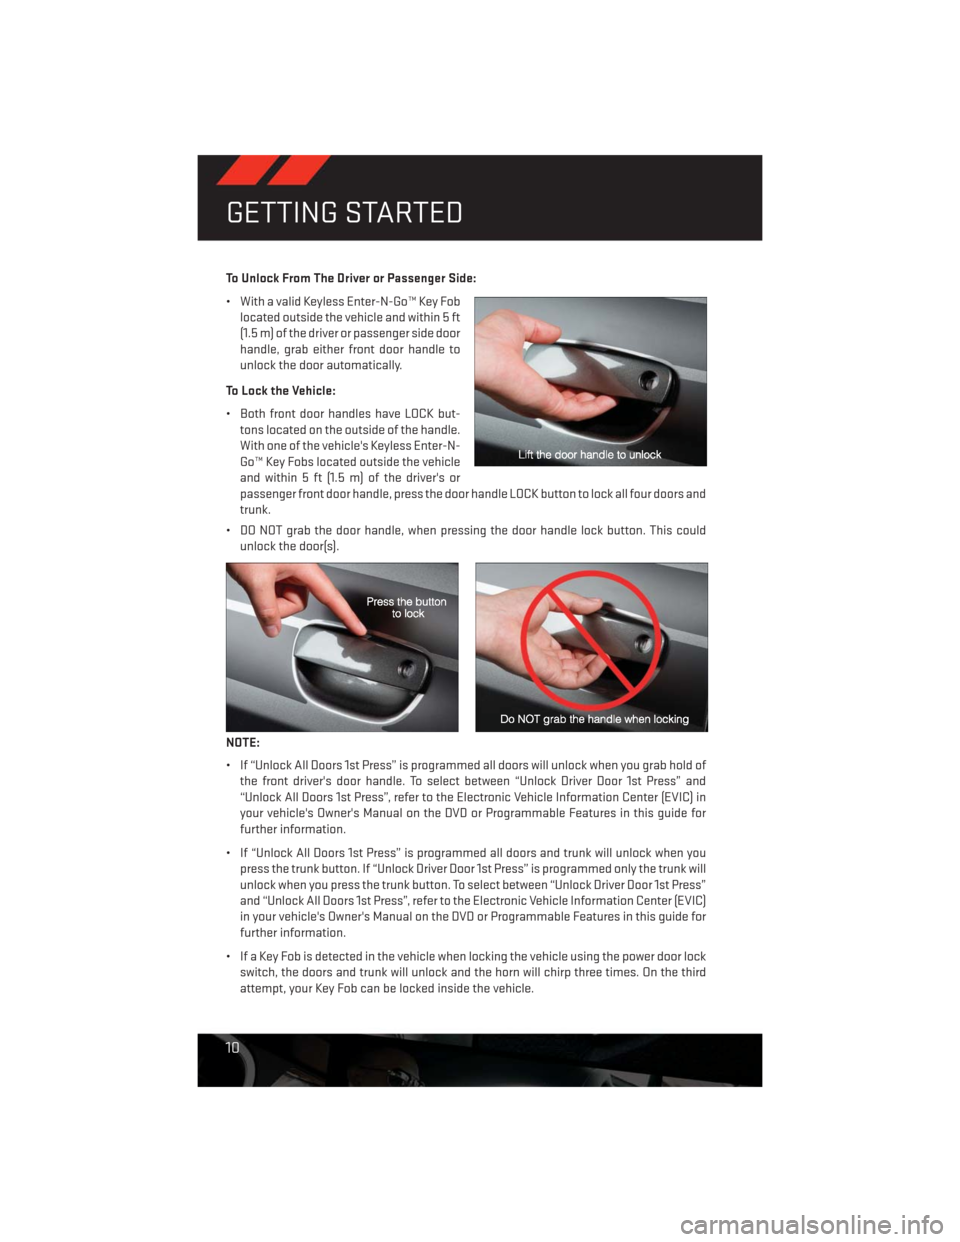
To Unlock From The Driver or Passenger Side:
• With a valid Keyless Enter-N-Go™ Key Fob
located outside the vehicle and within 5 ft
(1.5 m) of the driver or passenger side door
handle, grab either front door handle to
unlock the door automatically.
To Lock the Vehicle:
• Both front door handles have LOCK but-
tons located on the outside of the handle.
With one of the vehicle's Keyless Enter-N-
Go™ Key Fobs located outside the vehicle
and within 5 ft (1.5 m) of the driver's or
passenger front door handle, press the door handle LOCK button to lock all four doors and
trunk.
• DO NOT grab the door handle, when pressing the door handle lock button. This could
unlock the door(s).
NOTE:
• If “Unlock All Doors 1st Press” is programmed all doors will unlock when you grab hold of
the front driver's door handle. To select between “Unlock Driver Door 1st Press” and
“Unlock All Doors 1st Press”, refer to the Electronic Vehicle Information Center (EVIC) in
your vehicle's Owner's Manual on the DVD or Programmable Features in this guide for
further information.
• If “Unlock All Doors 1st Press” is programmed all doors and trunk will unlock when you
press the trunk button. If “Unlock Driver Door 1st Press” is programmed only the trunk will
unlock when you press the trunk button. To select between “Unlock Driver Door 1st Press”
and “Unlock All Doors 1st Press”, refer to the Electronic Vehicle Information Center (EVIC)
in your vehicle's Owner's Manual on the DVD or Programmable Features in this guide for
further information.
• If a Key Fob is detected in the vehicle when locking the vehicle using the power door lock
switch, the doors and trunk will unlock and the horn will chirp three times. On the third
attempt, your Key Fob can be locked inside the vehicle.
GETTING STARTED
10
Page 13 of 140
•After pressing the Keyless Enter-N-Go™ LOCK button, you must wait 2 seconds before you
can lock or unlock the vehicle using the door handle. This is done to allow you to check if the
vehicle is locked by pulling the door handle, without the vehicle reacting and unlocking.
• If a Keyless Enter-N-Go™ door handle has not been used for 72 hours, the Keyless
Enter-N-Go™ feature for that handle may time out. Pulling the deactivated front door
handle will reactivate the door handle's Keyless Enter-N-Go™ feature.
To Enter the Trunk
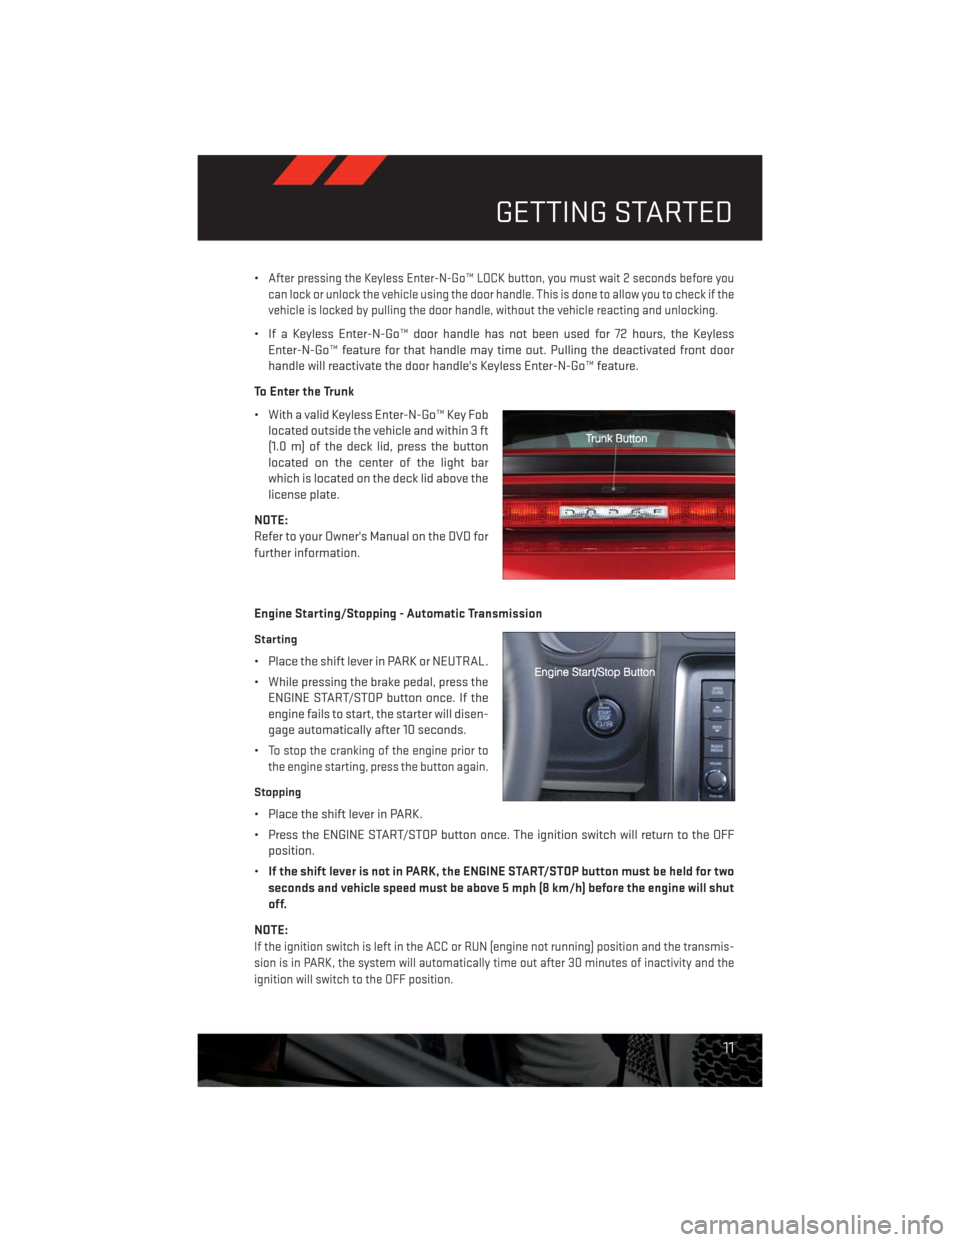
• With a valid Keyless Enter-N-Go™ Key Fob
located outside the vehicle and within 3 ft
(1.0 m) of the deck lid, press the button
located on the center of the light bar
which is located on the deck lid above the
license plate.
NOTE:
Refer to your Owner's Manual on the DVD for
further information.
Engine Starting/Stopping - Automatic Transmission
Starting
• Place the shift lever in PARK or NEUTRAL.
• While pressing the brake pedal, press the
ENGINE START/STOP button once. If the
engine fails to start, the starter will disen-
gage automatically after 10 seconds.
•
To stop the cranking of the engine prior to
the engine starting, press the button again.
Stopping
• Place the shift lever in PARK.
• Press the ENGINE START/STOP button once. The ignition switch will return to the OFF
position.
•If the shift lever is not in PARK, the ENGINE START/STOP button must be held for two
seconds and vehicle speed must be above 5 mph (8 km/h) before the engine will shut
off.
NOTE:
If the ignition switch is left in the ACC or RUN (engine not running) position and the transmis-
sion is in PARK, the system will automatically time out after 30 minutes of inactivity and the
ignition will switch to the OFF position.
GETTING STARTED
11
Page 15 of 140
THEFT ALARM
To Arm
•Keyless Enter-N-Go™ button installed:Press the Keyless Enter-N-Go™ Start/Stop but-
ton until the Electronic Vehicle Information Center (EVIC) indicates that the vehicle
ignition is “OFF”. Press the power door lock switch while the door is open, press the Key
Fob LOCK button, or with one of the Key Fobs located outside the vehicle and within 5 ft
(1.5 m) of the driver's and passenger front door handles, press the Keyless Enter-N-Go™
LOCK button located on the door handle.
•Keyless Enter-N-Go™ button not installed:Turn the ignition switch to the “OFF” posi-
tion. Press the power door lock switch while the door is open, press the Key Fob LOCK
button, or with one of the Key Fobs located outside the vehicle and within 5 ft (1.5 m) of
the driver's and passenger front door handles, press the Keyless Enter-N-Go™ LOCK
button located on the door handle.
NOTE:
After pressing the Keyless Enter-N-Go™ LOCK button, you must wait two seconds before
you can lock or unlock the vehicle via the door handle.
To Disarm
•Keyless Enter-N-Go™ button installed:Press the Key Fob UNLOCK button or with one of
the Key Fobs located outside the vehicle and within 5 ft (1.5 m) of the driver's and
passenger front door handles, grab the Keyless Enter-N-Go™ door handle and enter the
vehicle, then press the Keyless Enter-N-Go™ Start/Stop button (requires at least one
valid Key Fob in the vehicle).
•Keyless Enter-N-Go™ button not installed:Press the Key Fob UNLOCK button or with
one of the Key Fobs located outside the vehicle and within 5 ft (1.5 m) of the driver's and
passenger front door handles, grab the Keyless Enter-N-Go™ door handle and enter the
vehicle, then turn the ignition to the ON/RUN position.
SEAT BELT
• Be sure everyone in your vehicle is in a seat and using a seat belt properly.
• Position the lap belt across your thighs, below your abdomen. To remove slack in the lap
portion, pull up a bit on the shoulder belt. To loosen the lap belt if it is too tight, tilt the
latch plate and pull on the lap belt. A snug belt reduces the risk of sliding under the belt
in a collision.
• Position the shoulder belt on your chest so that it is comfortable and not resting on your
neck. The retractor will withdraw any slack in the belt.
• A shoulder belt placed behind you will not protect you from injury during a collision. You
are more likely to hit your head in a collision if you do not wear your shoulder belt. The lap
and shoulder belt are meant to be used together.
GETTING STARTED
13
Page 70 of 140
PROGRAMMABLE FEATURES
Electronic Vehicle Information Center (EVIC) – If Equipped
•
The EVIC can be used to program the following Personal Settings. Press and release the
MENU
button until Personal Settings displays, then press the UPor DOWNbut-
tons to scroll through the settings. Press the SELECT
button to change the setting.
• Language • Hill Start Assist (HSA)
• Unlock Doors Automatically on Exit •
Turn Headlights On with Remote Key Unlock
• Remote Key Unlock • Delay Power Off to Accessories Until Exit
• Remote Start Comfort Sys. • Turn-by-Turn Navigation
• Sound Horn with Remote Key Lock • Display ECO Mode
• Flash Lights with Remote Key Lock • Keyless Enter-N-Go™
• Headlamps On with Wipers
(Available with Auto Headlamps Only)• Enable/Disable The Rear Park Assist
System
• Delay Turning Headlights Off • Display Units of Measure In
• Lock Doors Automatically • Park Assist Sound And Display
Key Fob Programmable Features
• The following features may also be programmed by using the Key Fob transmitter or the
ignition switch and driver's door lock switch.
NOTE:
Pressing the LOCK button while you are inside the vehicle will activate the Vehicle Security
Alarm. Opening a door with the Vehicle Security Alarm activated will cause the alarm to
sound. Press the UNLOCK button to deactivate the Vehicle Security Alarm.
Unlock On First Press
• To unlock either the driver's side, or all doors, on the first press of the UNLOCK button:
• Press and hold the LOCK button for at least four seconds, but no longer than 10 sec-
onds. Then, press and hold the UNLOCK button while still holding the LOCK button.
• Release both buttons at the same time.
Auto Unlock Doors On Exit
• To have all of the vehicle doors unlock when any door is opened:
• Enter your vehicle and close all the doors, and fasten your seat belt.
• Cycle the ignition switch between the LOCK and ON position four times, ending in the
LOCK position (do not start the engine).
• Press the power door UNLOCK switch to unlock the doors. A single chime will indicate
that programming is complete.
ELECTRONICS
68
Page 129 of 140
Jacking Instructions...........86
Jack Location..............84
Jack Operation..............86
JumpStarting ..............96
KeyFob...................8
Key Fob Programmable Features.....68
Keyless Enter-N-Go............9
Lock/Unlock.............10
Starting/Stopping .........11, 12
Lane Change Assist...........23
Lap/Shoulder Belts............13
LATCH (Lower Anchors and Tether
for CHildren)..............15
Lights
Tire Pressure Monitoring (TPMS) . . .78
Warning (Instrument Cluster
Description)..............6
Maintenance Record.........114, 117
Maintenance Schedule.......110, 115
Malfunction Indicator Light
(CheckEngine) ............80
MOPAR® Accessories..........125
Navigation Voice Prompt Volume. . .44, 54
New Vehicle Break-In Period.......22
OilChangeIndicator ...........81
Oil Change Indicator, Reset........81
Oil, Engine
Capacity...............106
Outlet
Power .................72
Overheating, Engine...........83
Placard, Tire and Loading Information. .121
Power
Outlet (Auxiliary Electrical Outlet)...72
Seats .................18
Steering...............106
Power Sunroof..............30
Preparation for Jacking.........86
Programmable Electronic
Features..............68,76Rain Sensitive Wiper System.......23
Rear Seat, Folding............20
Recreational Towing...........73
Remote Starting System..........9
Replacement Bulbs...........122
Reporting Safety Defects........124
Rocking Vehicle When Stuck......100
Schedule, Maintenance.........110
Seat Belts.................13
Seats...................18
Adjustment..............18
Heated................20
Power .................18
Rear Folding.............20
Security Against Theft..........13
Shift Lever Override............98
Signals, Turn...............23
SpareTire.................84
Spark Plugs...............106
Speed Control
Accel/Decel.............25
Cancel................25
Resume ...............25
Set ..................25
Starting
Remote ................9
Steering
Tilt Column..............21
Steering Wheel Audio Controls......60
Stuck, Freeing..............100
Temperature Control, Automatic (ATC) . .29
Theft System Arming...........13
Theft System Disarming.........13
Tilt Steering Column...........21
TIREFIT..................90
Tires
Air Pressure.............121
Changing.............84,86
Flat Changing............84
Jacking................86
SpareTire ..............84
Towing...................73
Disabled Vehicle...........99
Recreational.............73
INDEX
127