interior lights DODGE CHALLENGER 2013 3.G User Guide
[x] Cancel search | Manufacturer: DODGE, Model Year: 2013, Model line: CHALLENGER, Model: DODGE CHALLENGER 2013 3.GPages: 140, PDF Size: 5.35 MB
Page 26 of 140

HEADLIGHT SWITCH
Automatic Headlights/Parking
Lights/Headlights
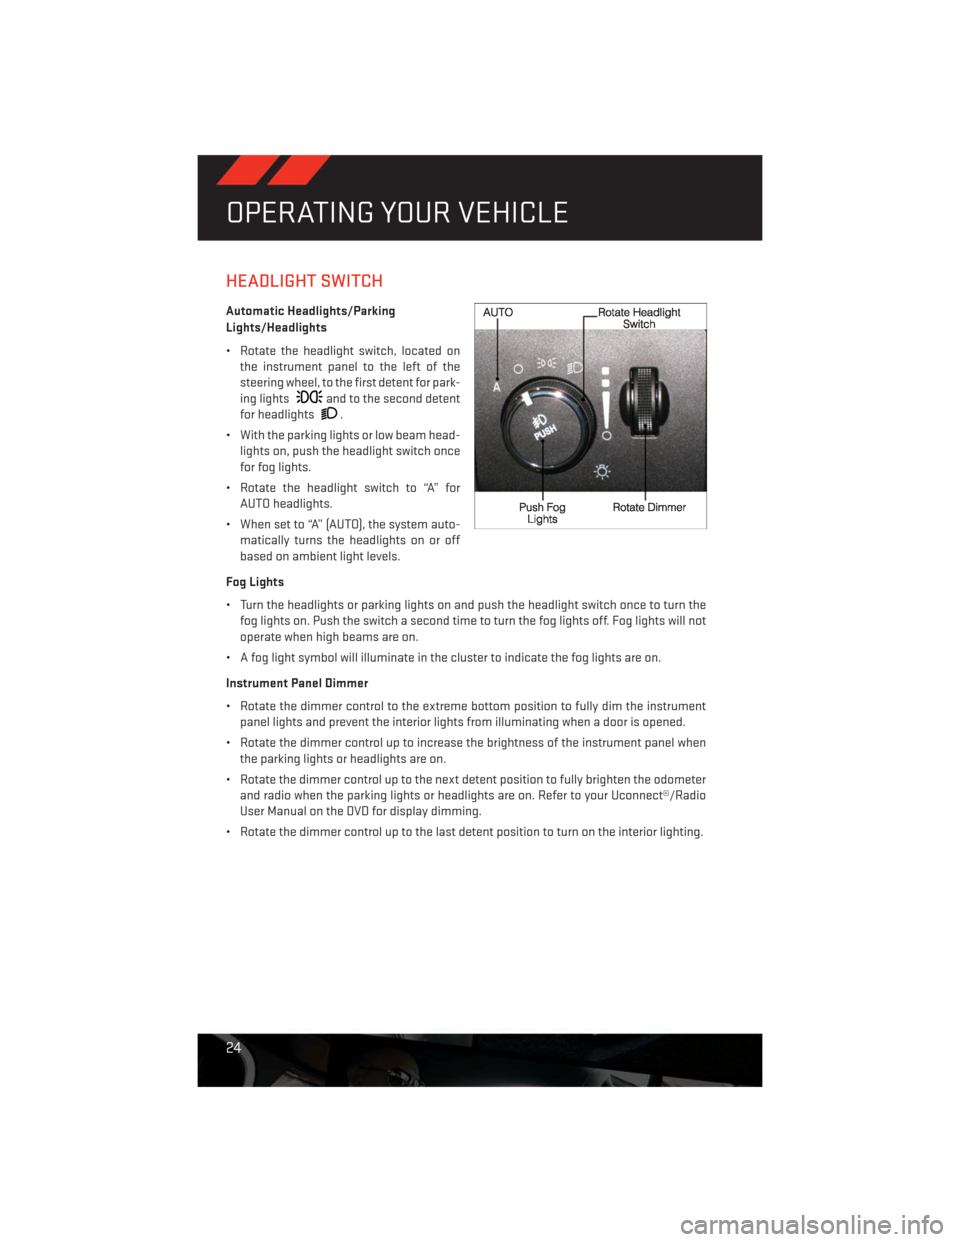
• Rotate the headlight switch, located on
the instrument panel to the left of the
steering wheel, to the first detent for park-
ing lights
and to the second detent
for headlights
.
• With the parking lights or low beam head-
lights on, push the headlight switch once
for fog lights.
• Rotate the headlight switch to “A” for
AUTO headlights.
• When set to “A” (AUTO), the system auto-
matically turns the headlights on or off
based on ambient light levels.
Fog Lights
• Turn the headlights or parking lights on and push the headlight switch once to turn the
fog lights on. Push the switch a second time to turn the fog lights off. Fog lights will not
operate when high beams are on.
• A fog light symbol will illuminate in the cluster to indicate the fog lights are on.
Instrument Panel Dimmer
• Rotate the dimmer control to the extreme bottom position to fully dim the instrument
panel lights and prevent the interior lights from illuminating when a door is opened.
• Rotate the dimmer control up to increase the brightness of the instrument panel when
the parking lights or headlights are on.
• Rotate the dimmer control up to the next detent position to fully brighten the odometer
and radio when the parking lights or headlights are on. Refer to your Uconnect®/Radio
User Manual on the DVD for display dimming.
• Rotate the dimmer control up to the last detent position to turn on the interior lighting.
OPERATING YOUR VEHICLE
24
Page 113 of 140

Once A Month Or Before A Long Trip:
• Check engine oil level
• Check windshield washer fluid level
• Check the tire inflation pressures and look for unusual wear or damage
• Check the fluid levels of the coolant reservoir, brake master cylinder, power steering and
transmission as needed
• Check function of all interior and exterior lights
Required Maintenance Intervals.
Refer to the maintenance schedules on the following page for the required maintenance
intervals.
At Every Oil Change Interval As Indicated By Oil Change Indicator System:
• Change oil and filter
• Rotate the tires.Rotate at the first sign of irregular wear, even if it occurs before the oil
indicator system turns on.
• Inspect battery and clean and tighten terminals as required
• Inspect automatic transmission fluid if equipped with dipstick
• Inspect brake pads, shoes, rotors, drums, hoses and park brake
• Inspect engine cooling system protection and hoses
• Inspect exhaust system
• Inspect engine air cleaner if using in dusty or off-road conditions
MAINTAINING YOUR VEHICLE
111
Page 127 of 140

AUTHENTIC ACCESSORIES BY MOPAR®
• The following highlights just some of the many Authentic Dodge Accessories by Mopar
featuring a fit, finish, and functionality specifically for your Dodge Challenger.
• In choosing Authentic Accessories you gain far more than expressive style, premium
protection, or extreme entertainment, you also benefit from enhancing your vehicle with
accessories that have been thoroughly tested and factory-approved.
• For the full line of Authentic Dodge Accessories by Mopar, visit your local Dodge dealer-
ship or online at mopar.com.
EXTERIOR:
• Rear Go-Wing Spoiler • Body Decal Kit • T/A Hood
• Molded Splash Guards • Full Vehicle Cover • Fuel Filler Doors
• Custom Wheels • Graphics Packages • Quad Exhaust Tips
• Hood Venting System
INTERIOR:
• Premium Carpet Floor Mats • Katzkin Leather Seats • Bright Pedal Kit
• Door Sill Guards • Pedal Kit • Shifters
• Slush Mats
ELECTRONICS:
•
Portable Navigation Systems• Uconnect® Web (WiFi) • Uconnect® Phone
• iPod® Adapter • Media Center Upgrades • Remote Start
• Kicker® Double SubWoofer • Electronic Vehicle Tracking
System• Ecometer
• Rear Park Assist
• iPod® is a registered trademark of Apple, Inc.
• Kicker® is a registered trademark of Stillwater Designs and Audio, Inc.
MOPAR ACCESSORIES
125