change wheel DODGE CHALLENGER 2015 3.G Owners Manual
[x] Cancel search | Manufacturer: DODGE, Model Year: 2015, Model line: CHALLENGER, Model: DODGE CHALLENGER 2015 3.GPages: 603, PDF Size: 14.97 MB
Page 163 of 603
•Normal (fixed speed) cruise control mode is for cruis-
ing at a constant preset speed. For additional informa-
tion, refer to “Normal (Fixed Speed) Cruise Control
Mode” in this section.
NOTE:The system will not react to preceding vehicles.
Always be aware of the mode selected.
You can change the mode by using the Cruise Control
buttons. The two control modes function differently.
Always confirm which mode is selected.
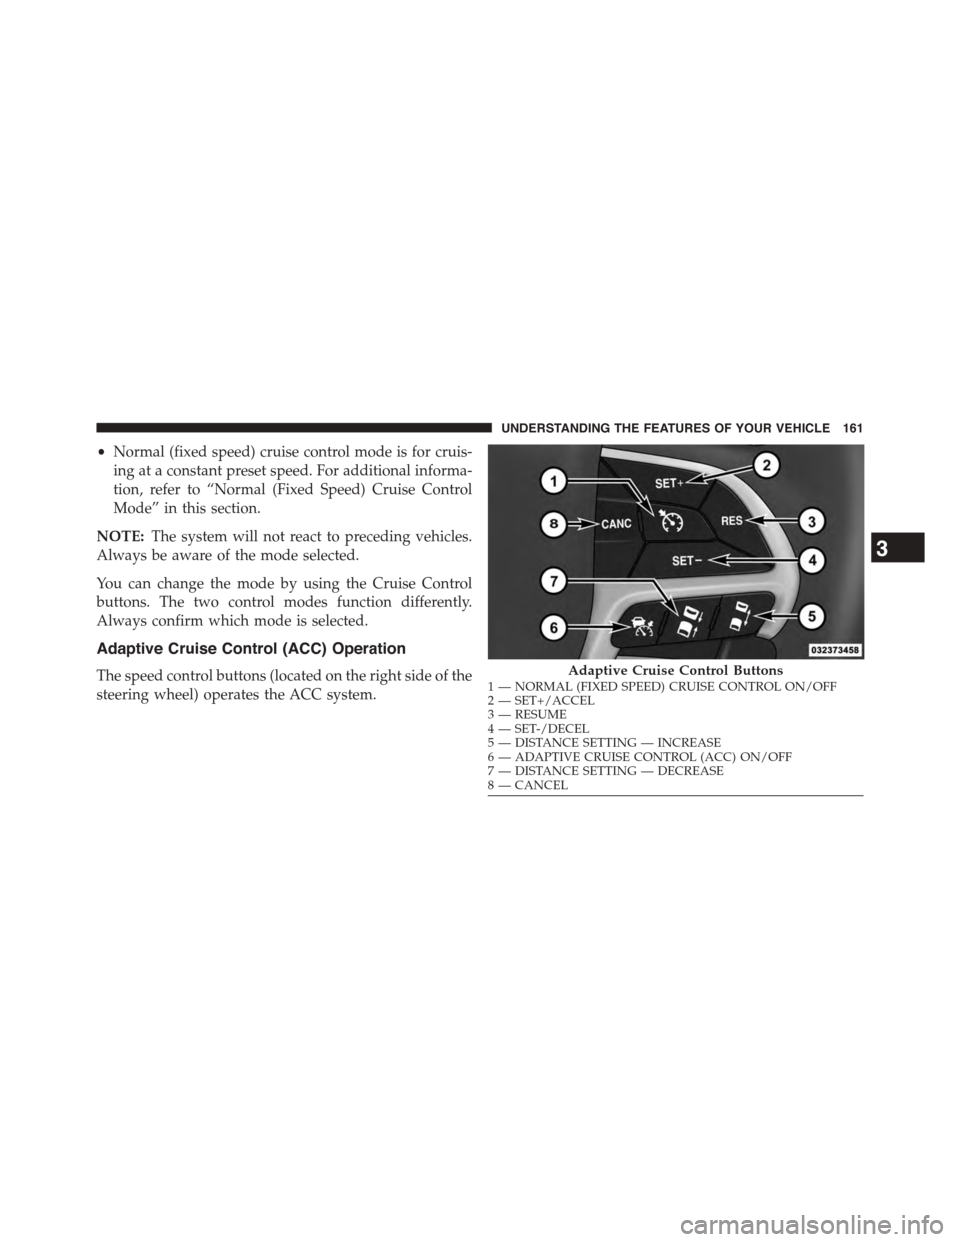
Adaptive Cruise Control (ACC) Operation
The speed control buttons (located on the right side of the
steering wheel) operates the ACC system.
Adaptive Cruise Control Buttons1—NORMAL(FIXEDSPEED)CRUISECONTROLON/OFF2—SET+/ACCEL3—RESUME4—SET-/DECEL5—DISTANCESETTING—INCREASE6—ADAPTIVECRUISECONTROL(ACC)ON/OFF7—DISTANCESETTING—DECREASE8—CANCEL
3
UNDERSTANDING THE FEATURES OF YOUR VEHICLE 161
Page 174 of 603
Adaptive Cruise Control (ACC) Menu
The DID displays the current ACC system settings. The
DID is located in the center of the instrument cluster. The
information it displays depends on ACC system status.
Press the ADAPTIVE CRUISE CONTROL (ACC) ON/
OFF button (located on the steering wheel) until one of
the following displays in the DID:
Adaptive Cruise Control Off
When ACC is deactivated, the display will read “Adap-
tive Cruise Control Off.”
Adaptive Cruise Control Ready
When ACC is activated but the vehicle speed setting has
not been selected, the display will read “Adaptive Cruise
Control Ready.”
Press the SET + or the SET- button (located on the
steering wheel) and the following will display in the DID:
ACC SET
When ACC is set, the set speed will display in the
instrument cluster.
The ACC screen may display once again if any ACC
activity occurs, which may include any of the following:
•Distance Setting Change
•System Cancel
•Driver Override
•System Off
•ACC Proximity Warning
•ACC Unavailable Warning
•The DID will return to the last display selected after
five seconds of no ACC display activity
172 UNDERSTANDING THE FEATURES OF YOUR VEHICLE
Page 237 of 603
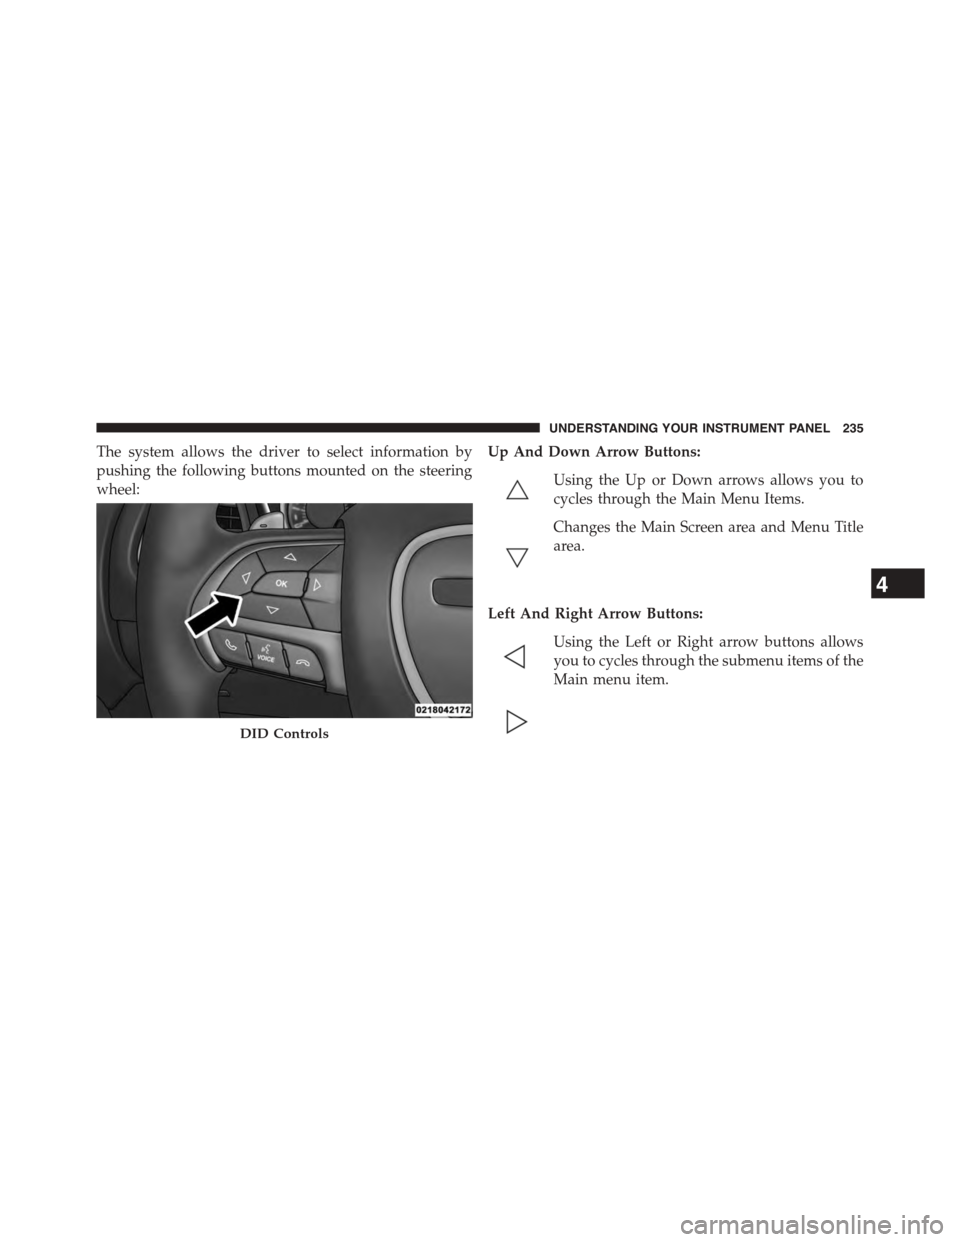
The system allows the driver to select information by
pushing the following buttons mounted on the steering
wheel:
Up And Down Arrow Buttons:
Using the Up or Down arrows allows you to
cycles through the Main Menu Items.
Changes the Main Screen area and Menu Title
area.
Left And Right Arrow Buttons:
Using the Left or Right arrow buttons allows
you to cycles through the submenu items of the
Main menu item.
DID Controls
4
UNDERSTANDING YOUR INSTRUMENT PANEL 235
Page 240 of 603
Use the steering wheel DID controls for the following
procedure(s):
1. Without pushing the brake pedal, cycle the ignition to
the ON/RUN position (do not start the engine.)
2. Push and release theDOWNarrow button to scroll
downward through the main menu to “Vehicle Info”.
3. Push and release theRIGHTarrow button to access
the ”Oil Life” screen.
4. Push and hold theOKbutton until the ”Oil Life”
screen displays.
5. Push and release theDOWNarrow button to select “
Ye s”, then push and release theOKbutton to select
reset of the Oil Life.
6. Push and release theUparrow button to exit the sub
menu screen.
NOTE:If the indicator message illuminates when you
start the vehicle, the oil change indicator system did not
reset. If necessary, repeat this procedure.
DID Selectable Menu Items
Push and release the UP or DOWN arrow buttons until
the desired Selectable Menu item is highlighted in the
DID.
Follow the Menu or submenu prompts as desired.
238 UNDERSTANDING YOUR INSTRUMENT PANEL
Page 248 of 603
Top Speed
When selected, this screen displays the To Speed during
a drive cycle:
•Populates a top speed from first drive cycle and every
time that speed is exceeded that number is stored here
unless/until the driver resets the screen.
•Latching over ignition cycles.
•Units will change with the global change in units.
Driver Assist
Adaptive Cruise Control (ACC) Menu
The DID displays the current ACC system settings. The
information displayed depends on ACC system status.
Push the ADAPTIVE CRUISE CONTROL (ACC) ON/
OFF button (located on the steering wheel) until one of
the following displays in the DID:
Adaptive Cruise Control Off
When ACC is deactivated, the display will read “Adap-
tive Cruise Control Off.”
Adaptive Cruise Control Ready
When ACC is activated but the vehicle speed setting has
not been selected, the display will read “Adaptive Cruise
Control Ready.”
Push the SET + or the SET- button (located on the steering
wheel) and the following will display in the DID:
ACC SET
When ACC is set, the set speed will display in the
instrument cluster.
The ACC screen may display once again if any ACC
activity occurs, which may include any of the following:
•Distance Setting Change
246 UNDERSTANDING YOUR INSTRUMENT PANEL
Page 265 of 603
Auto Comfort Systems — If Equipped
After pressing the “Auto-On Comfort & Remote Start”
button on the touchscreen the following settings will be
available:
•Auto-On Driver Heated/Ventilated Seat & Steering
Wheel With Vehicle Start — If Equipped
When this feature is selected the driver’s heated seat and
heated steering wheel will automatically turn ON when
temperatures are below 40° F (4.4° C). When tempera-
tures are above 80° F (26.7° C) the driver vented seat will
turn ON. To make your selection, press the “Auto Heated
Seats” button on the touchscreen then select either “Off,”
“Remote Start” or “All Starts.” Press the back arrow/
Done button on the touchscreen to return to the previous
menu.
Engine Off Options
After pressing the “Engine Off Options” button on the
touchscreen the following settings will be available.
•Headlight Off Delay
When this feature is selected, the driver can choose to
have the headlights remain on for 0, 30, 60, or 90 seconds
when exiting the vehicle. To change the Headlight Off
Delay status press the “Headlight Off Delay” button on
the touchscreen and select from “0,” “30,” “60,” or “90”
buttons on the touchscreen to select your desired time
interval. Press the back arrow/Done button on the touch-
screen to return to the previous menu.
•Engine Off Power Delay
When this feature is selected, the power window
switches, radio, Uconnect® phone system (if equipped),
DVD video system (if equipped), power sunroof (if
equipped), and power outlets will remain active for up to
4
UNDERSTANDING YOUR INSTRUMENT PANEL 263
Page 304 of 603
Launch Control will abort before launch completion and
display “Launch Aborted” in the DID for any the follow-
ing conditions:
•The brake is applied during launch.
•The ESC system detects that the vehicle is no longer
moving in a straight line.
•The “ESC OFF” button is pressed to change the ESC
system to another mode if Launch Control is enabled.
NOTE:Launch mode is not available within the first 500
miles of engine break-in.
NOTE:Do not attempt to shift when the drive wheels
are spinning and do not have traction. Damage to the
transmission may occur.
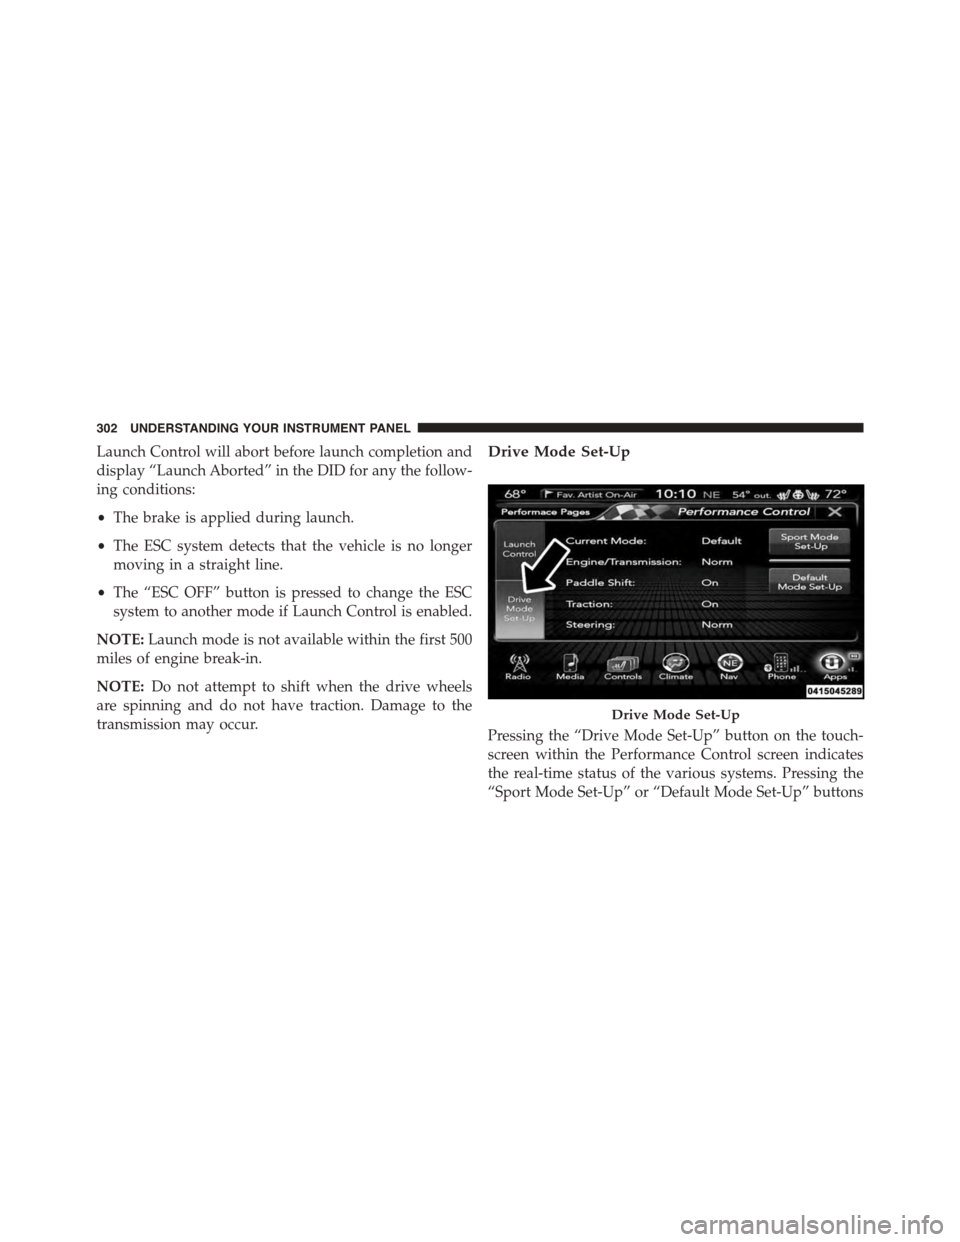
Drive Mode Set-Up
Pressing the “Drive Mode Set-Up” button on the touch-
screen within the Performance Control screen indicates
the real-time status of the various systems. Pressing the
“Sport Mode Set-Up” or “Default Mode Set-Up” buttons
Drive Mode Set-Up
302 UNDERSTANDING YOUR INSTRUMENT PANEL
Page 307 of 603
Sport Mode
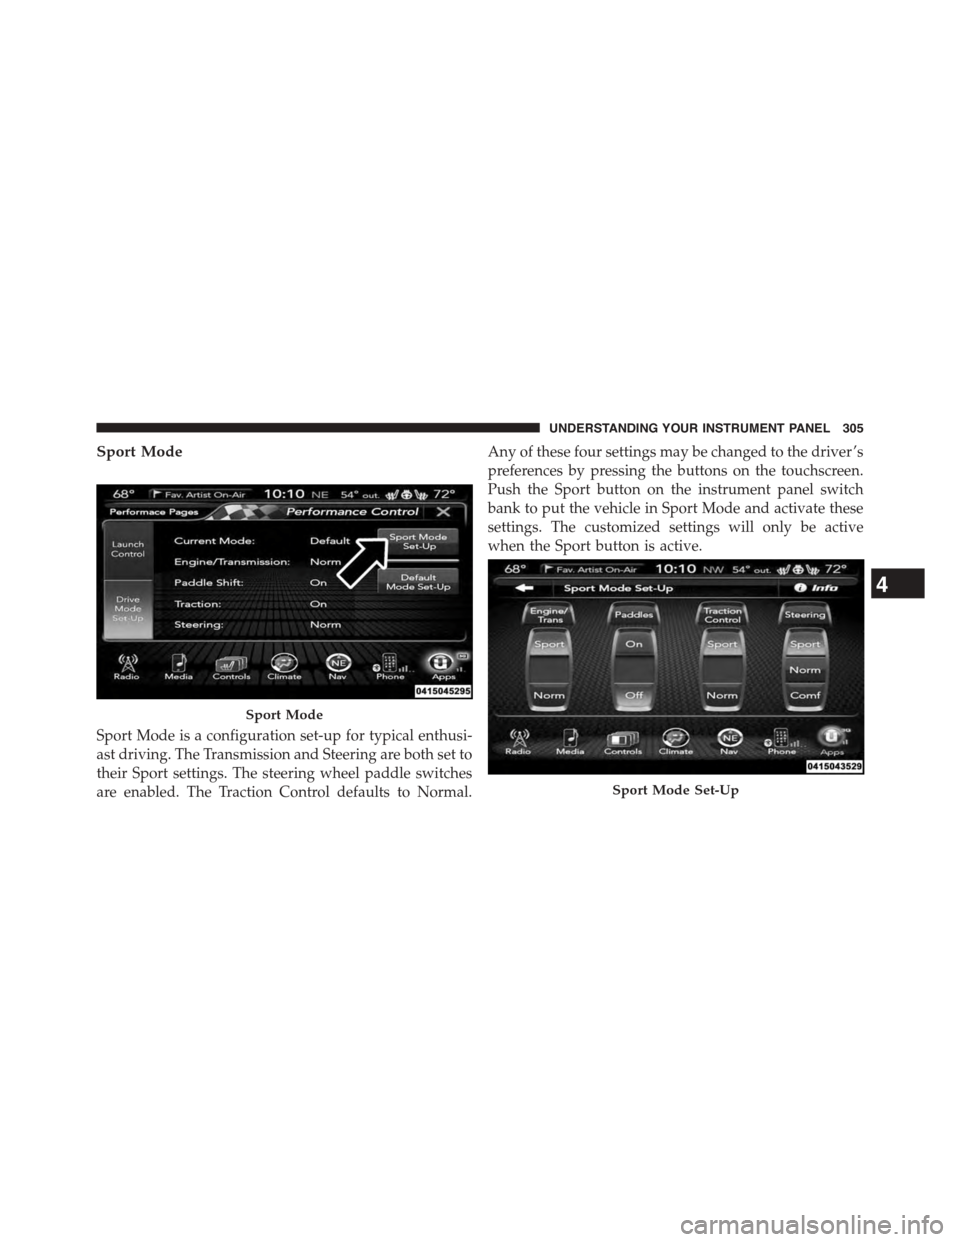
Sport Mode is a configuration set-up for typical enthusi-
ast driving. The Transmission and Steering are both set to
their Sport settings. The steering wheel paddle switches
are enabled. The Traction Control defaults to Normal.
Any of these four settings may be changed to the driver ’s
preferences by pressing the buttons on the touchscreen.
Push the Sport button on the instrument panel switch
bank to put the vehicle in Sport Mode and activate these
settings. The customized settings will only be active
when the Sport button is active.
Sport Mode
Sport Mode Set-Up
4
UNDERSTANDING YOUR INSTRUMENT PANEL 305
Page 416 of 603
wear and correct cold tire inflation pressures. The manu-
facturer strongly recommends that you use tires equiva-
lent to the originals in size, quality and performance
when replacement is needed. Refer to the paragraph on
“Tread Wear Indicator.” Refer to the Tire and Loading
Information placard or the Vehicle Certification Label for
the size designation of your tire. The Load Index and
Speed Symbol for your tire will be found on the original
equipment tire sidewall. See the Tire Sizing Chart ex-
ample found in the Tire Safety Information section of this
manual for more information relating to the Load Index
and Speed Symbol of a tire.
It is recommended to replace the two front tires or two
rear tires as a pair. Replacing just one tire can seriously
affect your vehicle’s handling. If you ever replace a
wheel, make sure that the wheel’s specifications match
those of the original wheels.
It is recommended you contact your authorized tire
dealer or original equipment dealer with any questions
you may have on tire specifications or capability. Failure
to use equivalent replacement tires may adversely affect
the safety, handling, and ride of your vehicle.
WARNING!
•Do not use a tire, wheel size or rating other than
that specified for your vehicle. Some combinations
of unapproved tires and wheels may change sus-
pension dimensions and performance characteris-
tics, resulting in changes to steering, handling, and
braking of your vehicle. This can cause unpredict-
able handling and stress to steering and suspen-
sion components. You could lose control and have
a collision resulting in serious injury or death. Use
only the tire and wheel sizes with load ratings
approved for your vehicle.
(Continued)
414 STARTING AND OPERATING
Page 460 of 603
WARNING!
•Do not attempt to seal a tire on the side of the
vehicle closest to traffic. Pull far enough off the
road to avoid the danger of being hit when using
the Tire Service Kit.
•Do not use Tire Service Kit or drive the vehicle
under the following circumstances:
– If the puncture in the tire tread is approximately
1/4” (6 mm) or larger.
– If the tire has any sidewall damage.
– If the tire has any damage from driving with
extremely low tire pressure.
– If the tire has any damage from driving on a flat
tire.
– If the wheel has any damage.
– If you are unsure of the condition of the tire or
the wheel.
(Continued)
WARNING!(Continued)
•Keep Tire Service Kit away from open flames or
heat source.
•A loose Tire Service Kit thrown forward in a
collision or hard stop could endanger the occupants
of the vehicle. Always stow the Tire Service Kit in
the place provided. Failure to follow these warn-
ings can result in injuries that are serious or fatal to
you, your passengers, and others around you.
•Take care not to allow the contents of Tire Service
Kit to come in contact with hair, eyes, or clothing.
Tire Service Kit is harmful if inhaled, swallowed,
or absorbed through the skin. It causes skin, eye,
and respiratory irritation. Flush immediately with
plenty of water if there is any contact with eyes or
skin. Change clothing as soon as possible, if there
is any contact with clothing.
(Continued)
458 WHAT TO DO IN EMERGENCIES