check transmission fluid DODGE CHALLENGER 2015 3.G Owners Manual
[x] Cancel search | Manufacturer: DODGE, Model Year: 2015, Model line: CHALLENGER, Model: DODGE CHALLENGER 2015 3.GPages: 603, PDF Size: 14.97 MB
Page 93 of 603
While cruising, brief full-throttle acceleration within the
limits of local traffic laws contributes to a good break-in.
However, wide-open throttle acceleration in low gear can
be detrimental and should be avoided.
The engine oil, transmission fluid, and axle lubricant
installed at the factory is high-quality and energy-
conserving. Oil, fluid, and lubricant changes should be
consistent with anticipated climate and conditions under
which vehicle operations will occur. For the recom-
mended viscosity and quality grades, refer to “Mainte-
nance Procedures” in “Maintaining Your Vehicle”.
CAUTION!
Never use Non-Detergent Oil or Straight Mineral Oil
in the engine or damage may result.
NOTE:A new engine may consume some oil during its
first few thousand miles (kilometers) of operation. This
should be considered a normal part of the break-in and
not interpreted as an indication of difficulty. Please check
your oil level with the engine oil indicator often during
the break in period. Add oil as required.
For vehicles equipped with the 6.4L use the following
engine break-in recommendations:
Despite modern technology and World Class manufac-
turing methods, the moving parts of the vehicle must still
wear in with each other. This wearing in occurs mainly
during the first 500 miles (805 km) and continues through
the first oil change interval.
2
THINGS TO KNOW BEFORE STARTING YOUR VEHICLE 91
Page 229 of 603
7. Gear Status Indicator — Automatic Transmission
Only
The Gear Status Indicator is self-contained within the
instrument cluster. It displays the gear position of the
automatic transmission.
8. Seat Belt Reminder Light
This light will turn on for four to eight seconds as
a bulb check when the ignition switch is first
placed in ON/RUN. A chime will sound if the
driver’s seat belt is unbuckled during the bulb check. The
Seat Belt Warning Light will flash or remain on continu-
ously if the driver’s seat belt remains unbuckled after the
bulb check or when driving. Refer to “Occupant Re-
straints” in “Things To Know Before Starting Your Ve-
hicle” for further information.
9. Brake Warning Light
This light monitors various brake functions,
including brake fluid level and parking brake
application. If the brake light turns on it may
indicate that the parking brake is applied, that
the brake fluid level is low, or that there is a problem with
the anti-lock brake system reservoir.
If the light remains on when the parking brake has been
disengaged, and the fluid level is at the full mark on the
master cylinder reservoir, it indicates a possible brake
hydraulic system malfunction. In this case, the light will
remain on until the condition has been corrected.
The dual brake system provides a reserve braking capac-
ity in the event of a failure to a portion of the hydraulic
system. A leak in either half of the dual brake system is
indicated by the Brake Warning Light which will turn on
when the brake fluid level in the master cylinder has
dropped below a specified level.
4
UNDERSTANDING YOUR INSTRUMENT PANEL 227
Page 462 of 603
4. Remove the cap from the valve stem and then screw
the fitting at the end of the Sealant Hose (6) onto the
valve stem.
5. Uncoil the Power Plug (8) and insert the plug into the
vehicle’s 12 Volt power outlet.
NOTE:Do not remove foreign objects (e.g., screws or
nails) from the tire.
(C) Injecting Tire Service Kit Sealant Into The
Deflated Tire:
•Always start the engine before turning ON the Tire
Service Kit.
NOTE:Manual transmission vehicles must have the
parking brake engaged and the shift lever in NEUTRAL.
•After pressing the Power Button (4), the sealant (white
fluid) will flow from the Sealant Bottle (1) through the
Sealant Hose (6) and into the tire.
NOTE:Sealant may leak out through the puncture in the
tire.
If the sealant (white fluid) does not flow within0–10
seconds through the Sealant Hose (6):
1. Press the Power Button (4) to turn Off the Tire Service
Kit. Disconnect the Sealant Hose (6) from the valve
stem. Make sure the valve stem is free of debris.
Reconnect the Sealant Hose (6) to the valve stem.
Check that the Mode Select Knob (5) is in the Sealant
Mode position and not Air Mode. Press the Power
Button (4) to turn On the Tire Service Kit.
2. Connect the Power Plug (8) to a different 12 Volt
power outlet in your vehicle or another vehicle, if
available. Make sure the engine is running before
turning ON the Tire Service Kit.
3. The Sealant Bottle (1) may be empty due to previous
use. Call for assistance.
460 WHAT TO DO IN EMERGENCIES
Page 498 of 603
CAUTION!(Continued)
•Your vehicle has been built with improved fluids
that protect the performance and durability of your
vehicle and also allow extended maintenance inter-
vals. Do not use chemical flushes in these compo-
nents as the chemicals can damage your engine,
transmission, power steering or air conditioning.
Such damage is not covered by the New Vehicle
Limited Warranty. If a flush is needed because of
component malfunction, use only the specified
fluid for the flushing procedure.
Engine Oil
Checking Oil Level — 3.6L Engine
To assure proper engine lubrication, the engine oil must
be maintained at the correct level. Check the oil level at
regular intervals, such as every fuel stop. The best time to
check the engine oil level is about five minutes after a
fully warmed engine is shut off.
Checking the oil while the vehicle is on level ground will
improve the accuracy of the oil level readings. Maintain
the oil level between the MIN and MAX markings on the
dipstick. Adding 1.0 qt (1.0 L) of oil when the reading is
at the MIN mark will result in a MAX reading on these
engines.
CAUTION!
Overfilling or underfilling will cause oil aeration or
loss of oil pressure. This could damage your engine.
Checking Oil Level — 5.7L and 6.4L Engine
To assure proper engine lubrication, the engine oil must
be maintained at the correct level. Check the oil level at
496 MAINTAINING YOUR VEHICLE
Page 522 of 603
Clutch Hydraulic System — Manual Transmission
(If Equipped)
The clutch hydraulic system is fed by a segregated
volume of fluid within the brake system master cylinder
reservoir. In the event of leakage or wear, use only the
manufacturer’s recommended brake fluid. Refer to “Flu-
ids, Lubricants, and Genuine Parts” in “Maintaining Your
Vehicle” for further information.
Manual Transmission — If Equipped
Fluid Level Check
Check the fluid level by removing the fill plug on the left
side of the transmission. The fluid level should be 1/4
inch (6.4mm) below the bottom of the fill hole. Add fluid,
if necessary, to maintain the proper level. Refer to “Flu-
ids, Lubricants, and Genuine Parts” in “Maintaining Your
Vehicle” for further information.
CAUTION!
Using a transmission fluid other than the manufac-
turer’s recommended fluid may cause deterioration
in transmission shift quality and/or damage to the
transmission. Refer to “Fluids, Lubricants, and
Genuine Parts” in this section for fluid specifica-
tions.
Change Transmission Fluid
If contaminated with water, change the fluid immedi-
ately. See your authorized dealer for service.
Refer to the “Maintenance Schedule” for the proper
maintenance intervals.
520 MAINTAINING YOUR VEHICLE
Page 524 of 603
Fluid Level Check
The fluid level is preset at the factory and does not require
adjustment under normal operating conditions. Routine
fluid level checks are not required, therefore the transmis-
sion has no dipstick. Your authorized dealer can check your
transmission fluid level using special service tools.
If you notice fluid leakage or transmission malfunction,
visit your authorized dealer immediately to have the
transmission fluid level checked. Operating the vehicle
with an improper fluid level can cause severe transmis-
sion damage.
CAUTION!
If a transmission fluid leak occurs, visit your autho-
rized dealer immediately. Severe transmission dam-
age may occur. Your authorized dealer has the proper
tools to adjust the fluid level accurately.
Fluid And Filter Changes
Under normal operating conditions, the fluid installed at
the factory will provide satisfactory lubrication for the
life of the vehicle.
Routine fluid and filter changes are not required. How-
ever, change the fluid and filter if the fluid becomes
contaminated (with water, etc.), or if the transmission is
disassembled for any reason.
Rear Axle
Fluid Level Check
Checking the fluid level while the vehicle is on level
ground will improve the accuracy of the fluid level
reading.
Check the fluid level by removing the fill plug on the
axle. The fluid level should be at the bottom of the fill
hole. Add fluid, if necessary, to maintain the proper level.
522 MAINTAINING YOUR VEHICLE
Page 583 of 603
Alterations/Modifications, Vehicle...............7
Antifreeze (Engine Coolant)..................512
Disposal..............................516
Anti-Lock Brake System (ABS)................382
Anti-Lock Warning Light....................225
Appearance Care.........................523
Arming System (Security Alarm)...............18
Auto Down Power Windows..................38
Automatic Door Locks......................31
Automatic Headlights......................139
Automatic High Beams.....................139
Automatic Temperature Control (ATC)..........314
Automatic Transmission....................362
Adding Fluid..........................522
Autostick.............................369
Fluid and Filter Changes..................522
Fluid Change..........................522
Fluid Level Check.......................522
Fluid Type............................552
Special Additives.......................521
Automatic Transmission Limp Home Mode.......368
Autostick...............................369
Auto Unlock, Doors........................32
Axle Fluid..............................552
Axle Lubrication..........................552
Battery.................................502
Keyless Transmitter Replacement (RKE)........24
Location..............................502
Belts, Seat...............................95
Body Mechanism Lubrication.................507
B-Pillar Location..........................398
Brake Assist System.......................385
Brake Control System, Electronic..............381
Brake Fluid.............................552
Brake, Parking...........................377
Brakes.................................381
Brake System............................38110
INDEX 581
Page 584 of 603
Anti-Lock (ABS)........................382
Fluid Check...........................518
Master Cylinder........................518
Parking..............................377
Warning Light.........................227
Brake/Transmission Interlock.................361
Break-In Recommendations, New Vehicle.........90
Brightness, Interior Lights...................145
Bulb Replacement.........................543
Bulbs, Light..............................97
Camera, Rear............................195
Capacities, Fluid..........................548
Caps, Filler
Fuel.................................431
Oil (Engine)...........................499
Radiator (Coolant Pressure)................515
Carbon Monoxide Warning...................94
Cargo (Vehicle Loading)....................433
Car Washes.............................524
Cellular Phone...........................312
Center High Mounted Stop Light..............547
Certification Label.........................433
Chains, Tire.............................415
Changing A Flat Tire.......................466
Chart, Tire Sizing.........................393
Check Engine Light (Malfunction Indicator Light) . .493
Checking Your Vehicle For Safety...............93
Checks, Safety............................93
Child Restraint............................69
Child Restraints
Booster Seats...........................74
Center Seat LATCH......................82
Child Restraints.........................69
Child Seat Installation.....................87
How To Stow An Unused ALR Seat Belt........83
Infants And Child Restraints................72
Install A LATCH-compatible Child Restraint.....82
582 INDEX
Page 588 of 603
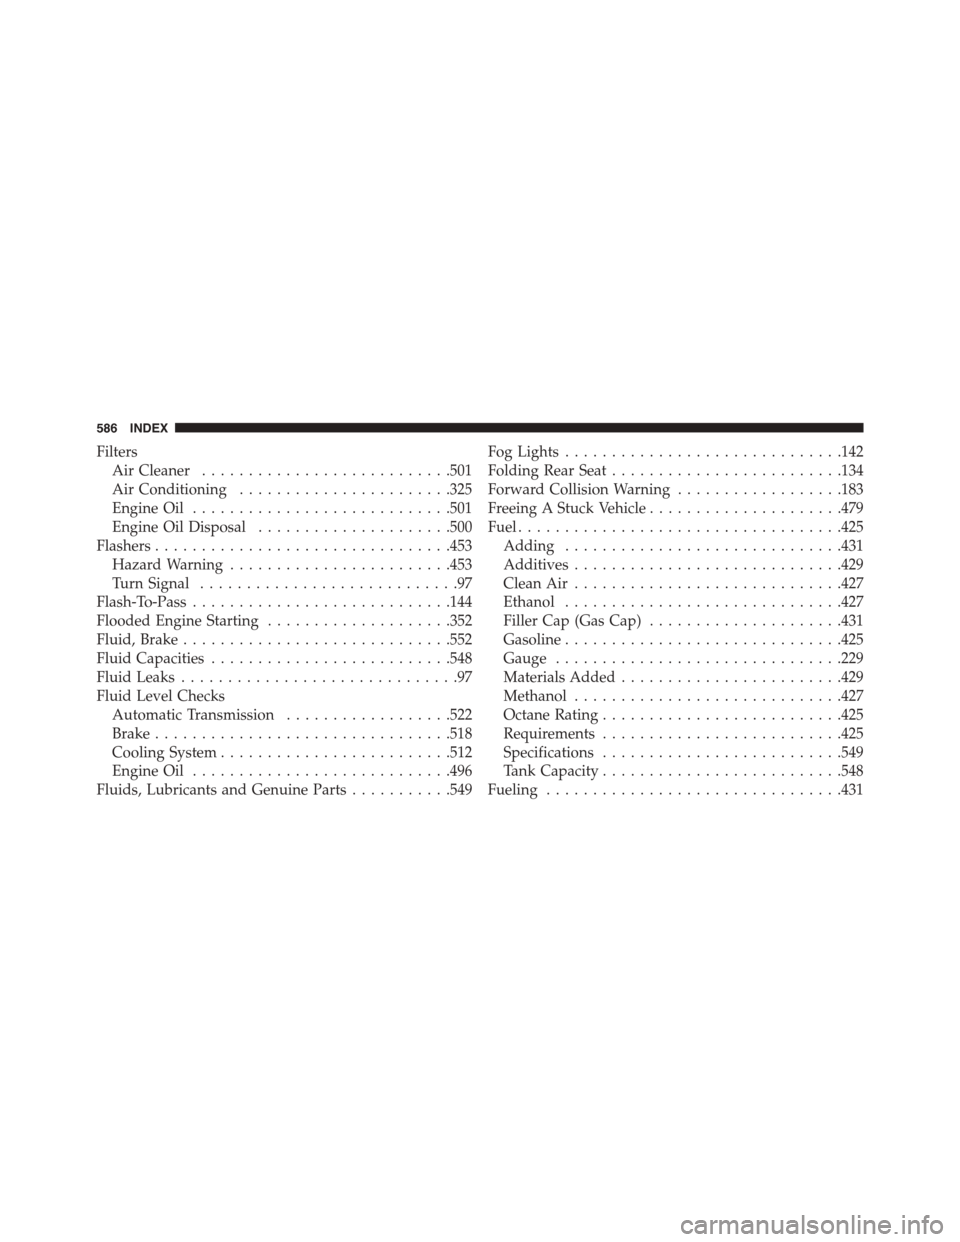
Filters
Air Cleaner...........................501
Air Conditioning.......................325
Engine Oil............................501
Engine Oil Disposal.....................500
Flashers................................453
Hazard Warning........................453
Turn Signal............................97
Flash-To-Pass............................144
Flooded Engine Starting....................352
Fluid, Brake.............................552
Fluid Capacities..........................548
Fluid Leaks..............................97
Fluid Level Checks
Automatic Transmission..................522
Brake................................518
Cooling System.........................512
Engine Oil............................496
Fluids, Lubricants and Genuine Parts...........549
Fog Lights..............................142
Folding Rear Seat.........................134
Forward Collision Warning..................183
Freeing A Stuck Vehicle.....................479
Fuel...................................425
Adding..............................431
Additives.............................429
Clean Air.............................427
Ethanol..............................427
Filler Cap (Gas Cap).....................431
Gasoline..............................425
Gauge...............................229
Materials Added........................429
Methanol.............................427
Octane Rating..........................425
Requirements..........................425
Specifications..........................549
Tank Capacity..........................548
Fueling................................431
586 INDEX
Page 593 of 603
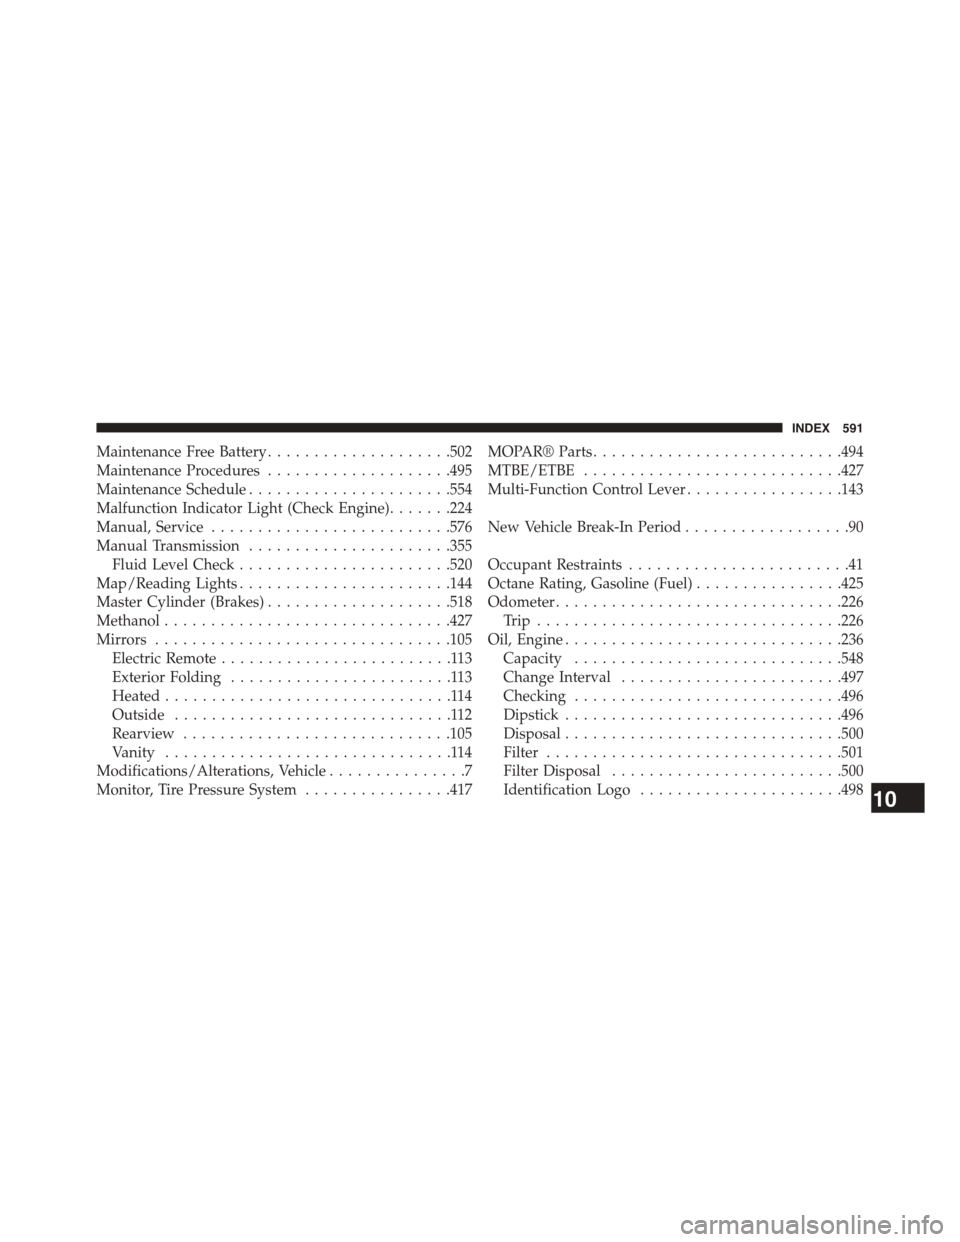
Maintenance Free Battery....................502
Maintenance Procedures....................495
Maintenance Schedule......................554
Malfunction Indicator Light (Check Engine).......224
Manual, Service..........................576
Manual Transmission......................355
Fluid Level Check.......................520
Map/Reading Lights.......................144
Master Cylinder (Brakes)....................518
Methanol...............................427
Mirrors................................105
Electric Remote.........................113
Exterior Folding........................113
Heated...............................114
Outside..............................112
Rearview.............................105
Vanity...............................114
Modifications/Alterations, Vehicle...............7
Monitor, Tire Pressure System................417
MOPAR® Parts...........................494
MTBE/ETBE............................427
Multi-Function Control Lever.................143
New Vehicle Break-In Period..................90
Occupant Restraints........................41
Octane Rating, Gasoline (Fuel)................425
Odometer...............................226
Tr i p . . . . . . . . . . . . . . . . . . . . . . . . . . . . . . . ..226
Oil, Engine..............................236
Capacity.............................548
Change Interval........................497
Checking.............................496
Dipstick..............................496
Disposal..............................500
Filter................................501
Filter Disposal.........................500
Identification Logo......................49810
INDEX 591