ECO mode DODGE CHALLENGER 2015 3.G Owner's Manual
[x] Cancel search | Manufacturer: DODGE, Model Year: 2015, Model line: CHALLENGER, Model: DODGE CHALLENGER 2015 3.GPages: 220, PDF Size: 30.96 MB
Page 43 of 220
•Tochangebetweenthedifferentcruisecontrolmodes,presstheADAPTIVECRUISE
CONTROL (ACC) ON/OFF button which turns the ACC and the normal (Fixed Speed)
Speed Control OFF.
•Pressingthenormal(FixedSpeed)SPEEDCONTROLON/OFFbuttonwillresultin
turning ON (changing to) the normal (Fixed Speed) Speed Control mode.
Refer to your Owner's Manual on the DVD for further information.
WARNING!
Adaptive Cruise Control (ACC) is a convenience system. It is not a substitute for active
driving involvement. It is always the driver’s responsibility to be attentive of road,
traffic, and weather conditions, vehicle speed, distance to the vehicle ahead; and, most
importantly, brake operation to ensure safe operation of the vehicle under all road
conditions. Your complete attention is always required while driving to maintain safe
control of your vehicle. Failure to follow these warnings can result in a collision and
death or serious personal injury.
The ACC system:
•Doesnotreacttopedestrians,oncomingvehicles,andstationaryobjects(e.g.,a
stopped vehicle in a traffic jam or a disabled vehicle).
•Cannottakestreet,traffic,andweatherconditionsintoaccount,andmaybelimited
upon adverse sight distance conditions.
•Doesnotalwaysfullyrecognizecomplexdrivingconditions,whichcanresultin
wrong or missing distance warnings.
•Canonlyapplyamaximumof40%ofthevehicle’sbrakingcapability,andwillnot
bring the vehicle to a complete stop.
Yo u s h o u l d s w i t c h o f f t h e A C C s y s t e m :
•Whendrivinginfog,heavyrain,heavysnow,sleet,heavytraffic,andcomplex
driving situations (i.e., in highway construction zones).
•Whenenteringaturnlaneorhighwayofframp;whendrivingonroadsthatare
winding, icy, snow-covered, slippery, or have steep uphill or downhill slopes.
•Whentowingatrailerupordownsteepslopes.
•Whencircumstancesdonotallowsafedrivingataconstantspeed.
The Cruise Control system has two control modes:
•AdaptiveCruiseControlmodeformaintaininganappropriatedistancebetween
vehicles.
•Normal(fixedspeed)electronicspeedcontrolmodeforcruisingataconstant
preset speed. For additional information, refer to “Normal (Fixed Speed) Cruise
Control Mode” in this section.
Normal (fixed speed) electronic speed control will not react to preceding vehicles.
Always be aware of the mode selected.
Yo u c a n c h a n g e t h e m o d e b y u s i n g t h e C r u i s e C o n t r o l b u t t o n s . T h e t w o c o n t r o l m o d e s
function differently. Always confirm which mode is selected.
OPERATING YOUR VEHICLE
41
Page 46 of 220
NOTE:
Ta p p i n g o n e o f t h e s t e e r i n g w h e e l - m o u n t e d s h i f t p a d d l e s ( + / - ) , i f e q u i p p e d , w h i l e t h e s h i f t
lever is in DRIVE, will activate a temporary AutoStick mode. Tapping (-) to enter AutoStick
mode will downshift the transmission to the next lower gear, while using (+) to enter
AutoStick mode will retain the current gear. The current gear will be displayed in the
instrument cluster, but the "M" will not be highlighted. The transmission will revert back
to normal operation (if the shift lever remains in DRIVE) after a period of time, depending
on accelerator pedal activity.
In AutoStick mode, the transmission will shift up or down when (+/-) is manually selected
by the driver (using the shift lever, or the shift paddles [if equipped]), unless an engine
lugging or overspeed condition would result. It will remain in the selected gear until
another upshift or downshift is chosen, except as described below.
•IntemporaryAutoStickmode(shiftleverinDRIVE),thetransmissionwillautomatically
shift up when maximum engine speed is reached. If the accelerator is fully depressed,
the transmission will downshift when possible (based on current vehicle speed and
gear). Lack of accelerator pedal activity will cause the transmission to revert to
automatic operation.
•IfnormalAutoStickmodeisengaged(shiftleverinMANUALposition),manualgear
selection will be maintained until the shift lever is returned to DRIVE, or as described
below. The transmission will not upshift automatically at redline in this mode, nor will
downshifts be obtained if the accelerator pedal is pressed to the floor.
•Thetransmissionwillautomaticallydownshiftasthevehicleslows(topreventengine
lugging) and will display the current gear.
•Thetransmissionwillautomaticallydownshifttofirstgearwhencomingtoastop.After
astop,thedrivershouldmanuallyupshift(+)thetransmissionasthevehicleis
accelerated.
•Youcanstartout,fromastop,infirstorsecondgear.Tapping(+)(atastop)willallow
starting in second gear. Starting out in second gear can be helpful in snowy or icy
conditions.
•Ifarequesteddownshiftwouldcausetheenginetoover-speed,thatshiftwillnotoccur.
•Thesystemwillignoreattemptstoupshiftattoolowofavehiclespeed.
•Holdingthe(-)paddledepressed(ifequipped),orholdingtheshiftleverinthe(-)
position, will downshift the transmission to the lowest gear possible at the current
speed.
•TransmissionshiftingwillbemorenoticeablewhenAutoStickisengaged.
•Thesystemmayreverttoautomaticshiftmodeifafaultoroverheatconditionis
detected.
OPERATING YOUR VEHICLE
44
Page 47 of 220
To d i s e n g a g e A u t o S t i c k m o d e , r e t u r n t h e s h i f t l e v e r t o t h e D R I V E p o s i t i o n , o r p r e s s a n d
hold the (+) shift paddle (if equipped, and the shift lever is already in DRIVE) until “D” is
once again indicated in the instrument cluster. You can shift in or out of the AutoStick
mode at any time without taking your foot off the accelerator pedal.
WARNING!
Do not downshift for additional engine braking on a slippery surface. The drive wheels
could lose their grip and the vehicle could skid, causing a collision or personal injury.
SPORT MODE — WITHOUT PERFORMANCE CONTROL
Yo u r v e h i c l e i s e q u i p p e d w i t h a S p o r t M o d e f e a t u r e . T h i s m o d e i s a c o n f i g u r a t i o n s e t u p
for typical enthusiast driving. The engine, transmission (when equipped with automatic
transmission), and steering systems are all set to their SPORT settings. Sport Mode will
provide improved throttle response and modified shifting for an enhanced driving
experience, as well the greatest amount of steering feel. This mode may be activated and
deactivated by pressing the Sport button on the instrument panel switch bank.
For vehicles equipped with Drive Modes, Refer to “Performance Control — If Equipped”
within “Uconnect Settings” in “Understanding Your Instrument Panel” chapter on your
DVD or in the “Drive Mode Supplement” within your Owners information kit for further
information.
MANUAL TRANSMISSION 1 TO 4 SKIP SHIFT
There are times when you must shift the transmission directly from first gear to fourth gear
instead of from first gear to second gear. This is to help you get the best possible fuel
economy from your vehicle. This occurs when the engine coolant (antifreeze) is higher
than 106°F (41°C), vehicle speed is greater than 19 mph (30 km/h) but less than 21 mph
(34 km/h), and the transmission is in first gear, and the accelerator is at¼throttle or less.
After you shift the transmission to fourth gear, you can press the clutch in and shift to
another forward gear.
OPERATING YOUR VEHICLE
45
Page 48 of 220
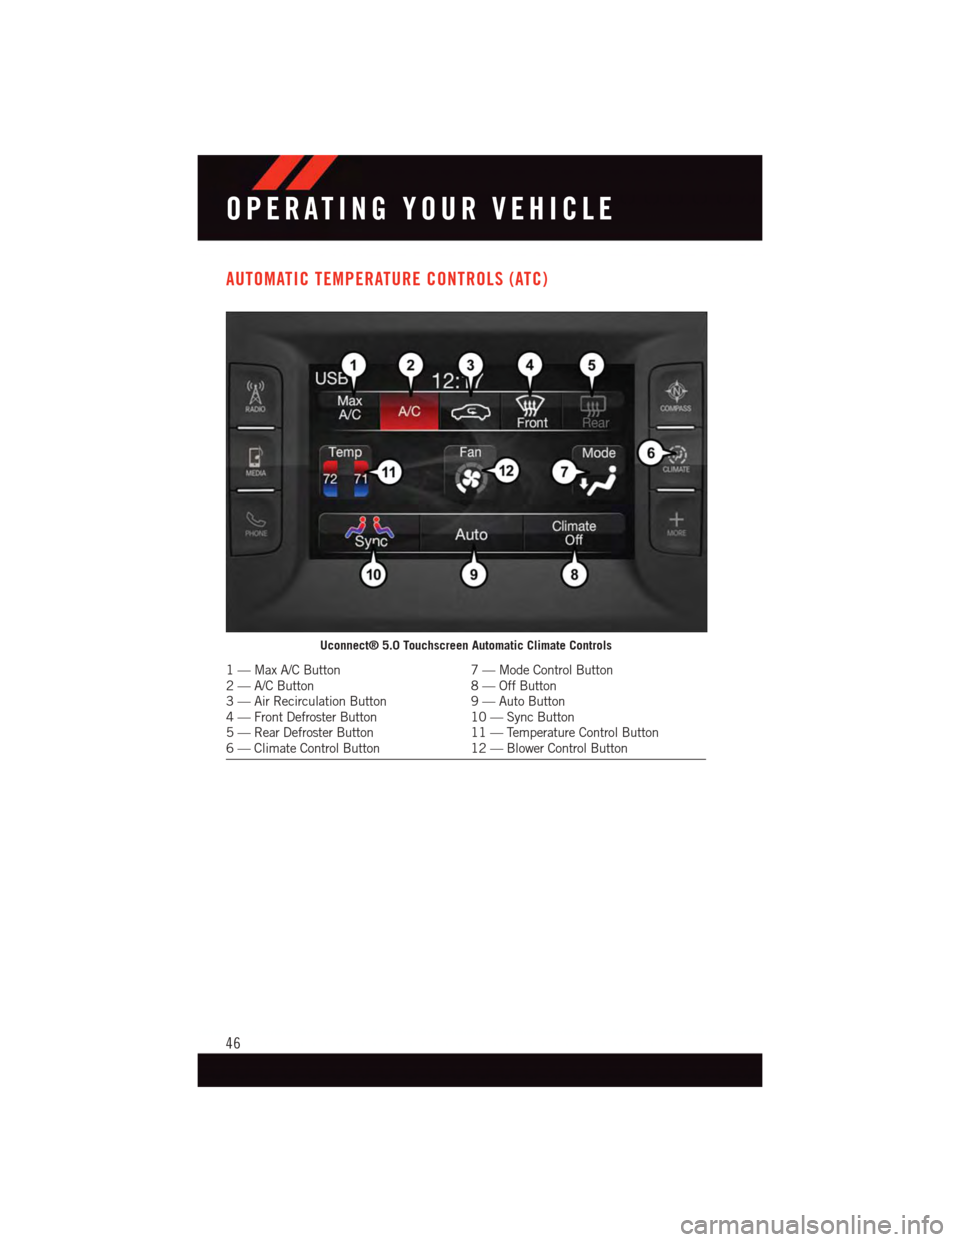
AUTOMATIC TEMPERATURE CONTROLS (ATC)
Uconnect® 5.0 Touchscreen Automatic Climate Controls
1—MaxA/CButton7—ModeControlButton2—A/CButton8—OffButton3—AirRecirculationButton9—AutoButton4—FrontDefrosterButton10 — Sync Button5—RearDefrosterButton11 — Temperature Control Button6—ClimateControlButton12 — Blower Control Button
OPERATING YOUR VEHICLE
46
Page 50 of 220
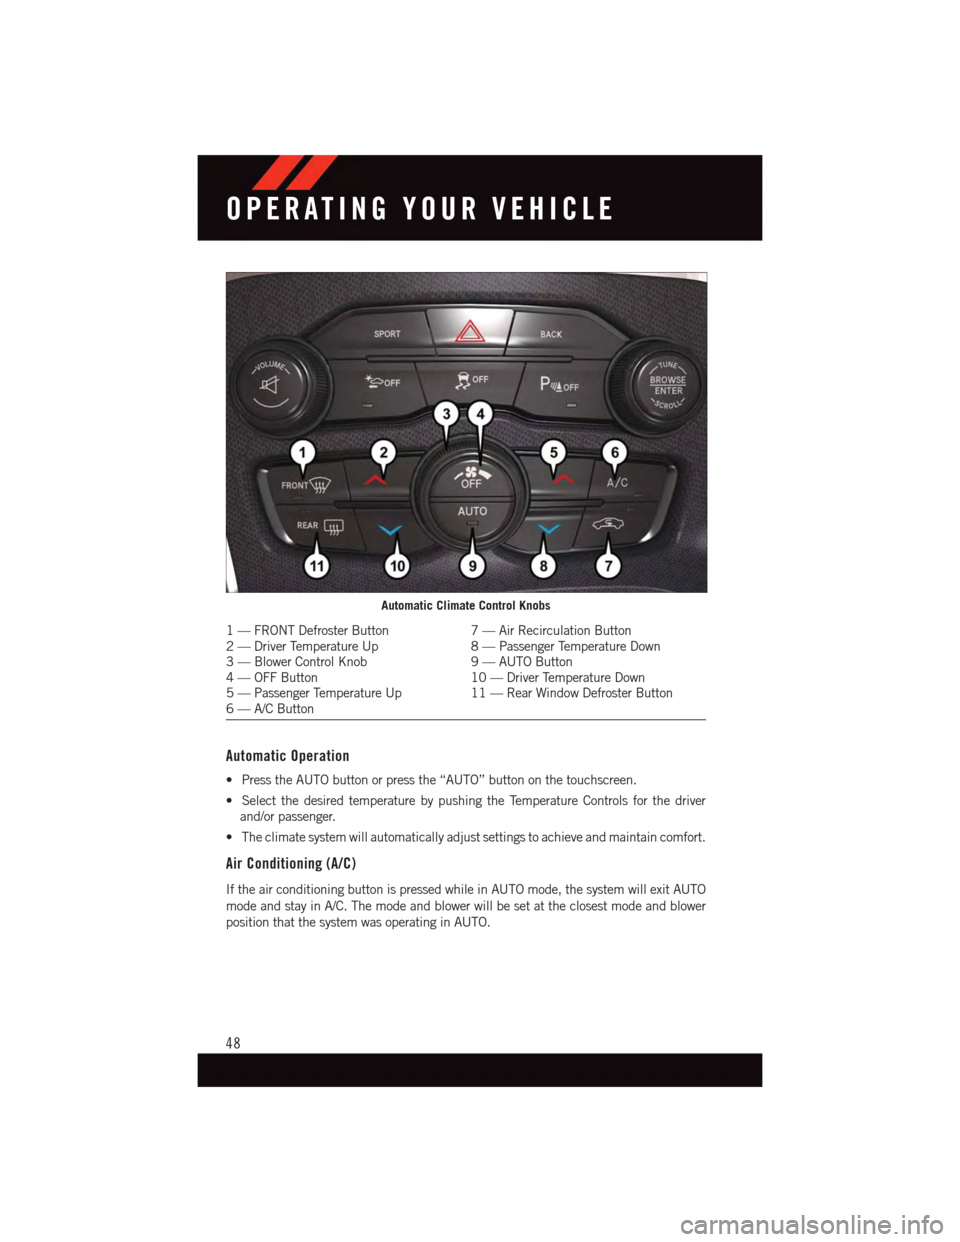
Automatic Operation
•PresstheAUTObuttonorpressthe“AUTO”buttononthetouchscreen.
•SelectthedesiredtemperaturebypushingtheTemperatureControlsforthedriver
and/or passenger.
•Theclimatesystemwillautomaticallyadjustsettingstoachieveandmaintaincomfort.
Air Conditioning (A/C)
If the air conditioning button is pressed while in AUTO mode, the system will exit AUTO
mode and stay in A/C. The mode and blower will be set at the closest mode and blower
position that the system was operating in AUTO.
Automatic Climate Control Knobs
1—FRONTDefrosterButton7—AirRecirculationButton2—DriverTemperatureUp8—PassengerTemperatureDown3—BlowerControlKnob9—AUTOButton4—OFFButton10 — Driver Temperature Down5—PassengerTemperatureUp11 — Rear Window Defroster Button6—A/CButton
OPERATING YOUR VEHICLE
48
Page 51 of 220
MAX A/C
MAX A/C sets the control for maximum cooling performance.
•PressandreleasetotogglebetweenMAXA/Candthepriorsettings.Thebuttononthe
touchscreen illuminates when MAX A/C is ON.
In MAX A/C, the blower level and mode position can be adjusted to desired user settings.
Pressing other settings will cause the MAX A/C operation to switch to the prior settings and
the MAX A/C indicator will turn off.
SYNC Temperature Button
•Pressthe“SYNC”buttononcetocontroldriverandpassengertemperaturessimulta-
neously.
•Pressthe“SYNC”buttonasecondtimetocontrolthetemperaturesindividually.
Air Recirculation
•UseRecirculationformaximumA/Coperation.
•Forwindowdefogging,turntheRecirculationbuttonoff.
•IftheRecirculationbuttonispushedwhileintheAUTOmode,theindicatorlightmay
flash three times to indicate the cabin air is being controlled automatically. The
Recirculation button will be greyed out in these conditions.
Heated Mirrors (If Equipped)
The mirrors are heated to melt frost or ice. This feature is activated whenever you turn on
the rear window defroster.
PARKVIEW® REAR BACK-UP CAMERA
Yo u c a n s e e a n o n - s c r e e n i m a g e o f t h e r e a r o f y o u r v e h i c l e w h e n e v e r t h e s h i f t l e v e r i s p u t
into REVERSE. The ParkView®Rear Back-Up Camera image will be displayed on the radio
display screen, located on the center stack of the instrument panel.
If the radio display screen appears foggy, clean the camera lens located on the rear of the
vehicle above the rear license plate.
Refer to your Owner's Manual on the DVD for further details.
WARNING!
Drivers must be careful when backing up; even when using the ParkView®Rear
Back-Up Camera. Always check carefully behind your vehicle, and be sure to check for
pedestrians, animals, other vehicles, obstructions, or blind spots before backing up.
Yo u m u s t c o n t i n u e t o p a y a t t e n t i o n w h i l e b a c k i n g u p . F a i l u r e t o d o s o c a n r e s u l t i n
serious injury or death.
OPERATING YOUR VEHICLE
49
Page 53 of 220
Pinch Protection Feature
•ThisfeaturewilldetectanobstructionintheopeningofthesunroofduringExpress
Close operation. If an obstruction in the path of the sunroof is detected, the sunroof will
automatically retract. Remove the obstruction if this occurs. Next, press the switch
forward and release to Express Close.
NOTE:
If three consecutive sunroof close attempts result in Pinch Protect reversals, the fourth
close attempt will be a Manual Close movement with Pinch Protect disabled.
WARNING!
•Neverleavechildrenunattendedinavehicle,anddonotleavetheKeyFobinor
near the vehicle, and do not leave a vehicle equipped with Keyless Enter-N-Go™ in
the ACC or ON/RUN mode. Occupants, particularly unattended children, can
become entrapped by the power sunroof while operating the power sunroof switch.
Such entrapment may result in serious injury or death.
•Inacollision,thereisagreaterriskofbeingthrownfromavehiclewithanopen
sunroof. You could also be severely injured or killed. Always fasten your seat belt
properly and make sure all passengers are properly secured.
•Donotallowsmallchildrentooperatethesunroof.Neverallowyourfingers,other
body parts, or any object to project through the sunroof opening. Injury may result.
WIND BUFFETING
•Windbuffetingcanbedescribedasahelicopter-typepercussionsound.Ifbuffeting
occurs with the windows open, adjust the windows together.
•Ifbuffetingoccurswiththesunroofopen,adjustthesunroofopening,oradjustany
window. This will minimize buffeting.
OPERATING YOUR VEHICLE
51
Page 74 of 220
Equalizer, Balance And Fade
1. Push the MORE button on the faceplate, then press the “Settings” button on the
touchscreen.
2. Then scroll down and press the “Audio” button on the touchscreen to get to the Audio
menu.
3. The Audio Menu shows the following options for you to customize your audio settings.
Equalizer
•Pressthe“Equalizer”buttononthetouchscreentoadjusttheBass,MidandTreble.
Use the “+” or “–” button on the touchscreen to adjust the equalizer to your desired
settings. Press the “back arrow” button on the touchscreen when done.
Balance/Fade
•Pressthe“Balance/Fade”buttononthetouchscreentoadjustthesoundfromthe
speakers. Use the “arrow” button on the touchscreen to adjust the sound level from the
front and rear or right and left side speakers. Press the Center “C” button on the
touchscreen to reset the balance and fade to the factory setting. Press the “back arrow”
button on the touchscreen when done.
Speed Adjustable
•Pressthe“SpeedAdjustedVolume”buttononthetouchscreentoselectbetweenOFF,
1, 2 or 3. This will decrease the radio volume relative to a decrease in vehicle speed.
Press the “back arrow” button on the touchscreen when done.
Loudness
•Pressthe“Loudness”buttononthetouchscreentoselecttheLoudnessfeature.When
this feature is activated it improves sound quality at lower volumes. Press the “back
arrow” button on the touchscreen when done.
Radio Operation
Seek Up/Seek Down
•PresstoseekthroughradiostationsinAM,FMorSXMbands.
•Holdeitherbuttontobypassstationswithoutstopping.
Store Radio Presets
When you are receiving a station that you wish to commit into memory, press and hold the
desired numbered button on the touchscreen for more that two seconds or until you hear
aconfirmationbeep.
The Radio stores up to 12 presets in each of the Radio modes. Four presets are visible at
the top of the radio screen. Pressing the “All” button on the touchscreen on the radio
home screen will display all of the preset stations for that mode.
ELECTRONICS
72
Page 87 of 220
Seek Up/Seek Down
•Pressthe“Seekarrow”buttononthetouchscreenforlessthantwosecondstoseek
through radio stations.
•Pressandholdeither“arrow”buttononthetouchscreenformorethantwosecondsto
bypass stations without stopping. The radio will stop at the next listenable station once
the “arrow” button on the touchscreen is released.
Direct Tune
•Tunedirectlytoaradiostationbypressingthe“Tune”buttononthescreen,and
entering the desired station number.
Store Radio Presets
Yo u r r a d i o c a n s t o r e 3 6 t o t a l p r e s e t s t a t i o n s , 1 2 p r e s e t s p e r b a n d ( A M , F M a n d S X M ) .
They are shown at the top of your radio screen.
•Toseethe12presetstationsperband,pressthe“arrow”buttononthetouchscreenat
the top right of the screen to toggle between the two sets of six presets.
•Tosetastationintomemorypressandholdthedesirednumberedbuttononthe
touchscreen for more than two seconds or until you hear a confirmation beep.
SiriusXM Premier Over 160 Channels
Get every channel available on your satellite radio, and enjoy all you want, all in one place.
Hear commercial-free music plus sports, news, talk and entertainment. Get all the
premium programming, including Howard Stern, every NFL game, Oprah Radio®,every
MLB®and NHL®game, every NASCAR®race and more. And get 20+ Xtra channels,
including SiriusXM Latino, a selection of channels dedicated to Spanish language
programming.
•ToaccessSiriusXMSatelliteRadio,pressthe“SXM”buttononthetouchscreenonthe
main Radio screen.
The following describes features that are available when in SiriusXM Satellite Radio
mode.
Seek Up/Seek Down
•Pressthe“Seekarrow”buttononthetouchscreenforlessthantwosecondstoseek
through channels in SXM mode.
•Pressandholdeither“arrow”buttononthetouchscreenformorethantwosecondsto
bypass channels without stopping. The radio will stop at the next listenable channel
once the arrow button on the touchscreen is released.
Direct Tune
•TunedirectlytoaSXMchannelbypressingthe“Tune”buttononthetouchscreenon
the screen, and entering the desired station number.
ELECTRONICS
85
Page 90 of 220
There are also two USB “Charge Only” ports located on the back of the center console for
rear passengers.
To r o u t e t h e U S B / i P o d®cable out of the center console, use the access cut out.
NOTE:
•WhenconnectingyouriPod®device for the first time, the system may take several
minutes to read your music, depending on the number of files. For example, the system
will take approximately five minutes for every 1,000 songs loaded on the device. Also
during the reading process, the Shuffle and Browse functions will be disabled. This
process is needed to ensure the full use of your iPod®features and only happens the
first time it is connected. After the first time, the reading process of your iPod®will take
considerably less time unless changes are made or new songs are added to the playlist.
•TheUSBportsupportscertainMini,Classic,Nano,Touch,andiPhone®devices. The
USB port also supports playing music from compatible external USB Mass Storage
Class memory devices. Some iPod®software versions may not fully support the USB
port features. Please visit Apple’s website for iPod®software updates.
Audio Jack (AUX)
The AUX allows a portable device, such as an MP3 player or an iPod®,tobepluggedinto
the radio and utilize the vehicle’s sound system, using a 3.5 mm audio cable, to amplify
the source and play through the vehicle speakers.
•Pressingthe“AUX”buttononthetouchscreenwillchangethemodetoauxiliarydevice
if the audio jack is connected, allowing the music from your portable device to be heard
through the vehicle's speakers. In order to activate the AUX, plug in the audio jack.
•Thefunctionsoftheportabledevicearecontrolledusingthedevicebuttons.The
volume may be controlled using the radio or portable device.
•Toroutetheaudiocableoutofthecenterconsole,usetheaccesscutoutinthefront
of the console.
Bluetooth® Streaming Audio
If using a Bluetooth®-equippeddevice,youmayalsobeabletostreammusictoyour
vehicle's sound system. Your connected device must be Bluetooth-compatible, and paired
with your system (see Uconnect®Phone for pairing instructions).
•YoucanaccessthemusicfromyourconnectedBluetooth®device by Pressing the
“Bluetooth®”buttononthetouchscreenwhileinMediamode.
SD Card
SD Card Mode allows you to play music that has been saved to your SD Card through your
vehicle’s sound system.
•YoucanenterSDCardModeisbyeitherinsertingaSDCardintotheSDCardslotor
press the “SD Card” button on the left side of the display while media mode.
For further information refer to your Radio Supplement.
ELECTRONICS
88