display DODGE CHALLENGER 2015 3.G User Guide
[x] Cancel search | Manufacturer: DODGE, Model Year: 2015, Model line: CHALLENGER, Model: DODGE CHALLENGER 2015 3.GPages: 220, PDF Size: 30.96 MB
Page 3 of 220
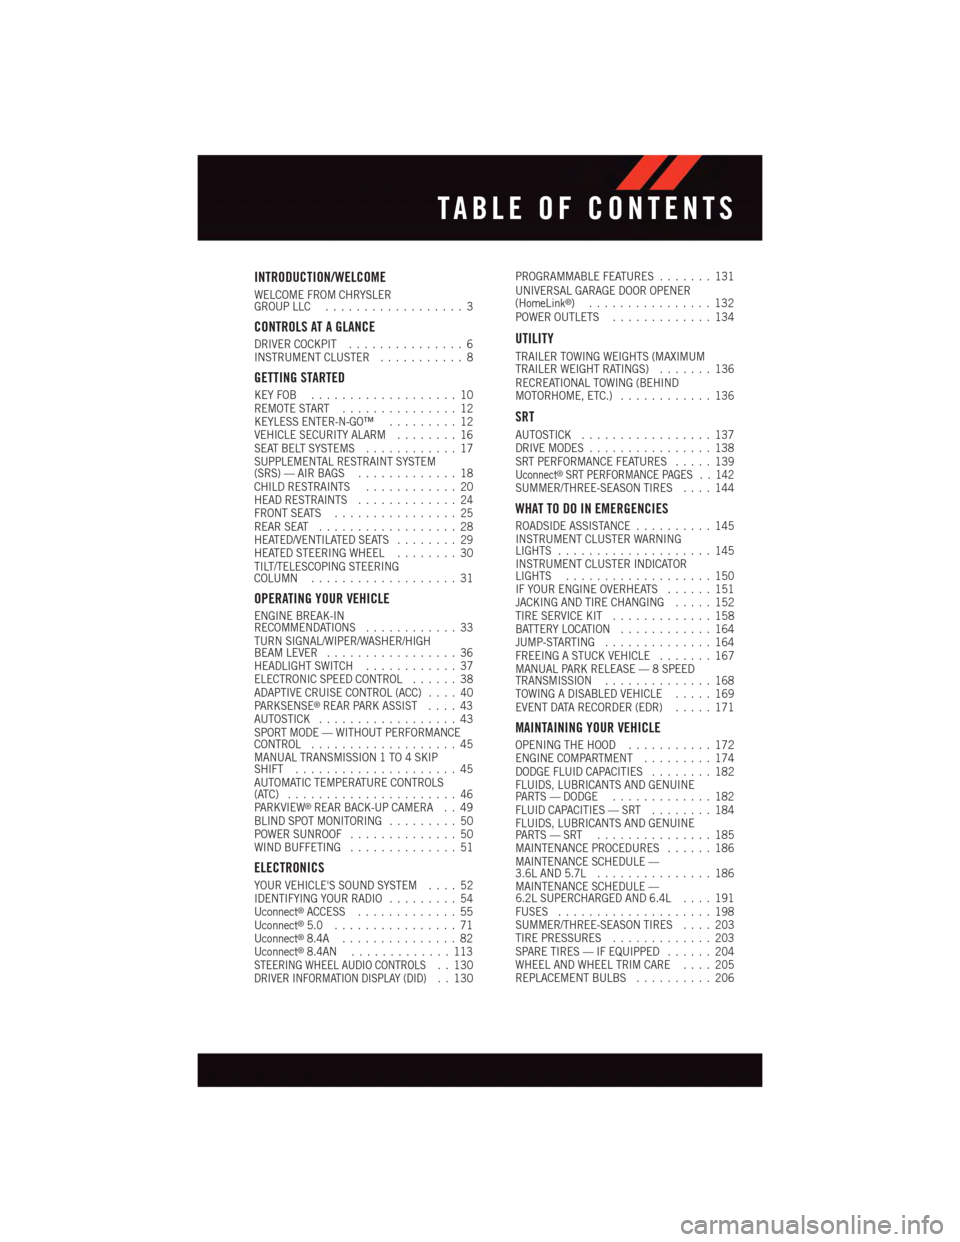
INTRODUCTION/WELCOME
WELCOME FROM CHRYSLERGROUP LLC..................3
CONTROLS AT A GLANCE
DRIVER COCKPIT...............6INSTRUMENT CLUSTER...........8
GETTING STARTED
KEY FOB . . . . . . . . . . . . . . . . . . . 10REMOTE START . . . . . . . . . . . . . . . 12KEYLESS ENTER-N-GO™.........12VEHICLE SECURITY ALARM........16SEAT BELT SYSTEMS............17SUPPLEMENTAL RESTRAINT SYSTEM(SRS) — AIR BAGS.............18CHILD RESTRAINTS............20HEAD RESTRAINTS.............24FRONT SEATS................25REAR SEAT..................28HEATED/VENTILATED SEATS........29HEATED STEERING WHEEL........30TILT/TELESCOPING STEERINGCOLUMN...................31
OPERATING YOUR VEHICLE
ENGINE BREAK-INRECOMMENDATIONS............33TURN SIGNAL/WIPER/WASHER/HIGHBEAM LEVER.................36HEADLIGHT SWITCH............37ELECTRONIC SPEED CONTROL......38ADAPTIVE CRUISE CONTROL (ACC)....40PA R K S E N S E®REAR PARK ASSIST....43AUTOSTICK..................43SPORT MODE — WITHOUT PERFORMANCECONTROL...................45MANUAL TRANSMISSION 1 TO 4 SKIPSHIFT.....................45AUTOMATIC TEMPERATURE CONTROLS(ATC) . . . . . . . . . . . . . . . . . . . . . . 46PA R K V I E W®REAR BACK-UP CAMERA . . 49BLIND SPOT MONITORING.........50POWER SUNROOF..............50WIND BUFFETING..............51
ELECTRONICS
YOUR VEHICLE'S SOUND SYSTEM....52IDENTIFYING YOUR RADIO.........54Uconnect®ACCESS.............55Uconnect®5.0 . . . . . . . . . . . . . . . . 71Uconnect®8.4A...............82Uconnect®8.4AN.............113STEERING WHEEL AUDIO CONTROLS..130DRIVER INFORMATION DISPLAY (DID)..130
PROGRAMMABLE FEATURES.......131UNIVERSAL GARAGE DOOR OPENER(HomeLink®)................132POWER OUTLETS.............134
UTILITY
TRAILER TOWING WEIGHTS (MAXIMUMTRAILER WEIGHT RATINGS).......136RECREATIONAL TOWING (BEHINDMOTORHOME, ETC.)............136
SRT
AUTOSTICK.................137DRIVE MODES................138SRT PERFORMANCE FEATURES.....139Uconnect®SRT PERFORMANCE PAGES . . 142SUMMER/THREE-SEASON TIRES....144
WHAT TO DO IN EMERGENCIES
ROADSIDE ASSISTANCE..........145INSTRUMENT CLUSTER WARNINGLIGHTS....................145INSTRUMENT CLUSTER INDICATORLIGHTS...................150IF YOUR ENGINE OVERHEATS......151JACKING AND TIRE CHANGING.....152TIRE SERVICE KIT.............158BATTERY LOCATION............164JUMP-STARTING..............164FREEING A STUCK VEHICLE.......167MANUAL PARK RELEASE — 8 SPEEDTRANSMISSION..............168TOWING A DISABLED VEHICLE.....169EVENT DATA RECORDER (EDR).....171
MAINTAINING YOUR VEHICLE
OPENING THE HOOD...........172ENGINE COMPARTMENT.........174DODGE FLUID CAPACITIES........182FLUIDS, LUBRICANTS AND GENUINEPA RT S — D O D G E.............182FLUID CAPACITIES — SRT........184FLUIDS, LUBRICANTS AND GENUINEPA RT S — S RT . . . . . . . . . . . . . . . 1 8 5MAINTENANCE PROCEDURES......186MAINTENANCE SCHEDULE —3.6L AND 5.7L...............186MAINTENANCE SCHEDULE —6.2L SUPERCHARGED AND 6.4L....191FUSES....................198SUMMER/THREE-SEASON TIRES....203TIRE PRESSURES.............203SPARE TIRES — IF EQUIPPED......204WHEEL AND WHEEL TRIM CARE....205REPLACEMENT BULBS..........206
TABLE OF CONTENTS
Page 8 of 220
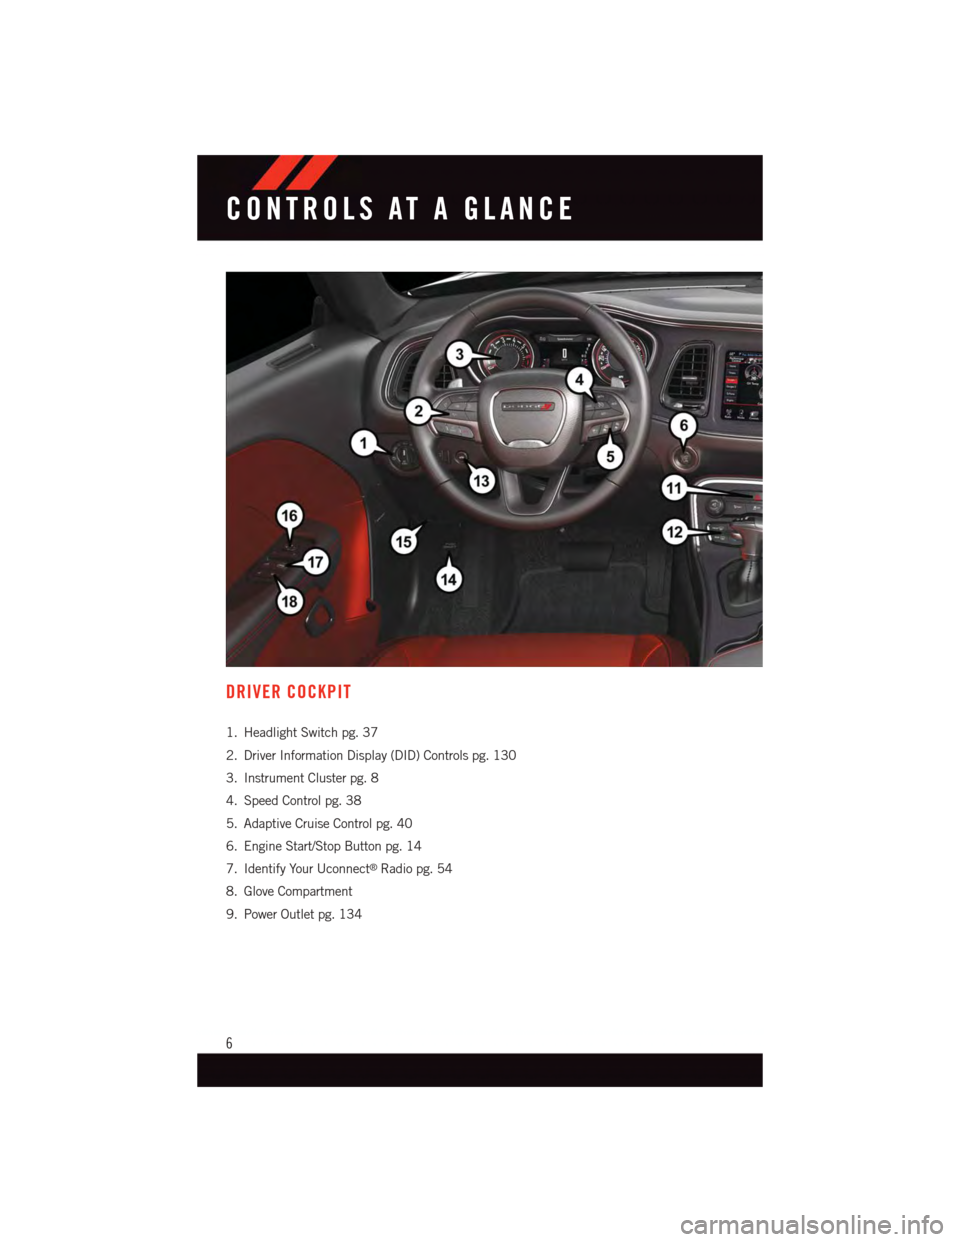
DRIVER COCKPIT
1. Headlight Switch pg. 37
2. Driver Information Display (DID) Controls pg. 130
3. Instrument Cluster pg. 8
4. Speed Control pg. 38
5. Adaptive Cruise Control pg. 40
6. Engine Start/Stop Button pg. 14
7. Identify Your Uconnect®Radio pg. 54
8. Glove Compartment
9. Power Outlet pg. 134
CONTROLS AT A GLANCE
6
Page 15 of 220
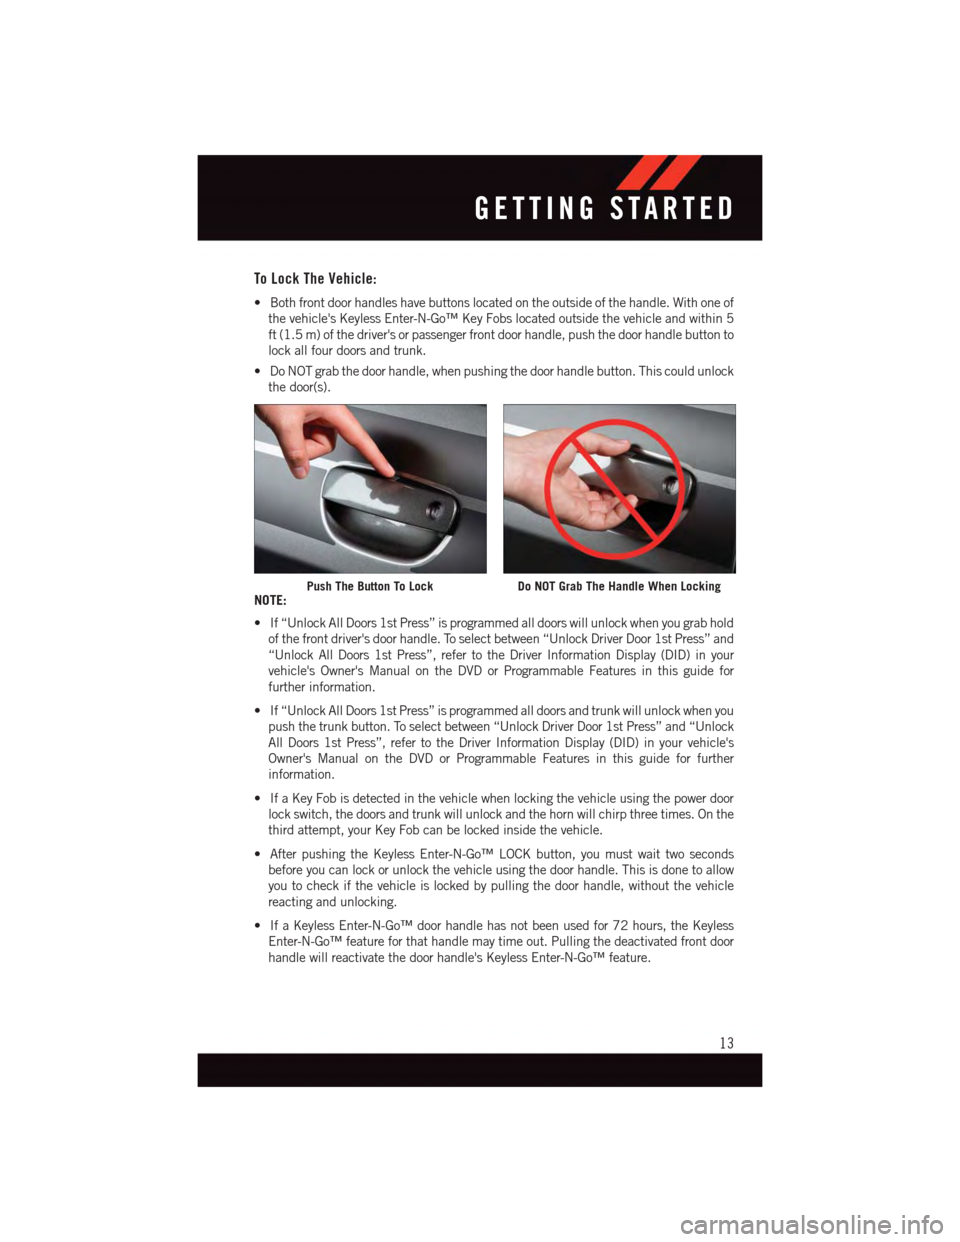
To Lock The Vehicle:
•Bothfrontdoorhandleshavebuttonslocatedontheoutsideofthehandle.Withoneof
the vehicle's Keyless Enter-N-Go™ Key Fobs located outside the vehicle and within 5
ft (1.5 m) of the driver's or passenger front door handle, push the door handle button to
lock all four doors and trunk.
•DoNOTgrabthedoorhandle,whenpushingthedoorhandlebutton.Thiscouldunlock
the door(s).
NOTE:
•If“UnlockAllDoors1stPress”isprogrammedalldoorswillunlockwhenyougrabhold
of the front driver's door handle. To select between “Unlock Driver Door 1st Press” and
“Unlock All Doors 1st Press”, refer to the Driver Information Display (DID) in your
vehicle's Owner's Manual on the DVD or Programmable Features in this guide for
further information.
•If“UnlockAllDoors1stPress”isprogrammedalldoorsandtrunkwillunlockwhenyou
push the trunk button. To select between “Unlock Driver Door 1st Press” and “Unlock
All Doors 1st Press”, refer to the Driver Information Display (DID) in your vehicle's
Owner's Manual on the DVD or Programmable Features in this guide for further
information.
•IfaKeyFobisdetectedinthevehiclewhenlockingthevehicleusingthepowerdoor
lock switch, the doors and trunk will unlock and the horn will chirp three times. On the
third attempt, your Key Fob can be locked inside the vehicle.
•AfterpushingtheKeylessEnter-N-Go™LOCKbutton,youmustwaittwoseconds
before you can lock or unlock the vehicle using the door handle. This is done to allow
you to check if the vehicle is locked by pulling the door handle, without the vehicle
reacting and unlocking.
•IfaKeylessEnter-N-Go™doorhandlehasnotbeenusedfor72hours,theKeyless
Enter-N-Go™ feature for that handle may time out. Pulling the deactivated front door
handle will reactivate the door handle's Keyless Enter-N-Go™ feature.
Push The Button To LockDo NOT Grab The Handle When Locking
GETTING STARTED
13
Page 18 of 220
VEHICLE SECURITY ALARM
The Vehicle Security Alarm monitors the vehicle doors for unauthorized entry and the
Keyless Enter-N-Go™ START/STOP button for unauthorized operation. While the Vehicle
Security Alarm is armed, interior switches for door locks and decklid release are disabled.
If something triggers the alarm, the Vehicle Security Alarm will provide the following
audible and visible signals: the horn will pulse, the park lamps and/or turn signals will
flash, and the Vehicle Security Light in the instrument cluster will flash.
To Arm
•Keyless Enter-N-Go™ button installed:Push the Keyless Enter-N-Go™ START/STOP
button until the Driver Information Display (DID) indicates that the vehicle ignition is
“OFF”. Push the power door LOCK switch while the door is open, Push the Key Fob
LOCK button, or with one of the Key Fobs located outside the vehicle and within 5 ft
(1.5 m) of the driver's and passenger front door handles, push the Keyless Enter-N-
Go™ LOCK button located on the door handle.
•Keyless Enter-N-Go™ button not installed:Tu r n t h e i g n i t i o n s w i t c h t o t h e “ O F F ”
position. Push the power door lock switch while the door is open, push the Key Fob
LOCK button, or with one of the Key Fobs located outside the vehicle and within 5 ft
(1.5 m) of the driver's and passenger front door handles, push the Keyless Enter-N-
Go™ LOCK button located on the door handle.
NOTE:
After pushing the Keyless Enter-N-Go™ LOCK button, you must wait two seconds before
you can lock or unlock the vehicle via the door handle.
To Disarm
•Keyless Enter-N-Go™ button installed:Push the Key Fob UNLOCK button or with one
of the Key Fobs located outside the vehicle and within 5 ft (1.5 m) of the driver's and
passenger front door handles, grab the Keyless Enter-N-Go™ door handle and enter the
vehicle, then push the Keyless Enter-N-Go™ START/STOP button (requires at least one
valid Key Fob in the vehicle).
•Keyless Enter-N-Go™ button not installed:Push the Key Fob UNLOCK button or with
one of the Key Fobs located outside the vehicle and within 5 ft (1.5 m) of the driver's
and passenger front door handles, grab the Keyless Enter-N-Go™ door handle and
enter the vehicle, then turn the ignition to the ON/RUN position.
GETTING STARTED
16
Page 32 of 220
To o p e r a t e t h e s y s t e m , p r e s s t h e “ C o n t r o l s ” b u t t o n o n t o u c h s c r e e n l o c a t e d o n t h e b o t t o m
of the Uconnect®display.
•Presstheventilatedseatbuttononce to choose HIGH.
•PresstheventilatedseatbuttonasecondtimetochooseLOW.
•PresstheventilatedseatbuttonathirdtimetoturntheventilatedseatOFF.
NOTE:
Vehicle Equipped With Remote Start
On models that are equipped with remote start, this feature can be programmed to come
on during a remote start through the Uconnect®system. Refer to “Uconnect®Settings”
in “Understanding Your Instrument Panel” in the Owner's Manual on the DVD.
HEATED STEERING WHEEL
The steering wheel contains a heating element that heats the steering wheel to one
temperature setting.
The heated steering wheel control button is located within the Uconnect®system. You can
gain access to the control buttons through the climate screen or the controls screen.
•Presstheheatedsteeringwheelbuttononce to turn the heating element ON.
•Presstheheatedsteeringwheelbuttonasecondtimetoturntheheatingelement
OFF.
Once the heated steering wheel has been turned on, it will operate for up to 80 minutes
before automatically shutting off. The heated steering wheel can shut off early or may not
turn on when the steering wheel is already warm.
NOTE:
Vehicle Equipped With Remote Start
On models that are equipped with remote start, this feature can be programmed to come
on during a remote start through the Uconnect®system. Refer to “Uconnect®Settings”
in “Understanding Your Instrument Panel” in the Owner's Manual on the DVD.
WARNING!
•Personswhoareunabletofeelpaintotheskinbecauseofadvancedage,chronic
illness, diabetes, spinal cord injury, medication, alcohol use, exhaustion, or other
physical conditions must exercise care when using the steering wheel heater. It may
cause burns even at low temperatures, especially if used for long periods.
•Donotplaceanythingonthesteeringwheelthatinsulatesagainstheat,suchasa
blanket or steering wheel covers of any type and material. This may cause the
steering wheel heater to overheat.
GETTING STARTED
30
Page 40 of 220

•Rotatethedimmercontroluptothelastdetentpositiontoturnontheinteriorlighting.
•Ifyourvehicleisequippedwithatouchscreen,thedimmingisprogrammablethroughthe Uconnect®system. Refer to “Uconnect®Settings” in “Understanding Your Instru-ment Panel” in the Owner's Manual on the DVD for further details.
Ambient Light Dimmer
•Rotatetheambientlightcontrolupordowntoincreaseordecreasethebrightnessofthe release handle, map pocket (if equipped), overhead and floor lighting when theparking lights or headlights are on.
•Rotatetoextremebottompositiontoturnoff.
ELECTRONIC SPEED CONTROL
The Electronic Speed Control switches are located on the right side of the steering wheel.
Cruise ON/OFF
•PushtheON/OFFbuttonto activate
the Electronic Speed Control.
CRUISE CONTROL READY will appear in
the Driver Information Display (DID) to in-
dicate the Electronic Speed Control is on.
•PushtheON/OFFbuttonasecond
time to turn the system off.
CRUISE CONTROL OFF will appear in the
Driver Information Display (DID) to indicate
the Electronic Speed Control is off.
SET
•WiththeElectronicSpeedControlon,
push and release the SET+ or SET- but-
ton to set a desired speed.
Once a speed has been set a message
CRUISE CONTROL SET TO MPH/KM will
appear indicating what speed was set. An
indicator CRUISE will also appear and stay
on in the Driver Information Display (DID) when the speed is set.
Accel/Decel
To Increase Speed
•WhentheElectronicSpeedControlisset,youcanincreasespeedbypushingtheSET
+button.
Electronic Speed Control Switches
1—PushCancel2—PushSet+/Accel3—PushResume4—PushOn/Off5—PushSet-/Decel
OPERATING YOUR VEHICLE
38
Page 42 of 220
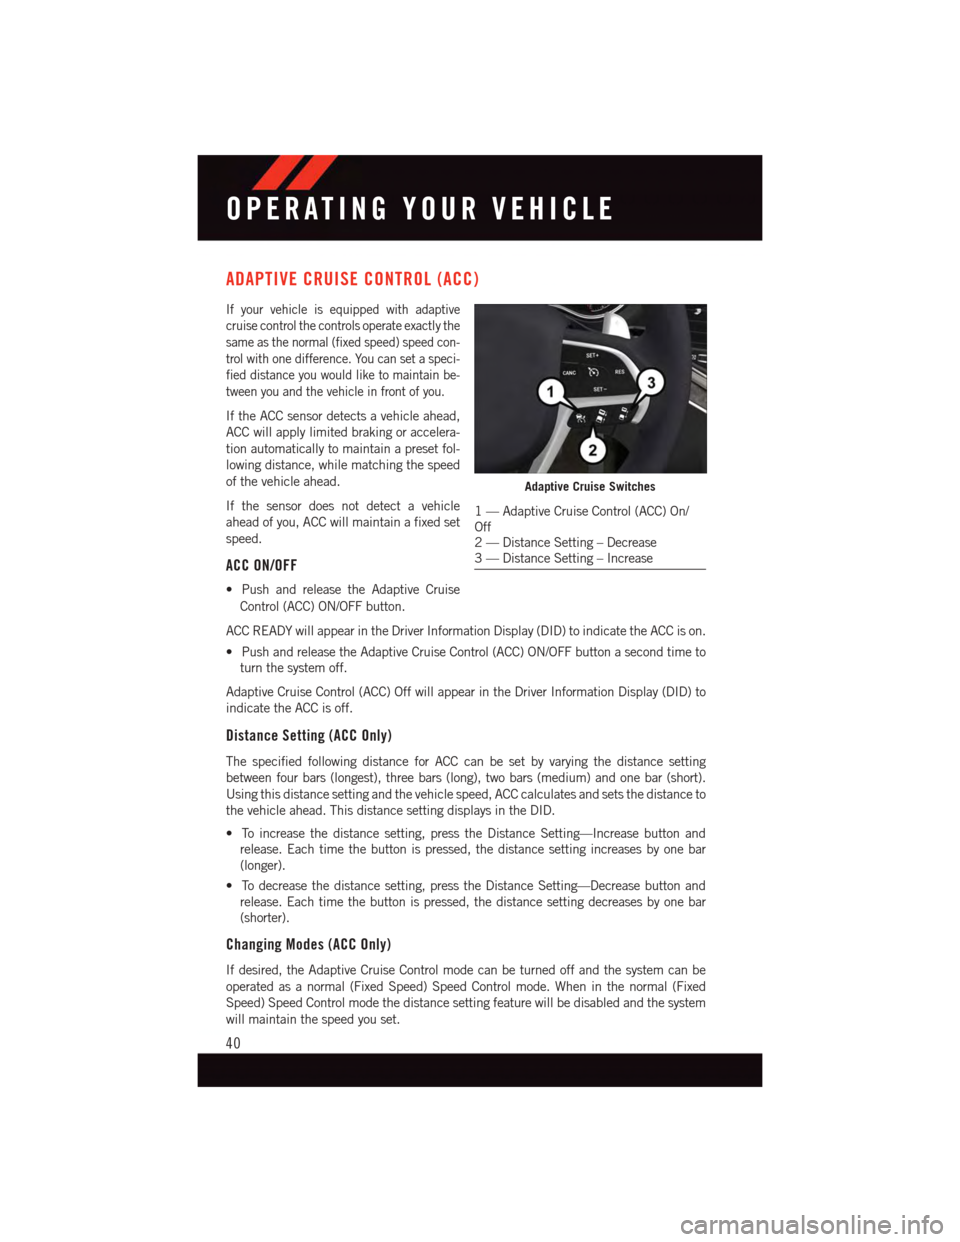
ADAPTIVE CRUISE CONTROL (ACC)
If your vehicle is equipped with adaptive
cruise control the controls operate exactly the
same as the normal (fixed speed) speed con-
trol with one difference. You can set a speci-
fied distance you would like to maintain be-
tween you and the vehicle in front of you.
If the ACC sensor detects a vehicle ahead,
ACC will apply limited braking or accelera-
tion automatically to maintain a preset fol-
lowing distance, while matching the speed
of the vehicle ahead.
If the sensor does not detect a vehicle
ahead of you, ACC will maintain a fixed set
speed.
ACC ON/OFF
•PushandreleasetheAdaptiveCruise
Control (ACC) ON/OFF button.
ACC READY will appear in the Driver Information Display (DID) to indicate the ACC is on.
•PushandreleasetheAdaptiveCruiseControl(ACC)ON/OFFbuttonasecondtimeto
turn the system off.
Adaptive Cruise Control (ACC) Off will appear in the Driver Information Display (DID) to
indicate the ACC is off.
Distance Setting (ACC Only)
The specified following distance for ACC can be set by varying the distance setting
between four bars (longest), three bars (long), two bars (medium) and one bar (short).
Using this distance setting and the vehicle speed, ACC calculates and sets the distance to
the vehicle ahead. This distance setting displays in the DID.
•Toincreasethedistancesetting,presstheDistanceSetting—Increasebuttonand
release. Each time the button is pressed, the distance setting increases by one bar
(longer).
•Todecreasethedistancesetting,presstheDistanceSetting—Decreasebuttonand
release. Each time the button is pressed, the distance setting decreases by one bar
(shorter).
Changing Modes (ACC Only)
If desired, the Adaptive Cruise Control mode can be turned off and the system can be
operated as a normal (Fixed Speed) Speed Control mode. When in the normal (Fixed
Speed) Speed Control mode the distance setting feature will be disabled and the system
will maintain the speed you set.
Adaptive Cruise Switches
1—AdaptiveCruiseControl(ACC)On/Off2—DistanceSetting–Decrease3—DistanceSetting–Increase
OPERATING YOUR VEHICLE
40
Page 44 of 220
FORWARD COLLISION WARNING (FCW)
The Forward Collision Warning (FCW) system provides the driver with audible warnings
and visual warnings within the Driver Information Display (DID), to warn the driver when
it detects a potential frontal collision. The warnings are intended to provide the driver with
enough time to react, avoid or mitigate the potential collision.
NOTE:
FCW monitors the information from the forward looking sensors as well as the Electronic
Brake Controller (EBC), to calculate the probability of a forward collision. When the
system determines that a forward collision is probable, the driver will be provided with
audible and visual warnings.
Turning FCW ON Or OFF
The forward collision button is located on the switch panel below the Uconnect®display.
•ToturntheFCWsystemOFF,presstheforwardcollisionbuttononce(LEDturnson).
•To t u r n t h e F C W s y s t e m b a c k O N , p r e s s t h e f o r w a r d c o l l i s i o n b u t t o n a g a i n ( L E D t u r n s o f f ) .
NOTE:
The default status of FCW is “On”, this allows the system to warn you of a possible
collision with the vehicle in front of you.
Changing the FCW status to “Off” prevents the system from warning you of a possible
collision with the vehicle in front of you. If FCW is set to “Off”, “FCW OFF” will be
displayed in the Driver Information Display (DID).
Changing FCW Status
The FCW feature has two settings and can be changed within the Uconnect®System
Screen:
•Far
•Near
Far
The default status of FCW is the “Far” setting.
The far setting provides warnings for potential collisions more distant in front of the
vehicle, allowing the driver to have the most reaction time to avoid a collision.
More cautious drivers that do not mind frequent warnings may prefer this setting.
NOTE:
This setting gives you the most reaction time.
Near
Changing the FCW status to the “Near” setting, allows the system to warn you of a
potential frontal collision when you are much closer.
OPERATING YOUR VEHICLE
42
Page 45 of 220
This setting provides less reaction time than the “Far” setting, which allows for a more
dynamic driving experience.
More dynamic or aggressive drivers that want to avoid frequent warnings may prefer this
setting.
Refer to the Owner's Manual on the DVD for further details.
WARNING!
Forward Collision Warning (FCW) is not intended to avoid a collision on its own, nor can
FCW detect every type of potential collision. The driver has the responsibility to avoid
acollisionbycontrollingthevehicleviabrakingandsteering.Failuretofollowthis
warning could lead to serious injury or death.
PARKSENSE® REAR PARK ASSIST
The four ParkSense®sensors, located in the rear fascia/bumper, monitor the area behind
the vehicle that is within the sensors’ field of view.
The sensors can detect obstacles from approximately 12 in (30 cm) up to 79 in (200 cm)
from the rear bumper while the vehicle is in REVERSE, a warning will display in the Driver
Information Display (DID) only when (Sound and Display is selected from the Uconnect®
System). As the vehicle moves closer to the obstacle, the (DID) will show fewer arcs and
the sound tone will change from slow, to fast, to continuous.
Refer to your Owner's Manual on the DVD for further details.
AUTOSTICK
AutoStick is a driver-interactive transmission feature providing manual shift control,
giving you more control of the vehicle. AutoStick allows you to maximize engine braking,
eliminate undesirable upshifts and downshifts, and improve overall vehicle performance.
This system can also provide you with more control during passing, city driving, cold
slippery conditions, mountain driving, trailer towing, and many other situations.
Operation
When the shift lever is in the DRIVE (D) position, the transmission will operate automatically,
shifting between the eight available gears. To activate AutoStick, move the shift lever into the
MANUAL (M) position (beside the DRIVE position). The current transmission gear will be
displayed in the instrument cluster, along with a highlighted "M" (Manual) indication. When
the shift lever is in the MANUAL (M) position, tap the shift lever forward (-) (or tap the (-) shift
paddle on the steering wheel, if equipped) to downshift the transmission to the next lower
gear, or tap the lever rearward (+) (or tap the (+) shift paddle, if equipped) to command an
upshift.
OPERATING YOUR VEHICLE
43
Page 46 of 220
NOTE:
Ta p p i n g o n e o f t h e s t e e r i n g w h e e l - m o u n t e d s h i f t p a d d l e s ( + / - ) , i f e q u i p p e d , w h i l e t h e s h i f t
lever is in DRIVE, will activate a temporary AutoStick mode. Tapping (-) to enter AutoStick
mode will downshift the transmission to the next lower gear, while using (+) to enter
AutoStick mode will retain the current gear. The current gear will be displayed in the
instrument cluster, but the "M" will not be highlighted. The transmission will revert back
to normal operation (if the shift lever remains in DRIVE) after a period of time, depending
on accelerator pedal activity.
In AutoStick mode, the transmission will shift up or down when (+/-) is manually selected
by the driver (using the shift lever, or the shift paddles [if equipped]), unless an engine
lugging or overspeed condition would result. It will remain in the selected gear until
another upshift or downshift is chosen, except as described below.
•IntemporaryAutoStickmode(shiftleverinDRIVE),thetransmissionwillautomatically
shift up when maximum engine speed is reached. If the accelerator is fully depressed,
the transmission will downshift when possible (based on current vehicle speed and
gear). Lack of accelerator pedal activity will cause the transmission to revert to
automatic operation.
•IfnormalAutoStickmodeisengaged(shiftleverinMANUALposition),manualgear
selection will be maintained until the shift lever is returned to DRIVE, or as described
below. The transmission will not upshift automatically at redline in this mode, nor will
downshifts be obtained if the accelerator pedal is pressed to the floor.
•Thetransmissionwillautomaticallydownshiftasthevehicleslows(topreventengine
lugging) and will display the current gear.
•Thetransmissionwillautomaticallydownshifttofirstgearwhencomingtoastop.After
astop,thedrivershouldmanuallyupshift(+)thetransmissionasthevehicleis
accelerated.
•Youcanstartout,fromastop,infirstorsecondgear.Tapping(+)(atastop)willallow
starting in second gear. Starting out in second gear can be helpful in snowy or icy
conditions.
•Ifarequesteddownshiftwouldcausetheenginetoover-speed,thatshiftwillnotoccur.
•Thesystemwillignoreattemptstoupshiftattoolowofavehiclespeed.
•Holdingthe(-)paddledepressed(ifequipped),orholdingtheshiftleverinthe(-)
position, will downshift the transmission to the lowest gear possible at the current
speed.
•TransmissionshiftingwillbemorenoticeablewhenAutoStickisengaged.
•Thesystemmayreverttoautomaticshiftmodeifafaultoroverheatconditionis
detected.
OPERATING YOUR VEHICLE
44