key DODGE CHALLENGER 2020 Service Manual
[x] Cancel search | Manufacturer: DODGE, Model Year: 2020, Model line: CHALLENGER, Model: DODGE CHALLENGER 2020Pages: 396, PDF Size: 16.64 MB
Page 208 of 396
206IN CASE OF EMERGENCY
REPLACING EXTERIOR BULBS
Low Beam Headlamp, High Beam
Headlamp — Models With Halogen
Headlamps — If Equipped
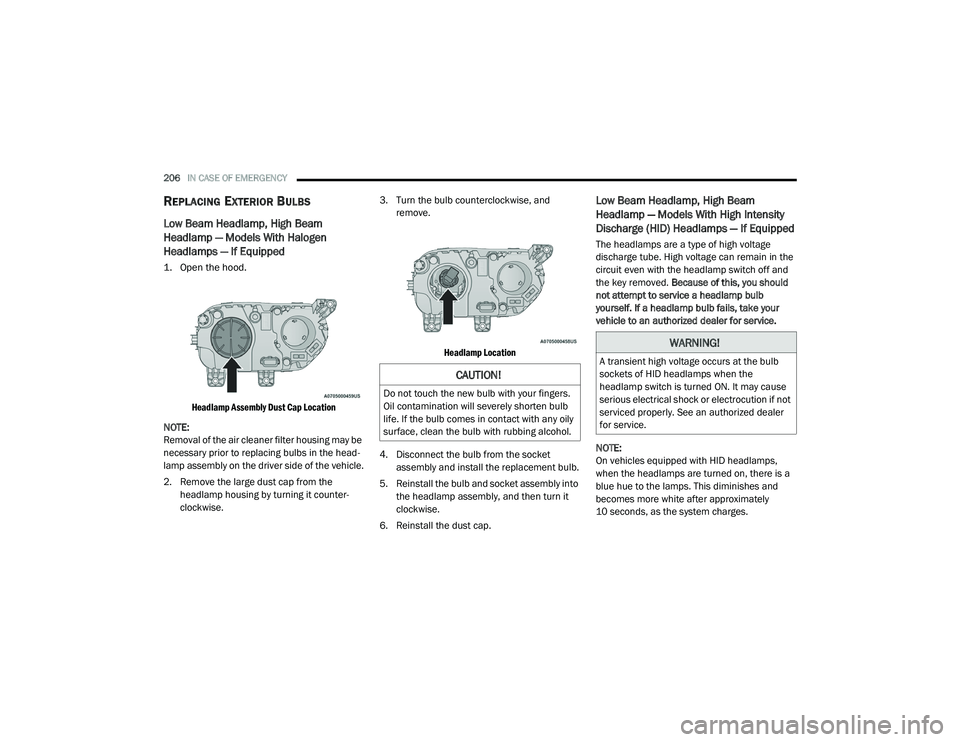
1. Open the hood.
Headlamp Assembly Dust Cap Location
NOTE:
Removal of the air cleaner filter housing may be
necessary prior to replacing bulbs in the head -
lamp assembly on the driver side of the vehicle.
2. Remove the large dust cap from the headlamp housing by turning it counter -
clockwise. 3. Turn the bulb counterclockwise, and
remove.
Headlamp Location
4. Disconnect the bulb from the socket assembly and install the replacement bulb.
5. Reinstall the bulb and socket assembly into the headlamp assembly, and then turn it
clockwise.
6. Reinstall the dust cap.
Low Beam Headlamp, High Beam
Headlamp — Models With High Intensity
Discharge (HID) Headlamps — If Equipped
The headlamps are a type of high voltage
discharge tube. High voltage can remain in the
circuit even with the headlamp switch off and
the key removed. Because of this, you should
not attempt to service a headlamp bulb
yourself. If a headlamp bulb fails, take your
vehicle to an authorized dealer for service.
NOTE:
On vehicles equipped with HID headlamps,
when the headlamps are turned on, there is a
blue hue to the lamps. This diminishes and
becomes more white after approximately
10 seconds, as the system charges.
CAUTION!
Do not touch the new bulb with your fingers.
Oil contamination will severely shorten bulb
life. If the bulb comes in contact with any oily
surface, clean the bulb with rubbing alcohol.
WARNING!
A transient high voltage occurs at the bulb
sockets of HID headlamps when the
headlamp switch is turned ON. It may cause
serious electrical shock or electrocution if not
serviced properly. See an authorized dealer
for service.
20_LA_OM_EN_USC_t.book Page 206
Page 234 of 396
232IN CASE OF EMERGENCY
TOWING A DISABLED VEHICLE
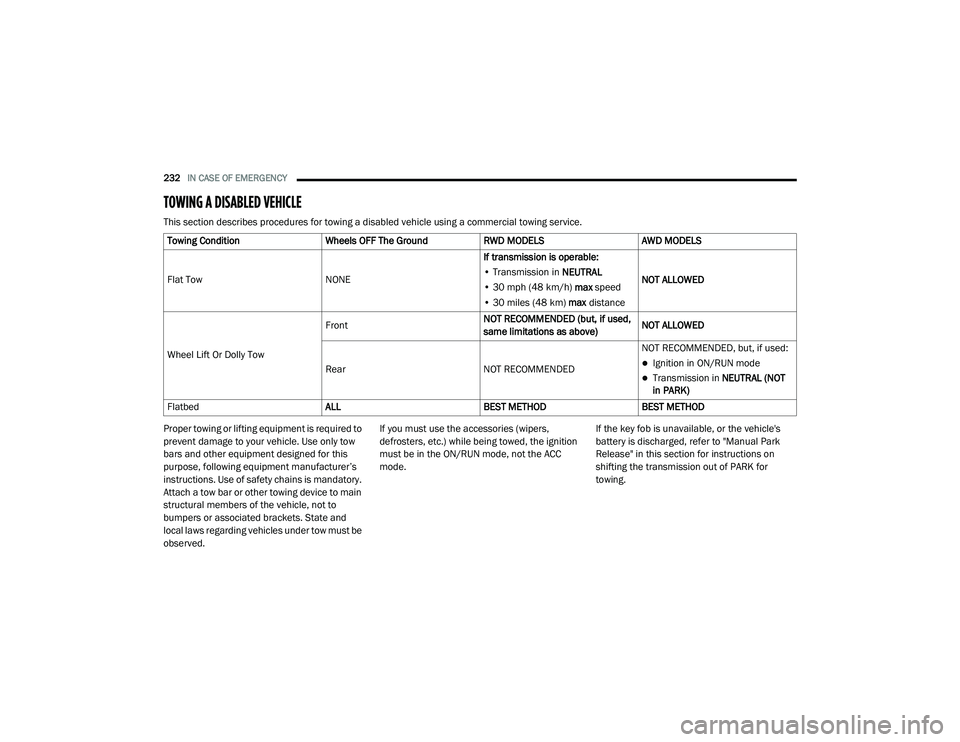
This section describes procedures for towing a disabled vehicle using a commercial towing service.
Proper towing or lifting equipment is required to
prevent damage to your vehicle. Use only tow
bars and other equipment designed for this
purpose, following equipment manufacturer’s
instructions. Use of safety chains is mandatory.
Attach a tow bar or other towing device to main
structural members of the vehicle, not to
bumpers or associated brackets. State and
local laws regarding vehicles under tow must be
observed. If you must use the accessories (wipers,
defrosters, etc.) while being towed, the ignition
must be in the ON/RUN mode, not the ACC
mode.
If the key fob is unavailable, or the vehicle's
battery is discharged, refer to "Manual Park
Release" in this section for instructions on
shifting the transmission out of PARK for
towing.
Towing Condition
Wheels OFF The Ground RWD MODELS AWD MODELS
Flat Tow NONEIf transmission is operable:
• Transmission in NEUTRAL
• 30 mph (48 km/h) max speed
• 30 miles (48 km) max distance NOT ALLOWED
Wheel Lift Or Dolly Tow Front
NOT RECOMMENDED (but, if used,
same limitations as above)NOT ALLOWED
Rear NOT RECOMMENDEDNOT RECOMMENDED, but, if used:
Ignition in ON/RUN mode
Transmission in
NEUTRAL (NOT
in PARK)
Flatbed ALLBEST METHODBEST METHOD
20_LA_OM_EN_USC_t.book Page 232
Page 318 of 396
316MULTIMEDIA
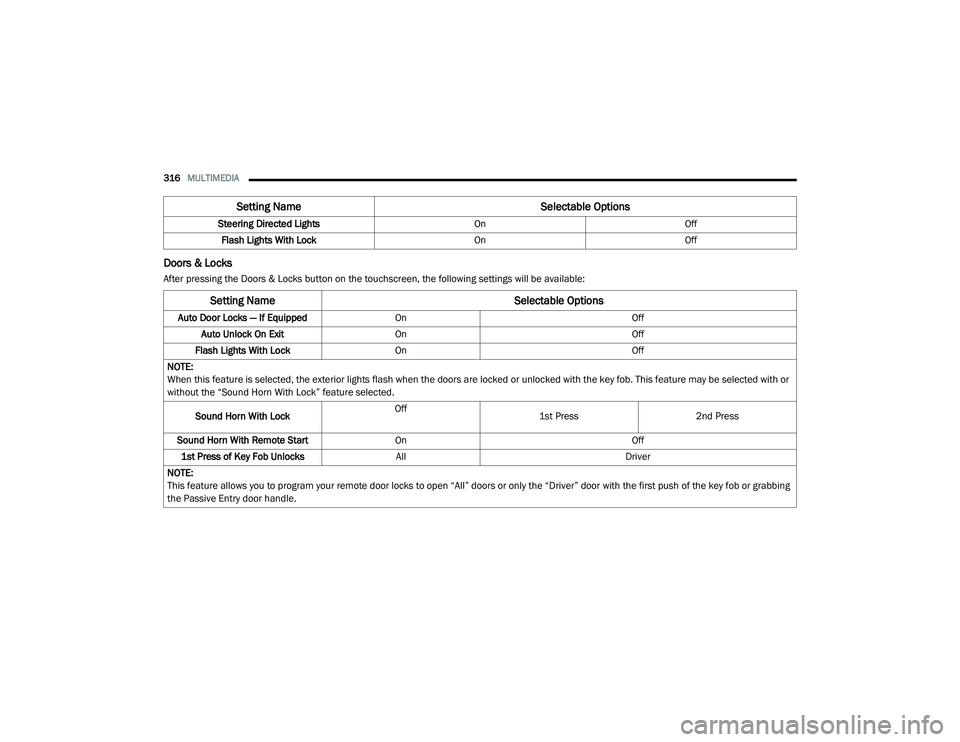
Doors & Locks
After pressing the Doors & Locks button on the touchscreen, the following settings will be available:Steering Directed Lights
OnOff
Flash Lights With Lock OnOff
Setting Name Selectable Options
Setting NameSelectable Options
Auto Door Locks — If EquippedOn Off
Auto Unlock On Exit On Off
Flash Lights With Lock On Off
NOTE:
When this feature is selected, the exterior lights flash when the doors are locked or unlocked with the key fob. This feature may be selected with or
without the “Sound Horn With Lock” feature selected.
Sound Horn With Lock Off
1st Press
2nd Press
Sound Horn With Remote Start On Off
1st Press of Key Fob Unlocks All Driver
NOTE:
This feature allows you to program your remote door locks to open “All” doors or only the “Driver” door with the first push of the key fob or grabbing
the Passive Entry door handle.
20_LA_OM_EN_USC_t.book Page 316
Page 319 of 396
MULTIMEDIA317
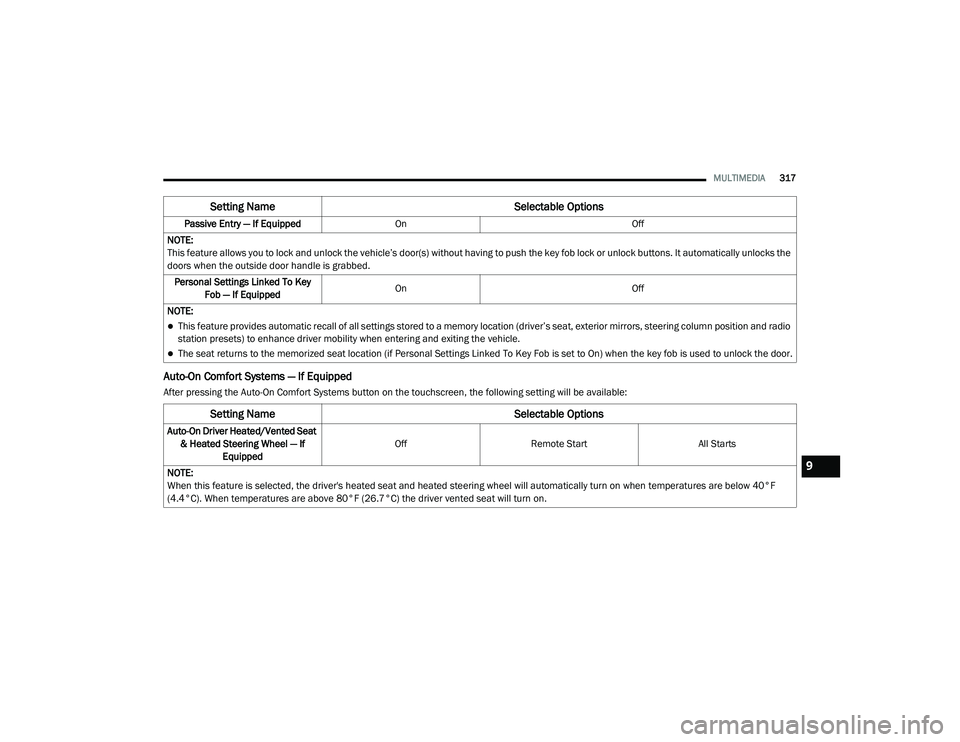
Auto-On Comfort Systems — If Equipped
After pressing the Auto-On Comfort Systems button on the touchscreen, the following setting will be available:Passive Entry — If Equipped
On Off
NOTE:
This feature allows you to lock and unlock the vehicle’s door(s) without having to push the key fob lock or unlock buttons. It automatically unlocks the
doors when the outside door handle is grabbed. Personal Settings Linked To Key Fob — If Equipped On
Off
NOTE:
This feature provides automatic recall of all settings stored to a memory location (driver’s seat, exterior mirrors, steering column position and radio
station presets) to enhance driver mobility when entering and exiting the vehicle.
The seat returns to the memorized seat location (if Personal Settings Linked To Key Fob is set to On) when the key fob is used to unlock the door.
Setting Name Selectable Options
Setting NameSelectable Options
Auto-On Driver Heated/Vented Seat
& Heated Steering Wheel — If Equipped Off
Remote Start All Starts
NOTE:
When this feature is selected, the driver's heated seat and heated steering wheel will automatically turn on when temperatures are below 40°F
(4.4°C). When temperatures are above 80°F (26.7°C) the driver vented seat will turn on.
9
20_LA_OM_EN_USC_t.book Page 317
Page 325 of 396
MULTIMEDIA323
CUSTOMER PROGRAMMABLE FEATURES
— U
CONNECT 4C/4C NAV SETTINGS
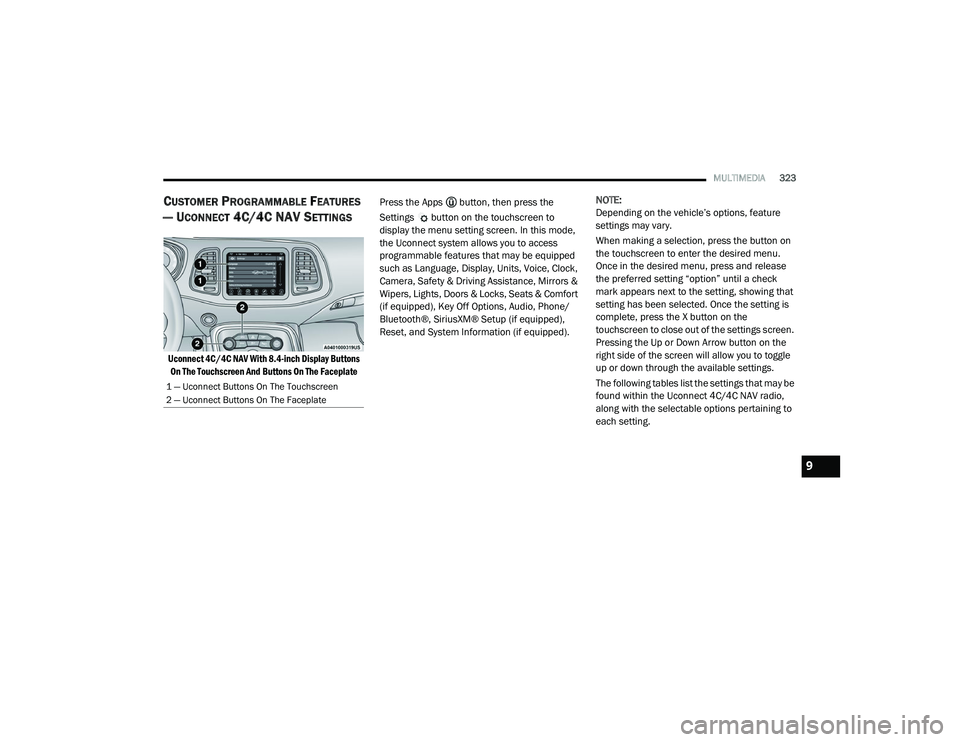
Uconnect 4C/4C NAV With 8.4-inch Display Buttons
On The Touchscreen And Buttons On The Faceplate
Press the Apps button, then press the
Settings button on the touchscreen to
display the menu setting screen. In this mode,
the Uconnect system allows you to access
programmable features that may be equipped
such as Language, Display, Units, Voice, Clock,
Camera, Safety & Driving Assistance, Mirrors &
Wipers, Lights, Doors & Locks, Seats & Comfort
(if equipped), Key Off Options, Audio, Phone/
Bluetooth®, SiriusXM® Setup (if equipped),
Reset, and System Information (if equipped).
NOTE:
Depending on the vehicle’s options, feature
settings may vary.
When making a selection, press the button on
the touchscreen to enter the desired menu.
Once in the desired menu, press and release
the preferred setting “option” until a check
mark appears next to the setting, showing that
setting has been selected. Once the setting is
complete, press the X button on the
touchscreen to close out of the settings screen.
Pressing the Up or Down Arrow button on the
right side of the screen will allow you to toggle
up or down through the available settings.
The following tables list the settings that may be
found within the Uconnect 4C/4C NAV radio,
along with the selectable options pertaining to
each setting.
1 — Uconnect Buttons On The Touchscreen
2 — Uconnect Buttons On The Faceplate
9
20_LA_OM_EN_USC_t.book Page 323
Page 334 of 396
332MULTIMEDIA
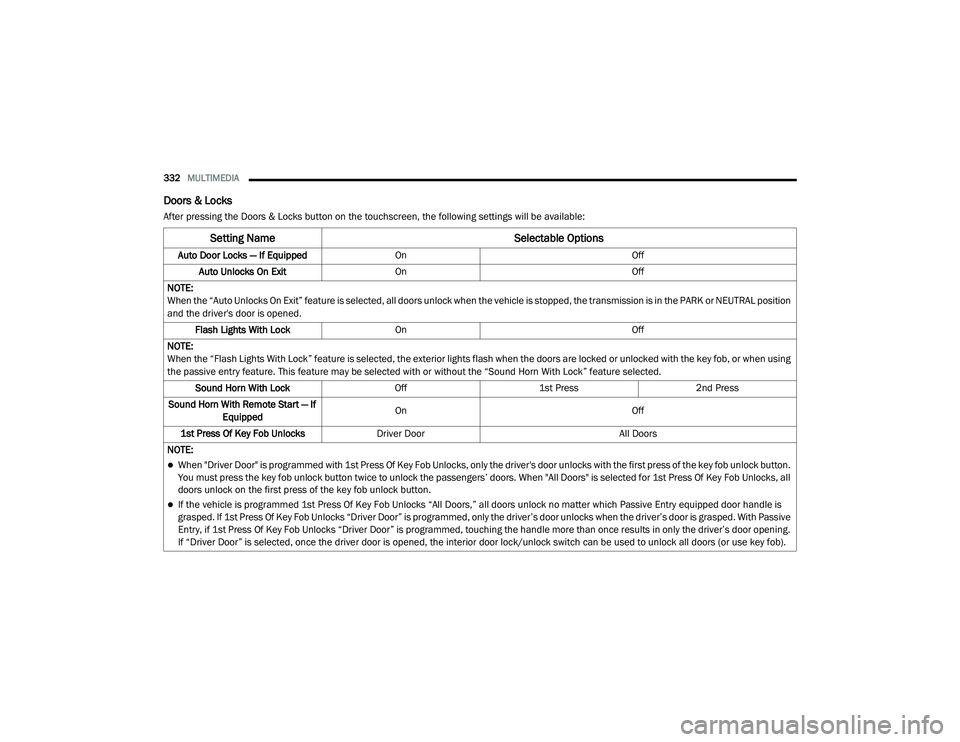
Doors & Locks
After pressing the Doors & Locks button on the touchscreen, the following settings will be available:
Setting Name Selectable Options
Auto Door Locks — If EquippedOn Off
Auto Unlocks On Exit On Off
NOTE:
When the “Auto Unlocks On Exit” feature is selected, all doors unlock when the vehicle is stopped, the transmission is in the PARK or NEUTRAL position
and the driver's door is opened. Flash Lights With Lock On Off
NOTE:
When the “Flash Lights With Lock” feature is selected, the exterior lights flash when the doors are locked or unlocked with the key fob, or when using
the passive entry feature. This feature may be selected with or without the “Sound Horn With Lock” feature selected. Sound Horn With Lock Off1st Press 2nd Press
Sound Horn With Remote Start — If Equipped On
Off
1st Press Of Key Fob Unlocks Driver Door All Doors
NOTE:
When "Driver Door" is programmed with 1st Press Of Key Fob Unlocks, only the driver's door unlocks with the first press of the key fob unlock button.
You must press the key fob unlock button twice to unlock the passengers’ doors. When "All Doors" is selected for 1st Press Of Key Fob Unlocks, all
doors unlock on the first press of the key fob unlock button.
If the vehicle is programmed 1st Press Of Key Fob Unlocks “All Doors,” all doors unlock no matter which Passive Entry equipped door handle is
grasped. If 1st Press Of Key Fob Unlocks “Driver Door” is programmed, only the driver’s door unlocks when the driver’s door is grasped. With Passive
Entry, if 1st Press Of Key Fob Unlocks “Driver Door” is programmed, touching the handle more than once results in only the driver’s door opening.
If “Driver Door” is selected, once the driver door is opened, the interior door lock/unlock switch can be used to unlock all doors (or use key fob).
20_LA_OM_EN_USC_t.book Page 332
Page 335 of 396
MULTIMEDIA333
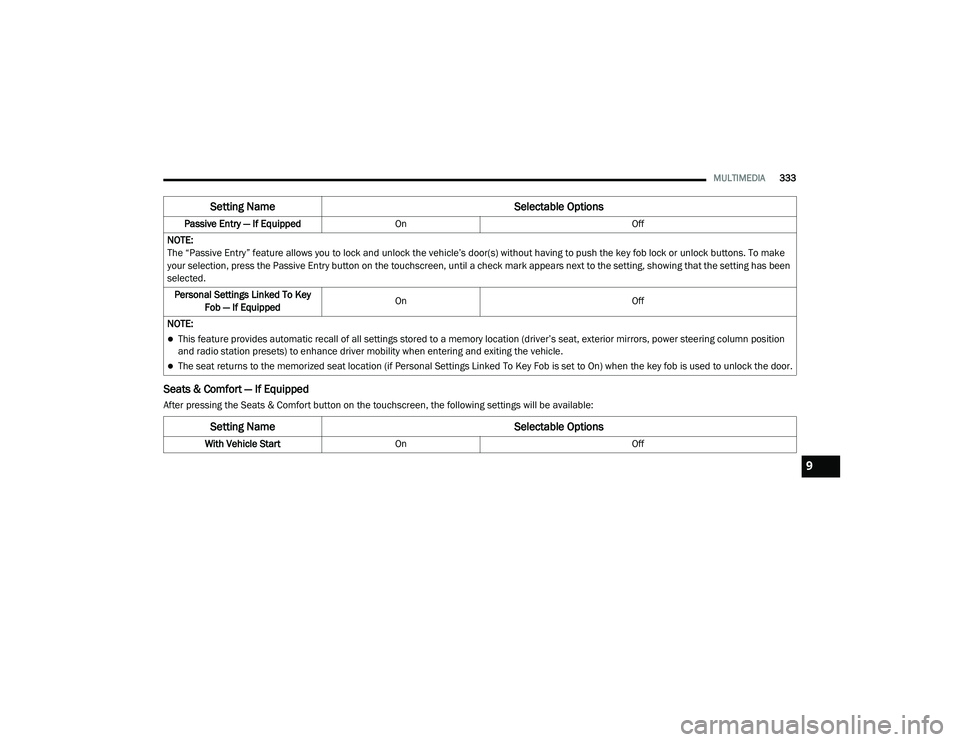
Seats & Comfort — If Equipped
After pressing the Seats & Comfort button on the touchscreen, the following settings will be available:Passive Entry — If Equipped
On Off
NOTE:
The “Passive Entry” feature allows you to lock and unlock the vehicle’s door(s) without having to push the key fob lock or unlock buttons. To make
your selection, press the Passive Entry button on the touchscreen, until a check mark appears next to the setting, showing that the setting has been
selected. Personal Settings Linked To Key Fob — If Equipped On
Off
NOTE:
This feature provides automatic recall of all settings stored to a memory location (driver’s seat, exterior mirrors, power steering column position
and radio station presets) to enhance driver mobility when entering and exiting the vehicle.
The seat returns to the memorized seat location (if Personal Settings Linked To Key Fob is set to On) when the key fob is used to unlock the door.
Setting Name Selectable Options
Setting NameSelectable Options
With Vehicle StartOn Off
9
20_LA_OM_EN_USC_t.book Page 333
Page 336 of 396
334MULTIMEDIA
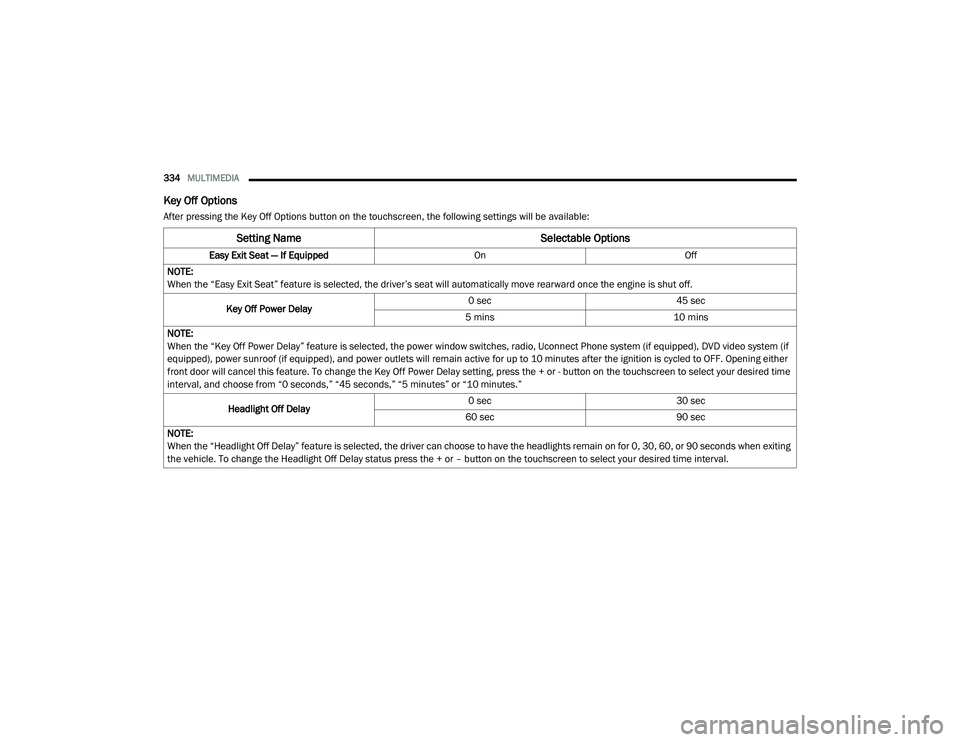
Key Off Options
After pressing the Key Off Options button on the touchscreen, the following settings will be available:
Setting Name Selectable Options
Easy Exit Seat — If EquippedOnOff
NOTE:
When the “Easy Exit Seat” feature is selected, the driver’s seat will automatically move rearward once the engine is shut off.
Key Off Power Delay 0 sec
45 sec
5 mins 10 mins
NOTE:
When the “Key Off Power Delay” feature is selected, the power window switches, radio, Uconnect Phone system (if equipped), DVD video system (if
equipped), power sunroof (if equipped), and power outlets will remain active for up to 10 minutes after the ignition is cycled to OFF. Opening either
front door will cancel this feature. To change the Key Off Power Delay setting, press the + or - button on the touchscreen to select your desired time
interval, and choose from “0 seconds,” “45 seconds,” “5 minutes” or “10 minutes.”
Headlight Off Delay 0 sec
30 sec
60 sec 90 sec
NOTE:
When the “Headlight Off Delay” feature is selected, the driver can choose to have the headlights remain on for 0, 30, 60, or 90 seconds when exiting
the vehicle. To change the Headlight Off Delay status press the + or – button on the touchscreen to select your desired time interval.
20_LA_OM_EN_USC_t.book Page 334
Page 345 of 396
MULTIMEDIA343
Setting Presets
The Presets are available for all Radio Modes,
and are activated by pressing any of the six
Preset buttons on the touchscreen, located at
the top of the screen.
When you are receiving a station that you wish
to commit into memory, press and hold the
desired numbered button on the touchscreen
for more than two seconds or until you hear a
confirmation beep.
The Radio stores up to 12 presets in each of the
Radio modes. A set of six presets are visible at
the top of the radio screen.
You can switch between the two radio presets
by pressing the Arrow button located in the
upper right of the radio touchscreen.
Browse In AM/FM
When in either AM or FM, the Browse Screen
provides a means to edit the Presets List and is
entered by pushing the ENTER/BROWSE
button.
Scrolling Preset List
Once in the Browse Presets screen, you can
scroll the preset list by rotation of the TUNE/
SCROLL knob, or by pressing the Up and Down
arrow keys, located on the right of the screen. Preset Selection From List
A Preset can be selected by pressing any of the
listed Presets or by pushing the ENTER/
BROWSE button on the TUNE/SCROLL knob to
select the currently highlighted Preset.
When selected, the radio tunes to the station
stored in the Preset and returns to the main
radio screen.
Deleting Presets
A Preset can be deleted in the Presets Browse
screen by pressing the Trash Can icon for the
corresponding Preset.
Return To Main Radio Screen
You can return to the Main Radio Screen, by
pressing the X button on the touchscreen when
in the Browse Presets screen.
SiriusXM® Satellite Radio Mode — If
Equipped
SiriusXM® Satellite Radio uses direct
satellite-to-receiver broadcasting technology to
provide clear, coast-to-coast radio content.
SiriusXM® is a subscription based service.
SiriusXM® All Access Package
All satellite radio-equipped vehicles come with a
one-year trial to the SiriusXM® All Access
package, providing over 160 channels of the
best programming for all the places life takes
you.
In your vehicle — You’ll get every channel
available on your radio, including all the
premium programming like Howard Stern,
every NFL® game, every MLB® game, every
NASCAR® race, Oprah Radio, and more.
On the go — With a SiriusXM® Internet Radio
subscription included with the All Access trial,
you’ll get SiriusXM® on your computer,
smartphone, or tablet. Including:
A huge On Demand catalog
Xtra Channels featuring SiriusXM®
Latino – a collection of Spanish-language
channels
MySXM – allowing you to personalize
your favorite music channels
Go to siriusxm.com/getallaccess for more
information9
20_LA_OM_EN_USC_t.book Page 343
Page 359 of 396
MULTIMEDIA357
Uconnect Phone supports the following
features:
Voice Activated Features
Hands-Free dialing via Voice (“Call John
Smith Mobile” or, “Dial 248-555-1212”).
Hands-Free text-to-speech listening of your
incoming SMS messages.
Hands-Free text message replying (Forward
one of 18 pre-defined SMS messages to
incoming calls/text messages).
Redialing last dialed numbers (“Redial”).
Calling back the last incoming call number
(“Call Back”).
Viewing call logs on screen (“Show incoming
calls,” “Show outgoing calls,” “Show missed
calls,” “Show recent calls”).
Searching contacts phone number (“Search
for John Smith Mobile”).
NOTE:
Examples of Voice Commands are provided
throughout this manual. For quick use, go to the
Voice Command Quick Reference Section. Screen Activated Features
Dialing via keypad using touchscreen.
Viewing and calling contacts from phone -
books displayed on the touchscreen.
Setting favorite contact phone numbers so
they are easily accessible on the main phone
screen.
Viewing and calling contacts from recent call
logs.
Reviewing your recent incoming SMS.
Listening to music on your Bluetooth® device
via the touchscreen.
Pairing up to 10 phones/audio devices for
easy access to connect to them quickly.
NOTE:
Your phone must be capable of SMS messaging
via Bluetooth® for messaging features to work
properly.
Your mobile phone’s audio is transmitted
through your vehicle’s audio system; the system
automatically mutes your radio when using the
Uconnect Phone. For Uconnect customer support:
US residents - visit UconnectPhone.com or
call:
877-855-8400
Canadian residents - (English) call:
800-465-2001
or (French) call:
800-387-9983
Visit UconnectPhone.com
Uconnect Phone allows you to transfer calls
between the system and your mobile phone as
you enter or exit your vehicle and enables you to
mute the system's microphone for private
conversation.
WARNING!
ALWAYS drive safely with your hands on the
steering wheel. You have full responsibility
and assume all risks related to the use of the
Uconnect features and applications in this
vehicle. Only use Uconnect when it is safe to
do so. Failure to do so may result in an
accident involving serious injury or death.
9
20_LA_OM_EN_USC_t.book Page 357