USB DODGE CHALLENGER 2020 Owners Manual
[x] Cancel search | Manufacturer: DODGE, Model Year: 2020, Model line: CHALLENGER, Model: DODGE CHALLENGER 2020Pages: 396, PDF Size: 16.64 MB
Page 9 of 396
7
MULTIMEDIA
UCONNECT SYSTEMS ....................................... 305
CYBERSECURITY ............................................... 305
UCONNECT SETTINGS ...................................... 306Customer Programmable Features —
Uconnect 4 Settings ..................................307 Customer Programmable Features —
Uconnect 4C/4C NAV Settings ................. 323
SAFETY AND GENERAL INFORMATION .......... 339
Safety Guidelines .......................................339
UCONNECT 4 WITH 7-INCH DISPLAY .............. 340
Introduction ................................................340
Radio Mode ................................................341
Media Mode ...............................................349Phone Mode ...............................................356
STEERING WHEEL AUDIO CONTROLS — IF
EQUIPPED ......................................................... 367
Radio Operation .........................................368
Media Mode ...............................................368
IPOD®/USB/MP3 CONTROL —
IF EQUIPPED ...................................................... 368
RADIO OPERATION AND MOBILE
PHONES .............................................................. 368
Regulatory And Safety Information........... 368 UCONNECT VOICE RECOGNITION
QUICK TIPS ......................................................... 370
Introducing Uconnect ................................ 370
Get Started ................................................. 370
Basic Voice Commands............................. 371Radio .......................................................... 371
Media.......................................................... 371
Phone ......................................................... 372Voice Text Reply — If Equipped ................. 372
Climate ....................................................... 373Navigation (4C NAV) .................................. 373Siri® Eyes Free — If Equipped ................. 373
Do Not Disturb .......................................... 373Android Auto™ — If Equipped ................... 374
Apple CarPlay® — If Equipped ................. 374
General Information .................................. 375Additional Information ............................... 375
CUSTOMER ASSISTANCE
SUGGESTIONS FOR OBTAINING SERVICE
FOR YOUR VEHICLE .......................................... 376
Prepare For The Appointment................... 376
Prepare A List............................................. 376
Be Reasonable With Requests ................. 376 IF YOU NEED ASSISTANCE .............................. 376
FCA US LLC Customer Center ................... 377
FCA Canada Inc. Customer Center ........... 377
Mexico ........................................................ 377
Puerto Rico And US Virgin Islands ............ 377
Customer Assistance For The Hearing
Or Speech Impaired (TDD/TTY) ................ 377 Service Contract ....................................... 377
WARRANTY INFORMATION .............................. 378
MOPAR PARTS................................................... 378
REPORTING SAFETY DEFECTS ........................ 378
In The 50 United States And
Washington, D.C. ....................................... 378 In Canada ................................................... 378
PUBLICATION ORDER FORMS ........................ 379
20_LA_OM_EN_USC_t.book Page 7
Page 66 of 396
64GETTING TO KNOW YOUR VEHICLE
La operación de este equipo está sujeta a las
siguientes dos condiciones:
1. es posible que este equipo o dispositivo no
cause interferencia perjudicial y
2. este equipo o dispositivo debe aceptar cualquier interferencia, incluyendo la que
pueda causar su operación no deseada.
NOTE:
Changes or modifications not expressly
approved by the party responsible for compli -
ance could void the user’s authority to operate
the equipment.
INTERNAL EQUIPMENT
STORAGE
Glove Compartment
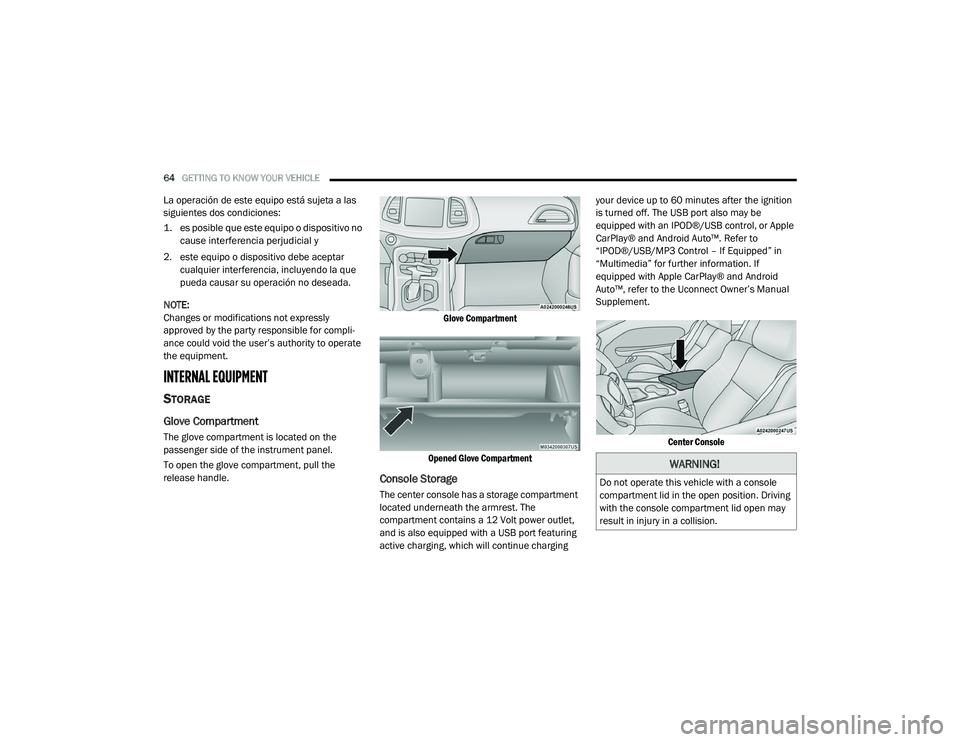
The glove compartment is located on the
passenger side of the instrument panel.
To open the glove compartment, pull the
release handle.
Glove Compartment
Opened Glove Compartment
Console Storage
The center console has a storage compartment
located underneath the armrest. The
compartment contains a 12 Volt power outlet,
and is also equipped with a USB port featuring
active charging, which will continue charging your device up to 60 minutes after the ignition
is turned off. The USB port also may be
equipped with an IPOD®/USB control, or Apple
CarPlay® and Android Auto™. Refer to
“IPOD®/USB/MP3 Control – If Equipped” in
“Multimedia” for further information. If
equipped with Apple CarPlay® and Android
Auto™, refer to the Uconnect Owner’s Manual
Supplement.
Center Console
WARNING!
Do not operate this vehicle with a console
compartment lid in the open position. Driving
with the console compartment lid open may
result in injury in a collision.
20_LA_OM_EN_USC_t.book Page 64
Page 84 of 396
82GETTING TO KNOW YOUR INSTRUMENT PANEL
Turning on all possible vehicle electrical
loads (e.g. HVAC to max settings, exterior
and interior lights, overloaded power outlets
+12 Volts, 115 Volts AC, USB ports) during
certain driving conditions (city driving,
towing, frequent stopping).
Installing options like additional lights,
upfitter electrical accessories, audio
systems, alarms and similar devices.
Unusual driving cycles (short trips separated
by long parking periods).
The vehicle was parked for an extended
period of time (weeks, months).
The battery was recently replaced and was
not charged completely.
The battery was discharged by an electrical
load left on when the vehicle was parked.
The battery was used for an extended period
with the engine not running to supply radio,
lights, chargers, +12 Volts portable appli-
ances like vacuum cleaners, game consoles
and similar devices. What to do when an electrical load reduction
action message is present (“Battery Saver On”
or “Battery Saver Mode”)
During a trip:
Reduce power to unnecessary loads if
possible:
Turn off redundant lights (interior or exte
-
rior)
Check what may be plugged in to power
outlets +12 Volts, 115 Volts AC, USB
ports
Check HVAC settings (blower,
temperature)
Check the audio settings (volume)
After a trip:
Check if any aftermarket equipment was
installed (additional lights, upfitter electrical
accessories, audio systems, alarms) and
review specifications if any (load and Ignition
Off Draw currents).
Evaluate the latest driving cycles (distance,
driving time and parking time).
The vehicle should have service performed if
the message is still present during consecu -
tive trips and the evaluation of the vehicle
and driving pattern did not help to identify the
cause.
WARNING LIGHTS AND MESSAGES
The warning/indicator lights will illuminate in
the instrument panel together with a dedicated
message and/or acoustic signal when
applicable. These indications are indicative and
precautionary and as such must not be
considered as exhaustive and/or alternative to
the information contained in the Owner’s
Manual, which you are advised to read carefully
in all cases. Always refer to the information in
this chapter in the event of a failure indication.
All active telltales will display first if applicable.
The system check menu may appear different
based upon equipment options and current
vehicle status. Some telltales are optional and
may not appear.
20_LA_OM_EN_USC_t.book Page 82
Page 214 of 396
212IN CASE OF EMERGENCY
Cavity Cartridge Fuse Mini-FuseDescription
F02 60 Amp Yellow –Front PDC Feed #1
F03 ––Fuse – Spare
F04 60 Amp Yellow –Front PDC Feed #2
F05 30 Amp Pink
20 Amp Blue – Police –
Sunroof/Dome Lamp – Police
F06 40 Amp Green –Exterior Lighting #1
F07 40 Amp Green –Exterior Lighting #2
F08 30 Amp Pink –Interior Lighting
F09 40 Amp Green –Power Locks
F10 30 Amp Pink –Driver Door Control Module
F11 30 Amp Pink –Passenger Door Control Module
F12 –20 Amp YellowDual USB Center Console Rear/
Cigar Lighter/ IP APO – If Equipped
F15 40 Amp Green –HVAC Blower
F16 20 Amp Blue –Left Spot Lamp – Police
F17 20 Amp Blue –Right Spot Lamp – Police
F18 30 Amp Pink –VISM MOD (Police)
F19 ––Fuse – Spare
F20 ––Fuse – Spare
F21 30 Amp Pink –Fuel Pump (Non 6.2L ADR)
F22 –5 Amp Tan Cyber Gateway Mod
20_LA_OM_EN_USC_t.book Page 212
Page 217 of 396
IN CASE OF EMERGENCY215
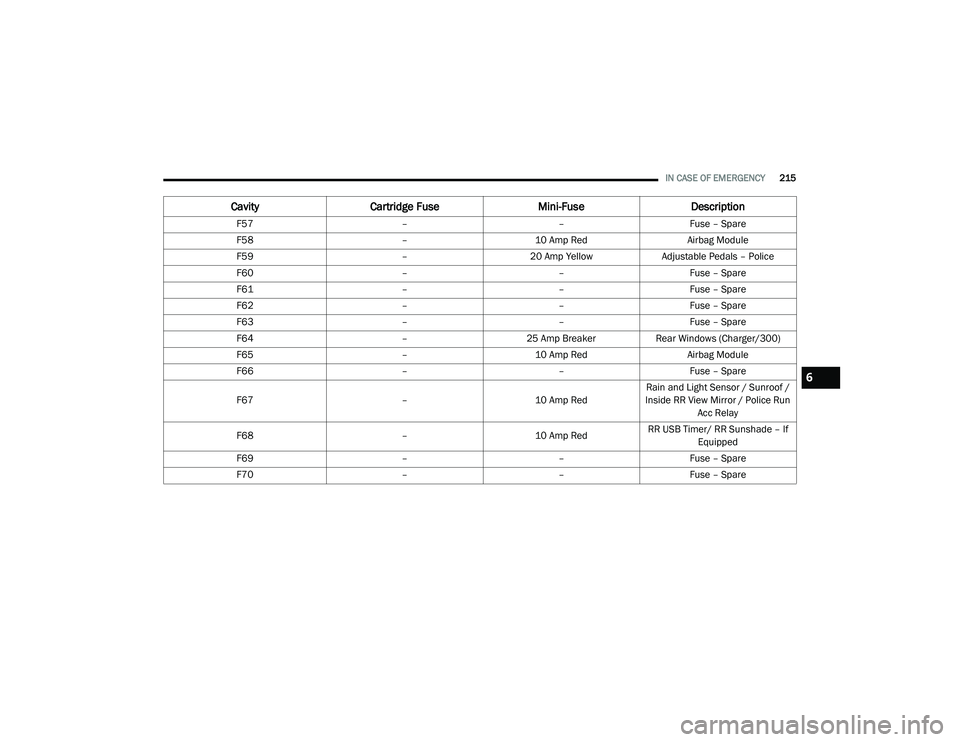
F57 ––Fuse – Spare
F58 –10 Amp Red Airbag Module
F59 –20 Amp Yellow Adjustable Pedals – Police
F60 ––Fuse – Spare
F61 ––Fuse – Spare
F62 ––Fuse – Spare
F63 ––Fuse – Spare
F64 –25 Amp Breaker Rear Windows (Charger/300)
F65 –10 Amp Red Airbag Module
F66 ––Fuse – Spare
F67 –10 Amp RedRain and Light Sensor / Sunroof /
Inside RR View Mirror / Police Run Acc Relay
F68 –10 Amp RedRR USB Timer/ RR Sunshade – If
Equipped
F69 ––Fuse – Spare
F70 ––Fuse – Spare
CavityCartridge Fuse Mini-FuseDescription
6
20_LA_OM_EN_USC_t.book Page 215
Page 307 of 396
305
MULTIMEDIA
UCONNECT SYSTEMS
For detailed information about your Uconnect
4/4C/4C NAV With 8.4-inch Display system,
refer to your Uconnect Owner’s Manual
Supplement.
NOTE:
Uconnect screen images are for illustration
purposes only and may not reflect exact soft-
ware for your vehicle.
CYBERSECURITY
Your vehicle may be a connected vehicle and
may be equipped with both wired and wireless
networks. These networks allow your vehicle to
send and receive information. This information
allows systems and features in your vehicle to
function properly. Your vehicle may be equipped with certain
security features to reduce the risk of
unauthorized and unlawful access to vehicle
systems and wireless communications. Vehicle
software technology continues to evolve over
time and FCA US LLC, working with its suppliers,
evaluates and takes appropriate steps as
needed. Similar to a computer or other devices,
your vehicle may require software updates to
improve the usability and performance of your
systems or to reduce the potential risk of
unauthorized and unlawful access to your
vehicle systems.
The risk of unauthorized and unlawful access to
your vehicle systems may still exist, even if the
most recent version of vehicle software (such as
Uconnect software) is installed.
WARNING!
It is not possible to know or to predict all of
the possible outcomes if your vehicle’s
systems are breached. It may be possible
that vehicle systems, including safety
related systems, could be impaired or a
loss of vehicle control could occur that may
result in an accident involving serious injury
or death.
ONLY insert media (e.g., USB, SD card, or
CD) into your vehicle if it came from a
trusted source. Media of unknown origin
could possibly contain malicious software,
and if installed in your vehicle, it may
increase the possibility for vehicle systems
to be breached.
As always, if you experience unusual
vehicle behavior, take your vehicle to your
nearest authorized dealer immediately.9
20_LA_OM_EN_USC_t.book Page 305
Page 308 of 396

306MULTIMEDIA
NOTE:
FCA US LLC or your dealer may contact you
directly regarding software updates.
To help further improve vehicle security and
minimize the potential risk of a security
breach, vehicle owners should:
Routinely check www.driveuconnect.com
(US Residents) or www.driveuconnect.ca
(Canadian Residents) to learn about
available Uconnect software updates.
Only connect and use trusted media
devices (e.g. personal mobile phones,
USBs, CDs). Privacy of any wireless and wired
communications cannot be assured. Third
parties may unlawfully intercept information
and private communications without your
consent. For further information, refer to “Data
Collection & Privacy” in your Uconnect Owner’s
Manual Supplement or “Onboard Diagnostic
System (OBD II) Cybersecurity” in “Getting To
Know Your Instrument Panel”.
UCONNECT SETTINGS
The Uconnect system uses a combination of
buttons on the touchscreen and buttons on the
faceplate located on the center of the
instrument panel. These buttons allow you to
access and change the Customer
Programmable Features. Many features can
vary by vehicle. Buttons on the faceplate are located below
and/or beside the Uconnect system in the
center of the instrument panel. In addition,
there is a Scroll/Enter control knob located on
the right side. Turn the control knob to scroll
through menus and change settings. Push the
center of the control knob one or more times to
select or change a setting.
Your Uconnect system may also have Screen
Off and Mute buttons on the faceplate.
Push the Screen Off button on the faceplate to
turn off the Uconnect screen. Push the button
again or tap the screen to turn the screen on.
Press the Back Arrow button to exit out of a
Menu or certain option on the Uconnect system.
20_LA_OM_EN_USC_t.book Page 306
Page 340 of 396
338MULTIMEDIA
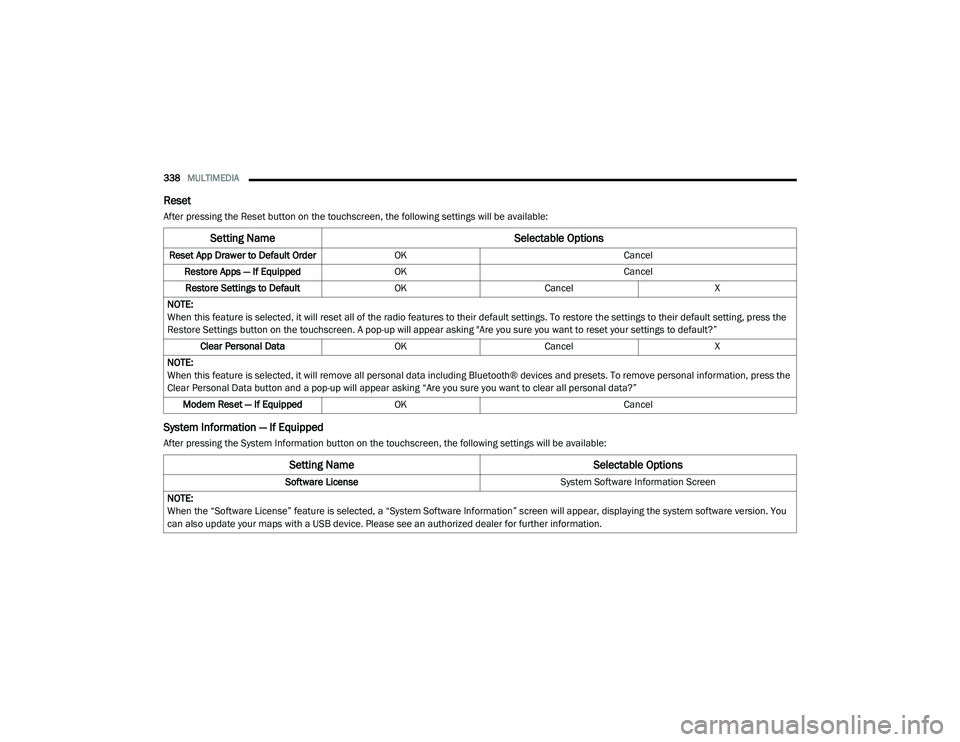
Reset
After pressing the Reset button on the touchscreen, the following settings will be available:
System Information — If Equipped
After pressing the System Information button on the touchscreen, the following settings will be available:
Setting Name Selectable Options
Reset App Drawer to Default OrderOK Cancel
Restore Apps — If Equipped OK Cancel
Restore Settings to Default OKCancel X
NOTE:
When this feature is selected, it will reset all of the radio features to their default settings. To restore the settings to their default setting, press the
Restore Settings button on the touchscreen. A pop-up will appear asking "Are you sure you want to reset your settings to default?” Clear Personal Data OKCancel X
NOTE:
When this feature is selected, it will remove all personal data including Bluetooth® devices and presets. To remove personal information, press the
Clear Personal Data button and a pop-up will appear asking “Are you sure you want to clear all personal data?” Modem Reset — If Equipped OK Cancel
Setting Name Selectable Options
Software License System Software Information Screen
NOTE:
When the “Software License” feature is selected, a “System Software Information” screen will appear, displaying the system software version. You
can also update your maps with a USB device. Please see an authorized dealer for further information.
20_LA_OM_EN_USC_t.book Page 338
Page 342 of 396
340MULTIMEDIA
Care And Maintenance
Touchscreen
Do not press the touchscreen with any hard
or sharp objects (pen, USB stick, jewelry,
etc.), which could scratch the touchscreen
surface!
Do not spray any liquid or caustic chemicals
directly on the screen! Use a clean and dry
microfiber lens cleaning cloth in order to
clean the touchscreen.
If necessary, use a lint-free cloth dampened
with a cleaning solution, such as isopropyl
alcohol or an isopropyl alcohol and water
solution ratio of 50:50. Be sure to follow the
solvent manufacturer's precautions and
directions.
UCONNECT 4 WITH 7-INCH DISPLAY
INTRODUCTION
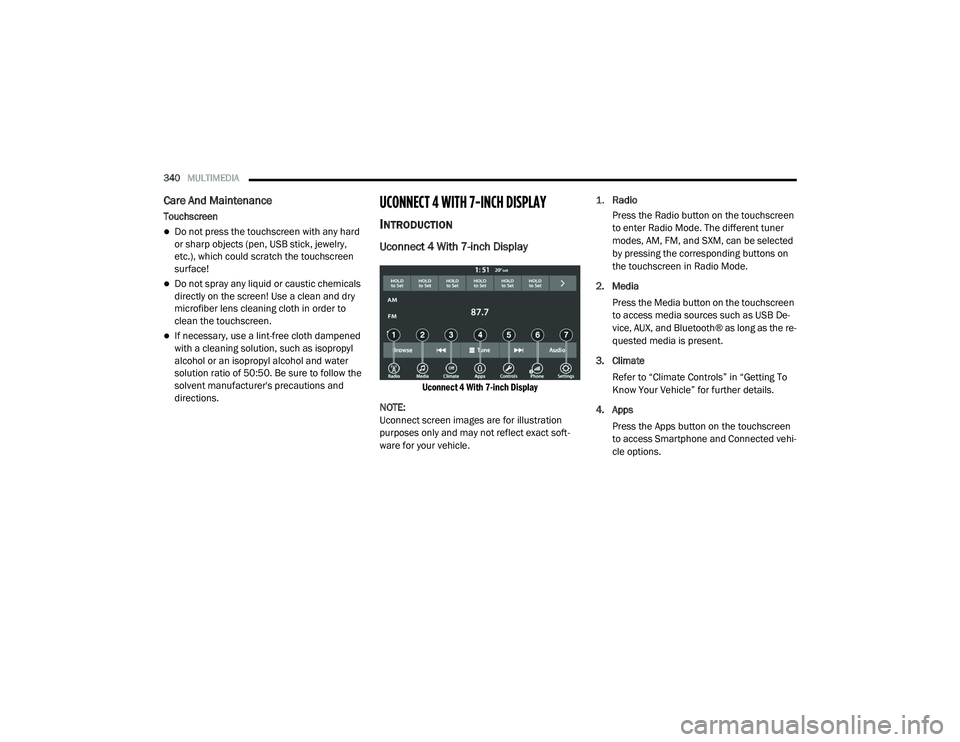
Uconnect 4 With 7-inch Display
Uconnect 4 With 7-inch Display
NOTE:
Uconnect screen images are for illustration
purposes only and may not reflect exact soft -
ware for your vehicle.
1.
Radio
Press the Radio button on the touchscreen
to enter Radio Mode. The different tuner
modes, AM, FM, and SXM, can be selected
by pressing the corresponding buttons on
the touchscreen in Radio Mode.
2. Media Press the Media button on the touchscreen
to access media sources such as USB De -
vice, AUX, and Bluetooth® as long as the re -
quested media is present.
3. Climate Refer to “Climate Controls” in “Getting To
Know Your Vehicle” for further details.
4. Apps Press the Apps button on the touchscreen
to access Smartphone and Connected vehi -
cle options.
20_LA_OM_EN_USC_t.book Page 340
Page 351 of 396
MULTIMEDIA349
Auto Play
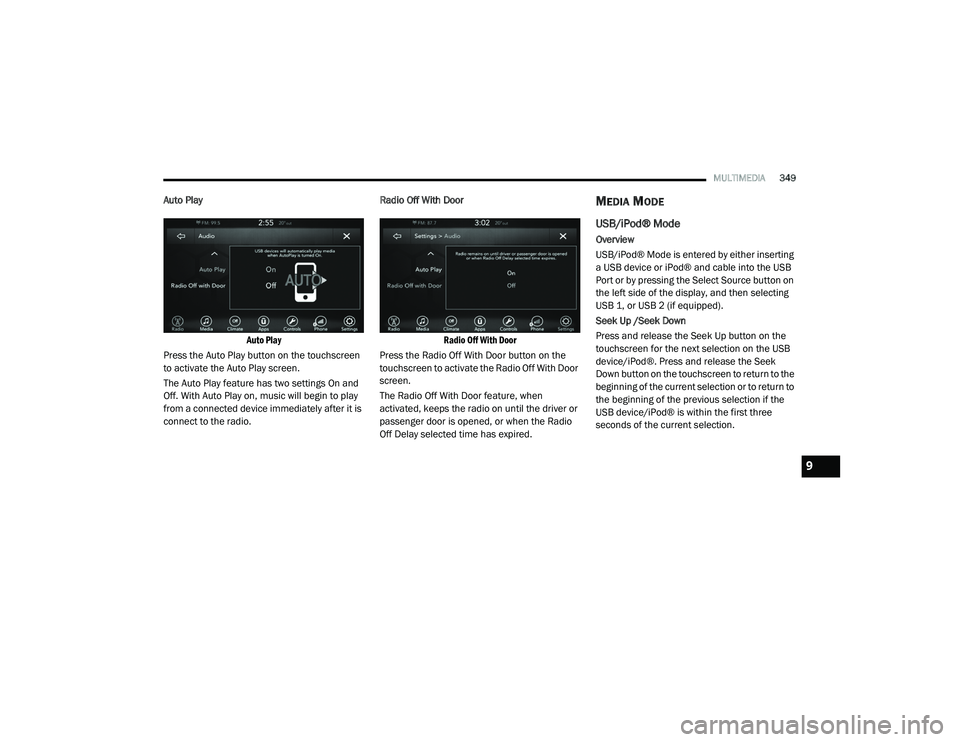
Auto Play
Press the Auto Play button on the touchscreen
to activate the Auto Play screen.
The Auto Play feature has two settings On and
Off. With Auto Play on, music will begin to play
from a connected device immediately after it is
connect to the radio. Radio Off With Door
Radio Off With Door
Press the Radio Off With Door button on the
touchscreen to activate the Radio Off With Door
screen.
The Radio Off With Door feature, when
activated, keeps the radio on until the driver or
passenger door is opened, or when the Radio
Off Delay selected time has expired.MEDIA MODE
USB/iPod® Mode
Overview
USB/iPod® Mode is entered by either inserting
a USB device or iPod® and cable into the USB
Port or by pressing the Select Source button on
the left side of the display, and then selecting
USB 1, or USB 2 (if equipped).
Seek Up /Seek Down
Press and release the Seek Up button on the
touchscreen for the next selection on the USB
device/iPod®. Press and release the Seek
Down button on the touchscreen to return to the
beginning of the current selection or to return to
the beginning of the previous selection if the
USB device/iPod® is within the first three
seconds of the current selection.
9
20_LA_OM_EN_USC_t.book Page 349