automatic transmission DODGE CHALLENGER 2020 Owners Manual
[x] Cancel search | Manufacturer: DODGE, Model Year: 2020, Model line: CHALLENGER, Model: DODGE CHALLENGER 2020Pages: 396, PDF Size: 16.64 MB
Page 6 of 396
4
OCCUPANT RESTRAINT SYSTEMS .................. 111 Occupant Restraint Systems Features ....111
Important Safety Precautions ...................111Seat Belt Systems ..................................... 112Supplemental Restraint Systems (SRS) ...120Child Restraints .........................................130
Transporting Pets.......................................145
SAFETY TIPS ....................................................... 145
Transporting Passengers ..........................145
Exhaust Gas ........................................... 145
Safety Checks You Should Make Inside
The Vehicle ................................................146 Periodic Safety Checks You Should
Make Outside The Vehicle ........................ 147
STARTING AND OPERATING
STARTING THE ENGINE .................................. 148
Manual Transmission — If Equipped ........148Automatic Transmission — If Equipped ....148
Normal Starting ......................................149
Cold Weather Operation
(Below –22°F Or −30°C) .........................151 If Engine Fails To Start .............................. 152
After Starting ..............................................152
ENGINE BLOCK HEATER — IF EQUIPPED ........ 152
ENGINE BREAK-IN RECOMMENDATIONS —
3.6L & 5.7L ....................................................... 152 ENGINE BREAK-IN RECOMMENDATIONS —
6.2L & 6.4L ......................................................... 153
PARKING BRAKE ................................................ 154
MANUAL TRANSMISSION — IF EQUIPPED ...... 155
Six-Speed Manual Transmission .............. 155
Shifting ....................................................... 156Recommended Shift Speeds .................... 157
1–4 Skip Shift ........................................... 158
Downshifting .............................................. 158
AUTOMATIC TRANSMISSION —
IF EQUIPPED ...................................................... 158
Ignition Park Interlock ............................... 159Brake/Transmission Shift Interlock
System ....................................................... 160 Eight-Speed Automatic Transmission ...... 160
SPORT MODE — WITHOUT PERFORMANCE
CONTROL............................................................. 165
FUEL SAVER TECHNOLOGY 5.7L AND 6.4L
ONLY — IF EQUIPPED......................................... 166
ELECTRIC POWER STEERING ........................... 166
SPEED CONTROL — IF EQUIPPED .................... 166 To Activate ................................................ 167
To Set A Desired Speed ............................ 167
To Vary The Speed Setting ....................... 167
To Accelerate For Passing ........................ 168
To Resume Speed .................................... 168
To Deactivate ............................................ 168 ADAPTIVE CRUISE CONTROL (ACC) —
IF EQUIPPED .................................................... 169
Adaptive Cruise Control (ACC)
Operation ................................................... 170 Activating Adaptive Cruise Control
(ACC) ........................................................... 171 To Activate/Deactivate.............................. 171
To Set A Desired ACC Speed..................... 171
To Cancel ................................................... 172
To Turn Off ................................................. 172To Resume ................................................. 172To Vary The Speed Setting ........................ 172
Setting The Following Distance In ACC .... 174
Overtake Aid............................................... 175
Adaptive Cruise Control (ACC) Menu ........ 175
Display Warnings And Maintenance ........ 175
Precautions While Driving With ACC......... 176
General Information .................................. 179
Normal (Fixed Speed) Cruise Control
Mode .......................................................... 179
PARKSENSE REAR PARK ASSIST —
IF EQUIPPED ....................................................... 181
ParkSense Sensors ................................... 181
ParkSense Warning Display...................... 181
ParkSense Display..................................... 182
Enabling And Disabling ParkSense .......... 185Service The ParkSense Rear Park Assist
System........................................................ 185 Cleaning The ParkSense System.............. 185
ParkSense System Usage Precautions .... 185
20_LA_OM_EN_USC_t.book Page 4
Page 8 of 396
6
DEALER SERVICE .............................................. 252 Engine Oil ...................................................252
Engine Oil Filter .........................................255
Engine Air Cleaner Filter ...........................255
Air Conditioner Maintenance ....................257
Accessory Drive Belt Inspection................258Body Lubrication ........................................259
Windshield Wiper Blades ..........................259
Exhaust System .........................................261
Cooling System ........................................262
Brake System ............................................266
Clutch Hydraulic System — Manual
Transmission (If Equipped) .......................267 Manual Transmission — If Equipped ........267Automatic Transmission — If Equipped ....267
All Wheel Drive (AWD) — If Equipped .......268
Rear Axle ....................................................268
RAISING THE VEHICLE ...................................... 269
TIRES ................................................................... 269
Tire Safety Information .............................. 269
Tires — General Information .....................276Tire Types ...................................................280
Spare Tires — If Equipped .........................281
Wheel And Wheel Trim Care .....................283Tire Chains And Traction Devices —
Non-SRT......................................................284 Tire Chains And Traction Devices —
SRT .............................................................285 Tire Rotation Recommendations —
Non-SRT ..................................................... 285 Tire Rotation Recommendations —
SRT ............................................................ 285 Tire Rotation—Different Tire Size On
Front And Rear Axle ................................... 286
DEPARTMENT OF TRANSPORTATION
UNIFORM TIRE QUALITY GRADES ................... 286
Treadwear .................................................. 286
Traction Grades ......................................... 286
Temperature Grades ................................. 287
VEHICLE STORAGE ...........................................287
BODYWORK ........................................................ 287
Protection From Atmospheric Agents ...... 287
Body And Underbody Maintenance .......... 288Preserving The Bodywork .......................... 288
INTERIORS ......................................................... 289
Seats And Fabric Parts .............................. 289
Plastic And Coated Parts ........................... 290
Leather Parts ............................................. 290
Glass Surfaces .......................................... 290
TECHNICAL SPECIFICATIONS
IDENTIFICATION DATA .......................................291Vehicle Identification Number .................. 291
BRAKE SYSTEM ................................................. 291 WHEEL AND TIRE TORQUE
SPECIFICATIONS .............................................. 291
Torque Specifications................................ 292
FUEL REQUIREMENTS ....................................... 293
3.6L Engine ................................................ 293
5.7L Engine (With Automatic
Transmission) ............................................ 293 5.7L Engine (With Manual
Transmission) ............................................ 293 6.2L Supercharged Engine ....................... 2946.4L Engine ................................................ 294
Reformulated Gasoline ............................. 294
Materials Added To Fuel ........................... 295
Gasoline/Oxygenate Blends ..................... 295
Do Not Use E-85 In Non-Flex Fuel
Vehicles ...................................................... 295 CNG And LP Fuel System
Modifications ............................................. 295 MMT In Gasoline........................................ 296
Fuel System Cautions................................ 296
Carbon Monoxide Warnings...................... 296
FLUID CAPACITIES — NON-SRT ........................ 297
FLUID CAPACITIES — SRT ................................. 298
FLUIDS AND LUBRICANTS — NON-SRT .......... 299
Engine ....................................................... 299
Chassis ................................................... 301
FLUIDS AND LUBRICANTS — SRT .................... 302
Engine ........................................................ 302
Chassis ....................................................... 304
20_LA_OM_EN_USC_t.book Page 6
Page 20 of 396
18GETTING TO KNOW YOUR VEHICLE
(Continued)
(Continued)
ON/RUN
Driving position.
All the electrical devices are available.
START
The engine will start.
NOTE:
Refer to "Starting The Engine" in "Starting And
Operating" for further information.
VEHICLE ON MESSAGE
When opening the driver's door with the ignition
in the ON/RUN position (engine not running), a
chime will sound to remind you to place the
ignition in the OFF position.
In addition to the chime, the Vehicle On
message will display in the cluster (if equipped). NOTE:
The power window switches and power sunroof
(if equipped) will remain active for three
minutes after the ignition is placed in the OFF
position. Opening either front door will cancel
this feature. The timing for this feature is
programmable.
WARNING!
When exiting the vehicle, always remove
the key fob from the vehicle and lock your
vehicle.
Never leave children alone in a vehicle, or
with access to an unlocked vehicle.
Allowing children to be in a vehicle unat
-
tended is dangerous for a number of
reasons. A child or others could be seriously
or fatally injured. Children should be
warned not to touch the parking brake,
brake pedal or the gear selector.
Do not leave the key fob in or near the
vehicle, or in a location accessible to chil-
dren, and do not leave the ignition of a
vehicle equipped with Keyless Enter-N-Go
in the ON/RUN mode. A child could operate
power windows, other controls, or move the
vehicle.
Do not leave children or animals inside
parked vehicles in hot weather. Interior
heat build-up may cause serious injury or
death.
CAUTION!
An unlocked vehicle is an invitation for
thieves. Always remove key fob from the
vehicle and lock all doors when leaving the
vehicle unattended.
WARNING! (Continued)
WARNING!
Before exiting a vehicle, always come to a
complete stop, then shift the automatic
transmission into PARK, apply the parking
brake, place the engine in the OFF position,
remove the key fob from the vehicle and
lock your vehicle. If equipped with Keyless
Enter-N-Go, always make sure the keyless
ignition is in “OFF” position, remove the key
fob from the vehicle and lock the vehicle.
Never leave children alone in a vehicle, or
with access to an unlocked vehicle.
Allowing children to be in a vehicle unat -
tended is dangerous for a number of
reasons. A child or others could be seriously
or fatally injured. Children should be
warned not to touch the parking brake,
brake pedal or the gear selector.
20_LA_OM_EN_USC_t.book Page 18
Page 26 of 396
24GETTING TO KNOW YOUR VEHICLE
(Continued)
NOTE:
The driver's door key cylinder and the trunk
button on the key fob cannot arm or disarm
the vehicle security alarm.
When the vehicle security alarm is armed,
the interior power door lock switches will not
unlock the doors.
The vehicle security alarm is designed to protect
your vehicle. However, you can create
conditions where the system will give you a false
alarm. If one of the previously described arming
sequences has occurred, the vehicle security
alarm will arm regardless of whether you are in
the vehicle or not. If you remain in the vehicle
and open a door, the alarm will sound. If this
occurs, disarm the vehicle security alarm.
If the vehicle security alarm is armed and the
battery becomes disconnected, the vehicle
security alarm will remain armed when the
battery is reconnected; the exterior lights will
flash, the horn will sound. If this occurs, disarm
the vehicle security alarm.
REARMING OF THE SYSTEM
If something triggers the alarm, and no action is
taken to disarm it, the vehicle security alarm will
turn the horn off after 29 seconds, five seconds between cycles, up to eight cycles if the trigger
remains active and the vehicle security alarm
will rearm itself.
TAMPER ALERT
If something has triggered the vehicle security
alarm in your absence, the horn will sound three
times and the exterior lights will blink three
times when you disarm the vehicle security
alarm. Check the vehicle for tampering.
DOORS
MANUAL DOOR LOCKS
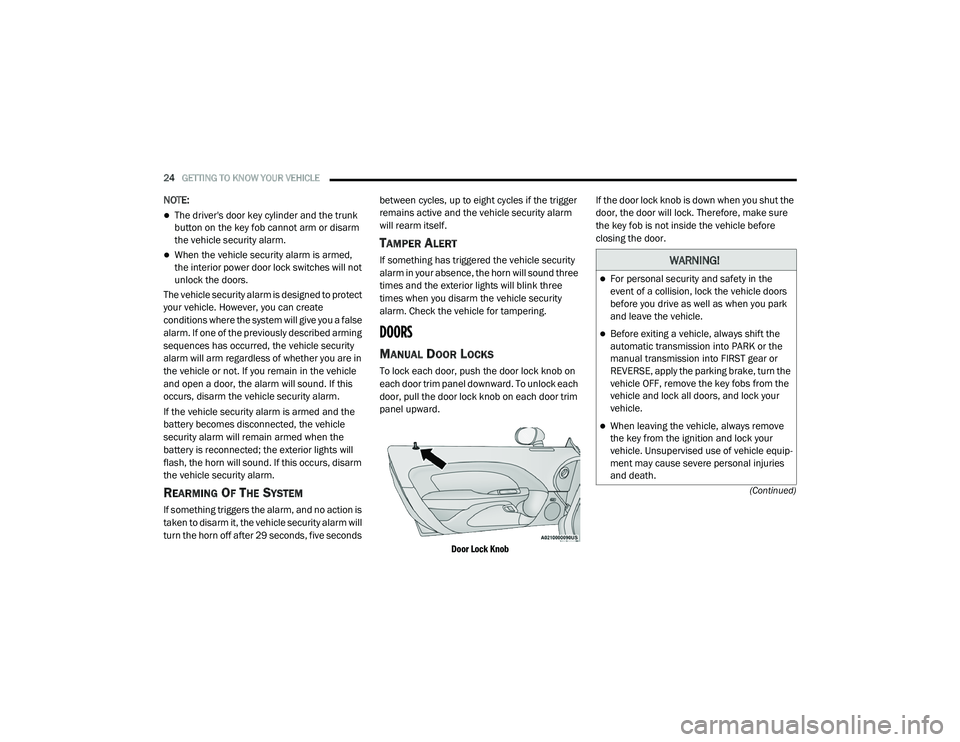
To lock each door, push the door lock knob on
each door trim panel downward. To unlock each
door, pull the door lock knob on each door trim
panel upward.
Door Lock Knob
If the door lock knob is down when you shut the
door, the door will lock. Therefore, make sure
the key fob is not inside the vehicle before
closing the door.
WARNING!
For personal security and safety in the
event of a collision, lock the vehicle doors
before you drive as well as when you park
and leave the vehicle.
Before exiting a vehicle, always shift the
automatic transmission into PARK or the
manual transmission into FIRST gear or
REVERSE, apply the parking brake, turn the
vehicle OFF, remove the key fobs from the
vehicle and lock all doors, and lock your
vehicle.
When leaving the vehicle, always remove
the key from the ignition and lock your
vehicle. Unsupervised use of vehicle equip
-
ment may cause severe personal injuries
and death.
20_LA_OM_EN_USC_t.book Page 24
Page 30 of 396
28GETTING TO KNOW YOUR VEHICLE
General Information
The following regulatory statement applies to all
Radio Frequency (RF) devices equipped in this
vehicle:
This device complies with Part 15 of the FCC
Rules and with Innovation, Science and
Economic Development Canada license-exempt
RSS standard(s). Operation is subject to the
following two conditions:
1. This device may not cause harmful
interference, and
2. This device must accept any interference received, including interference that may
cause undesired operation.
Le présent appareil est conforme aux CNR
d`Innovation, Science and Economic
Development applicables aux appareils radio
exempts de licence. L'exploitation est autorisée
aux deux conditions suivantes:
1. l'appareil ne doit pas produire de brouillage, et
2. l'utilisateur de l'appareil doit accepter tout brouillage radioélectrique subi, même si le
brouillage est susceptible d'en compro -
mettre le fonctionnement. La operación de este equipo está sujeta a las
siguientes dos condiciones:
1. es posible que este equipo o dispositivo no
cause interferencia perjudicial y
2. este equipo o dispositivo debe aceptar cualquier interferencia, incluyendo la que
pueda causar su operación no deseada.
NOTE:
Changes or modifications not expressly
approved by the party responsible for compli -
ance could void the user’s authority to operate
the equipment.
AUTOMATIC UNLOCK DOORS ON EXIT
The doors will unlock automatically on vehicles
with power door locks if:
1. The Automatic Unlock Doors On Exit feature is enabled.
2. The vehicle was in motion, then speed returned to 0 mph (0 km/h) and the
transmission is placed in PARK.
3. The driver door is opened.
4. The doors were not previously unlocked. Automatic Unlock Doors On Exit Programming
To change the current setting, refer to
“Uconnect Settings” in “Multimedia” for further
information.
NOTE:
Use the Automatic Unlock Doors On Exit feature
in accordance with local laws.
AUTOMATIC DOOR LOCKS — IF
E
QUIPPED
The auto door lock feature default condition is
enabled. When enabled, the door locks will lock
automatically when the vehicle's speed exceeds
15 mph (24 km/h). The auto door lock feature
can be enabled or disabled by an authorized
dealer per written request of the customer.
Please see an authorized dealer for service.
20_LA_OM_EN_USC_t.book Page 28
Page 48 of 396
46GETTING TO KNOW YOUR VEHICLE
Mist Feature
Rotate the end of the lever downward to the
MIST position to activate a single wipe cycle to
clear off road mist or spray from a passing
vehicle. The wipers will continue to operate until
you release the multifunction lever.
NOTE:
The mist feature does not activate the washer
pump; therefore, no washer fluid will be sprayed
on the windshield. The wash function must be
used in order to spray the windshield with
washer fluid.
RAIN SENSING WIPERS — IF EQUIPPED
This feature senses rain or snowfall on the
windshield and automatically activates the
wipers for the driver. The feature is especially
useful for road splash or overspray from the
windshield washers of the vehicle ahead.
Rotate the end of the multifunction lever to one
of four settings to activate this feature. The sensitivity of the system can be adjusted
with the multifunction lever. Wiper delay
position 1 is the least sensitive, and wiper delay
position 4 is the most sensitive. Setting 3
should be used for normal rain conditions.
Settings 1 and 2 can be used if the driver
desires less wiper sensitivity. Setting 4 can be
used if the driver desires more sensitivity. Place
the wiper switch in the off position when not
using the system.
NOTE:
The Rain Sensing feature will not operate
when the wiper switch is in the low or
high-speed position.
The Rain Sensing feature may not function
properly when ice, or dried salt water is
present on the windshield.
Use of Rain-X or products containing wax or
silicone may reduce Rain Sensing perfor
-
mance. The Rain Sensing system has protection
features for the wiper blades and arms, and will
not operate under the following conditions:
Low Ambient Temperature
— When the igni-
tion is first placed in the ON position, the Rain
Sensing system will not operate until the
wiper switch is moved, vehicle speed is
greater than 0 mph (0 km/h), or the outside
temperature is greater than 32°F (0°C).
Transmission In NEUTRAL Position — When
the ignition is ON, and the transmission is in
the NEUTRAL position, the Rain Sensing
system will not operate until the wiper switch
is moved, vehicle speed is greater than
3 mph (5 km/h), or the gear selector is
moved out of the NEUTRAL position.
NOTE:
Rain Sensing can be turned on and off using the
Uconnect System, refer to “Uconnect Settings”
in “Multimedia” for further information.
20_LA_OM_EN_USC_t.book Page 46
Page 60 of 396
58GETTING TO KNOW YOUR VEHICLE
TRUNK
OPENING
The trunk can be opened from inside the vehicle
using the power trunk button located on the
instrument panel to the left of the steering
wheel.
The trunk lid can be released from outside the
vehicle by pushing the trunk button on the key
fob twice within five seconds or by using the
external release switch located on the
underside of the decklid overhang. The release
feature will function only when the vehicle is in
the unlock condition.
With the ignition in the ON/RUN position, the
trunk open symbol will display in the instrument
cluster indicating that the trunk is open. The
odometer display will reappear once the trunk is
closed. With the ignition in the OFF position, the trunk
open symbol will display until the trunk is
closed.
NOTE:
Refer to “Keyless Enter-N-Go — Passive Entry” in
”Doors” in this chapter for further information
on trunk operation with the Passive Entry
feature.
Opening From Inside The Vehicle
Interior Power Trunk Release
The trunk can be opened from inside
the vehicle using the power trunk
release button located on the
instrument panel to the left of the
steering wheel.
NOTE:
The automatic transmission must be in PARK
before the button will operate. For manual
transmissions, the vehicle must be in NEUTRAL.
Opening From Outside The Vehicle
To Unlock/Open The Trunk
The trunk may be unlocked/opened using
either of the following methods:
Key Fob Trunk Release Button
Passive Entry Button Key Fob Trunk Release Button
Push the power trunk button on the
key fob twice within five seconds to
release the trunk.
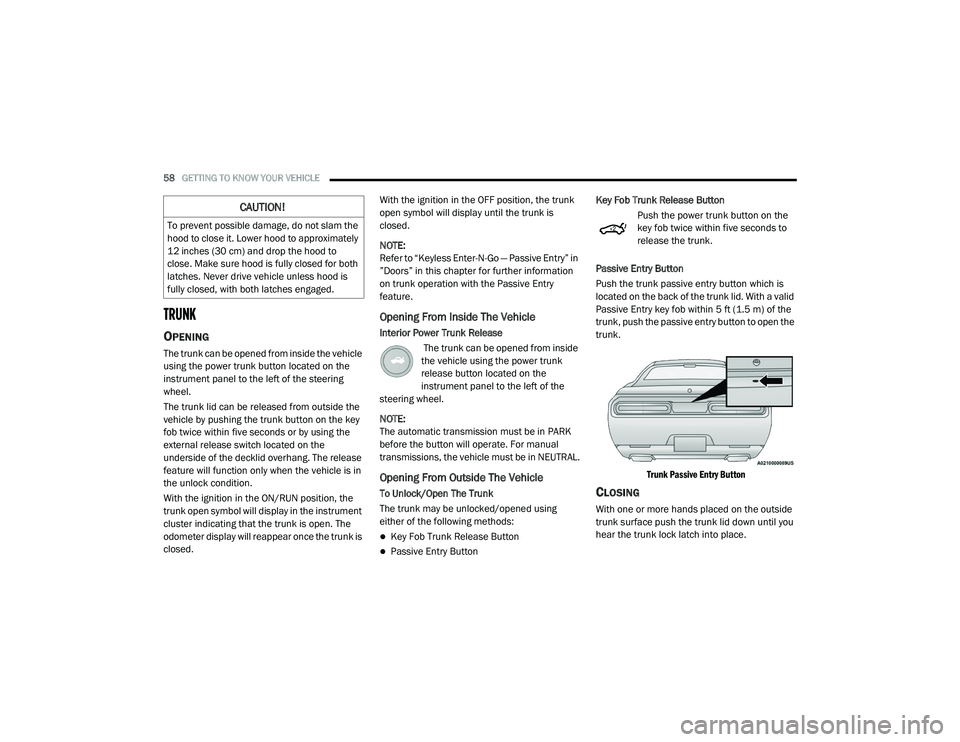
Passive Entry Button
Push the trunk passive entry button which is
located on the back of the trunk lid. With a valid
Passive Entry key fob within 5 ft (1.5 m) of the
trunk, push the passive entry button to open the
trunk.
Trunk Passive Entry Button
CLOSING
With one or more hands placed on the outside
trunk surface push the trunk lid down until you
hear the trunk lock latch into place.
CAUTION!
To prevent possible damage, do not slam the
hood to close it. Lower hood to approximately
12 inches (30 cm) and drop the hood to
close. Make sure hood is fully closed for both
latches. Never drive vehicle unless hood is
fully closed, with both latches engaged.
20_LA_OM_EN_USC_t.book Page 58
Page 61 of 396
GETTING TO KNOW YOUR VEHICLE59
NOTE:
Before closing the trunk lid make sure your key
fob isn’t inside the trunk area. The trunk will
latch then automatically unlock if the key fob is
sensed, not allowing the key fob to be locked in
the trunk area.
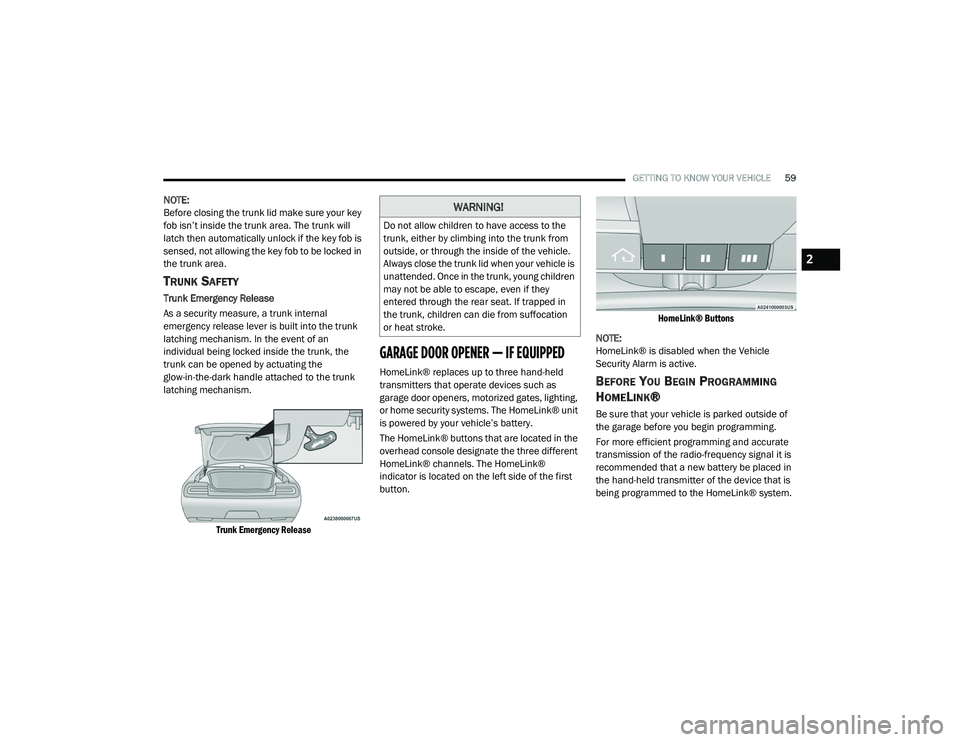
TRUNK SAFETY
Trunk Emergency Release
As a security measure, a trunk internal
emergency release lever is built into the trunk
latching mechanism. In the event of an
individual being locked inside the trunk, the
trunk can be opened by actuating the
glow-in-the-dark handle attached to the trunk
latching mechanism.
Trunk Emergency Release
GARAGE DOOR OPENER — IF EQUIPPED
HomeLink® replaces up to three hand-held
transmitters that operate devices such as
garage door openers, motorized gates, lighting,
or home security systems. The HomeLink® unit
is powered by your vehicle’s battery.
The HomeLink® buttons that are located in the
overhead console designate the three different
HomeLink® channels. The HomeLink®
indicator is located on the left side of the first
button.
HomeLink® Buttons
NOTE:
HomeLink® is disabled when the Vehicle
Security Alarm is active.BEFORE YOU BEGIN PROGRAMMING
H
OMELINK®
Be sure that your vehicle is parked outside of
the garage before you begin programming.
For more efficient programming and accurate
transmission of the radio-frequency signal it is
recommended that a new battery be placed in
the hand-held transmitter of the device that is
being programmed to the HomeLink® system.
WARNING!
Do not allow children to have access to the
trunk, either by climbing into the trunk from
outside, or through the inside of the vehicle.
Always close the trunk lid when your vehicle is
unattended. Once in the trunk, young children
may not be able to escape, even if they
entered through the rear seat. If trapped in
the trunk, children can die from suffocation
or heat stroke.
2
20_LA_OM_EN_USC_t.book Page 59
Page 78 of 396
76GETTING TO KNOW YOUR INSTRUMENT PANEL
5. Push and release the up or down
arrow button to return to previous main
menu.
NOTE:
If the indicator message illuminates when you
start the vehicle, the oil change indicator
system did not reset. If necessary, repeat this
procedure.
Secondary Method Of Resetting Engine Oil Life
1. Without pressing the brake pedal, push the ENGINE START/STOP button and place the
ignition to the ON/RUN position (do not
start the engine).
2. Fully press the accelerator pedal, slowly, three times within ten seconds.
3. Without pushing the brake pedal, push the ENGINE START/STOP button once to return
the ignition to the OFF/LOCK position.
NOTE:
If the indicator message illuminates when you
start the vehicle, the oil change indicator
system did not reset. If necessary, repeat this
procedure.PERFORMANCE SHIFT INDICATOR (PSI)
— I
F EQUIPPED
The Performance Shift Indicator (PSI) is enabled
on vehicles with manual transmission, or when
a vehicle with automatic transmission is in
manual shift mode. The PSI provides the driver
with a visual indication within the instrument
cluster display when the driver configured gear
shift point has been reached and the driver is
still accelerating. This indication notifies the
driver to change gear corresponding to the
configured RPMs in the head unit.
INSTRUMENT CLUSTER DISPLAY
S
ELECTABLE MENU ITEMS
Push and release the up or down arrow
button until the desired Selectable Menu item is
displayed in the instrument cluster display.
Follow the Menu or submenu prompts as
desired.
Speedometer
Push and release the up or down arrow
button until the speedometer menu is displayed
in the instrument cluster display. Push and
release the OK button to toggle units (km/h or
mph) of the speedometer.
Vehicle Info
Push and release the up or down arrow
button until the “Vehicle Info” menu is displayed
in the instrument cluster display. Push and
release the right or left arrow button to
scroll through the submenus items of “Vehicle
Info.” Follow the directional prompts to access
or reset any of the following “Vehicle Info”
submenu items:
Tire Pressure Monitor
If tire pressure is OK for all tires, a vehicle ICON
is displayed with tire pressure values in each
corner of the ICON.
If one or more tires have low pressure, “Inflate
Tire To XX” is displayed with the vehicle ICON
and the tire pressure values in each corner of
the ICON with the pressure value of the low tire
are displayed in a different color than the other
tire pressure value.
If the Tire Pressure system requires service,
“Service Tire Pressure System” is displayed.
Tire PSI is an information only function and
cannot be reset. Refer to “Tire Pressure
Monitoring System (TPMS)” under “Safety” for
further information.
20_LA_OM_EN_USC_t.book Page 76
Page 88 of 396
86GETTING TO KNOW YOUR INSTRUMENT PANEL
Door Open Warning Light
This indicator will illuminate when a
door is ajar/open and not fully closed.
NOTE:
If the vehicle is moving, there will also be a
single chime.
Trunk Open Warning Light
This indicator will illuminate when the
trunk is open and not fully closed.
NOTE:
If the vehicle is moving, there will also be a
single chime.
YELLOW WARNING LIGHTS
Engine Check/Malfunction Indicator
Warning Light (MIL)
The Engine Check/Malfunction
Indicator Light (MIL) is a part of an
Onboard Diagnostic System called
OBD II that monitors engine and
automatic transmission control systems. This
warning light will illuminate when the ignition is
in the ON/RUN position before engine start. If the bulb does not come on when turning the
ignition switch from OFF to ON/RUN, have the
condition checked promptly.
Certain conditions, such as a loose or missing
gas cap, poor quality fuel, etc., may illuminate
the light after engine start. The vehicle should
be serviced if the light stays on through several
typical driving styles. In most situations, the
vehicle will drive normally and will not require
towing.
When the engine is running, the MIL may flash
to alert serious conditions that could lead to
immediate loss of power or severe catalytic
converter damage. The vehicle should be
serviced by an authorized dealer as soon as
possible if this occurs.
Electronic Stability Control (ESC) Active
Warning Light — If Equipped
This warning light will indicate when
the Electronic Stability Control system
is Active. The “ESC Indicator Light” in
the instrument cluster will come on
when the ignition is placed in the ON/RUN or
ACC/ON/RUN position, and when ESC is
activated. It should go out with the engine
running. If the “ESC Indicator Light” comes on
continuously with the engine running, a
malfunction has been detected in the ESC
system.
WARNING!
A malfunctioning catalytic converter, as
referenced above, can reach higher
temperatures than in normal operating
conditions. This can cause a fire if you drive
slowly or park over flammable substances
such as dry plants, wood, cardboard, etc. This
could result in death or serious injury to the
driver, occupants or others.
CAUTION!
Prolonged driving with the Malfunction
Indicator Light (MIL) on could cause damage
to the vehicle control system. It also could
affect fuel economy and driveability. If the
MIL is flashing, severe catalytic converter
damage and power loss will soon occur.
Immediate service is required.
20_LA_OM_EN_USC_t.book Page 86