key DODGE CHALLENGER 2021 Owner's Guide
[x] Cancel search | Manufacturer: DODGE, Model Year: 2021, Model line: CHALLENGER, Model: DODGE CHALLENGER 2021Pages: 328, PDF Size: 15 MB
Page 89 of 328
STARTING AND OPERATING87
IGNITION PARK INTERLOCK
This vehicle is equipped with an Ignition Park
Interlock which requires the transmission to be in
PARK before the ignition can be turned to the OFF
mode. This helps the driver avoid inadvertently
leaving the vehicle without placing the
transmission in PARK. This system also locks the
transmission in PARK whenever the ignition is in
the OFF mode.
NOTE:The transmission is NOT locked in PARK when the
ignition is in the ACC mode (even though the
engine will be off). Ensure that the transmission is
in PARK, and the ignition is OFF (not in ACC mode)
before exiting the vehicle.
BRAKE TRANSMISSION SHIFT
I
NTERLOCK (BTSI) SYSTEM
This vehicle is equipped with a BTSI system that
holds the transmission gear selector in PARK
unless the brakes are applied. To shift the
transmission out of PARK, the engine must be
running and the brake pedal must be pressed. The
brake pedal must also be pressed to shift from
NEUTRAL into DRIVE or REVERSE when the vehicle
is stopped or moving at low speeds.
EIGHT-SPEED AUTOMATIC
T
RANSMISSION
The transmission gear range is displayed both on
the gear selector and in the instrument cluster. To
select a gear range, push the lock button on the
gear selector and move the selector rearward or
forward. To shift the transmission out of PARK, the
engine must be running and the brake pedal must
be pressed. You must also press the brake pedal to
shift from NEUTRAL into DRIVE or REVERSE when
the vehicle is stopped or moving at low speeds.
Select the DRIVE range for normal driving.
Unintended movement of a vehicle could
injure those in or near the vehicle. As with all
vehicles, you should never exit a vehicle while
the engine is running. Before exiting a vehicle,
always come to a complete stop, then apply
the parking brake, shift the transmission into
PARK, and turn the ignition OFF. When the
ignition is in the OFF mode, the transmission
is locked in PARK, securing the vehicle against
unwanted movement.
When exiting the vehicle, always make sure
the ignition is in the OFF mode, remove the
key fob from the vehicle, and lock the vehicle.
Never leave children alone in a vehicle, or with
access to an unlocked vehicle. Allowing chil -
dren to be in a vehicle unattended is
dangerous for a number of reasons. A child or
others could be seriously or fatally injured.
Children should be warned not to touch the
parking brake, brake pedal or the transmis -
sion gear selector.
Do not leave the key fob in or near the vehicle
(or in a location accessible to children), and do
not leave the ignition in the ACC or ON/RUN
mode. A child could operate power windows,
other controls, or move the vehicle.
WARNING!CAUTION!
Shift into or out of PARK or REVERSE only after
the vehicle has come to a complete stop.
Do not shift between PARK, REVERSE,
NEUTRAL, or DRIVE when the engine is above
idle speed.
Before shifting into any gear, make sure your
foot is firmly pressing the brake pedal.
4
21_LA_OM_EN_USC_t.book Page 87
Page 90 of 328
88STARTING AND OPERATING
(Continued)
NOTE:
The transmission electronics are self-cali-
brating; therefore, the first few shifts on a new
vehicle may be somewhat abrupt. This is a
normal condition, and precision shifts will
develop within a few hundred miles (kilome -
ters).
In the event of a mismatch between the gear
selector position and the actual transmission
gear (for example, driver selects PARK while
driving), the position indicator will blink continu -
ously until the selector is returned to the proper
position, or the requested shift can be
completed.
The electronically-controlled transmission adapts
its shift schedule based on driver inputs, along
with environmental and road conditions.
Only shift from DRIVE to PARK or REVERSE when
the accelerator pedal is released and the vehicle is
stopped. Be sure to keep your foot on the brake
pedal when shifting between these gears.
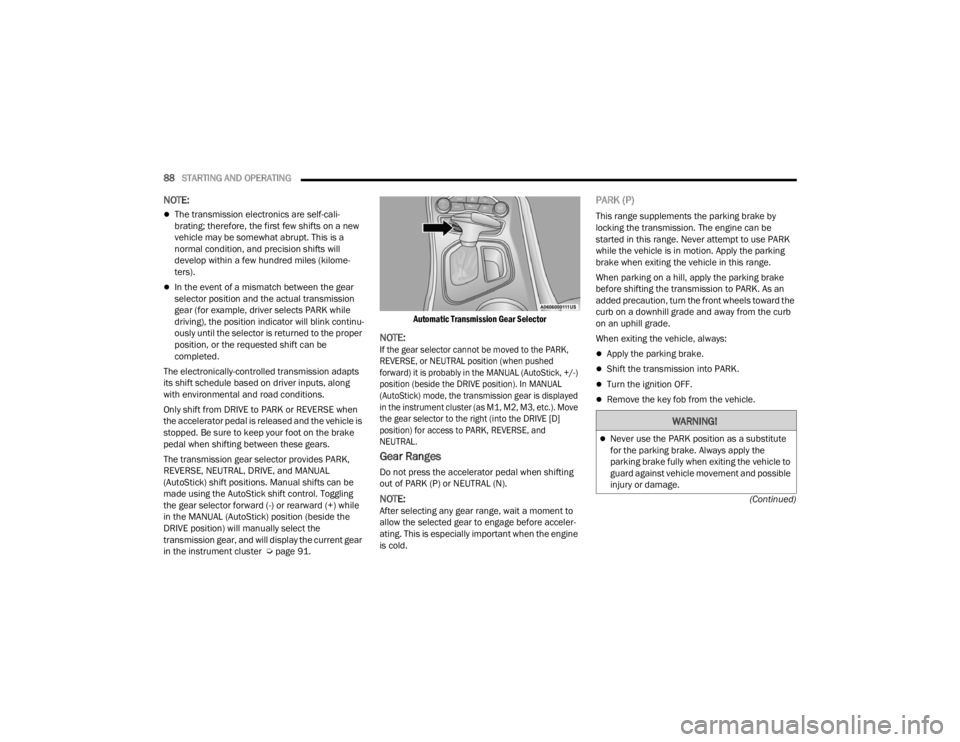
The transmission gear selector provides PARK,
REVERSE, NEUTRAL, DRIVE, and MANUAL
(AutoStick) shift positions. Manual shifts can be
made using the AutoStick shift control. Toggling
the gear selector forward (-) or rearward (+) while
in the MANUAL (AutoStick) position (beside the
DRIVE position) will manually select the
transmission gear, and will display the current gear
in the instrument cluster Ú page 91.
Automatic Transmission Gear Selector
NOTE:
If the gear selector cannot be moved to the PARK,
REVERSE, or NEUTRAL position (when pushed
forward) it is probably in the MANUAL (AutoStick, +/-)
position (beside the DRIVE position). In MANUAL
(AutoStick) mode, the transmission gear is displayed
in the instrument cluster (as M1, M2, M3, etc.). Move
the gear selector to the right (into the DRIVE [D]
position) for access to PARK, REVERSE, and
NEUTRAL.
Gear Ranges
Do not press the accelerator pedal when shifting
out of PARK (P) or NEUTRAL (N).
NOTE:After selecting any gear range, wait a moment to
allow the selected gear to engage before acceler
-
ating. This is especially important when the engine
is cold.
PARK (P)
This range supplements the parking brake by
locking the transmission. The engine can be
started in this range. Never attempt to use PARK
while the vehicle is in motion. Apply the parking
brake when exiting the vehicle in this range.
When parking on a hill, apply the parking brake
before shifting the transmission to PARK. As an
added precaution, turn the front wheels toward the
curb on a downhill grade and away from the curb
on an uphill grade.
When exiting the vehicle, always:
Apply the parking brake.
Shift the transmission into PARK.
Turn the ignition OFF.
Remove the key fob from the vehicle.
WARNING!
Never use the PARK position as a substitute
for the parking brake. Always apply the
parking brake fully when exiting the vehicle to
guard against vehicle movement and possible
injury or damage.
21_LA_OM_EN_USC_t.book Page 88
Page 91 of 328
STARTING AND OPERATING89
(Continued) The following indicators should be used to ensure
that you have properly engaged the transmission
into the PARK position:
When shifting into PARK, push the lock button
on the gear selector and firmly move the
selector all the way forward until it stops and is
fully seated.
Look at the transmission gear position display
and verify that it indicates the PARK position (P),
and is not blinking.
With the brake pedal released, verify that the
gear selector will not move out of PARK.
Your vehicle could move and injure you and
others if it is not in PARK. Check by trying to
move the transmission gear selector out of
PARK with the brake pedal released. Make
sure the transmission is in PARK before
exiting the vehicle.
The transmission may not engage PARK if the
vehicle is moving. Always bring the vehicle to a
complete stop before shifting to PARK, and
verify that the transmission gear position indi
-
cator solidly indicates PARK (P) without
blinking. Ensure that the vehicle is completely
stopped, and the PARK position is properly
indicated, before exiting the vehicle.
It is dangerous to shift out of PARK or
NEUTRAL if the engine speed is higher than
idle speed. If your foot is not firmly pressing
the brake pedal, the vehicle could accelerate
quickly forward or in reverse. You could lose
control of the vehicle and hit someone or
something. Only shift into gear when the
engine is idling normally and your foot is firmly
pressing the brake pedal.
WARNING!
Unintended movement of a vehicle could
injure those in or near the vehicle. As with all
vehicles, you should never exit a vehicle while
the engine is running. Before exiting a vehicle,
always come to a complete stop, then apply
the parking brake, shift the transmission into
PARK, and turn the ignition OFF. When the
ignition is in the OFF mode, the transmission
is locked in PARK, securing the vehicle against
unwanted movement.
When exiting the vehicle, always make sure
the ignition is in the OFF mode, remove the
key fob from the vehicle, and lock the vehicle.
Never leave children alone in a vehicle, or with
access to an unlocked vehicle. Allowing chil -
dren to be in a vehicle unattended is
dangerous for a number of reasons. A child or
others could be seriously or fatally injured.
Children should be warned not to touch the
parking brake, brake pedal or the transmis -
sion gear selector.
Do not leave the key fob in or near the vehicle
(or in a location accessible to children), and do
not leave the ignition in the ACC or ON/RUN
mode. A child could operate power windows,
other controls, or move the vehicle.
WARNING!CAUTION!
Before moving the transmission gear selector
out of PARK, you must start the engine, and
also press the brake pedal. Otherwise,
damage to the gear selector could result.
DO NOT race the engine when shifting from
PARK or NEUTRAL into another gear range, as
this can damage the drivetrain.
4
21_LA_OM_EN_USC_t.book Page 89
Page 129 of 328

MULTIMEDIA127
Lights
When the Lights button is pressed on the touchscreen, the system displays the options related to the vehicle’s exterior and interior lights.
NOTE:When the “Daytime Running Lights” feature is selected, the daytime running lights can be turned On or Off. This feature is only allowed by law in the country
of the vehicle purchased.
Depending on the vehicle’s options, feature settings may vary.
Setting Name Description
Headlight Off DelayThis setting will allow you to set the amount of time it takes for the headlights
to shut off after the vehicle is turned off. The available settings are “0 sec”, “30 sec”, “60 sec”, and “90 sec”.
Headlight Illumination On Approach This setting will allow you to set the amount of time it takes for the headlights
to shut off after the vehicle is unlocked. The available settings are “0 sec”, “30 sec”, “60 sec”, and “90 sec”.
Headlights with Wipers This setting will turn the headlights on when the wipers are activated.
Daytime Running Lights This setting will allow you to turn the Daytime Running Lights on or off.
Flash Lights With Lock This setting will allow you to turn on or off the flashing of the lights when the
Lock button is pushed on the key fob. Available settings are “On” and “Off”.
Auto Dim High Beams This setting will allow you to turn the Auto Dim High Beams on or off.5
21_LA_OM_EN_USC_t.book Page 127
Page 130 of 328

128MULTIMEDIA
Doors & Locks
When the Doors & Locks button is pressed on the touchscreen, the system displays the options related to locking and unlocking the vehicle’s doors.
NOTE:Depending on the vehicle’s options, feature settings may vary.
Setting Name Description
Auto Unlock On Exit
This setting will unlock the doors when any of the doors are opened from the inside.
Flash Lights With Lock This setting will allow you to turn on or off the flashing of the lights when the
Lock button is pushed on the key fob. Available settings are “On” and “Off”.
Sound Horn With Lock This setting will sound the horn when the Lock button is pushed on the key
fob. The “Off” setting will not sound the horn when the Lock button is pushed. The “1st Press” setting will sound the horn when the Lock button is pushed once. The “2nd Press” setting will sound the horn when the Lock button is pushed twice.
Sound Horn With Remote Start This setting will sound the horn when the remote start is activated from the
key fob.
Remote Door Unlock This setting will change how many pushes of the Unlock button on the key fob
are needed to unlock all the doors. The “Driver Door” setting will only unlock
the driver door on the first push on the Unlock button. The “All Doors” setting will unlock all doors on the first push of the Unlock button.
21_LA_OM_EN_USC_t.book Page 128
Page 131 of 328

MULTIMEDIA129
Seats & Comfort
Passive Entry
This setting will allow you to turn the Passive Entry feature
(Keyless Enter ‘n Go™) on or off.
Personal Settings Linked To Key Fob This setting will recall preset radio stations and driver seat position that have
been linked to the key fob.
Setting Name Description
When Seats & Comfort button is pressed on the touchscreen, the system displays the option related to the vehicle’s comfort systems when remote start has
been activated or the vehicle has been started.
NOTE:Depending on the vehicle’s options, feature settings may vary.
Setting NameDescription
Auto-On Driver Heated/Ventilated Seat & Steering Wheel With Vehicle Start
This setting will activate the vehicle’s comfort system and heated seats or
heated steering wheel when the vehicle is remote started or ignition is
started. The “Off” setting will not activate the comfort systems. The “Remote Start” setting will only activate the comfort systems when using Remote
Start. The “All Start” setting will activate the comfort systems whenever the vehicle is started.
5
21_LA_OM_EN_USC_t.book Page 129
Page 132 of 328

130MULTIMEDIA
Key Off/Engine Off Options
When the Key Off/Engine Off Options button is pressed on the touchscreen, the system displays the options related to vehicle shut off. These settings will only
activate when the ignition is set to OFF.
NOTE:Depending on the vehicle’s options, feature settings may vary.
Setting Name Description
Easy Exit SeatThis setting adjusts the seats to make exiting the vehicle easier.
Key Off/Engine Off Power Delay This setting will keep certain electrical features running after the engine is
turned off. When any door is opened, the electronics will deactivate. The available settings are “0 sec”, “45 sec”, “5 min”, and “10 min”.
Headlight Off Delay This setting will allow you to set the amount of time the headlights remain on
after the vehicle has been turned off. The “+” will increase the amount of time. The “-” will decrease the amount of time.
21_LA_OM_EN_USC_t.book Page 130
Page 148 of 328
146MULTIMEDIA
The Presets are available for all Radio Modes, and
are activated by pressing any of the Preset
buttons, located at the top of the screen.
When you are on a station that you wish to save as
a preset, press and hold the numbered button on
the touchscreen for more than two seconds.
The Radio stores up to 12 presets in each of the
Radio Modes.
A total of six presets will appear on the screen. You
can switch between the radio presets list by
pressing the Arrow button located in the upper
right of the radio touchscreen.
PRESET FEATURES — IF EQUIPPED
Browse In AM/FM
When in either AM or FM, the Browse Screen
provides a means to edit the Presets List and is
entered by pushing the Enter/Browse button. Scrolling Preset List
Once in the Browse Presets screen, you can scroll
the preset list by rotation of the Tune/Scroll knob
or by pressing the Up and Down Arrow keys,
located on the right of the screen.
Preset Selection From List
A preset can be selected by pressing any of the
listed Presets, or by pushing the Enter/Browse
button on the Tune/Scroll knob to select the
currently highlighted Preset.
When selected, the radio tunes to the station
stored in the Presets.
Deleting Presets
A preset can be deleted in the Presets Browse
screen by pressing the Trash Can icon for the
corresponding preset.
Return To Main Radio Screen
You can return to the Main Radio Screen by
pressing the X button or the Back Arrow button
when in the Browse Presets screen.
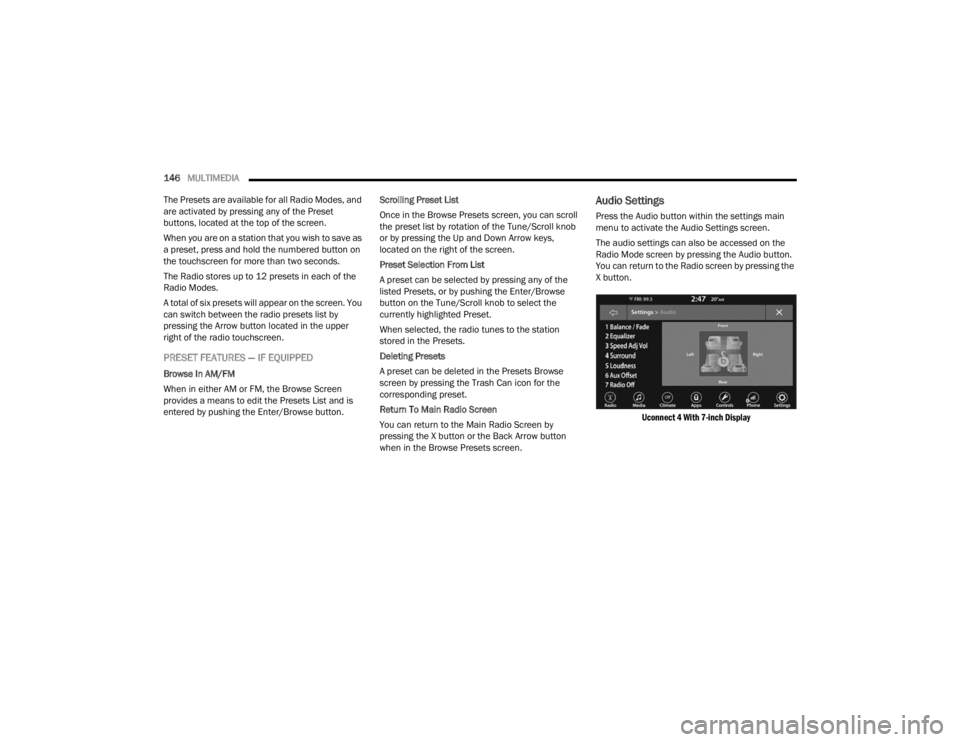
Audio Settings
Press the Audio button within the settings main
menu to activate the Audio Settings screen.
The audio settings can also be accessed on the
Radio Mode screen by pressing the Audio button.
You can return to the Radio screen by pressing the
X button.
Uconnect 4 With 7-inch Display
21_LA_OM_EN_USC_t.book Page 146
Page 152 of 328

150MULTIMEDIA
Audio
Audio settings can be accessed by pressing the
Audio button Ú page 140.
Info
In both Disc and USB Modes, press the Info button
on the touchscreen to display the current track
information. Press the Info or X button on the
touchscreen a second time to cancel this feature.
Tracks
In both Disc and USB Modes, press the Tracks button on the touchscreen to display a pop-up with
the Song List. The song currently playing is
indicated by an arrow and lines above and below
the song title. When in the Tracks List screen you
can rotate the Tune/Scroll knob to highlight a track
(indicated by the line above and below the track
name) and then push the Enter/Browse knob to
start playing that track.
In Bluetooth® Mode, if the Bluetooth® device
supports this feature, press the Tracks button on
the touchscreen to display a pop-up with the Song
List. The currently playing song is indicated by a red
arrow and lines above and below the song title.
Pressing the Tracks button on the touchscreen
while the pop-up is displayed will close the pop-up.
MEDIA VOICE COMMANDS
Uconnect offers connections via USB, Bluetooth®,
and auxiliary (AUX) ports. Voice operation is only
available for connected USB and AUX devices.
Push the VR button located on the steering
wheel. After the beep, say one of the following
commands and follow the prompts to switch your
media source or choose an artist:
“ Change source to Bluetooth®”
“Change source to AUX”
“Change source to USB”
“Play artist Beethoven”; “ Play album Greatest
Hits”; “ Play song Moonlight Sonata”; “ Play genre
Classical”
Did You Know: Press the Browse button on the
touchscreen to see all of the music on your USB
device. Your Voice Command must match exactly
how the artist, album, song, and genre information
is displayed.
PHONE MODE
Overview
Uconnect Phone is a voice-activated, hands-free,
in-vehicle communications system. It allows you to
dial a phone number with your mobile phone. The feature supports the following:
Voice Activated Features
Hands-Free dialing via Voice (“Call John Smith
Mobile” or “Dial 248-555-1212”).
Hands-Free text-to-speech listening of your
incoming SMS messages.
Hands-Free Text Message Replying: Forward
one of 18 predefined SMS messages to
incoming calls/text messages.
Redialing last dialed numbers (“Redial”).
Calling Back the last incoming call number
(“Call Back”).
Viewing call logs on screen (“Show Incoming
Calls,” “Show Outgoing Calls,” “Show Missed
Calls,” or “Show Recent Calls”).
Searching Contacts phone number (“Search for
John Smith Mobile”).
Screen Activated Features
Dialing via Keypad using touchscreen.
Viewing and Calling contacts from Phonebooks
displayed on the touchscreen.
Setting Favorite Contact phone numbers so they
are easily accessible on the Main Phone screen.
21_LA_OM_EN_USC_t.book Page 150
Page 159 of 328
MULTIMEDIA157
KEY PAD NUMBER ENTRY
1. Press the Phone button.
2. Press the Dial/Keypad button on the
touchscreen.
3. The Touch-Tone screen will be displayed.
4. Use the numbered buttons on the touchscreens to enter the number and press
“Dial/Call”.
RECENT CALLS — IF EQUIPPED
You may browse a list of the most recent of each of
the following call types:
All Calls
Incoming Calls or Calls Received
Outgoing Calls or Calls Made
Missed Calls
These can be accessed by pressing the Recent
Calls button on the phone main screen.
You can also push the VR button on your steering
wheel and perform the above operation. For
example, say “Show my incoming calls”.
ANSWER OR IGNORE AN INCOMING CALL —
NO CALL CURRENTLY IN PROGRESS
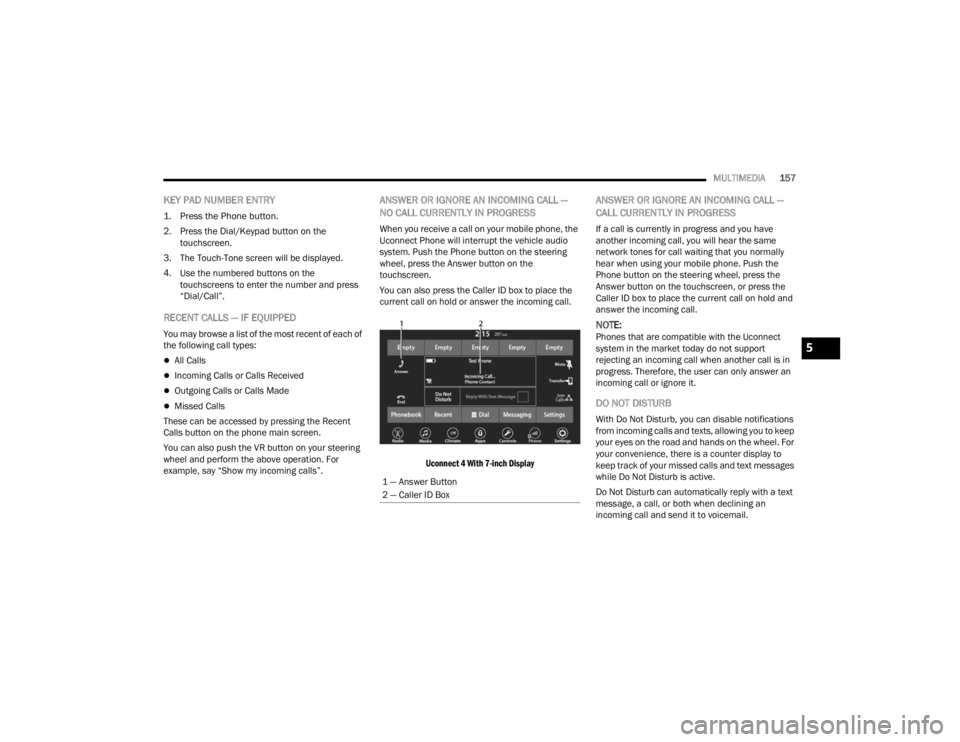
When you receive a call on your mobile phone, the
Uconnect Phone will interrupt the vehicle audio
system. Push the Phone button on the steering
wheel, press the Answer button on the
touchscreen.
You can also press the Caller ID box to place the
current call on hold or answer the incoming call.
Uconnect 4 With 7-inch Display
ANSWER OR IGNORE AN INCOMING CALL —
CALL CURRENTLY IN PROGRESS
If a call is currently in progress and you have
another incoming call, you will hear the same
network tones for call waiting that you normally
hear when using your mobile phone. Push the
Phone button on the steering wheel, press the
Answer button on the touchscreen, or press the
Caller ID box to place the current call on hold and
answer the incoming call.
NOTE:Phones that are compatible with the Uconnect
system in the market today do not support
rejecting an incoming call when another call is in
progress. Therefore, the user can only answer an
incoming call or ignore it.
DO NOT DISTURB
With Do Not Disturb, you can disable notifications
from incoming calls and texts, allowing you to keep
your eyes on the road and hands on the wheel. For
your convenience, there is a counter display to
keep track of your missed calls and text messages
while Do Not Disturb is active.
Do Not Disturb can automatically reply with a text
message, a call, or both when declining an
incoming call and send it to voicemail.
1 — Answer Button
2 — Caller ID Box
5
21_LA_OM_EN_USC_t.book Page 157