engine DODGE CHALLENGER 2021 Repair Manual
[x] Cancel search | Manufacturer: DODGE, Model Year: 2021, Model line: CHALLENGER, Model: DODGE CHALLENGER 2021Pages: 328, PDF Size: 15 MB
Page 119 of 328
STARTING AND OPERATING117
Automatic Transmission — If Equipped
Select the DRIVE range when towing. The
transmission controls include a drive strategy to
avoid frequent shifting when towing. However, if
frequent shifting does occur while in DRIVE, you
can use the AutoStick shift control to manually
select a lower gear.
NOTE:Using a lower gear while operating the vehicle
under heavy loading conditions will improve perfor -
mance and extend transmission life by reducing
excessive shifting and heat build-up. This action
will also provide better engine braking.
Cruise Control — If Equipped
Do not use on hilly terrain or with heavy loads.
When using the Cruise Control, if you experience
speed drops greater than 10 mph (16 km/h),
disengage until you can get back to cruising
speed.
Use Cruise Control in flat terrain and with light
loads to maximize fuel efficiency.
AutoStick
When using the AutoStick shift control, select
the highest gear that allows for adequate perfor -
mance and avoids frequent downshifts. For
example, choose “5” if the desired speed can be
maintained. Choose “4” or “3” if needed to
maintain the desired speed.
To prevent excess heat generation, avoid
continuous driving at high RPM. Reduce vehicle
speed as necessary to avoid extended driving at
high RPM. Return to a higher gear or vehicle
speed when grade and road conditions allow.
RECREATIONAL TOWING
(BEHIND MOTORHOME)
Recreational towing (with all four wheels on the
ground, or using a tow dolly) is NOT ALLOWED. The
only acceptable method for towing this vehicle
(behind another vehicle) is on a vehicle trailer with
all four wheels OFF the ground.
DRIVING TIPS
DRIVING ON SLIPPERY SURFACES
Information in this section will aid in safe
controlled launches in adverse conditions.
Acceleration
Rapid acceleration on snow covered, wet, or other
slippery surfaces may cause the driving wheels to
pull erratically to the right or left. This phenomenon
occurs when there is a difference in the surface
traction under the rear (driving) wheels.
Traction
When driving on wet or slushy roads, it is possible
for a wedge of water to build up between the tire
and road surface. This is known as hydroplaning
and may cause partial or complete loss of vehicle
control and stopping ability. To reduce this
possibility, the following precautions should be
observed:
Slow down during rainstorms or when the roads
are slushy.
Slow down if the road has standing water or
puddles.
CAUTION!
Towing this vehicle in violation of the above
requirements can cause severe engine,
transmission and/or transfer case damage.
Damage from improper towing is not covered
under the New Vehicle Limited Warranty.
WARNING!
Rapid acceleration on slippery surfaces is
dangerous. Unequal traction can cause sudden
pulling of the rear wheels. You could lose control
of the vehicle and possibly have a collision.
Accelerate slowly and carefully whenever there
is likely to be poor traction (ice, snow, wet, mud,
loose sand, etc.).
4
21_LA_OM_EN_USC_t.book Page 117
Page 120 of 328

118STARTING AND OPERATING
(Continued)
Replace tires when tread wear indicators first
become visible.
Keep tires properly inflated.
Maintain sufficient distance between your
vehicle and the vehicle in front of you to avoid a
collision in a sudden stop.
Your vehicle may be equipped with a Limited Slip
Differential (LSD) that reduces, but does not
eliminate, the amount of wheel slip across a given
axle for improved handling.
DRIVING THROUGH WATER
Driving through water more than a few inches/
centimeters deep will require extra caution to
ensure safety and prevent damage to your vehicle.
Flowing/Rising Water Shallow Standing Water
Although your vehicle is capable of driving through
shallow standing water, consider the following
Warnings and Cautions before doing so.
WARNING!
Do not drive on or across a road or path where
water is flowing and/or rising (as in storm
run-off). Flowing water can wear away the road
or path's surface and cause your vehicle to sink
into deeper water. Furthermore, flowing and/or
rising water can carry your vehicle away swiftly.
Failure to follow this warning may result in
injuries that are serious or fatal to you, your
passengers, and others around you.
WARNING!
Driving through standing water limits your
vehicle’s traction capabilities. Do not exceed
5 mph (8 km/h) when driving through
standing water.
Driving through standing water limits your
vehicle’s braking capabilities, which increases
stopping distances. Therefore, after driving
through standing water, drive slowly and
lightly press on the brake pedal several times
to dry the brakes.
Failure to follow these warnings may result in
injuries that are serious or fatal to you, your
passengers, and others around you.
CAUTION!
Always check the depth of the standing water
before driving through it. Never drive through
standing water that is deeper than the bottom
of the tire rims mounted on the vehicle.
Determine the condition of the road or the
path that is under water and if there are any
obstacles in the way before driving through
the standing water.
Do not exceed 5 mph (8 km/h) when driving
through standing water. This will minimize
wave effects.
Driving through standing water may cause
damage to your vehicle’s drivetrain compo -
nents. Always inspect your vehicle’s fluids
(i.e., engine oil, transmission, axle, etc.) for
signs of contamination (i.e., fluid that is milky
or foamy in appearance) after driving through
standing water. Do not continue to operate
the vehicle if any fluid appears contaminated,
as this may result in further damage. Such
damage is not covered by the New Vehicle
Limited Warranty.
Getting water inside your vehicle’s engine can
cause it to lock up and stall out, and cause
serious internal damage to the engine. Such
damage is not covered by the New Vehicle
Limited Warranty.
CAUTION!
21_LA_OM_EN_USC_t.book Page 118
Page 132 of 328

130MULTIMEDIA
Key Off/Engine Off Options
When the Key Off/Engine Off Options button is pressed on the touchscreen, the system displays the options related to vehicle shut off. These settings will only
activate when the ignition is set to OFF.
NOTE:Depending on the vehicle’s options, feature settings may vary.
Setting Name Description
Easy Exit SeatThis setting adjusts the seats to make exiting the vehicle easier.
Key Off/Engine Off Power Delay This setting will keep certain electrical features running after the engine is
turned off. When any door is opened, the electronics will deactivate. The available settings are “0 sec”, “45 sec”, “5 min”, and “10 min”.
Headlight Off Delay This setting will allow you to set the amount of time the headlights remain on
after the vehicle has been turned off. The “+” will increase the amount of time. The “-” will decrease the amount of time.
21_LA_OM_EN_USC_t.book Page 130
Page 154 of 328
152MULTIMEDIA
You will be prompted for a specific command and
then guided through the available options.
Prior to giving a voice command, one must wait
for the beep, which follows the “Listen” prompt
or another prompt.
For certain operations, compound commands
can be used. For example, instead of saying
“Call” and then “John Smith” and then “mobile”,
the following compound command can be said:
“Call John Smith mobile.”
For each feature explanation in this section,
only the compound command form of the voice
command is given. You can also break the
commands into parts and say each part of the
command when you are asked for it. For
example, you can use the compound command
form voice command “Search for John Smith,”
or you can break the compound command form
into two voice commands: “Search Contacts”
and when asked, “John Smith.” Please
remember, the Uconnect Phone works best
when you talk in a normal conversational tone,
as if speaking to someone sitting a few feet/
meters away from you.
NATURAL SPEECH
Your Uconnect Phone Voice system uses a Natural
Language Voice Recognition (VR) engine.
Natural speech allows the user to speak
commands in phrases or complete sentences. The
system filters out certain non-word utterances and
sounds such as “ah” and “eh.” The system handles
fill-in words such as “I would like to”.
The system handles multiple inputs in the same
phrase or sentence such as “make a phone call”
and “to Kelly Smith”. For multiple inputs in the
same phrase or sentence, the system identifies
the topic or context and provides the associated
follow-up prompt such as “Who do you want to
call?” in the case where a phone call was
requested but the specific name was not
recognized.
The system utilizes continuous dialog. When the
system requires more information from the user, it
will ask a question to which the user can respond
without pushing the Voice Command button on the
steering wheel.
HELP COMMAND
If you need assistance at any prompt, or if you want
to know your options at any prompt, say “Help”
following the beep.
To activate the Uconnect Phone from idle, simply
push the Phone button (if active) on your steering
wheel and say a command or say “Help”. All Phone
sessions begin with a push of the VR button or the
Phone button.
CANCEL COMMAND
At any prompt, after the beep, you can say “Cancel”
and you will be returned to the main menu.
You can also push the VR button or Phone button
on your steering wheel when the system is listening
for a command and be returned to the main or
previous menu.
PAIR (LINK) UCONNECT PHONE TO A MOBILE
PHONE
Use this QR code to access your
digital experience.
To begin using your Uconnect
Phone, you must pair your
compatible Bluetooth®-enabled
mobile phone. Mobile phone
pairing is the process of
establishing a wireless connection between a
cellular phone and the Uconnect system.
21_LA_OM_EN_USC_t.book Page 152
Page 168 of 328
166MULTIMEDIA
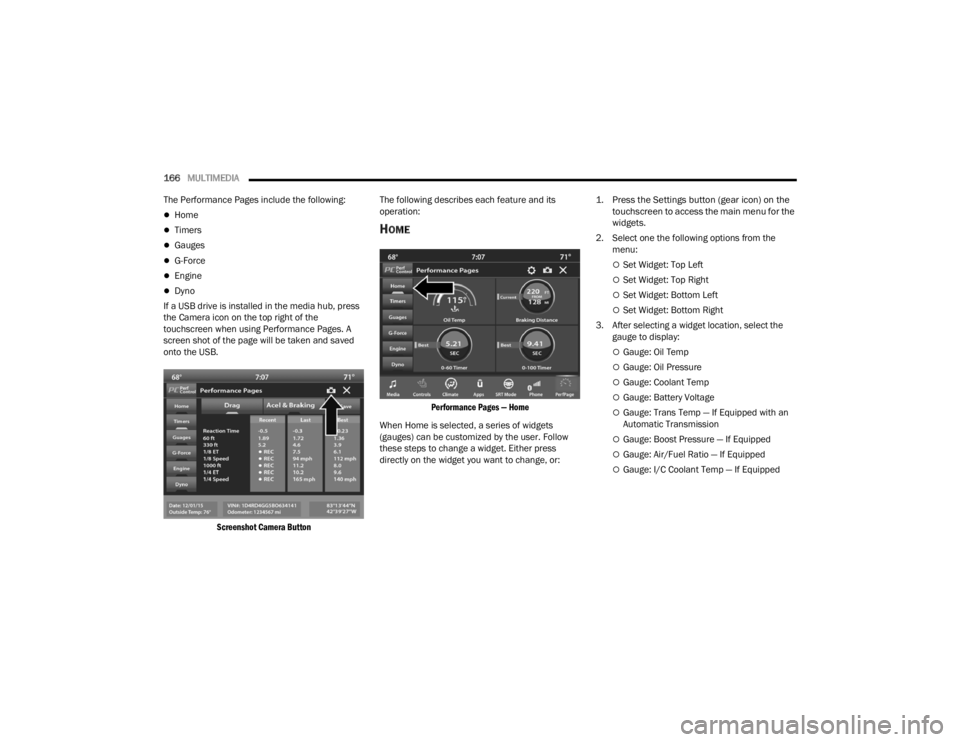
The Performance Pages include the following:
Home
Timers
Gauges
G-Force
Engine
Dyno
If a USB drive is installed in the media hub, press
the Camera icon on the top right of the
touchscreen when using Performance Pages. A
screen shot of the page will be taken and saved
onto the USB.
Screenshot Camera Button
The following describes each feature and its
operation:
HOME
Performance Pages — Home
When Home is selected, a series of widgets
(gauges) can be customized by the user. Follow
these steps to change a widget. Either press
directly on the widget you want to change, or:
1. Press the Settings button (gear icon) on the
touchscreen to access the main menu for the
widgets.
2. Select one the following options from the menu:
Set Widget: Top Left
Set Widget: Top Right
Set Widget: Bottom Left
Set Widget: Bottom Right
3. After selecting a widget location, select the gauge to display:
Gauge: Oil Temp
Gauge: Oil Pressure
Gauge: Coolant Temp
Gauge: Battery Voltage
Gauge: Trans Temp — If Equipped with an
Automatic Transmission
Gauge: Boost Pressure — If Equipped
Gauge: Air/Fuel Ratio — If Equipped
Gauge: I/C Coolant Temp — If Equipped
21_LA_OM_EN_USC_t.book Page 166
Page 169 of 328
MULTIMEDIA167
Gauge: Intake Air Temp
Gauge: Engine Torque
Gauge: Engine Power
Gauge: G-Force
Gauge: Steering Angle
Gauge: Current Gear
Gauge: Current Speed
Timer: 0–60 mph (0–100 km/h)
Timer: 0–100 mph (0–160 km/h)
Timer: 60 ft (20 m)
Timer: 330 ft (100 m)
Timer: 1/8 Mile (200 m)
Timer: 1000 ft (300 m)
Timer: 1/4 Mile (400 m)
Timer: Braking Distance
Timer: Reaction Time
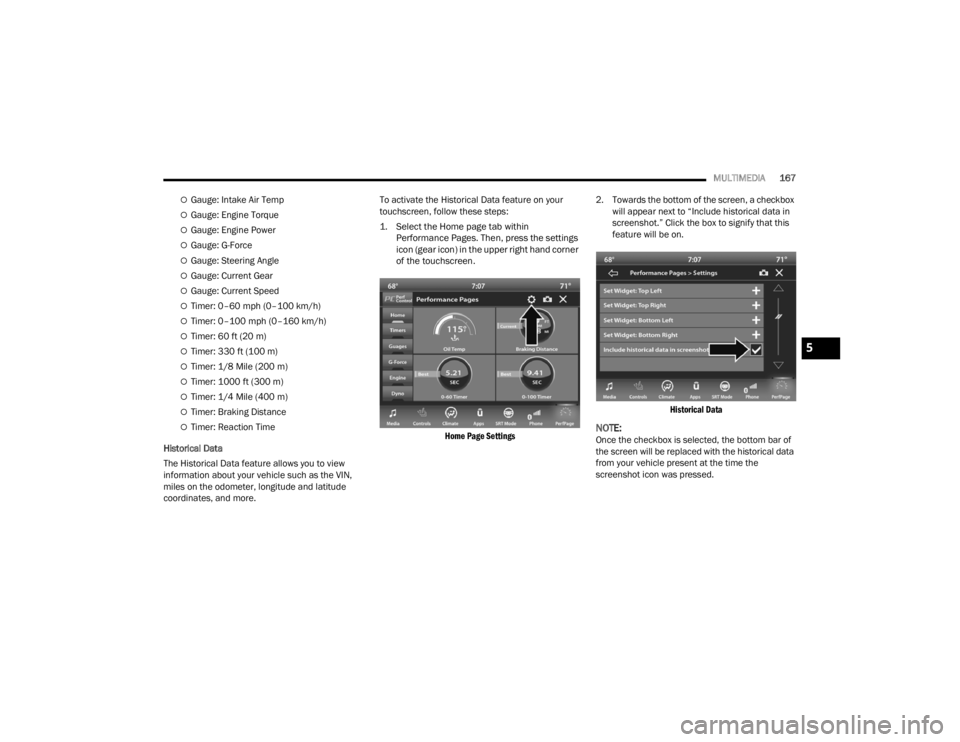
Historical Data
The Historical Data feature allows you to view
information about your vehicle such as the VIN,
miles on the odometer, longitude and latitude
coordinates, and more. To activate the Historical Data feature on your
touchscreen, follow these steps:
1. Select the Home page tab within
Performance Pages. Then, press the settings
icon (gear icon) in the upper right hand corner
of the touchscreen.
Home Page Settings
2. Towards the bottom of the screen, a checkbox
will appear next to “Include historical data in
screenshot.” Click the box to signify that this
feature will be on.
Historical Data
NOTE:Once the checkbox is selected, the bottom bar of
the screen will be replaced with the historical data
from your vehicle present at the time the
screenshot icon was pressed.
5
21_LA_OM_EN_USC_t.book Page 167
Page 174 of 328
172MULTIMEDIA
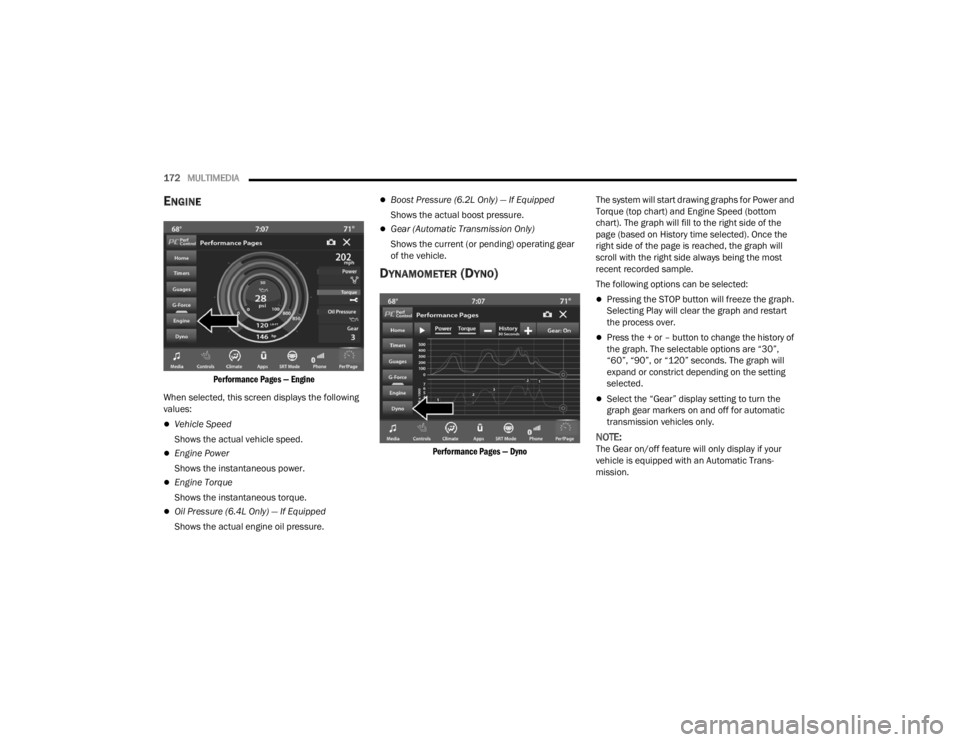
ENGINE
Performance Pages — Engine
When selected, this screen displays the following
values:
Vehicle Speed
Shows the actual vehicle speed.
Engine Power
Shows the instantaneous power.
Engine Torque
Shows the instantaneous torque.
Oil Pressure (6.4L Only) — If Equipped
Shows the actual engine oil pressure.
Boost Pressure (6.2L Only) — If Equipped
Shows the actual boost pressure.
Gear (Automatic Transmission Only)
Shows the current (or pending) operating gear
of the vehicle.
DYNAMOMETER (DYNO)
Performance Pages — Dyno
The system will start drawing graphs for Power and
Torque (top chart) and Engine Speed (bottom
chart). The graph will fill to the right side of the
page (based on History time selected). Once the
right side of the page is reached, the graph will
scroll with the right side always being the most
recent recorded sample.
The following options can be selected:
Pressing the STOP button will freeze the graph.
Selecting Play will clear the graph and restart
the process over.
Press the + or – button to change the history of
the graph. The selectable options are “30”,
“60”, “90”, or “120” seconds. The graph will
expand or constrict depending on the setting
selected.
Select the “Gear” display setting to turn the
graph gear markers on and off for automatic
transmission vehicles only.
NOTE:The Gear on/off feature will only display if your
vehicle is equipped with an Automatic Trans
-
mission.
21_LA_OM_EN_USC_t.book Page 172
Page 175 of 328
MULTIMEDIA173
DODGE DRIVE MODES — IF EQUIPPED
PERFORMANCE CONTROL — IF
E
QUIPPED
Your vehicle may be equipped with a Performance
Control feature which allows for coordinating the
operation of various vehicle systems depending
upon the type of driving behavior desired. The
Performance Control feature is controlled through
the Uconnect system and may be accessed by
performing any of the following:
Pushing the Super Track Pack button on the
instrument panel switch bank.
Selecting “Performance Control” from the
“Apps” menu.
Selecting “Performance Control” from within the
Performance Pages menu.
You will be able to enable, disable, and customize
the functionality of the Launch Control and
Performance Control Set-Up features within
Performance Control. Descriptions of these features are provided below.
To access information about the functionality of
these features through the Uconnect system,
press the Info button on the touchscreen.
NOTE:Dodge vehicles equipped with a 6.4L engine,
except for R/T Scat Pack 1320 6.4L non-widebody
vehicles, will use SRT Drive Modes rather than the
Dodge Performance Control Pages. Please refer to
the following sections for further information on
the SRT Drive Modes.
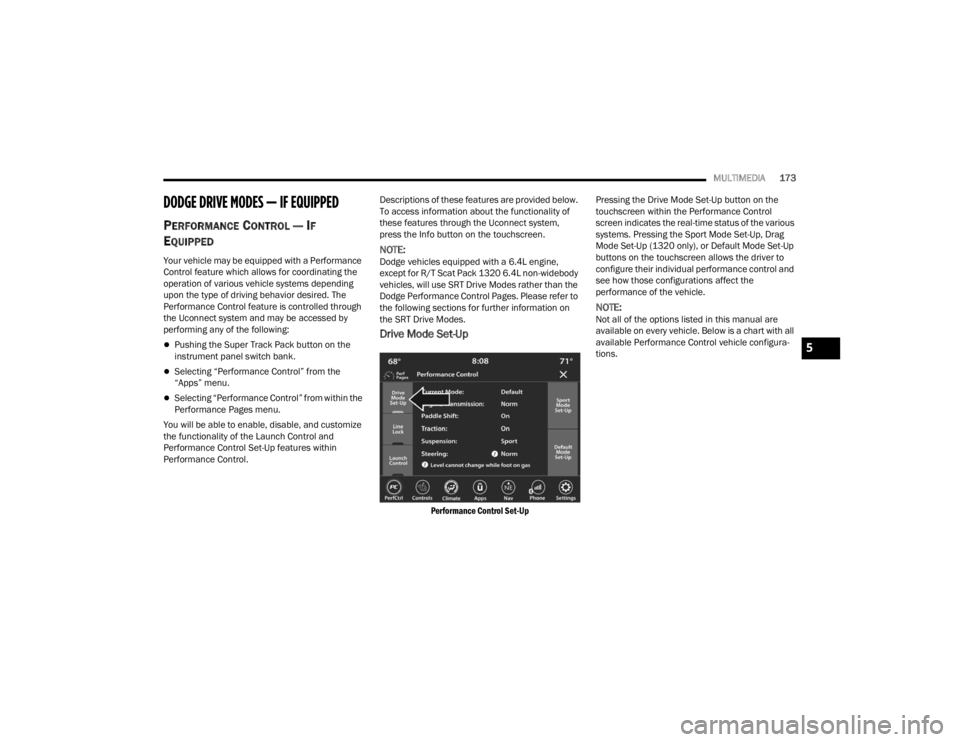
Drive Mode Set-Up
Performance Control Set-Up
Pressing the Drive Mode Set-Up button on the
touchscreen within the Performance Control
screen indicates the real-time status of the various
systems. Pressing the Sport Mode Set-Up, Drag
Mode Set-Up (1320 only), or Default Mode Set-Up
buttons on the touchscreen allows the driver to
configure their individual performance control and
see how those configurations affect the
performance of the vehicle.
NOTE:Not all of the options listed in this manual are
available on every vehicle. Below is a chart with all
available Performance Control vehicle configura
-
tions.
5
21_LA_OM_EN_USC_t.book Page 173
Page 176 of 328
174MULTIMEDIA
Available Mode Configurations
Refer to the Sport and Default Modes for their
detailed operation.
NOTE:These settings will remain in effect when using the
Launch Control feature.
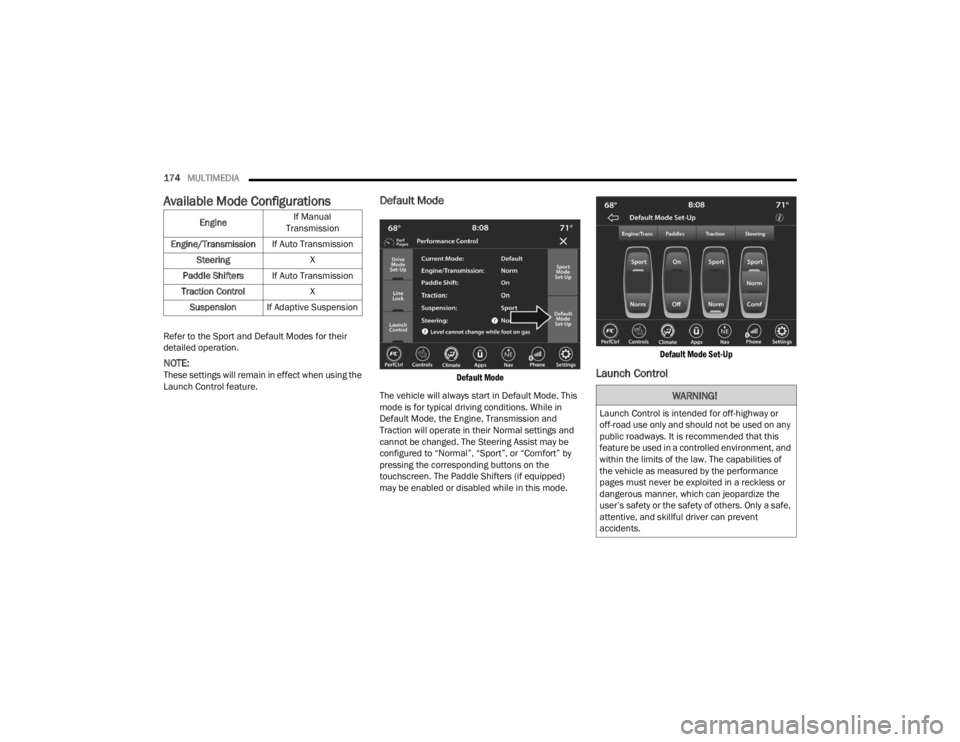
Default Mode
Default Mode
The vehicle will always start in Default Mode. This
mode is for typical driving conditions. While in
Default Mode, the Engine, Transmission and
Traction will operate in their Normal settings and
cannot be changed. The Steering Assist may be
configured to “Normal”, “Sport”, or “Comfort” by
pressing the corresponding buttons on the
touchscreen. The Paddle Shifters (if equipped)
may be enabled or disabled while in this mode.
Default Mode Set-Up
Launch Control
Engine
If Manual
Transmission
Engine/Transmission If Auto Transmission
Steering X
Paddle Shifters If Auto Transmission
Traction Control X
Suspension If Adaptive Suspension
WARNING!
Launch Control is intended for off-highway or
off-road use only and should not be used on any
public roadways. It is recommended that this
feature be used in a controlled environment, and
within the limits of the law. The capabilities of
the vehicle as measured by the performance
pages must never be exploited in a reckless or
dangerous manner, which can jeopardize the
user’s safety or the safety of others. Only a safe,
attentive, and skillful driver can prevent
accidents.
21_LA_OM_EN_USC_t.book Page 174
Page 177 of 328
MULTIMEDIA175
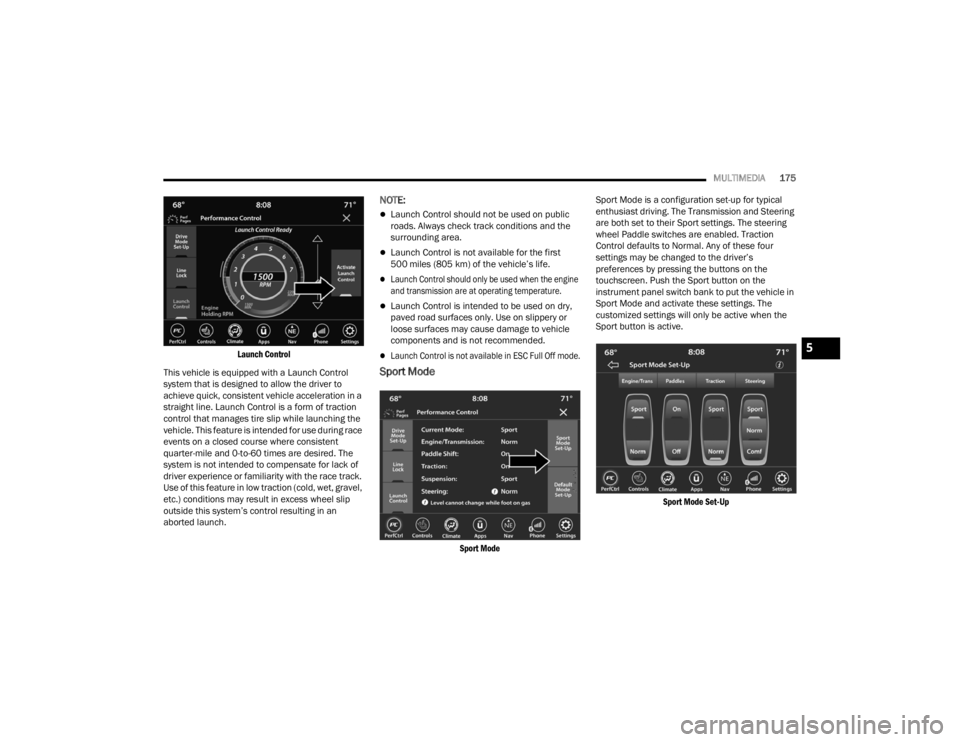
Launch Control
This vehicle is equipped with a Launch Control
system that is designed to allow the driver to
achieve quick, consistent vehicle acceleration in a
straight line. Launch Control is a form of traction
control that manages tire slip while launching the
vehicle. This feature is intended for use during race
events on a closed course where consistent
quarter-mile and 0-to-60 times are desired. The
system is not intended to compensate for lack of
driver experience or familiarity with the race track.
Use of this feature in low traction (cold, wet, gravel,
etc.) conditions may result in excess wheel slip
outside this system’s control resulting in an
aborted launch.
NOTE:
Launch Control should not be used on public
roads. Always check track conditions and the
surrounding area.
Launch Control is not available for the first
500 miles (805 km) of the vehicle’s life.
Launch Control should only be used when the engine
and transmission are at operating temperature.
Launch Control is intended to be used on dry,
paved road surfaces only. Use on slippery or
loose surfaces may cause damage to vehicle
components and is not recommended.
Launch Control is not available in ESC Full Off mode.
Sport Mode
Sport Mode
Sport Mode is a configuration set-up for typical
enthusiast driving. The Transmission and Steering
are both set to their Sport settings. The steering
wheel Paddle switches are enabled. Traction
Control defaults to Normal. Any of these four
settings may be changed to the driver’s
preferences by pressing the buttons on the
touchscreen. Push the Sport button on the
instrument panel switch bank to put the vehicle in
Sport Mode and activate these settings. The
customized settings will only be active when the
Sport button is active.
Sport Mode Set-Up
5
21_LA_OM_EN_USC_t.book Page 175