battery replacement DODGE CHALLENGER 2021 Owners Manual
[x] Cancel search | Manufacturer: DODGE, Model Year: 2021, Model line: CHALLENGER, Model: DODGE CHALLENGER 2021Pages: 328, PDF Size: 15 MB
Page 8 of 328
6
JUMP STARTING .................................................. 238 Preparations For Jump Start......................... 239Jump Starting Procedure .............................. 240
IF YOUR ENGINE OVERHEATS ........................... 241
MANUAL PARK RELEASE — 8 – SPEED
TRANSMISSION .................................................. 241
FREEING A STUCK VEHICLE ............................... 243
TOWING A DISABLED VEHICLE .......................... 244 Rear-Wheel Drive (RWD) Models.................. 245
ENHANCED ACCIDENT RESPONSE SYSTEM
(EARS) .................................................................. 245
EVENT DATA RECORDER (EDR) ......................... 245
SERVICING AND MAINTENANCE
SCHEDULED SERVICING .................................... 246
3.6L And 5.7L Engines ................................. 246
ENGINE COMPARTMENT .................................... 251
3.6L Engine ................................................... 2515.7L Engine ................................................... 252Checking Oil Level ......................................... 253
Adding Washer Fluid ..................................... 253
Maintenance-Free Battery ............................ 254
Pressure Washing ......................................... 254 VEHICLE MAINTENANCE..................................... 254
Engine Oil ...................................................... 255
Engine Oil Filter ............................................. 256Engine Air Cleaner Filter .............................. 256Air Conditioner Maintenance ....................... 257
Accessory Drive Belt Inspection ................... 259Body Lubrication ........................................... 260Windshield Wiper Blades.............................. 260Exhaust System ............................................. 261Cooling System .............................................. 262
Brake System ............................................... 265
Clutch Hydraulic System — Manual
Transmission (If Equipped)........................... 266Manual Transmission — If Equipped............ 266
Automatic Transmission — If Equipped ....... 266
All Wheel Drive (AWD) — If Equipped .......... 267
Rear Axle ........................................................ 267Fuses.............................................................. 267
Bulb Replacement ........................................ 276 TIRES ..................................................................... 279
Tire Safety Information ................................ 279Tires — General Information ........................ 288Tire Types....................................................... 291Spare Tires — If Equipped ............................ 292
Wheel And Wheel Trim Care ........................ 294Snow Traction Devices.................................. 295Tire Rotation Recommendations ................. 296
DEPARTMENT OF TRANSPORTATION UNIFORM
TIRE QUALITY GRADES ...................................... 296
Treadwear...................................................... 297
Traction Grades ............................................. 297Temperature Grades..................................... 297
VEHICLE STORAGE .............................................. 298
BODYWORK .......................................................... 298 Protection From Atmospheric Agents .......... 298
Body And Underbody Maintenance ............. 298
Preserving The Bodywork ............................. 298
INTERIORS ........................................................... 299
Seats And Fabric Parts ................................. 299
Plastic And Coated Parts .............................. 299
Leather Surfaces........................................... 300
Glass Surfaces ............................................. 300
21_LA_OM_EN_USC_t.book Page 6
Page 16 of 328
14GETTING TO KNOW YOUR VEHICLE
All doors can be programmed to unlock on the first
push of the unlock button through Uconnect
Settings Ú page 120.
NOTE:When you use the key fob to open any door, the
courtesy lights, overhead lights, and approach
lighting in the outside mirrors (if equipped) will turn
on Úpage 44.
To Unlatch The Trunk
Push the trunk button on the key fob two times
within five seconds to unlatch the trunk.
Replacing The Battery In The Key Fob
The recommended replacement battery is one
CR2032 battery.
NOTE:
Customers are recommended to use a battery
obtained from Mopar®. Aftermarket coin
battery dimensions may not meet the original
OEM coin battery dimensions.
Perchlorate Material — special handling may
apply. See www.dtsc.ca.gov/hazard -
ouswaste/perchlorate for further information.
Do not touch the battery terminals that are on
the back housing or the printed circuit board.
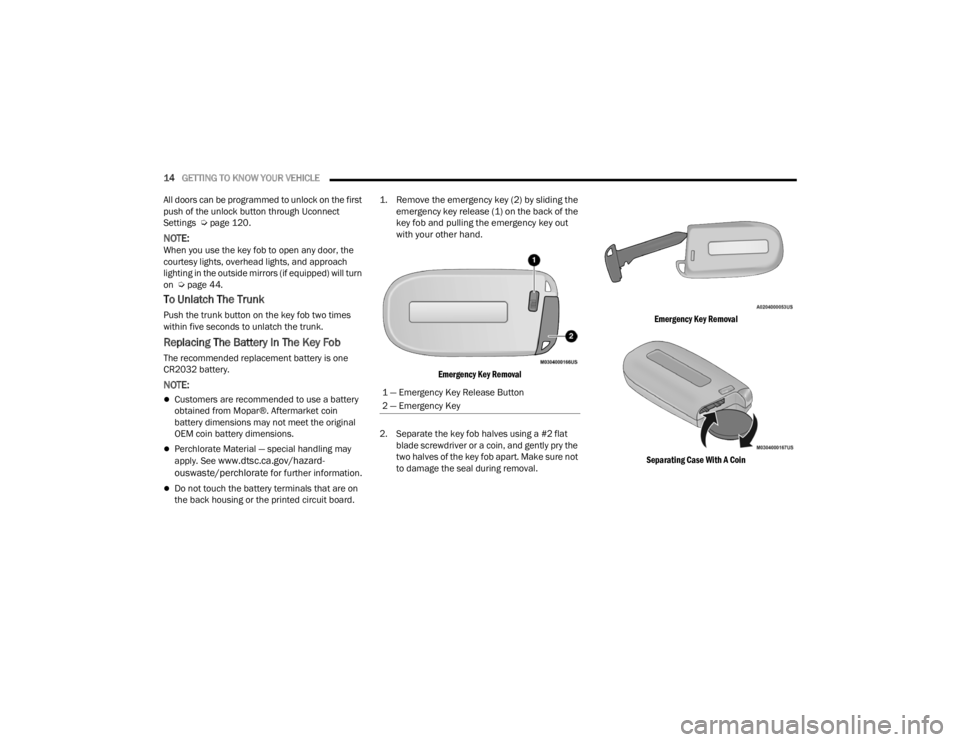
1. Remove the emergency key (2) by sliding the
emergency key release (1) on the back of the
key fob and pulling the emergency key out
with your other hand.
Emergency Key Removal
2. Separate the key fob halves using a #2 flat blade screwdriver or a coin, and gently pry the
two halves of the key fob apart. Make sure not
to damage the seal during removal.
Emergency Key Removal
Separating Case With A Coin
1 — Emergency Key Release Button
2 — Emergency Key
21_LA_OM_EN_USC_t.book Page 14
Page 17 of 328
GETTING TO KNOW YOUR VEHICLE15
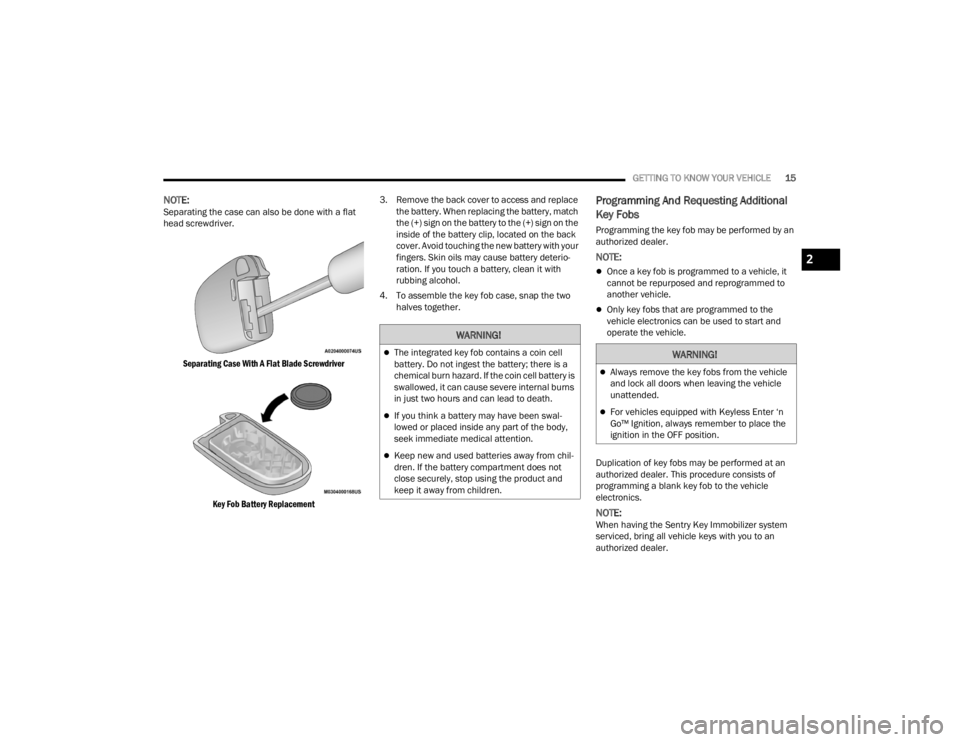
NOTE:Separating the case can also be done with a flat
head screwdriver.
Separating Case With A Flat Blade Screwdriver
Key Fob Battery Replacement
3. Remove the back cover to access and replace
the battery. When replacing the battery, match
the (+) sign on the battery to the (+) sign on the
inside of the battery clip, located on the back
cover. Avoid touching the new battery with your
fingers. Skin oils may cause battery deterio -
ration. If you touch a battery, clean it with
rubbing alcohol.
4. To assemble the key fob case, snap the two halves together.Programming And Requesting Additional
Key Fobs
Programming the key fob may be performed by an
authorized dealer.
NOTE:
Once a key fob is programmed to a vehicle, it
cannot be repurposed and reprogrammed to
another vehicle.
Only key fobs that are programmed to the
vehicle electronics can be used to start and
operate the vehicle.
Duplication of key fobs may be performed at an
authorized dealer. This procedure consists of
programming a blank key fob to the vehicle
electronics.
NOTE:When having the Sentry Key Immobilizer system
serviced, bring all vehicle keys with you to an
authorized dealer.
WARNING!
The integrated key fob contains a coin cell
battery. Do not ingest the battery; there is a
chemical burn hazard. If the coin cell battery is
swallowed, it can cause severe internal burns
in just two hours and can lead to death.
If you think a battery may have been swal-
lowed or placed inside any part of the body,
seek immediate medical attention.
Keep new and used batteries away from chil -
dren. If the battery compartment does not
close securely, stop using the product and
keep it away from children.
WARNING!
Always remove the key fobs from the vehicle
and lock all doors when leaving the vehicle
unattended.
For vehicles equipped with Keyless Enter ‘n
Go™ Ignition, always remember to place the
ignition in the OFF position.
2
21_LA_OM_EN_USC_t.book Page 15
Page 79 of 328
GETTING TO KNOW YOUR INSTRUMENT PANEL77
EMISSIONS INSPECTION AND
MAINTENANCE PROGRAMS
In some localities, it may be a legal requirement to
pass an inspection of your vehicle's emissions
control system. Failure to pass could prevent
vehicle registration. For states that require an Inspection
and Maintenance (I/M), this check
verifies the Malfunction Indicator Light
(MIL) is functioning and is not on when
the engine is running, and that the OBD II system
is ready for testing.
Normally, the OBD II system will be ready. The OBD
II system may not be ready if your vehicle was
recently serviced, recently had a dead battery or a
battery replacement. If the OBD II system should
be determined not ready for the I/M test, your
vehicle may fail the test.
Your vehicle has a simple ignition actuated test,
which you can use prior to going to the test station.
To check if your vehicle's OBD II system is ready,
you must do the following:
1. Cycle the ignition switch to the ON position, but do not crank or start the engine.
NOTE:If you crank or start the engine, you will have to
start this test over.
2. As soon as you cycle the ignition switch to the ON position, you will see the Malfunction
Indicator Light (MIL) symbol come on as part of
a normal bulb check. 3. Approximately 15 seconds later, one of two
things will happen:
The MIL will flash for about 10 seconds and
then return to being fully illuminated until
you turn OFF the ignition or start the engine.
This means that your vehicle's OBD II
system is not ready and you should not
proceed to the I/M station.
The MIL will not flash at all and will remain
fully illuminated until you place the ignition
in the off position or start the engine. This
means that your vehicle's OBD II system is
ready and you can proceed to the I/M
station.
If your OBD II system is not ready, you should see
an authorized dealer or repair facility. If your
vehicle was recently serviced or had a battery
failure or replacement, you may need to do nothing
more than drive your vehicle as you normally would
in order for your OBD II system to update. A
recheck with the above test routine may then
indicate that the system is now ready.
Regardless of whether your vehicle's OBD II system
is ready or not, if the MIL is illuminated during
normal vehicle operation you should have your
vehicle serviced before going to the I/M station.
The I/M station can fail your vehicle because the
MIL is on with the engine running.
WARNING!
ONLY an authorized service technician should
connect equipment to the OBD II connection
port in order to read the VIN, diagnose, or
service your vehicle.
If unauthorized equipment is connected to the
OBD II connection port, such as a
driver-behavior tracking device, it may:
Be possible that vehicle systems,
including safety related systems, could be
impaired or a loss of vehicle control could
occur that may result in an accident
involving serious injury or death.
Access, or allow others to access, infor -
mation stored in your vehicle systems,
including personal information.
3
21_LA_OM_EN_USC_t.book Page 77
Page 240 of 328
238IN CASE OF EMERGENCY
(E) After Driving:
Pull over to a safe location before continuing
Úpage 236.
1. Push in the Mode Select Knob (6) and turn to the Air Mode position.
2. Uncoil the power plug and insert the plug into the vehicle's 12 Volt power outlet.
3. Uncoil the Air Pump Hose (8) (black in color) and screw the fitting at the end of hose on to
the valve stem.
4. Check the pressure in the tire by reading the Pressure Gauge (5).
If tire pressure is less than 19 psi (1.3 Bar):
The tire is too badly damaged. Do not attempt to
drive the vehicle further. Call for assistance.
If the tire pressure is 19 psi (1.3 Bar) or higher:
1. Push the Power Button (3) to turn on Tire Service Kit and inflate the tire to the pressure
indicated on the tire and loading information
label on the driver-side door opening.
NOTE:If the tire becomes overinflated, push the Deflation
Button (2) to reduce the tire pressure to the recom -
mended inflation pressure before continuing. 2. Disconnect the Tire Service Kit from the valve
stem, reinstall the cap on the valve stem and
unplug from 12 Volt outlet.
3. Place the Tire Service Kit in its proper storage area in the vehicle.
4. Have the tire inspected and repaired or replaced at the earliest opportunity at an
authorized dealer or tire service center.
5. Remove the Speed Limit sticker from the instrument panel after the tire has been
repaired.
6. Replace the Sealant Bottle (1) and Sealant Hose (4) assembly at an authorized dealer as
soon as possible.
NOTE:When having the tire serviced, advise the autho -
rized dealer or service center that the tire has been
sealed using the Tire Service Kit.
(F) Sealant Bottle And Hose Replacement:
1. Uncoil the Sealant Hose (4) (clear in color).
2. Locate the round Sealant Bottle release button in the recessed area under the sealant bottle.
3. Push the Sealant Bottle release button. The Sealant Bottle (1) will pop up. Remove the
bottle and dispose of it accordingly. 4. Clean any remaining sealant from the Tire
Service Kit housing.
5. Position the new Sealant Bottle (1) in the housing so that the Sealant Hose (4) aligns
with the hose slot in the front of the housing.
Push the bottle into the housing. An audible
click will be heard indicating the bottle is
locked into place.
6. Verify that the cap is installed on the fitting at the end of the Sealant Hose (4) and return the
hose to its storage area (located on the bottom
of the air pump).
7. Return the Tire Service Kit to its storage location in the vehicle.
JUMP STARTING
If your vehicle has a discharged battery, it can be
jump started using a set of jumper cables and a
battery in another vehicle, or by using a portable
battery booster pack. Jump starting can be
dangerous if done improperly, so please follow the
procedures in this section carefully.
WARNING!
Do not attempt jump starting if the battery is
frozen. It could rupture or explode and cause
personal injury.
21_LA_OM_EN_USC_t.book Page 238
Page 315 of 328

313
Autostick Operation
.................................................... 91Axle Fluid....................................................... 307Axle Lubrication............................................. 307
B
Back-Up......................................................... 108Battery.................................................... 70, 254Charging System Light................................. 70Keyless Key Fob Replacement.................... 14Location.................................................... 254Belts, Seat..................................................... 223Blind Spot Monitoring.................................... 184BluetoothConnecting To A Particular Mobile Phone Or Audio Device After Pairing
................154Body Mechanism Lubrication........................ 260B-Pillar Location............................................. 285Brake Assist System...................................... 179Brake Control System.................................... 179Brake Fluid.......................................... 265, 307Brake System...................................... 265, 301Fluid Check..................................... 265, 307Master Cylinder......................................... 265Parking........................................................ 82Warning Light..................................... 70, 301
Brake/Transmission Interlock......................... 87Break-In Recommendations, New Vehicle....... 82Brightness, Interior Lights................................ 45Bulb Replacement........................................ 276Bulbs, Light.......................................... 225, 276
C
Camera, Rear................................................ 108Capacities, Fluid........................................... 305Caps, FillerFuel.......................................................... 109Oil (Engine)............................................... 251Radiator (Coolant Pressure)..................... 264Car Washes................................................... 298Carbon Monoxide Warning............................ 225CargoVehicle Loading........................................ 110CD................................................................. 148Cellular Phone.............................................. 177Certification Label......................................... 110Chains, Tire................................................... 295Chart, Tire Sizing........................................... 281Check Engine Light
(Malfunction Indicator Light)............................ 77Checking Your Vehicle For Safety................. 223Checks, Safety.............................................. 223Child Restraint.............................................. 208
Child RestraintsBooster Seats........................................... 211Child Seat Installation............................... 221How To Stow An unused ALR Seat Belt..... 217Infant And Child Restraints....................... 210Lower Anchors And Tethers For Children.. 213Older Children And Child Restraints.......... 210Seating Positions...................................... 212Clean Air Gasoline......................................... 303CleaningWheels...................................................... 294Climate Control................................................48Cold Weather Operation...................................81Compact Spare Tire...................................... 292Contract, Service........................................... 309Controls........................................................ 140Cooling Pressure Cap (Radiator Cap)............ 264Cooling System............................................. 262Adding Coolant (Antifreeze)...................... 263Coolant Level................................... 262, 264Cooling Capacity....................................... 305Disposal Of Used Coolant......................... 264Drain, Flush, And Refill............................. 262Inspection................................................. 264Points To Remember................................ 264Pressure Cap............................................ 264Radiator Cap............................................. 264Selection Of Coolant (Antifreeze)......................... 263, 305, 306
11
21_LA_OM_EN_USC_t.book Page 313
Page 318 of 328

316 I
Ignition
............................................................ 16Switch......................................................... 16Information Center, Vehicle............................. 63Inside Rearview Mirror............................ 36, 226Instrument Cluster Descriptions......................................... 61, 75Display................................................. 62, 64Instrument Cluster DisplayAudio........................................................... 67Driver Assist................................................ 66Fuel Economy.............................................. 67Speedometer.............................................. 65Vehicle Info................................................. 65Instrument Panel Lens Cleaning.................... 300Interior Appearance Care............................... 299Interior Lights.................................................. 44Intermittent Wipers (Delay Wipers).................. 46iPod/USB/MP3 Control................................... 54Bluetooth Streaming Audio......................... 54
J
Jack Location................................................. 230Jack Operation............................................... 231Jacking Instructions....................................... 231Jump Starting............................. 238, 239, 240
K
Key FobArm The System
.......................................... 20Programming Additional Key Fobs............... 15Unlatch The Trunk....................................... 14Key Fob Battery Service
(Remote Keyless Entry).................................... 14
Key Fob Programming (Remote Keyless Entry).. 15
Keyless Enter 'n Go™....................................... 22Enter The Trunk........................................... 14Keys................................................................. 13Replacement............................................... 15
L
Lane Change And Turn Signals........................ 44Lane Change Assist......................................... 44Lap/Shoulder Belts....................................... 195Latches......................................................... 225Hood............................................................ 58Lead Free Gasoline....................................... 302Leaks, Fluid.................................................. 225Life Of Tires................................................... 290Light Bulbs........................................... 225, 276
Lights............................................................ 225Air Bag...................................... 69, 200, 223Automatic Headlights..................................43Brake Assist Warning................................ 182Brake Warning................................... 70, 301Bulb Replacement.................................... 276Courtesy/Reading........................................45Cruise...................................................75, 76Daytime Running.........................................42Dimmer Switch, Headlight...........................42
Electronic Stability Program(ESP) Indicator....71
Exterior.............................................. 41, 225Fog...............................................................44Headlight Switch..........................................41Headlights............................................ 41, 43Headlights On With Wipers..........................43High Beam...................................................42High Beam/Low Beam Select......................42Instrument Cluster.......................................41Intensity Control..........................................45Interior.........................................................44License..................................................... 279Lights On Reminder.....................................43Malfunction Indicator (Check Engine)..........73
21_LA_OM_EN_USC_t.book Page 316