warning light DODGE CHALLENGER 2021 Owners Manual
[x] Cancel search | Manufacturer: DODGE, Model Year: 2021, Model line: CHALLENGER, Model: DODGE CHALLENGER 2021Pages: 328, PDF Size: 15 MB
Page 6 of 328

4
WARNING LIGHTS AND MESSAGES ................... 69 Red Warning Lights ..........................................69
Yellow Warning Lights ......................................72
Yellow Indicator Lights .....................................75
Green Indicator Lights......................................75
White Indicator Lights ......................................76
Blue Indicator Lights ........................................76
ONBOARD DIAGNOSTIC SYSTEM — OBD II ....... 76
Onboard Diagnostic System
(OBD II) Cybersecurity ......................................76
EMISSIONS INSPECTION AND MAINTENANCE
PROGRAMS ............................................................ 77
STARTING AND OPERATING
STARTING THE ENGINE ........................................ 78
Manual Transmission — If Equipped ...............78
Automatic Transmission —
If Equipped........................................................78
Normal Starting ................................................79
AutoPark ...........................................................80
Cold Weather Operation (Below –22°F
Or −30°C) ........................................................81
If Engine Fails To Start .....................................81
After Starting.....................................................81 ENGINE BLOCK HEATER — IF EQUIPPED ...........81
ENGINE BREAK-IN RECOMMENDATIONS —
3.6L & 5.7L ............................................................82
PARKING BRAKE ....................................................82
MANUAL TRANSMISSION — IF EQUIPPED ..........83
Six-Speed Manual Transmission .....................83
Shifting ..............................................................84
Recommended Shift Speeds...........................85
1–4 Skip Shift .................................................86
Downshifting.....................................................86
AUTOMATIC TRANSMISSION —
IF EQUIPPED .......................................................... 86
Ignition Park Interlock ......................................87
Brake Transmission Shift Interlock (BTSI)
System .............................................................87
Eight-Speed Automatic Transmission .............87
SPORT MODE — WITHOUT PERFORMANCE
CONTROL................................................................. 92
FUEL SAVER TECHNOLOGY 5.7L —
IF EQUIPPED ...........................................................93
ELECTRIC POWER STEERING ...............................93
CRUISE CONTROL SYSTEMS — IF EQUIPPED .....93
Cruise Control ..................................................94
Adaptive Cruise Control (ACC) .........................95 PARKSENSE REAR PARK ASSIST —
IF EQUIPPED ......................................................... 103
ParkSense Sensors ....................................... 104
ParkSense Display ........................................ 104
ParkSense Warning Display ......................... 107
Enabling And Disabling ParkSense.............. 107
Service The ParkSense Rear Park
Assist System ................................................ 107
Cleaning The ParkSense System ................. 107
ParkSense System Usage Precautions........ 107
PARKVIEW REAR BACK UP CAMERA ............... 108
REFUELING THE VEHICLE ................................... 109 Loose Fuel Filler Cap Message .................... 110
VEHICLE LOADING .............................................. 110
Vehicle Certification Label............................ 110
Gross Vehicle Weight Rating (GVWR) .......... 110
Gross Axle Weight Rating (GAWR) ............... 111
Overloading ................................................... 111
Loading ......................................................... 111
21_LA_OM_EN_USC_t.book Page 4
Page 12 of 328
10
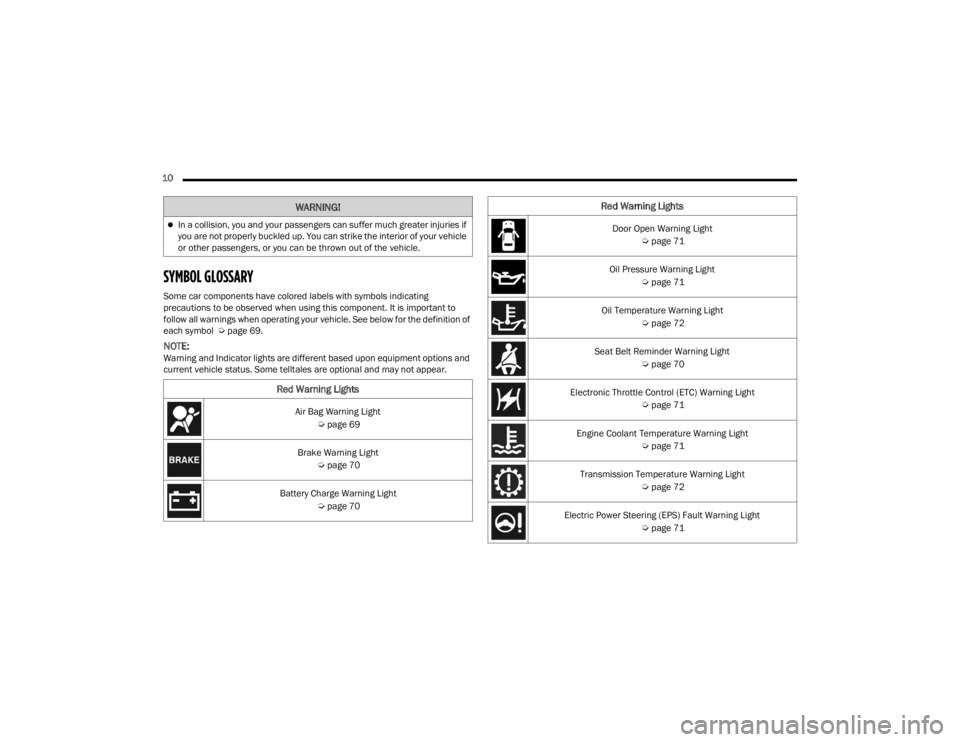
SYMBOL GLOSSARY
Some car components have colored labels with symbols indicating
precautions to be observed when using this component. It is important to
follow all warnings when operating your vehicle. See below for the definition of
each symbol Úpage 69.
NOTE:Warning and Indicator lights are different based upon equipment options and
current vehicle status. Some telltales are optional and may not appear.
In a collision, you and your passengers can suffer much greater injuries if
you are not properly buckled up. You can strike the interior of your vehicle
or other passengers, or you can be thrown out of the vehicle.
Red Warning Lights
Air Bag Warning Light
Úpage 69
Brake Warning Light Úpage 70
Battery Charge Warning Light Úpage 70
WARNING!
Door Open Warning Light
Úpage 71
Oil Pressure Warning Light Úpage 71
Oil Temperature Warning Light Úpage 72
Seat Belt Reminder Warning Light Úpage 70
Electronic Throttle Control (ETC) Warning Light Úpage 71
Engine Coolant Temperature Warning Light Úpage 71
Transmission Temperature Warning Light Úpage 72
Electric Power Steering (EPS) Fault Warning Light Úpage 71
Red Warning Lights
21_LA_OM_EN_USC_t.book Page 10
Page 13 of 328
11
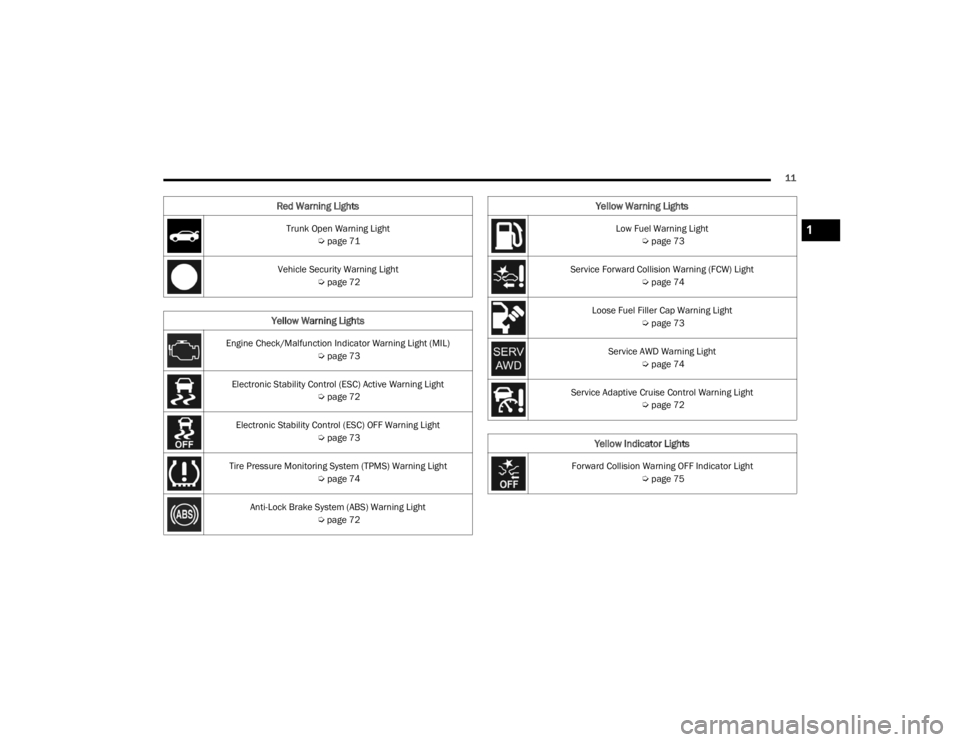
Trunk Open Warning Light Úpage 71
Vehicle Security Warning Light Úpage 72
Yellow Warning Lights
Engine Check/Malfunction Indicator Warning Light (MIL)
Úpage 73
Electronic Stability Control (ESC) Active Warning Light Úpage 72
Electronic Stability Control (ESC) OFF Warning Light Úpage 73
Tire Pressure Monitoring System (TPMS) Warning Light Úpage 74
Anti-Lock Brake System (ABS) Warning Light Úpage 72
Red Warning Lights
Low Fuel Warning Light
Úpage 73
Service Forward Collision Warning (FCW) Light Úpage 74
Loose Fuel Filler Cap Warning Light Úpage 73
Service AWD Warning Light Úpage 74
Service Adaptive Cruise Control Warning Light Úpage 72
Yellow Indicator Lights
Forward Collision Warning OFF Indicator Light
Úpage 75
Yellow Warning Lights
1
21_LA_OM_EN_USC_t.book Page 11
Page 20 of 328
18GETTING TO KNOW YOUR VEHICLE
HOW TO USE REMOTE START
Push and release the Remote Start button on the
key fob twice within five seconds. The vehicle
doors will lock, the parking lights will flash, and the
horn will chirp twice (if programmed). Then, the
engine will start, and the vehicle will remain in the
Remote Start mode for a 15 minute cycle. Pushing
the Remote Start button a third time shuts the
engine off.
To drive the vehicle, push the unlock button, and
place the ignition in the ON/RUN position.
NOTE:
With Remote Start, the engine will only run for
15 minutes.
Remote Start can only be used twice.
If an engine fault is present or fuel level is low,
the vehicle will start and then shut down in 10
seconds.
The park lamps will turn on and remain on
during Remote Start mode.
For security, power window and power sunroof
operation (if equipped) are disabled when the
vehicle is in the Remote Start mode.
The ignition must be placed in the ON/RUN posi -
tion before the Remote Start sequence can be
repeated for a third cycle.
All of the following conditions must be met before
the engine will remote start:
Gear selector in PARK
Doors closed
Hood closed
Trunk closed
Hazard switch off
Brake switch inactive (brake pedal not pressed)
Battery at an acceptable charge level
PANIC button not pushed
System not disabled from previous Remote
Start event
Vehicle Security system indicator flashing
Ignition in the OFF position
Fuel level meets minimum requirement
Vehicle Security system is not signaling an
intrusion
Malfunction Indicator Light is not illuminated
TO EXIT REMOTE START MODE
To drive the vehicle after starting the Remote Start
system, either push and release the unlock button
on the key fob to unlock the doors, or unlock the
vehicle using Keyless Enter ‘n Go™ — Passive Entry
via the door handles, and disarm the Vehicle
Security system (if equipped). Then, prior to the
end of the 15 minute cycle, push and release the
START/STOP ignition button.
WARNING!
Do not start or run an engine in a closed
garage or confined area. Exhaust gas contains
Carbon Monoxide (CO) which is odorless and
colorless. Carbon Monoxide is poisonous and
can cause serious injury or death when
inhaled.
Keep key fobs away from children. Operation
of the Remote Start system, windows, door
locks or other controls could cause serious
injury or death.
21_LA_OM_EN_USC_t.book Page 18
Page 21 of 328

GETTING TO KNOW YOUR VEHICLE19
The Remote Start system will turn the engine off
with another push and release of the Remote Start
button on the key fob, or if the engine is allowed to
run for the entire 15 minute cycle. Once the
ignition is placed in the ON/RUN position, the
climate controls will resume the previously set
operations (temperature, blower control, etc.).
NOTE:
To avoid unintentional shutdowns, the system
will disable for two seconds after receiving a
valid Remote Start request.
For vehicles equipped with the Keyless Enter ‘n
Go™ — Passive Entry feature, the message
“Remote Start Active — Push Start Button” will
show in the instrument cluster display until you
push the START/STOP ignition button.
Remote Start will also cancel if any of the following
occur:
The engine stalls or engine speed exceeds
2500 RPM.
Any engine warning lights come on.
The Low Fuel Light turns on.
The hood is opened.
The hazard switch is pushed.
The gear selector is moved out of PARK.
The brake pedal is pressed.
REMOTE START FRONT DEFROST
A
CTIVATION — IF EQUIPPED
When Remote Start is active, and the outside
ambient temperature is 40°F (4.5°C) or below, the
system will automatically activate front defrost for
15 minutes or less. The time is dependent on the
ambient temperature. Once the timer expires, the
system will automatically adjust the settings
depending on ambient conditions. See “Remote
Start Comfort Systems — If Equipped” in the next
section for detailed operation.
REMOTE START COMFORT SYSTEMS —
I
F EQUIPPED
When Remote Start is activated, the front and rear
defrost will automatically turn on in cold weather.
The heated steering wheel and driver heated seat
feature will turn on if selected in the comfort menu
screen within Uconnect Settings Ú page 120. In
warm weather, the driver vented seat feature will
automatically turn on when Remote Start is
activated, if programmed in the comfort menu
screen. The vehicle will adjust the climate control
settings depending on the outside ambient
temperature. Automatic Temperature Control (ATC) —
If Equipped
The climate controls will be automatically adjusted
to the optimal temperature and mode settings
depending on the outside ambient temperature.
This will occur until the ignition is placed in the ON/
RUN position where the climate controls will
resume their previous settings.
Manual Temperature Control (MTC) — If Equipped
In ambient temperatures at 40°F (4.5°C) or
below, the climate settings will default to
maximum heat, with fresh air entering the
cabin. If the front defrost timer expires, the
vehicle will enter Mix Mode.
In ambient temperatures from 40°F (4.5°C) to
78°F (26°C), the climate settings will be based
on the last settings selected by the driver.
In ambient temperatures at 78°F (26°C) or
above, the climate settings will default to MAX
A/C, Bi-Level Mode, with Recirculation on.
For more information on ATC, MTC, and climate
control settings, see Ú page 48.
2
21_LA_OM_EN_USC_t.book Page 19
Page 23 of 328
GETTING TO KNOW YOUR VEHICLE21
If you remain in the vehicle and open a door, the
alarm will sound. If this occurs, disarm the Vehicle
Security system.
If the Vehicle Security system is armed and the
battery becomes disconnected, the Vehicle
Security system will remain armed when the
battery is reconnected; the exterior lights will flash,
and the horn will sound. If this occurs, disarm the
Vehicle Security system.
REARMING THE SYSTEM
If something triggers the alarm and no action is
taken to disarm it, the Vehicle Security system will
turn the horn off after a 29 second cycle (with five
seconds between cycles and up to eight cycles if
the trigger remains active) and then rearm itself.
SECURITY SYSTEM MANUAL OVERRIDE
The Vehicle Security system will not arm if you lock
the doors using the manual door lock.
TAMPER ALERT
If something has triggered the Vehicle Security
system in your absence, the horn will sound three
times and the exterior lights will blink three times
when you disarm the Vehicle Security system.
DOORS
MANUAL DOOR LOCKS
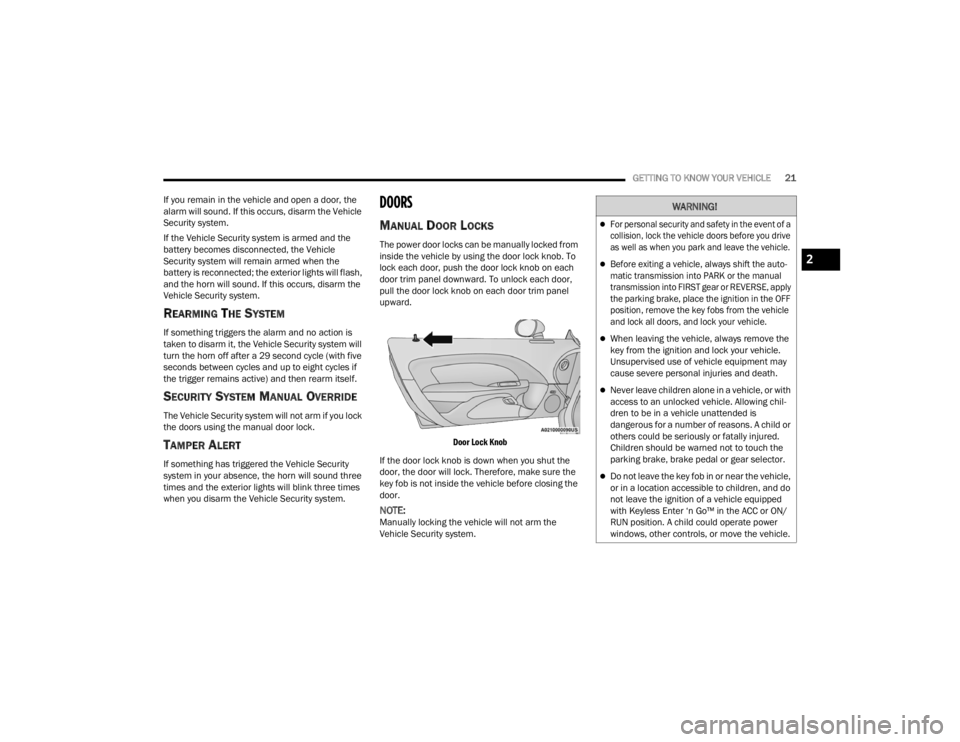
The power door locks can be manually locked from
inside the vehicle by using the door lock knob. To
lock each door, push the door lock knob on each
door trim panel downward. To unlock each door,
pull the door lock knob on each door trim panel
upward.
Door Lock Knob
If the door lock knob is down when you shut the
door, the door will lock. Therefore, make sure the
key fob is not inside the vehicle before closing the
door.
NOTE:Manually locking the vehicle will not arm the
Vehicle Security system.
WARNING!
For personal security and safety in the event of a
collision, lock the vehicle doors before you drive
as well as when you park and leave the vehicle.
Before exiting a vehicle, always shift the auto -
matic transmission into PARK or the manual
transmission into FIRST gear or REVERSE, apply
the parking brake, place the ignition in the OFF
position, remove the key fobs from the vehicle
and lock all doors, and lock your vehicle.
When leaving the vehicle, always remove the
key from the ignition and lock your vehicle.
Unsupervised use of vehicle equipment may
cause severe personal injuries and death.
Never leave children alone in a vehicle, or with
access to an unlocked vehicle. Allowing chil -
dren to be in a vehicle unattended is
dangerous for a number of reasons. A child or
others could be seriously or fatally injured.
Children should be warned not to touch the
parking brake, brake pedal or gear selector.
Do not leave the key fob in or near the vehicle,
or in a location accessible to children, and do
not leave the ignition of a vehicle equipped
with Keyless Enter ‘n Go™ in the ACC or ON/
RUN position. A child could operate power
windows, other controls, or move the vehicle.
2
21_LA_OM_EN_USC_t.book Page 21
Page 39 of 328
GETTING TO KNOW YOUR VEHICLE37
Sun Visor “Slide-On-Rod” And Extender
Feature
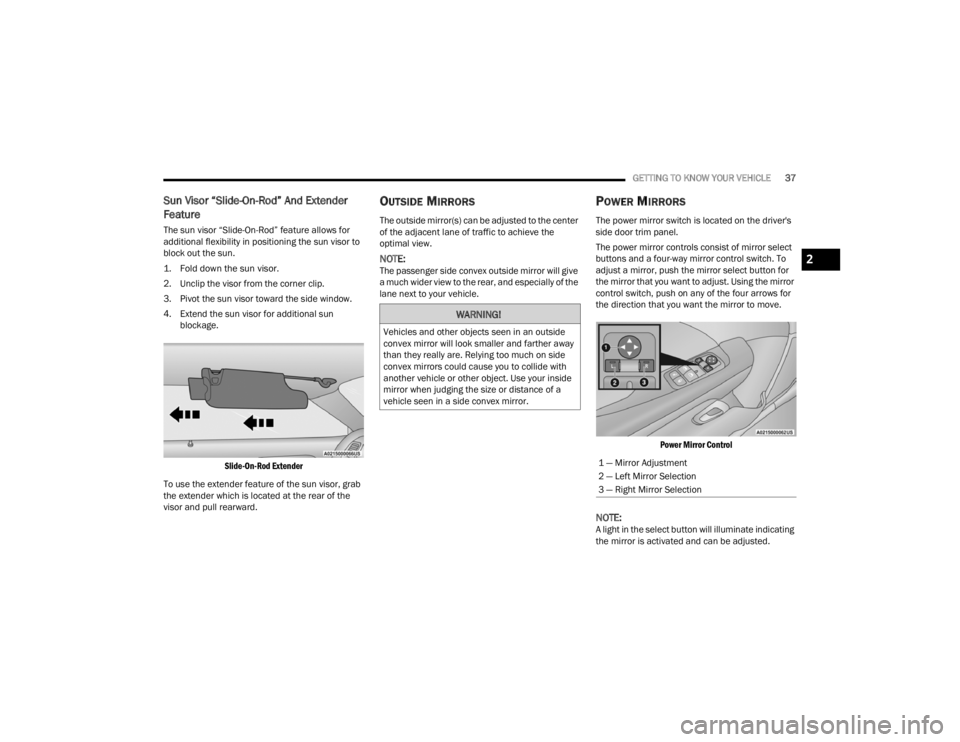
The sun visor “Slide-On-Rod” feature allows for
additional flexibility in positioning the sun visor to
block out the sun.
1. Fold down the sun visor.
2. Unclip the visor from the corner clip.
3. Pivot the sun visor toward the side window.
4. Extend the sun visor for additional sun
blockage.
Slide-On-Rod Extender
To use the extender feature of the sun visor, grab
the extender which is located at the rear of the
visor and pull rearward.
OUTSIDE MIRRORS
The outside mirror(s) can be adjusted to the center
of the adjacent lane of traffic to achieve the
optimal view.
NOTE:The passenger side convex outside mirror will give
a much wider view to the rear, and especially of the
lane next to your vehicle.
POWER MIRRORS
The power mirror switch is located on the driver's
side door trim panel.
The power mirror controls consist of mirror select
buttons and a four-way mirror control switch. To
adjust a mirror, push the mirror select button for
the mirror that you want to adjust. Using the mirror
control switch, push on any of the four arrows for
the direction that you want the mirror to move.
Power Mirror Control
NOTE:A light in the select button will illuminate indicating
the mirror is activated and can be adjusted.
WARNING!
Vehicles and other objects seen in an outside
convex mirror will look smaller and farther away
than they really are. Relying too much on side
convex mirrors could cause you to collide with
another vehicle or other object. Use your inside
mirror when judging the size or distance of a
vehicle seen in a side convex mirror.
1 — Mirror Adjustment
2 — Left Mirror Selection
3 — Right Mirror Selection
2
21_LA_OM_EN_USC_t.book Page 37
Page 41 of 328
GETTING TO KNOW YOUR VEHICLE39
(Continued)
Rolling Code Devices
To determine if your device has a rolling code, a
good indicator is its manufacturing date. Typically,
devices manufactured after 1995 have rolling
codes. A device with a rolling code will also have a
“LEARN” or “TRAIN” button located where the
antenna is attached to the device. The button may
not be immediately visible when looking at the
device. The name and color of the button may vary
slightly by manufacturer.
NOTE:The “LEARN” or “TRAIN” button is not the button
you normally use to operate the device.
Non-Rolling Code Devices
Most devices manufactured before 1995 will not
have a rolling code. These devices will also not
have a “LEARN” or “TRAIN” button.
PROGRAMMING HOMELINK® TO A
G
ARAGE DOOR OPENER
To program any of the HomeLink® buttons to
activate your garage door opener motor, follow the
steps below:
NOTE:All HomeLink® buttons are programmed using this
procedure. You do not need to erase all channels
when programming additional buttons.
1. Place the ignition switch into the ON/RUN
position.
2. Place the garage door opener transmitter 1 to 3 inches (3 to 8 cm) away from the
HomeLink® button you wish to program, while
keeping the HomeLink® indicator light in view.
3. Push and hold the HomeLink® button you want to program while you push and hold the
garage door opener transmitter button you are
trying to replicate.
4. Continue to hold both buttons and observe the HomeLink® indicator light. The HomeLink®
indicator light will flash slowly and then rapidly.
Once this happens, release both buttons.
NOTE:Make sure the garage door opener motor is
plugged in before moving on to the rolling code/
non-rolling code final steps.
Rolling Code Garage Door Opener Final Steps
NOTE:You have 30 seconds to initiate rolling code final
step 2, after completing rolling code final step 1.
1. At the garage door opener motor (in the garage), locate the “LEARN” or “TRAIN”
button. This can usually be found where the
hanging antenna wire is attached to the
garage door opener motor. Firmly push and
release the “LEARN” or “TRAIN” button.
2. Return to the vehicle and push the
programmed HomeLink® button three times
(holding the button for two seconds each
time). If the garage door opener motor
operates, programming is complete.
3. Push the programmed HomeLink® button to confirm that the garage door opener motor
operates. If the garage door opener motor
does not operate, repeat the final steps for the
rolling code procedure.
Non-Rolling Code Garage Door Opener Final Steps
1. Push and hold the programmed HomeLink® button and observe the HomeLink® indicator
light. If the HomeLink® indicator light stays
on constantly, programming is complete.
2. Push the programmed HomeLink® button to confirm that the garage door opener motor
operates. If the garage door opener motor
does not operate, repeat the steps from the
beginning.WARNING!
Your motorized door or gate will open and close
while you are programming the universal trans -
ceiver. Do not program the transceiver if people
or pets are in the path of the door or gate.
2
21_LA_OM_EN_USC_t.book Page 39
Page 42 of 328
40GETTING TO KNOW YOUR VEHICLE
PROGRAMMING HOMELINK® TO A
M
ISCELLANEOUS DEVICE
Follow the procedure on programming HomeLink®
to a garage door opener Ú page 39. Be sure to
determine if the device has a rolling code, or
non-rolling code before beginning the
programming process.
NOTE:Canadian radio frequency laws require transmitter
signals to time-out (or quit) after several seconds
of transmission, which may not be long enough for
HomeLink® to pick up the signal during
programming. Similar to this Canadian law, some
U.S. gate operators are designed to time-out in the
same manner. The procedure may need to be
performed multiple times to successfully pair the
device to your HomeLink® buttons.
REPROGRAMMING A SINGLE
H
OMELINK® BUTTON
To reprogram a single HomeLink® button that has
been previously trained, without erasing all the
channels, follow the procedure below. Be sure to
determine whether the new device you want to
program the HomeLink® button to has a rolling
code or non-rolling code.
1. Place the ignition in the ON/RUN position,
without starting the engine.
2. Push and hold the desired HomeLink® button until the HomeLink® Indicator light begins to
flash after 20 seconds. Do not release the
button.
3. Without releasing the button , proceed with
Step 2 in “Programming HomeLink® To A
Garage Door Opener” and follow all remaining
steps.
CANADIAN/GATE OPERATOR
P
ROGRAMMING
For programming transmitters in Canada/United
States that require the transmitter signals to
“time-out” after several seconds of transmission.
Canadian radio frequency laws require transmitter
signals to time-out (or quit) after several seconds
of transmission – which may not be long enough
for HomeLink® to pick up the signal during programming. Similar to this Canadian law, some
U.S. gate operators are designed to time-out in the
same manner.
It may be helpful to unplug the device during the
cycling process to prevent possible overheating of
the garage door or gate motor.
1. Place the ignition in the ON/RUN position.
2. Place the hand-held transmitter 1 to 3 inches
(3 to 8 cm) away from the HomeLink® button
you wish to program while keeping the
HomeLink® indicator light in view.
3. Continue to press and hold the HomeLink® button, while you press and release (cycle)
your hand-held transmitter every two seconds
until HomeLink® has successfully accepted
the frequency signal. The indicator light will
flash slowly and then rapidly when fully
trained.
4. Watch for the HomeLink® indicator to change flash rates. When it changes, it is
programmed. It may take up to 30 seconds or
longer in rare cases. The garage door may
open and close while you are programming.
5. Press and hold the programmed HomeLink® button and observe the indicator light.
Do not run your vehicle in a closed garage or
confined area while programming the trans -
ceiver. Exhaust gas from your vehicle contains
Carbon Monoxide (CO) which is odorless and
colorless. Carbon Monoxide is poisonous
when inhaled and can cause you and others to
be severely injured or killed.
WARNING!
21_LA_OM_EN_USC_t.book Page 40
Page 44 of 328
42GETTING TO KNOW YOUR VEHICLE
To turn on the headlights, rotate the headlight
switch clockwise. When the headlight switch is on,
the parking lights, taillights, license plate light and
instrument panel lights are also turned on. To turn
off the headlights, rotate the headlight switch back
to the O (off) position.
NOTE:For vehicles sold in Canada, rotate the headlight
switch clockwise from the parking lights and
instrument panel lights position to the first detent
to turn the headlight switch to the AUTO position.
Rotate to the second detent to turn on headlights,
parking lights, and instrument panel lights oper -
ation.
MULTIFUNCTION LEVER
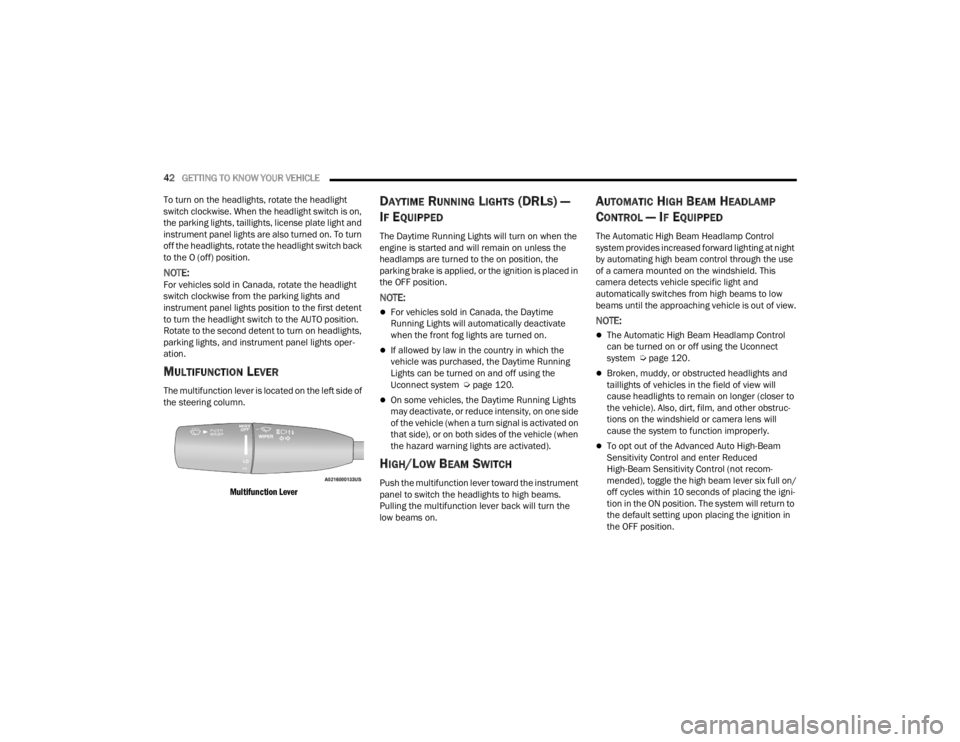
The multifunction lever is located on the left side of
the steering column.
Multifunction Lever
DAYTIME RUNNING LIGHTS (DRLS) —
I
F EQUIPPED
The Daytime Running Lights will turn on when the
engine is started and will remain on unless the
headlamps are turned to the on position, the
parking brake is applied, or the ignition is placed in
the OFF position.
NOTE:
For vehicles sold in Canada, the Daytime
Running Lights will automatically deactivate
when the front fog lights are turned on.
If allowed by law in the country in which the
vehicle was purchased, the Daytime Running
Lights can be turned on and off using the
Uconnect system Ú page 120.
On some vehicles, the Daytime Running Lights
may deactivate, or reduce intensity, on one side
of the vehicle (when a turn signal is activated on
that side), or on both sides of the vehicle (when
the hazard warning lights are activated).
HIGH/LOW BEAM SWITCH
Push the multifunction lever toward the instrument
panel to switch the headlights to high beams.
Pulling the multifunction lever back will turn the
low beams on.
AUTOMATIC HIGH BEAM HEADLAMP
C
ONTROL — IF EQUIPPED
The Automatic High Beam Headlamp Control
system provides increased forward lighting at night
by automating high beam control through the use
of a camera mounted on the windshield. This
camera detects vehicle specific light and
automatically switches from high beams to low
beams until the approaching vehicle is out of view.
NOTE:
The Automatic High Beam Headlamp Control
can be turned on or off using the Uconnect
system Ú page 120.
Broken, muddy, or obstructed headlights and
taillights of vehicles in the field of view will
cause headlights to remain on longer (closer to
the vehicle). Also, dirt, film, and other obstruc -
tions on the windshield or camera lens will
cause the system to function improperly.
To opt out of the Advanced Auto High-Beam
Sensitivity Control and enter Reduced
High-Beam Sensitivity Control (not recom -
mended), toggle the high beam lever six full on/
off cycles within 10 seconds of placing the igni -
tion in the ON position. The system will return to
the default setting upon placing the ignition in
the OFF position.
21_LA_OM_EN_USC_t.book Page 42