check engine DODGE CHALLENGER 2023 User Guide
[x] Cancel search | Manufacturer: DODGE, Model Year: 2023, Model line: CHALLENGER, Model: DODGE CHALLENGER 2023Pages: 300, PDF Size: 12.82 MB
Page 72 of 300
70GETTING TO KNOW YOUR INSTRUMENT PANEL
ONBOARD DIAGNOSTIC SYSTEM
(OBD II) C
YBERSECURITY
Your vehicle is required to have OBD II and a connection
port to allow access to information related to the
performance of your emissions controls. Authorized
service technicians may need to access this information to
assist with the diagnosis and service of your vehicle and
emissions system
Úpage 106.
EMISSIONS INSPECTION AND
MAINTENANCE PROGRAMS
In some localities, it may be a legal requirement to pass an
inspection of your vehicle's emissions control system.
Failure to pass could prevent vehicle registration.
For states that require an Inspection and
Maintenance (I/M), this check verifies the
Malfunction Indicator Light (MIL) is functioning
and is not on when the engine is running, and
that the OBD II system is ready for testing.
Normally, the OBD II system will be ready. The OBD II
system may not be ready if your vehicle was recently
serviced, recently had a dead battery or a battery
replacement. If the OBD II system should be determined
not ready for the I/M test, your vehicle may fail the test.
Your vehicle has a simple ignition actuated test, which you
can use prior to going to the test station. To check if your
vehicle's OBD II system is ready, you must do the following:
1. Cycle the ignition switch to the ON position, but do not crank or start the engine.
NOTE:If you crank or start the engine, you will have to start this
test over.
2. As soon as you cycle the ignition switch to the ON position, you will see the Malfunction Indicator Light
(MIL) symbol come on as part of a normal bulb check. 3. Approximately 15 seconds later, one of two things will
happen:
The MIL will flash for about 10 seconds and then
return to being fully illuminated until you turn OFF
the ignition or start the engine. This means that
your vehicle's OBD II system is not ready and you
should not proceed to the I/M station.
The MIL will not flash at all and will remain fully illu -
minated until you place the ignition in the off posi -
tion or start the engine. This means that your
vehicle's OBD II system is ready and you can
proceed to the I/M station.
If your OBD II system is not ready, you should see an
authorized dealer or repair facility. If your vehicle was
recently serviced or had a battery failure or replacement,
you may need to do nothing more than drive your vehicle
as you normally would in order for your OBD II system to
update. A recheck with the previously mentioned test
routine may then indicate that the system is now ready.
Regardless of whether your vehicle's OBD II system is
ready or not, if the MIL is illuminated during normal vehicle
operation you should have your vehicle serviced before
going to the I/M station. The I/M station can fail your
vehicle because the MIL is on with the engine running.
WARNING!
ONLY an authorized service technician should
connect equipment to the OBD II connection port in
order to read the VIN, diagnose, or service your
vehicle.
If unauthorized equipment is connected to the OBD II
connection port, such as a driver-behavior tracking
device, it may:
Be possible that vehicle systems, including
safety related systems, could be impaired or a
loss of vehicle control could occur that may
result in an accident involving serious injury or
death.
Access, or allow others to access, information
stored in your vehicle systems, including
personal information.
23_LA_OM_EN_USC_t.book Page 70
Page 74 of 300

72STARTING AND OPERATING
(Continued)
3. If you wish to stop the cranking of the engine prior to
the engine starting, release the ENGINE START/STOP
button.
NOTE:Normal starting of either a cold or a warm engine is
obtained without pumping or pressing the accelerator
pedal.
To Turn On The Engine Using The ENGINE
START/STOP Button — Automatic
Transmission Only
1. The transmission must be in PARK.
2. Press and hold the brake pedal while pushing the ENGINE START/STOP button once.
3. If the vehicle fails to start, the starter will disengage automatically after 10 seconds.
4. If you wish to stop the cranking of the engine prior to the engine starting, push the ENGINE START/STOP
button again.
NOTE:Normal starting of either a cold or a warm engine is
obtained without pumping or pressing the accelerator
pedal.
To Turn Off The Engine The Using ENGINE
START/STOP Button — Manual
Transmission Only
1. With the vehicle stopped, place the gear selector in NEUTRAL, then push and release the ENGINE
START/STOP button.
2. The ignition will return to the OFF position. 3. Place the gear selector in FIRST gear or REVERSE and
then apply the parking brake.
NOTE:
If the ignition switch is left in the ACC position, the
system will automatically time out after 30 minutes of
inactivity and the ignition will switch to the OFF posi -
tion.
If the ignition switch is left in the RUN position, the
system will automatically time out after 30 minutes of
inactivity if the vehicle speed is 0 mph (0 km/h) and
the engine is not running.
If the vehicle speed is above 5 mph (8 km/h), the
ENGINE START/STOP button must be held for two
seconds or three short pushes in a row before the
engine will shut off. The ignition switch position will
remain in the ACC position until the vehicle is stopped,
placed in park and the button is pushed twice to the
OFF position.
To Turn Off The Engine Using The ENGINE
START/STOP Button — Automatic
Transmission Only
1. Place the gear selector in PARK, then push and release the ENGINE START/STOP button.
2. The ignition will return to the OFF position.
3. If the gear selector is not in PARK, the ENGINE START/STOP button must be held for two seconds or
three short pushes in a row with the vehicle speed
above 5 mph (8 km/h) before the engine will shut off.
The ignition will remain in the ACC position until the
gear selector is in PARK and the button is pushed
twice to the OFF position. If the gear selector is not in PARK and the ENGINE
START/STOP button is pushed once, the instrument
cluster will display a “Vehicle Not In Park” message
and the engine will remain running. Never leave a
vehicle out of the PARK position, or it could roll.
NOTE:If the ignition switch is left in the ACC or RUN (engine not
running) position and the transmission is in PARK, the
system will automatically time out after 30 minutes of
inactivity and the ignition will switch to the OFF position.
AUTOPARK
AutoPark is a supplemental feature to assist with placing
the vehicle in PARK should the situations on the following
pages occur. It is a back up system and should not be
relied upon as the primary method by which the driver
shifts the vehicle into PARK.
The conditions under which AutoPark will engage are
outlined on the following pages.
WARNING!
Driver inattention could lead to failure to place the
vehicle in PARK. ALWAYS DO A VISUAL CHECK that
your vehicle is in PARK by verifying that a solid (not
blinking) “P” is indicated in the instrument cluster
display and on the gear selector. If the “P” indicator
is blinking, your vehicle is not in PARK. As an added
precaution, always apply the parking brake when
exiting the vehicle.
23_LA_OM_EN_USC_t.book Page 72
Page 75 of 300
STARTING AND OPERATING73
If the vehicle is not in PARK and the driver turns off the
engine, the vehicle may AutoPark.
AutoPark will engage when all of these conditions are met:
Vehicle is equipped with an 8-speed transmission
Vehicle is not in PARK
Vehicle speed is 1.2 mph (1.9 km/h) or less
Ignition switched from RUN to ACC
NOTE:For Keyless Enter ‘n Go™ equipped vehicles, the engine
will turn off and the ignition switch will change to ACC
position. After 30 minutes, the ignition switches to OFF
automatically, unless the driver turns the ignition switch
OFF.
If the vehicle is not in PARK and the driver exits the vehicle
with the engine running, the vehicle may AutoPark.
AutoPark will engage when all of these conditions are met:
Vehicle is equipped with an 8-speed transmission
Vehicle is not in PARK
Vehicle speed is 1.2 mph (1.9 km/h) or less
Driver’s seat belt is unbuckled
Driver’s door is ajar
Brake pedal is not pressed The message “
AutoPark Engaged Shift to P then Shift to
Gear ” will display in the instrument cluster.
NOTE:In some cases the ParkSense graphic will be displayed in
the instrument cluster. In these cases, the gear selector
must be returned to “P” to select desired gear.
If the driver shifts into PARK while moving, the vehicle may
AutoPark.
AutoPark will engage ONLY when vehicle speed is 1.2 mph
(1.9 km/h) or less.
The message “ Vehicle Speed is Too High to Shift to P ” will
be displayed in the instrument cluster if vehicle speed is
above 1.2 mph (1.9 km/h).
ALWAYS DO A VISUAL CHECK
that your vehicle is in PARK
by looking for the "P" in the instrument cluster display and
on the gear selector. As an added precaution, always apply
the parking brake when exiting the vehicle.
EXTENDED PARK STARTING
NOTE:Extended Park condition occurs when the vehicle has not
been started or driven for at least 30 days.
1. Install a battery charger or jumper cables to the battery to ensure a full battery charge during the
crank cycle.
2. Place the ignition in the START position and release it when the engine starts. For Keyless Enter ‘n Go™
ignition systems, press and hold the brake pedal
while pushing the ENGINE START/STOP button once.
3. If the engine fails to start within 10 seconds, place the ignition in the OFF position, wait 10 to 15 seconds
to allow the starter to cool, then repeat the “Extended
Park Starting” procedure.
4. If the engine fails to start after eight attempts, allow the starter to cool for at least 10 minutes, then repeat
the procedure.
AutoPark is a supplemental feature. It is not
designed to replace the need to shift your vehicle
into PARK. It is a back up system and should not be
relied upon as the primary method by which the
driver shifts the vehicle into PARK.
WARNING!
WARNING!
If vehicle speed is above 1.2 mph (1.9 km/h), the
transmission will default to NEUTRAL until the vehicle
speed drops below 1.2 mph (1.9 km/h). A vehicle left in
the NEUTRAL position can roll. As an added precaution,
always apply the parking brake when exiting the vehicle.
CAUTION!
To prevent damage to the starter, do not crank
continuously for more than 10 seconds at a time. Wait
10 to 15 seconds before trying again.
4
23_LA_OM_EN_USC_t.book Page 73
Page 76 of 300

74STARTING AND OPERATING
IF ENGINE FAILS TO START
If the engine fails to start after you have followed the
“Normal Starting” and the vehicle has not experienced an
extended park condition as defined previously, it may be
flooded. Push the accelerator pedal all the way to the floor
and hold it there. Crank the engine for no more than
10 seconds. This should clear any excess fuel in case the
engine is flooded. Leave the ignition key in the ON/RUN
position, release the accelerator pedal and repeat the
“Normal Starting” procedure.
COLD WEATHER OPERATION
(BELOW –22°F OR −30°C)
To ensure reliable starting at these temperatures, use of
an externally powered electric engine block heater
(available from an authorized dealer) is recommended.
AFTER STARTING
The idle speed is controlled automatically, and it will
decrease as the engine warms up.
ENGINE BREAK-IN RECOMMENDATIONS —
3.6L & 5.7L
A long break-in period is not required for the drivetrain
(engine, transmission, clutch, and rear axle) in your new
vehicle.
Drive moderately during the first 300 miles (500 km).
After the initial 60 miles (100 km), speeds up to 50 or
55 mph (80 or 90 km/h) are desirable.
While cruising, brief full-throttle acceleration within the
limits of local traffic laws contributes to a good break-in.
However, wide-open throttle acceleration in low gear can
be detrimental and should be avoided. The engine oil, transmission fluid, and axle lubricant
installed at the factory are high-quality and
energy-conserving. Oil, fluid, and lubricant changes should
be consistent with anticipated climate and conditions
under which vehicle operations will occur. For the
recommended viscosity and quality grades
Úpage 278.
NOTE:A new engine may consume some oil during its first few
thousand miles (kilometers) of operation. This should be
considered a normal part of the break-in and not inter
-
preted as an indication of difficulty. Please check your oil
level with the engine oil indicator often during the break in
period. Add oil as required.
PARKING BRAKE
Before leaving the vehicle, make sure that the parking
brake is fully applied and place the gear selector in the
PARK or REVERSE (manual transmission only) position.
When the parking brake is applied and the ignition switch
is in the ON/RUN position, the Brake Warning Light in the
instrument cluster will illuminate.
WARNING!
Never pour fuel or other flammable liquid into the
throttle body air inlet opening in an attempt to start
the vehicle. This could result in flash fire causing
serious personal injury.
Do not attempt to push or tow your vehicle to get it
started. Vehicles equipped with an automatic trans -
mission cannot be started this way. Unburned fuel
could enter the catalytic converter and once the
engine has started, ignite and damage the converter
and vehicle.
If the vehicle has a discharged battery, booster
cables may be used to obtain a start from a booster
battery or the battery in another vehicle. This type of
start can be dangerous if done improperly
Úpage 216.
CAUTION!
To prevent damage to the starter, do not continuously
crank the engine for more than 10 seconds at a time.
Wait 10 to 15 seconds before trying again.
CAUTION!
Never use Non-Detergent Oil or Straight Mineral Oil in
the engine or damage may result.
23_LA_OM_EN_USC_t.book Page 74
Page 80 of 300
78STARTING AND OPERATING
(Continued)
(Continued)
AUTOMATIC TRANSMISSION —
IF EQUIPPED
You must press and hold the brake pedal while shifting out
of PARK.
IGNITION PARK INTERLOCK
This vehicle is equipped with an Ignition Park Interlock
which requires the transmission to be in PARK before the
ignition can be turned to the OFF position. This helps the
driver avoid inadvertently leaving the vehicle without
placing the transmission in PARK. This system also locks
the transmission in PARK whenever the ignition is in the
OFF position.
NOTE:The transmission is NOT locked in PARK when the ignition
is in the ACC position (even though the engine will be off).
Ensure that the transmission is in PARK, and the ignition
is
OFF (not in ACC position) before exiting the vehicle.
WARNING!
Never use the PARK position as a substitute for the
parking brake. Always apply the parking brake fully
when exiting the vehicle to guard against vehicle
movement and possible injury or damage.
Your vehicle could move and injure you and others if
it is not in PARK. Check by trying to move the trans -
mission gear selector out of PARK with the brake
pedal released. Make sure the transmission is in
PARK before exiting the vehicle.
The transmission may not engage PARK if the vehicle
is moving. Always bring the vehicle to a complete
stop before shifting to PARK, and verify that the
transmission gear position indicator solidly indicates
PARK (P) without blinking. Ensure that the vehicle is
completely stopped, and the PARK position is prop -
erly indicated, before exiting the vehicle.
It is dangerous to shift out of PARK or NEUTRAL if the
engine speed is higher than idle speed. If your foot is
not firmly pressing the brake pedal, the vehicle could
accelerate quickly forward or in reverse. You could
lose control of the vehicle and hit someone or some -
thing. Only shift into gear when the engine is idling
normally and your foot is firmly pressing the brake
pedal.
Unintended movement of a vehicle could injure
those in or near the vehicle. As with all vehicles, you
should never exit a vehicle while the engine is
running. Before exiting a vehicle, always come to a
complete stop, then apply the parking brake, shift
the transmission into PARK, and turn the ignition
OFF. When the ignition is in the OFF position, the
transmission is locked in PARK, securing the vehicle
against unwanted movement.
When exiting the vehicle, always make sure the igni -
tion is in the OFF position, remove the key fob from
the vehicle, and lock the vehicle.
Never leave children alone in a vehicle, or with
access to an unlocked vehicle. Allowing children to
be in a vehicle unattended is dangerous for a
number of reasons. A child or others could be seri -
ously or fatally injured. Children should be warned
not to touch the parking brake, brake pedal or the
transmission gear selector.
WARNING!
Do not leave the key fob in or near the vehicle (or in
a location accessible to children), and do not leave
the ignition in the ACC or ON/RUN position. A child
could operate power windows, other controls, or
move the vehicle.
CAUTION!
Shift into or out of PARK or REVERSE only after the
vehicle has come to a complete stop.
Do not shift between PARK, REVERSE, NEUTRAL, or
DRIVE when the engine is above idle speed.
Before shifting into any gear, make sure your foot is
firmly pressing the brake pedal.
WARNING!
23_LA_OM_EN_USC_t.book Page 78
Page 82 of 300
80STARTING AND OPERATING
(Continued)
When exiting the vehicle, always:
Apply the parking brake.
Shift the transmission into PARK.
Turn the ignition OFF.
Remove the key fob from the vehicle.
The following indicators should be used to ensure that you
have properly engaged the transmission into the PARK
position:
When shifting into PARK, push the lock button on the
gear selector and firmly move the selector all the way
forward until it stops and is fully seated.
Look at the transmission gear position display and
verify that it indicates the PARK position (P), and is not
blinking.
With the brake pedal released, verify that the gear
selector will not move out of PARK.
REVERSE (R)
This range is for moving the vehicle backward. Shift into
REVERSE only after the vehicle has come to a complete
stop.
NEUTRAL (N)
Use this range when the vehicle is standing for prolonged
periods with the engine running. Apply the parking brake
and shift the transmission into PARK if you must exit the
vehicle.
WARNING!
Never use the PARK position as a substitute for the
parking brake. Always apply the parking brake fully
when exiting the vehicle to guard against vehicle move -
ment and possible injury or damage.
Your vehicle could move and injure you and others if it
is not in PARK. Check by trying to move the transmis -
sion gear selector out of PARK with the brake pedal
released. Make sure the transmission is in PARK
before exiting the vehicle.
The transmission may not engage PARK if the vehicle is
moving. Always bring the vehicle to a complete stop
before shifting to PARK, and verify that the transmis -
sion gear position indicator solidly indicates PARK (P)
without blinking. Ensure that the vehicle is completely
stopped, and the PARK position is properly indicated,
before exiting the vehicle.
It is dangerous to shift out of PARK or NEUTRAL if the
engine speed is higher than idle speed. If your foot is
not firmly pressing the brake pedal, the vehicle could
accelerate quickly forward or in reverse. You could lose
control of the vehicle and hit someone or something.
Only shift into gear when the engine is idling normally
and your foot is firmly pressing the brake pedal.
Unintended movement of a vehicle could injure
those in or near the vehicle. As with all vehicles, you
should never exit a vehicle while the engine is
running. Before exiting a vehicle, always come to a
complete stop, then apply the parking brake, shift
the transmission into PARK, and turn the ignition
OFF. When the ignition is in the OFF position, the
transmission is locked in PARK, securing the vehicle
against unwanted movement.
When exiting the vehicle, always make sure the igni -
tion is in the OFF position, remove the key fob from
the vehicle, and lock the vehicle.
Never leave children alone in a vehicle, or with
access to an unlocked vehicle. Allowing children to
be in a vehicle unattended is dangerous for a
number of reasons. A child or others could be seri -
ously or fatally injured. Children should be warned
not to touch the parking brake, brake pedal or the
transmission gear selector.
Do not leave the key fob in or near the vehicle (or in
a location accessible to children), and do not leave
the ignition in the ACC or ON/RUN position. A child
could operate power windows, other controls, or
move the vehicle.
WARNING!CAUTION!
Before moving the transmission gear selector out of
PARK, you must start the engine, and also press the
brake pedal. Otherwise, damage to the gear selector
could result.
DO NOT race the engine when shifting from PARK or
NEUTRAL into another gear range, as this can
damage the drivetrain.
23_LA_OM_EN_USC_t.book Page 80
Page 99 of 300

STARTING AND OPERATING97
Fuel Filler Cap
NOTE:When removing the fuel filler cap, lay the cap tether in the
hook, located on the fuel filler door.
3. Fully insert the gasoline nozzle into the filler pipe.
4. Fill the vehicle with fuel.
NOTE:
When the fuel nozzle “clicks” or shuts off, the fuel
tank is full.
Wait five seconds before removing the fuel nozzle
to allow excess fuel to drain from the nozzle.
5. Remove gasoline nozzle, reinstall fuel cap and close fuel filler door.
NOTE:
When the fuel nozzle “clicks” or shuts off, the fuel tank
is full.
Tighten the gas cap until you hear a “clicking” sound.
This is an indication that the gas cap is tightened prop -
erly. The MIL in the instrument cluster may turn on if
the gas cap is not secured properly. Make sure that the
gas cap is tightened each time the vehicle is refueled.
LOOSE FUEL FILLER CAP MESSAGE
If the vehicle diagnostic system determines that the fuel
filler cap is loose, improperly installed, or damaged, a
“gASCAP” message will display in the odometer or a
“Check Gascap” message will display in the instrument
cluster. If this occurs, tighten the fuel filler cap properly
and press the Trip Odometer button to turn off the
message. If the problem continues, the message will
appear the next time the vehicle is started.
A loose, improperly installed, or damaged fuel filler cap
may also turn on the MIL.
VEHICLE LOADING
The load carrying capacity of your vehicle is shown on the
“Vehicle Certification Label”. This information should be
used for passenger and luggage loading as indicated.
Do not exceed the specified Gross Vehicle Weight Rating
(GVWR) or the Gross Axle Weight Rating (GAWR).
WARNING!
Never have any smoking materials lit in or near the
vehicle when the fuel door is open or the tank is
being filled.
Never add fuel when the engine is running. This is in
violation of most state and federal fire regulations
and may cause the Malfunction Indicator Light to
turn on.
A fire may result if fuel is pumped into a portable
container that is inside of a vehicle. You could be
burned. Always place fuel containers on the ground
while filling.
CAUTION!
Damage to the fuel system or emissions control
system could result from using an improper fuel tank
filler tube cap.
A poorly fitting fuel filler cap could let impurities into
the fuel system.
A poorly fitting fuel filler cap may cause the
Malfunction Indicator Light (MIL) to turn on.
To avoid fuel spillage and overfilling, do not “top off”
the fuel tank after filling. When the fuel nozzle
“clicks” or shuts off, the fuel tank is full.
4
23_LA_OM_EN_USC_t.book Page 97
Page 104 of 300

102STARTING AND OPERATING
Perform the maintenance listed in the “Scheduled
Servicing” Úpage 223. When towing a trailer, never
exceed the GAWR or GCWR ratings.
Towing Requirements — Tires
Do not attempt to tow a trailer while using a compact
spare tire.
Do not drive more than 50 mph (80 km/h) when towing
while using a full size spare tire.
Proper tire inflation pressures are essential to the safe
and satisfactory operation of your vehicle. For proper
tire inflation procedures.
Check the trailer tires for proper tire inflation pressures
before trailer usage.
Check for signs of tire wear or visible tire damage
before towing a trailer.
Replacing tires with a higher load carrying capacity will
not increase the vehicle's GVWR and GAWR limits.
For further information
Úpage 253.
Towing Requirements — Trailer Brakes
Do not interconnect the hydraulic brake system or
vacuum system of your vehicle with that of the trailer.
This could cause inadequate braking and possible
personal injury.
An electronically actuated trailer brake controller is
required when towing a trailer with electronically actu -
ated brakes. When towing a trailer equipped with a
hydraulic surge actuated brake system, an electronic
brake controller is not required.
Trailer brakes are recommended for trailers over
1,000 lb (453 kg) and required for trailers in excess of
2,000 lb (907 kg).
Towing Requirements — Trailer Lights And
Wiring
Whenever you pull a trailer, regardless of the trailer size,
stoplights and turn signals on the trailer are required for
motoring safety.
The Trailer Tow Package may include a four- and seven-pin
wiring harness. Use a factory approved trailer harness and
connector.
NOTE:Do not cut or splice wiring into the vehicle’s wiring
harness.
CAUTION!
Do not tow a trailer at all during the first 500 miles
(805 km) the new vehicle is driven. The engine, axle
or other parts could be damaged.
Then, during the first 500 miles (805 km) that a
trailer is towed, do not drive over 50 mph (80 km/h)
and do not make starts at full throttle. This helps the
engine and other parts of the vehicle wear in at the
heavier loads.
WARNING!
Do not connect trailer brakes to your vehicle's
hydraulic brake lines. It can overload your brake
system and cause it to fail. You might not have
brakes when you need them and could have an acci -
dent.
Towing any trailer will increase your stopping
distance. When towing, you should allow for addi -
tional space between your vehicle and the vehicle in
front of you. Failure to do so could result in an
accident.
CAUTION!
If the trailer weighs more than 1,000 lb (453 kg)
loaded, it should have its own brakes and they should
be of adequate capacity. Failure to do this could lead to
accelerated brake lining wear, higher brake pedal
effort, and longer stopping distances.
23_LA_OM_EN_USC_t.book Page 102
Page 107 of 300
STARTING AND OPERATING105
(Continued)
DRIVING THROUGH WATER
Driving through water more than a few inches/
centimeters deep will require extra caution to ensure
safety and prevent damage to your vehicle.
Flowing/Rising Water
Shallow Standing Water
Although your vehicle is capable of driving through shallow
standing water, consider the following Warnings and
Cautions before doing so.
WARNING!
Do not drive on or across a road or path where water is
flowing and/or rising (as in storm run-off). Flowing water
can wear away the road or path's surface and cause
your vehicle to sink into deeper water. Furthermore,
flowing and/or rising water can carry your vehicle away
swiftly. Failure to follow this warning may result in
injuries that are serious or fatal to you, your
passengers, and others around you.
WARNING!
Driving through standing water limits your vehicle’s
traction capabilities. Do not exceed 5 mph (8 km/h)
when driving through standing water.
Driving through standing water limits your vehicle’s
braking capabilities, which increases stopping
distances. Therefore, after driving through standing
water, drive slowly and lightly press on the brake
pedal several times to dry the brakes.
Failure to follow these warnings may result in injuries
that are serious or fatal to you, your passengers, and
others around you.
CAUTION!
Always check the depth of the standing water before
driving through it. Never drive through standing
water that is deeper than the bottom of the tire rims
mounted on the vehicle.
Determine the condition of the road or the path that
is under water and if there are any obstacles in the
way before driving through the standing water.
Do not exceed 5 mph (8 km/h) when driving through
standing water. This will minimize wave effects.
Driving through standing water may cause damage
to your vehicle’s drivetrain components. Always
inspect your vehicle’s fluids (i.e., engine oil, transmis -
sion, axle, etc.) for signs of contamination (i.e., fluid
that is milky or foamy in appearance) after driving
through standing water. Do not continue to operate
the vehicle if any fluid appears contaminated, as this
may result in further damage. Such damage is not
covered by the New Vehicle Limited Warranty.
Getting water inside your vehicle’s engine can cause
it to lock up and stall out, and cause serious internal
damage to the engine. Such damage is not covered
by the New Vehicle Limited Warranty.
CAUTION!
4
23_LA_OM_EN_USC_t.book Page 105
Page 151 of 300
MULTIMEDIA149
3. After selecting a widget location, select the gauge to
display:
Gauge: Oil Temp
Gauge: Oil Pressure
Gauge: Coolant Temp
Gauge: Battery Voltage
Gauge: Trans Temp — If Equipped with an Auto -
matic Transmission
Gauge: Boost Pressure — If Equipped
Gauge: Air/Fuel Ratio — If Equipped
Gauge: I/C Coolant Temp — If Equipped
Gauge: Intake Air Temp
Gauge: Engine Torque
Gauge: Engine Power
Gauge: G-Force
Gauge: Steering Angle
Gauge: Current Gear
Gauge: Current Speed
Timer: 0–60 mph (0–100 km/h)
Timer: 0–100 mph (0–160 km/h)
Timer: 60 ft (20 m)
Timer: 330 ft (100 m)
Timer: 1/8 Mile (200 m)
Timer: 1000 ft (300 m)
Timer: 1/4 Mile (400 m)
Timer: Braking Distance
Timer: Reaction Time
Historical Data
The Historical Data feature allows you to view information
about your vehicle such as the VIN, miles on the odometer,
longitude and latitude coordinates, and more.
To activate the Historical Data feature on your
touchscreen, follow these steps:
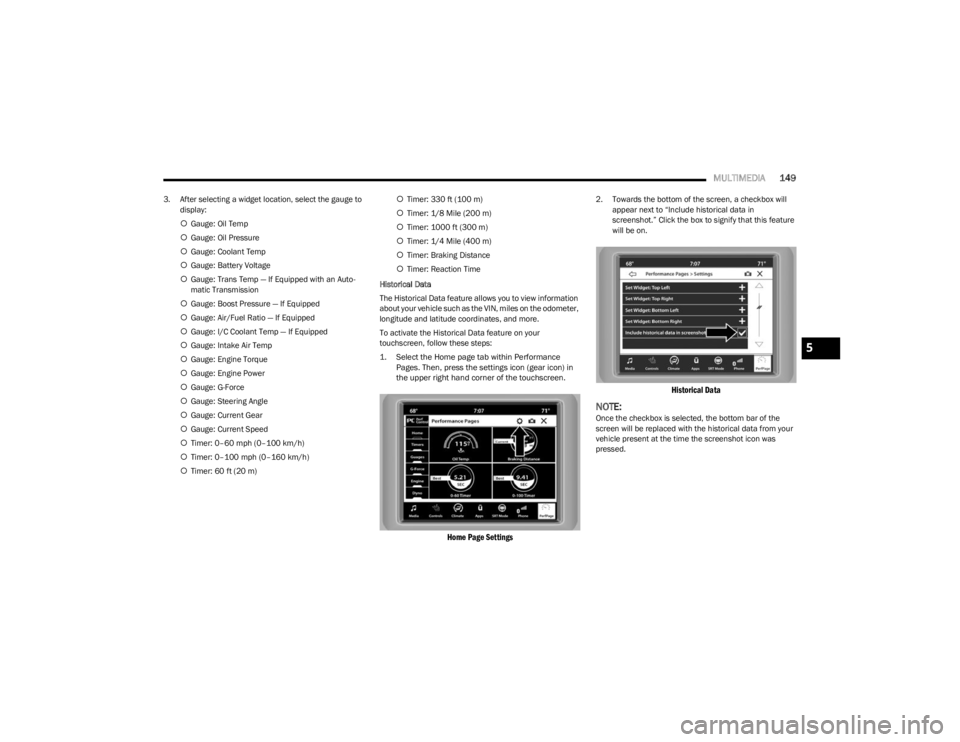
1. Select the Home page tab within Performance Pages. Then, press the settings icon (gear icon) in
the upper right hand corner of the touchscreen.
Home Page Settings
2. Towards the bottom of the screen, a checkbox will appear next to “Include historical data in
screenshot.” Click the box to signify that this feature
will be on.
Historical Data
NOTE:Once the checkbox is selected, the bottom bar of the
screen will be replaced with the historical data from your
vehicle present at the time the screenshot icon was
pressed.
5
23_LA_OM_EN_USC_t.book Page 149