service DODGE CHALLENGER 2023 Owner's Manual
[x] Cancel search | Manufacturer: DODGE, Model Year: 2023, Model line: CHALLENGER, Model: DODGE CHALLENGER 2023Pages: 300, PDF Size: 12.82 MB
Page 83 of 300
STARTING AND OPERATING81
DRIVE (D)
This range should be used for most city and highway
driving. It provides the smoothest upshifts and downshifts,
and the best fuel economy. The transmission
automatically upshifts through all forward gears.
When frequent transmission shifting occurs (such as
when operating the vehicle under heavy loading
conditions, in hilly terrain, traveling into strong head
winds, or while towing a heavy trailer), use the AutoStick
shift control to select a lower gear
Úpage 82. Under
these conditions, using a lower gear will improve
performance and extend transmission life by reducing
excessive shifting and heat buildup. During cold temperatures, transmission operation may be
modified depending on engine and transmission
temperature as well as vehicle speed. This feature
improves warm up time of the engine and transmission to
achieve maximum efficiency. Engagement of the torque
converter clutch is inhibited until the transmission fluid is
warm. Normal operation will resume once the
transmission temperature has risen to a suitable level.
MANUAL (M)
The MANUAL (M, +/-) position (beside the DRIVE position)
enables full manual control of transmission shifting (also
known as AutoStick mode
Úpage 82. Toggling the gear
selector forward (-) or rearward (+) while in the MANUAL
(AutoStick) position will manually select the transmission
gear, and will display the current gear in the instrument
cluster as M1, M2, M3, etc.
Transmission Limp Home Mode
Transmission function is monitored electronically for
abnormal conditions. If a condition is detected that could
result in transmission damage, Transmission Limp Home
Mode is activated. In this mode, the transmission may
operate only in certain gears, or may not shift at all.
Vehicle performance may be severely degraded and the
engine may stall. In some situations, the transmission may
not re-engage if the engine is turned off and restarted. The
Malfunction Indicator Light (MIL) may be illuminated. A
message in the instrument cluster will inform the driver of
the more serious conditions, and indicate what actions
may be necessary. In the event of a momentary problem, the transmission
can be reset to regain all forward gears by performing the
following steps:
NOTE:In cases where the instrument cluster message indicates
the transmission may not re-engage after engine
shutdown, perform this procedure only in a desired
location (preferably, at an authorized dealer).
1. Stop the vehicle.
2. Shift the transmission into PARK, if possible. If not,
shift the transmission to NEUTRAL.
3. Push and hold the ignition switch until the engine turns off.
4. Wait approximately 30 seconds.
5. Restart the engine.
6. Shift into the desired gear range. If the problem is no longer detected, the transmission will return to
normal operation.
NOTE:Even if the transmission can be reset, we recommend that
you visit an authorized dealer at your earliest possible
convenience. An authorized dealer has diagnostic
equipment to assess the condition of your transmission.
If the transmission cannot be reset, authorized dealer
service is required.
WARNING!
Do not coast in NEUTRAL and never turn off the ignition
to coast down a hill. These are unsafe practices that
limit your response to changing traffic or road
conditions. You might lose control of the vehicle and
have a collision.
CAUTION!
Towing the vehicle, coasting, or driving for any other
reason with the transmission in NEUTRAL can cause
severe transmission damage.
For Recreational Towing
Úpage 104.
For Towing A Disabled Vehicle
Úpage 221.
4
23_LA_OM_EN_USC_t.book Page 81
Page 85 of 300
STARTING AND OPERATING83
You can start out, from a stop, in FIRST or SECOND
gear. Tapping (+) (at a stop) will allow starting in
SECOND gear. Starting out in SECOND gear can be
helpful in snowy or icy conditions.
If a requested downshift would cause the engine to
overspeed, that shift will not occur and an indication
will display.
The system will ignore attempts to upshift at too low of
a vehicle speed and an indication will display.
Holding the (-) paddle pressed (if equipped), or holding
the gear selector in the (-) position, will downshift the
transmission to the lowest gear possible at the current
speed.
Transmission shifting will be more noticeable when
AutoStick is enabled.
The system may revert to automatic shift mode if a
fault or overheat condition is detected.
To disengage AutoStick mode, return the gear selector to
the DRIVE position, or press and hold the (+) shift paddle
(if equipped, and the gear selector is already in DRIVE)
until “D” is once again indicated in the instrument cluster.
You can shift in or out of the AutoStick mode at any time
without taking your foot off the accelerator pedal.SPORT MODE — WITHOUT PERFORMANCE
CONTROL
Your vehicle is equipped with a SPORT Mode feature. This
mode is a configuration set up for typical enthusiast
driving. The engine, transmission (when equipped with
automatic transmission), and steering systems are all set
to their SPORT settings. SPORT Mode will provide
improved throttle response and modified shifting for an
enhanced driving experience, as well the greatest amount
of steering feel. This mode may be activated and
deactivated by pushing the SPORT button on the
instrument panel switch bank.
NOTE:If equipped with a manual transmission, the 1 - 4 Skip
Shift feature is disabled in SPORT Mode.
FUEL SAVER TECHNOLOGY 5.7L —
IF EQUIPPED
This feature offers improved fuel economy by shutting off
four of the engine's eight cylinders during light load and
cruise conditions. The system is automatic with no driver
inputs or additional driving skills required. When the
system is active, an indication will display within the
instrument cluster “Fuel Economy” main menu screen.
NOTE:This system may take some time to return to full function -
ality after a battery disconnect.
ELECTRIC POWER STEERING
The electric power steering system provides increased
vehicle response and ease of maneuverability. The system
adapts to different driving conditions. If the electric
steering system experiences a fault that prevents it from
providing assist, you will still have the ability to steer the
vehicle manually.
Alternate electric power steering efforts can be selected
through the Uconnect System
Úpage 107.
If the Electric Power Steering Fault Warning Light is
displayed and the “SERVICE POWER STEERING” or the
“POWER STEERING ASSIST OFF – SERVICE SYSTEM”
message is displayed within the instrument cluster
display, this indicates the vehicle needs to be taken to the
dealer for service
Úpage 63.
NOTE:
Even if the power steering system is no longer opera -
tional, it is still possible to steer the vehicle. Under
these conditions there will be a substantial increase in
steering effort, especially at low speeds and during
parking maneuvers.
If the condition persists, see an authorized dealer for
service.WARNING!
Do not downshift for additional engine braking on a
slippery surface. The drive wheels could lose their grip
and the vehicle could skid, causing a collision or
personal injury.
WARNING!
Continued operation with reduced assist could pose a
safety risk to yourself and others. Service should be
obtained as soon as possible.4
23_LA_OM_EN_USC_t.book Page 83
Page 92 of 300
90STARTING AND OPERATING
Display Warnings And Maintenance
“WIPE FRONT RADAR SENSOR IN FRONT OF
VEHICLE” WARNING
The “ACC/FCW Unavailable Wipe Front Radar Sensor”
warning will display and a chime will sound when
conditions temporarily limit system performance.
This most often occurs at times of poor visibility, such as
in snow or heavy rain. The ACC system may also become
temporarily blinded due to obstructions, such as mud, dirt
or ice. In these cases, the instrument cluster display will
display “ACC/FCW Unavailable Wipe Front Radar Sensor”
and the system will deactivate.
The “ACC/FCW Unavailable Wipe Front Radar Sensor”
message can sometimes be displayed while driving in
highly reflective areas (i.e. tunnels with reflective tiles, or
ice and snow). The ACC system will recover after the
vehicle has left these areas. Under rare conditions, when
the radar is not tracking any vehicles or objects in its path
this warning may temporarily occur.
NOTE:If the “ACC/FCW Unavailable Wipe Front Radar Sensor”
warning is active, Fixed Speed Cruise Control is still
available.
If weather conditions are not a factor, the driver should
examine the sensor. It may require cleaning or removal of
an obstruction. The sensor is located in the center of the
vehicle behind the lower grille. To keep the ACC system operating properly, it is important
to note the following maintenance items:
Always keep the sensor clean. Carefully wipe the
sensor lens with a soft cloth. Be cautious not to
damage the sensor lens.
Do not remove any screws from the sensor. Doing so
could cause an ACC system malfunction or failure and
require a sensor realignment.
If the sensor or front end of the vehicle is damaged due
to a collision, see an authorized dealer for service.
Do not attach or install any accessories near the
sensor, including transparent material or aftermarket
grilles. Doing so could cause an ACC system failure or
malfunction.
When the condition that deactivated the system is no
longer present, the system will return to the “Adaptive
Cruise Control Off” state and will resume function by
simply reactivating it.
NOTE:
If the “ACC/FCW Unavailable Wipe Front Radar Sensor”
message occurs frequently (e.g. more than once on
every trip) without any snow, rain, mud, or other
obstruction, have the radar sensor realigned at an
authorized dealer.
Installing a snow plow, front-end protector, an after -
market grille or modifying the grille is not recom -
mended. Doing so may block the sensor and inhibit
ACC/FCW operation.
SERVICE ACC/FCW WARNING
If the system turns off, and the instrument cluster displays
“ACC/FCW Unavailable Service Required” or “Cruise/FCW
Unavailable Service Required”, there may be an internal
system fault or a temporary malfunction that limits ACC
functionality. Although the vehicle is still drivable under
normal conditions, ACC will be temporarily unavailable.
If this occurs, try activating ACC again later, following an
ignition cycle. If the problem persists, see an authorized
dealer.
Precautions While Driving With ACC
In certain driving situations, ACC may have detection
issues. In these cases, ACC may brake late or
unexpectedly. The driver needs to stay alert and may need
to intervene. The following are examples of these types of
situations:
TOWING A TRAILER
Towing a trailer is not recommended when using ACC.
23_LA_OM_EN_USC_t.book Page 90
Page 96 of 300
94STARTING AND OPERATING
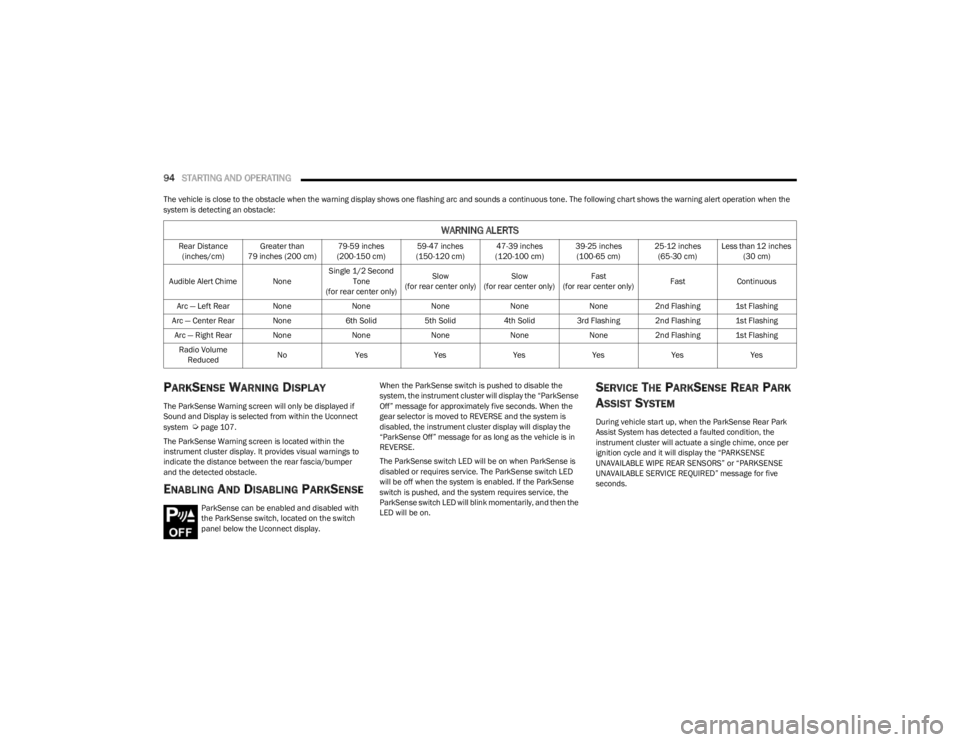
The vehicle is close to the obstacle when the warning display shows one flashing arc and sounds a continuous tone. The following chart shows the warning alert operation when the
system is detecting an obstacle:
PARKSENSE WARNING DISPLAY
The ParkSense Warning screen will only be displayed if
Sound and Display is selected from within the Uconnect
system
Úpage 107.
The ParkSense Warning screen is located within the
instrument cluster display. It provides visual warnings to
indicate the distance between the rear fascia/bumper
and the detected obstacle.
ENABLING AND DISABLING PARKSENSE
ParkSense can be enabled and disabled with
the ParkSense switch, located on the switch
panel below the Uconnect display. When the ParkSense switch is pushed to disable the
system, the instrument cluster will display the “ParkSense
Off” message for approximately five seconds. When the
gear selector is moved to REVERSE and the system is
disabled, the instrument cluster display will display the
“ParkSense Off” message for as long as the vehicle is in
REVERSE.
The ParkSense switch LED will be on when ParkSense is
disabled or requires service. The ParkSense switch LED
will be off when the system is enabled. If the ParkSense
switch is pushed, and the system requires service, the
ParkSense switch LED will blink momentarily, and then the
LED will be on.
SERVICE THE PARKSENSE REAR PARK
A
SSIST SYSTEM
During vehicle start up, when the ParkSense Rear Park
Assist System has detected a faulted condition, the
instrument cluster will actuate a single chime, once per
ignition cycle and it will display the “PARKSENSE
UNAVAILABLE WIPE REAR SENSORS” or “PARKSENSE
UNAVAILABLE SERVICE REQUIRED” message for five
seconds.
WARNING ALERTS
Rear Distance
(inches/cm) Greater than
79 inches (200 cm) 79-59 inches
(200-150 cm) 59-47 inches
(150-120 cm) 47-39 inches
(120-100 cm) 39-25 inches
(100-65 cm) 25-12 inches
(65-30 cm) Less than 12 inches
(30 cm)
Audible Alert Chime None Single 1/2 Second
Tone
(for rear center only) Slow
(for rear center only) Slow
(for rear center only) Fast
(for rear center only) Fast
Continuous
Arc — Left Rear NoneNoneNoneNoneNone2nd Flashing 1st Flashing
Arc — Center Rear None 6th Solid5th Solid4th Solid3rd Flashing 2nd Flashing 1st Flashing
Arc — Right Rear None NoneNoneNoneNone2nd Flashing 1st Flashing
Radio Volume Reduced No
Yes YesYesYesYesYes
23_LA_OM_EN_USC_t.book Page 94
Page 97 of 300
STARTING AND OPERATING95
When the gear selector is moved to REVERSE and the
system has detected a faulted condition, the instrument
cluster display will display the “PARKSENSE UNAVAILABLE
WIPE REAR SENSORS” or “PARKSENSE UNAVAILABLE
SERVICE REQUIRED” message for as long as the vehicle is
in REVERSE. Under this condition, ParkSense will not
operate.
If “PARKSENSE UNAVAILABLE WIPE REAR SENSORS”
appears in the instrument cluster display, make sure the
outer surface and the inside of the rear fascia/bumper is
clean and clear of snow, ice, mud, dirt or other
obstruction, and then cycle the ignition. If the message
continues to appear see an authorized dealer.
If “PARKSENSE UNAVAILABLE SERVICE REQUIRED”
appears in the instrument cluster display, see an
authorized dealer.
CLEANING THE PARKSENSE SYSTEM
Clean the Rear Park Assist sensors with water, car wash
soap and a soft cloth. Do not use rough or hard cloths. In
washing stations, clean sensors quickly keeping the vapor
jet/high pressure washing nozzles at least 4 inches (10
cm) from the sensors. Do not scratch or poke the sensors.
Otherwise, you could damage the sensors.
PARKSENSE SYSTEM USAGE
P
RECAUTIONS
Ensure that the rear fascia/bumper is free of snow, ice,
mud, dirt and debris to keep the ParkSense system
operating properly.
Jackhammers, large trucks, and other vibrations could
affect the performance of ParkSense or render the
system temporarily unavailable.
When you turn ParkSense off in DRIVE, the instrument
cluster will display "PARKSENSE OFF" for five seconds.
Furthermore, once you turn ParkSense off, it remains
off until you turn it on again, even if you cycle the igni -
tion.
When you move the gear selector to the REVERSE posi -
tion and ParkSense is turned off, the instrument
cluster display will show the “PARKSENSE OFF”
message for as long as the vehicle is in REVERSE.
ParkSense will reduce the volume of the radio when it
is sounding an audio tone.
Clean the ParkSense sensors regularly, taking care not
to scratch or damage them. The sensors must not be
covered with ice, snow, slush, mud, dirt or debris.
Failure to do so can result in the system not working
properly. The ParkSense system might not detect an
obstacle behind the fascia/bumper, or it could provide
a false indication that an obstacle is behind the fascia/
bumper.
Ensure the ParkSense system is off if objects such as
bicycle carriers, trailer hitches, etc., are placed within
12 inches (30 cm) from the rear fascia/bumper.
Failure to do so can result in the system misinter -
preting a close object as a sensor problem, causing the
“PARKSENSE UNAVAILABLE SERVICE REQUIRED”
message to be shown in the instrument cluster display.
WARNING!
Drivers must be careful when backing up even when
using the Rear Park Assist system. Always check
carefully behind your vehicle, and be sure to check for
pedestrians, animals, other vehicles, obstructions, or
blind spots before backing up. You are responsible for
the safety of your surroundings and must continue to
pay attention while backing up. Failure to do so can
result in serious injury or death.
CAUTION!
ParkSense is only a parking aid and it is unable to
recognize every obstacle, including small obstacles.
Parking curbs might be temporarily detected or not
detected at all. Obstacles located above or below the
sensors will not be detected when they are in close
proximity.
The vehicle must be driven slowly when using
ParkSense in order to be able to stop in time when an
obstacle is detected. It is recommended that the
driver looks over his/her shoulder when using
ParkSense.
4
23_LA_OM_EN_USC_t.book Page 95
Page 100 of 300

98STARTING AND OPERATING
VEHICLE CERTIFICATION LABEL
Your vehicle has a Vehicle Certification Label affixed to the
drivers side B-pillar or the rear of the driver’s door.
The label contains the following information:
Name of manufacturer
Month and year of manufacture
Gross Vehicle Weight Rating (GVWR)
Gross Axle Weight Rating (GAWR) front
Gross Axle Weight Rating (GAWR) rear
Vehicle Identification Number (VIN)
Type of vehicle
Month, Day, and Hour of manufacture (MDH)
The bar code allows a computer scanner to read the VIN.
GROSS VEHICLE WEIGHT RATING
(GVWR)
The GVWR is the total allowable weight of your vehicle.
This includes driver, passengers, and cargo. The total load
must be limited so that you do not exceed the GVWR.
GROSS AXLE WEIGHT RATING (GAWR)
The GAWR is the maximum capacity of the front and rear
axles. Distribute the load over the front and rear axles
evenly. Make sure that you do not exceed either front or
rear GAWR.
OVERLOADING
The load carrying components (axle, springs, tires, wheels,
etc.) of your vehicle will provide satisfactory service as
long as you do not exceed the GVWR and the front and
rear GAWR.
The best way to figure out the total weight of your vehicle
is to weigh it when it is fully loaded and ready for
operation. Weigh it on a commercial scale to ensure that
it is not over the GVWR.
Figure out the weight on the front and rear of the vehicle
separately. It is important that you distribute the load
evenly over the front and rear axles.
Overloading can cause potential safety hazards and
shorten useful service life. Heavier axles or suspension
components do not necessarily increase the vehicle's
GVWR.
LOADING
To load your vehicle properly, first figure out its empty
weight, axle-by-axle and side-by-side. Store heavier items
down low and be sure you distribute their weight as evenly
as possible. Stow all loose items securely before driving. If
weighing the loaded vehicle shows that you have
exceeded either GAWR, but the total load is within the
specified GVWR, you must redistribute the weight.
Improper weight distribution can have an adverse effect
on the way your vehicle steers and handles and the way
the brakes operate.
NOTE:Refer to the “Vehicle Certification Label” affixed to the rear
of the driver's door for your vehicle's GVWR and GAWRs
Úpage 98.
TRAILER TOWING
In this section, you will find safety tips and information on
limits to the type of towing you can reasonably do with your
vehicle. Before towing a trailer, carefully review this
information to tow your load as efficiently and safely as
possible.
To maintain warranty coverage, follow the requirements
and recommendations in this manual concerning vehicles
used for trailer towing.
Manual Transmission — If Equipped
Trailer towing with this vehicle is not recommended.
WARNING!
Because the front wheels steer the vehicle, it is
important that you do not exceed the maximum front or
rear GAWR. A dangerous driving condition can result if
either rating is exceeded. You could lose control of the
vehicle and have a collision.
23_LA_OM_EN_USC_t.book Page 98
Page 125 of 300
MULTIMEDIA123
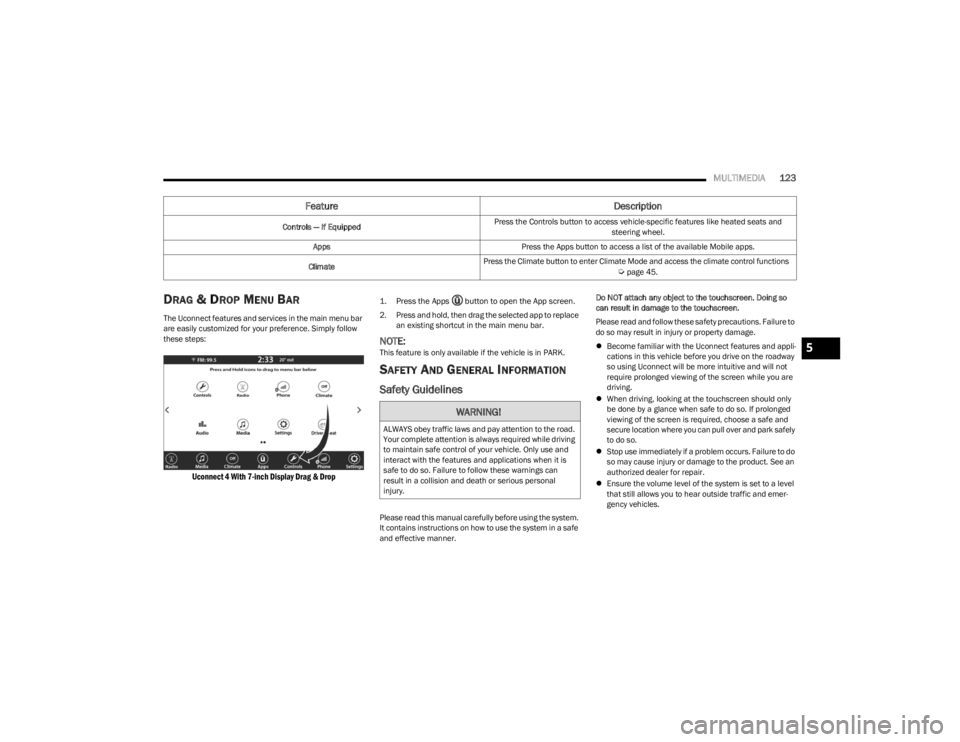
DRAG & DROP MENU BAR
The Uconnect features and services in the main menu bar
are easily customized for your preference. Simply follow
these steps:
Uconnect 4 With 7-inch Display Drag & Drop
1. Press the Apps button to open the App screen.
2. Press and hold, then drag the selected app to replace
an existing shortcut in the main menu bar.
NOTE:This feature is only available if the vehicle is in PARK.
SAFETY AND GENERAL INFORMATION
Safety Guidelines
Please read this manual carefully before using the system.
It contains instructions on how to use the system in a safe
and effective manner. Do NOT attach any object to the touchscreen. Doing so
can result in damage to the touchscreen.
Please read and follow these safety precautions. Failure to
do so may result in injury or property damage.
Become familiar with the Uconnect features and appli -
cations in this vehicle before you drive on the roadway
so using Uconnect will be more intuitive and will not
require prolonged viewing of the screen while you are
driving.
When driving, looking at the touchscreen should only
be done by a glance when safe to do so. If prolonged
viewing of the screen is required, choose a safe and
secure location where you can pull over and park safely
to do so.
Stop use immediately if a problem occurs. Failure to do
so may cause injury or damage to the product. See an
authorized dealer for repair.
Ensure the volume level of the system is set to a level
that still allows you to hear outside traffic and emer -
gency vehicles.
Feature Description
Controls — If EquippedPress the Controls button to access vehicle-specific features like heated seats and
steering wheel.
Apps Press the Apps button to access a list of the available Mobile apps.
Climate Press the Climate button to enter Climate Mode and access the climate control functions
Úpage 45.
WARNING!
ALWAYS obey traffic laws and pay attention to the road.
Your complete attention is always required while driving
to maintain safe control of your vehicle. Only use and
interact with the features and applications when it is
safe to do so. Failure to follow these warnings can
result in a collision and death or serious personal
injury.
5
23_LA_OM_EN_USC_t.book Page 123
Page 128 of 300
126MULTIMEDIA
Direct Tune
Press the Tune button located at the bottom of the radio
screen to directly tune to a desired radio station or
channel.
Press the available number button on the touchscreen to
begin selecting a desired station. Once a number has
been entered, any numbers that are no longer possible
(stations that cannot be reached) will become
deactivated/grayed out.
Undo
You can backspace an entry by pressing the
Back button on the touchscreen.
GO
Once the last digit of a station has been entered, press
“Ok”. The Direct Tune screen will close, and the system will
automatically tune to that station.
RADIO VOICE COMMANDS
Use your voice to quickly get to the AM, FM, or SiriusXM®
Satellite Radio stations you would like to hear.
(Subscription or included SiriusXM® Satellite Radio trial
required.) Push the VR button on the steering wheel and wait for
the beep to say a command. See an example:
“Tune to ninety-five-point-five FM”
“Tune to Satellite Channel Hits 1”
Did You Know: At any time, if you are not sure of what to
say or want to learn a Voice Command, push the VR button
and say “ Help”. The system provides you with a list of
commands.
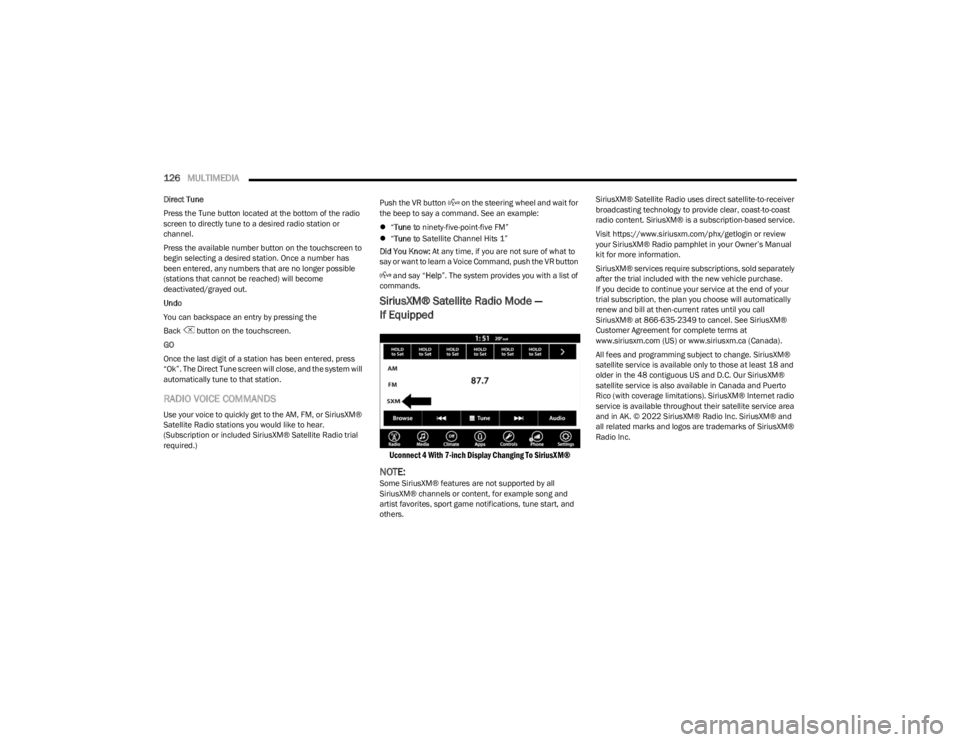
SiriusXM® Satellite Radio Mode —
If Equipped
Uconnect 4 With 7-inch Display Changing To SiriusXM®
NOTE:Some SiriusXM® features are not supported by all
SiriusXM® channels or content, for example song and
artist favorites, sport game notifications, tune start, and
others. SiriusXM® Satellite Radio uses direct satellite-to-receiver
broadcasting technology to provide clear, coast-to-coast
radio content. SiriusXM® is a subscription-based service.
Visit https://www.siriusxm.com/phx/getlogin or review
your SiriusXM® Radio pamphlet in your Owner’s Manual
kit for more information.
SiriusXM® services require subscriptions, sold separately
after the trial included with the new vehicle purchase.
If you decide to continue your service at the end of your
trial subscription, the plan you choose will automatically
renew and bill at then-current rates until you call
SiriusXM® at 866-635-2349 to cancel. See SiriusXM®
Customer Agreement for complete terms at
www.siriusxm.com (US) or www.siriusxm.ca (Canada).
All fees and programming subject to change. SiriusXM®
satellite service is available only to those at least 18 and
older in the 48 contiguous US and D.C. Our SiriusXM®
satellite service is also available in Canada and Puerto
Rico (with coverage limitations). SiriusXM® Internet radio
service is available throughout their satellite service area
and in AK. © 2022 SiriusXM® Radio Inc. SiriusXM® and
all related marks and logos are trademarks of SiriusXM®
Radio Inc.
23_LA_OM_EN_USC_t.book Page 126
Page 129 of 300
MULTIMEDIA127
This functionality is only available for radios equipped with
a Satellite receiver. In order to receive satellite radio, the
vehicle needs to be outside with a clear view to the sky.
If the screen shows “Acquiring Signal”, you might have to
change the vehicle’s position in order to receive a signal.
In most cases, the satellite radio does not receive a signal
in underground parking garages or tunnels.
No Subscription
Radios equipped with a Satellite receiver require a
subscription to the SiriusXM® Service. When the radio
does not have the necessary subscription, the radio is
able to receive the Preview channel only.
Acquiring SiriusXM® Subscription
To activate the SiriusXM® Satellite Radio subscription, US
residents visit https://www.siriusxm.com/phx/getlogin or
call: 1-800-643-2112
Canadian residents visit https://www.siriusxm.ca/ or call:
1-888-539-7474.
NOTE:You will need to provide the SiriusXM® ID (RID) located at
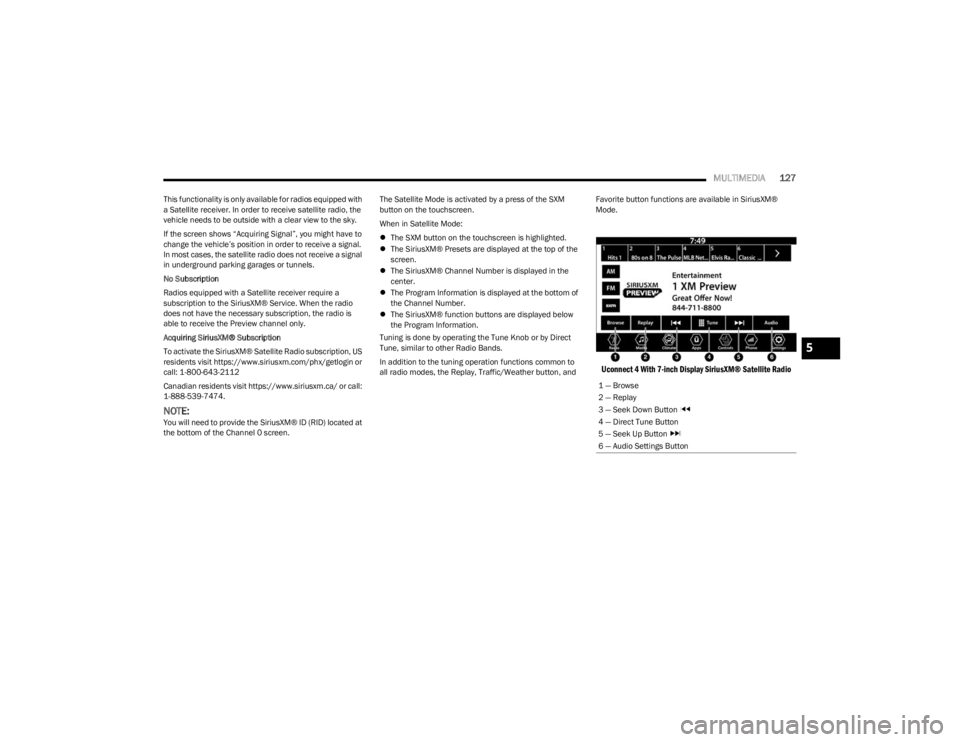
the bottom of the Channel 0 screen. The Satellite Mode is activated by a press of the SXM
button on the touchscreen.
When in Satellite Mode:
The SXM button on the touchscreen is highlighted.
The SiriusXM® Presets are displayed at the top of the
screen.
The SiriusXM® Channel Number is displayed in the
center.
The Program Information is displayed at the bottom of
the Channel Number.
The SiriusXM® function buttons are displayed below
the Program Information.
Tuning is done by operating the Tune Knob or by Direct
Tune, similar to other Radio Bands.
In addition to the tuning operation functions common to
all radio modes, the Replay, Traffic/Weather button, and Favorite button functions are available in SiriusXM®
Mode.
Uconnect 4 With 7-inch Display SiriusXM® Satellite Radio
1 — Browse
2 — Replay
3 — Seek Down Button
4 — Direct Tune Button
5 — Seek Up Button
6 — Audio Settings Button
5
23_LA_OM_EN_USC_t.book Page 127
Page 142 of 300
140MULTIMEDIA
Depending on the maximum number of entries down -
loaded, there may be a short delay before the latest
downloaded names can be used. Until then, if avail -
able, the previously downloaded phonebook is avail -
able for use.
Only the phonebook of the currently connected mobile
phone is accessible.
This downloaded phonebook cannot be edited or
deleted on the Uconnect Phone. These can only be
edited on the mobile phone. The changes are trans -
ferred and updated to Uconnect Phone on the next
phone connection.
MANAGING YOUR FAVORITES — IF EQUIPPED
There are two ways you can add an entry to your favorites:
1. After loading the mobile phonebook, press the Favorites button on the touchscreen, and then press
one of the +Add Favorite Contact buttons that
appears on the list.
2. After loading the mobile phonebook, select “Contacts” from the Phone main screen, and then
select the appropriate number. Press the Down Arrow
button or the Settings Gear button next to the
selected number to display the option’s pop-up. In the
pop-up, select “Add to Favorites”.
NOTE:If the Favorites list is full, you will be asked to remove an
existing favorite.
TO REMOVE A FAVORITE — IF EQUIPPED
1. To remove a Favorite, select “Favorites” from the Phone main screen.
2. Next, select the Down Arrow icon or the Settings Gear icon next to the contact you want to remove from your
favorites. This will bring up the options for that
Favorite contact.
3. Deselect the Star icon to delete the Favorite.
Phone Call Features
The following features can be accessed through the
Uconnect Phone if the feature(s) are available and
supported by Bluetooth® on your mobile service plan. For
example, if your mobile service plan provides three-way
calling, this feature can be accessed through the
Uconnect Phone. Check with your mobile service provider
for the features that you have.
Here are the phone options with Uconnect:
Redial
Dial by pressing in the number
Voice Commands (Dial by Saying a Name, Call by
Saying a Phonebook Name, Redial or Call Back)
Favorites
Mobile Phonebook
Recent Call Log
SMS Message Viewer
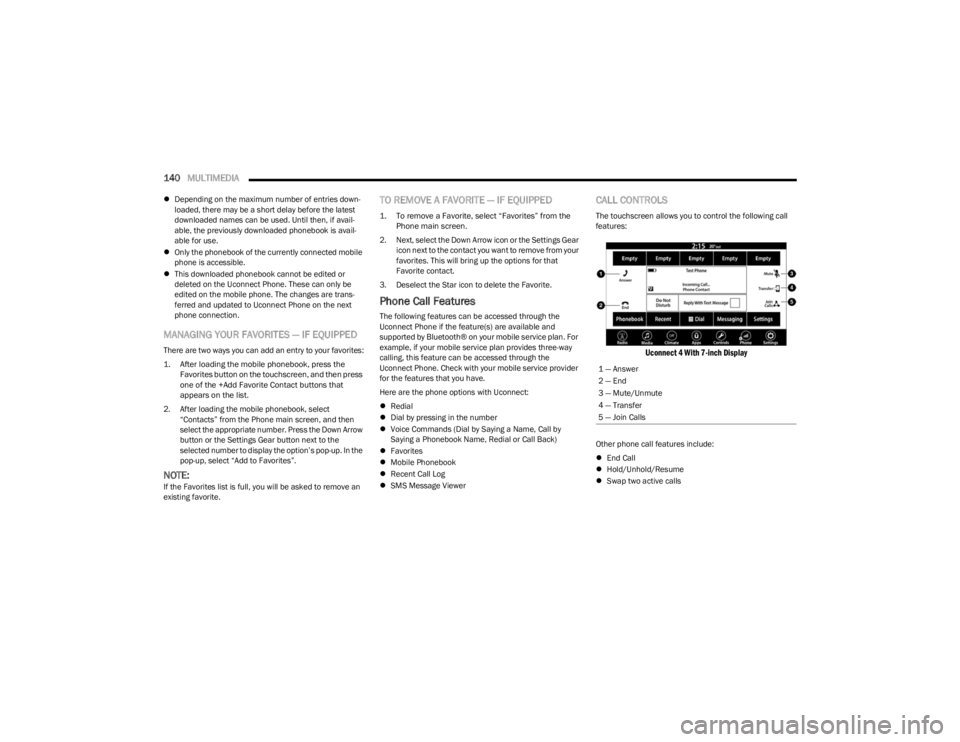
CALL CONTROLS
The touchscreen allows you to control the following call
features:
Uconnect 4 With 7-inch Display
Other phone call features include:
End Call
Hold/Unhold/Resume
Swap two active calls
1 — Answer
2 — End
3 — Mute/Unmute
4 — Transfer
5 — Join Calls
23_LA_OM_EN_USC_t.book Page 140