hood open DODGE CHALLENGER 2023 Owners Manual
[x] Cancel search | Manufacturer: DODGE, Model Year: 2023, Model line: CHALLENGER, Model: DODGE CHALLENGER 2023Pages: 300, PDF Size: 12.82 MB
Page 5 of 300
3
Headlight Time Delay ................................................. 41
Lights-On Reminder ................................................... 41
Fog Lights — If Equipped ............................................ 42
Turn Signals .............................................................. 42
Lane Change Assist — If Equipped............................. 42
INTERIOR LIGHTS ...............................................................42 Front Map/Reading Lights ........................................ 42
Ambient Light — If Equipped ...................................... 42
Dimmer Controls ........................................................ 43
Illuminated Entry ........................................................ 43
WINDSHIELD WIPERS AND WASHERS ........................... 44 Windshield Wiper Operation....................................... 44
Rain Sensing Wipers — If Equipped ........................... 45
CLIMATE CONTROLS ..........................................................45 Automatic Climate Control Descriptions
And Functions ............................................................. 45
Automatic Temperature Control (ATC) ...................... 48
Climate Voice Commands .......................................... 48
Operating Tips ............................................................ 48
INTERIOR STORAGE AND EQUIPMENT ............................49 Storage ........................................................................ 49
Illuminated Cupholders — If Equipped....................... 50
USB/AUX Control ......................................................... 50
Electrical Power Outlets.............................................. 50
WINDOWS ............................................................................52 Power Window Controls .............................................. 52
Wind Buffeting............................................................. 52
POWER SUNROOF — IF EQUIPPED ...................................52 Opening And Closing The Sunroof ............................. 53
Pinch Protect Feature — If Equipped ......................... 53
Sunshade Operation ................................................... 53
Sunroof Maintenance ................................................. 53
Ignition Off Operation.................................................. 53 HOOD.................................................................................... 54
Opening The Hood .......................................................54
Closing The Hood ......................................................... 54
TRUNK .................................................................................. 54 Opening The Trunk ......................................................54
Closing The Trunk ........................................................ 55
Trunk Safety ................................................................ 55
Cargo Area Features.................................................... 55
GETTING TO KNOW YOUR
INSTRUMENT PANEL
INSTRUMENT CLUSTER ..................................................... 56 Instrument Cluster Descriptions ................................. 57
INSTRUMENT CLUSTER DISPLAY ..................................... 57 Location And Controls ................................................. 58
Engine Oil Life Reset ................................................... 59
Performance Shift Indicator (PSI) — If Equipped ....... 59
Instrument Cluster Display Selectable
Menu Items .................................................................. 60
Battery Saver On/Battery Saver
Mode Message — Electrical Load Reduction
Actions — If Equipped .................................................. 62
WARNING LIGHTS AND MESSAGES ................................ 63 Red Warning Lights ..................................................... 63
Yellow Warning Lights ................................................. 66
Yellow Indicator Lights ................................................ 68
Green Indicator Lights ................................................. 68
White Indicator Lights.................................................. 69
Blue Indicator Lights.................................................... 69
ONBOARD DIAGNOSTIC SYSTEM — OBD II ..................... 69 Onboard Diagnostic System (OBD II)
Cybersecurity ...............................................................70
EMISSIONS INSPECTION AND MAINTENANCE
PROGRAMS ........................................................................ 70
STARTING AND OPERATING
STARTING THE ENGINE...................................................... 71 Manual Transmission — If Equipped .......................... 71
Automatic Transmission — If Equipped...................... 71
Normal Starting ........................................................... 71
AutoPark ...................................................................... 72
Extended Park Starting ............................................... 73
If Engine Fails To Start ............................................... 74
Cold Weather Operation
(Below –22°F Or −30°C) .......................................... 74
After Starting................................................................ 74
ENGINE BREAK-IN RECOMMENDATIONS —
3.6L & 5.7L ......................................................................... 74
PARKING BRAKE ................................................................ 74
MANUAL TRANSMISSION — IF EQUIPPED ...................... 76 6-Speed Manual Transmission................................... 76
Shifting ......................................................................... 76
Recommended Shift Speeds ...................................... 77
1–4 Skip Shift ............................................................. 77
Downshifting ................................................................ 77
AUTOMATIC TRANSMISSION —
IF EQUIPPED ...................................................................... 78 Ignition Park Interlock ................................................. 78
Brake Transmission Shift Interlock
(BTSI) System ............................................................. 79
8-Speed Automatic Transmission ............................. 79
SPORT MODE — WITHOUT PERFORMANCE
CONTROL ............................................................................. 83
FUEL SAVER TECHNOLOGY 5.7L — IF EQUIPPED .......... 83
ELECTRIC POWER STEERING ........................................... 83
CRUISE CONTROL SYSTEMS — IF EQUIPPED ................. 84 Cruise Control ............................................................. 84
Adaptive Cruise Control (ACC) .................................... 85
23_LA_OM_EN_USC_t.book Page 3
Page 19 of 300
GETTING TO KNOW YOUR VEHICLE17
NOTE:
When opening the driver's door with the ignition in
ON/RUN (engine not running), a chime will sound to
remind you to place the ignition in the OFF position.
In addition to the chime, the message will display
“Ignition Or Accessory On” in the cluster.
For more information on proper engine starting
procedures, see
Úpage 71.
REMOTE START — IF EQUIPPED
This system uses the key fob to start the engine
conveniently from outside the vehicle while still
maintaining security. The system has a range
of 328 ft (100 m).
Remote Start is used to defrost windows in cold weather,
and to reach a comfortable climate in all ambient
conditions before the driver enters the vehicle.
NOTE:Obstructions between the vehicle and key fob may reduce
this range Úpage 284.
HOW TO USE REMOTE START
Push and release the Remote Start button on the key fob
twice within five seconds. The vehicle doors will lock, the
parking lights will flash, and the horn will chirp
(if programmed). Then, the engine will start, and the
vehicle will remain in the Remote Start mode for a
15 minute cycle. Pushing the Remote Start button a third
time shuts the engine off.
To drive the vehicle, push the unlock button, and place the
ignition in the ON/RUN position.
NOTE:
With Remote Start, the engine will only run for
15 minutes.
Remote Start can only be used twice.
If an engine fault is present or fuel level is low, the
vehicle will start and then shut down in 10 seconds.
The parking lights will turn on and remain on during
Remote Start mode.
For security, power window and power sunroof opera -
tion (if equipped) are disabled when the vehicle is in
the Remote Start mode.
The ignition must be placed in the ON/RUN position
before the Remote Start sequence can be repeated for
a third cycle.
All of the following conditions must be met before the
engine will remote start:
Gear selector in PARK
Doors closed
Hood closed
Trunk closed
Hazard switch off
Brake switch inactive (brake pedal not pressed)
Battery at an acceptable charge level
Panic button not pushed
System not disabled from previous Remote Start event
Vehicle Security system indicator flashing
WARNING!
Do not start or run an engine in a closed garage or
confined area. Exhaust gas contains carbon
monoxide (CO) which is odorless and colorless.
Carbon monoxide is poisonous and can cause
serious injury or death when inhaled.
Keep key fobs away from children. Operation of the
Remote Start system, windows, door locks or other
controls could cause serious injury or death.
2
23_LA_OM_EN_USC_t.book Page 17
Page 20 of 300
18GETTING TO KNOW YOUR VEHICLE
Ignition in the OFF position
Fuel level meets minimum requirement
Vehicle Security system is not signaling an intrusion
Malfunction Indicator Light (MIL) is not illuminated
TO EXIT REMOTE START MODE
To drive the vehicle after starting the Remote Start
system, either push and release the unlock button on the
key fob to unlock the doors, or unlock the vehicle using
Keyless Enter ‘n Go™ — Passive Entry via the door
handles, and disarm the Vehicle Security system (if
equipped). Then, prior to the end of the 15 minute cycle,
push and release the START/STOP ignition button.
The Remote Start system will turn the engine off if the
Remote Start button on the key fob is pushed again, or if
the engine is allowed to run for the entire 15 minute cycle.
Once the ignition is placed in the ON/RUN position, the
climate controls will resume the previously set operations
(temperature, blower control, etc.).
NOTE:
To avoid unintentional shutdowns, the system will
disable for two seconds after receiving a valid Remote
Start request.
For vehicles equipped with the Keyless Enter ‘n Go™ —
Passive Entry feature, the message “Remote Start
Active — Push Start Button” will show in the instrument
cluster display until you push the START/STOP ignition
button.
Remote Start will also cancel if any of the following occur:
The engine stalls or engine speed exceeds 2500 RPM.
Any engine warning lights come on.
The Low Fuel Light turns on.
The hood is opened.
The hazard switch is pushed.
The gear selector is moved out of PARK.
The brake pedal is pressed.
REMOTE START FRONT DEFROST
A
CTIVATION — IF EQUIPPED
When Remote Start is active, and the outside ambient
temperature is 40°F (4.5°C) or below, the system will
automatically activate front defrost for 15 minutes or less.
The timing is dependent on the ambient temperature.
Once the timer expires, the system will automatically
adjust the settings depending on ambient conditions.
See “Remote Start Comfort Systems — If Equipped” in the
next section for detailed operation.
REMOTE START COMFORT SYSTEMS —
I
F EQUIPPED
When Remote Start is activated, the front and rear defrost
will automatically turn on in cold weather. The heated
steering wheel and driver heated seat feature will turn on
if selected in the Comfort menu screen within Uconnect
Settings
Úpage 107. In warm weather, the driver vented
seat feature will automatically turn on when Remote Start
is activated, if programmed in the Comfort menu screen.
The vehicle will adjust the climate control settings
depending on the outside ambient temperature.
Automatic Temperature Control (ATC) — If Equipped
The climate controls will be automatically adjusted to the
optimal temperature and mode settings depending on the
outside ambient temperature. This will occur until the
ignition is placed in the ON/RUN position where the
climate controls will resume their previous settings.
Manual Temperature Control (MTC) — If Equipped
In ambient temperatures at 40°F (4.5°C) or below, the
climate settings will default to maximum heat, with
fresh air entering the cabin. If the front defrost timer
expires, the vehicle will enter Mix Mode.
In ambient temperatures from 40°F (4.5°C) to 78°F
(26°C), the climate settings will be based on the last
settings selected by the driver.
In ambient temperatures at 78°F (26°C) or above, the
climate settings will default to MAX A/C, Bi-Level Mode,
with Recirculation on.
WARNING!
Do not start or run an engine in a closed garage or
confined area. Exhaust gas contains carbon
monoxide (CO) which is odorless and colorless.
Carbon monoxide is poisonous and can cause
serious injury or death when inhaled.
Keep key fobs away from children. Operation of the
Remote Start system, windows, door locks or other
controls could cause serious injury or death.
23_LA_OM_EN_USC_t.book Page 18
Page 21 of 300

GETTING TO KNOW YOUR VEHICLE19
For more information on ATC, MTC, and climate control
settings, see Úpage 45.
NOTE:These features will stay on through the duration of Remote
Start until the ignition is placed in the ON/RUN position.
The climate control settings will change if manually
adjusted by the driver while the vehicle is in Remote Start
mode, and exit automatic override. This includes the OFF
button on the climate controls, which will turn the system
off.
REMOTE START WINDSHIELD WIPER
D
E-ICER ACTIVATION — IF EQUIPPED
When Remote Start is active and the outside ambient
temperature is less than 33°F (0.6°C), the Windshield
Wiper De-Icer will activate. Exiting Remote Start will
resume its previous operation. If the Windshield Wiper
De-Icer was active, the timer and operation will continue.
REMOTE START CANCEL MESSAGE —
I
F EQUIPPED
One of the following messages will display in the
instrument cluster display if the vehicle fails to remote
start or exits Remote Start prematurely:
Remote Start Canceled — Door Open
Remote Start Canceled — Hood Open
Remote Start Canceled — Fuel Low
Remote Start Canceled — Trunk Open
Remote Start Disabled — Start Vehicle To Reset The message will stay active until the ignition is placed in
the ON/RUN position.
VEHICLE SECURITY SYSTEM — IF EQUIPPED
The Vehicle Security system monitors the vehicle doors for
unauthorized entry and the Keyless Enter ‘n Go™ Ignition
for unauthorized operation. While the Vehicle Security
system is armed, interior switches for door locks and trunk
release are disabled. If something triggers the alarm, the
Vehicle Security system will provide the following audible
and visible signals:
The horn will pulse
The turn signals will flash
The Vehicle Security Light in the instrument cluster will
flash
TO ARM THE SYSTEM
Follow these steps to arm the Vehicle Security system:
1. Make sure the vehicle’s ignition is placed in the OFF
position.
2. Perform one of the following methods to lock the vehicle:
Push lock on the interior power door lock switch
with the driver and/or passenger door open.
Push the lock button on the exterior Passive Entry
door handle with a valid key fob available in the
same exterior zone
Úpage 22.
Push the lock button on the key fob.
3. If any doors are open, close them.
TO DISARM THE SYSTEM
The Vehicle Security system can be disarmed using any of
the following methods:
Push the unlock button on the key fob.
Grab the Passive Entry door handle to unlock the door
Úpage 22.
Push the START/STOP ignition button (requires at least
one valid key fob in the vehicle).
NOTE:
The driver's door key cylinder and the trunk button on
the key fob cannot arm or disarm the Vehicle Security
system.
When the Vehicle Security system is armed, the interior
power door lock switches will not unlock the doors.
The Vehicle Security system is designed to protect your
vehicle. However, you can create conditions where the
system will give you a false alarm. If one of the previously
described arming sequences has occurred, the Vehicle
Security system will arm, regardless of whether you are in
the vehicle or not. If you remain in the vehicle and open a
door, the alarm will sound. If this occurs, disarm the
Vehicle Security system.
If the Vehicle Security system is armed and the battery
becomes disconnected, the Vehicle Security system will
remain armed when the battery is reconnected; the
exterior lights will flash, and the horn will sound. If this
occurs, disarm the Vehicle Security system.
2
23_LA_OM_EN_USC_t.book Page 19
Page 22 of 300
20GETTING TO KNOW YOUR VEHICLE
REARMING THE SYSTEM
If something triggers the alarm and no action is taken to
disarm it, the Vehicle Security system will turn the horn off
after a 29 second cycle (with five seconds between cycles
and up to eight cycles if the trigger remains active) and
then rearm itself.
SECURITY SYSTEM MANUAL OVERRIDE
The Vehicle Security system will not arm if you lock the
doors using the manual door lock.
TAMPER ALERT
If something has triggered the Vehicle Security system in
your absence, the horn will sound three times and the
exterior lights will blink three times when you disarm the
Vehicle Security system.
DELUXE VEHICLE SECURITY SYSTEM —
IF EQUIPPED
The Deluxe Vehicle Security system monitors the doors,
hood latch, and trunk for unauthorized entry and the
ignition switch for unauthorized operation. The system
also includes a dual function intrusion sensor and vehicle
tilt sensor. The intrusion sensor monitors the vehicle
interior for motion. The vehicle tilt sensor monitors the
vehicle for any tilting actions (tow away, tire removal, ferry
transport, etc.).
If a perimeter violation triggers the security system, the
horn will sound for 29 seconds and the exterior lights will
flash followed by approximately five seconds of no activity. This will continue for eight cycles if no action is taken to
disarm the system.
TO ARM THE SYSTEM
Follow these steps to arm the security system:
1. If any doors, windows, or the sunroof (if equipped)
are open, close them.
2. Make sure the vehicle ignition system is OFF.
3. Perform one of the following methods to lock the vehicle:
Push lock on the interior power door lock switch
with the driver and/or passenger door open.
Push the lock button on the exterior Passive Entry
door handle with a key fob available in the same
exterior zone
Úpage 22.
Push the lock button on the key fob.
NOTE:
When armed, the interior motion sensor detects move -
ment within the vehicle's interior, including moving
objects (i.e. people and pets) and air currents through
open windows or the sunroof. The windows and
sunroof should be closed, and moving objects should
not be left in the vehicle when the intrusion detection
is armed, otherwise false alarms can occur.
Once the security system is armed, it remains in that
state until you disarm it by following either of the
disarming procedures described. If a power loss occurs
after arming the system, you must disarm the system
after restoring power to prevent alarm activation.
The ultrasonic intrusion sensor (motion detector)
actively monitors your vehicle every time you arm the
Vehicle Security system. If you prefer, you can turn off
the ultrasonic intrusion sensor when arming the
Vehicle Security system. To do so, push the lock button
on the key fob three times within 15 seconds of arming
the system (while the Vehicle Security Light is flashing
rapidly). The vehicle will remain locked but will disable
the alarm in the case of repeated false alarms due to
ambient conditions.
TO DISARM THE SYSTEM
The Vehicle Security system can be disarmed using any of
the following methods:
Push the unlock button on the key fob.
Grab the Passive Entry door handle to unlock the door
Úpage 22.
Cycle the vehicle ignition system out of the OFF position
by pushing the START/STOP ignition button (requires at
least one valid key fob in the vehicle).
NOTE:
The driver's door key cylinder and the trunk button on
the key fob cannot arm or disarm the Vehicle Security
system.
The Vehicle Security system remains armed during
power trunk entry. If a valid key fob or key fob Passive
Entry is used to open the trunk, the motion sensing will
be suppressed until after the trunk is closed. If
someone enters the opened vehicle through the trunk,
then opens any door, the alarm will sound.
23_LA_OM_EN_USC_t.book Page 20
Page 56 of 300
54GETTING TO KNOW YOUR VEHICLE
HOOD
OPENING THE HOOD
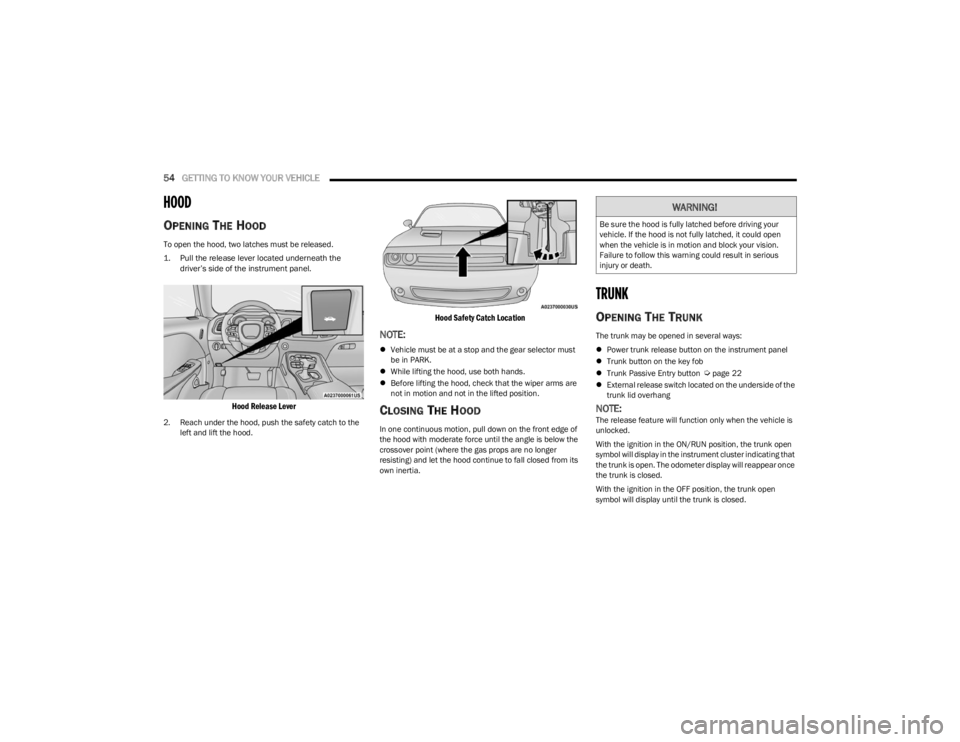
To open the hood, two latches must be released.
1. Pull the release lever located underneath the
driver’s side of the instrument panel.
Hood Release Lever
2. Reach under the hood, push the safety catch to the left and lift the hood.
Hood Safety Catch Location
NOTE:
Vehicle must be at a stop and the gear selector must
be in PARK.
While lifting the hood, use both hands.
Before lifting the hood, check that the wiper arms are
not in motion and not in the lifted position.
CLOSING THE HOOD
In one continuous motion, pull down on the front edge of
the hood with moderate force until the angle is below the
crossover point (where the gas props are no longer
resisting) and let the hood continue to fall closed from its
own inertia.
TRUNK
OPENING THE TRUNK
The trunk may be opened in several ways:
Power trunk release button on the instrument panel
Trunk button on the key fob
Trunk Passive Entry button
Úpage 22
External release switch located on the underside of the
trunk lid overhang
NOTE:The release feature will function only when the vehicle is
unlocked.
With the ignition in the ON/RUN position, the trunk open
symbol will display in the instrument cluster indicating that
the trunk is open. The odometer display will reappear once
the trunk is closed.
With the ignition in the OFF position, the trunk open
symbol will display until the trunk is closed.
WARNING!
Be sure the hood is fully latched before driving your
vehicle. If the hood is not fully latched, it could open
when the vehicle is in motion and block your vision.
Failure to follow this warning could result in serious
injury or death.
23_LA_OM_EN_USC_t.book Page 54
Page 67 of 300
GETTING TO KNOW YOUR INSTRUMENT PANEL65
Electric Power Steering (EPS) Fault
Warning Light
This warning light will turn on when there's a
fault with the EPS system Úpage 83.
Electronic Throttle Control (ETC)
Warning Light
This warning light will illuminate to indicate a
problem with the ETC system. If a problem is
detected while the vehicle is running, the light
will either stay on or flash depending on the
nature of the problem. Cycle the ignition when the vehicle
is safely and completely stopped and the transmission is
placed in the PARK position. The light should turn off. If the
light remains on with the vehicle running, your vehicle will
usually be drivable; however, see an authorized dealer for
service as soon as possible.
NOTE:This light may turn on if the accelerator and brake pedals
are pressed at the same time.
If the light continues to flash when the vehicle is running,
immediate service is required and you may experience
reduced performance, an elevated/rough idle, or engine
stall and your vehicle may require towing.
The light will come on when the ignition is placed in the
ON/RUN or ACC/ON/RUN position and remain on briefly
as a bulb check. If the light does not come on during
starting, have the system checked by an authorized
dealer.
Engine Coolant Temperature Warning
Light
This warning light warns of an overheated
engine condition. If the engine coolant
temperature is too high, this indicator will
illuminate and a single chime will sound. If the
temperature reaches the upper limit, a continuous chime
will sound for four minutes or until the engine is able to
cool, whichever comes first.
If the light turns on while driving, safely pull over and stop
the vehicle. If the Air Conditioning (A/C) system is on, turn
it off. Also, shift the transmission into NEUTRAL and idle
the vehicle. If the temperature reading does not return to
normal, turn the engine off immediately and call for
service
Úpage 218.
Trunk Open Warning Light
This indicator will illuminate when the trunk is
open and not fully closed.
NOTE:If the vehicle is moving, there will also be a single chime.
Oil Pressure Warning Light
This warning light will illuminate to indicate low
engine oil pressure. If the light turns on while
driving, stop the vehicle, shut off the engine as
soon as possible, and contact an authorized
dealer. A chime will sound when this light turns on.
Do not operate the vehicle until the cause is corrected.
This light does not indicate how much oil is in the engine.
The engine oil level must be checked under the hood.
Oil Temperature Warning Light
This warning light will illuminate to indicate the
engine oil temperature is high. If the light turns
on while driving, stop the vehicle and shut off
the engine as soon as possible. Wait for oil
temperature to return to normal levels.
WARNING!
Continued operation with reduced assist could pose a
safety risk to yourself and others. Service should be
obtained as soon as possible.3
23_LA_OM_EN_USC_t.book Page 65
Page 219 of 300
IN CASE OF EMERGENCY217
See the following steps to prepare for jump starting:
1. Apply the parking brake, shift into PARK (automatic
transmission) or FIRST gear (manual transmission)
and cycle the ignition to OFF.
2. Turn off the heater, radio, and all electrical accessories.
3. Pull upward and remove the protective cover over the remote positive (+) battery post.
4. If using another vehicle to jump start the battery, park the vehicle within the jumper cable’s reach, apply the
parking brake and make sure the ignition is OFF.JUMP STARTING PROCEDURE
1. Connect the positive
(+) end of the jumper cable to
the remote positive (+)
post of the vehicle with the
discharged battery.
2. Connect the opposite end of the positive (+) jumper
cable to the positive (+) post of the booster battery.
3. Connect the negative (-) end of the jumper cable to
the negative (-) post of the booster battery.
4. Connect the opposite end of the negative (-) jumper
cable to the remote negative (-) post (exposed
metallic/unpainted post of the discharge vehicle)
located directly behind the under-hood fuse box. 5. Start the engine in the vehicle that has the booster
battery, let the engine idle a few minutes, and then
start the engine in the vehicle with the discharged
battery.
6. Once the engine is started, follow the disconnection procedure.
Disconnecting The Jumper Cables
1. Disconnect the negative
(-) end of the jumper cable
from the remote negative (-)
post of the vehicle with
the discharged battery.
2. Disconnect the opposite end of the negative (-)
jumper cable from the negative (-) post of the booster
battery.
3. Disconnect the positive (+) end of the jumper cable
from the positive (+) post of the booster battery.
4. Disconnect the opposite end of the positive (+)
jumper cable from the remote positive (+) post of the
vehicle with the discharged battery, and reinstall the
protective cap.
WARNING!
Do not allow vehicles to touch each other as this could
establish a ground connection and personal injury
could result.
WARNING!
Take care to avoid the radiator cooling fan whenever
the hood is raised. It can start anytime the ignition
switch is ON. You can be injured by moving fan
blades.
Remove any metal jewelry such as rings, watch
bands and bracelets that could make an inadvertent
electrical contact. You could be seriously injured.
Batteries contain sulfuric acid that can burn your
skin or eyes and generate hydrogen gas which is
flammable and explosive. Keep open flames or
sparks away from the battery.
WARNING!
Failure to follow this jump starting procedure could
result in personal injury or property damage due to
battery explosion.
CAUTION!
Failure to follow these procedures could result in
damage to the charging system of the booster vehicle
or the discharged vehicle.
WARNING!
Do not connect the jumper cable to the negative (-) post
of the discharged battery. The resulting electrical spark
could cause the battery to explode and could result in
personal injury.
CAUTION!
Do not run the booster vehicle engine above
2,000 RPM since it provides no charging benefit,
wastes fuel, and can damage booster vehicle engine.
7
23_LA_OM_EN_USC_t.book Page 217
Page 220 of 300
218IN CASE OF EMERGENCY
If frequent jump starting is required to start your vehicle
you should have the battery and charging system
inspected at an authorized dealer.
IF YOUR ENGINE OVERHEATS
If the vehicle is overheating, it will need to be serviced by
an authorized dealer.
Potential signs of vehicle overheating can be:
Temperature gauge is at HOT (H)
Strong smell of coolant
White smoke coming from engine or exhaust
Coolant bottle coolant has bubbles present In the event it is observed that the temperature gauge is
moving towards or close to the HOT (H) position, you can
reduce the potential for overheating by taking the
appropriate action.
On the highways — slow down.
In city traffic — while stopped, place the transmission in
NEUTRAL (N), but do not increase the engine idle speed
while preventing vehicle motion with the brakes.
If your Air Conditioner (A/C) is on, turn it off. The A/C
system adds heat to the engine cooling system and
turning the A/C off can help remove this heat.
You can also turn the temperature control to maximum
heat, the mode control to floor and the blower control
to high. This allows the heater core to act as a supple -
ment to the radiator and aids in removing heat from the
engine cooling system.
MANUAL PARK RELEASE–8–SPEED
TRANSMISSION
CAUTION!
Accessories plugged into the vehicle power outlets draw
power from the vehicle’s battery, even when not in use
(i.e., cellular devices, etc.). Eventually, if plugged in long
enough without engine operation, the vehicle’s battery
will discharge sufficiently to degrade battery life and/or
prevent the engine from starting.
WARNING!
You or others can be badly burned by hot engine
coolant (antifreeze) or steam from your radiator. If you
see or hear steam coming from under the hood, do not
open the hood until the radiator has had time to cool.
Never try to open a cooling system pressure cap when
the radiator or coolant bottle is hot.
CAUTION!
Driving with a hot cooling system could damage your
vehicle. If the temperature gauge reads HOT (H), pull
over and stop the vehicle. Idle the vehicle with the air
conditioner turned off until the pointer drops back into
the normal range. If the pointer remains on HOT (H),
and you hear continuous chimes, turn the engine off
immediately and call for service.
WARNING!
Always secure your vehicle by fully applying the parking
brake before activating the Manual Park Release. In
addition, you should be seated in the driver's seat with
your foot firmly on the brake pedal when activating the
Manual Park Release. Activating the Manual Park
Release will allow your vehicle to roll away if it is not
secured by the parking brake, or by proper connection
to a tow vehicle. Activating the Manual Park Release on
an unsecured vehicle could lead to serious injury or
death for those in or around the vehicle.
23_LA_OM_EN_USC_t.book Page 218
Page 238 of 300

236SERVICING AND MAINTENANCE
Particular attention should also be given to hood latching
components to ensure proper function. When performing
other underhood services, the hood latch, release
mechanism and safety catch should be cleaned and
lubricated.
The external lock cylinders should be lubricated twice a
year, preferably in the Autumn and Spring. Apply a small
amount of a high quality lubricant, such as Mopar® Lock
Cylinder Lubricant directly into the lock cylinder.
WINDSHIELD WIPER BLADES
Clean the rubber edges of the wiper blades and the
windshield periodically with a sponge or soft cloth and a
mild nonabrasive cleaner. This will remove accumulations
of salt or road film.
Operation of the wipers on dry glass for long periods may
cause deterioration of the wiper blades. Always use
washer fluid when using the wipers to remove salt or dirt
from a dry windshield.
Avoid using the wiper blades to remove frost or ice from
the windshield. Keep the blade rubber out of contact with
petroleum products such as engine oil, gasoline, etc.
NOTE:Life expectancy of wiper blades varies depending on
geographical area and frequency of use. Poor perfor -
mance of blades may be present with chattering, marks,
water lines or wet spots. If any of these conditions are
present, clean the wiper blades or replace as necessary.
Wiper Blade Removal/Installation
1. Lift the wiper arm to raise the wiper blade off of the glass, until the wiper arm is in the full up position.
2. To disengage the wiper blade from the wiper arm, press the release tab on the wiper blade and while
holding the wiper arm with one hand, slide the wiper
blade down towards the base of the wiper arm.
Wiper Blade With Release Tab In Unlocked Position
3. With the wiper blade disengaged, remove the wiper blade from the wiper arm.
Wiper Blade Removed From Wiper Arm
4. Gently lower the wiper arm onto the glass.
Installing The Front Wipers
1. Lift the wiper arm off of the glass, until the wiper arm is in the full up position.
2. Position the wiper blade near the hook on the tip of the wiper arm.
3. Insert the hook on the tip of the arm through the opening in the wiper blade.
4. Slide the wiper blade up into the hook on the wiper arm, latch engagement will be accompanied by an
audible click.
5. Gently lower the wiper blade onto the glass.
CAUTION!
Do not allow the wiper arm to spring back against the
glass without the wiper blade in place or the glass may
be damaged.
1 — Wiper Blade
2 — Wiper Arm
3 — Release Tab
1 — Wiper Blade
2 — Wiper Arm
3 — Release Tab
23_LA_OM_EN_USC_t.book Page 236