spare tire location DODGE CHALLENGER 2023 Owners Manual
[x] Cancel search | Manufacturer: DODGE, Model Year: 2023, Model line: CHALLENGER, Model: DODGE CHALLENGER 2023Pages: 300, PDF Size: 12.82 MB
Page 7 of 300
5
IN CASE OF EMERGENCY
HAZARD WARNING FLASHERS ..................................... 199
ASSIST AND SOS MIRROR — IF EQUIPPED .................. 199
JACKING AND TIRE CHANGING ...................................... 202 Preparations For Jacking .......................................... 202
Jack Location/Spare Tire Stowage ......................... 202Jacking And Changing A Tire ................................... 203
TIRE SERVICE KIT — IF EQUIPPED ................................. 206 Alternate Tire Service Kit — If Equipped .................. 211
JUMP STARTING .............................................................. 216 Preparations For Jump Start .................................... 216
Jump Starting Procedure .......................................... 217
IF YOUR ENGINE OVERHEATS ........................................ 218
MANUAL PARK RELEASE–8–SPEED
TRANSMISSION ............................................................... 218
FREEING A STUCK VEHICLE............................................ 220
TOWING A DISABLED VEHICLE ..................................... 221 All Wheel Drive (AWD) Models — If Equipped.......... 222
Rear-Wheel Drive (RWD) Models ............................. 222
ENHANCED ACCIDENT RESPONSE
SYSTEM (EARS) ............................................................... 222
EVENT DATA RECORDER (EDR) ..................................... 222
SERVICING AND MAINTENANCE
SCHEDULED SERVICING ................................................ 223 3.6L And 5.7L Engines ............................................ 223
ENGINE COMPARTMENT ................................................ 228 3.6L Engine .............................................................. 228
5.7L Engine .............................................................. 229
Checking Oil Level .................................................... 230
Adding Washer Fluid................................................. 230Maintenance-Free Battery ....................................... 231
Pressure Washing ..................................................... 231
VEHICLE MAINTENANCE ................................................. 231 Engine Oil ................................................................. 231Engine Oil Filter ......................................................... 233Engine Air Cleaner Filter ........................................... 233Air Conditioner Maintenance ................................... 234Accessory Drive Belt Inspection............................... 235
Body Lubrication ....................................................... 235
Windshield Wiper Blades ......................................... 236
Exhaust System ........................................................ 237Cooling System ......................................................... 237Brake System ........................................................... 240
Clutch Hydraulic System —
Manual Transmission (If Equipped) ........................ 240
Manual Transmission — If Equipped ....................... 240
Automatic Transmission — If Equipped ................... 241
All-Wheel Drive (AWD) — If Equipped ...................... 241Rear Axle ................................................................... 241
Fuses ......................................................................... 242
Bulb Replacement .................................................... 250 TIRES ..................................................................................253
Tire Safety Information ............................................. 253
Tires — General Information ..................................... 261
Tire Types ................................................................... 264Spare Tires — If Equipped ......................................... 264
Wheel And Wheel Trim Care ..................................... 266
Snow Traction Devices ............................................. 267
Tire Rotation Recommendations ............................. 268
DEPARTMENT OF TRANSPORTATION UNIFORM
TIRE QUALITY GRADES ................................................... 268 Treadwear .................................................................. 268
Traction Grades ......................................................... 269
Temperature Grades ................................................. 269
VEHICLE STORAGE ...........................................................269
BODYWORK ......................................................................270 Protection From Atmospheric Agents ...................... 270
Body And Underbody Maintenance.......................... 270
Preserving The Bodywork ......................................... 270
INTERIORS ........................................................................ 271 Seats And Fabric Parts.............................................. 271Plastic And Coated Parts .......................................... 271
Leather Surfaces ....................................................... 272
Glass Surfaces .......................................................... 272
23_LA_OM_EN_USC_t.book Page 5
Page 204 of 300
202IN CASE OF EMERGENCY
(Continued)
Automatic SOS — If Equipped
Automatic SOS is a hands-free safety service that can
immediately connect you with help in the event that your
vehicle’s airbags deploy. Please refer to your provided
radio supplement for complete information.
JACKING AND TIRE CHANGING
Use this QR code to access your digital
experience.PREPARATIONS FOR JACKING
1. Park the vehicle on a firm, level surface as far from
the edge of the roadway as possible. Avoid icy or
slippery areas.
2. Turn on the Hazard Warning Flashers.
3. Apply the parking brake.
4. Place the gear selector into PARK (automatic transmission) or FIRST gear (manual transmission).
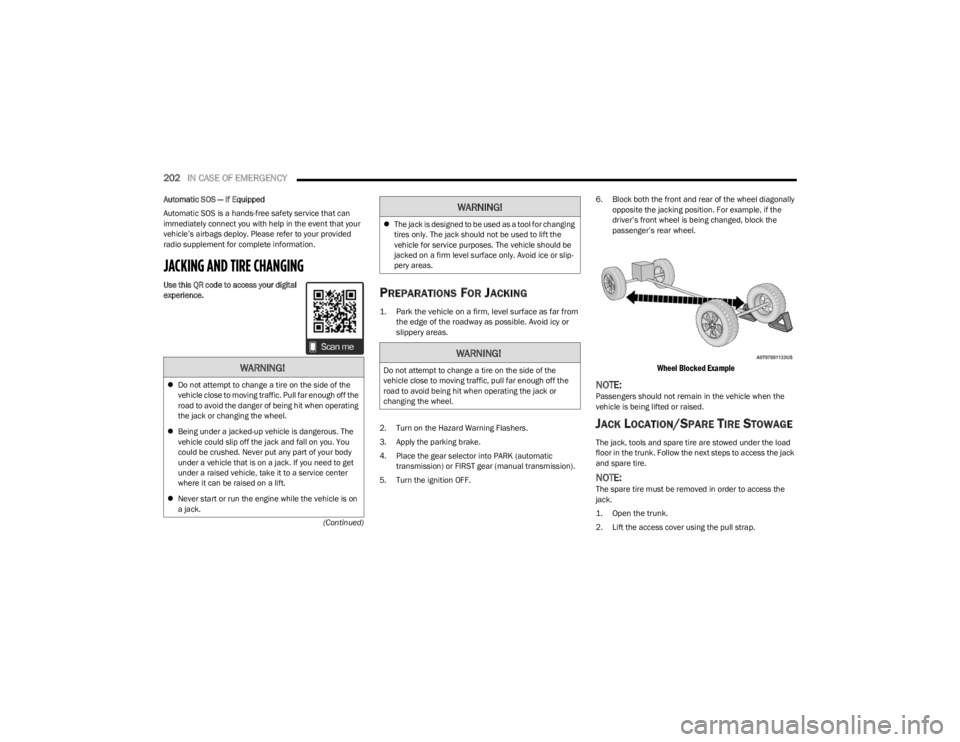
5. Turn the ignition OFF. 6. Block both the front and rear of the wheel diagonally
opposite the jacking position. For example, if the
driver’s front wheel is being changed, block the
passenger’s rear wheel.
Wheel Blocked Example
NOTE:Passengers should not remain in the vehicle when the
vehicle is being lifted or raised.
JACK LOCATION/SPARE TIRE STOWAGE
The jack, tools and spare tire are stowed under the load
floor in the trunk. Follow the next steps to access the jack
and spare tire.
NOTE:The spare tire must be removed in order to access the
jack.
1. Open the trunk.
2. Lift the access cover using the pull strap.
WARNING!
Do not attempt to change a tire on the side of the
vehicle close to moving traffic. Pull far enough off the
road to avoid the danger of being hit when operating
the jack or changing the wheel.
Being under a jacked-up vehicle is dangerous. The
vehicle could slip off the jack and fall on you. You
could be crushed. Never put any part of your body
under a vehicle that is on a jack. If you need to get
under a raised vehicle, take it to a service center
where it can be raised on a lift.
Never start or run the engine while the vehicle is on
a jack.
The jack is designed to be used as a tool for changing
tires only. The jack should not be used to lift the
vehicle for service purposes. The vehicle should be
jacked on a firm level surface only. Avoid ice or slip -
pery areas.
WARNING!
Do not attempt to change a tire on the side of the
vehicle close to moving traffic, pull far enough off the
road to avoid being hit when operating the jack or
changing the wheel.
WARNING!
23_LA_OM_EN_USC_t.book Page 202
Page 206 of 300
204IN CASE OF EMERGENCY
1. Remove the spare tire, jack, and lug wrench.
2. If equipped with aluminum wheels where the center
cap covers the lug nuts, use the lug wrench to pry the
center cap off carefully before raising the vehicle.
NOTE:When the following label is present, the spare tire must be
used for the rear wheel(s) only. For a flat front tire, you
must first install the spare on one of the rear tires. Then,
follow the jacking instructions for front tire replacement
and replace the front road wheel with the wheel removed
from the rear of the vehicle.
Spare Tire Label
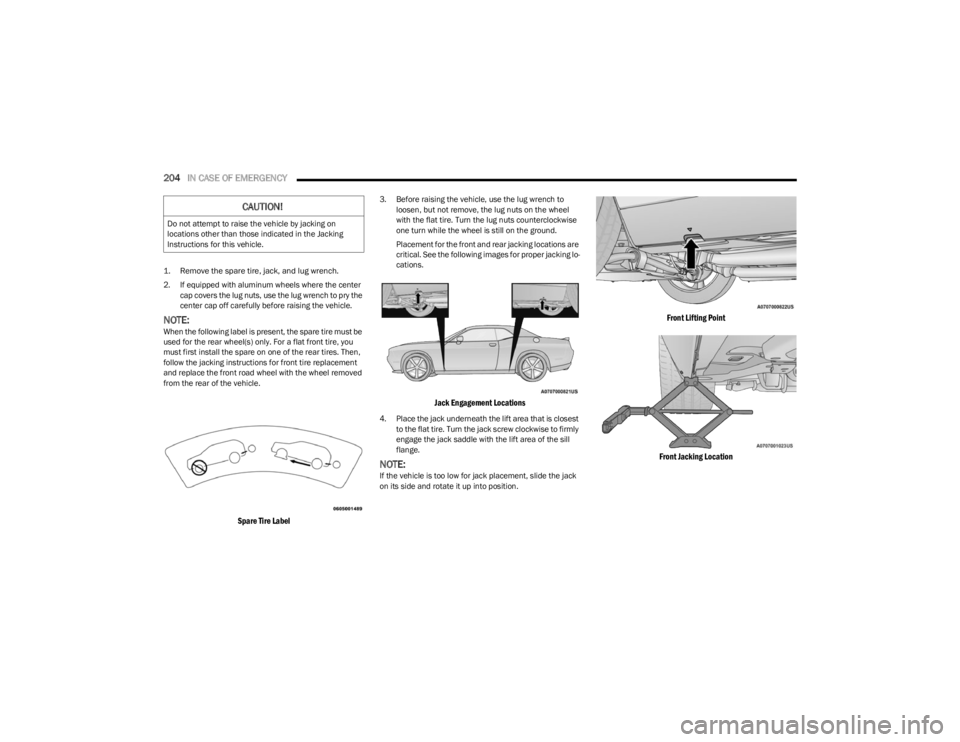
3. Before raising the vehicle, use the lug wrench to loosen, but not remove, the lug nuts on the wheel
with the flat tire. Turn the lug nuts counterclockwise
one turn while the wheel is still on the ground.
Placement for the front and rear jacking locations are
critical. See the following images for proper jacking lo -
cations.
Jack Engagement Locations
4. Place the jack underneath the lift area that is closest to the flat tire. Turn the jack screw clockwise to firmly
engage the jack saddle with the lift area of the sill
flange.
NOTE:If the vehicle is too low for jack placement, slide the jack
on its side and rotate it up into position.
Front Lifting Point
Front Jacking Location
CAUTION!
Do not attempt to raise the vehicle by jacking on
locations other than those indicated in the Jacking
Instructions for this vehicle.
23_LA_OM_EN_USC_t.book Page 204
Page 207 of 300
IN CASE OF EMERGENCY205
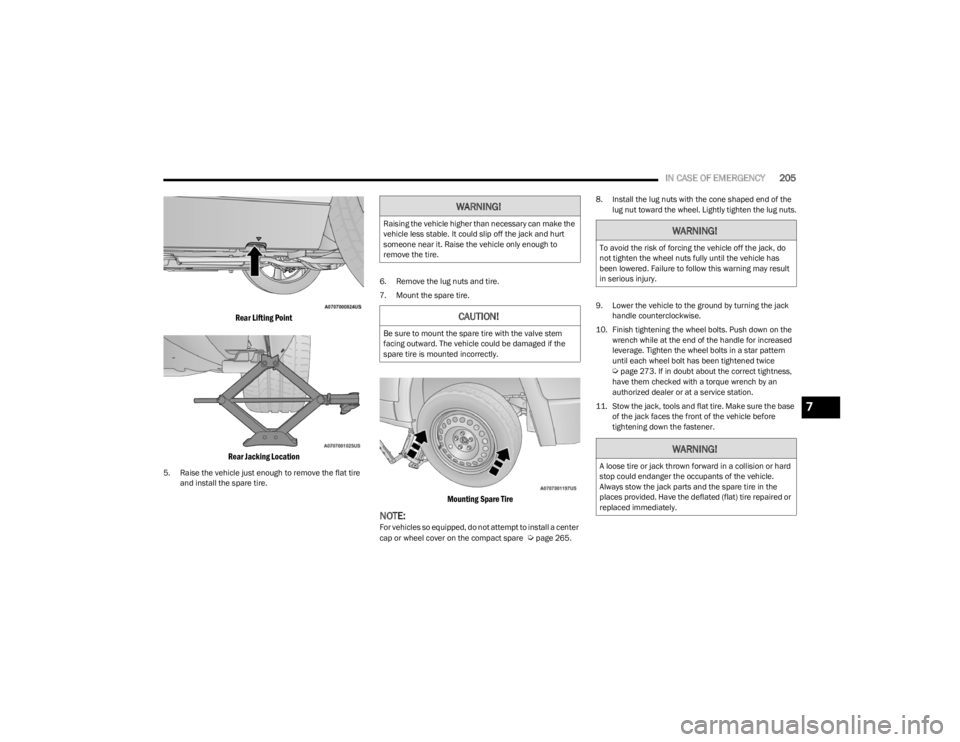
Rear Lifting Point
Rear Jacking Location
5. Raise the vehicle just enough to remove the flat tire and install the spare tire. 6. Remove the lug nuts and tire.
7. Mount the spare tire.
Mounting Spare Tire
NOTE:For vehicles so equipped, do not attempt to install a center
cap or wheel cover on the compact spare Úpage 265.8. Install the lug nuts with the cone shaped end of the
lug nut toward the wheel. Lightly tighten the lug nuts.
9. Lower the vehicle to the ground by turning the jack handle counterclockwise.
10. Finish tightening the wheel bolts. Push down on the wrench while at the end of the handle for increased
leverage. Tighten the wheel bolts in a star pattern
until each wheel bolt has been tightened twice
Úpage 273. If in doubt about the correct tightness,
have them checked with a torque wrench by an
authorized dealer or at a service station.
11. Stow the jack, tools and flat tire. Make sure the base of the jack faces the front of the vehicle before
tightening down the fastener.
WARNING!
Raising the vehicle higher than necessary can make the
vehicle less stable. It could slip off the jack and hurt
someone near it. Raise the vehicle only enough to
remove the tire.
CAUTION!
Be sure to mount the spare tire with the valve stem
facing outward. The vehicle could be damaged if the
spare tire is mounted incorrectly.
WARNING!
To avoid the risk of forcing the vehicle off the jack, do
not tighten the wheel nuts fully until the vehicle has
been lowered. Failure to follow this warning may result
in serious injury.
WARNING!
A loose tire or jack thrown forward in a collision or hard
stop could endanger the occupants of the vehicle.
Always stow the jack parts and the spare tire in the
places provided. Have the deflated (flat) tire repaired or
replaced immediately.
7
23_LA_OM_EN_USC_t.book Page 205
Page 248 of 300
246SERVICING AND MAINTENANCE
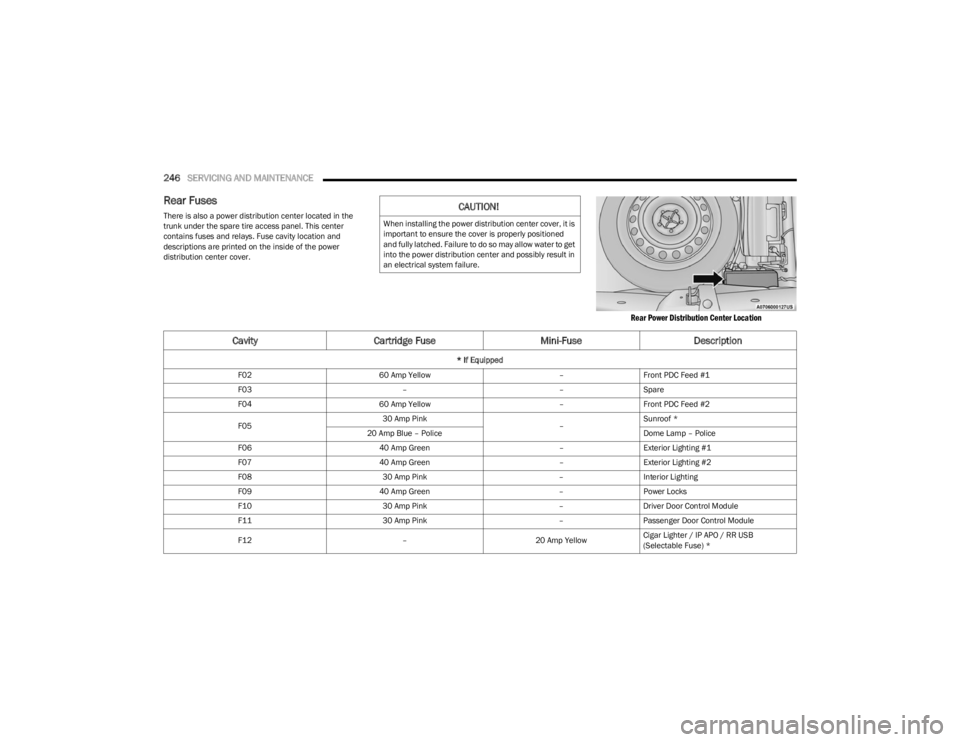
Rear Fuses
There is also a power distribution center located in the
trunk under the spare tire access panel. This center
contains fuses and relays. Fuse cavity location and
descriptions are printed on the inside of the power
distribution center cover.
Rear Power Distribution Center Location
CAUTION!
When installing the power distribution center cover, it is
important to ensure the cover is properly positioned
and fully latched. Failure to do so may allow water to get
into the power distribution center and possibly result in
an electrical system failure.
CavityCartridge Fuse Mini-FuseDescription
* If Equipped
F02 60 Amp Yellow –Front PDC Feed #1
F03 ––Spare
F04 60 Amp Yellow –Front PDC Feed #2
F05 30 Amp Pink
–Sunroof *
20 Amp Blue – Police Dome Lamp – Police
F06 40 Amp Green –Exterior Lighting #1
F07 40 Amp Green –Exterior Lighting #2
F08 30 Amp Pink –Interior Lighting
F09 40 Amp Green –Power Locks
F10 30 Amp Pink –Driver Door Control Module
F11 30 Amp Pink –Passenger Door Control Module
F12 –20 Amp YellowCigar Lighter / IP APO / RR USB
(Selectable Fuse) *
23_LA_OM_EN_USC_t.book Page 246
Page 260 of 300
258SERVICING AND MAINTENANCE
Tire Loading And Tire Pressure
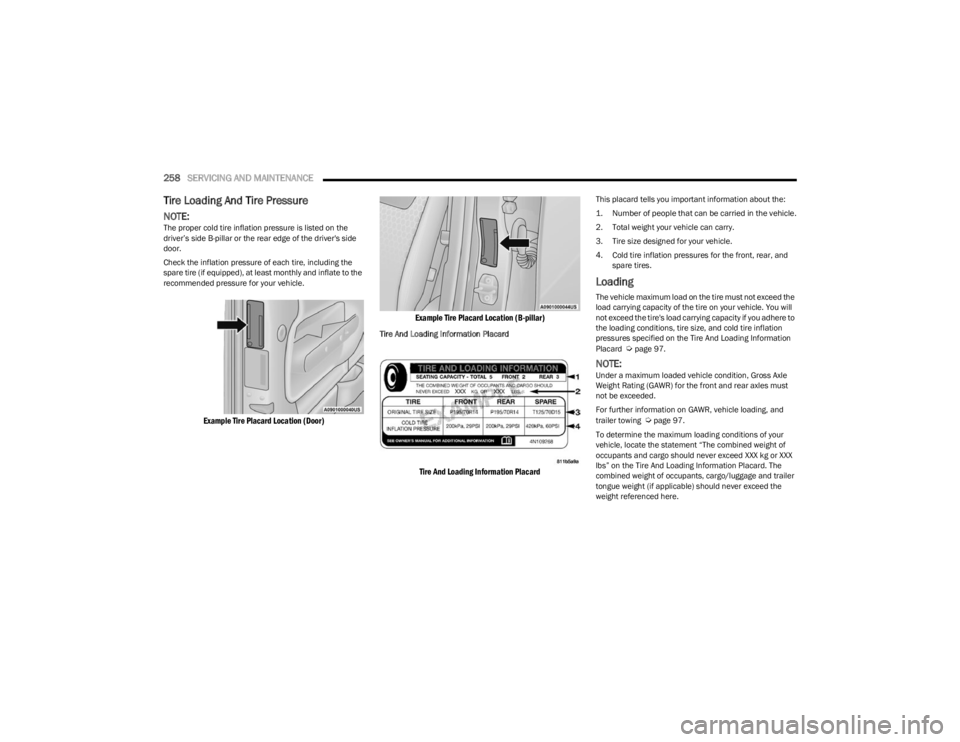
NOTE:The proper cold tire inflation pressure is listed on the
driver’s side B-pillar or the rear edge of the driver's side
door.
Check the inflation pressure of each tire, including the
spare tire (if equipped), at least monthly and inflate to the
recommended pressure for your vehicle.
Example Tire Placard Location (Door) Example Tire Placard Location (B-pillar)
Tire And Loading Information Placard
Tire And Loading Information Placard
This placard tells you important information about the:
1. Number of people that can be carried in the vehicle.
2. Total weight your vehicle can carry.
3. Tire size designed for your vehicle.
4. Cold tire inflation pressures for the front, rear, and
spare tires.
Loading
The vehicle maximum load on the tire must not exceed the
load carrying capacity of the tire on your vehicle. You will
not exceed the tire's load carrying capacity if you adhere to
the loading conditions, tire size, and cold tire inflation
pressures specified on the Tire And Loading Information
Placard
Úpage 97.
NOTE:Under a maximum loaded vehicle condition, Gross Axle
Weight Rating (GAWR) for the front and rear axles must
not be exceeded.
For further information on GAWR, vehicle loading, and
trailer towing
Úpage 97.
To determine the maximum loading conditions of your
vehicle, locate the statement “The combined weight of
occupants and cargo should never exceed XXX kg or XXX
lbs” on the Tire And Loading Information Placard. The
combined weight of occupants, cargo/luggage and trailer
tongue weight (if applicable) should never exceed the
weight referenced here.
23_LA_OM_EN_USC_t.book Page 258