ESP DODGE CHARGER 2015 7.G Owner's Manual
[x] Cancel search | Manufacturer: DODGE, Model Year: 2015, Model line: CHARGER, Model: DODGE CHARGER 2015 7.GPages: 236, PDF Size: 35.67 MB
Page 52 of 236
This setting is designed to provide early warnings per NHTSA (National Highway Traffic
Safety Administration) recommendations.
More cautious drivers that do not mind frequent warnings may prefer this setting.
NOTE:
This setting gives you the most reaction time.
Near
Changing the FCW status to the “Near” setting, allows the system to warn you of a
potential frontal collision when you are much closer.
This setting provides less reaction time than the “Far” setting, which allows for a more
dynamic driving experience.
More dynamic or aggressive drivers that want to avoid frequent warnings may prefer this
setting.
Off
Changing the FCW status to “Off” prevents the system from warning you of a possible
collision with the vehicle in front of you.
Turning Active Braking ON Or OFF
The Active Braking feature has two settings and can be changed within the Uconnect®
System Screen:
•On
•Off
Changing the Active Braking status to “Off” prevents the system from providing limited
autonomous braking, or additional brake support if the driver is not braking adequately in
the event of a potential frontal collision.
NOTE:
If FCW is set to “Off,” “FCW OFF” will be displayed in the DID.
Refer to the Owner's Manual on the DVD for further details.
WARNING!
Forward Collision Warning (FCW) is not intended to avoid a collision on its own, nor can
FCW detect every type of potential collision. The driver has the responsibility to avoid
acollisionbycontrollingthevehicleviabrakingandsteering.Failuretofollowthis
warning could lead to serious injury or death.
OPERATING YOUR VEHICLE
50
Page 57 of 236
•Thetransmissionwillautomaticallydownshiftasthevehicleslows(topreventengine
lugging) and will display the current gear.
•Thetransmissionwillautomaticallydownshifttofirstgearwhencomingtoastop.After
astop,thedrivershouldmanuallyupshift(+)thetransmissionasthevehicleis
accelerated.
•Youcanstartout,fromastop,infirstorsecondgear.Tapping(+)(atastop)willallow
starting in second gear. Starting out in second gear can be helpful in snowy or icy
conditions.
•Ifarequesteddownshiftwouldcausetheenginetoover-speed,thatshiftwillnotoccur.
•Thesystemwillignoreattemptstoupshiftattoolowofavehiclespeed.
•Holdingthe(-)paddledepressed(ifequipped),orholdingtheshiftleverinthe(-)
position, will downshift the transmission to the lowest gear possible at the current
speed.
•TransmissionshiftingwillbemorenoticeablewhenAutoStickisengaged.
•Thesystemmayreverttoautomaticshiftmodeifafaultoroverheatconditionis
detected.
To d i s e n g a g e A u t o S t i c k m o d e , r e t u r n t h e s h i f t l e v e r t o t h e D R I V E p o s i t i o n , o r p r e s s a n d
hold the (+) shift paddle (if equipped, and the shift lever is already in DRIVE) until “D” is
once again indicated in the instrument cluster. You can shift in or out of the AutoStick
mode at any time without taking your foot off the accelerator pedal.
WARNING!
Do not downshift for additional engine braking on a slippery surface. The drive wheels
could lose their grip and the vehicle could skid, causing a collision or personal injury.
SPORT MODE — WITHOUT PERFORMANCE CONTROL
Yo u r v e h i c l e i s e q u i p p e d w i t h a S p o r t M o d e f e a t u r e . T h i s m o d e i s a c o n f i g u r a t i o n s e t u p
for typical enthusiast driving. The engine, transmission (when equipped with automatic
transmission), and steering systems are all set to their SPORT settings. Sport Mode will
provide improved throttle response and modified shifting for an enhanced driving
experience, as well the greatest amount of steering feel. This mode may be activated and
deactivated by pressing the Sport button on the instrument panel switch bank.
For vehicles equipped with Drive Modes, refer to “Performance Control — If Equipped”
within “Uconnect Settings” in “Understanding Your Instrument Panel” chapter on your
DVD or in the “Drive Mode Supplement” within your Owners information kit for further
information.
OPERATING YOUR VEHICLE
55
Page 67 of 236
Uconnect® ACCESS
Uconnect® Access — If Equipped (Available On Uconnect® 8.4A/8.4AN —
U.S. Residents Only)
WARNING!
ALWAYS drive safely with your hands on the steering wheel. You have full responsibility
and assume all risks related to the use of the Uconnect®features and applications in
this vehicle. Only use Uconnect®when it is safe to do so. Failure to do so may result in
an accident involving serious injury or death.
Uconnect®Access enhances your ownership and driving experience by connecting your
vehicle with a built-in cellular connection. With Uconnect®Access, you can:
•Placeacalltoalocal9-1-1Operatorforemergencyassistance.
•Remotelylock/unlockyourdoorsandstartyourvehiclefromvirtuallyanywhere,using
the Uconnect®Access App from your smartphone. You can also do so by logging into
Mopar Owner Connect, or by calling Uconnect®Care. (Vehicle must be within the
United States and have network coverage).
•TurnyourvehicleintoaWiFiHotspotandconnectyourdevicestotheinternet.
•Receivetextoremailnotificationsifyourvehicle'stheftalarmgoesoff.
•Receivestolenvehicleassistance,usingGPStechnologytohelpauthoritieslocateyour
vehicle if it is stolen.
•Listentoyourtextmessagesorsendfree-formtextmessageswithyourvoicewhile
keeping your hands on the wheel, using the Voice Texting feature. Requires a cell phone
that supports Bluetooth Message Access Profile (MAP).
•Searchforplacestoeat,shop,relaxandplaywithYelp®,usingyourvoiceoron-screen
menu. Then navigate to them (navigation standard on Uconnect®8.4AN, optional on
Uconnect®8.4A).
•GetoperatorassistanceusingtheASSISTbuttononyourinteriorrearviewmirror.
Before you drive, familiarize yourself with the easy-to-use Uconnect® Access.
1. The ASSIST and 9-1-1 buttons are located on your rearview mirror. The ASSIST button
is used for contacting Roadside Assistance, Vehicle Care and Uconnect®Care. The
9-1-1 button connects you to emergency services.
NOTE:
Vehicles sold in Canada and Mexico DO NOT have 9-1-1 Call system capabilities. 9-1-1
or other emergency line operators in Canada and Mexico may not answer or respond to
9-1-1 system calls.
2. The Uconnect®“Apps” button on the menu bar at the bottom right corner of the radio
touchscreen. This is where you can begin your registration process, manage your Apps
and purchase WiFi on demand.
ELECTRONICS
65
Page 69 of 236
NOTE:
For security reasons, this link is valid for 72 hours from the time you’ve submitted your
email address into the radio touchscreen. If the link has expired, simply re-enter your
email address into the Uconnect®Registration App on the radio touchscreen to receive
another link. The secured registration link will take you through the Uconnect®Access
registration process step by step.
7. To unlock the full potential of Uconnect®Access in your vehicle, you will need to create
or validate an existing Mopar Owner Connect account previously (Owner Center).
Uconnect®along with Mopar Owner Connect have joined forces to create one
destination to manage all of your vehicle needs, from managing your Uconnect®
Access account, to tracking service history and finding recommended accessories for
your vehicle. If you already have a Mopar Owner Connect account, log in to the website
with your existing username/email and password. For assistance with this web based
registration process, call Uconnect®Care at 1-855-792-4241.
8. Once you are logged in to your Mopar Owner Connect account, you will create a
personal Uconnect®Security PIN. The Uconnect®Security PIN will be required to
authenticate you when accessing your account via Uconnect®Care or performing any
remote services such as Remote Door Lock/Unlock, Remote Horn & Lights or Starting
and Stopping the engine.
9. If your vehicle qualifies for a trial package it will be presented. Simply agree to the
Uconnect®Te r m s o f S e r v i c e ( c h e c k b o x ) a n d t h e n s e l e c t t h e “ S t a r t S e r v i c e ” b u t t o n .
At this point your vehicle is registered with Uconnect®Access. Continue to set up Via
Mobile. Apps will be downloaded the next time you start your vehicle. If the Apps have not
appeared after 24 hours, please contact Uconnect®Care.
Download The Uconnect® Access App
The Uconnect®Access smartphone app allows you to remotely lock or unlock your doors,
start your engine (if equipped) and activate your horn and lights from virtually anywhere.
The smartphone app also features Via Mobile (if equipped) which uses your smartphone’s
data plan to access your personal Pandora®,iHeartRadio,SlackerRadioandAha™by
HARMAN accounts and control them using your vehicle touchscreen.
The Uconnect®Access app is only compatible with select iPhone®and Android smart-
phones. Visit UconnectPhone.com or call 1-877-855-8400 to confirm that your smart-
phone is compatible with Uconnect®.Onceyou’veconfirmedyoursmartphoneis
compatible, Android and iPhone®users should visit their respective app store and search
for “Uconnect Access” to download the app.
Set Up Your Via Mobile Profile — If Equipped
Setting up your Via Mobile profile means entering your login information for each App so
that they can work in your vehicle. Complete your Via Mobile Profile online during
registration of your Uconnect®Access system. Access this page by logging into your
Mopar Owner Connect account (moparownerconnect.com), going to Edit Profile, then Via
Mobile Profile.
ELECTRONICS
67
Page 75 of 236
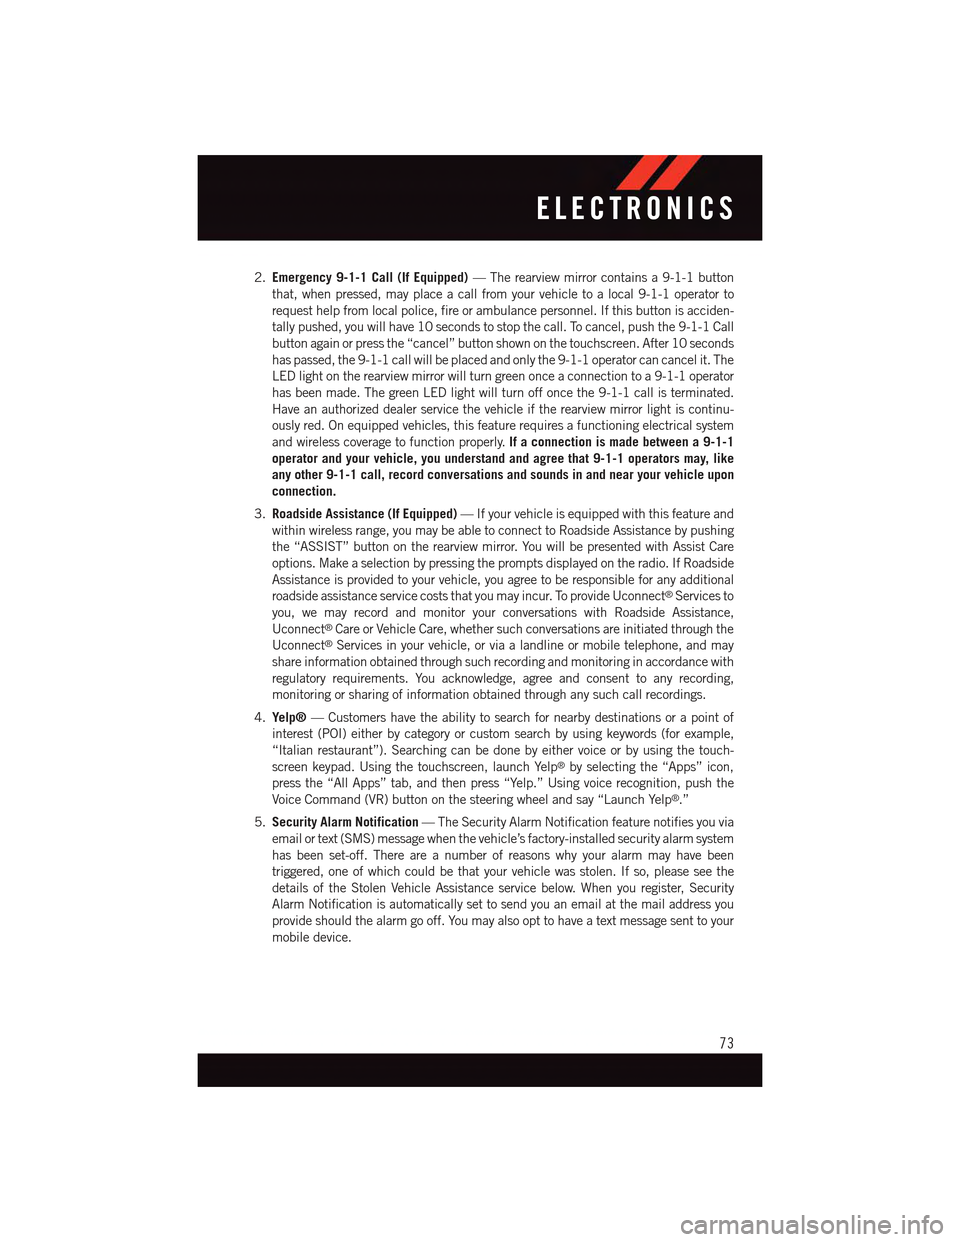
2.Emergency 9-1-1 Call (If Equipped)—Therearviewmirrorcontainsa9-1-1button
that, when pressed, may place a call from your vehicle to a local 9-1-1 operator to
request help from local police, fire or ambulance personnel. If this button is acciden-
tally pushed, you will have 10 seconds to stop the call. To cancel, push the 9-1-1 Call
button again or press the “cancel” button shown on the touchscreen. After 10 seconds
has passed, the 9-1-1 call will be placed and only the 9-1-1 operator can cancel it. The
LED light on the rearview mirror will turn green once a connection to a 9-1-1 operator
has been made. The green LED light will turn off once the 9-1-1 call is terminated.
Have an authorized dealer service the vehicle if the rearview mirror light is continu-
ously red. On equipped vehicles, this feature requires a functioning electrical system
and wireless coverage to function properly.If a connection is made between a 9-1-1
operator and your vehicle, you understand and agree that 9-1-1 operators may, like
any other 9-1-1 call, record conversations and sounds in and near your vehicle upon
connection.
3.Roadside Assistance (If Equipped)—Ifyourvehicleisequippedwiththisfeatureand
within wireless range, you may be able to connect to Roadside Assistance by pushing
the “ASSIST” button on the rearview mirror. You will be presented with Assist Care
options. Make a selection by pressing the prompts displayed on the radio. If Roadside
Assistance is provided to your vehicle, you agree to be responsible for any additional
roadside assistance service costs that you may incur. To provide Uconnect®Services to
you, we may record and monitor your conversations with Roadside Assistance,
Uconnect®Care or Vehicle Care, whether such conversations are initiated through the
Uconnect®Services in your vehicle, or via a landline or mobile telephone, and may
share information obtained through such recording and monitoring in accordance with
regulatory requirements. You acknowledge, agree and consent to any recording,
monitoring or sharing of information obtained through any such call recordings.
4.Yelp®—Customershavetheabilitytosearchfornearbydestinationsorapointof
interest (POI) either by category or custom search by using keywords (for example,
“Italian restaurant”). Searching can be done by either voice or by using the touch-
screen keypad. Using the touchscreen, launch Yelp®by selecting the “Apps” icon,
press the “All Apps” tab, and then press “Yelp.” Using voice recognition, push the
Voice Command (VR) button on the steering wheel and say “Launch Yelp®.”
5.Security Alarm Notification—TheSecurityAlarmNotificationfeaturenotifiesyouvia
email or text (SMS) message when the vehicle’s factory-installed security alarm system
has been set-off. There are a number of reasons why your alarm may have been
triggered, one of which could be that your vehicle was stolen. If so, please see the
details of the Stolen Vehicle Assistance service below. When you register, Security
Alarm Notification is automatically set to send you an email at the mail address you
provide should the alarm go off. You may also opt to have a text message sent to your
mobile device.
ELECTRONICS
73
Page 142 of 236
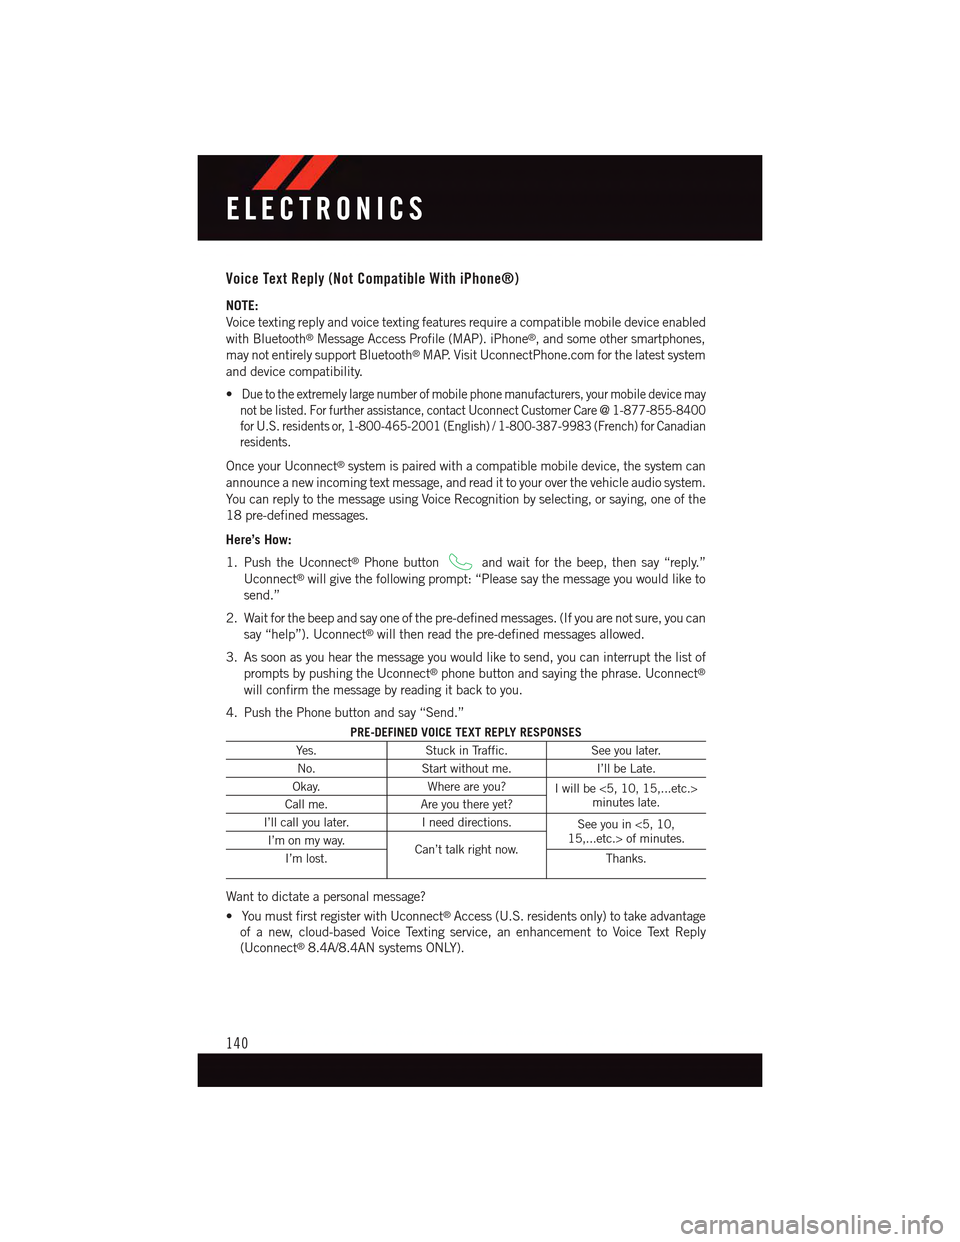
Voice Text Reply (Not Compatible With iPhone®)
NOTE:
Voice texting reply and voice texting features require a compatible mobile device enabled
with Bluetooth®Message Access Profile (MAP). iPhone®,andsomeothersmartphones,
may not entirely support Bluetooth®MAP. Visit UconnectPhone.com for the latest system
and device compatibility.
•Due to the extremely large number of mobile phone manufacturers, your mobile device may
not be listed. For further assistance, contact Uconnect Customer Care @ 1-877-855-8400
for U.S. residents or, 1-800-465-2001 (English) / 1-800-387-9983 (French) for Canadian
residents.
Once your Uconnect®system is paired with a compatible mobile device, the system can
announce a new incoming text message, and read it to your over the vehicle audio system.
Yo u c a n r e p l y t o t h e m e s s a g e u s i n g Vo i c e R e c o g n i t i o n b y s e l e c t i n g , o r s a y i n g , o n e o f t h e
18 pre-defined messages.
Here’s How:
1. Push the Uconnect®Phone buttonand wait for the beep, then say “reply.”
Uconnect®will give the following prompt: “Please say the message you would like to
send.”
2. Wait for the beep and say one of the pre-defined messages. (If you are not sure, you can
say “help”). Uconnect®will then read the pre-defined messages allowed.
3. As soon as you hear the message you would like to send, you can interrupt the list of
prompts by pushing the Uconnect®phone button and saying the phrase. Uconnect®
will confirm the message by reading it back to you.
4. Push the Phone button and say “Send.”
PRE-DEFINED VOICE TEXT REPLY RESPONSES
Ye s .Stuck in Traffic.See you later.
No.Start without me.I’ll be Late.
Okay.Where are you?Iwillbe<5,10,15,...etc.>minutes late.Call me.Are you there yet?
I’ll call you later.Ineeddirections.See you in <5, 10,15,...etc.> of minutes.I’m on my way.Can’t talk right now.I’m lost.Thanks.
Want to dictate a personal message?
•YoumustfirstregisterwithUconnect®Access (U.S. residents only) to take advantage
of a new, cloud-based Voice Texting service, an enhancement to Voice Text Reply
(Uconnect®8.4A/8.4AN systems ONLY).
ELECTRONICS
140
Page 146 of 236
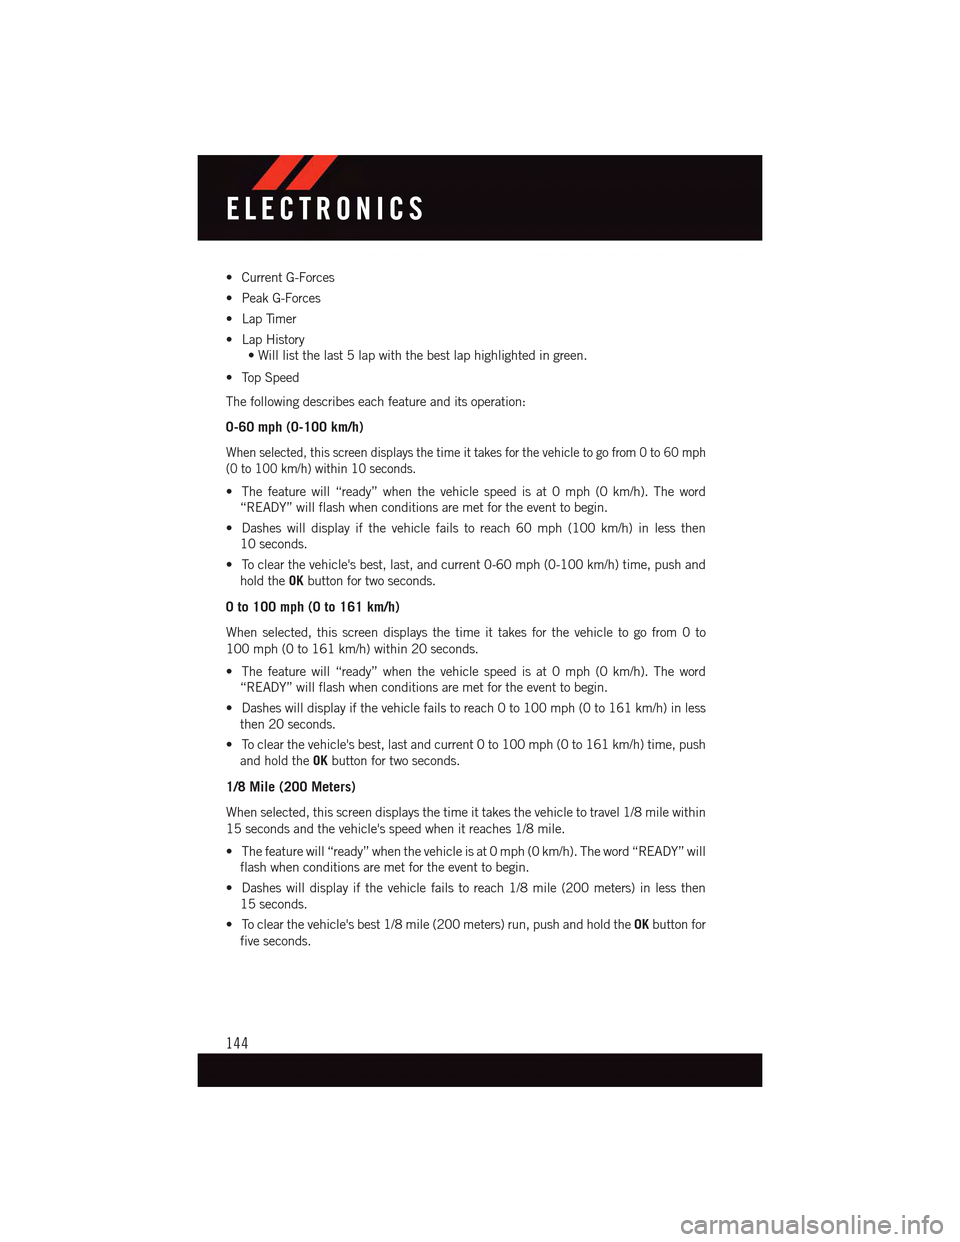
•CurrentG-Forces
•PeakG-Forces
•LapTimer
•LapHistory
•Willlistthelast5lapwiththebestlaphighlightedingreen.
•TopSpeed
The following describes each feature and its operation:
0-60 mph (0-100 km/h)
When selected, this screen displays the time it takes for the vehicle to go from 0 to 60 mph
(0 to 100 km/h) within 10 seconds.
•Thefeaturewill“ready”whenthevehiclespeedisat0mph(0km/h).Theword
“READY” will flash when conditions are met for the event to begin.
•Dasheswilldisplayifthevehiclefailstoreach60mph(100km/h)inlessthen
10 seconds.
•Toclearthevehicle'sbest,last,andcurrent0-60mph(0-100km/h)time,pushand
hold theOKbutton for two seconds.
0 to 100 mph (0 to 161 km/h)
When selected, this screen displays the time it takes for the vehicle to go from 0 to
100 mph (0 to 161 km/h) within 20 seconds.
•Thefeaturewill“ready”whenthevehiclespeedisat0mph(0km/h).Theword
“READY” will flash when conditions are met for the event to begin.
•Dasheswilldisplayifthevehiclefailstoreach0to100mph(0to161km/h)inless
then 20 seconds.
•Toclearthevehicle'sbest,lastandcurrent0to100mph(0to161km/h)time,push
and hold theOKbutton for two seconds.
1/8 Mile (200 Meters)
When selected, this screen displays the time it takes the vehicle to travel 1/8 mile within
15 seconds and the vehicle's speed when it reaches 1/8 mile.
•Thefeaturewill“ready”whenthevehicleisat0mph(0km/h).Theword“READY”will
flash when conditions are met for the event to begin.
•Dasheswilldisplayifthevehiclefailstoreach1/8mile(200meters)inlessthen
15 seconds.
•Toclearthevehicle'sbest1/8mile(200meters)run,pushandholdtheOKbutton for
five seconds.
ELECTRONICS
144
Page 156 of 236
![DODGE CHARGER 2015 7.G Owners Manual In AutoStick mode, the transmission will shift up or down when (+/-) is manually selected
by the driver (using the shift lever, or the shift paddles [if equipped]), unless an engine
lugging or overspe DODGE CHARGER 2015 7.G Owners Manual In AutoStick mode, the transmission will shift up or down when (+/-) is manually selected
by the driver (using the shift lever, or the shift paddles [if equipped]), unless an engine
lugging or overspe](/img/12/5581/w960_5581-155.png)
In AutoStick mode, the transmission will shift up or down when (+/-) is manually selected
by the driver (using the shift lever, or the shift paddles [if equipped]), unless an engine
lugging or overspeed condition would result. It will remain in the selected gear until
another upshift or downshift is chosen, except as described below.
•IntemporaryAutoStickmode(shiftleverinDRIVE),thetransmissionwillautomatically
shift up when maximum engine speed is reached. If the accelerator is fully depressed,
the transmission will downshift when possible (based on current vehicle speed and
gear, except 6.4L models). Lack of accelerator pedal activity will cause the transmis-
sion to revert to automatic operation.
•IfnormalAutoStickmodeisengaged(shiftleverinMANUALposition),manualgear
selection will be maintained until the shift lever is returned to DRIVE, or as described
below. The transmission will not upshift automatically at redline in this mode, nor will
downshifts be obtained if the accelerator pedal is pressed to the floor.
•Thetransmissionwillautomaticallydownshiftasthevehicleslows(topreventengine
lugging) and will display the current gear.
•Thetransmissionwillautomaticallydownshifttofirstgearwhencomingtoastop.After
astop,thedrivershouldmanuallyupshift(+)thetransmissionasthevehicleis
accelerated.
•Youcanstartout,fromastop,infirstorsecondgear.Tapping(+)(atastop)willallow
starting in second gear. Starting out in second gear can be helpful in snowy or icy
conditions.
•Ifarequesteddownshiftwouldcausetheenginetoover-speed,thatshiftwillnotoccur.
•Thesystemwillignoreattemptstoupshiftattoolowofavehiclespeed.
•Holdingthe(-)paddledepressed(ifequipped),orholdingtheshiftleverinthe(-)
position, will downshift the transmission to the lowest gear possible at the current
speed.
•TransmissionshiftingwillbemorenoticeablewhenAutoStickisengaged.
•Thesystemmayreverttoautomaticshiftmodeifafaultoroverheatconditionis
detected.
To d i s e n g a g e A u t o S t i c k m o d e , r e t u r n t h e s h i f t l e v e r t o t h e D R I V E p o s i t i o n , o r p r e s s a n d
hold the (+) shift paddle (if equipped, and the shift lever is already in DRIVE) until “D” is
once again indicated in the instrument cluster. You can shift in or out of the AutoStick
mode at any time without taking your foot off the accelerator pedal.
WARNING!
Do not downshift for additional engine braking on a slippery surface. The drive wheels
could lose their grip and the vehicle could skid, causing a collision or personal injury.
SRT
154
Page 158 of 236
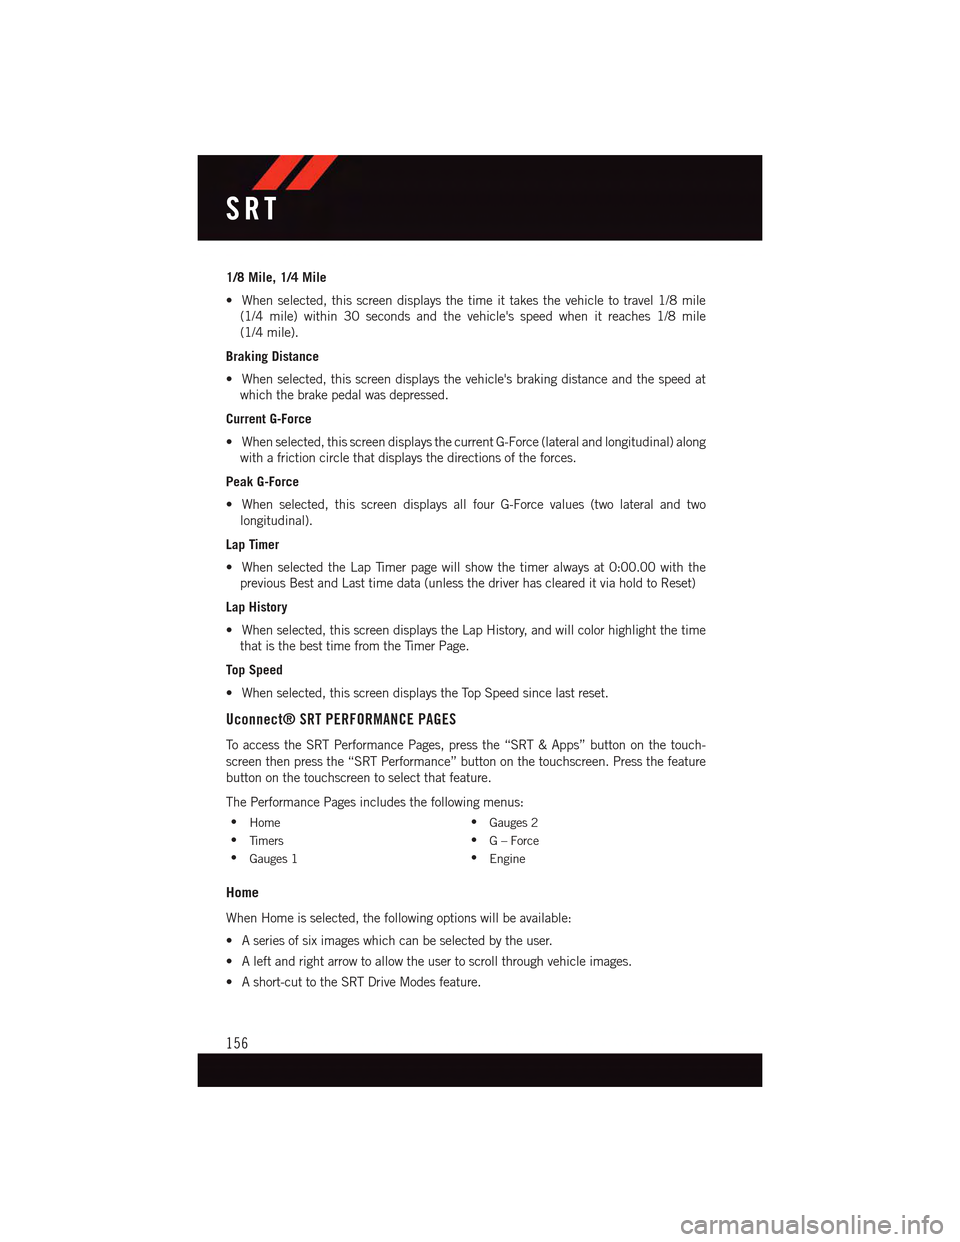
1/8 Mile, 1/4 Mile
•Whenselected,thisscreendisplaysthetimeittakesthevehicletotravel1/8mile
(1/4 mile) within 30 seconds and the vehicle's speed when it reaches 1/8 mile
(1/4 mile).
Braking Distance
•Whenselected,thisscreendisplaysthevehicle'sbrakingdistanceandthespeedat
which the brake pedal was depressed.
Current G-Force
•Whenselected,thisscreendisplaysthecurrentG-Force(lateralandlongitudinal)along
with a friction circle that displays the directions of the forces.
Peak G-Force
•Whenselected,thisscreendisplaysallfourG-Forcevalues(twolateralandtwo
longitudinal).
Lap Timer
•WhenselectedtheLapTimerpagewillshowthetimeralwaysat0:00.00withthe
previous Best and Last time data (unless the driver has cleared it via hold to Reset)
Lap History
•Whenselected,thisscreendisplaystheLapHistory,andwillcolorhighlightthetime
that is the best time from the Timer Page.
Top Speed
•Whenselected,thisscreendisplaystheTopSpeedsincelastreset.
Uconnect® SRT PERFORMANCE PAGES
To a c c e s s t h e S R T P e r f o r m a n c e P a g e s , p r e s s t h e “ S R T & A p p s ” b u t t o n o n t h e t o u c h -
screen then press the “SRT Performance” button on the touchscreen. Press the feature
button on the touchscreen to select that feature.
The Performance Pages includes the following menus:
•Home•Gauges 2
•Ti m e r s•G–Force
•Gauges 1•Engine
Home
When Home is selected, the following options will be available:
•Aseriesofsiximageswhichcanbeselectedbytheuser.
•Aleftandrightarrowtoallowtheusertoscrollthroughvehicleimages.
•Ashort-cuttotheSRTDriveModesfeature.
SRT
156
Page 159 of 236
Timers
When the Timers Page is selected you will be able to select from following “Tickets”:
Current
•Pressingthe“Current”buttondisplaysa“realtime”summaryofperformancetimers.
Last
•Pressingthe“Last”buttondisplaysthelastrecordedrunofperformancetimers.
Best
•Pressingthe“Best”buttondisplaysthebestrecordedrunofperformancetimers,
except for braking data.
Save
•Pressingthe“Save”buttonwillletyousavethelastrun.Anysavedrunover10,will
overwrite the last saved run for Uconnect®System storage.
Gauges 1
When selected, this screen displays the following values:
•CoolantTemperature
•OilPressure
•OilTemperature
•BatteryVoltage(6.2LOnly)
•TransOilTemp(6.2LOnly)
Gauges 2
When selected, this screen displays the following values for the 6.2L:
•BoostPressure
•AirFuelRatio
•Inter-Cooler(I/C)CoolantTemperature
•IntakeAirTemperature
When selected, this screen displays the following values for the 6.4L:
•BatteryVoltage
•IntakeAirTemperature
•TransmissionTemperature
G-Force
When selected, this screen displays the following values:
•LateralG-ForceLeftandRight
•LongitudinalG-ForceForeandAft
•PeakG-ForcesForeAft,LeftandRight
•VehicleSpeed
•SteeringWheelAngle
SRT
157