tow DODGE CHARGER 2015 7.G Owner's Manual
[x] Cancel search | Manufacturer: DODGE, Model Year: 2015, Model line: CHARGER, Model: DODGE CHARGER 2015 7.GPages: 236, PDF Size: 35.67 MB
Page 74 of 236
Built-In Features (Uconnect® 8.4A/8.4AN)
CAUTION!
•Ignoringtherearviewmirrorlightcouldmeanyoumaynothave9-1-1Callservice
if needed. If the rearview mirror light is illuminated, have an authorized dealer
service the 9-1-1 Call system immediately.
•TheOccupantRestraintController(ORC)turnsontheAirBagWarningLightonthe
instrument panel if a malfunction is detected in any part of the air bag system. If the
Air Bag Warning Light is illuminated, the air bag system may not be working
properly and the 9-1-1 system may not be able to send a signal to a 9-1-1 operator.
If the Air Bag Warning Light is illuminated, have an authorized dealer service your
vehicle immediately.
•Ifanyoneinthevehiclecouldbeindanger(e.g.,fireorsmokeisvisible,dangerous
road conditions or location), do not wait for voice contact from a 9-1-1 operator. All
occupants should exit the vehicle immediately and move to a safe location.
•Donotaddanyaftermarketelectricalequipmenttothevehicle’selectricalsystem.
This may prevent your vehicle from sending a signal to initiate an emergency call.
To a v o i d i n t e r f e r e n c e t h a t c a n c a u s e t h e 9 - 1 - 1 C a l l s y s t e m t o f a i l , n e v e r a d d
aftermarket equipment (e.g., two-way mobile radio, CB radio, data recorder, etc.) to
your vehicle’s electrical system or modify the antennas on your vehicle. IF YOUR
VEHICLE LOSES BATTERY POWER FOR ANY REASON (INCLUDING DURING OR
AFTER AN ACCIDENT), THE UCONNECT®FEATURES, APPS AND SERVICES,
AMONG OTHERS, WILL NOT OPERATE.
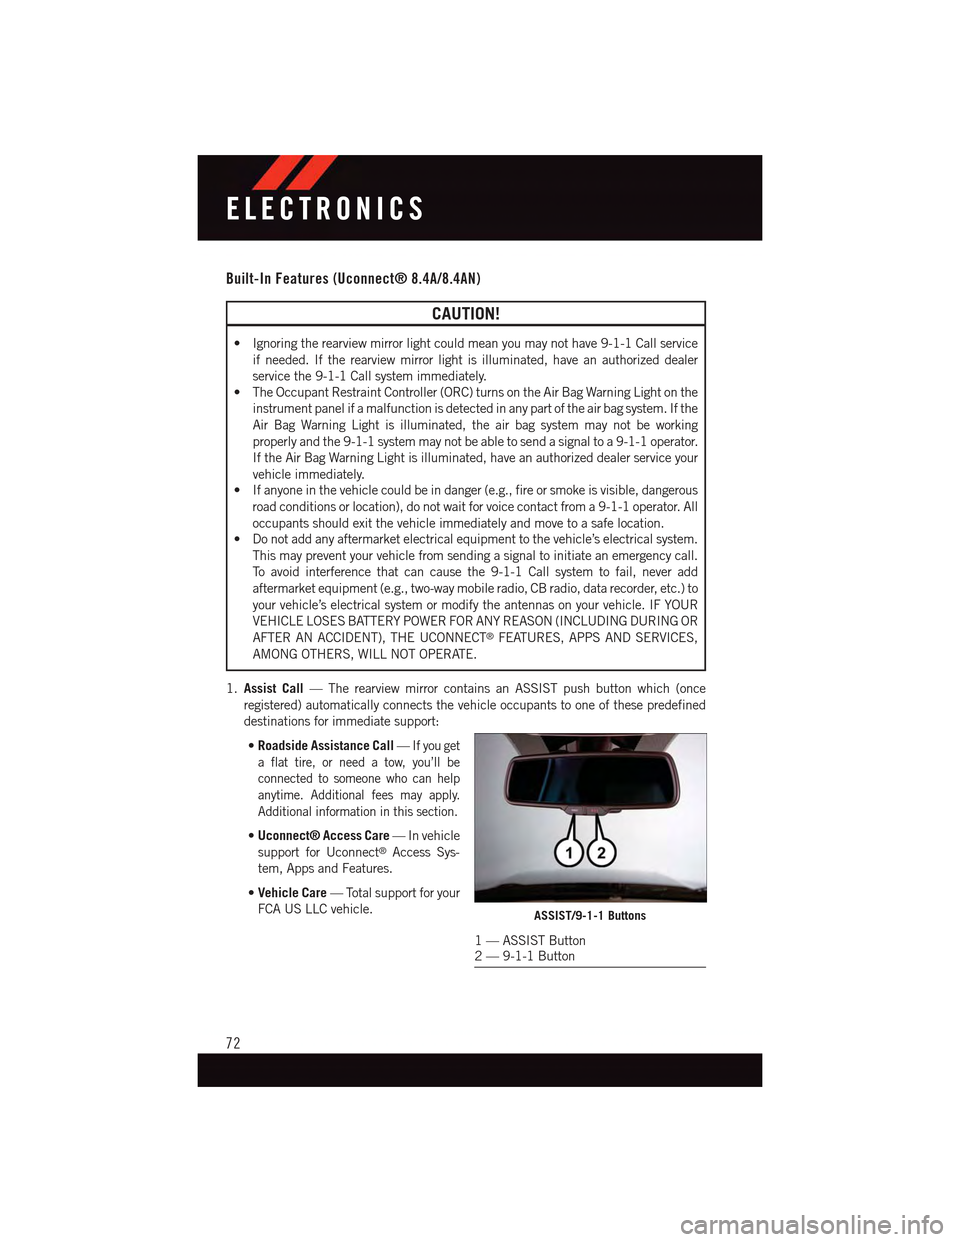
1.Assist Call—TherearviewmirrorcontainsanASSISTpushbuttonwhich(once
registered) automatically connects the vehicle occupants to one of these predefined
destinations for immediate support:
•Roadside Assistance Call—If you get
aflattire,orneedatow,you’llbe
connected to someone who can help
anytime. Additional fees may apply.
Additional information in this section.
•Uconnect® Access Care—Invehicle
support for Uconnect®Access Sys-
tem, Apps and Features.
•Vehicle Care—Totalsupportforyour
FCA US LLC vehicle.ASSIST/9-1-1 Buttons
1—ASSISTButton2—9-1-1Button
ELECTRONICS
72
Page 154 of 236
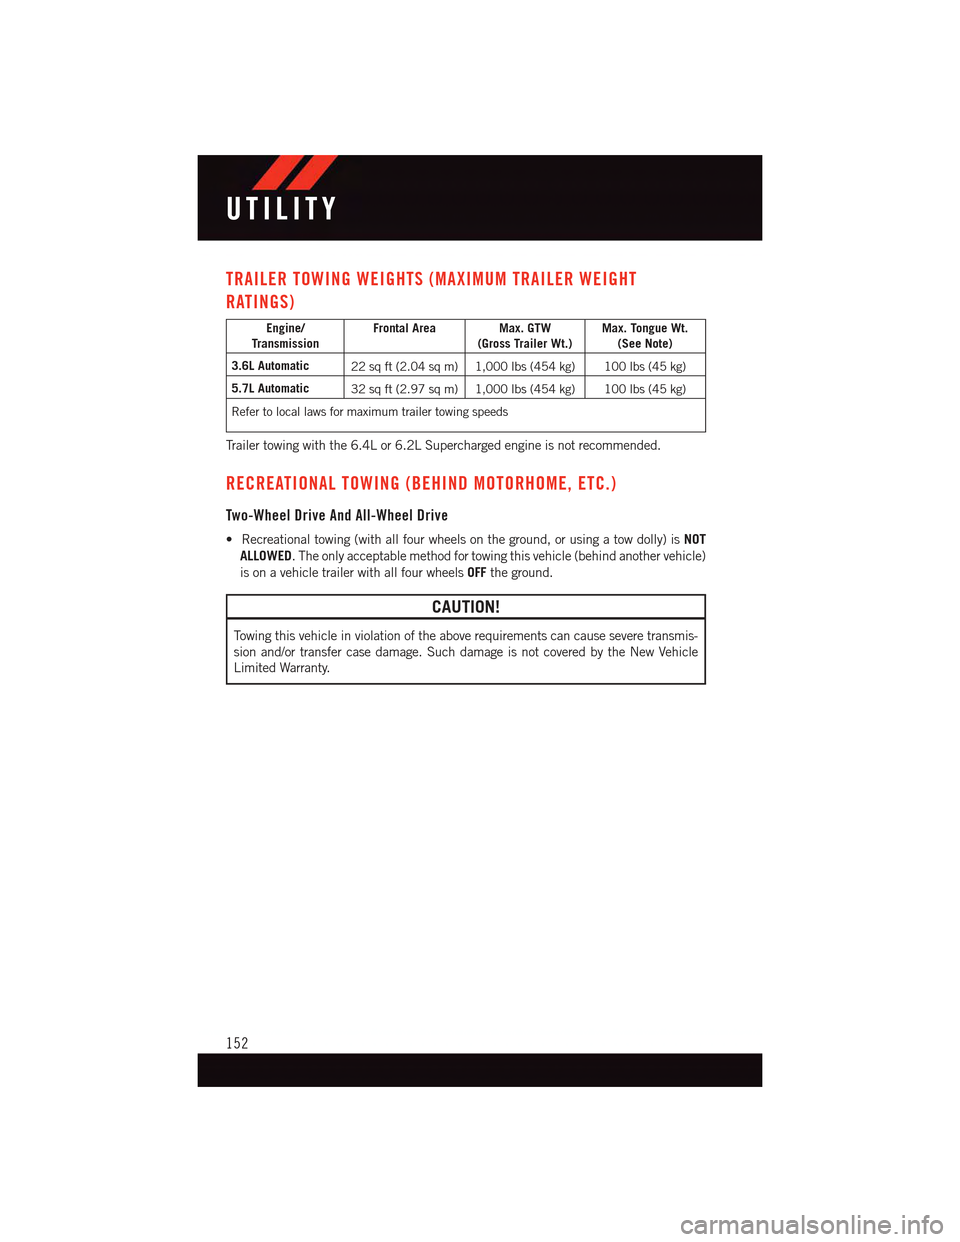
TRAILER TOWING WEIGHTS (MAXIMUM TRAILER WEIGHT
RATINGS)
Engine/TransmissionFrontal Area Max. GTW(Gross Trailer Wt.)Max. Tongue Wt.(See Note)
3.6L Automatic22 sq ft (2.04 sq m) 1,000 lbs (454 kg) 100 lbs (45 kg)
5.7L Automatic32 sq ft (2.97 sq m) 1,000 lbs (454 kg) 100 lbs (45 kg)
Refer to local laws for maximum trailer towing speeds
Tr a i l e r t o w i n g w i t h t h e 6 . 4 L o r 6 . 2 L S u p e r c h a r g e d e n g i n e i s n o t r e c o m m e n d e d .
RECREATIONAL TOWING (BEHIND MOTORHOME, ETC.)
Two-Wheel Drive And All-Wheel Drive
•Recreationaltowing(withallfourwheelsontheground,orusingatowdolly)isNOT
ALLOWED.Theonlyacceptablemethodfortowingthisvehicle(behindanothervehicle)
is on a vehicle trailer with all four wheelsOFFthe ground.
CAUTION!
To w i n g t h i s v e h i c l e i n v i o l a t i o n o f t h e a b o v e r e q u i r e m e n t s c a n c a u s e s e v e r e t r a n s m i s -
sion and/or transfer case damage. Such damage is not covered by the New Vehicle
Limited Warranty.
UTILITY
152
Page 155 of 236
AUTOSTICK
Steering Wheel Mounted Paddle Shifters Or Console Mounted Shifter
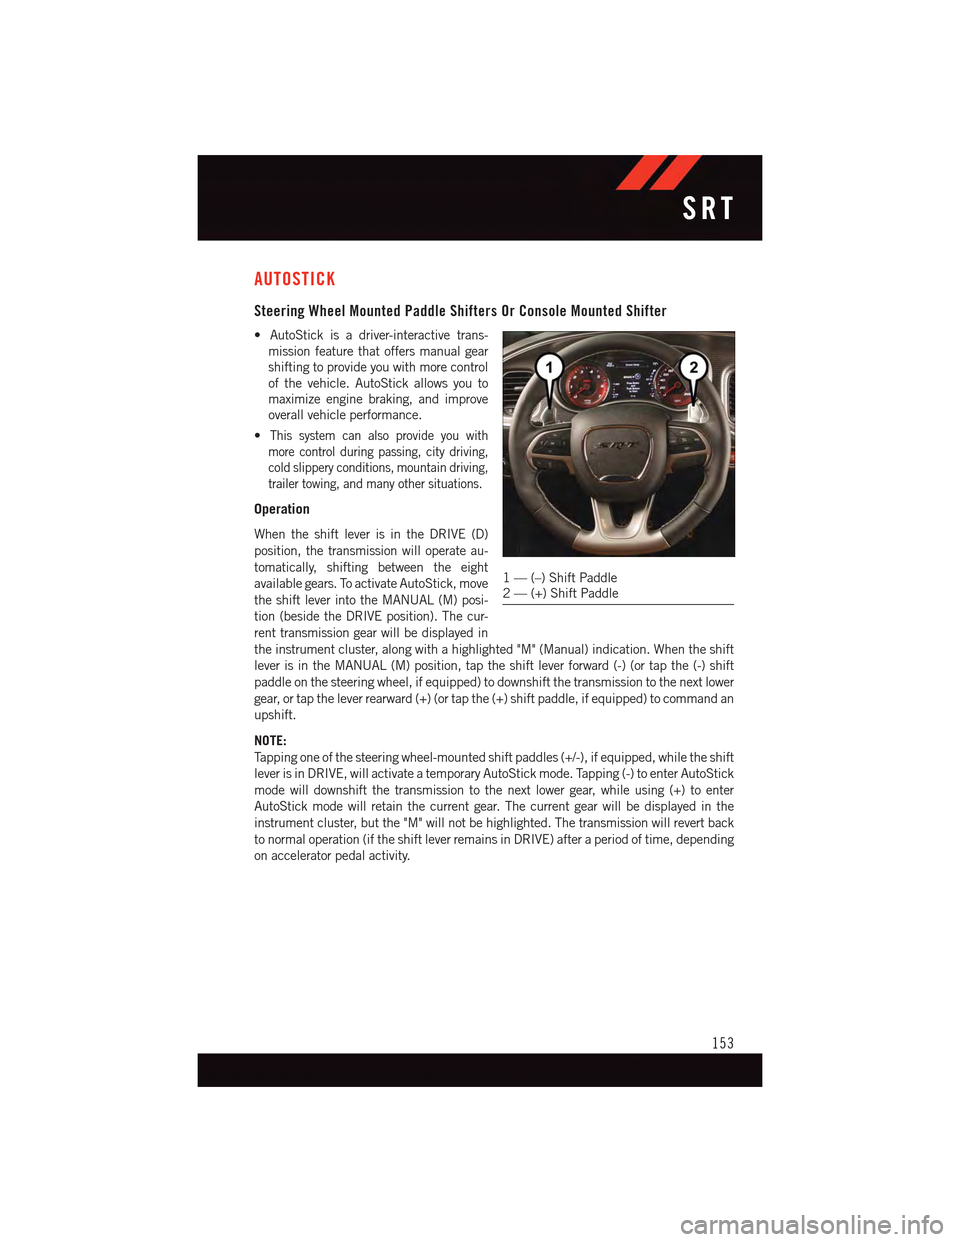
•AutoStickisadriver-interactivetrans-
mission feature that offers manual gear
shifting to provide you with more control
of the vehicle. AutoStick allows you to
maximize engine braking, and improve
overall vehicle performance.
•This system can also provide you with
more control during passing, city driving,
cold slippery conditions, mountain driving,
trailer towing, and many other situations.
Operation
When the shift lever is in the DRIVE (D)
position, the transmission will operate au-
tomatically, shifting between the eight
available gears. To activate AutoStick, move
the shift lever into the MANUAL (M) posi-
tion (beside the DRIVE position). The cur-
rent transmission gear will be displayed in
the instrument cluster, along with a highlighted "M" (Manual) indication. When the shift
lever is in the MANUAL (M) position, tap the shift lever forward (-) (or tap the (-) shift
paddle on the steering wheel, if equipped) to downshift the transmission to the next lower
gear, or tap the lever rearward (+) (or tap the (+) shift paddle, if equipped) to command an
upshift.
NOTE:
Ta p p i n g o n e o f t h e s t e e r i n g w h e e l - m o u n t e d s h i f t p a d d l e s ( + / - ) , i f e q u i p p e d , w h i l e t h e s h i f t
lever is in DRIVE, will activate a temporary AutoStick mode. Tapping (-) to enter AutoStick
mode will downshift the transmission to the next lower gear, while using (+) to enter
AutoStick mode will retain the current gear. The current gear will be displayed in the
instrument cluster, but the "M" will not be highlighted. The transmission will revert back
to normal operation (if the shift lever remains in DRIVE) after a period of time, depending
on accelerator pedal activity.
1—(–)ShiftPaddle2—(+)ShiftPaddle
SRT
153
Page 162 of 236
Electronic Throttle Control (ETC) Indicator Light
This light informs you of a problem with the system.
If a problem is detected, the light will come on while the engine is running. Cycle the
ignition when the vehicle has completely stopped and the shift lever is placed in the PARK
position; the light should turn off.
If the light remains lit with the engine running, your vehicle will usually be drivable.
However, see an authorized dealer immediately. If the light is flashing when the engine is
running, immediate service is required, and you may experience reduced performance, an
elevated/rough idle or engine stall, and your vehicle may require towing.
Tire Pressure Monitoring System (TPMS) Light
Each tire, including the spare (if provided), should be checked monthly when cold and
inflated to the inflation pressure recommended by the vehicle manufacturer on the
vehicle placard or tire inflation pressure label. (If your vehicle has tires of a different size
than the size indicated on the vehicle placard or tire inflation pressure label, you should
determine the proper tire inflation pressure for those tires).
As an added safety feature, your vehicle has been equipped with a tire pressure
monitoring system (TPMS) that illuminates a low tire pressure telltale when one or more
of your tires is significantly under-inflated. Accordingly, when the low tire pressure telltale
illuminates, you should stop and check your tires as soon as possible and inflate them to
the proper pressure. Driving on a significantly under-inflated tire causes the tire to
overheat and can lead to tire failure. Under-inflation also reduces fuel efficiency and tire
tread life and may affect the vehicle’s handling and stopping ability.
IF THE LIGHT STARTS FLASHING INDICATING A LOW TIRE PRESSURE, ADJUST THE AIR
PRESSURE IN THE LOW TIRE TO THE AIR PRESSURE SHOWN ON THE VEHICLE PLACARD OR
TIRE INFLATION PRESSURE LABEL LOCATED ON THE DRIVER'S DOOR.
NOTE:
AFTER INFLATION, THE VEHICLE MAY NEED TO BE DRIVEN FOR 20 MINUTES
BEFORE THE FLASHING LIGHT WILL TURN OFF.
Please note that the TPMS is not a substitute for proper tire maintenance, and it is the
driver’s responsibility to maintain correct tire pressure, even if under-inflation has not
reached the level to trigger illumination of the TPMS low tire pressure telltale.
Yo u r v e h i c l e h a s a l s o b e e n e q u i p p e d w i t h a T P M S m a l f u n c t i o n i n d i c a t o r t o i n d i c a t e w h e n
the system is not operating properly. The TPMS malfunction indicator is combined with
the low tire pressure telltale.
WHAT TO DO IN EMERGENCIES
160
Page 165 of 236

WARNING!
Driving a vehicle with the red brake light on is dangerous. Part of the brake system may
have failed. It will take longer to stop the vehicle. You could have a collision. Have the
vehicle checked immediately.
Malfunction Indicator Light (MIL)
Certain conditions, such as a poor fuel quality, etc., may illuminate the MIL after engine
start. The vehicle should be serviced if the light stays on through several typical driving
cycles. In most situations, the vehicle will drive normally and not require towing.
If the MIL flashes when the engine is running, serious conditions may exist that could lead
to immediate loss of power or severe catalytic converter damage. We recommend you do
not operate the vehicle. Have the vehicle serviced immediately.
Electronic Stability Control (ESC) OFF Indicator Light
This light indicates the Electronic Stability Control (ESC) is off.
INSTRUMENT CLUSTER INDICATOR LIGHTS
Turn Signal Indicator
The arrows will flash with the exterior turn signals when the turn signal lever is operated.
Atonewillchime,andaDIDmessagewillappearifeitherturnsignalisleftonformore
than 1 mile (1.6 km).
NOTE:
If either indicator flashes at a rapid rate, check for a defective outside light bulb.
High Beam Indicator
Indicates that headlights are on high beam.
Front Fog Light Indicator
This indicator will illuminate when the front fog lights are on.
Vehicle Security Light
This light will flash rapidly for approximately 15 seconds when the vehicle security alarm
is arming. The light will flash at a slower speed continuously after the alarm is set. The
security light will also come on for about three seconds when the ignition is first turned on.
Electronic Speed Control Set
Indicates that the Electronic Speed Control has been set.
WHAT TO DO IN EMERGENCIES
163
Page 168 of 236
JACKING AND TIRE CHANGING
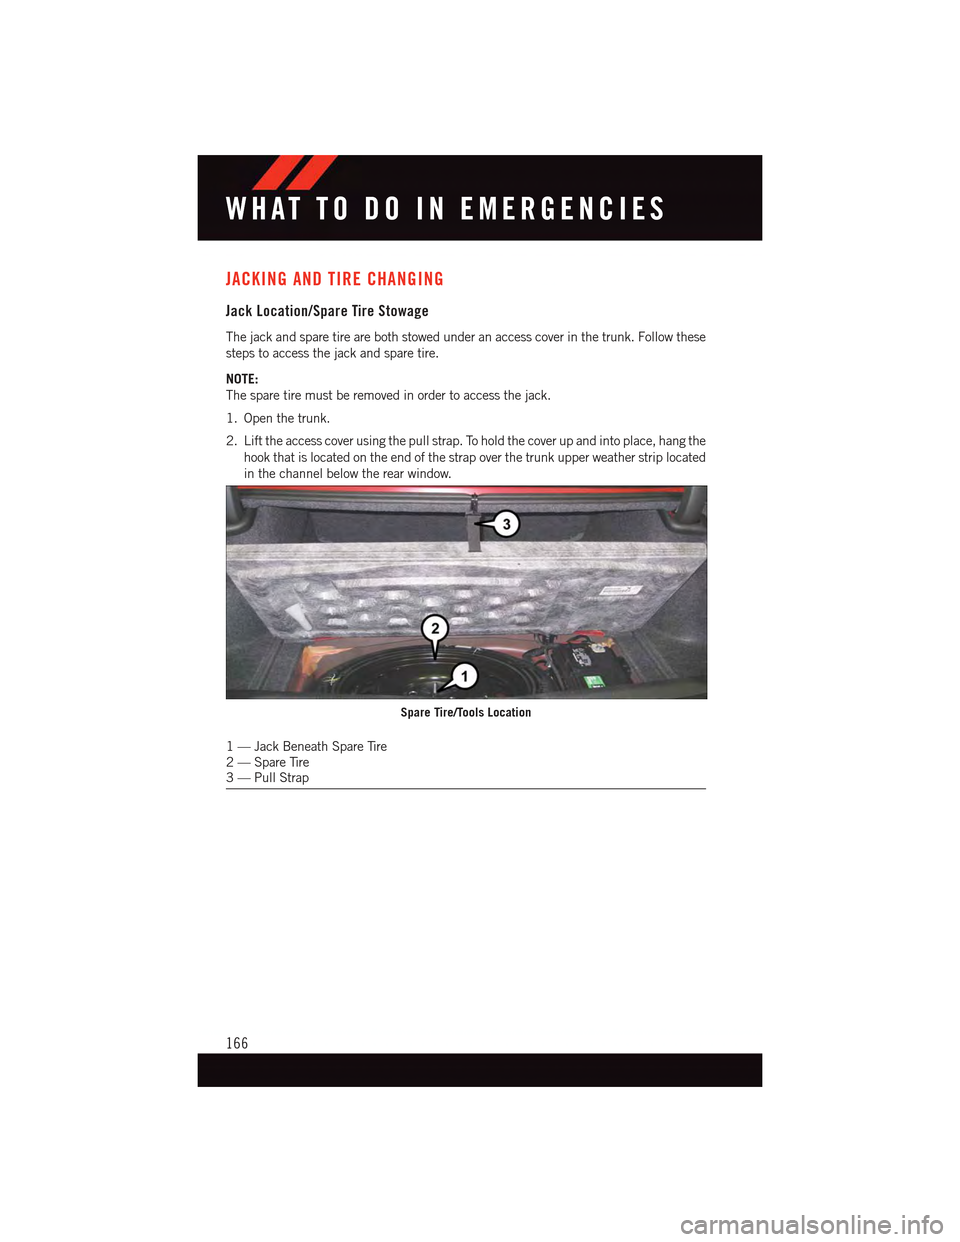
Jack Location/Spare Tire Stowage
The jack and spare tire are both stowed under an access cover in the trunk. Follow these
steps to access the jack and spare tire.
NOTE:
The spare tire must be removed in order to access the jack.
1. Open the trunk.
2. Lift the access cover using the pull strap. To hold the cover up and into place, hang the
hook that is located on the end of the strap over the trunk upper weather strip located
in the channel below the rear window.
1—JackBeneathSpareTire2—SpareTire3—PullStrap
Spare Tire/Tools Location
WHAT TO DO IN EMERGENCIES
166
Page 172 of 236
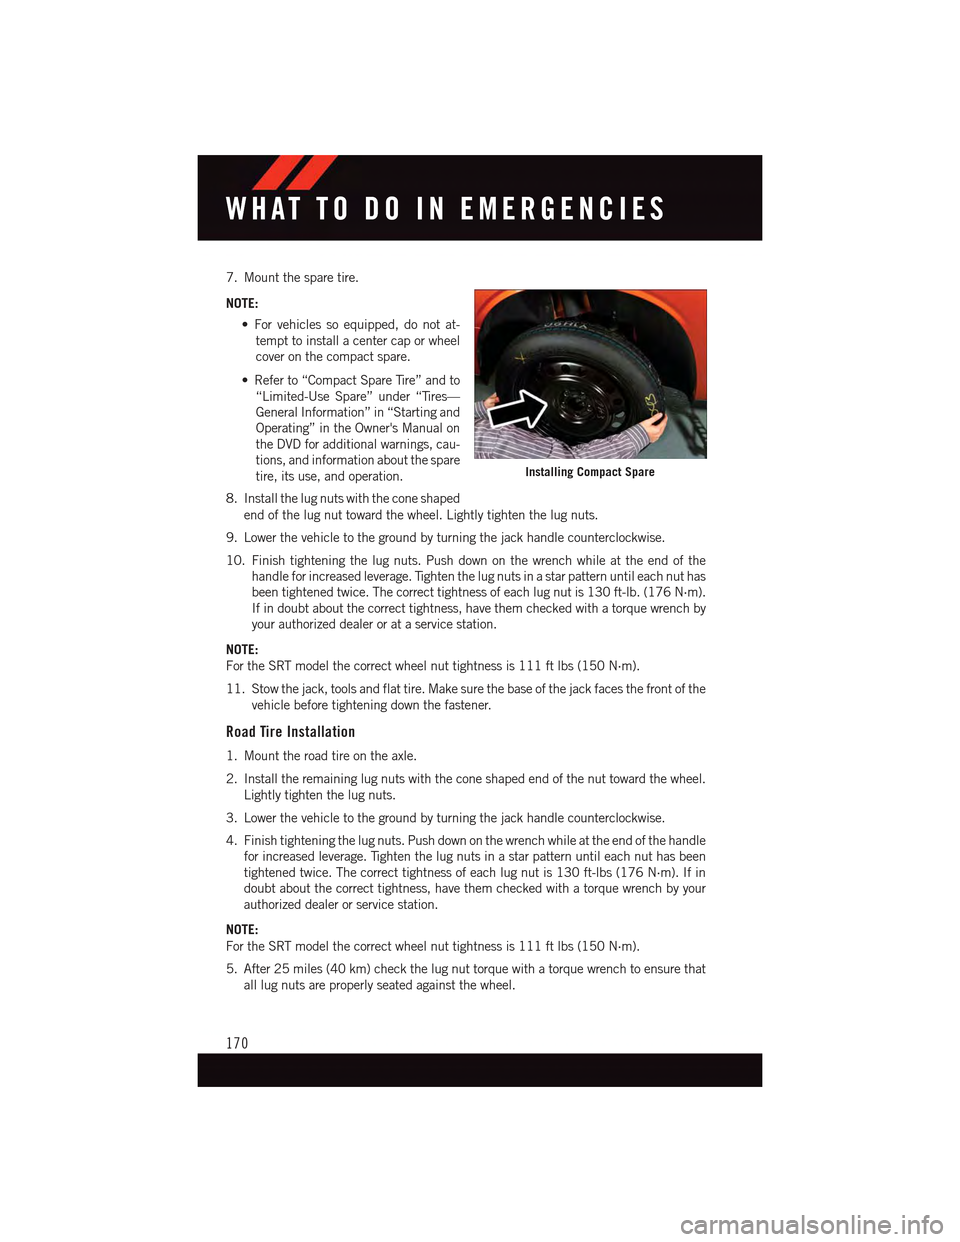
7. Mount the spare tire.
NOTE:
•Forvehiclessoequipped,donotat-
tempt to install a center cap or wheel
cover on the compact spare.
•Referto“CompactSpareTire”andto
“Limited-Use Spare” under “Tires—
General Information” in “Starting and
Operating” in the Owner's Manual on
the DVD for additional warnings, cau-
tions, and information about the spare
tire, its use, and operation.
8. Install the lug nuts with the cone shaped
end of the lug nut toward the wheel. Lightly tighten the lug nuts.
9. Lower the vehicle to the ground by turning the jack handle counterclockwise.
10. Finish tightening the lug nuts. Push down on the wrench while at the end of the
handle for increased leverage. Tighten the lug nuts in a star pattern until each nut has
been tightened twice. The correct tightness of each lug nut is 130 ft-lb. (176 N·m).
If in doubt about the correct tightness, have them checked with a torque wrench by
your authorized dealer or at a service station.
NOTE:
For the SRT model the correct wheel nut tightness is 111 ft lbs (150 N·m).
11. Stow the jack, tools and flat tire. Make sure the base of the jack faces the front of the
vehicle before tightening down the fastener.
Road Tire Installation
1. Mount the road tire on the axle.
2. Install the remaining lug nuts with the cone shaped end of the nut toward the wheel.
Lightly tighten the lug nuts.
3. Lower the vehicle to the ground by turning the jack handle counterclockwise.
4. Finish tightening the lug nuts. Push down on the wrench while at the end of the handle
for increased leverage. Tighten the lug nuts in a star pattern until each nut has been
tightened twice. The correct tightness of each lug nut is 130 ft-lbs (176 N·m). If in
doubt about the correct tightness, have them checked with a torque wrench by your
authorized dealer or service station.
NOTE:
For the SRT model the correct wheel nut tightness is 111 ft lbs (150 N·m).
5. After 25 miles (40 km) check the lug nut torque with a torque wrench to ensure that
all lug nuts are properly seated against the wheel.
Installing Compact Spare
WHAT TO DO IN EMERGENCIES
170
Page 173 of 236
CAUTION!
Do not attempt to raise the vehicle by jacking on locations other than those indicatedin the Jacking Instructions for this vehicle.
WARNING!
•Do not attempt to change a tire on the side of the vehicle close to moving traffic. Pullfar enough off the road to avoid the danger of being hit when operating the jack orchanging the wheel.
•Beingunderajacked-upvehicleisdangerous.Thevehiclecouldslipoffthejackand fall on you. You could be crushed. Never put any part of your body under avehicle that is on a jack.
•Neverstartorruntheenginewhilethevehicleisonajack.Ifyouneedtogetunder
araisedvehicle,takeittoaservicecenterwhereitcanberaisedonalift.
•Thejackisdesignedtobeusedasatoolforchangingtiresonly.Thejackshouldnot
be used to lift the vehicle for service purposes. The vehicle should be jacked on a
firm level surface only. Avoid ice or slippery areas.
•Aloosetireorjackthrownforwardinacollisionorhardstopcouldendangerthe
occupants of the vehicle. Always stow the jack parts and the spare tire in the places
provided.
•Carefullyfollowthesetirechangingwarningstohelppreventpersonalinjuryor
damage to your vehicle:
•Alwaysparkonafirm,levelsurfaceasfarfromtheedgeoftheroadwayaspossible
before raising the vehicle.
•TurnontheHazardWarningflasher.
•Blockthewheeldiagonallyoppositethewheeltoberaised.
•SettheparkingbrakefirmlyandsetanautomatictransmissioninPARK;amanual
transmission in REVERSE.
•Donotletanyonesitinthevehiclewhenitisonajack.
•Donotgetunderthevehiclewhenitisonajack.
•Onlyusethejackinthepositionsindicatedandforliftingthisvehicleduringatire
change.
•Ifworkingonorneararoadway,beextremelycarefulofmotortraffic.
•Raising the vehicle higher than necessary can make the vehicle less stable. It could slip
off the jack and hurt someone near it. Raise the vehicle only enough to remove the tire.
•Toavoidtheriskofforcingthevehicleoffthejack,donotfullytightenthewheel
nuts until the vehicle has been lowered. Failure to follow this warning may result in
personal injury.
•Aloosetireorjackthrownforwardinacollisionorhardstopcouldendangertheoccu-
pantsof the vehicle. Always stow the jack parts and the spare tire in the places provided.
•Thelimited-usesparetiresareforemergencyuseonly.Installationofthislimited-use spare tire affects vehicle handling. With this tire, do not drive more than60 mph (100 km/h). Keep inflated to the cold tire inflation pressure listed on eitheryour tire placard or limited-use spare tire and wheel assembly. Replace (or repair)the original tire at the first opportunity and reinstall it on your vehicle. Failure to doso could result in loss of vehicle control.
WHAT TO DO IN EMERGENCIES
171
Page 179 of 236
WARNING!
•Donotattempttosealatireonthesideofthevehicleclosesttotraffic.Pullfar
enough off the road to avoid the danger of being hit when using the Tire Service Kit.•DonotusetheTireServiceKitordrivethevehicleunderthefollowingcircum-
stances:
•Ifthepunctureinthetiretreadisapproximately1/4”.(6mm)orlarger.
•Ifthetirehasanysidewalldamage.
•Ifthetirehasanydamagefromdrivingwithextremelylowtirepressure.
•Ifthetirehasanydamagefromdrivingonaflattire.
•Ifthewheelhasanydamage.
•Ifyouareunsureoftheconditionofthetireorthewheel.
•KeeptheTireServiceKitawayfromopenflamesorheatsource.
•AlooseTireServiceKitthrownforwardinacollisionorhardstopcouldendangerthe
occupants of the vehicle. Always stow the Tire Service Kit in the place provided.
Failure to follow these warnings can result in injuries that are serious or fatal to you,
your passengers, and others around you.
•TakecarenottoallowthecontentsoftheTireServiceKittocomeincontactwith
hair, eyes, or clothing. The Tire Service Kit is harmful if inhaled, swallowed, or
absorbed through the skin. It causes skin, eye, and respiratory irritation. Flush
immediately with plenty of water if there is any contact with eyes or skin. Change
clothing as soon as possible, if there is any contact with clothing.
•TheTireServiceKitSealantsolutioncontainslatex.Incaseofanallergicreaction
or rash, consult a physician immediately. Keep the Tire Service Kit out of reach of
children. If swallowed, rinse mouth immediately with plenty of water and drink
plenty of water. Do not induce vomiting! Consult a physician immediately.
•TheTireServiceKitisnotapermanentflattirerepair.Havethetireinspectedand
repaired or replaced after using the Tire Service Kit. Do not exceed 55 mph
(88 km/h) until the tire is repaired or replaced. Failure to follow this warning can
result in injuries that are serious or fatal to you, your passengers, and others around
you.
WHAT TO DO IN EMERGENCIES
177
Page 182 of 236
WARNING!
•Whentemperaturesarebelowthefreezingpoint,electrolyteinadischargedbattery
may freeze. Do not attempt jump-starting because the battery could rupture or
explode and cause personal injury. Battery temperature must be brought above
freezing point before attempting a jump-start.
•Takecaretoavoidtheradiatorcoolingfanwheneverthehoodisraised.Itcanstart
anytime the ignition switch is on. You can be injured by moving fan blades.
•Removeanymetaljewelry,suchaswatchbandsorbracelets,thatmightmakean
inadvertent electrical contact. You could be severely injured.
•Batteriescontainsulfuricacidthatcanburnyourskinoreyesandgenerate
hydrogen gas which is flammable and explosive. Keep open flames or sparks away
from the battery.
•Donotallowvehiclestotoucheachotherasthiscouldestablishaground
connection and personal injury could result.
•Failuretofollowthisprocedurecouldresultinpersonalinjuryorpropertydamage
due to battery explosion.
•Donotconnectthecabletothenegativepost(-)of the discharged battery. The
resulting electrical spark could cause the battery to explode and could result in
personal injury.
MANUAL PARK RELEASE — 8 SPEED TRANSMISSION
WARNING!
Always secure your vehicle by fully applying the parking brake, before activating the
Manual Park Release. Activating the Manual Park Release will allow your vehicle to roll
away if it is not secured by the parking brake or by proper connection to a tow vehicle.
Activating the Manual Park Release on an unsecured vehicle could lead to serious
injury or death for those in or around the vehicle.
WHAT TO DO IN EMERGENCIES
180