reset DODGE CHARGER 2015 7.G User Guide
[x] Cancel search | Manufacturer: DODGE, Model Year: 2015, Model line: CHARGER, Model: DODGE CHARGER 2015 7.GPages: 236, PDF Size: 35.67 MB
Page 31 of 236
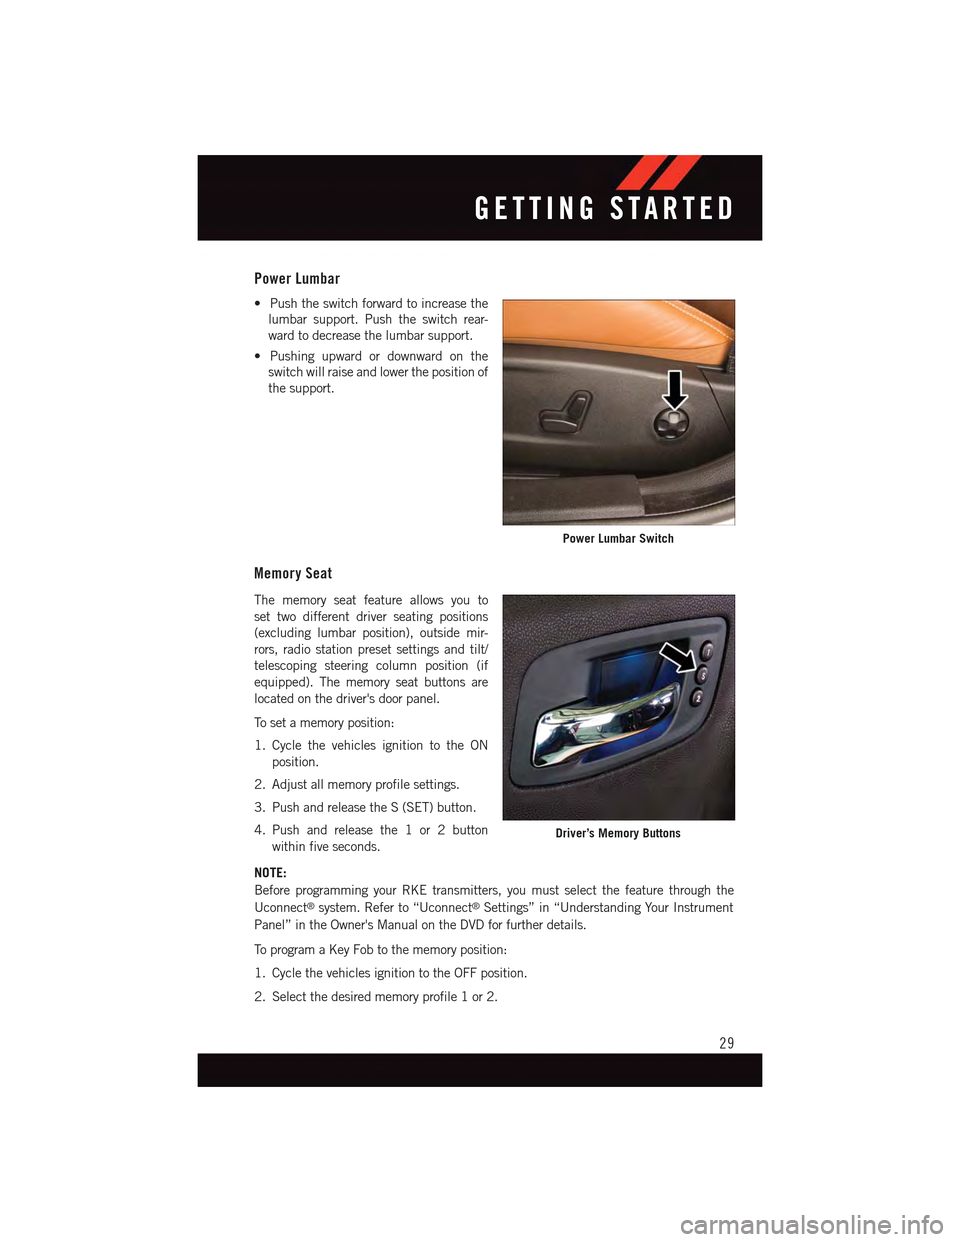
Power Lumbar
•Pushtheswitchforwardtoincreasethe
lumbar support. Push the switch rear-
ward to decrease the lumbar support.
•Pushingupwardordownwardonthe
switch will raise and lower the position of
the support.
Memory Seat
The memory seat feature allows you to
set two different driver seating positions
(excluding lumbar position), outside mir-
rors, radio station preset settings and tilt/
telescoping steering column position (if
equipped). The memory seat buttons are
located on the driver's door panel.
To s e t a m e m o r y p o s i t i o n :
1. Cycle the vehicles ignition to the ON
position.
2. Adjust all memory profile settings.
3. Push and release the S (SET) button.
4. Push and release the 1 or 2 button
within five seconds.
NOTE:
Before programming your RKE transmitters, you must select the feature through the
Uconnect®system. Refer to “Uconnect®Settings” in “Understanding Your Instrument
Panel” in the Owner's Manual on the DVD for further details.
To p r o g r a m a K e y F o b t o t h e m e m o r y p o s i t i o n :
1. Cycle the vehicles ignition to the OFF position.
2. Select the desired memory profile 1 or 2.
Power Lumbar Switch
Driver’s Memory Buttons
GETTING STARTED
29
Page 47 of 236
ADAPTIVE CRUISE CONTROL (ACC)
If your vehicle is equipped with Adaptive
Cruise Control the controls operate exactly
the same as the electronic speed control
with only a couple of differences. With this
option you can set a specified distance you
would like to maintain between you and the
vehicle in front of you.
If the ACC sensor detects a vehicle ahead,
ACC will apply limited braking or accelera-
tion automatically to maintain a preset fol-
lowing distance, while matching the speed
of the vehicle ahead.
If the sensor does not detect a vehicle
ahead of you, ACC will maintain a fixed set
speed.
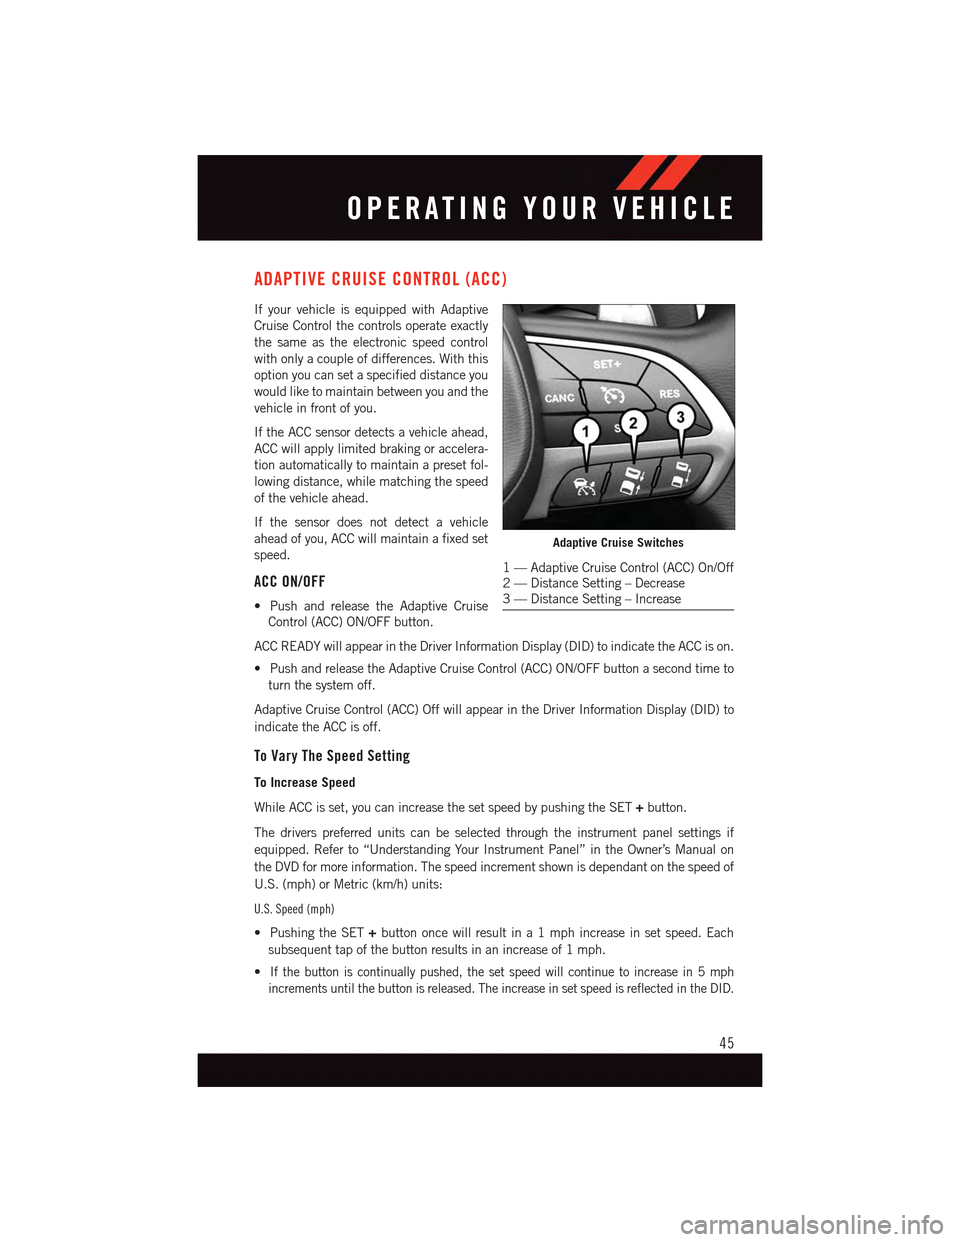
ACC ON/OFF
•PushandreleasetheAdaptiveCruise
Control (ACC) ON/OFF button.
ACC READY will appear in the Driver Information Display (DID) to indicate the ACC is on.
•PushandreleasetheAdaptiveCruiseControl(ACC)ON/OFFbuttonasecondtimeto
turn the system off.
Adaptive Cruise Control (ACC) Off will appear in the Driver Information Display (DID) to
indicate the ACC is off.
To Vary The Speed Setting
To Increase Speed
While ACC is set, you can increase the set speed by pushing the SET+button.
The drivers preferred units can be selected through the instrument panel settings if
equipped. Refer to “Understanding Your Instrument Panel” in the Owner’s Manual on
the DVD for more information. The speed increment shown is dependant on the speed of
U.S. (mph) or Metric (km/h) units:
U.S. Speed (mph)
•PushingtheSET+button once will result in a 1 mph increase in set speed. Each
subsequent tap of the button results in an increase of 1 mph.
•If the button is continually pushed, the set speed will continue to increase in 5 mph
increments until the button is released. The increase in set speed is reflected in the DID.
Adaptive Cruise Switches
1—AdaptiveCruiseControl(ACC)On/Off2—DistanceSetting–Decrease3—DistanceSetting–Increase
OPERATING YOUR VEHICLE
45
Page 50 of 236
WARNING!
Adaptive Cruise Control (ACC) is a convenience system. It is not a substitute for active
driving involvement. It is always the driver’s responsibility to be attentive of road,
traffic, and weather conditions, vehicle speed, distance to the vehicle ahead; and, most
importantly, brake operation to ensure safe operation of the vehicle under all road
conditions. Your complete attention is always required while driving to maintain safe
control of your vehicle. Failure to follow these warnings can result in a collision and
death or serious personal injury.
The ACC system:
•Doesnotreacttopedestrians,oncomingvehicles,andstationaryobjects(e.g.,
astoppedvehicleinatrafficjamoradisabledvehicle).
•Cannottakestreet,traffic,andweatherconditionsintoaccount,andmaybelimited
upon adverse sight distance conditions.
•Doesnotalwaysfullyrecognizecomplexdrivingconditions,whichcanresultin
wrong or missing distance warnings.
•Willbringthevehicletoacompletestopwhilefollowingatargetvehicleandhold
the vehicle for 2 seconds in the stop position. If the target vehicle does not start
moving within two seconds the ACC system will display a message that the system
will release the brakes and that the brakes must be applied manually. An audible
chime will sound when the brakes are released.
Yo u s h o u l d s w i t c h o f f t h e A C C s y s t e m :
•Whendrivinginfog,heavyrain,heavysnow,sleet,heavytraffic,andcomplex
driving situations (i.e., in highway construction zones).
•Whenenteringaturnlaneorhighwayofframp;whendrivingonroadsthatare
winding, icy, snow-covered, slippery, or have steep uphill or downhill slopes.
•Whentowingatrailerupordownsteepslopes.
•Whencircumstancesdonotallowsafedrivingataconstantspeed.
The Cruise Control system has two control modes:
•AdaptiveCruiseControlmodeformaintaininganappropriatedistancebetween
vehicles.
•Normal(fixedspeed)electronicspeedcontrolmodeforcruisingataconstant
preset speed. For additional information, refer to “Normal (Fixed Speed) Cruise
Control Mode” in this section.
Normal (fixed speed) electronic speed control will not react to preceding vehicles.
Always be aware of the mode selected.
Yo u c a n c h a n g e t h e m o d e b y u s i n g t h e C r u i s e C o n t r o l b u t t o n s . T h e t w o c o n t r o l m o d e s
function differently. Always confirm which mode is selected.
OPERATING YOUR VEHICLE
48
Page 73 of 236
Maintaining Your Uconnect® Access Account
Reinstalling An App (Uconnect® 8.4A/8.4AN)
Yo u c a n e a s i l y c o r r e c t m a n y A p p l i c a t i o n r e l a t e d i s s u e s y o u m a y b e e x p e r i e n c i n g b y
resetting the App back to the factory setting. From the vehicle’s radio touchscreen,
complete the following steps:
1. Press the Uconnect®“Apps” button and open the Uconnect®Store. Go to My Apps.
2. In My Apps, select “Settings,” then “Reinstall App.” Press “Continue.”
3. Your Apps have been successfully re-installed.
Canceling Your Subscription
Should you want to cancel your subscription, you can remove your account information
using the same procedure contained in the Selling Your Vehicle section.
Selling Your Vehicle
When you sell your vehicle, we recommend that you remove your Uconnect®Access
Account information from the vehicle. You can do this using the radio touchscreen in the
vehicle or on the Mopar Owner Connect website (moparownerconnect.com). Removing
your account information cancels your subscription and makes your vehicle factory-ready
for a new owner/subscriber.
1. From your vehicle’s radio touchscreen, select “Uconnect®Store” from the Apps Menu.
2. Select “My Apps,” then “Settings.” Press “Remove Uconnect®Account.”
3. Enter your Uconnect®Security PIN, and select “Continue.”
For additional information on Uconnect®:
•U.S.residents-visitDriveUconnect.comorcall1-877-855-8400.
•CanadianResidents-visitDriveUconnect.caorcall,1-800-465-2001(English)or
1-800-387-9983 (French).
ELECTRONICS
71
Page 83 of 236
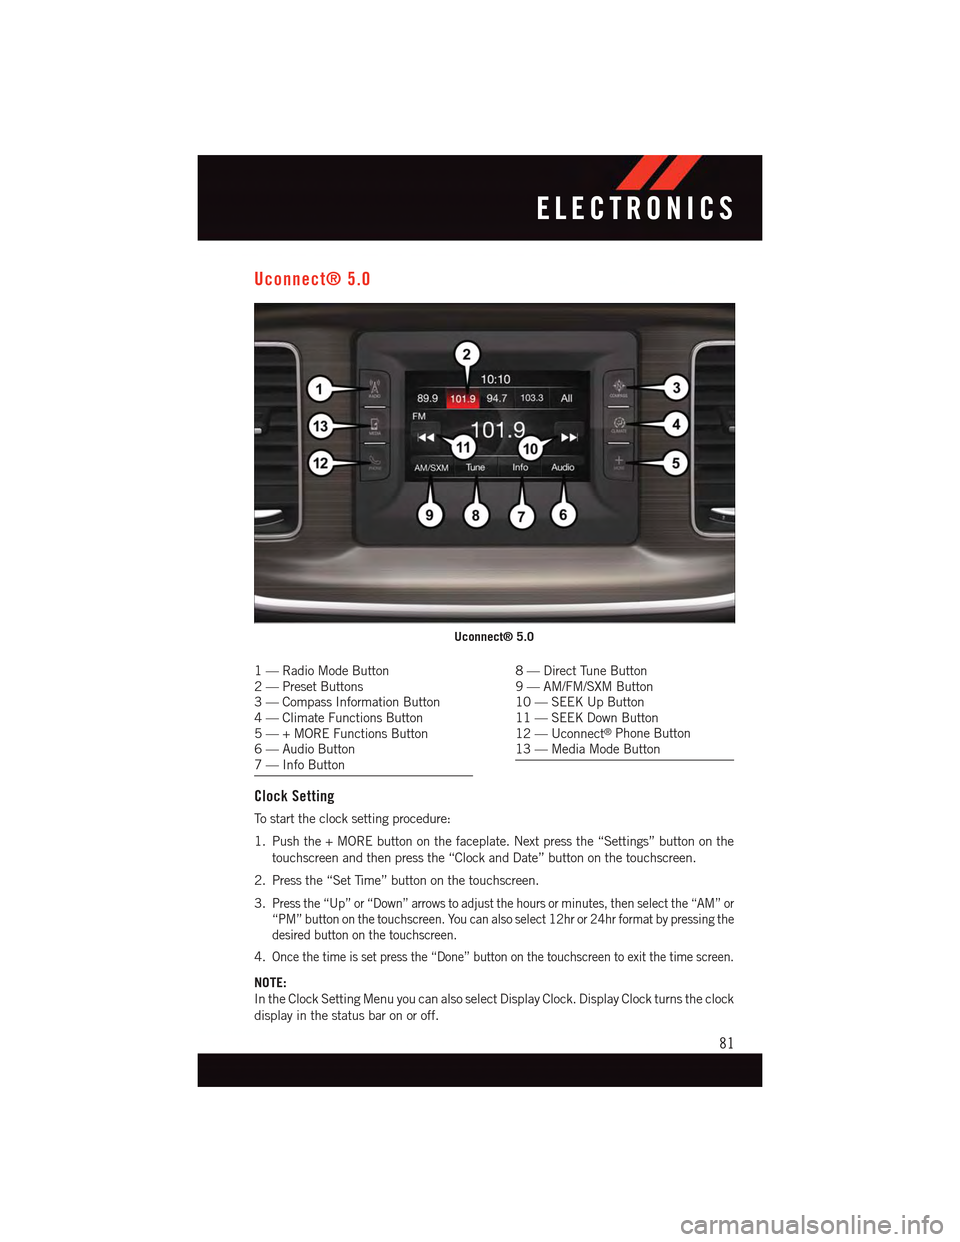
Uconnect® 5.0
1—RadioModeButton2—PresetButtons3—CompassInformationButton4—ClimateFunctionsButton5—+MOREFunctionsButton6—AudioButton7—InfoButton
8—DirectTuneButton9—AM/FM/SXMButton10 — SEEK Up Button11 — SEEK Down Button12 — Uconnect®Phone Button13 — Media Mode Button
Clock Setting
To s t a r t t h e c l o c k s e t t i n g p r o c e d u r e :
1. Push the + MORE button on the faceplate. Next press the “Settings” button on the
touchscreen and then press the “Clock and Date” button on the touchscreen.
2. Press the “Set Time” button on the touchscreen.
3.Press the “Up” or “Down” arrows to adjust the hours or minutes, then select the “AM” or
“PM” button on the touchscreen. You can also select 12hr or 24hr format by pressing the
desired button on the touchscreen.
4.Once the time is set press the “Done” button on the touchscreen to exit the time screen.
NOTE:
In the Clock Setting Menu you can also select Display Clock. Display Clock turns the clock
display in the status bar on or off.
Uconnect® 5.0
ELECTRONICS
81
Page 84 of 236
Equalizer, Balance And Fade
To a d j u s t t h e A u d i o s e t t i n g s :
1. Push the + MORE button on the faceplate, then press the “Settings” button on the
touchscreen.
2. Scroll down and press the “Audio” button on the touchscreen to open the Audio menu.
The Audio Menu shows the following options for you to customize your audio settings.
Equalizer
•Pressthe“Equalizer”buttononthetouchscreentoadjusttheBass,MidandTreble.
Use the “+” or “–” button on the touchscreen to adjust the equalizer to your desired
settings. Press the “back arrow” button on the touchscreen when done.
Balance/Fade
•Pressthe“Balance/Fade”buttononthetouchscreentoadjustthesoundfromthe
speakers. Use the “arrow” button on the touchscreen to adjust the sound level from the
front and rear or right and left side speakers. Press the Center “C” button on the
touchscreen to reset the balance and fade to the factory setting. Press the “back arrow”
button on the touchscreen when done.
Speed Adjustable
•Pressthe“SpeedAdjustedVolume”buttononthetouchscreentoselectbetweenOFF,
1, 2 or 3. This will decrease the radio volume relative to a decrease in vehicle speed.
Press the “back arrow” button on the touchscreen when done.
Loudness
•Pressthe“Loudness”buttononthetouchscreentoselecttheLoudnessfeature.When
this feature is activated it improves sound quality at lower volumes. Press the “back
arrow” button on the touchscreen when done.
Radio Operation
Seek Up/Seek Down
•PresstoseekthroughradiostationsinAM,FMorSXMbands.
•Holdeitherbuttontobypassstationswithoutstopping.
Store Radio Presets
When you are receiving a station that you wish to commit into memory, press and hold the
desired numbered button on the touchscreen for more that two seconds or until you hear
aconfirmationbeep.
The Radio stores up to 12 presets in each of the Radio modes. Four presets are visible at
the top of the radio screen. Pressing the “All” button on the touchscreen on the radio
home screen will display all of the preset stations for that mode.
ELECTRONICS
82
Page 96 of 236
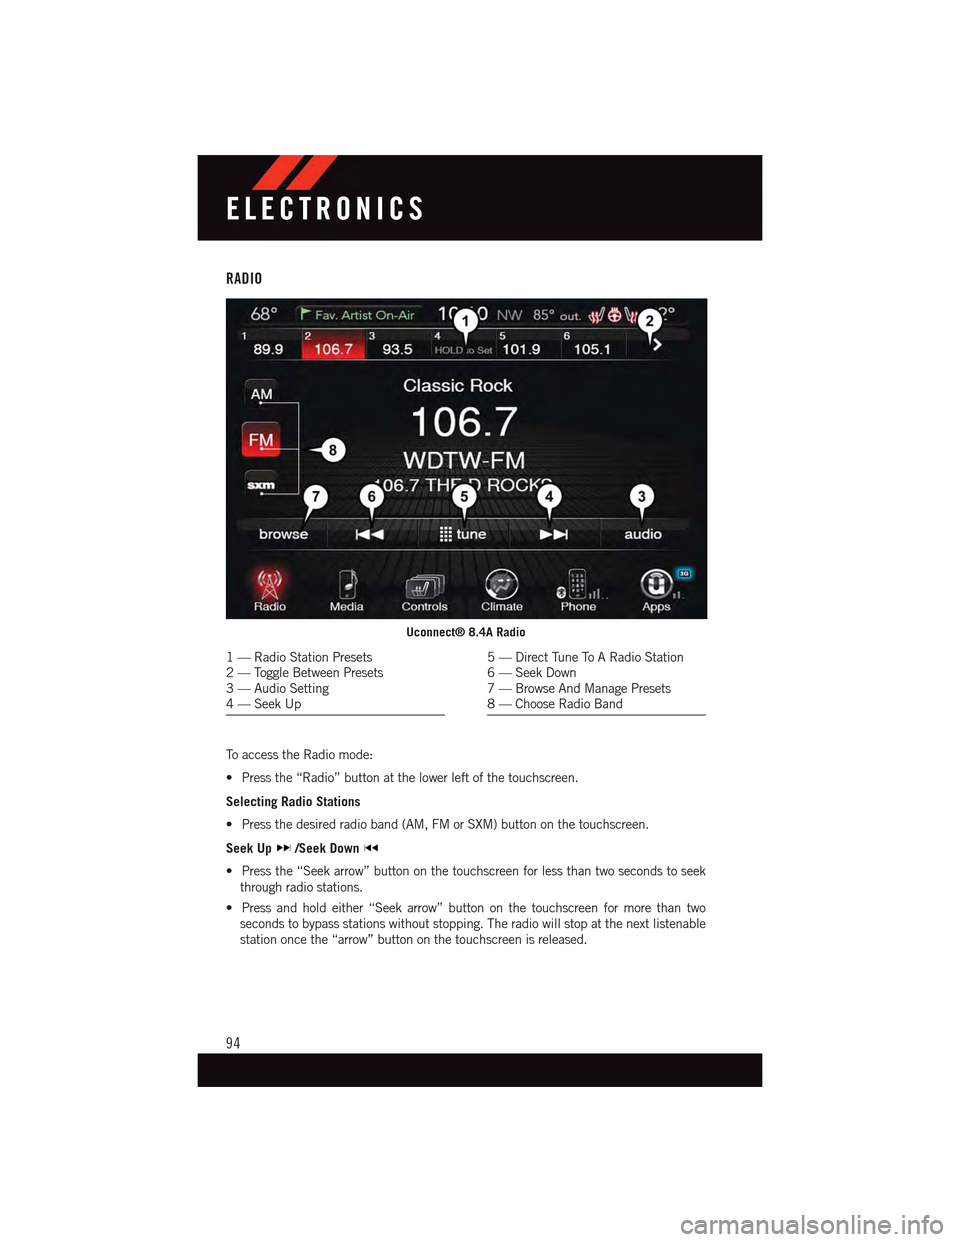
RADIO
To a c c e s s t h e R a d i o m o d e :
•Pressthe“Radio”buttonatthelowerleftofthetouchscreen.
Selecting Radio Stations
•Pressthedesiredradioband(AM,FMorSXM)buttononthetouchscreen.
Seek Up/Seek Down
•Pressthe“Seekarrow”buttononthetouchscreenforlessthantwosecondstoseek
through radio stations.
•Pressandholdeither“Seekarrow”buttononthetouchscreenformorethantwo
seconds to bypass stations without stopping. The radio will stop at the next listenable
station once the “arrow” button on the touchscreen is released.
Uconnect® 8.4A Radio
1—RadioStationPresets2—ToggleBetweenPresets3—AudioSetting4—SeekUp
5—DirectTuneToARadioStation6—SeekDown7—BrowseAndManagePresets8—ChooseRadioBand
ELECTRONICS
94
Page 97 of 236
Direct Tune
•Tunedirectlytoaradiostationbypressingthe“Tune”buttononthescreen,and
entering the desired station number.
Store Radio Presets
Yo u r r a d i o c a n s t o r e 3 6 t o t a l p r e s e t s t a t i o n s , 1 2 p r e s e t s p e r b a n d ( A M , F M a n d S X M ) .
They are shown at the top of your radio screen.
•Toseethe12presetstationsperband,pressthe“arrow”buttononthetouchscreenat
the top right of the screen to toggle between the two sets of six presets.
•Tosetastationintomemorypressandholdthedesirednumberedbuttononthe
touchscreen for more than two seconds or until you hear a confirmation beep.
SiriusXM Premier Over 160 Channels
Get every channel available on your satellite radio, and enjoy all you want, all in one place.
Hear commercial-free music plus sports, news, talk and entertainment. Get all the
premium programming, including Howard Stern, every NFL game, Oprah Radio®,every
MLB®and NHL®game, every NASCAR®race and more. And get 20+ Xtra channels,
including SiriusXM Latino, a selection of channels dedicated to Spanish language
programming.
•ToaccessSiriusXMSatelliteRadio,pressthe“SXM”buttononthetouchscreenonthe
main Radio screen.
The following describes features that are available when in SiriusXM Satellite Radio
mode.
Seek Up/Seek Down
•Pressthe“Seekarrow”buttononthetouchscreenforlessthantwosecondstoseek
through channels in SXM mode.
•Pressandholdeither“Seekarrow”buttononthetouchscreenformorethantwo
seconds to bypass channels without stopping. The radio will stop at the next listenable
channel once the arrow button on the touchscreen is released.
Direct Tune
•TunedirectlytoaSXMchannelbypressingthe“Tune”buttononthetouchscreen,and
entering the desired station number.
Jump
Jump automatically tells you when Traffic & Weather for a favorite city is available, and
gives you the option to switch to that channel.
•Press“Jump”toactivatethefeature.AfterlisteningtoTrafficandWeather,press
“Jump” again to return to the previous channel.
ELECTRONICS
95
Page 98 of 236
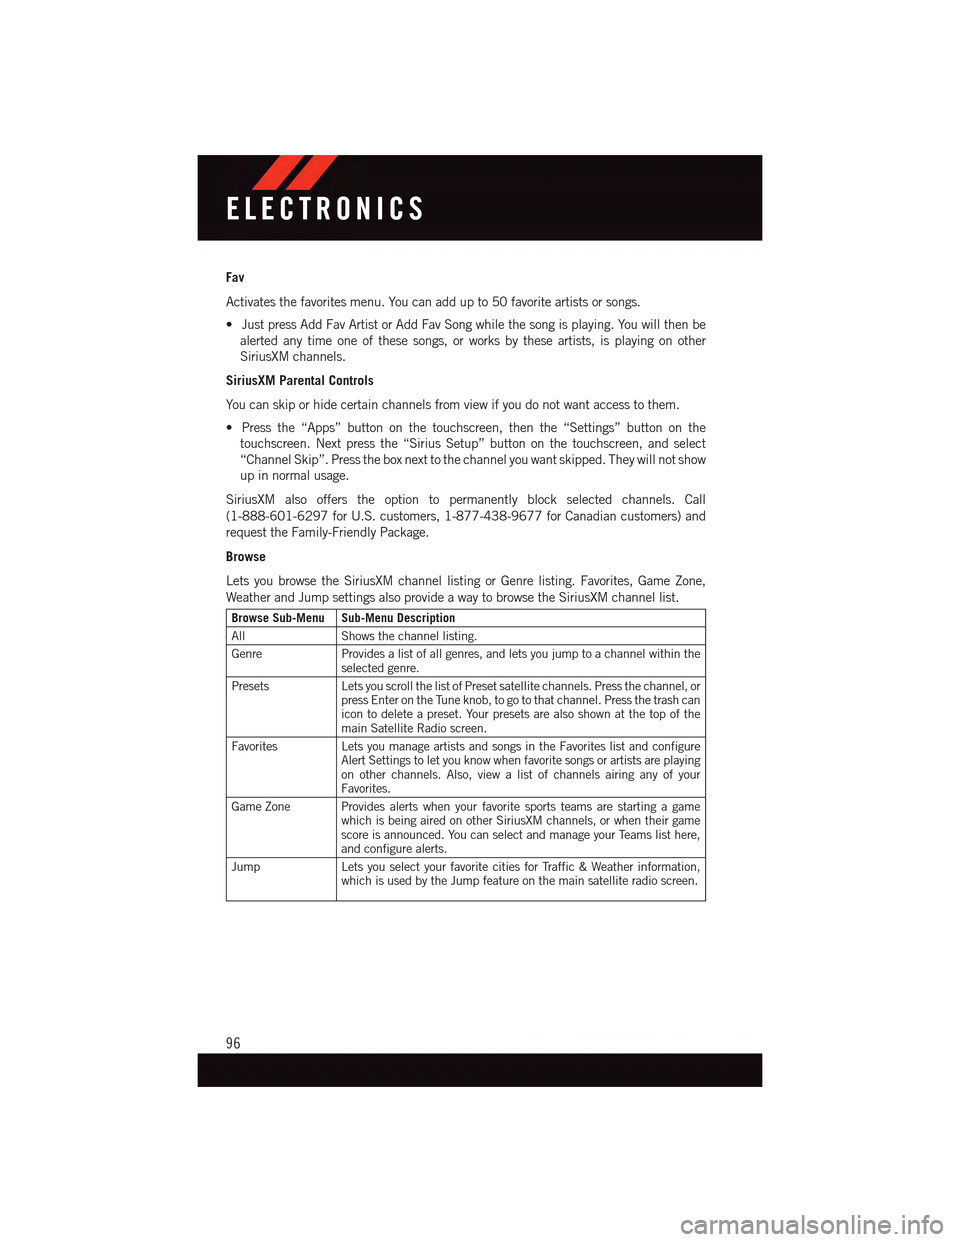
Fav
Activates the favorites menu. You can add up to 50 favorite artists or songs.
•JustpressAddFavArtistorAddFavSongwhilethesongisplaying.Youwillthenbe
alerted any time one of these songs, or works by these artists, is playing on other
SiriusXM channels.
SiriusXM Parental Controls
Yo u c a n s k i p o r h i d e c e r t a i n c h a n n e l s f r o m v i e w i f y o u d o n o t w a n t a c c e s s t o t h e m .
•Pressthe“Apps”buttononthetouchscreen,thenthe“Settings”buttononthe
touchscreen. Next press the “Sirius Setup” button on the touchscreen, and select
“Channel Skip”. Press the box next to the channel you want skipped. They will not show
up in normal usage.
SiriusXM also offers the option to permanently block selected channels. Call
(1-888-601-6297 for U.S. customers, 1-877-438-9677 for Canadian customers) and
request the Family-Friendly Package.
Browse
Lets you browse the SiriusXM channel listing or Genre listing. Favorites, Game Zone,
Weather and Jump settings also provide a way to browse the SiriusXM channel list.
Browse Sub-Menu Sub-Menu Description
AllShows the channel listing.
GenreProvides a list of all genres, and lets you jump to a channel within theselected genre.
PresetsLets you scroll the list of Preset satellite channels. Press the channel, orpress Enter on the Tune knob, to go to that channel. Press the trash canicon to delete a preset. Your presets are also shown at the top of themain Satellite Radio screen.
FavoritesLets you manage artists and songs in the Favorites list and configureAlert Settings to let you know when favorite songs or artists are playingon other channels. Also, view a list of channels airing any of yourFavorites.
Game Zone Provides alerts when your favorite sports teams are starting a gamewhich is being aired on other SiriusXM channels, or when their gamescore is announced. You can select and manage your Teams list here,and configure alerts.
JumpLets you select your favorite cities for Traffic & Weather information,which is used by the Jump feature on the main satellite radio screen.
ELECTRONICS
96
Page 123 of 236
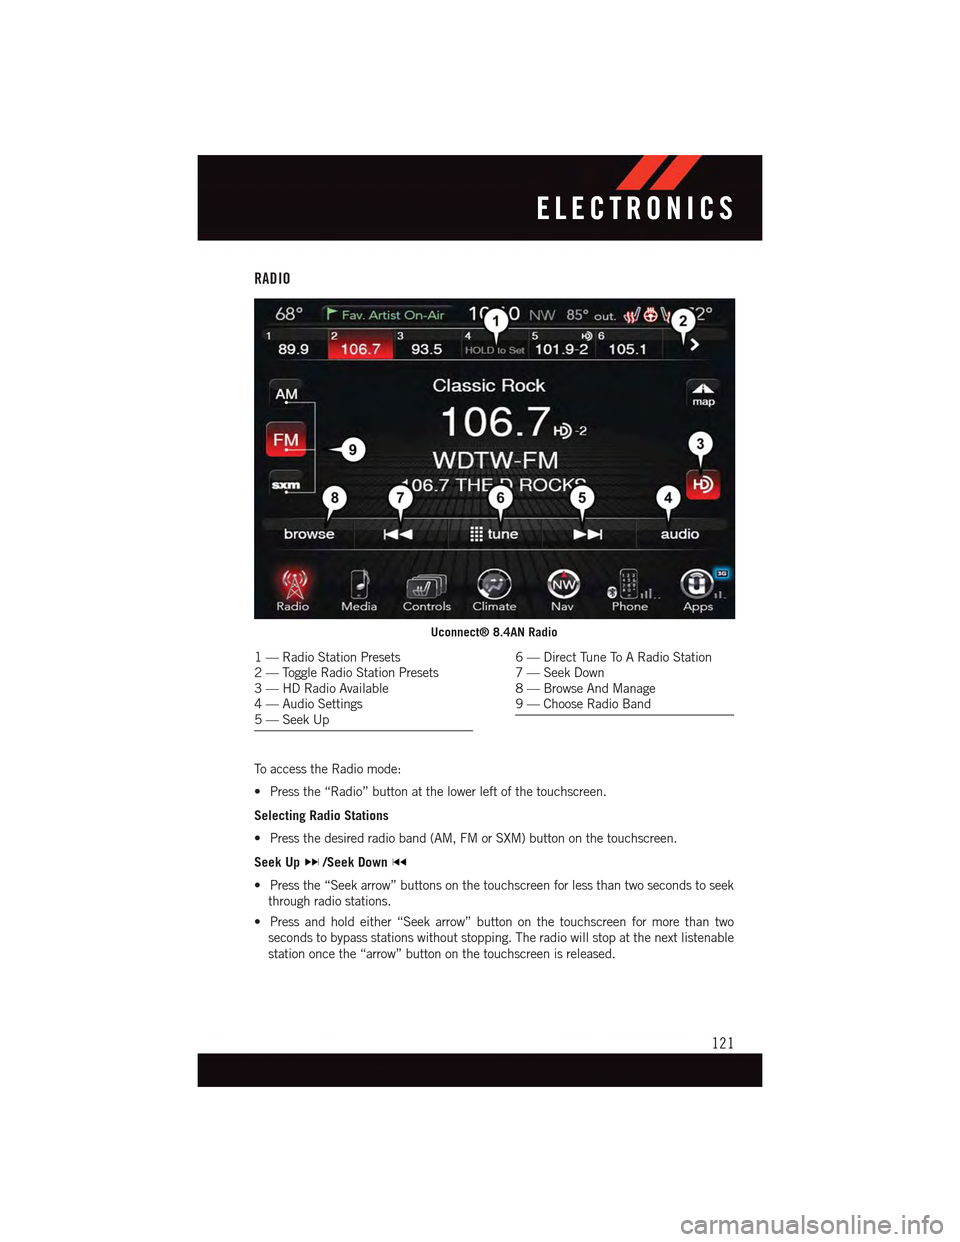
RADIO
To a c c e s s t h e R a d i o m o d e :
•Pressthe“Radio”buttonatthelowerleftofthetouchscreen.
Selecting Radio Stations
•Pressthedesiredradioband(AM,FMorSXM)buttononthetouchscreen.
Seek Up/Seek Down
•Pressthe“Seekarrow”buttonsonthetouchscreenforlessthantwosecondstoseek
through radio stations.
•Pressandholdeither“Seekarrow”buttononthetouchscreenformorethantwo
seconds to bypass stations without stopping. The radio will stop at the next listenable
station once the “arrow” button on the touchscreen is released.
Uconnect® 8.4AN Radio
1—RadioStationPresets2—ToggleRadioStationPresets3—HDRadioAvailable4—AudioSettings5—SeekUp
6—DirectTuneToARadioStation7—SeekDown8—BrowseAndManage9—ChooseRadioBand
ELECTRONICS
121