light DODGE CHARGER 2015 7.G Service Manual
[x] Cancel search | Manufacturer: DODGE, Model Year: 2015, Model line: CHARGER, Model: DODGE CHARGER 2015 7.GPages: 236, PDF Size: 35.67 MB
Page 187 of 236
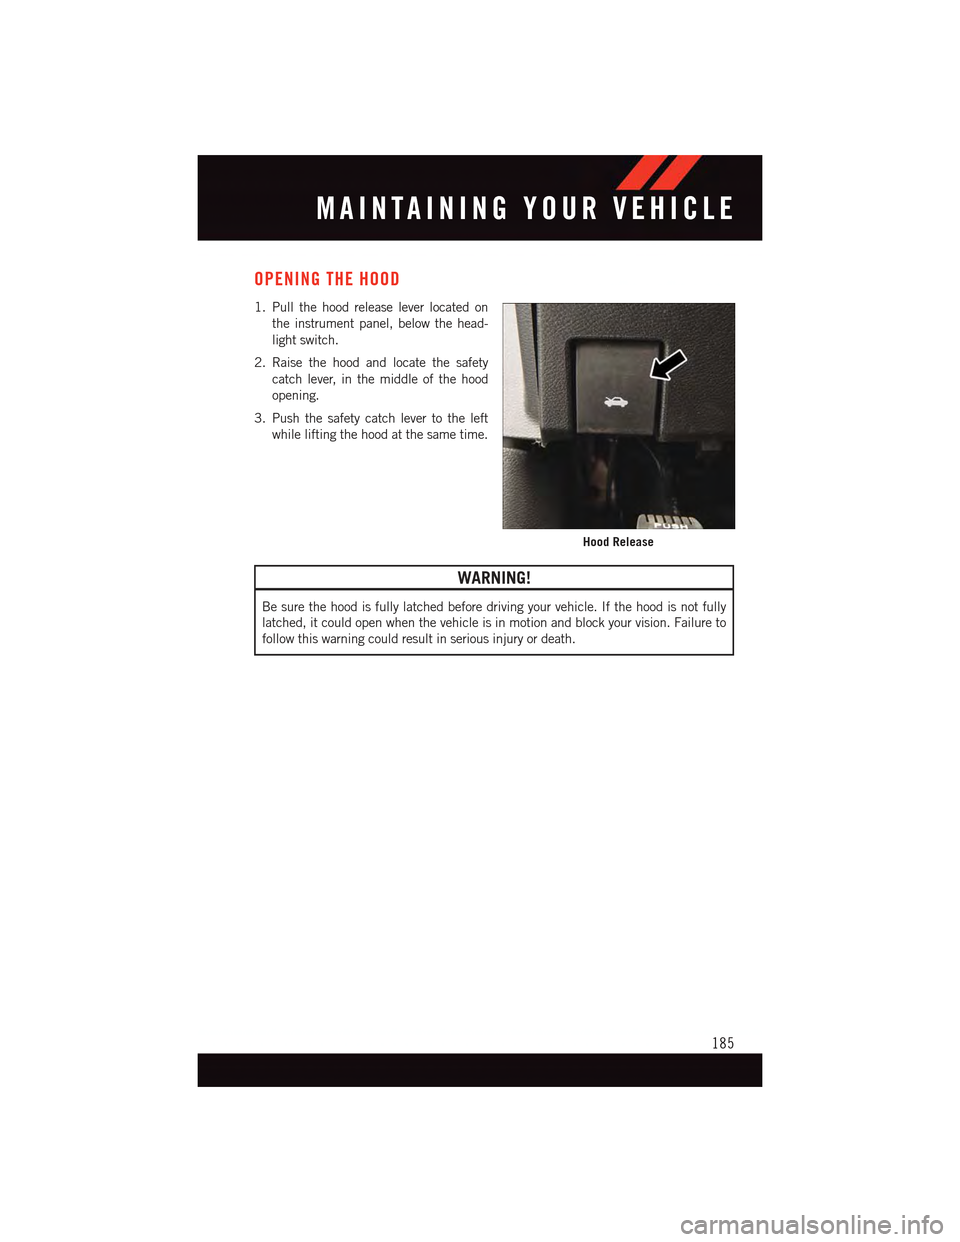
OPENING THE HOOD
1. Pull the hood release lever located on
the instrument panel, below the head-
light switch.
2. Raise the hood and locate the safety
catch lever, in the middle of the hood
opening.
3. Push the safety catch lever to the left
while lifting the hood at the same time.
WARNING!
Be sure the hood is fully latched before driving your vehicle. If the hood is not fully
latched, it could open when the vehicle is in motion and block your vision. Failure to
follow this warning could result in serious injury or death.
Hood Release
MAINTAINING YOUR VEHICLE
185
Page 200 of 236
MAINTENANCE PROCEDURES
For information on the maintenance procedures for your vehicle, please refer to “Main-
tenance Procedures” in “Maintaining Your Vehicle” in your Owner’s Manual or applicable
supplement on the DVD for further details.
MAINTENANCE SCHEDULE — NON-SRT
Yo u r v e h i c l e i s e q u i p p e d w i t h a n a u t o m a t i c o i l c h a n g e i n d i c a t o r s y s t e m . T h e o i l c h a n g e
indicator system will remind you that it is time to take your vehicle in for scheduled
maintenance.
Based on engine operation conditions, the oil change indicator message will illuminate.
This means that service is required for your vehicle. Operating conditions such as frequent
short-trips, trailer tow, extremely hot or cold ambient temperatures, and E85 fuel usage
will influence when the “Change Oil” or “Oil Change Required” message is displayed.
Severe Operating Conditions can cause the change oil message to illuminate as early as
3,500 miles (5,600 km) since last reset. Have your vehicle serviced as soon as possible,
within the next 500 miles (805 km).
The “Oil Change Required” message will be displayed in the DID and a single chime will
sound, indicating that an oil change is necessary.
Yo u r a u t h o r i z e d d e a l e r w i l l r e s e t t h e o i l c h a n g e i n d i c a t o r m e s s a g e a f t e r c o m p l e t i n g t h e
scheduled oil change. If a scheduled oil change is performed by someone other than your
authorized dealer, the message can be reset by referring to the steps described under
“Instrument Cluster Warning Lights” in “What To Do In Emergencies” in this guide or
“Driver Information Dispay (DID)” in “Understanding Your Instrument Panel” in your
Owners Manual on the DVD for further information.
NOTE:
Under no circumstances should oil change intervals exceed 10,000 miles (16,000 km)
or twelve months, whichever comes first.
MAINTAINING YOUR VEHICLE
198
Page 201 of 236
Severe Duty All Models
Change Engine Oil at 4000 miles (6,500 km) if the vehicle is operated in a dusty and off
road environment. This type of vehicle use is considered Severe Duty
Once A Month Or Before A Long Trip:
•Checkengineoillevel
•Checkwindshieldwasherfluidlevel
•Checktirepressureandlookforunusualwearordamage.Rotatetiresatthefirstsign
of irregular wear, even if it occurs before your next scheduled service.
•Checkthefluidlevelsofthecoolantreservoir,brakemastercylinder,andpower
steering (If Equipped) and fill as needed.
•Checkfunctionofallinteriorandexteriorlights
Required Maintenance Intervals.
Refer to the maintenance schedules on the following page for the required maintenance
intervals.
At Every Oil Change Interval As Indicated By Oil Change Indicator System:
•Change oil and filter
•Rotatethetires.Rotate at the first sign of irregular wear, even if it occurs before your next
scheduled service
•Inspect battery and clean and tighten terminals as required
•Inspect brake pads, shoes, rotors, drums, hoses and park brake
•Inspect engine cooling system protection and hoses
•Inspect exhaust system
•Inspect engine air cleaner if using in dusty or off-road conditions
MAINTAINING YOUR VEHICLE
199
Page 205 of 236
MAINTENANCE SCHEDULE — SRT
The Scheduled Maintenance services listed in this manual must be done at the times or
mileages specified to protect your vehicle warranty and ensure the best vehicle perfor-
mance and reliability. More frequent maintenance may be needed for vehicles in severe
operating conditions, such as dusty areas and very short trip driving. Inspection and
service should also be done anytime a malfunction is suspected.
The oil change indicator system will remind you that it is time to take your vehicle in forscheduled maintenance.
A“OilChangeRequired”messagewillbedisplayedintheDIDandasinglechimewillsound, indicating that an oil change is necessary.
Based on engine operation conditions, the oil change indicator message will illuminate.This means that service is required for your vehicle. Have your vehicle serviced as soon aspossible, within the next 500 miles (805 km).
NOTE:
•Theoilchangeindicatormessagewillnotmonitorthetimesincethelastoilchange.Change your vehicle's oil if it has been six months since your last oil change, even if theoil change indicator message is NOT illuminated.
•Changeyourengineoilmoreoftenifyoudriveyourvehicleoff-road/trackusageforanextended period of time.
•Undernocircumstancesshouldoilchangeintervalsexceed6,000miles(10,000km)or six months, whichever comes first.
Yo u r a u t h o r i z e d d e a l e r w i l l r e s e t t h e o i l c h a n g e i n d i c a t o r m e s s a g e a f t e r c o m p l e t i n g t h escheduled oil change. If a scheduled oil change is performed by someone other than yourauthorized dealer, the message can be reset by referring to the steps described under“Instrument Cluster Warning Lights” in “What To Do In Emergencies” in this guide or“Driver Information Display (DID)” in “Understanding Your Instrument Panel” in yourOwners Manual on the DVD for further information.
At Each Stop For Fuel
•Checktheengineoillevel.Referto“MaintenanceProcedures/EngineOil”in“Main-taining Your Vehicle” for further information.•Checkthewindshieldwashersolventandaddifrequired.
Once A Month
•Checktirepressureandlookforunusualwearordamage.
•Inspectthebattery,andcleanandtightentheterminalsasrequired.
•Checkthefluidlevelsofthecoolantreservoir,brakemastercylinder,andpowersteering
(6.2L Only), and add as needed.
•Checkalllightsandotherelectricalitemsforcorrectoperation.
At Each Oil Change
•Changetheengineoilfilter.
•Inspectthebrakehosesandlines.
CAUTION!
Failure to perform the required maintenance items may result in damage to the vehicle.
MAINTAINING YOUR VEHICLE
203
Page 212 of 236
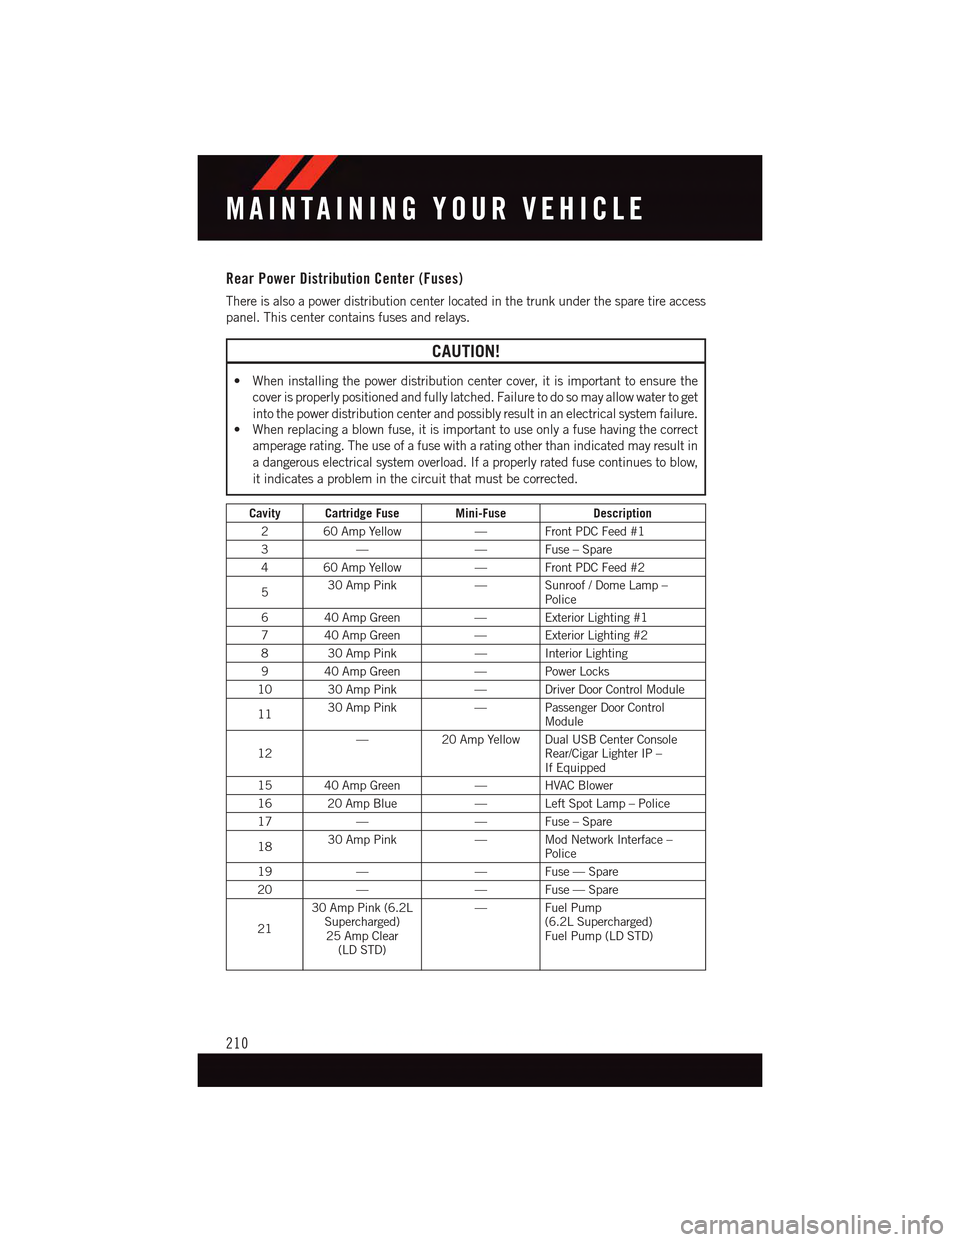
Rear Power Distribution Center (Fuses)
There is also a power distribution center located in the trunk under the spare tire access
panel. This center contains fuses and relays.
CAUTION!
•Wheninstallingthepowerdistributioncentercover,itisimportanttoensurethe
cover is properly positioned and fully latched. Failure to do so may allow water to get
into the power distribution center and possibly result in an electrical system failure.•Whenreplacingablownfuse,itisimportanttouseonlyafusehavingthecorrect
amperage rating. The use of a fuse with a rating other than indicated may result in
adangerouselectricalsystemoverload.Ifaproperlyratedfusecontinuestoblow,
it indicates a problem in the circuit that must be corrected.
Cavity Cartridge Fuse Mini-FuseDescription
260AmpYellow—FrontPDCFeed#1
3——Fuse–Spare
460AmpYellow—FrontPDCFeed#2
530 Amp Pink—Sunroof/DomeLamp–Police
640AmpGreen—ExteriorLighting#1
740AmpGreen—ExteriorLighting#2
830AmpPink—InteriorLighting
940AmpGreen—PowerLocks
10 30 Amp Pink—DriverDoorControlModule
1130 Amp Pink—PassengerDoorControlModule
12—20 Amp Yellow Dual USB Center ConsoleRear/Cigar Lighter IP –If Equipped
15 40 Amp Green—HVACBlower
16 20 Amp Blue—LeftSpotLamp–Police
17——Fuse–Spare
1830 Amp Pink—ModNetworkInterface–Police
19——Fuse—Spare
20——Fuse—Spare
21
30 Amp Pink (6.2LSupercharged)25 Amp Clear(LD STD)
—FuelPump(6.2L Supercharged)Fuel Pump (LD STD)
MAINTAINING YOUR VEHICLE
210
Page 214 of 236
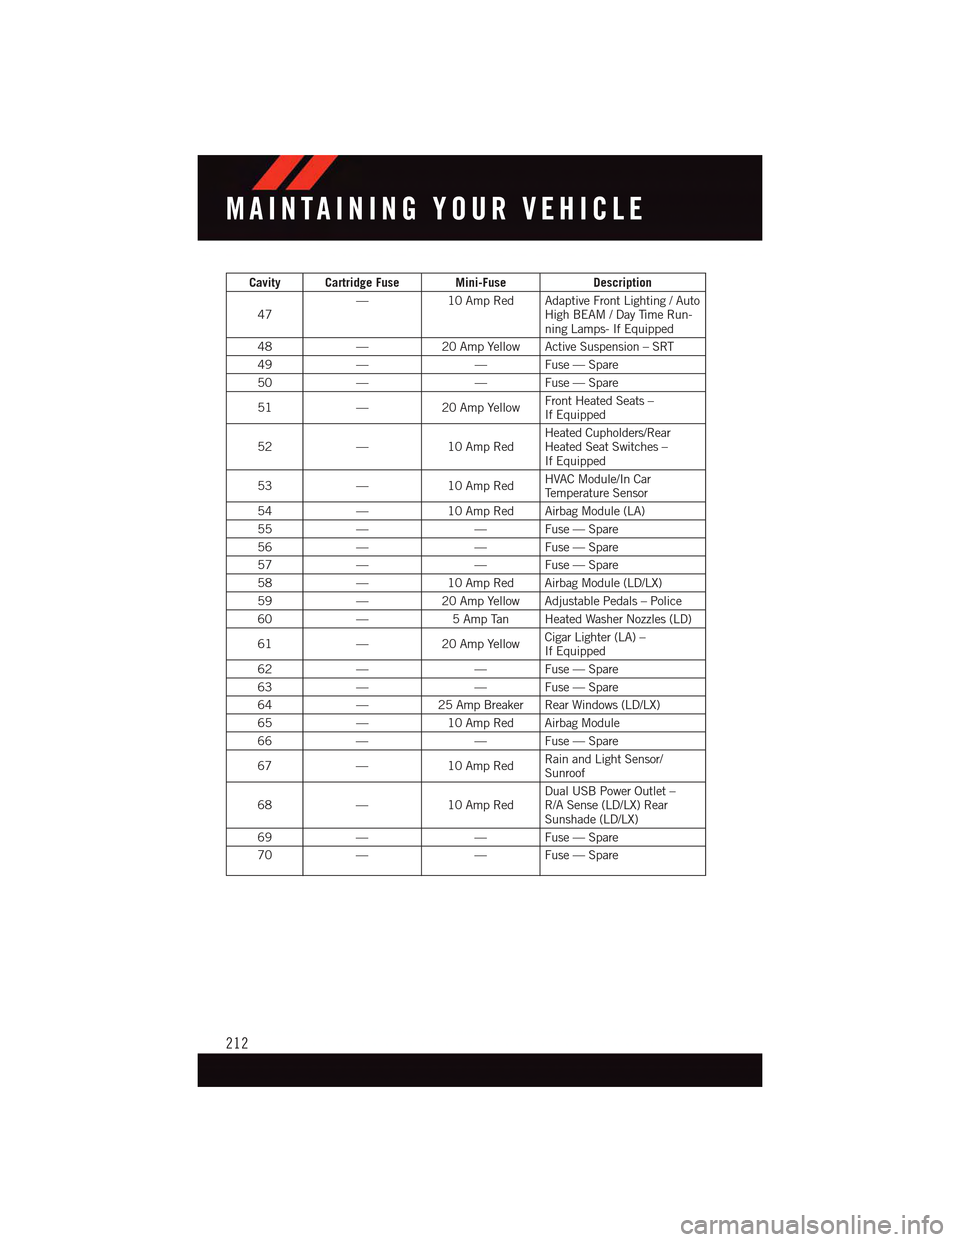
Cavity Cartridge Fuse Mini-FuseDescription
47—10 Amp Red Adaptive Front Lighting / AutoHigh BEAM / Day Time Run-ning Lamps- If Equipped
48—20 Amp Yellow Active Suspension – SRT
49——Fuse—Spare
50——Fuse—Spare
51—20 Amp YellowFront Heated Seats –If Equipped
52—10 Amp RedHeated Cupholders/RearHeated Seat Switches –If Equipped
53—10 Amp RedHVAC Module/In CarTe m p e r a t u r e S e n s o r
54—10 Amp Red Airbag Module (LA)
55——Fuse—Spare
56——Fuse—Spare
57——Fuse—Spare
58—10 Amp Red Airbag Module (LD/LX)
59—20 Amp Yellow Adjustable Pedals – Police
60—5AmpTan HeatedWasherNozzles(LD)
61—20 Amp YellowCigar Lighter (LA) –If Equipped
62——Fuse—Spare
63——Fuse—Spare
64—25 Amp Breaker Rear Windows (LD/LX)
65—10 Amp Red Airbag Module
66——Fuse—Spare
67—10 Amp RedRain and Light Sensor/Sunroof
68—10 Amp RedDual USB Power Outlet –R/A Sense (LD/LX) RearSunshade (LD/LX)
69——Fuse—Spare
70——Fuse—Spare
MAINTAINING YOUR VEHICLE
212
Page 219 of 236

WHEEL AND WHEEL TRIM CARE
All wheels and wheel trim, especially aluminum and chrome plated wheels, should be
cleaned regularly with a mild soap and water to prevent corrosion.
To r e m o v e h e a v y s o i l a n d / o r e x c e s s i v e b r a k e d u s t , u s e M O PA R®Wheel Cleaner or
equivalent or select a non-abrasive, non-acidic cleaner.
CAUTION!
Do not use scouring pads, steel wool, a bristle brush, or metal polishes. Do not use ovencleaner. These products may damage the wheel's protective finish. Avoid automatic carwashes that use acidic solutions or harsh brushes that may damage the wheel'sprotective finish. Only MOPAR®Wheel Cleaner or equivalent is recommended.
REPLACEMENT BULBS
All of the interior bulbs are glass wedge base or glass cartridge types. Aluminum basebulbs are not approved and should not be used for replacement.
Interior Bulbs
Bulb Number
Rear Courtesy/Reading LampsW5W
Rear Compartment (Trunk) Lamp562
Overhead Console Reading Lamp578
Visor Vanity LampsA6220
Glove Box Lamp – If Equipped194
Door Courtesy562
Shift Indicator LampJKLE14140
Center High-Mount Stop Lamp (CHMSL) LED (Serviced at Authorized Dealer)
Optional Door Map Pocket/Cup HolderLED (Serviced at Authorized Dealer)
For lighted switches, see your authorized dealer for replacement instructions.
Exterior Bulbs
Bulb Number
Low/High Beam Headlamp (Standard HalogenBi Function Projector)HIR2
Low/High Beam Headlamp – High IntensityDischarge (Premium HID Bi Function Projector)D3S (Serviced at Authorized Dealer)
Front Park/Turn Lamp LED (Serviced at Authorized Dealer)
Front Fog Lamp – If Equipped LED (Serviced at Authorized Dealer)
Front Side Marker LED (Serviced at Authorized Dealer)
Rear Tail Lamp LED (Serviced at Authorized Dealer)
Rear Stop/Turn Lamp LED (Serviced at Authorized Dealer)
Rear Side Marker LED (Serviced at Authorized Dealer)
Backup Lamp LED (Serviced at Authorized Dealer)
License LED (Serviced at Authorized Dealer)
MAINTAINING YOUR VEHICLE
217
Page 222 of 236
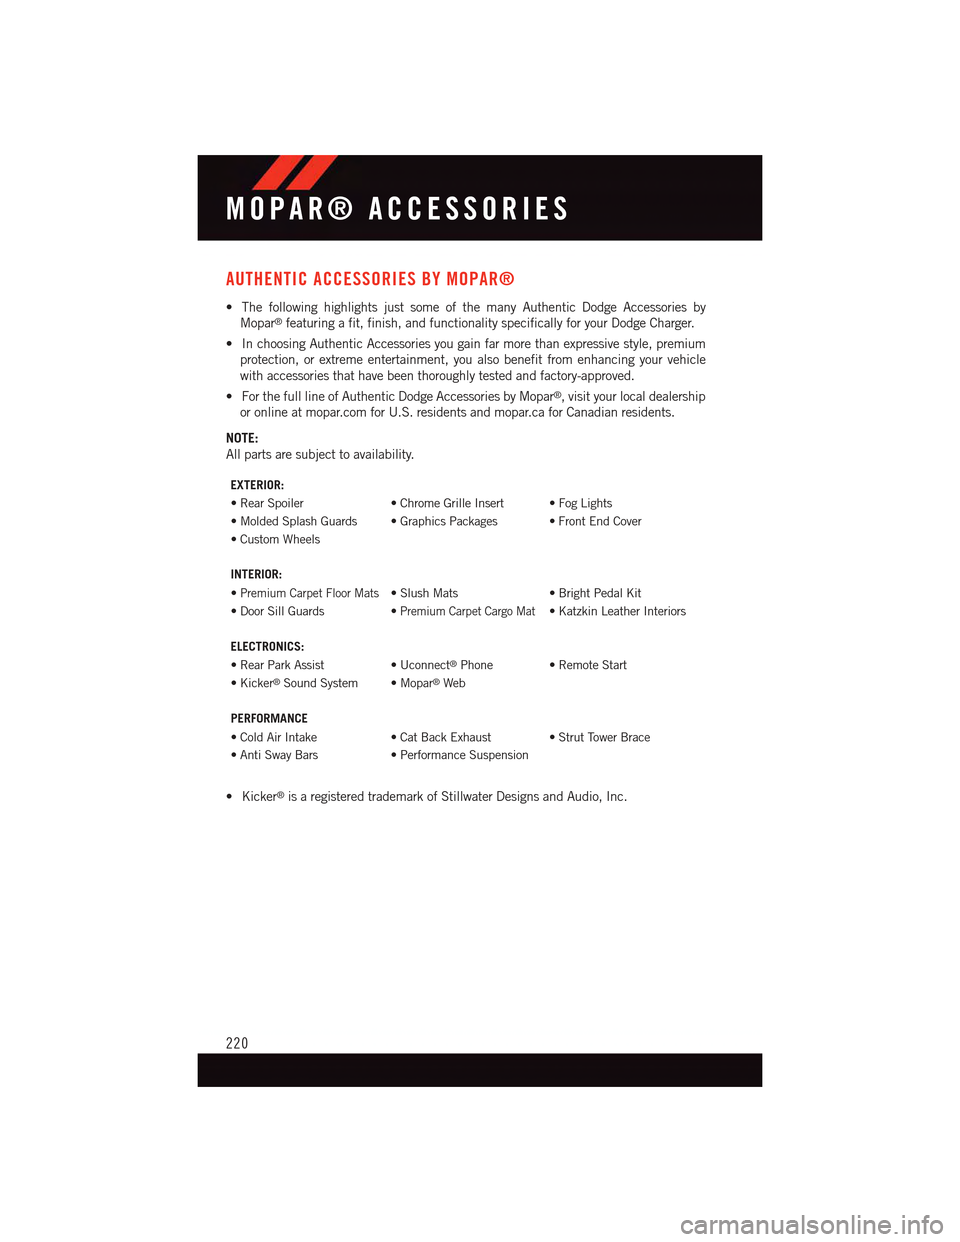
AUTHENTIC ACCESSORIES BY MOPAR®
•ThefollowinghighlightsjustsomeofthemanyAuthenticDodgeAccessoriesby
Mopar®featuring a fit, finish, and functionality specifically for your Dodge Charger.
•InchoosingAuthenticAccessoriesyougainfarmorethanexpressivestyle,premium
protection, or extreme entertainment, you also benefit from enhancing your vehicle
with accessories that have been thoroughly tested and factory-approved.
•ForthefulllineofAuthenticDodgeAccessoriesbyMopar®,visityourlocaldealership
or online at mopar.com for U.S. residents and mopar.ca for Canadian residents.
NOTE:
All parts are subject to availability.
EXTERIOR:
•RearSpoiler•ChromeGrilleInsert •FogLights
•MoldedSplashGuards •GraphicsPackages •FrontEndCover
•CustomWheels
INTERIOR:
•Premium Carpet Floor Mats•SlushMats•BrightPedalKit
•DoorSillGuards•Premium Carpet Cargo Mat•KatzkinLeatherInteriors
ELECTRONICS:
•RearParkAssist•Uconnect®Phone • Remote Start
•Kicker®Sound System • Mopar®Web
PERFORMANCE
•ColdAirIntake•CatBackExhaust •StrutTowerBrace
•AntiSwayBars•PerformanceSuspension
•Kicker®is a registered trademark of Stillwater Designs and Audio, Inc.
MOPAR® ACCESSORIES
220
Page 223 of 236
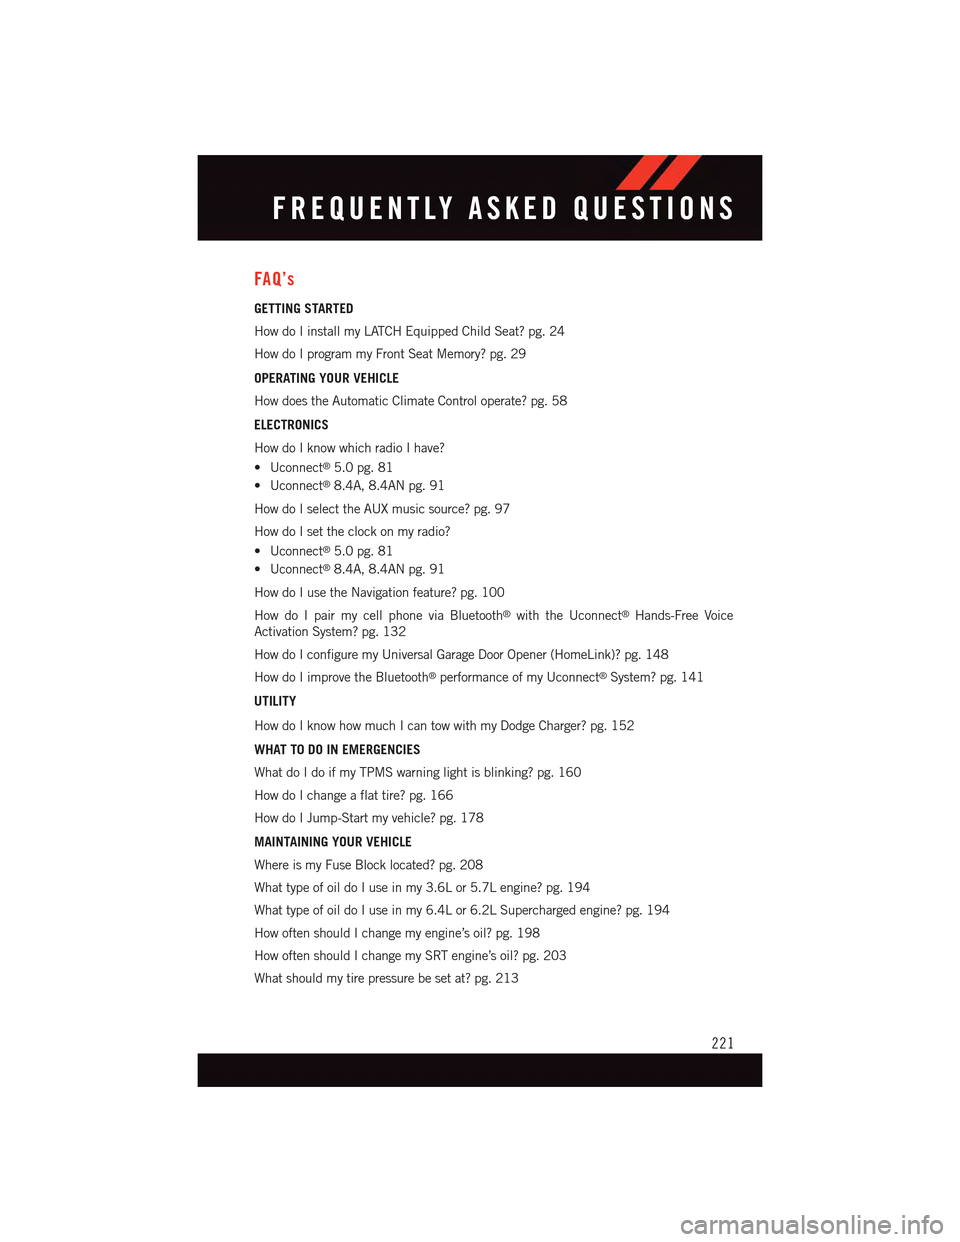
FAQ’s
GETTING STARTED
How do I install my LATCH Equipped Child Seat? pg. 24
How do I program my Front Seat Memory? pg. 29
OPERATING YOUR VEHICLE
How does the Automatic Climate Control operate? pg. 58
ELECTRONICS
How do I know which radio I have?
•Uconnect®5.0 pg. 81
•Uconnect®8.4A, 8.4AN pg. 91
How do I select the AUX music source? pg. 97
How do I set the clock on my radio?
•Uconnect®5.0 pg. 81
•Uconnect®8.4A, 8.4AN pg. 91
How do I use the Navigation feature? pg. 100
How do I pair my cell phone via Bluetooth®with the Uconnect®Hands-Free Voice
Activation System? pg. 132
How do I configure my Universal Garage Door Opener (HomeLink)? pg. 148
How do I improve the Bluetooth®performance of my Uconnect®System? pg. 141
UTILITY
How do I know how much I can tow with my Dodge Charger? pg. 152
WHAT TO DO IN EMERGENCIES
What do I do if my TPMS warning light is blinking? pg. 160
How do I change a flat tire? pg. 166
How do I Jump-Start my vehicle? pg. 178
MAINTAINING YOUR VEHICLE
Where is my Fuse Block located? pg. 208
What type of oil do I use in my 3.6L or 5.7L engine? pg. 194
What type of oil do I use in my 6.4L or 6.2L Supercharged engine? pg. 194
How often should I change my engine’s oil? pg. 198
How often should I change my SRT engine’s oil? pg. 203
What should my tire pressure be set at? pg. 213
FREQUENTLY ASKED QUESTIONS
221
Page 224 of 236
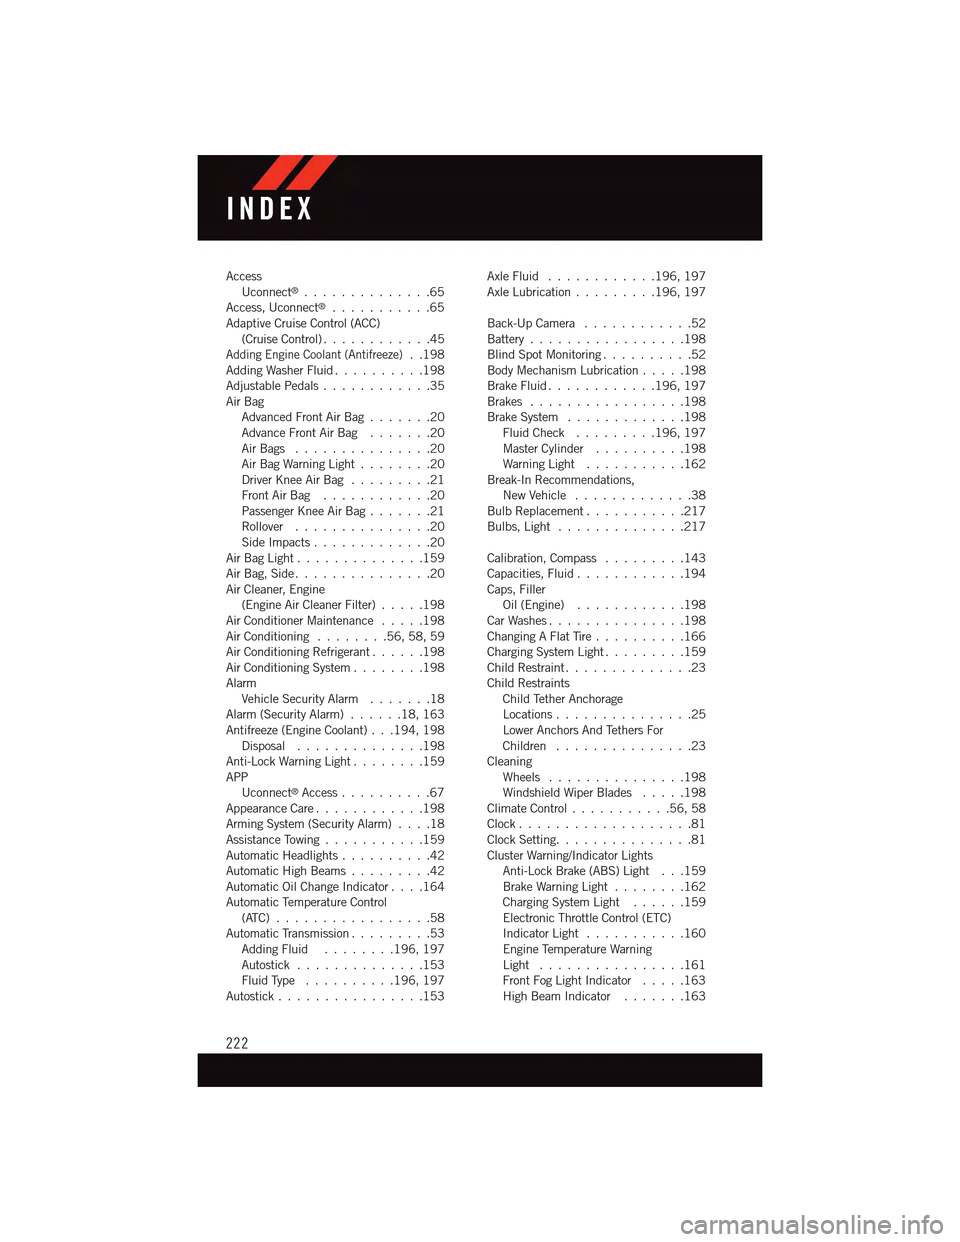
AccessUconnect®..............65Access, Uconnect®...........65Adaptive Cruise Control (ACC)(Cruise Control) . . . . . . . . . . . .45Adding Engine Coolant (Antifreeze)..198Adding Washer Fluid..........198Adjustable Pedals............35Air BagAdvanced Front Air Bag.......20Advance Front Air Bag.......20Air Bags . . . . . . . . . . . . . . .20Air Bag Warning Light . . . . . . . .20Driver Knee Air Bag.........21Front Air Bag . . . . . . . . . . . .20Passenger Knee Air Bag.......21Rollover . . . . . . . . . . . . . . .20Side Impacts.............20Air Bag Light . . . . . . . . . . . . . .159Air Bag, Side . . . . . . . . . . . . . . .20Air Cleaner, Engine(Engine Air Cleaner Filter).....198Air Conditioner Maintenance.....198Air Conditioning........56,58,59Air Conditioning Refrigerant......198Air Conditioning System........198AlarmVehicle Security Alarm.......18Alarm (Security Alarm)......18,163Antifreeze (Engine Coolant) . . .194, 198Disposal . . . . . . . . . . . . . .198Anti-Lock Warning Light........159APPUconnect®Access..........67Appearance Care............198Arming System (Security Alarm)....18Assistance Towing...........159Automatic Headlights..........42Automatic High Beams.........42Automatic Oil Change Indicator....164Automatic Temperature Control(ATC) . . . . . . . . . . . . . . . . .58Automatic Transmission.........53Adding Fluid........196, 197Autostick..............153Fluid Type . . . . . . . . . .196, 197Autostick................153
Axle Fluid . . . . . . . . . . . .196, 197Axle Lubrication . . . . . . . . .196, 197
Back-Up Camera............52Battery . . . . . . . . . . . . . . . . .198Blind Spot Monitoring..........52Body Mechanism Lubrication.....198Brake Fluid . . . . . . . . . . . .196, 197Brakes.................198Brake System.............198Fluid Check.........196, 197Master Cylinder..........198Warning Light . . . . . . . . . . .162Break-In Recommendations,New Vehicle . . . . . . . . . . . . .38Bulb Replacement...........217Bulbs, Light . . . . . . . . . . . . . .217
Calibration, Compass.........143Capacities, Fluid............194Caps, FillerOil (Engine)............198Car Washes . . . . . . . . . . . . . . .198Changing A Flat Tire..........166Charging System Light.........159Child Restraint..............23Child RestraintsChild Tether AnchorageLocations...............25Lower Anchors And Tethers ForChildren . . . . . . . . . . . . . . .23CleaningWheels...............198Windshield Wiper Blades.....198Climate Control . . . . . . . . . . .56, 58Clock . . . . . . . . . . . . . . . . . . .81Clock Setting...............81Cluster Warning/Indicator LightsAnti-Lock Brake (ABS) Light . . .159Brake Warning Light . . . . . . . .162Charging System Light......159Electronic Throttle Control (ETC)Indicator Light . . . . . . . . . . .160Engine Temperature WarningLight . . . . . . . . . . . . . . . .161Front Fog Light Indicator . . . . .163High Beam Indicator.......163
INDEX
222