ECU DODGE CHARGER 2015 7.G User Guide
[x] Cancel search | Manufacturer: DODGE, Model Year: 2015, Model line: CHARGER, Model: DODGE CHARGER 2015 7.GPages: 236, PDF Size: 35.67 MB
Page 3 of 236
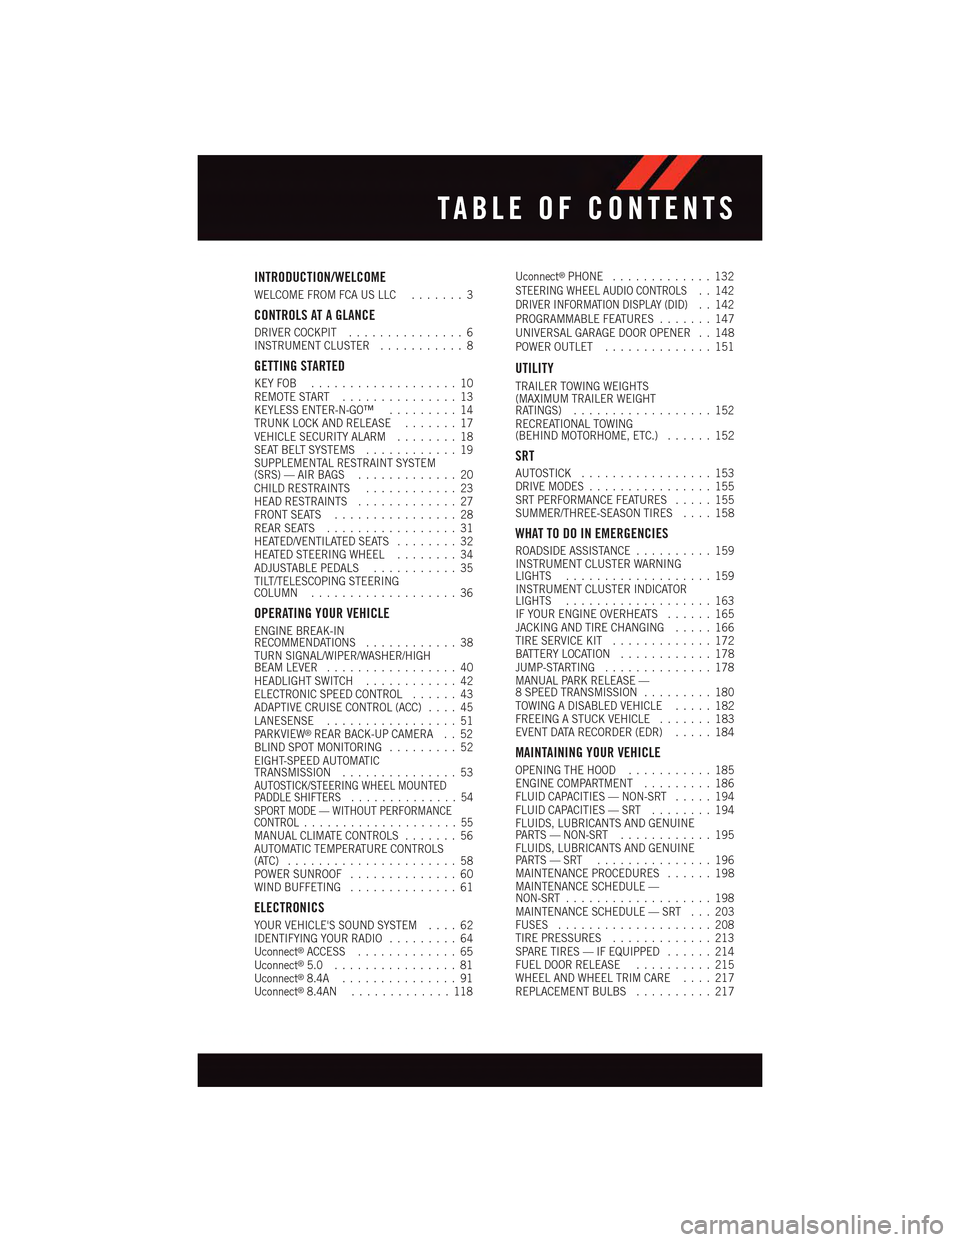
INTRODUCTION/WELCOME
WELCOME FROM FCA US LLC.......3
CONTROLS AT A GLANCE
DRIVER COCKPIT...............6INSTRUMENT CLUSTER...........8
GETTING STARTED
KEY FOB . . . . . . . . . . . . . . . . . . . 10REMOTE START . . . . . . . . . . . . . . . 13KEYLESS ENTER-N-GO™.........14TRUNK LOCK AND RELEASE.......17VEHICLE SECURITY ALARM........18SEAT BELT SYSTEMS............19SUPPLEMENTAL RESTRAINT SYSTEM(SRS) — AIR BAGS.............20CHILD RESTRAINTS............23HEAD RESTRAINTS.............27FRONT SEATS................28REAR SEATS.................31HEATED/VENTILATED SEATS........32HEATED STEERING WHEEL........34ADJUSTABLE PEDALS...........35TILT/TELESCOPING STEERINGCOLUMN...................36
OPERATING YOUR VEHICLE
ENGINE BREAK-INRECOMMENDATIONS............38TURN SIGNAL/WIPER/WASHER/HIGHBEAM LEVER.................40HEADLIGHT SWITCH............42ELECTRONIC SPEED CONTROL......43ADAPTIVE CRUISE CONTROL (ACC)....45LANESENSE.................51PA R K V I E W®REAR BACK-UP CAMERA . . 52BLIND SPOT MONITORING.........52EIGHT-SPEED AUTOMATICTRANSMISSION...............53AUTOSTICK/STEERING WHEEL MOUNTEDPA D D L E S H I F T E R S..............54SPORT MODE — WITHOUT PERFORMANCECONTROL....................55MANUAL CLIMATE CONTROLS.......56AUTOMATIC TEMPERATURE CONTROLS(ATC) . . . . . . . . . . . . . . . . . . . . . . 58POWER SUNROOF..............60WIND BUFFETING..............61
ELECTRONICS
YOUR VEHICLE'S SOUND SYSTEM....62IDENTIFYING YOUR RADIO.........64Uconnect®ACCESS.............65Uconnect®5.0 . . . . . . . . . . . . . . . . 81Uconnect®8.4A...............91Uconnect®8.4AN.............118
Uconnect®PHONE.............132STEERING WHEEL AUDIO CONTROLS..142DRIVER INFORMATION DISPLAY (DID)..142PROGRAMMABLE FEATURES.......147UNIVERSAL GARAGE DOOR OPENER . . 148POWER OUTLET..............151
UTILITY
TRAILER TOWING WEIGHTS(MAXIMUM TRAILER WEIGHTRATINGS)..................152RECREATIONAL TOWING(BEHIND MOTORHOME, ETC.)......152
SRT
AUTOSTICK.................153DRIVE MODES................155SRT PERFORMANCE FEATURES.....155SUMMER/THREE-SEASON TIRES....158
WHAT TO DO IN EMERGENCIES
ROADSIDE ASSISTANCE..........159INSTRUMENT CLUSTER WARNINGLIGHTS...................159INSTRUMENT CLUSTER INDICATORLIGHTS...................163IF YOUR ENGINE OVERHEATS......165JACKING AND TIRE CHANGING.....166TIRE SERVICE KIT.............172BATTERY LOCATION............178JUMP-STARTING..............178MANUAL PARK RELEASE —8SPEEDTRANSMISSION.........180TOWING A DISABLED VEHICLE.....182FREEING A STUCK VEHICLE.......183EVENT DATA RECORDER (EDR).....184
MAINTAINING YOUR VEHICLE
OPENING THE HOOD...........185ENGINE COMPARTMENT.........186FLUID CAPACITIES — NON-SRT.....194FLUID CAPACITIES — SRT........194FLUIDS, LUBRICANTS AND GENUINEPA RT S — N O N - S RT............195FLUIDS, LUBRICANTS AND GENUINEPA RT S — S RT . . . . . . . . . . . . . . . 1 9 6MAINTENANCE PROCEDURES......198MAINTENANCE SCHEDULE —NON-SRT...................198MAINTENANCE SCHEDULE — SRT . . . 203FUSES....................208TIRE PRESSURES.............213SPARE TIRES — IF EQUIPPED......214FUEL DOOR RELEASE..........215WHEEL AND WHEEL TRIM CARE....217REPLACEMENT BULBS..........217
TABLE OF CONTENTS
Page 15 of 236
WARNING!
•NeverusethePARKpositionasasubstitutefortheparkingbrake.Alwaysapplythe
parking brake fully when parked to guard against vehicle movement and possible
injury or damage.
•Whenleavingthevehicle,alwaysmakesuretheKeylessIgnitionNodeisinthe
“OFF” mode and remove the Key Fob from the vehicle.
•Neverleavechildrenaloneinavehicle,orwithaccesstoanunlockedvehicle.
Allowing children to be in a vehicle unattended is dangerous for a number of
reasons. A child or others could be seriously or fatally injured. Children should be
warned not to touch the parking brake, brake pedal or the gear selector.
•DonotleavetheKeyFobinornearthevehicle,orinalocationaccessibleto
children, and do not leave the ignition of a vehicle equipped with Keyless
Enter-N-Go™ in the ACC or ON/RUN mode. A child could operate power windows,
other controls, or move the vehicle.
REMOTE START
•PushtheREMOTESTARTbuttonx2on the Key Fob twice within five seconds.
Pushing the REMOTE START button a third time shuts the engine off.
•Todrivethevehicle,pushtheUNLOCKbuttonandcycletheignitiontotheON/RUN
position.
With Remote Start, the engine will only run for 15 minutes (timeout) unless the ignition
is cycled to the ON/RUN position.
The vehicle must be cycled to the ON/RUN position after two consecutive timeouts.
WARNING!
•Donotstartorrunanengineinaclosedgarageorconfinedarea.Exhaustgas
contains Carbon Monoxide (CO) which is odorless and colorless. Carbon Monoxide
is poisonous and can cause you or others to be severely injured or killed when
inhaled.
•KeepKeyFobtransmittersawayfromchildren.OperationoftheRemoteStart
System, windows, door locks or other controls could cause you and others to be
severely injured or killed.
GETTING STARTED
13
Page 20 of 236
Trunk Emergency Release
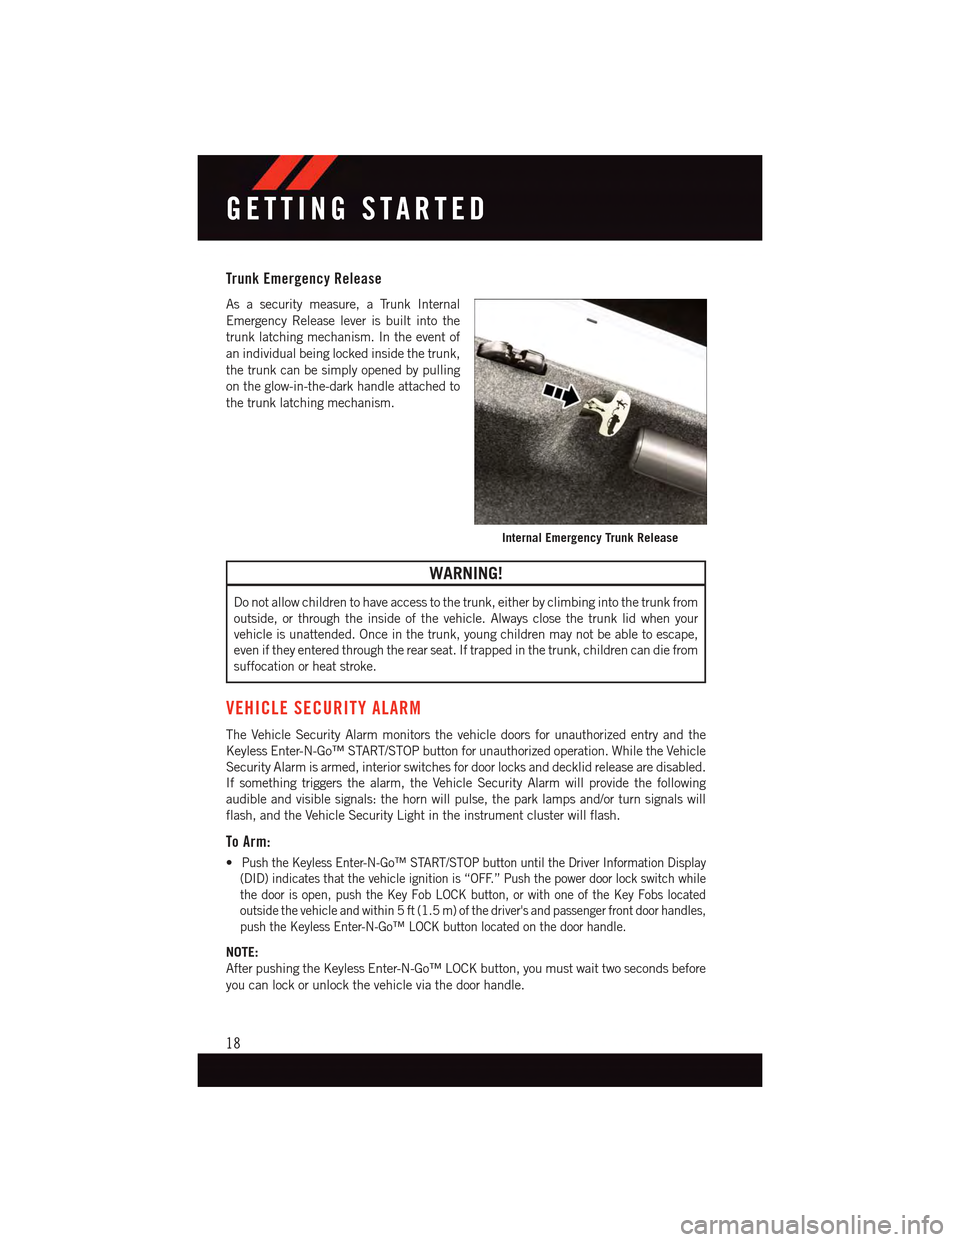
As a security measure, a Trunk Internal
Emergency Release lever is built into the
trunk latching mechanism. In the event of
an individual being locked inside the trunk,
the trunk can be simply opened by pulling
on the glow-in-the-dark handle attached to
the trunk latching mechanism.
WARNING!
Do not allow children to have access to the trunk, either by climbing into the trunk from
outside, or through the inside of the vehicle. Always close the trunk lid when your
vehicle is unattended. Once in the trunk, young children may not be able to escape,
even if they entered through the rear seat. If trapped in the trunk, children can die from
suffocation or heat stroke.
VEHICLE SECURITY ALARM
The Vehicle Security Alarm monitors the vehicle doors for unauthorized entry and the
Keyless Enter-N-Go™ START/STOP button for unauthorized operation. While the Vehicle
Security Alarm is armed, interior switches for door locks and decklid release are disabled.
If something triggers the alarm, the Vehicle Security Alarm will provide the following
audible and visible signals: the horn will pulse, the park lamps and/or turn signals will
flash, and the Vehicle Security Light in the instrument cluster will flash.
To Arm:
•Push the Keyless Enter-N-Go™ START/STOP button until the Driver Information Display
(DID) indicates that the vehicle ignition is “OFF.” Push the power door lock switch while
the door is open, push the Key Fob LOCK button, or with one of the Key Fobs located
outside the vehicle and within 5 ft (1.5 m) of the driver's and passenger front door handles,
push the Keyless Enter-N-Go™ LOCK button located on the door handle.
NOTE:
After pushing the Keyless Enter-N-Go™ LOCK button, you must wait two seconds before
you can lock or unlock the vehicle via the door handle.
Internal Emergency Trunk Release
GETTING STARTED
18
Page 24 of 236
Supplemental Side Air Bags
•ThisvehicleisequippedwithSupplementalSeat-MountedSideAirBags(SABs)
located in the outboard side of the front seats. The SABs are marked with a SRS
AIRBAG or AIRBAG label sewn into the outboard side of the seats.
•ThisvehicleisequippedwithSupplementalSideAirBagInflatableCurtains(SABICs)
located above the side windows. The trim covering the SABICs is labeled SRS AIRBAG
or AIRBAG. The SABICs may help reduce the risk of partial or complete ejection of
vehicle occupants through side windows in certain side impact events.
•TheSABICsandSABs(“SideAirBags”)aredesignedtoactivateincertainside
impacts and certain rollover events. The Occupant Restraint Controller (“ORC”)
determines whether the deployment of the Side Air Bags in a particular side impact or
rollover event is appropriate, based on the severity and type of collision. Vehicle damage
by itself is not a good indicator of whether or not Side Air Bags should have deployed.
WARNING!
•Side Air Bags need room to inflate. Do not lean against the door or window. Sit upright
in the center of the seat.
•BeingtooclosetotheSideAirBagsduringdeploymentcouldcauseyoutobe
severely injured or killed.
•RelyingontheSideAirBagsalonecouldleadtomoresevereinjuriesinacollision.
The Side Air Bags work with your seat belt to restrain you properly. In some
collisions, Side Air Bags won’t deploy at all. Always wear your seat belt even though
you have Side Air Bags.
•ThisvehicleisequippedwithleftandrightSupplementalSideAirBagInflatable
Curtains (SABICs). Do not stack luggage or other cargo up high enough to block the
deployment of the SABICs. The trim covering above the side windows where the
SABIC and its deployment path are located should remain free from any obstruc-
tions.
•ThisvehicleisequippedwithSABICs.InorderfortheSABICstoworkasintended,
do not install any accessory items in your vehicle which could alter the roof. Do not
add an aftermarket sunroof to your vehicle. Do not add roof racks that require
permanent attachments (bolts or screws) for installation on the vehicle roof. Do not
drill into the roof of the vehicle for any reason.
•DonotuseaccessoryseatcoversorplaceobjectsbetweenyouandtheSideAir
Bags; the performance could be adversely affected and/or objects could be pushed
into you, causing serious injury.
GETTING STARTED
22
Page 25 of 236
CHILD RESTRAINTS
Children 12 years or younger should ride properly buckled up in a rear seat, if available.
According to crash statistics, children are safer when properly restrained in the rear seats
rather than in the front.
Every state in the United States and all Canadian provinces require that small children
ride in proper restraint systems. This is the law, and you can be prosecuted for ignoring it.
NOTE:
•Foradditionalinformation,refertowww.Seatcheck.orgorcall1-866-SEATCHECK.
•CanadianresidentsshouldrefertoTransportCanada’swebsiteforadditionalinforma-
tion: http://www.tc.gc.ca/eng/motorvehiclesafety/safedrivers-childsafety-index-53.htm
LATCH – Lower Anchors And Tethers For CHildren
•YourvehicleisequippedwiththechildrestraintanchoragesystemcalledLATCH,
which stands for Lower Anchors and Tethers for CHildren.
•Allrearseatingpositionshaveloweranchorsandtoptetheranchors.
LATCH System Weight Limit
Yo u m a y u s e t h e L AT C H a n c h o r a g e s y s t e m u n t i l t h e c o m b i n e d w e i g h t o f t h e c h i l d a n d t h e
child restraint is 65 lbs (29.5 kg). Use the seat belt and tether anchor instead of the
LATCH system once the combined weight is more than 65 lbs (29.5 kg).
Locating LATCH Anchorages
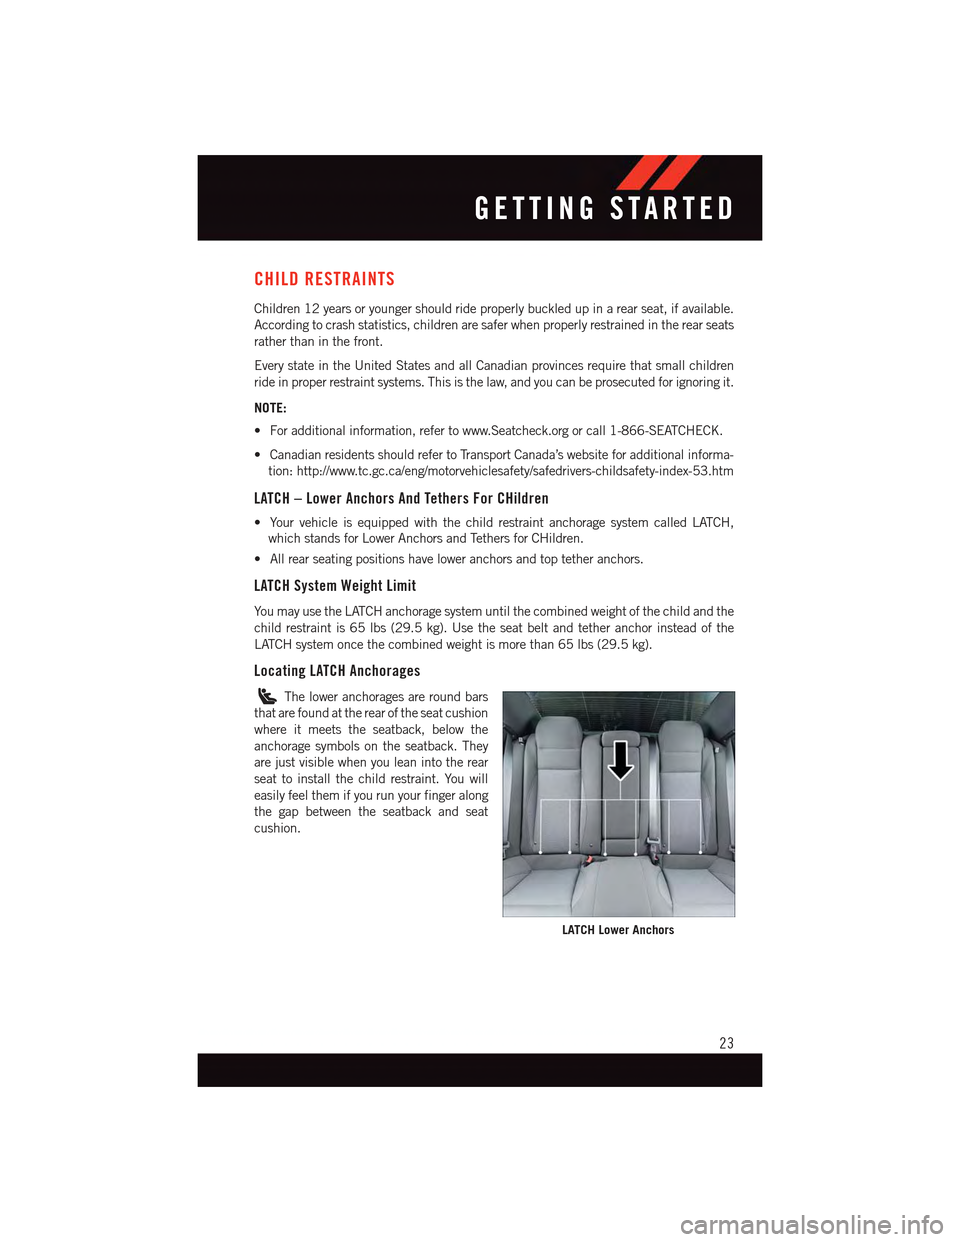
The lower anchorages are round bars
that are found at the rear of the seat cushion
where it meets the seatback, below the
anchorage symbols on the seatback. They
are just visible when you lean into the rear
seat to install the child restraint. You will
easily feel them if you run your finger along
the gap between the seatback and seat
cushion.
LATCH Lower Anchors
GETTING STARTED
23
Page 27 of 236
Tether Anchorage Weight Limit
Always use the tether anchor when using the seat belt to install a forward facing child
restraint, up to the recommended weight limit of the child restraint.
To Install A Child Seat Using An ALR:
1. Pull enough of the seat belt webbing from the retractor to pass it through the belt path
of the child restraint. Do not twist the belt webbing in the belt path.
2. Slide the latch plate into the buckle until you hear a “click.”
3. Pull on the webbing to make the lap portion tight against the child seat.
4. To lock the seat belt, pull down on the shoulder part of the belt until you have pulled
all the seat belt webbing out of the retractor. Then, allow the webbing to retract back
into the retractor. As the webbing retracts, you will hear a clicking sound. This means
the seat belt is now in the Automatic Locking mode.
5. Try to pull the webbing out of the retractor. If it is locked, you should not be able to pull
out any webbing. If the retractor is not locked, repeat the last step.
6.Finally, pull up on any extra webbing to tighten the lap portion around the child restraint
while you push the child restraint rearward and downward into the vehicle seat.
7. If the child restraint has a top tether strap and the seating position has a top tether
anchorage, connect the tether strap to the anchorage and tighten the tether strap. See
below for directions to attach a tether anchor.
8. Test that the child restraint is installed tightly by pulling back and forth on the child
seat at the belt path. It should not move more than 1 inch (25.4 mm) in any direction.
Installing The Top Tether Strap (With Either Lower Anchors Or Vehicle Seat Belt):
When installing a forward-facing child restraint, always secure the top tether strap, up to
the tether anchor weight limit, whether the child restraint is installed with the lower
anchors or the vehicle seat belt.
Tether Strap Installation
1. Rotate or lift the cover to access the anchor directly behind the seat where you are
placing the child restraint.
2. Route the tether strap to provide the most direct path for the strap between the anchor
and the child seat.
3. If your vehicle is equipped with adjustable rear head restraints, raise the head
restraint, and where possible, route the tether strap under the head restraint and
between the two posts. If not possible, lower the head restraint and pass the tether
strap around the outboard side of the head restraint.
GETTING STARTED
25
Page 28 of 236
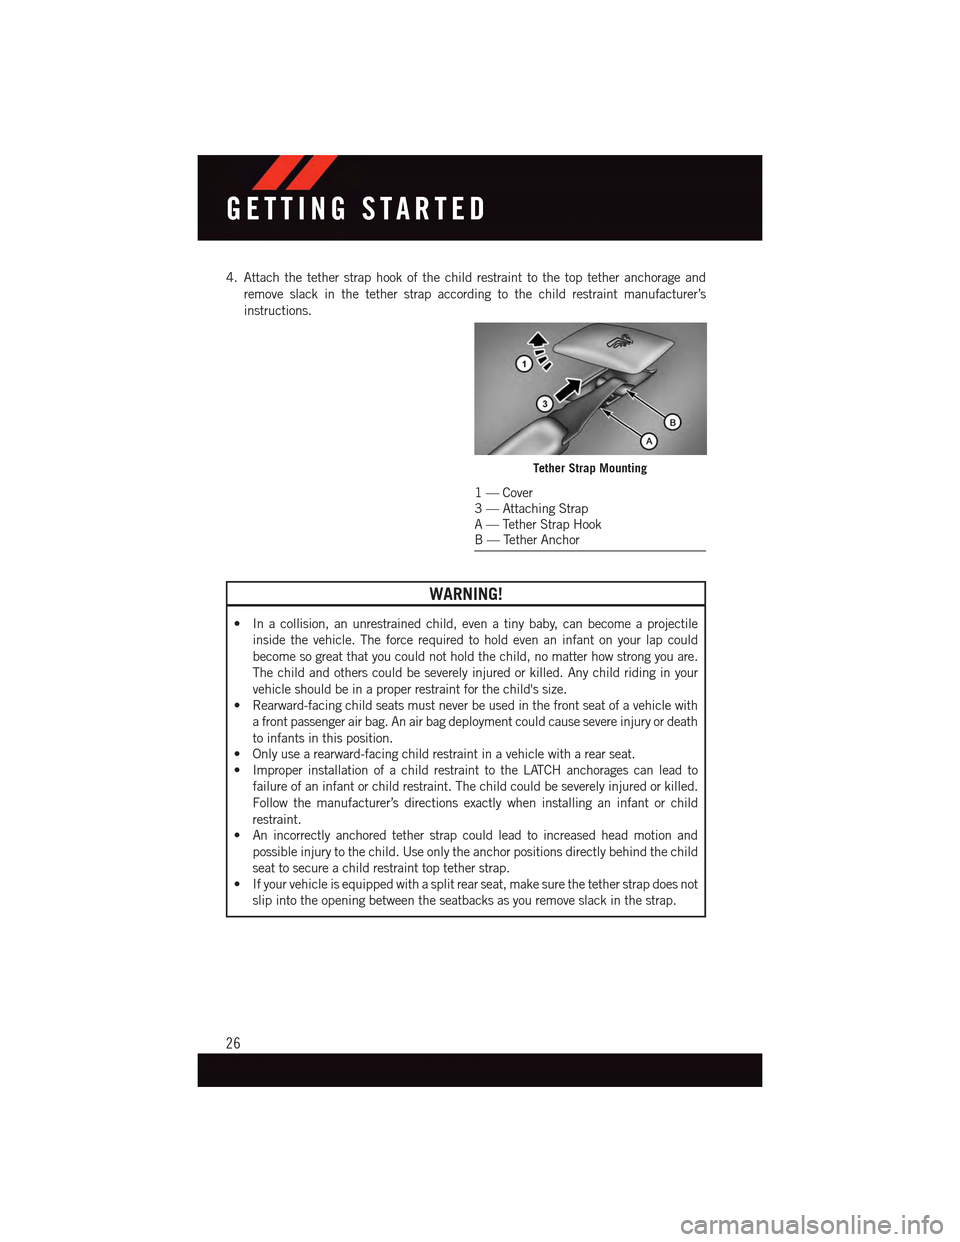
4. Attach the tether strap hook of the child restraint to the top tether anchorage and
remove slack in the tether strap according to the child restraint manufacturer’s
instructions.
WARNING!
•Inacollision,anunrestrainedchild,evenatinybaby,canbecomeaprojectile
inside the vehicle. The force required to hold even an infant on your lap could
become so great that you could not hold the child, no matter how strong you are.
The child and others could be severely injured or killed. Any child riding in your
vehicle should be in a proper restraint for the child's size.
•Rearward-facingchildseatsmustneverbeusedinthefrontseatofavehiclewith
afrontpassengerairbag.Anairbagdeploymentcouldcausesevereinjuryordeath
to infants in this position.
•Onlyusearearward-facingchildrestraintinavehiclewitharearseat.
•ImproperinstallationofachildrestrainttotheLATCHanchoragescanleadto
failure of an infant or child restraint. The child could be severely injured or killed.
Follow the manufacturer’s directions exactly when installing an infant or child
restraint.
•Anincorrectlyanchoredtetherstrapcouldleadtoincreasedheadmotionand
possible injury to the child. Use only the anchor positions directly behind the child
seat to secure a child restraint top tether strap.
•Ifyourvehicleisequippedwithasplitrearseat,makesurethetetherstrapdoesnot
slip into the opening between the seatbacks as you remove slack in the strap.
Tether Strap Mounting
1—Cover3—AttachingStrapA—TetherStrapHookB—TetherAnchor
GETTING STARTED
26
Page 29 of 236
HEAD RESTRAINTS
Head restraints are designed to reduce the risk of injury by restricting head movement in
the event of a rear impact. Head restraints should be adjusted so that the top of the head
restraint is located above the top of your ear.
WARNING!
The head restraints for all occupants must be properly adjusted prior to operating the
vehicle or occupying a seat. Head restraints should never be adjusted while the vehicle
is in motion. Driving a vehicle with the head restraints improperly adjusted or removed
could cause serious injury or death in the event of a collision.
NOTE:
Do not reposition the head restraint 180 degrees to the incorrect position in an attempt to
gain additional clearance to the back of the head.
Reactive Head Restraints — Front Seats
The front driver and passenger seats are equipped with Reactive Head Restraints (RHR).
In the event of a rear impact the RHRs will automatically extend forward minimizing the
gap between the back of the occupants head and the RHR.
The RHRs will automatically return to their normal position following a rear impact. If the
RHRs do not return to their normal position see your authorized dealer immediately.
To r a i s e t h e h e a d r e s t r a i n t , p u l l u p w a r d o n t h e h e a d r e s t r a i n t . To l o w e r t h e h e a d r e s t r a i n t ,
push the adjustment button located at the base of the head restraint and push downward
on the head restraint.
NOTE:
To r e m o v e t h e h e a d r e s t r a i n t , r a i s e i t a s f a r a s i t c a n g o t h e n p u s h t h e r e l e a s e b u t t o n a n d t h e
adjustment button at the base of each post while pulling the head restraint up. To reinstall
the head restraint, put the head restraint posts into the holes and push downward. Then
adjust the head restraint to the appropriate height.
WARNING!
•Alooseheadrestraintthrownforwardinacollisionorhardstopcouldcauseserious
injury or death to occupants of the vehicle. Always securely stow removed head
restraints in a location outside the occupant compartment.
•ALLtheheadrestraintsMUSTbereinstalledinthevehicletoproperlyprotectthe
occupants. Follow the re-installation instructions above prior to operating the
vehicle or occupying a seat.
•DonotplaceitemsoverthetopoftheReactiveHeadRestraint,suchascoats,seat
covers or portable DVD players. These items may interfere with the operation of the
Reactive Head Restraint in the event of a collision and could result in serious injury
or death.
GETTING STARTED
27
Page 33 of 236
CAUTION!
Do not place any article under a power seat or impede its ability to move as it may cause
damage to the seat controls. Seat travel may become limited if movement is stopped
by an obstruction in the seat’s path.
WARNING!
•Adjustingaseatwhilethevehicleismovingisdangerous.Thesuddenmovementof
the seat could cause you to lose control. The seat belt might not be properly
adjusted, and you could be severely injured or killed. Only adjust a seat while the
vehicle is parked.
•Donotridewiththeseatbackreclinedsothattheseatbeltisnolongerrestingagainst your chest. In a collision, you could slide under the seat belt and be severelyinjured or killed. Use the recliner only when the vehicle is parked.
REAR SEATS
Folding Rear Seatback
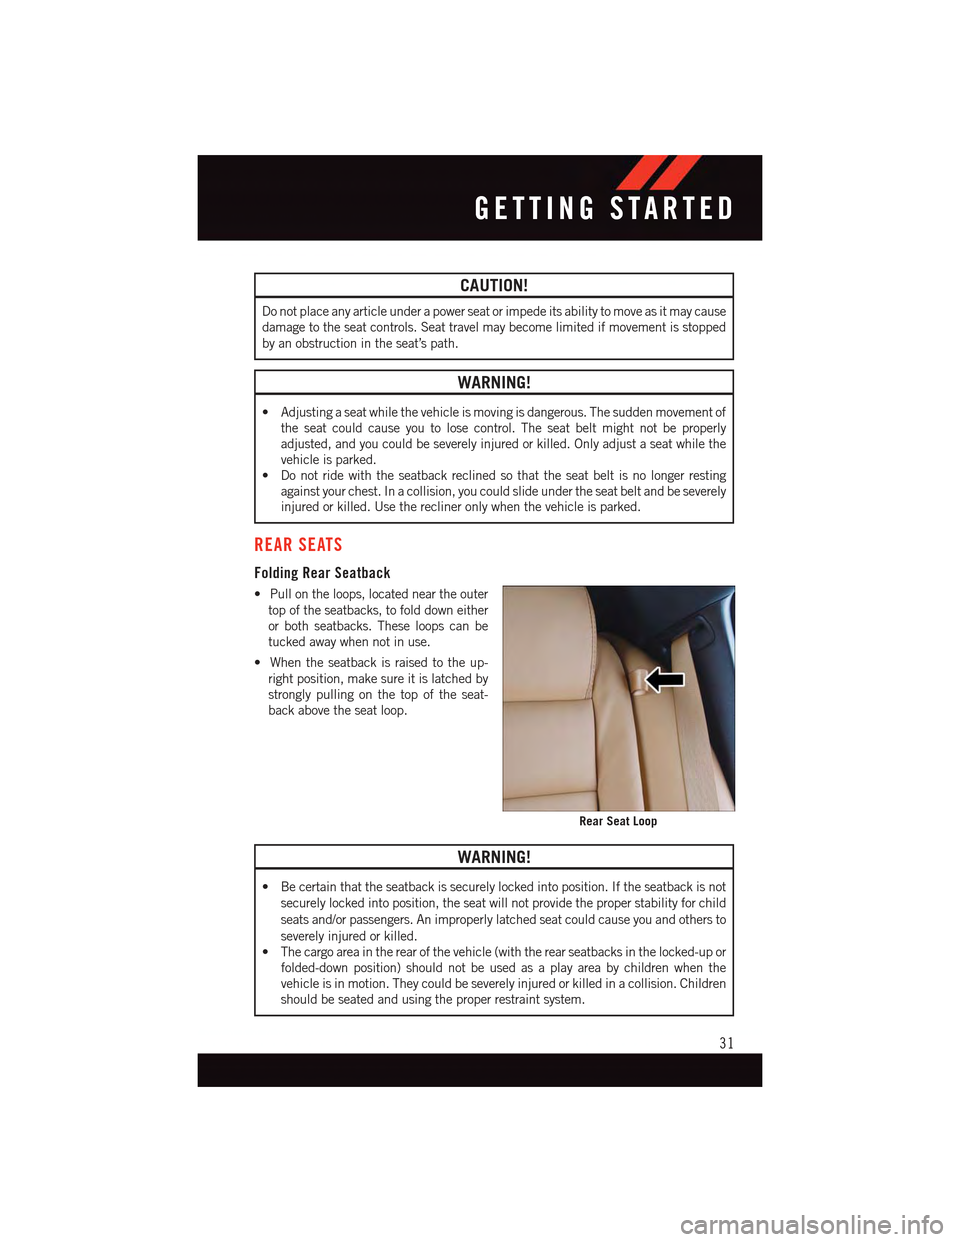
•Pullontheloops,locatedneartheouter
top of the seatbacks, to fold down either
or both seatbacks. These loops can be
tucked away when not in use.
•Whentheseatbackisraisedtotheup-
right position, make sure it is latched by
strongly pulling on the top of the seat-
back above the seat loop.
WARNING!
•Becertainthattheseatbackissecurelylockedintoposition.Iftheseatbackisnot
securely locked into position, the seat will not provide the proper stability for child
seats and/or passengers. An improperly latched seat could cause you and others to
severely injured or killed.
•Thecargoareaintherearofthevehicle(withtherearseatbacksinthelocked-upor
folded-down position) should not be used as a play area by children when the
vehicle is in motion. They could be severely injured or killed in a collision. Children
should be seated and using the proper restraint system.
Rear Seat Loop
GETTING STARTED
31
Page 63 of 236
Closing Sunroof
Express Closing
Push the switch forward and release it within one-half second. The sunroof will fully close
automatically from any position.
Manual Closing
Push and hold the switch forward to close the sunroof. Any release of the switch will stop
the movement, and the sunroof will remain in a partially closed position until the switch
is pushed again.
Pinch Protection Feature
This feature will detect an obstruction in the opening of the sunroof during Express Close
operation. If an obstruction in the path of the sunroof is detected, the sunroof will
automatically retract. Remove the obstruction if this occurs. Next, push the switch
forward and release to Express Close.
NOTE:
If three consecutive sunroof close attempts result in Pinch Protect reversals, the fourth
close attempt will be a Manual Close movement with Pinch Protect disabled.
WARNING!
•Donotletchildrenplaywiththesunroof.Neverleavechildrenunattendedina
vehicle, or with access to an unlocked vehicle. Do not leave the Key Fob in or near
the vehicle, and do not leave the ignition of a vehicle equipped with Keyless
Enter-N-Go™ in the ACC or ON/RUN mode. Occupants, particularly unattended
children, can become entrapped by the power sunroof while operating the power
sunroof switch. Such entrapment may result in serious injury or death.
•Inacollision,thereisagreaterriskofbeingthrownfromavehiclewithanopen
sunroof. You could also be severely injured or killed. Always fasten your seat belt
properly and make sure all passengers are properly secured.
•Donotallowsmallchildrentooperatethesunroof.Neverallowyourfingers,other
body parts, or any object to project through the sunroof opening. Injury may result.
WIND BUFFETING
Wind buffeting can be described as a helicopter-type percussion sound. If buffeting
occurs with the rear windows open, adjust the front and rear windows together.
If buffeting occurs with the sunroof open, adjust the sunroof opening, or adjust any
window. This will minimize buffeting.
OPERATING YOUR VEHICLE
61