center console DODGE CHARGER 2015 7.G User Guide
[x] Cancel search | Manufacturer: DODGE, Model Year: 2015, Model line: CHARGER, Model: DODGE CHARGER 2015 7.GPages: 236, PDF Size: 35.67 MB
Page 35 of 236
Rear Heated Seats
On some models, the two outboard seats are equipped with heated seats. The heated seat
switches for these seats are located on the rear of the center console. There are two heated
seat switchesthat allow the rear passengers to operate the seats independently.
Yo u c a n c h o o s e f r o m H I , L O o r O F F h e a t s e t t i n g s . T h e i n d i c a t o r l i g h t s i n e a c h s w i t c h i n d i c a t e
the level of heat in use. Two indicator lights will illuminate for HI, one for LO and none for OFF.
•Pushtheheatedseatbuttononce to select HI-level heating.
•PushtheheatedseatbuttonasecondtimetoselectLO-levelheating.
•PushtheheatedseatbuttonathirdtimetoturntheheatingelementsOFF.
NOTE:
•Onceaheatsettingisselected,heatwillbefeltwithintwotofiveminutes.
•Theenginemustberunningfortheheatedseatstooperate.
When the HI-level setting is selected, the heater will provide a boosted heat level during
the first four minutes of operation. Then, the heat output will drop to the normal HI-level.
If the HI-level setting is selected, the system will automatically switch to LO-level after
approximately 60 minutes of continuous operation. At that time, the number of illumi-
nated LEDs changes from two to one, indicating the change. The LO-level setting will turn
OFF automatically after approximately 45 minutes.
Front Ventilated Seats
Located in the seat cushion and seat back are small fans that draw the air from the
passenger compartment and move air through fine perforations in the seat cover to help
keep the driver and front passenger cooler in higher ambient temperatures. The fans
operate at two speeds, HI and LO.
The front ventilated seats control buttons are located within the Uconnect®system. You
can gain access to the control buttons through the climate screen or the controls screen.
•Presstheventilatedseatbuttononce to choose HI.
•PresstheventilatedseatbuttonasecondtimetochooseLO.
•PresstheventilatedseatbuttonathirdtimetoturntheventilatedseatOFF.
NOTE:
The engine must be running for the ventilated seats to operate.
Vehicles Equipped With Remote Start
On models that are equipped with remote start, the ventilated seats can be programed to
come on during a remote start.
This feature can be programmed through the Uconnect®system. Refer to “Uconnect®
Settings” in “Understanding Your Instrument Panel” in the Owner's Manual on the DVD.
GETTING STARTED
33
Page 65 of 236
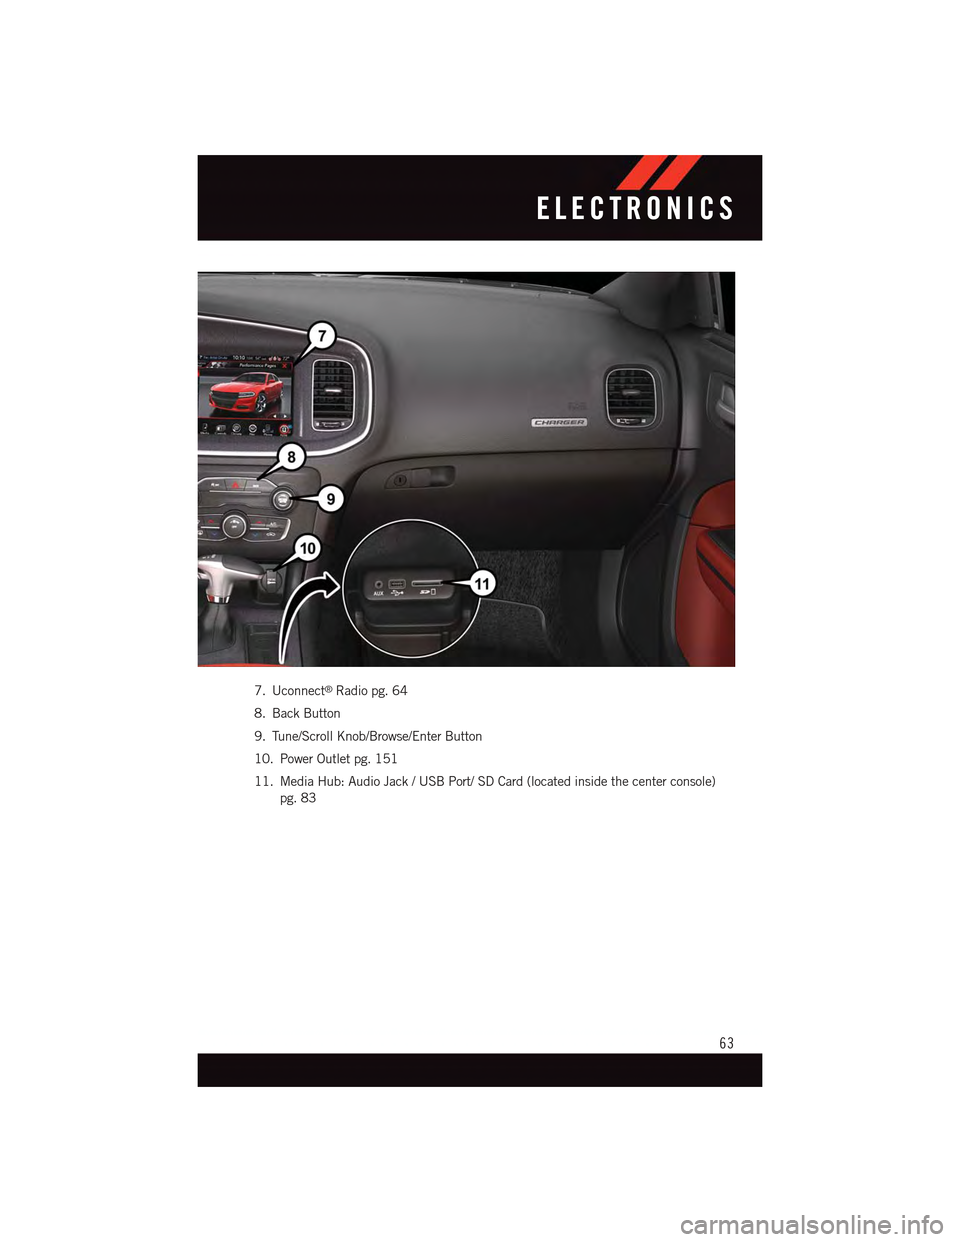
7. Uconnect®Radio pg. 64
8. Back Button
9. Tune/Scroll Knob/Browse/Enter Button
10. Power Outlet pg. 151
11. Media Hub: Audio Jack / USB Port/ SD Card (located inside the center console)
pg. 83
ELECTRONICS
63
Page 100 of 236
When connected, the iPod®/compatible USB device can be controlled using the radio or
Steering Wheel Audio Controls to play, skip to the next or previous track, browse, and list
the contents.
The iPod®battery charges when plugged into the USB port (if supported by the specific
device).
There are also two USB Charge Only ports located on the back of the center console for
rear passengers.
To r o u t e t h e U S B / i P o d®cable out of the center console, use the access cut out.
NOTE:
•WhenconnectingyouriPod®device for the first time, the system may take several
minutes to read your music, depending on the number of files. For example, the system
will take approximately five minutes for every 1,000 songs loaded on the device. Also
during the reading process, the Shuffle and Browse functions will be disabled. This
process is needed to ensure the full use of your iPod®features and only happens the
first time it is connected. After the first time, the reading process of your iPod®will take
considerably less time unless changes are made or new songs are added to the playlist.
•TheUSBportsupportscertainMini,Classic,Nano,Touch,andiPhone®devices. The
USB port also supports playing music from compatible external USB Mass Storage
Class memory devices. Some iPod®software versions may not fully support the USB
port features. Please visit Apple’s website for iPod®software updates.
Audio Jack (AUX)
The AUX allows a portable device, such as an MP3 player or an iPod®,tobepluggedinto
the radio and utilize the vehicle’s sound system, using a 3.5 mm stereo audio cable, to
amplify the source and play through the vehicle speakers.
•Pressingthe“AUX”buttononthetouchscreenwillchangethemodetoauxiliarydevice
if the audio jack is connected, allowing the music from your portable device to be heard
through the vehicle's speakers. To activate the AUX, plug in the audio jack.
•Thefunctionsoftheportabledevicearecontrolledusingthedevicebuttons.The
volume may be controlled using the radio or portable device.
•Toroutetheaudiocableoutofthecenterconsole,usetheaccesscutoutinthefront
of the console.
Bluetooth® Streaming Audio
If using a Bluetooth®-equippeddevice,youmayalsobeabletostreammusictoyour
vehicle's sound system. Your connected device must be Bluetooth-compatible, and paired
with your system (see Uconnect®Phone for pairing instructions).
•YoucanaccessthemusicfromyourconnectedBluetooth®device by pressing the
“Bluetooth®”button on the touchscreen while in Media mode.
ELECTRONICS
98
Page 127 of 236
When connected, the iPod®/compatible USB device can be controlled using the radio or
Steering Wheel Audio Controls to play, skip to the next or previous track, browse, and list
the contents.
The iPod®battery charges when plugged into the USB port (if supported by the specific
device.)
To r o u t e t h e U S B / i P o d®cable out of the center console, use the access cut out.
NOTE:
•WhenconnectingyouriPod®device for the first time, the system may take several
minutes to read your music, depending on the number of files. For example, the system
will take approximately five minutes for every 1,000 songs loaded on the device. Also
during the reading process, the Shuffle and Browse functions will be disabled. This
process is needed to ensure the full use of your iPod®features and only happens the
first time it is connected. After the first time, the reading process of your iPod®will take
considerably less time unless changes are made or new songs are added to the playlist.
•TheUSBportsupportscertainMini,Classic,Nano,Touch,andiPhone®devices. The
USB port also supports playing music from compatible external USB Mass Storage
Class memory devices. Some iPod®software versions may not fully support the USB
port features. Please visit Apple’s website for iPod®software updates.
Audio Jack (AUX)
The AUX allows a portable device, such as an MP3 player or an iPod®,tobepluggedinto
the radio and utilize the vehicle’s sound system, using a 3.5 mm audio cable, to amplify
the source and play through the vehicle speakers.
•Pressingthe“AUX”buttononthetouchscreenwillchangethemodetoauxiliarydevice
if the audio jack is connected, allowing the music from your portable device to be heard
through the vehicle's speakers. In order to activate the AUX, plug in the audio jack.
•Thefunctionsoftheportabledevicearecontrolledusingthedevicebuttons.The
volume may be controlled using the radio or portable device.
•Toroutetheaudiocableoutofthecenterconsole,usetheaccesscutoutinthefront
of the console.
Bluetooth® Streaming Audio
If using a Bluetooth®-equippeddevice,youmayalsobeabletostreammusictoyour
vehicle's sound system. Your connected device must be Bluetooth-compatible, and paired
with your system (see Uconnect®Phone for pairing instructions).
•YoucanaccessthemusicfromyourconnectedBluetooth®device by pressing the
“Bluetooth®”button on the touchscreen while in Media mode.
ELECTRONICS
125
Page 150 of 236
UNIVERSAL GARAGE DOOR OPENER
Universal Garage Door Opener (HomeLink®)
HomeLink®replaces up to three hand-held transmitters that operate devices such as
garage door openers, motorized gates, lighting or home security systems. The HomeLink®
unit is powered by your vehicles 12 Volt battery.
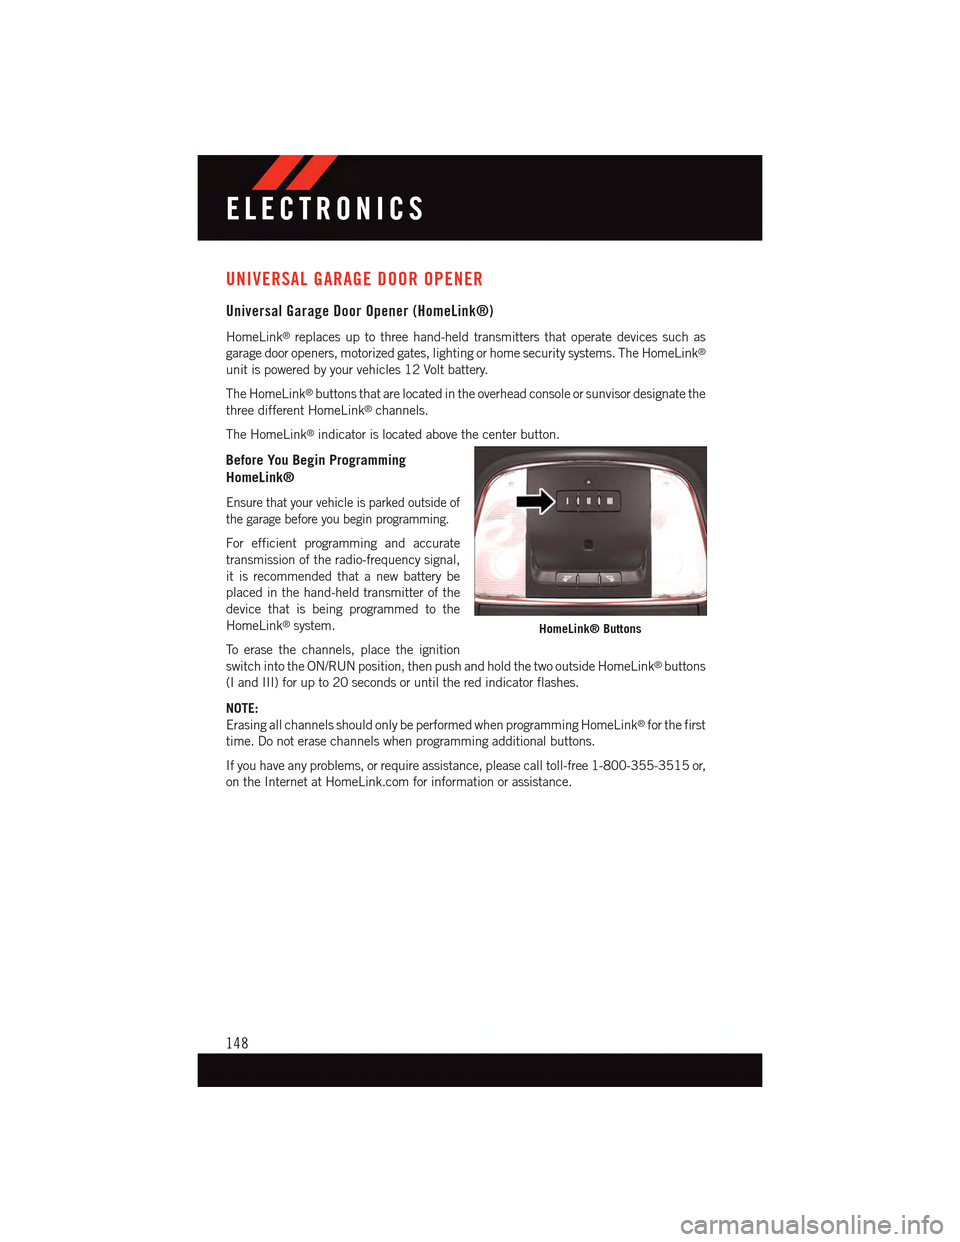
The HomeLink®buttons that are located in the overhead console or sunvisor designate the
three different HomeLink®channels.
The HomeLink®indicator is located above the center button.
Before You Begin Programming
HomeLink®
Ensure that your vehicle is parked outside of
the garage before you begin programming.
For efficient programming and accurate
transmission of the radio-frequency signal,
it is recommended that a new battery be
placed in the hand-held transmitter of the
device that is being programmed to the
HomeLink®system.
To e r a s e t h e c h a n n e l s , p l a c e t h e i g n i t i o n
switch into the ON/RUN position, then push and hold the two outside HomeLink®buttons
(I and III) for up to 20 seconds or until the red indicator flashes.
NOTE:
Erasing all channels should only be performed when programming HomeLink®for the first
time. Do not erase channels when programming additional buttons.
If you have any problems, or require assistance, please call toll-free 1-800-355-3515 or,
on the Internet at HomeLink.com for information or assistance.
HomeLink® Buttons
ELECTRONICS
148
Page 153 of 236

POWER OUTLET
There are two 12 Volt electrical outlets on
this vehicle.
The front 12 Volt power outlet has power
available only when the ignition is placed in
the ACC or RUN position.
The center console outlet is powered di-
rectly from the battery (power available at
all times). Items plugged into this outlet
may discharge the battery and/or prevent
the engine from starting.
NOTE:
•Donotexceedthemaximumpowerof
160 Watts (13 Amps) at 12 Volts. If the
160 Watt (13 Amp) power rating is ex-
ceeded, the fuse protecting the system
will need to be replaced.
•Power outlets are designed for accessory
plugs only. Do not insert any other object in
the power outlet as this will damage the
outlet and blow the fuse. Improper use of
the power outlet can cause damage not
covered by your new vehicle warranty.
Front Power Outlet
Center Console Power Outlet
Power Outlet Fuses
1—#12Fuse20AYellowCigarLighterIntegratedCenterStack/DualUSBChargeOnly Ports2—#38Fuse15ABluePowerOutletCenterConsole/MediaHub
ELECTRONICS
151
Page 183 of 236
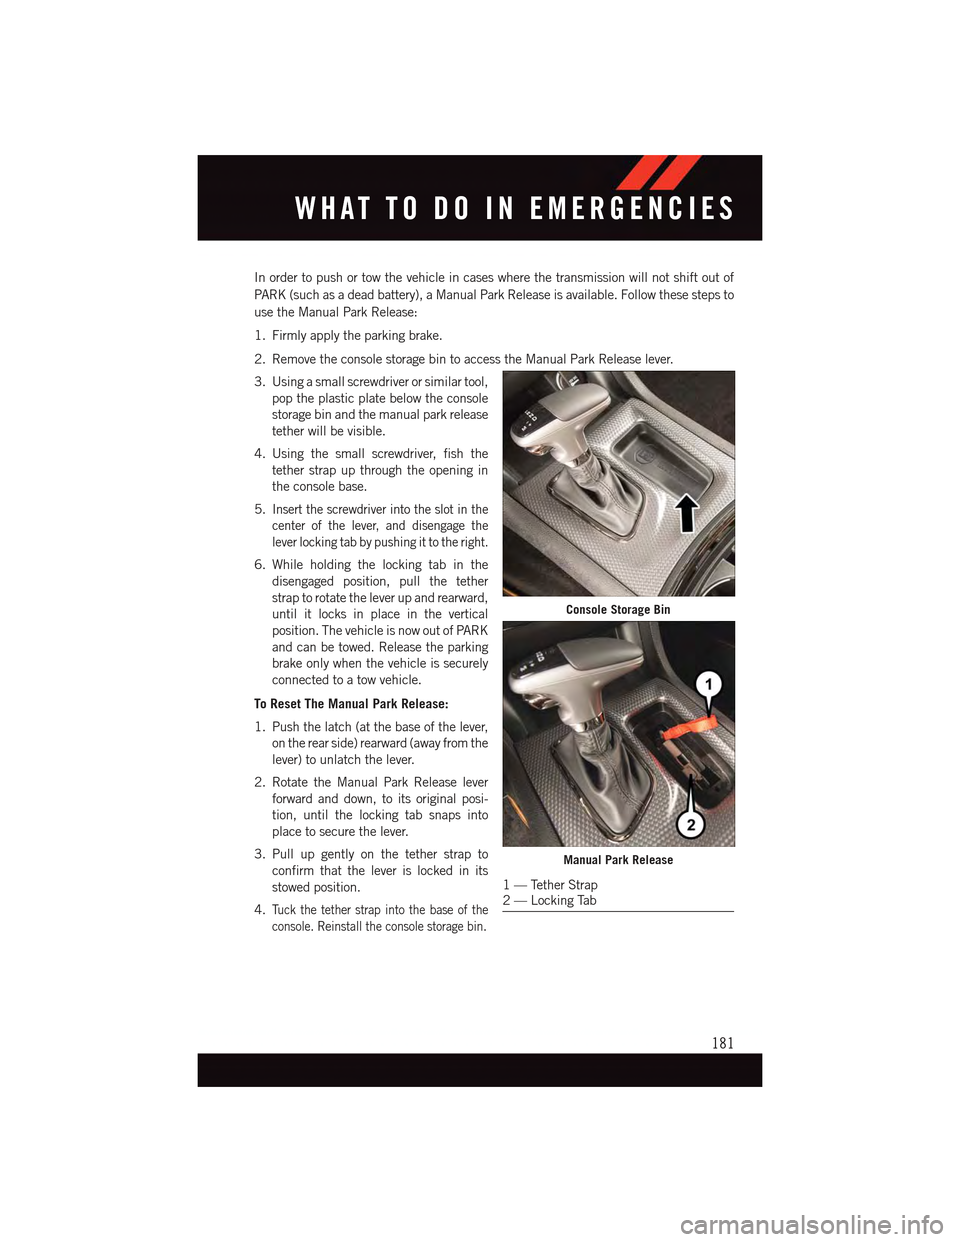
In order to push or tow the vehicle in cases where the transmission will not shift out of
PA R K ( s u c h a s a d e a d b a t t e r y ) , a M a n u a l P a r k R e l e a s e i s a v a i l a b l e . F o l l o w t h e s e s t e p s t o
use the Manual Park Release:
1. Firmly apply the parking brake.
2. Remove the console storage bin to access the Manual Park Release lever.
3. Using a small screwdriver or similar tool,
pop the plastic plate below the console
storage bin and the manual park release
tether will be visible.
4. Using the small screwdriver, fish the
tether strap up through the opening in
the console base.
5.Insert the screwdriver into the slot in the
center of the lever, and disengage the
lever locking tab by pushing it to the right.
6. While holding the locking tab in the
disengaged position, pull the tether
strap to rotate the lever up and rearward,
until it locks in place in the vertical
position. The vehicle is now out of PARK
and can be towed. Release the parking
brake only when the vehicle is securely
connected to a tow vehicle.
To Reset The Manual Park Release:
1. Push the latch (at the base of the lever,
on the rear side) rearward (away from the
lever) to unlatch the lever.
2. Rotate the Manual Park Release lever
forward and down, to its original posi-
tion, until the locking tab snaps into
place to secure the lever.
3. Pull up gently on the tether strap to
confirm that the lever is locked in its
stowed position.
4.Tu c k t h e t e t h e r s t r a p i n t o t h e b a s e o f t h e
console. Reinstall the console storage bin.
Console Storage Bin
Manual Park Release
1—TetherStrap2—LockingTab
WHAT TO DO IN EMERGENCIES
181
Page 212 of 236
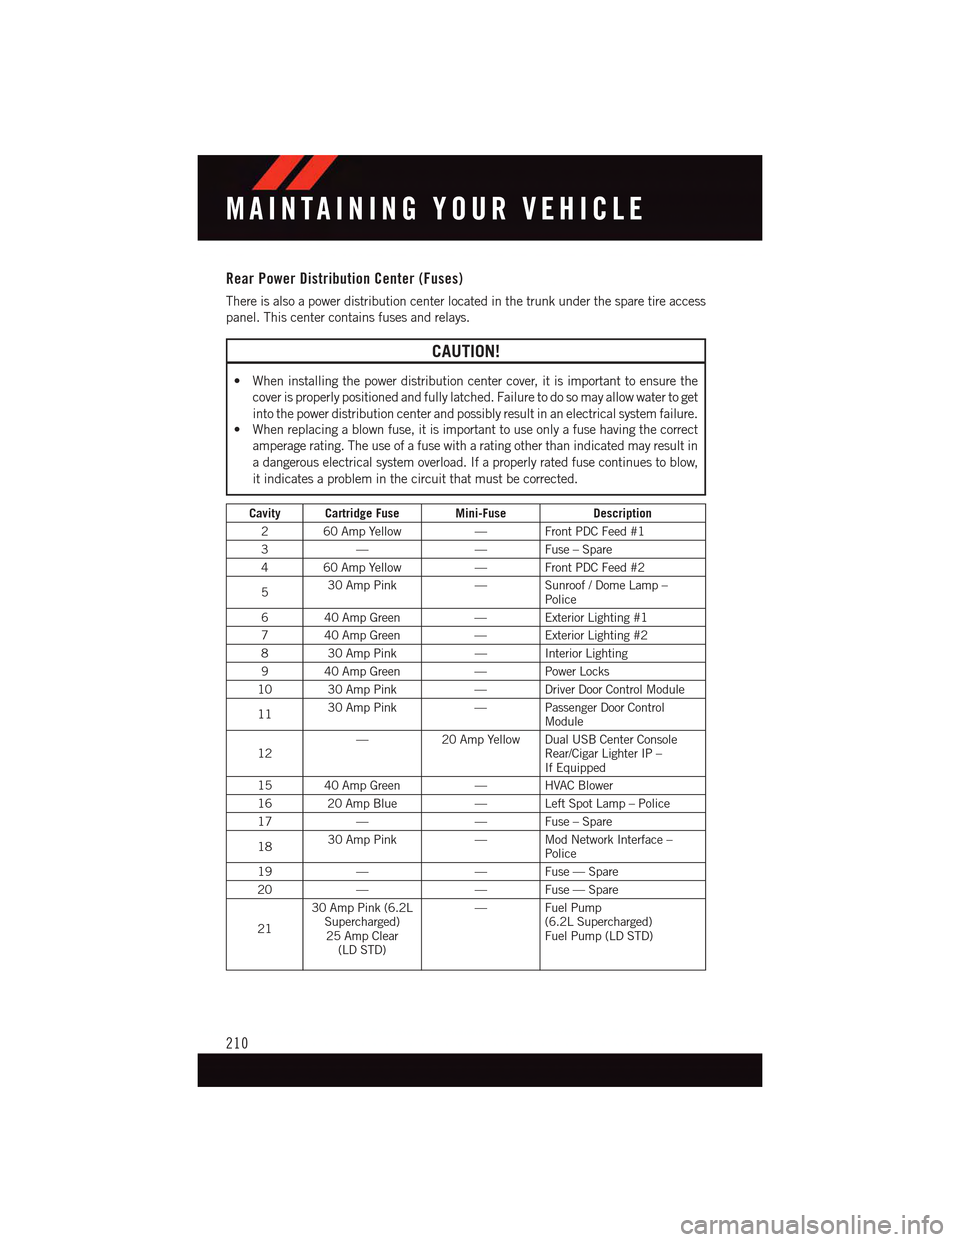
Rear Power Distribution Center (Fuses)
There is also a power distribution center located in the trunk under the spare tire access
panel. This center contains fuses and relays.
CAUTION!
•Wheninstallingthepowerdistributioncentercover,itisimportanttoensurethe
cover is properly positioned and fully latched. Failure to do so may allow water to get
into the power distribution center and possibly result in an electrical system failure.•Whenreplacingablownfuse,itisimportanttouseonlyafusehavingthecorrect
amperage rating. The use of a fuse with a rating other than indicated may result in
adangerouselectricalsystemoverload.Ifaproperlyratedfusecontinuestoblow,
it indicates a problem in the circuit that must be corrected.
Cavity Cartridge Fuse Mini-FuseDescription
260AmpYellow—FrontPDCFeed#1
3——Fuse–Spare
460AmpYellow—FrontPDCFeed#2
530 Amp Pink—Sunroof/DomeLamp–Police
640AmpGreen—ExteriorLighting#1
740AmpGreen—ExteriorLighting#2
830AmpPink—InteriorLighting
940AmpGreen—PowerLocks
10 30 Amp Pink—DriverDoorControlModule
1130 Amp Pink—PassengerDoorControlModule
12—20 Amp Yellow Dual USB Center ConsoleRear/Cigar Lighter IP –If Equipped
15 40 Amp Green—HVACBlower
16 20 Amp Blue—LeftSpotLamp–Police
17——Fuse–Spare
1830 Amp Pink—ModNetworkInterface–Police
19——Fuse—Spare
20——Fuse—Spare
21
30 Amp Pink (6.2LSupercharged)25 Amp Clear(LD STD)
—FuelPump(6.2L Supercharged)Fuel Pump (LD STD)
MAINTAINING YOUR VEHICLE
210
Page 213 of 236
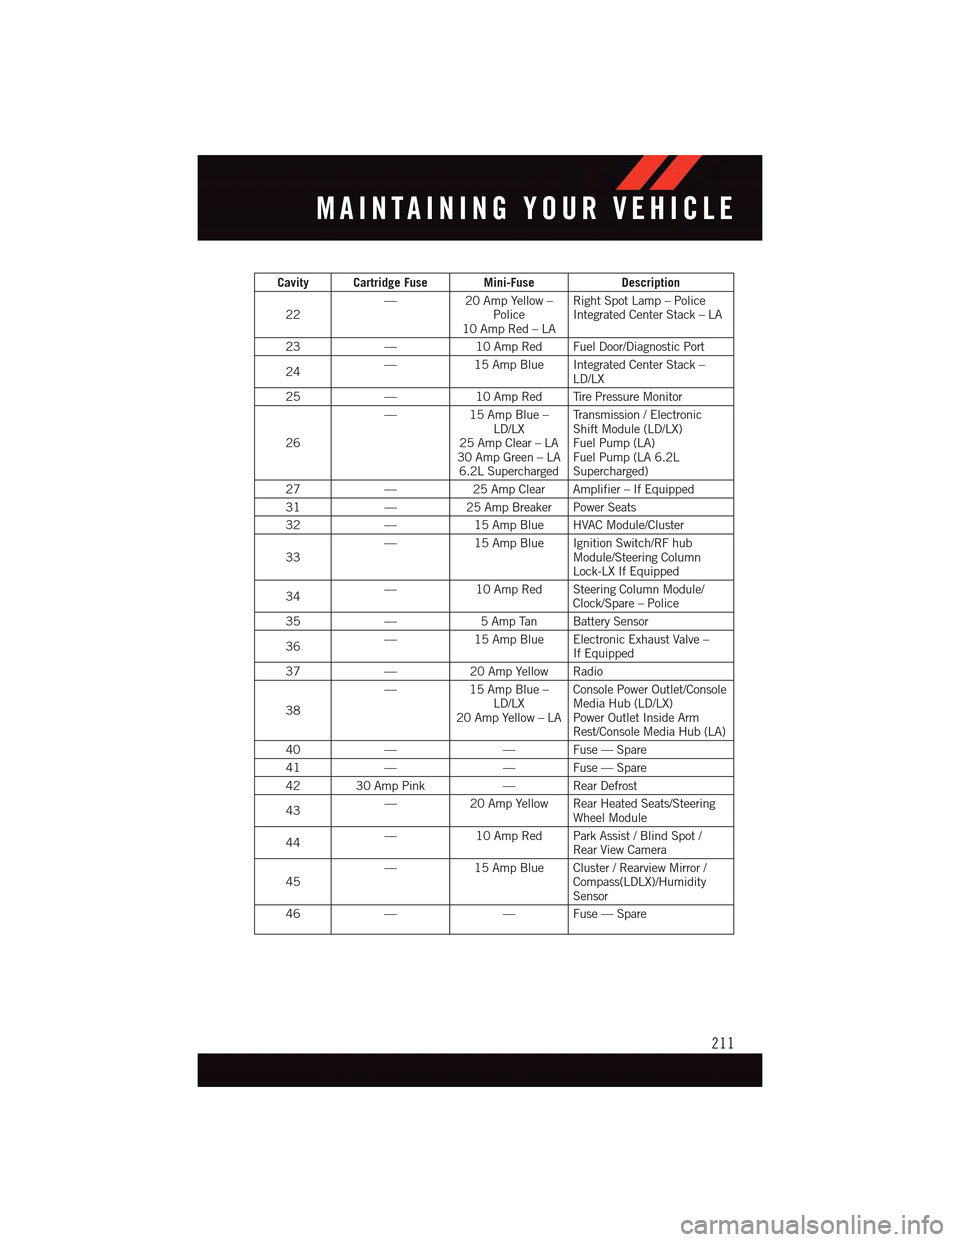
Cavity Cartridge Fuse Mini-FuseDescription
22—20 Amp Yellow –Police10 Amp Red – LA
Right Spot Lamp – PoliceIntegrated Center Stack – LA
23—10 Amp Red Fuel Door/Diagnostic Port
24—15 Amp Blue Integrated Center Stack –LD/LX
25—10 Amp Red Tire Pressure Monitor
26
—15 Amp Blue –LD/LX25 Amp Clear – LA30 Amp Green – LA6.2L Supercharged
Tr a n s m i s s i o n / E l e c t r o n i cShift Module (LD/LX)Fuel Pump (LA)Fuel Pump (LA 6.2LSupercharged)
27—25 Amp Clear Amplifier – If Equipped
31—25 Amp Breaker Power Seats
32—15 Amp Blue HVAC Module/Cluster
33—15 Amp Blue Ignition Switch/RF hubModule/Steering ColumnLock-LX If Equipped
34—10 Amp Red Steering Column Module/Clock/Spare – Police
35—5AmpTan BatterySensor
36—15 Amp Blue Electronic Exhaust Valve –If Equipped
37—20 Amp Yellow Radio
38
—15 Amp Blue –LD/LX20 Amp Yellow – LA
Console Power Outlet/ConsoleMedia Hub (LD/LX)Power Outlet Inside ArmRest/Console Media Hub (LA)
40——Fuse—Spare
41——Fuse—Spare
42 30 Amp Pink—RearDefrost
43—20 Amp Yellow Rear Heated Seats/SteeringWheel Module
44—10 Amp Red Park Assist / Blind Spot /Rear View Camera
45—15 Amp Blue Cluster / Rearview Mirror /Compass(LDLX)/HumiditySensor
46——Fuse—Spare
MAINTAINING YOUR VEHICLE
211
Page 219 of 236

WHEEL AND WHEEL TRIM CARE
All wheels and wheel trim, especially aluminum and chrome plated wheels, should be
cleaned regularly with a mild soap and water to prevent corrosion.
To r e m o v e h e a v y s o i l a n d / o r e x c e s s i v e b r a k e d u s t , u s e M O PA R®Wheel Cleaner or
equivalent or select a non-abrasive, non-acidic cleaner.
CAUTION!
Do not use scouring pads, steel wool, a bristle brush, or metal polishes. Do not use ovencleaner. These products may damage the wheel's protective finish. Avoid automatic carwashes that use acidic solutions or harsh brushes that may damage the wheel'sprotective finish. Only MOPAR®Wheel Cleaner or equivalent is recommended.
REPLACEMENT BULBS
All of the interior bulbs are glass wedge base or glass cartridge types. Aluminum basebulbs are not approved and should not be used for replacement.
Interior Bulbs
Bulb Number
Rear Courtesy/Reading LampsW5W
Rear Compartment (Trunk) Lamp562
Overhead Console Reading Lamp578
Visor Vanity LampsA6220
Glove Box Lamp – If Equipped194
Door Courtesy562
Shift Indicator LampJKLE14140
Center High-Mount Stop Lamp (CHMSL) LED (Serviced at Authorized Dealer)
Optional Door Map Pocket/Cup HolderLED (Serviced at Authorized Dealer)
For lighted switches, see your authorized dealer for replacement instructions.
Exterior Bulbs
Bulb Number
Low/High Beam Headlamp (Standard HalogenBi Function Projector)HIR2
Low/High Beam Headlamp – High IntensityDischarge (Premium HID Bi Function Projector)D3S (Serviced at Authorized Dealer)
Front Park/Turn Lamp LED (Serviced at Authorized Dealer)
Front Fog Lamp – If Equipped LED (Serviced at Authorized Dealer)
Front Side Marker LED (Serviced at Authorized Dealer)
Rear Tail Lamp LED (Serviced at Authorized Dealer)
Rear Stop/Turn Lamp LED (Serviced at Authorized Dealer)
Rear Side Marker LED (Serviced at Authorized Dealer)
Backup Lamp LED (Serviced at Authorized Dealer)
License LED (Serviced at Authorized Dealer)
MAINTAINING YOUR VEHICLE
217