remote start DODGE CHARGER 2015 7.G User Guide
[x] Cancel search | Manufacturer: DODGE, Model Year: 2015, Model line: CHARGER, Model: DODGE CHARGER 2015 7.GPages: 236, PDF Size: 35.67 MB
Page 3 of 236
INTRODUCTION/WELCOME
WELCOME FROM FCA US LLC.......3
CONTROLS AT A GLANCE
DRIVER COCKPIT...............6INSTRUMENT CLUSTER...........8
GETTING STARTED
KEY FOB . . . . . . . . . . . . . . . . . . . 10REMOTE START . . . . . . . . . . . . . . . 13KEYLESS ENTER-N-GO™.........14TRUNK LOCK AND RELEASE.......17VEHICLE SECURITY ALARM........18SEAT BELT SYSTEMS............19SUPPLEMENTAL RESTRAINT SYSTEM(SRS) — AIR BAGS.............20CHILD RESTRAINTS............23HEAD RESTRAINTS.............27FRONT SEATS................28REAR SEATS.................31HEATED/VENTILATED SEATS........32HEATED STEERING WHEEL........34ADJUSTABLE PEDALS...........35TILT/TELESCOPING STEERINGCOLUMN...................36
OPERATING YOUR VEHICLE
ENGINE BREAK-INRECOMMENDATIONS............38TURN SIGNAL/WIPER/WASHER/HIGHBEAM LEVER.................40HEADLIGHT SWITCH............42ELECTRONIC SPEED CONTROL......43ADAPTIVE CRUISE CONTROL (ACC)....45LANESENSE.................51PA R K V I E W®REAR BACK-UP CAMERA . . 52BLIND SPOT MONITORING.........52EIGHT-SPEED AUTOMATICTRANSMISSION...............53AUTOSTICK/STEERING WHEEL MOUNTEDPA D D L E S H I F T E R S..............54SPORT MODE — WITHOUT PERFORMANCECONTROL....................55MANUAL CLIMATE CONTROLS.......56AUTOMATIC TEMPERATURE CONTROLS(ATC) . . . . . . . . . . . . . . . . . . . . . . 58POWER SUNROOF..............60WIND BUFFETING..............61
ELECTRONICS
YOUR VEHICLE'S SOUND SYSTEM....62IDENTIFYING YOUR RADIO.........64Uconnect®ACCESS.............65Uconnect®5.0 . . . . . . . . . . . . . . . . 81Uconnect®8.4A...............91Uconnect®8.4AN.............118
Uconnect®PHONE.............132STEERING WHEEL AUDIO CONTROLS..142DRIVER INFORMATION DISPLAY (DID)..142PROGRAMMABLE FEATURES.......147UNIVERSAL GARAGE DOOR OPENER . . 148POWER OUTLET..............151
UTILITY
TRAILER TOWING WEIGHTS(MAXIMUM TRAILER WEIGHTRATINGS)..................152RECREATIONAL TOWING(BEHIND MOTORHOME, ETC.)......152
SRT
AUTOSTICK.................153DRIVE MODES................155SRT PERFORMANCE FEATURES.....155SUMMER/THREE-SEASON TIRES....158
WHAT TO DO IN EMERGENCIES
ROADSIDE ASSISTANCE..........159INSTRUMENT CLUSTER WARNINGLIGHTS...................159INSTRUMENT CLUSTER INDICATORLIGHTS...................163IF YOUR ENGINE OVERHEATS......165JACKING AND TIRE CHANGING.....166TIRE SERVICE KIT.............172BATTERY LOCATION............178JUMP-STARTING..............178MANUAL PARK RELEASE —8SPEEDTRANSMISSION.........180TOWING A DISABLED VEHICLE.....182FREEING A STUCK VEHICLE.......183EVENT DATA RECORDER (EDR).....184
MAINTAINING YOUR VEHICLE
OPENING THE HOOD...........185ENGINE COMPARTMENT.........186FLUID CAPACITIES — NON-SRT.....194FLUID CAPACITIES — SRT........194FLUIDS, LUBRICANTS AND GENUINEPA RT S — N O N - S RT............195FLUIDS, LUBRICANTS AND GENUINEPA RT S — S RT . . . . . . . . . . . . . . . 1 9 6MAINTENANCE PROCEDURES......198MAINTENANCE SCHEDULE —NON-SRT...................198MAINTENANCE SCHEDULE — SRT . . . 203FUSES....................208TIRE PRESSURES.............213SPARE TIRES — IF EQUIPPED......214FUEL DOOR RELEASE..........215WHEEL AND WHEEL TRIM CARE....217REPLACEMENT BULBS..........217
TABLE OF CONTENTS
Page 7 of 236
USE OF AFTERMARKET PRODUCTS (ELECTRONICS)
The use of aftermarket devices including cell phones, MP3 players, GPS systems, or
chargers may affect the performance of on-board wireless features including Keyless
Enter-N-Go™ and Remote Start range. If you are experiencing difficulties with any of your
wireless features, try disconnecting your aftermarket devices to see if the situation
improves. If your symptoms persist, please see an authorized dealer.
CHRYSLER, DODGE, JEEP, RAM, MOPAR and Uconnect are registered trademarks of
FCA US LLC.
COPYRIGHT ©2014 FCA US LLC
INTRODUCTION/WELCOME
5
Page 12 of 236
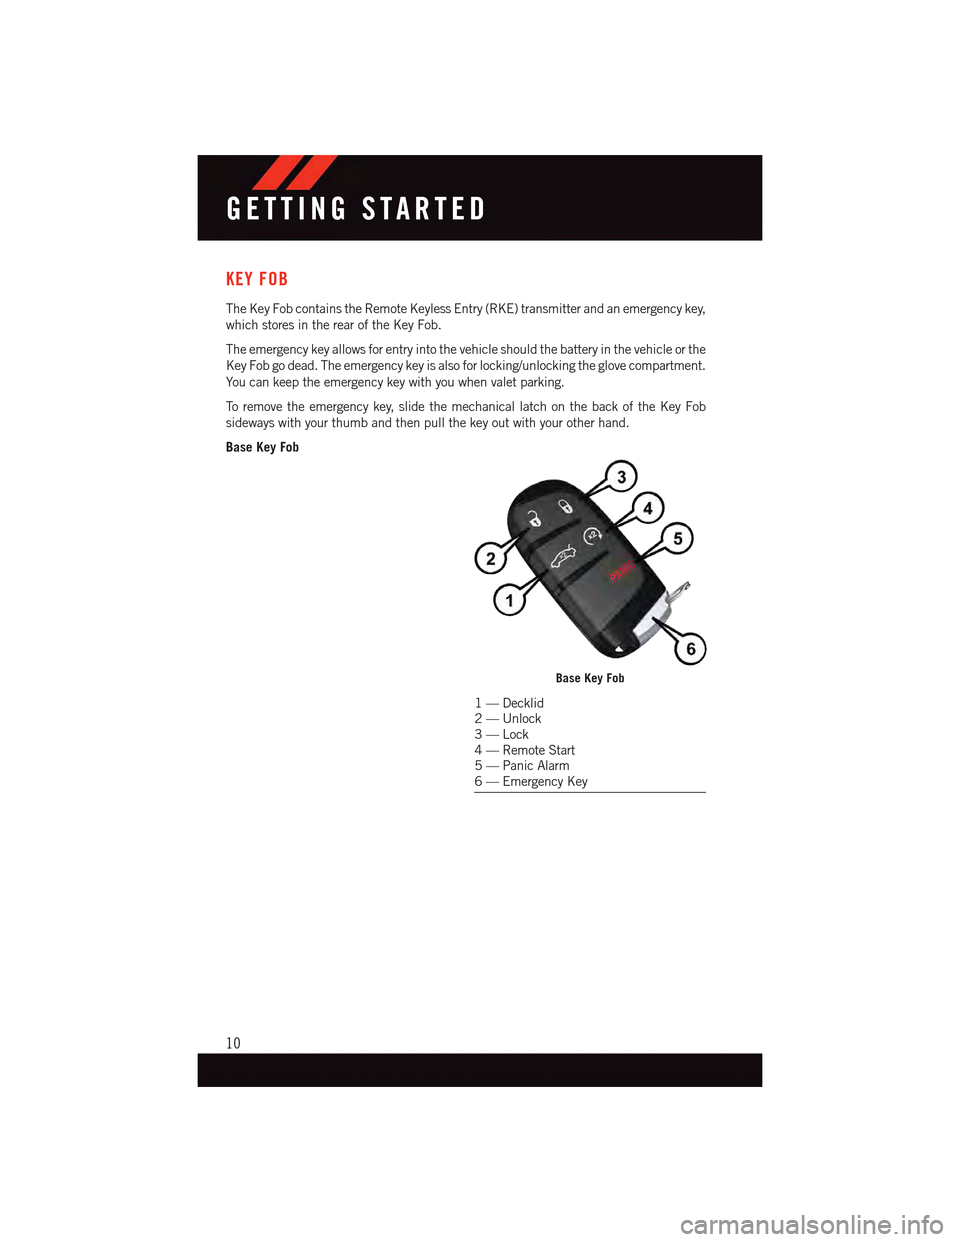
KEY FOB
The Key Fob contains the Remote Keyless Entry (RKE) transmitter and an emergency key,
which stores in the rear of the Key Fob.
The emergency key allows for entry into the vehicle should the battery in the vehicle or the
Key Fob go dead. The emergency key is also for locking/unlocking the glove compartment.
Yo u c a n k e e p t h e e m e r g e n c y k e y w i t h y o u w h e n v a l e t p a r k i n g .
To r e m o v e t h e e m e r g e n c y k e y, s l i d e t h e m e c h a n i c a l l a t c h o n t h e b a c k o f t h e K e y F o b
sideways with your thumb and then pull the key out with your other hand.
Base Key Fob
Base Key Fob
1—Decklid2—Unlock3—Lock4—RemoteStart5—PanicAlarm6—EmergencyKey
GETTING STARTED
10
Page 13 of 236
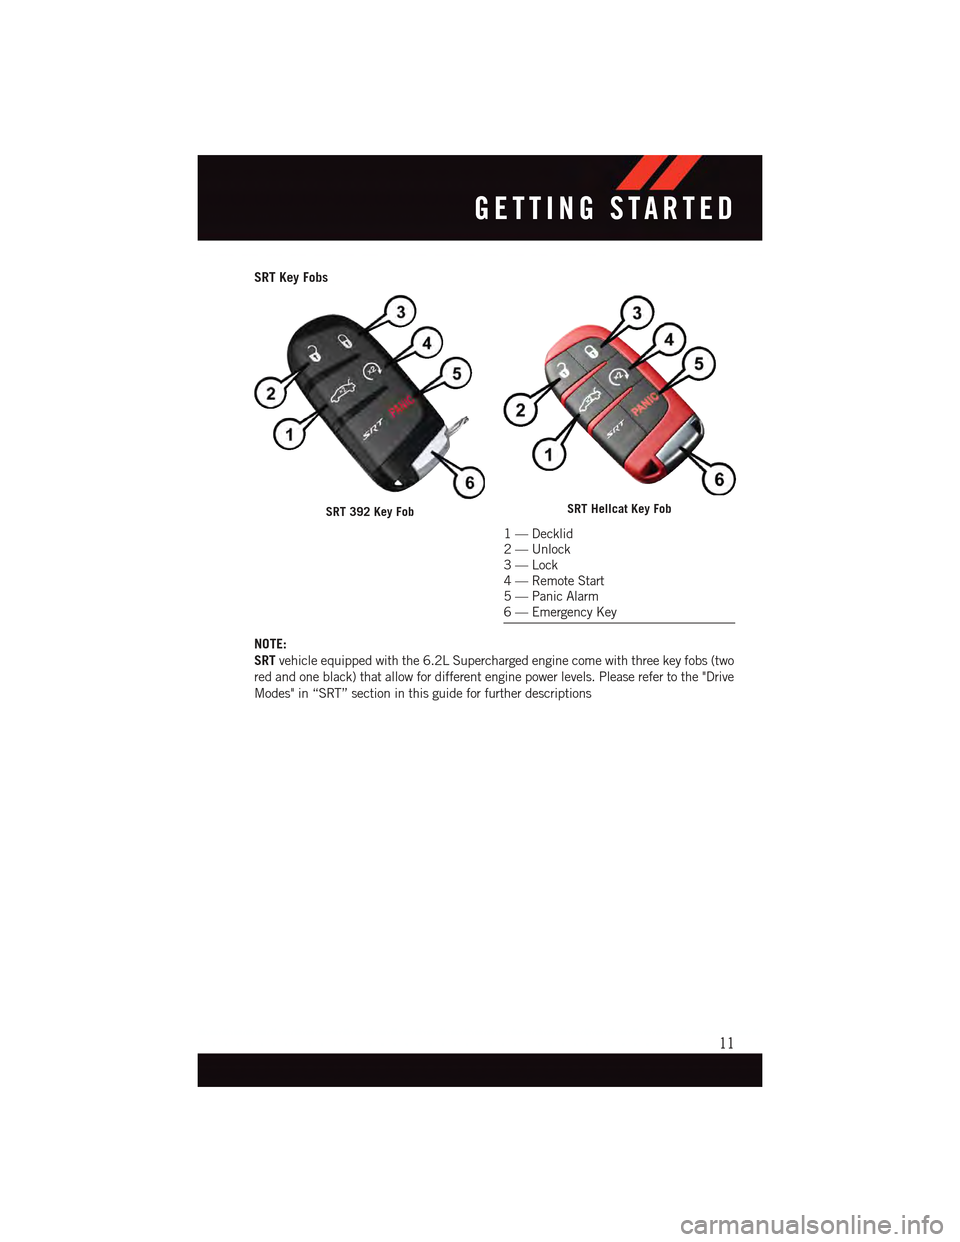
SRT Key Fobs
NOTE:
SRTvehicle equipped with the 6.2L Supercharged engine come with three key fobs (two
red and one black) that allow for different engine power levels. Please refer to the "Drive
Modes" in “SRT” section in this guide for further descriptions
SRT 392 Key FobSRT Hellcat Key Fob
1—Decklid2—Unlock3—Lock4—RemoteStart5—PanicAlarm6—EmergencyKey
GETTING STARTED
11
Page 15 of 236
WARNING!
•NeverusethePARKpositionasasubstitutefortheparkingbrake.Alwaysapplythe
parking brake fully when parked to guard against vehicle movement and possible
injury or damage.
•Whenleavingthevehicle,alwaysmakesuretheKeylessIgnitionNodeisinthe
“OFF” mode and remove the Key Fob from the vehicle.
•Neverleavechildrenaloneinavehicle,orwithaccesstoanunlockedvehicle.
Allowing children to be in a vehicle unattended is dangerous for a number of
reasons. A child or others could be seriously or fatally injured. Children should be
warned not to touch the parking brake, brake pedal or the gear selector.
•DonotleavetheKeyFobinornearthevehicle,orinalocationaccessibleto
children, and do not leave the ignition of a vehicle equipped with Keyless
Enter-N-Go™ in the ACC or ON/RUN mode. A child could operate power windows,
other controls, or move the vehicle.
REMOTE START
•PushtheREMOTESTARTbuttonx2on the Key Fob twice within five seconds.
Pushing the REMOTE START button a third time shuts the engine off.
•Todrivethevehicle,pushtheUNLOCKbuttonandcycletheignitiontotheON/RUN
position.
With Remote Start, the engine will only run for 15 minutes (timeout) unless the ignition
is cycled to the ON/RUN position.
The vehicle must be cycled to the ON/RUN position after two consecutive timeouts.
WARNING!
•Donotstartorrunanengineinaclosedgarageorconfinedarea.Exhaustgas
contains Carbon Monoxide (CO) which is odorless and colorless. Carbon Monoxide
is poisonous and can cause you or others to be severely injured or killed when
inhaled.
•KeepKeyFobtransmittersawayfromchildren.OperationoftheRemoteStart
System, windows, door locks or other controls could cause you and others to be
severely injured or killed.
GETTING STARTED
13
Page 19 of 236
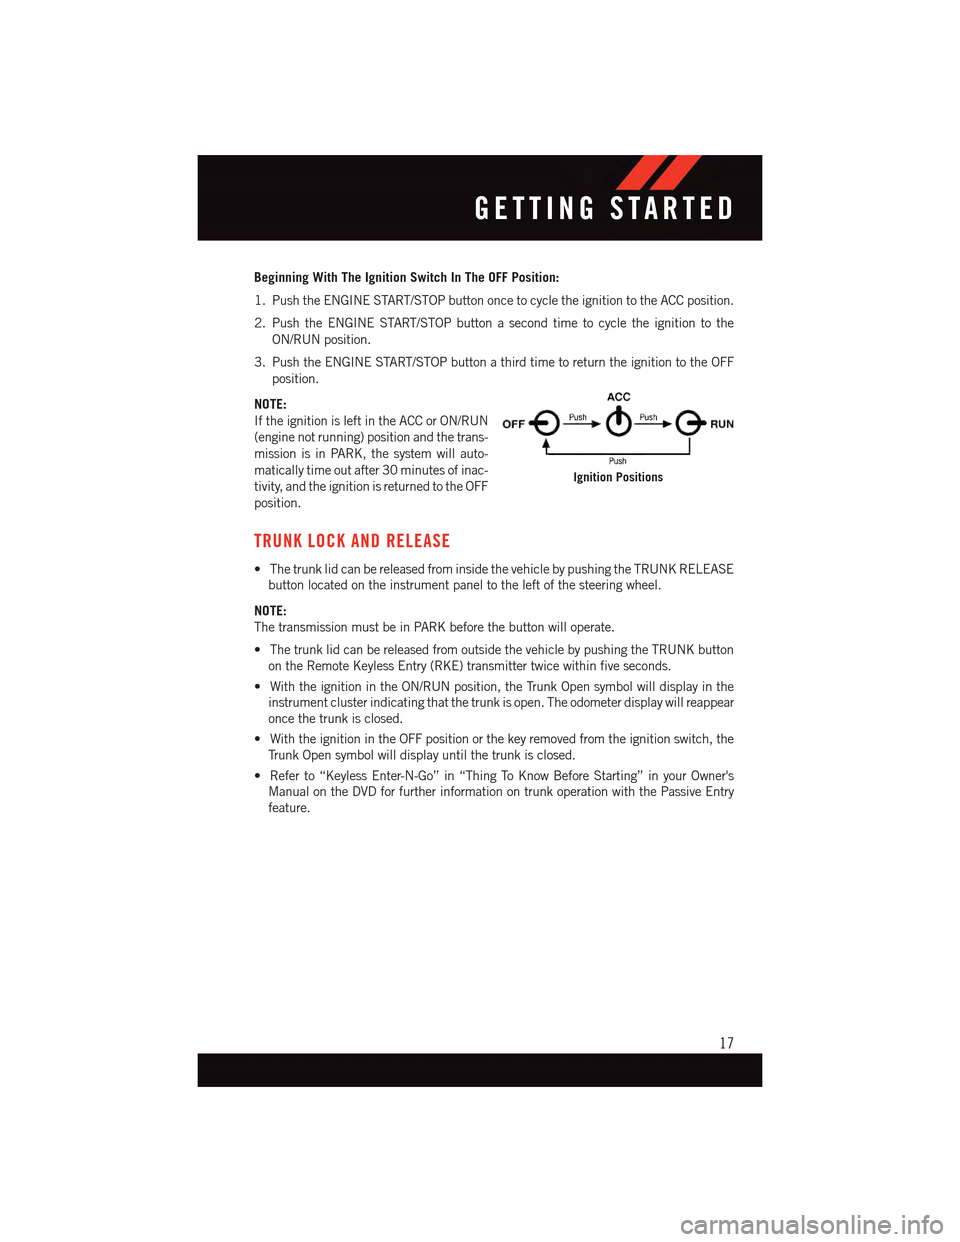
Beginning With The Ignition Switch In The OFF Position:
1. Push the ENGINE START/STOP button once to cycle the ignition to the ACC position.
2. Push the ENGINE START/STOP button a second time to cycle the ignition to the
ON/RUN position.
3. Push the ENGINE START/STOP button a third time to return the ignition to the OFF
position.
NOTE:
If the ignition is left in the ACC or ON/RUN
(engine not running) position and the trans-
mission is in PARK, the system will auto-
matically time out after 30 minutes of inac-
tivity, and the ignition is returned to the OFF
position.
TRUNK LOCK AND RELEASE
•ThetrunklidcanbereleasedfrominsidethevehiclebypushingtheTRUNKRELEASE
button located on the instrument panel to the left of the steering wheel.
NOTE:
The transmission must be in PARK before the button will operate.
•ThetrunklidcanbereleasedfromoutsidethevehiclebypushingtheTRUNKbutton
on the Remote Keyless Entry (RKE) transmitter twice within five seconds.
•WiththeignitionintheON/RUNposition,theTrunkOpensymbolwilldisplayinthe
instrument cluster indicating that the trunk is open. The odometer display will reappear
once the trunk is closed.
•WiththeignitionintheOFFpositionorthekeyremovedfromtheignitionswitch,the
Tr u n k O p e n s y m b o l w i l l d i s p l a y u n t i l t h e t r u n k i s c l o s e d .
•Referto“KeylessEnter-N-Go”in“ThingToKnowBeforeStarting”inyourOwner's
Manual on the DVD for further information on trunk operation with the Passive Entry
feature.
Ignition Positions
GETTING STARTED
17
Page 34 of 236
HEATED/VENTILATED SEATS
Heated Seats
On some models, the front and rear seats may be equipped with heaters in both the seat
cushions and seatbacks.
The front driver and passenger heated seats are operated using the Uconnect®System.
WARNING!
•Personswhoareunabletofeelpaintotheskinbecauseofadvancedage,chronic
illness, diabetes, spinal cord injury, medication, alcohol use, exhaustion or other
physical condition must exercise care when using the seat heater. It may cause
burns even at low temperatures, especially if used for long periods of time.
•Donotplaceanythingontheseatorseatbackthatinsulatesagainstheat,suchas
ablanketorcushion.Thismaycausetheseatheatertooverheat.Sittinginaseat
that has been overheated could cause serious burns due to the increased surface
temperature of the seat.
Front Heated Seats
The front heated seats control buttons are located within the climate or controls screen of
the touchscreen.
Yo u c a n c h o o s e f r o m H I , L O o r O F F h e a t s e t t i n g s . T h e i n d i c a t o r l i g h t s i n e a c h s w i t c h
indicate the level of heat in use. Two indicator lights will illuminate for HI, one for LO and
none for OFF.
•Presstheheatedseatbuttononce to turn the HI setting ON.
•PresstheheatedseatbuttonasecondtimetoturntheLOsettingON.
•PresstheheatedseatbuttonathirdtimetoturntheheatingelementsOFF.
If the HI-level setting is selected, the system will automatically switch to LO-level after
approximately 60 minutes of continuous operation. At that time, the display will change
from HI to LO, indicating the change. The LO-level setting will turn OFF automatically
after approximately 45 minutes.
NOTE:
•Onceaheatsettingisselected,heatwillbefeltwithintwotofiveminutes.
•Theenginemustberunningfortheheatedseatstooperate.
Vehicles Equipped With Remote Start
On models that are equipped with remote start, the heated seats can be programed to come
on during a remote start.
This feature can be programmed through the Uconnect®system. Refer to “Uconnect®
Settings” in “Understanding Your Instrument Panel” in the Owner's Manual on the DVD.
GETTING STARTED
32
Page 35 of 236
Rear Heated Seats
On some models, the two outboard seats are equipped with heated seats. The heated seat
switches for these seats are located on the rear of the center console. There are two heated
seat switchesthat allow the rear passengers to operate the seats independently.
Yo u c a n c h o o s e f r o m H I , L O o r O F F h e a t s e t t i n g s . T h e i n d i c a t o r l i g h t s i n e a c h s w i t c h i n d i c a t e
the level of heat in use. Two indicator lights will illuminate for HI, one for LO and none for OFF.
•Pushtheheatedseatbuttononce to select HI-level heating.
•PushtheheatedseatbuttonasecondtimetoselectLO-levelheating.
•PushtheheatedseatbuttonathirdtimetoturntheheatingelementsOFF.
NOTE:
•Onceaheatsettingisselected,heatwillbefeltwithintwotofiveminutes.
•Theenginemustberunningfortheheatedseatstooperate.
When the HI-level setting is selected, the heater will provide a boosted heat level during
the first four minutes of operation. Then, the heat output will drop to the normal HI-level.
If the HI-level setting is selected, the system will automatically switch to LO-level after
approximately 60 minutes of continuous operation. At that time, the number of illumi-
nated LEDs changes from two to one, indicating the change. The LO-level setting will turn
OFF automatically after approximately 45 minutes.
Front Ventilated Seats
Located in the seat cushion and seat back are small fans that draw the air from the
passenger compartment and move air through fine perforations in the seat cover to help
keep the driver and front passenger cooler in higher ambient temperatures. The fans
operate at two speeds, HI and LO.
The front ventilated seats control buttons are located within the Uconnect®system. You
can gain access to the control buttons through the climate screen or the controls screen.
•Presstheventilatedseatbuttononce to choose HI.
•PresstheventilatedseatbuttonasecondtimetochooseLO.
•PresstheventilatedseatbuttonathirdtimetoturntheventilatedseatOFF.
NOTE:
The engine must be running for the ventilated seats to operate.
Vehicles Equipped With Remote Start
On models that are equipped with remote start, the ventilated seats can be programed to
come on during a remote start.
This feature can be programmed through the Uconnect®system. Refer to “Uconnect®
Settings” in “Understanding Your Instrument Panel” in the Owner's Manual on the DVD.
GETTING STARTED
33
Page 36 of 236
HEATED STEERING WHEEL
The steering wheel contains a heating element that heats the steering wheel to one
temperature setting.
The heated steering wheel control button is located within the Uconnect®system. You can
gain access to the control buttons through the climate screen or the controls screen.
•Presstheheatedsteeringwheelbuttononce to turn the heating element ON.
•Presstheheatedsteeringwheelbuttonasecondtimetoturntheheatingelement
OFF.
Once the heated steering wheel has been turned on, it will operate for up to 80 minutes
before automatically shutting off. The heated steering wheel can shut off early or may not
turn on when the steering wheel is already warm.
NOTE:
On models that are equipped with Remote Start, this feature can be programmed to come
on during a Remote Start through the Uconnect®system. Refer to “Uconnect®Settings”
in “Understanding Your Instrument Panel” in the Owner's Manual on the DVD.
WARNING!
•Personswhoareunabletofeelpaintotheskinbecauseofadvancedage,chronic
illness, diabetes, spinal cord injury, medication, alcohol use, exhaustion, or other
physical conditions must exercise care when using the steering wheel heater. It may
cause burns even at low temperatures, especially if used for long periods.
•Donotplaceanythingonthesteeringwheelthatinsulatesagainstheat,suchasa
blanket or steering wheel covers of any type and material. This may cause the
steering wheel heater to overheat.
GETTING STARTED
34
Page 67 of 236
Uconnect® ACCESS
Uconnect® Access — If Equipped (Available On Uconnect® 8.4A/8.4AN —
U.S. Residents Only)
WARNING!
ALWAYS drive safely with your hands on the steering wheel. You have full responsibility
and assume all risks related to the use of the Uconnect®features and applications in
this vehicle. Only use Uconnect®when it is safe to do so. Failure to do so may result in
an accident involving serious injury or death.
Uconnect®Access enhances your ownership and driving experience by connecting your
vehicle with a built-in cellular connection. With Uconnect®Access, you can:
•Placeacalltoalocal9-1-1Operatorforemergencyassistance.
•Remotelylock/unlockyourdoorsandstartyourvehiclefromvirtuallyanywhere,using
the Uconnect®Access App from your smartphone. You can also do so by logging into
Mopar Owner Connect, or by calling Uconnect®Care. (Vehicle must be within the
United States and have network coverage).
•TurnyourvehicleintoaWiFiHotspotandconnectyourdevicestotheinternet.
•Receivetextoremailnotificationsifyourvehicle'stheftalarmgoesoff.
•Receivestolenvehicleassistance,usingGPStechnologytohelpauthoritieslocateyour
vehicle if it is stolen.
•Listentoyourtextmessagesorsendfree-formtextmessageswithyourvoicewhile
keeping your hands on the wheel, using the Voice Texting feature. Requires a cell phone
that supports Bluetooth Message Access Profile (MAP).
•Searchforplacestoeat,shop,relaxandplaywithYelp®,usingyourvoiceoron-screen
menu. Then navigate to them (navigation standard on Uconnect®8.4AN, optional on
Uconnect®8.4A).
•GetoperatorassistanceusingtheASSISTbuttononyourinteriorrearviewmirror.
Before you drive, familiarize yourself with the easy-to-use Uconnect® Access.
1. The ASSIST and 9-1-1 buttons are located on your rearview mirror. The ASSIST button
is used for contacting Roadside Assistance, Vehicle Care and Uconnect®Care. The
9-1-1 button connects you to emergency services.
NOTE:
Vehicles sold in Canada and Mexico DO NOT have 9-1-1 Call system capabilities. 9-1-1
or other emergency line operators in Canada and Mexico may not answer or respond to
9-1-1 system calls.
2. The Uconnect®“Apps” button on the menu bar at the bottom right corner of the radio
touchscreen. This is where you can begin your registration process, manage your Apps
and purchase WiFi on demand.
ELECTRONICS
65