reset DODGE CHARGER 2015 7.G Owner's Manual
[x] Cancel search | Manufacturer: DODGE, Model Year: 2015, Model line: CHARGER, Model: DODGE CHARGER 2015 7.GPages: 236, PDF Size: 35.67 MB
Page 124 of 236
Direct Tune
•Tunedirectlytoaradiostationbypressingthe“Tune”buttononthescreen,and
entering the desired station number.
Store Radio Presets
Yo u r r a d i o c a n s t o r e 3 6 t o t a l p r e s e t s t a t i o n s , 1 2 p r e s e t s p e r b a n d ( A M , F M a n d S X M ) . T h e y
are shown at the top of your radio screen.
•Toseethe12presetstationsperband,pressthe“arrow”buttononthetouchscreenat
the top right of the screen to toggle between the two sets of six presets.
•Tosetastationintomemorypressandholdthedesirednumberedbuttononthe
touchscreen for more than two seconds or until you hear a confirmation beep.
HD Radio
HD Radio technology (available on Uconnect®8.4AN) allows broadcasters to transmit a
high-quality digital signal.
With an HD radio receiver, the listener is provided with a clear sound that enhances the
listening experience. HD radio can also transmit data such as song title or artist.
SiriusXM Premier Over 160 Channels
Get every channel available on your satellite radio, and enjoy all you want, all in one place.
Hear commercial-free music plus sports, news, talk and entertainment. Get all the
premium programming, including Howard Stern, every NFL game, Oprah Radio®,every
MLB®and NHL®game, every NASCAR®race and more. And get 20+ Xtra channels,
including SiriusXM Latino, a selection of channels dedicated to Spanish language
programming.
•ToaccessSiriusXMSatelliteRadio,pressthe“SXM”buttononthetouchscreenonthe
main Radio screen.
The following describes features that are available when in SiriusXM Satellite Radio
mode.
Seek Up/Seek Down
•Pressthe“Seekarrow”buttononthetouchscreenforlessthantwosecondstoseek
through channels in SXM mode.
•Pressandholdeither“Seekarrow”buttononthetouchscreenformorethantwo
seconds to bypass channels without stopping. The radio will stop at the next listenable
channel once the arrow button on the touchscreen is released.
Direct Tune
•TunedirectlytoaSXMchannelbypressingthe“Tune”buttononthetouchscreen,and
entering the desired station number.
ELECTRONICS
122
Page 125 of 236
Jump
Jump automatically tells you when Traffic & Weather for a favorite city is available, and
gives you the option to switch to that channel.
•Press“Jump”toactivatethefeature.AfterlisteningtoTrafficandWeather,press
“Jump” again to return to the previous channel.
Fav
Activates the favorites menu. You can add up to 50 favorite artists or songs.
•JustpressAddFavArtistorAddFavSongwhilethesongisplaying.Youwillthenbe
alerted any time one of these songs, or works by these artists, is playing on other
SiriusXM channels.
SiriusXM Parental Controls
Yo u c a n s k i p o r h i d e c e r t a i n c h a n n e l s f r o m v i e w i f y o u d o n o t w a n t a c c e s s t o t h e m .
•Pressthe“Apps”buttononthetouchscreen,thenthe“Settings”buttononthe
touchscreen. Next press the “Sirius Setup” button on the touchscreen, and select
“Channel Skip”. Press the box next to the channel you want skipped. They will not show
up in normal usage.
SiriusXM also offers the option to permanently block selected channels. Call
(1-888-601-6297 for U.S. customers, 1-877-438-9677 for Canadian customers) and
request the Family-Friendly Package.
Browse
Lets you browse the SiriusXM channel listing or Genre listing. Favorites, Game Zone,
Weather and Jump settings also provide a way to browse the SiriusXM channel list.
Browse Sub-Menu Sub-Menu Description
AllShows the channel listing.
GenreProvides a list of all genres, and lets you jump to a channel within theselected genre.
PresetsLets you scroll the list of Preset satellite channels. Press the channel, orpress Enter on the Tune knob, to go to that channel. Press the trash canicon to delete a preset. Your presets are also shown at the top of themain Satellite Radio screen.
FavoritesLets you manage artists and songs in the Favorites list and configureAlert Settings to let you know when favorite songs or artists are playingon other channels. Also, view a list of channels airing any of yourFavorites.
Game Zone Provides alerts when your favorite sports teams are starting a gamewhich is being aired on other SiriusXM channels, or when their gamescore is announced. You can select and manage your Teams list here,and configure alerts.
JumpLets you select your favorite cities for Traffic & Weather information,which is used by the Jump feature on the main satellite radio screen.
ELECTRONICS
123
Page 143 of 236
Helpful Tips And Common Questions To Improve Bluetooth® Performance With
Your Uconnect® System
Mobile Phone won’t reconnect to system after pairing:
•Setmobilephonetoauto-connectortrusteddeviceinmobilephoneBluetooth®
settings (Blackberry devices).
•Performafactoryresetonyourmobilephone.Refertoyourmobilephonemanufacturer
or cellular provider for instructions.
•Manymobilephonesdonotautomaticallyreconnectafterbeingrestarted(hard
reboot). Your mobile phone can still be connected manually. Close all applications that
may be operating (refer to mobile phone manufacturer’s instructions), and follow
“Pairing (Wirelessly Connecting) Your Mobile Phone To The Uconnect®System”.
Mobile Phone won’t pair to system:
•Performahardresetinthemobilephonebyremovingthebattery(ifremovable—see
your mobile phone’s owner manual).
•DeletepairinghistoryinmobilephoneandUconnectsystem;usuallyfoundinphone’s
Bluetooth®connection settings.
•Verifyyouareselecting“Uconnect”inthediscoveredBluetooth®devices on your
mobile phone.
•Ifyourvehiclesystemgeneratesapincodethedefaultis0000.
Mobile Phonebook didn’t download:
•Check“Donotaskagain,”thenacceptthe“phonebookdownload”requestonyour
mobile phone.
•Upto5,000contactnameswithfournumberspercontactwilltransfertothe
Uconnect®8.4A/8.4AN system phonebook.
•Upto2,000contactnameswithsixnumberspercontactwilltransfertothe
Uconnect®5.0 system phonebook.
Te x t m e s s a g i n g w o n ’ t w o r k :
•Check“Donotaskagain,”thenacceptthe“connecttoyourmessages”requestonyour
mobile phone.
•VerifythatyourmobilephonehastheBluetooth®feature (Message Access Profile).
Can’t make a conference call:
•CDMA(Code-DivisionMultipleAccess)carriersdonotsupportconferencecalling.
Refer to your mobile phone user’s manual for further information.
Making calls while connected to AUX:
•PlugginginyourmobilephonetoAUXwhileconnectedtoBluetooth®will disable
Hands-Free Calling. Do not make calls while your mobile phone is plugged into the AUX
jack.
ELECTRONICS
141
Page 144 of 236
STEERING WHEEL AUDIO CONTROLS
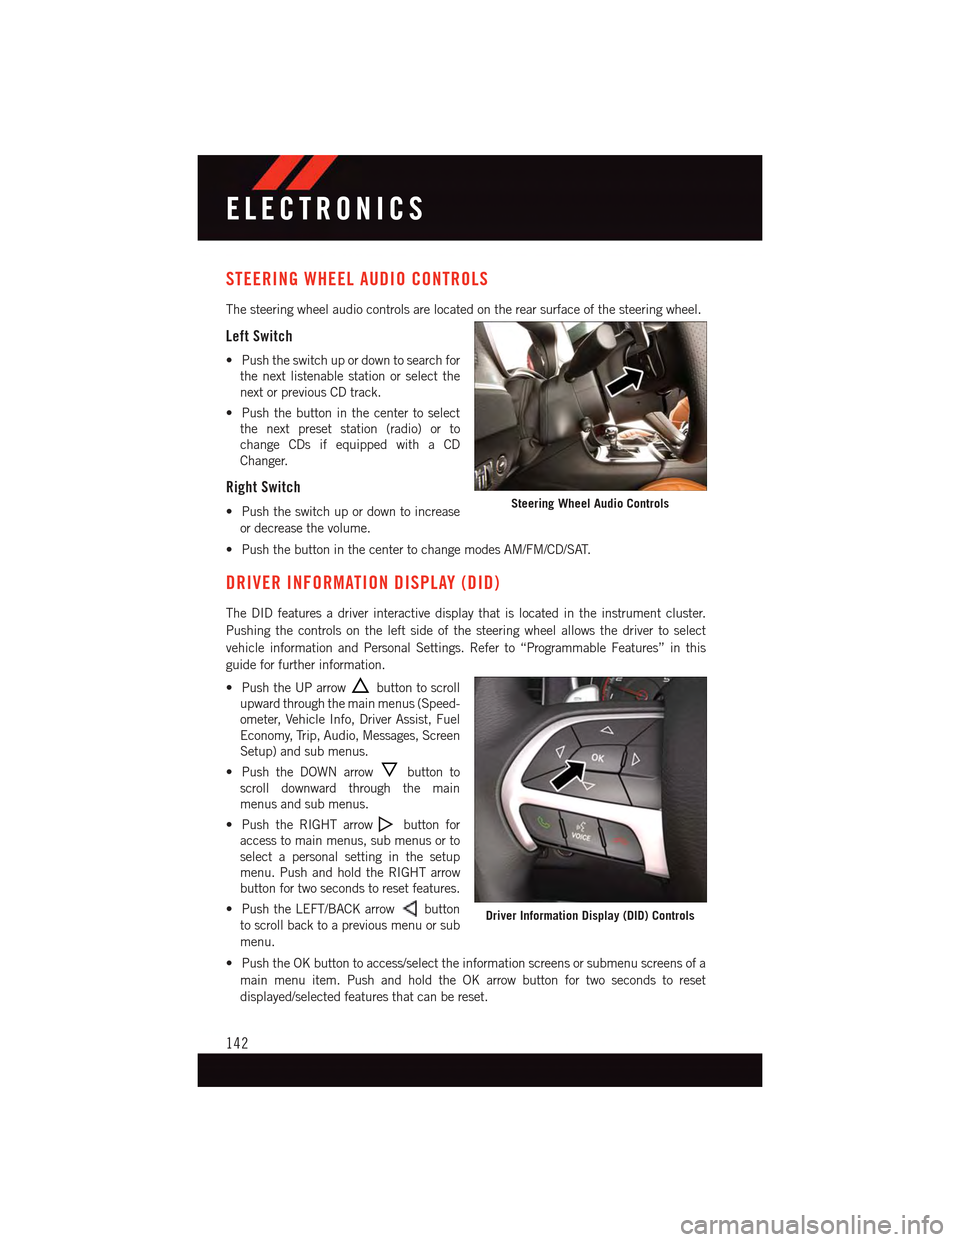
The steering wheel audio controls are located on the rear surface of the steering wheel.
Left Switch
•Pushtheswitchupordowntosearchfor
the next listenable station or select the
next or previous CD track.
•Pushthebuttoninthecentertoselect
the next preset station (radio) or to
change CDs if equipped with a CD
Changer.
Right Switch
•Pushtheswitchupordowntoincrease
or decrease the volume.
•PushthebuttoninthecentertochangemodesAM/FM/CD/SAT.
DRIVER INFORMATION DISPLAY (DID)
The DID features a driver interactive display that is located in the instrument cluster.
Pushing the controls on the left side of the steering wheel allows the driver to select
vehicle information and Personal Settings. Refer to “Programmable Features” in this
guide for further information.
•PushtheUParrowbutton to scroll
upward through the main menus (Speed-
ometer, Vehicle Info, Driver Assist, Fuel
Economy, Trip, Audio, Messages, Screen
Setup) and sub menus.
•PushtheDOWNarrowbutton to
scroll downward through the main
menus and sub menus.
•PushtheRIGHTarrowbutton for
access to main menus, sub menus or to
select a personal setting in the setup
menu. Push and hold the RIGHT arrow
button for two seconds to reset features.
•PushtheLEFT/BACKarrowbutton
to scroll back to a previous menu or sub
menu.
•PushtheOKbuttontoaccess/selecttheinformationscreensorsubmenuscreensofa
main menu item. Push and hold the OK arrow button for two seconds to reset
displayed/selected features that can be reset.
Steering Wheel Audio Controls
Driver Information Display (DID) Controls
ELECTRONICS
142
Page 148 of 236
Lap Timer
When selected, the Lap Timer page will show the timer always at 0:00.00 with the
previous Best and Last time data (unless the driver has cleared it via hold to Reset).
•PushingOKwill start “current” timer from 0:00.0.
•WhenOKis pushed, the times are updated accordingly.
•AssoonasthedriverexitstheLapTimerpages,the“current”timerwillstopandthe
time will be reset to 0:00.00.
•IfthedriverstaysontheLapTimerpages,the“current”timerwillresetto0:00.0when
ignition is placed in the off position, or ignition placed in the ON position (or will roll
over at 59:59.99 if ever possible).
•EachtimethedriverpushesOKfor a Lap that current time populates, the Last time and
also populates the 1st (top) space on the Timer History page the current time resets to
0:00.0 at every push of theOKbutton.
•Thetimerwillstopwhenthedrivernavigatesawayfromthispage.
Lap History
When selected, this screen displays the Lap History, and will color highlight the time that
is the best time from the Timer Page.
•EachtimethedriverpushestheOKbutton(whileontheLapTimerpage)thecurrent
Lap Time populates the 1st spot and the rest of the data shifts down.
•ColorwillindicatethetimethatisthebesttimefromtheTimerPage.
•HoldingtheOKbutton only resets the page you are on.
•LapHistorypageisastaticdisplayoflaptimesonly.
Top Speed
When selected, this screen displays the Top Speed since last reset:
•Populatesatopspeedfromfirstdrivecycleandeverytimethatspeedisexceededthat
number is stored here unless/until the driver resets the screen.
•Latchingoverignitioncycles.
•Unitswillchangewiththeglobalchangeinunits.
ELECTRONICS
146
Page 149 of 236
PROGRAMMABLE FEATURES
Driver Information Display (DID)
The DID can be used to view or change the following settings. Push the UPor DOWN
button to scroll through the main menus, then push the RIGHTbutton to scroll
through the submenus of each menu item. Push theBACKbutton to scroll back to a
previous menu or sub menu.
•Speedometer•Audio
•VehicleInfo•Messages
•DriverAssist—IfEquipped•ScreenSetup
•FuelEconomy•SpeedWarning—IfEquipped
•Trip•Diagnostic—IfEquipped
Uconnect® Customer Programmable Features
The Uconnect®system allows you to access Customer Programmable feature settings
such as Display, Units, Voice, Clock, Safety & Driving Assistance, Lights, Doors & Locks,
Auto-On Comfort, Engine Off Options, Audio, Phone/Bluetooth®,SiriusXMSetup,Restore
Settings, Clear Personal Data, System Information, and Compass Settings (5.0 Radio
Only) through buttons on the touchscreen.
NOTE:
If equipped with the Super Track Pak option please refer to the “Drive Mode Supplement”
within your Owners Information Kit for further descriptions of these modes.
•Pressthe“Controls”buttonlocatednearthebottomofthetouchscreen,thenpressthe
“Settings” button on the touchscreen to access the Settings screen. When making a
selection, scroll up or down until the preferred setting is highlighted, then press and
release the preferred setting until a check-mark appears next to the setting, showing
that setting has been selected. The following feature settings are available:
•Display•EngineOffOptions
•Units•Audio
•Voice•Phone/Bluetooth®
•Clock•SiriusXMSetup
•Safety&DrivingAssistance•RestoreSettings
•Lights•ClearPersonalData
•Doors&Locks•SystemInformation
•Auto-OnComfort•Compass(5.0RadioOnly)
Refer to “Uconnect Settings/Customer Programmable Features” found within “Under-
standing Your Instrument Panel” located in your Owner's Manual on the DVD for further
information.
ELECTRONICS
147
Page 158 of 236
1/8 Mile, 1/4 Mile
•Whenselected,thisscreendisplaysthetimeittakesthevehicletotravel1/8mile
(1/4 mile) within 30 seconds and the vehicle's speed when it reaches 1/8 mile
(1/4 mile).
Braking Distance
•Whenselected,thisscreendisplaysthevehicle'sbrakingdistanceandthespeedat
which the brake pedal was depressed.
Current G-Force
•Whenselected,thisscreendisplaysthecurrentG-Force(lateralandlongitudinal)along
with a friction circle that displays the directions of the forces.
Peak G-Force
•Whenselected,thisscreendisplaysallfourG-Forcevalues(twolateralandtwo
longitudinal).
Lap Timer
•WhenselectedtheLapTimerpagewillshowthetimeralwaysat0:00.00withthe
previous Best and Last time data (unless the driver has cleared it via hold to Reset)
Lap History
•Whenselected,thisscreendisplaystheLapHistory,andwillcolorhighlightthetime
that is the best time from the Timer Page.
Top Speed
•Whenselected,thisscreendisplaystheTopSpeedsincelastreset.
Uconnect® SRT PERFORMANCE PAGES
To a c c e s s t h e S R T P e r f o r m a n c e P a g e s , p r e s s t h e “ S R T & A p p s ” b u t t o n o n t h e t o u c h -
screen then press the “SRT Performance” button on the touchscreen. Press the feature
button on the touchscreen to select that feature.
The Performance Pages includes the following menus:
•Home•Gauges 2
•Ti m e r s•G–Force
•Gauges 1•Engine
Home
When Home is selected, the following options will be available:
•Aseriesofsiximageswhichcanbeselectedbytheuser.
•Aleftandrightarrowtoallowtheusertoscrollthroughvehicleimages.
•Ashort-cuttotheSRTDriveModesfeature.
SRT
156
Page 166 of 236

-AdaptiveCruiseControl(ACC)ONIndicator
•If your vehicle is equipped with adaptive cruise control, the controls operate exactly the
same as the normal (fixed speed) cruise control with one difference. You can set a
specified distance you would like to maintain between you and the vehicle in front of you.
•IftheACCsensordetectsavehicleahead,ACCwillapplylimitedbrakingoraccelera-
tion automatically to maintain a preset following distance, while matching the speed of
the vehicle ahead.
•If the sensor does not detect a vehicle ahead of you, ACC will maintain a fixed set speed.
•Referto“SpeedControl”in“OperatingYourVehicle”forfurtherinformationon
Adaptive Cruise Control (ACC) ON operation and proper use.
NOTE:
Adaptive Cruise Control (ACC) increases the driving convenience provided by cruise
control while traveling on highways and major roadways. However, it is not a safety system
and not designed to prevent collisions.
Electronic Stability Control (ESC) OFF Indicator Light
This light indicates the Electronic Stability Control (ESC) is off.
-DoorAjarIndicator
This indicator will illuminate when a door(s) is left ajar and not fully closed.
Oil Change Due
Yo u r v e h i c l e i s e q u i p p e d w i t h a n e n g i n e o i l c h a n g e i n d i c a t o r s y s t e m . T h e “ O i l C h a n g e
Due” message will display for 5 seconds along with a single chime to indicate the next
scheduled oil change interval. The engine oil change indicator system is duty cycle based,
which means the engine oil change interval may fluctuate dependent upon your personal
driving style.
Resetting The Light After Servicing
Vehicles Equipped With Keyless Enter-N-Go™
1. Without pushing the brake pedal, push the ENGINE START/STOP button and cycle the
ignition to the ON/RUN position (do not start the engine).
2. Fully depress the accelerator pedal, slowly, three times within 10 seconds.
3. Without pushing the brake pedal, push the ENGINE START/STOP button once to
return the ignition to the OFF/LOCK position.
Vehicles Not Equipped With Keyless Enter-N-Go™
1. Turn the ignition switch to the ON/RUN position (do not start the engine).
2. Fully depress the accelerator pedal, slowly, three times within 10 seconds.
3. Turn the ignition switch to the OFF/LOCK position.
WHAT TO DO IN EMERGENCIES
164
Page 167 of 236
NOTE:
If the indicator message illuminates when you start the vehicle, the oil change indicator
system did not reset. If necessary, repeat this procedure.
NOTE:
Resetting the oil life can also be done within the "Oil Life" menu under “Vehicle Info.”
IF YOUR ENGINE OVERHEATS
In any of the following situations, you can reduce the potential for overheating by taking
the appropriate action:
•Onthehighways—slowdown.
•Incitytraffic—whilestopped,shiftthetransmissiontoNEUTRAL,butdonotincrease
engine idle speed.
NOTE:
There are steps that you can take to slow down an impending overheat condition:
•Ifyourairconditioner(A/C)ison,turnitoff.TheA/Csystemaddsheattotheengine
cooling system and turning the A/C off can help remove this heat.
•Youcanalsoturnthetemperaturecontroltomaximumheat,themodecontroltofloor
and the blower control to high. This allows the heater core to act as a supplement to the
radiator and aids in removing heat from the engine cooling system.
CAUTION!
Driving with a hot cooling system could damage your vehicle. If the temperature gauge
reads HOT (H), pull over and stop the vehicle. Idle the vehicle with the air conditioner
turned off until the pointer drops back into the normal range. If the pointer remains on
HOT (H), and you hear continuous chimes, turn the engine off immediately, and call for
service.
WARNING!
Yo u o r o t h e r s c a n b e b a d l y b u r n e d b y h o t e n g i n e c o o l a n t ( a n t i f r e e z e ) o r s t e a m f r o m y o u r
radiator. If you see or hear steam coming from under the hood, do not open the hood
until the radiator has had time to cool. Never try to open a cooling system pressure cap
when the radiator or coolant bottle is hot.
WHAT TO DO IN EMERGENCIES
165
Page 183 of 236
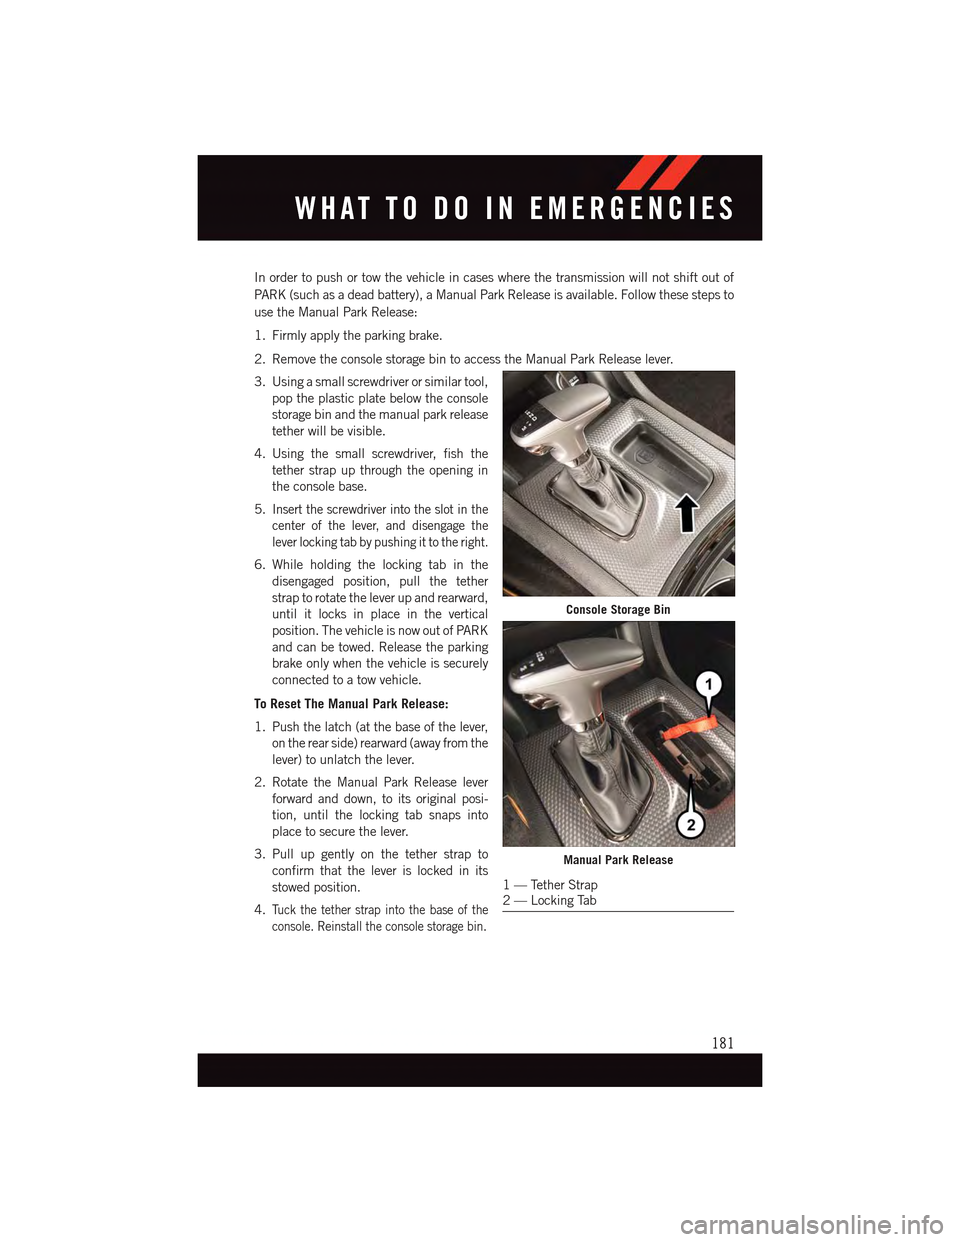
In order to push or tow the vehicle in cases where the transmission will not shift out of
PA R K ( s u c h a s a d e a d b a t t e r y ) , a M a n u a l P a r k R e l e a s e i s a v a i l a b l e . F o l l o w t h e s e s t e p s t o
use the Manual Park Release:
1. Firmly apply the parking brake.
2. Remove the console storage bin to access the Manual Park Release lever.
3. Using a small screwdriver or similar tool,
pop the plastic plate below the console
storage bin and the manual park release
tether will be visible.
4. Using the small screwdriver, fish the
tether strap up through the opening in
the console base.
5.Insert the screwdriver into the slot in the
center of the lever, and disengage the
lever locking tab by pushing it to the right.
6. While holding the locking tab in the
disengaged position, pull the tether
strap to rotate the lever up and rearward,
until it locks in place in the vertical
position. The vehicle is now out of PARK
and can be towed. Release the parking
brake only when the vehicle is securely
connected to a tow vehicle.
To Reset The Manual Park Release:
1. Push the latch (at the base of the lever,
on the rear side) rearward (away from the
lever) to unlatch the lever.
2. Rotate the Manual Park Release lever
forward and down, to its original posi-
tion, until the locking tab snaps into
place to secure the lever.
3. Pull up gently on the tether strap to
confirm that the lever is locked in its
stowed position.
4.Tu c k t h e t e t h e r s t r a p i n t o t h e b a s e o f t h e
console. Reinstall the console storage bin.
Console Storage Bin
Manual Park Release
1—TetherStrap2—LockingTab
WHAT TO DO IN EMERGENCIES
181