radiator DODGE CHARGER 2020 Owners Manual
[x] Cancel search | Manufacturer: DODGE, Model Year: 2020, Model line: CHARGER, Model: DODGE CHARGER 2020Pages: 412, PDF Size: 18.96 MB
Page 63 of 412
GETTING TO KNOW YOUR VEHICLE61
CLIMATE CONTROL FUNCTIONS
A/C (Air Conditioning)
The Air Conditioning (A/C) button allows the
operator to manually activate or deactivate the
air conditioning system. When the air
conditioning system is turned on, cool
dehumidified air will flow through the outlets
into the cabin. For improved fuel economy,
press the A/C button to turn off the air
conditioning and manually adjust the blower
and airflow mode settings. Also, make sure to
select only Panel, Bi-Level, or Floor modes. NOTE:
For Manual Climate Controls, if the system is
in Mix, Floor or Defrost Mode, the A/C can be
turned off, but the A/C system shall remain
active to prevent fogging of the windows.
If fog or mist appears on the windshield or
side glass, select Defrost mode, and increase
blower speed if needed.
If your air conditioning performance seems
lower than expected, check the front of the
A/C condenser (located in front of the radi
-
ator), for an accumulation of dirt or insects.
Clean with a gentle water spray from the front
of the radiator and through the condenser. MAX A/C
MAX A/C sets the control for maximum cooling
performance.
Press and release to toggle between MAX A/C
and the prior settings. The button illuminates
when MAX A/C is on.
In MAX A/C, the blower level and mode position
can be adjusted to desired user settings.
Pressing other settings will cause the MAX A/C
operation to switch to the selected setting and
MAX A/C to exit.
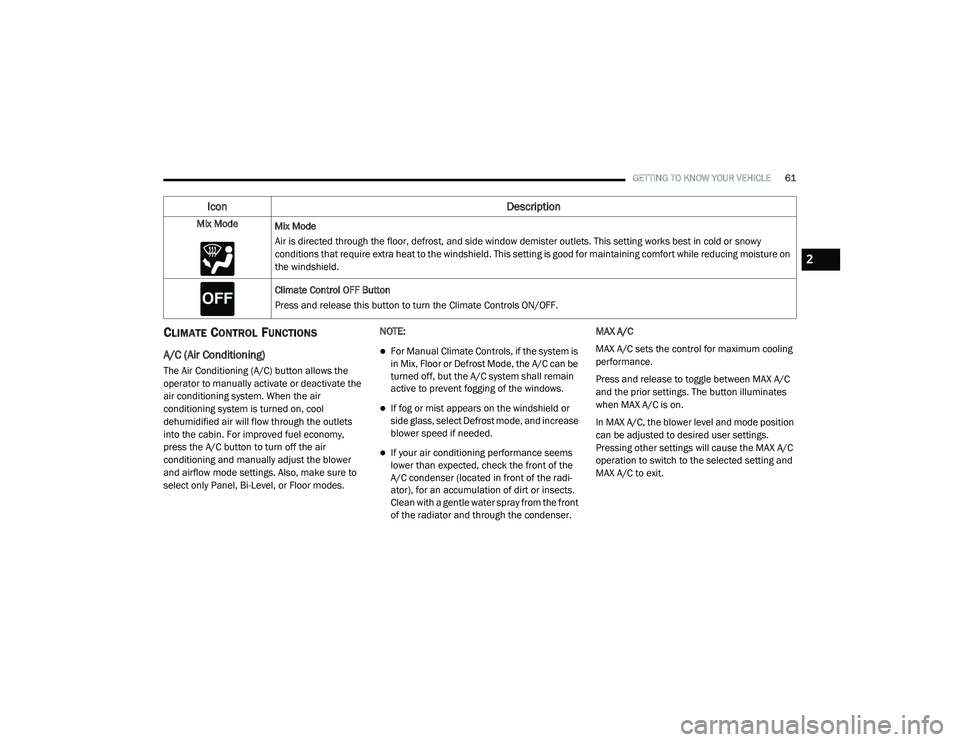
Mix Mode
Mix Mode
Air is directed through the floor, defrost, and side window demister outlets. This setting works best in cold or snowy
conditions that require extra heat to the windshield. This setting is good for maintaining comfort while reducing moisture on
the windshield.
Climate Control OFF Button
Press and release this button to turn the Climate Controls ON/OFF.
Icon Description
2
20_LD_OM_EN_USC_t.book Page 61
Page 224 of 412
222IN CASE OF EMERGENCY
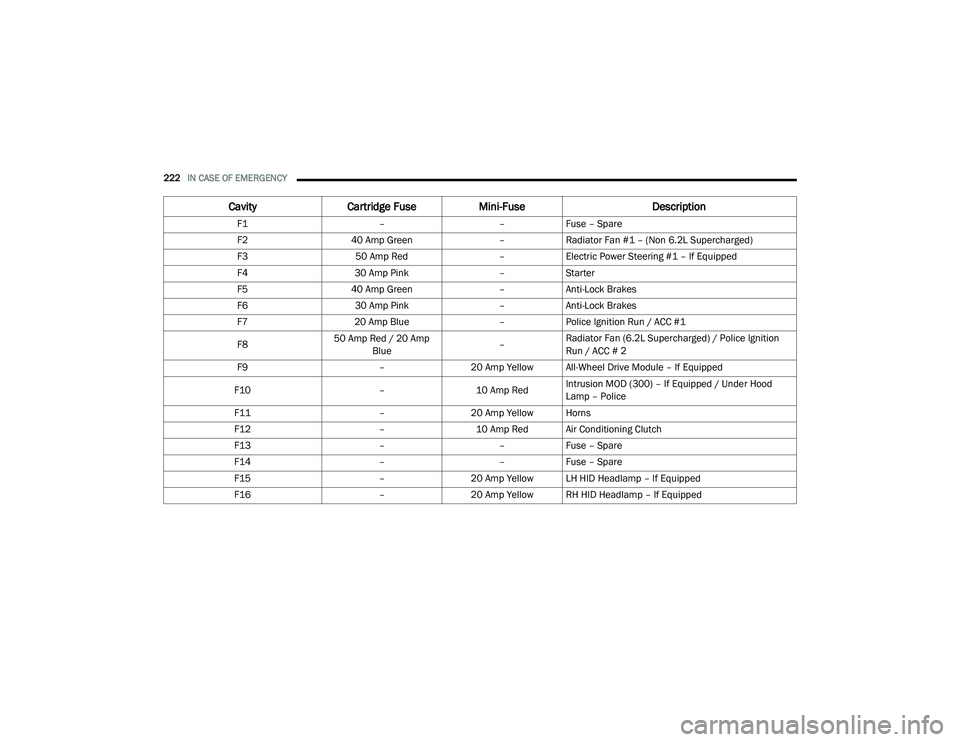
CavityCartridge Fuse Mini-Fuse Description
F1––Fuse – Spare
F2 40 Amp Green –Radiator Fan #1 – (Non 6.2L Supercharged)
F3 50 Amp Red –Electric Power Steering #1 – If Equipped
F4 30 Amp Pink –Starter
F5 40 Amp Green –Anti-Lock Brakes
F6 30 Amp Pink –Anti-Lock Brakes
F7 20 Amp Blue –Police Ignition Run / ACC #1
F8 50 Amp Red / 20 Amp
Blue –Radiator Fan (6.2L Supercharged) / Police Ignition
Run / ACC # 2
F9 –20 Amp Yellow All-Wheel Drive Module – If Equipped
F10 –10 Amp RedIntrusion MOD (300) – If Equipped / Under Hood
Lamp – Police
F11 –20 Amp Yellow Horns
F12 –10 Amp Red Air Conditioning Clutch
F13 ––Fuse – Spare
F14 ––Fuse – Spare
F15 –20 Amp Yellow LH HID Headlamp – If Equipped
F16 –20 Amp Yellow RH HID Headlamp – If Equipped
20_LD_OM_EN_USC_t.book Page 222
Page 225 of 412
IN CASE OF EMERGENCY223
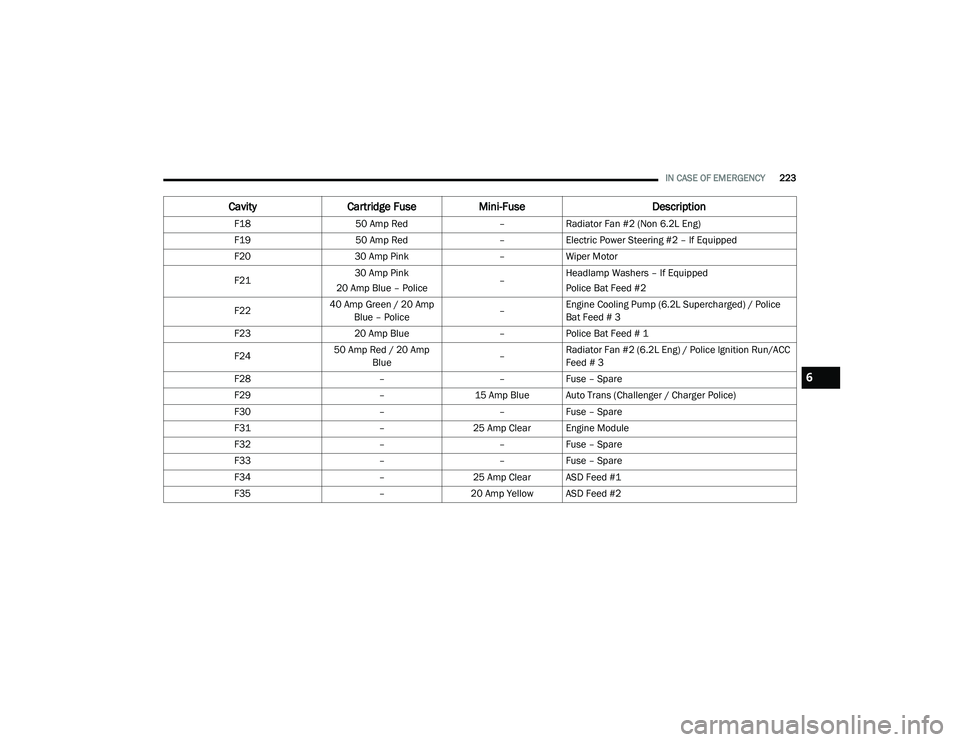
F18 50 Amp Red –Radiator Fan #2 (Non 6.2L Eng)
F19 50 Amp Red –Electric Power Steering #2 – If Equipped
F20 30 Amp Pink –Wiper Motor
F21 30 Amp Pink
20 Amp Blue – Police –Headlamp Washers – If Equipped
Police Bat Feed #2
F22 40 Amp Green / 20 Amp
Blue – Police –Engine Cooling Pump (6.2L Supercharged) / Police
Bat Feed # 3
F23 20 Amp Blue –Police Bat Feed # 1
F24 50 Amp Red / 20 Amp
Blue –Radiator Fan #2 (6.2L Eng) / Police Ignition Run/ACC
Feed # 3
F28 ––Fuse – Spare
F29 –15 Amp Blue Auto Trans (Challenger / Charger Police)
F30 ––Fuse – Spare
F31 –25 Amp Clear Engine Module
F32 ––Fuse – Spare
F33 ––Fuse – Spare
F34 –25 Amp Clear ASD Feed #1
F35 –20 Amp Yellow ASD Feed #2
Cavity Cartridge Fuse Mini-Fuse Description
6
20_LD_OM_EN_USC_t.book Page 223
Page 242 of 412
240IN CASE OF EMERGENCY
(Continued)
JUMP STARTING
If your vehicle has a discharged battery, it can
be jump started using a set of jumper cables
and a battery in another vehicle, or by using a
portable battery booster pack. Jump starting
can be dangerous if done improperly, so please
follow the procedures in this section carefully.
NOTE:
When using a portable battery booster pack,
follow the manufacturer's operating instruc-
tions and precautions.
PREPARATIONS FOR JUMP START
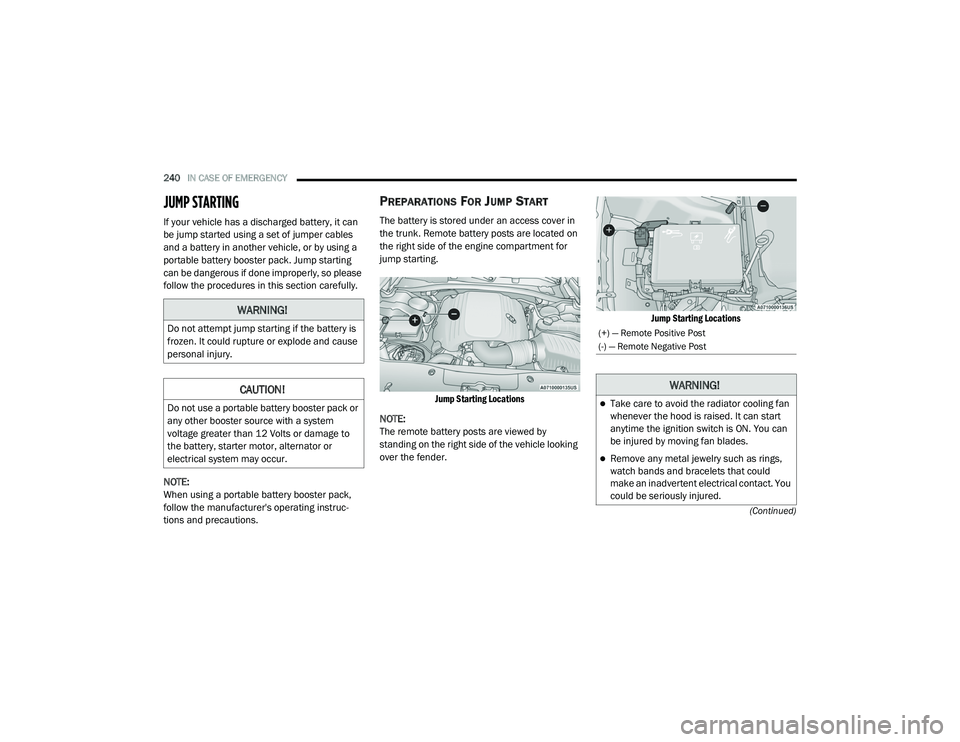
The battery is stored under an access cover in
the trunk. Remote battery posts are located on
the right side of the engine compartment for
jump starting.
Jump Starting Locations
NOTE:
The remote battery posts are viewed by
standing on the right side of the vehicle looking
over the fender.
Jump Starting Locations
WARNING!
Do not attempt jump starting if the battery is
frozen. It could rupture or explode and cause
personal injury.
CAUTION!
Do not use a portable battery booster pack or
any other booster source with a system
voltage greater than 12 Volts or damage to
the battery, starter motor, alternator or
electrical system may occur.
(+) — Remote Positive Post
(-) — Remote Negative Post
WARNING!
Take care to avoid the radiator cooling fan
whenever the hood is raised. It can start
anytime the ignition switch is ON. You can
be injured by moving fan blades.
Remove any metal jewelry such as rings,
watch bands and bracelets that could
make an inadvertent electrical contact. You
could be seriously injured.
20_LD_OM_EN_USC_t.book Page 240
Page 244 of 412
242IN CASE OF EMERGENCY
3. Disconnect the positive (+) end of the
jumper cable from the positive (+) post of
the booster battery.
4. Disconnect the opposite end of the positive (+) jumper cable from the remote positive
(+) post of the vehicle with the discharged
battery.
If frequent jump starting is required to start your
vehicle you should have the battery and
charging system inspected at an authorized
dealer.IF YOUR ENGINE OVERHEATS
In any of the following situations, you can
reduce the potential for overheating by taking
the appropriate action.
On the highways — slow down.
In city traffic — while stopped, place the trans -
mission in NEUTRAL, but do not increase the
engine idle speed while preventing vehicle
motion with the brakes.
NOTE:
There are steps that you can take to slow down
an impending overheat condition:
If your Air Conditioner (A/C) is on, turn it off.
The A/C system adds heat to the engine
cooling system and turning the A/C off can
help remove this heat.
You can also turn the temperature control to
maximum heat, the mode control to floor and
the blower control to high. This allows the
heater core to act as a supplement to the
radiator and aids in removing heat from the
engine cooling system.
CAUTION!
Accessories plugged into the vehicle power
outlets draw power from the vehicle’s battery,
even when not in use (i.e., cellular devices,
etc.). Eventually, if plugged in long enough
without engine operation, the vehicle’s
battery will discharge sufficiently to degrade
battery life and/or prevent the engine from
starting.
WARNING!
You or others can be badly burned by hot
engine coolant (antifreeze) or steam from
your radiator. If you see or hear steam coming
from under the hood, do not open the hood
until the radiator has had time to cool. Never
try to open a cooling system pressure cap
when the radiator or coolant bottle is hot.
CAUTION!
Driving with a hot cooling system could
damage your vehicle. If the temperature
gauge reads HOT (H), pull over and stop the
vehicle. Idle the vehicle with the air
conditioner turned off until the pointer drops
back into the normal range. If the pointer
remains on HOT (H), and you hear continuous
chimes, turn the engine off immediately and
call for service.
20_LD_OM_EN_USC_t.book Page 242
Page 272 of 412
270SERVICING AND MAINTENANCE
CHECKING OIL LEVEL — 3.6L AND 5.7L
E
NGINE
To ensure proper engine lubrication, the engine
oil must be maintained at the correct level.
Check the oil level at regular intervals, such as
every month. The best time to check the engine
oil level is about five minutes after a fully
warmed up engine is shut off.
Checking the oil while the vehicle is on level
ground will improve the accuracy of the oil level
readings.
There are three possible dipstick types:
Crosshatched zone.
Crosshatched zone marked SAFE.
Crosshatched zone marked with MIN at the
low end of the range and MAX at the high end
of the range.
NOTE:
Always maintain the oil level within the cross -
hatch markings on the dipstick.
Adding 1 Quart (1.0 Liter) of oil when the
reading is at the low end of the dipstick range
will raise the oil level to the high end of the
range marking.
CHECKING OIL LEVEL — 6.2L
S
UPERCHARGED ENGINE AND 6.4L
E
NGINE
To ensure proper engine lubrication, the engine
oil must be maintained at the correct level.
Check the oil level at regular intervals, such as
once a month. The best time to check the
engine oil level is about five minutes after a fully
warmed engine is shut off.
Checking the oil while the vehicle is on level
ground will improve the accuracy of the oil level
readings. Maintain the oil level in the “SAFE”
range. Adding 1.0 Quart (1 Liter) of oil when the
reading is at the bottom of the “SAFE” range will
result in an oil level at the top of the “SAFE”
range on these engines.
ADDING WASHER FLUID
The windshield washer fluid reservoir is located
in the front of the engine compartment. Be sure
to check the fluid level at regular intervals. Fill the
reservoir with windshield washer solvent (not
radiator antifreeze) and operate the system for a
few seconds to flush out the residual water.
When refilling the washer fluid reservoir, apply
some washer fluid to a cloth or towel and wipe
the wiper blades clean. This will help blade
performance.
To prevent freeze-up of your windshield washer
system in cold weather, select a solution or
mixture that meets or exceeds the temperature
range of your climate. This rating information
can be found on most washer fluid containers.
The fluid reservoir will hold nearly 1 Gallon
(4 Liters) of washer fluid when the message
“Low Washer Fluid” appears in the instrument
cluster.
CAUTION!
Overfilling or underfilling the crankcase will
cause aeration or loss of oil pressure. This
could damage your engine.
CAUTION!
Overfilling or underfilling the crankcase will
cause aeration or loss of oil pressure. This
could damage your engine.
20_LD_OM_EN_USC_t.book Page 270
Page 278 of 412
276SERVICING AND MAINTENANCE
(Continued)
recommends that air conditioning service be
performed by an authorized dealer using
recovery and recycling equipment.
NOTE:
Use only manufacturer approved A/C system
PAG compressor oil, and refrigerants.
A/C Air Filter
The filter is located in the fresh air inlet under
the hood, behind a removable panel in the cowl
on the passenger side of the vehicle, next to the
windshield wipers. When installing a new filter,
ensure its proper orientation.
1. Remove the access door in the cowl screen by pressing the retaining clips.
Access Door
2. Unsnap both ends and lift the filter access
cover.
Filter Access Cover
3. Remove the used filter.
4. Install the new filter with arrows pointing in the direction of airflow, which is toward the
rear of the vehicle (text and arrows on the
filter will indicate this).
A/C Air Filter
5. Close the filter access cover.
Refer to “Scheduled Servicing” in this section
for the proper maintenance intervals.
ACCESSORY DRIVE BELT INSPECTION
WARNING!
Do not attempt to inspect an accessory
drive belt with vehicle running.
When working near the radiator cooling fan,
disconnect the fan motor lead. The fan is
temperature controlled and can start at any
time regardless of ignition mode. You could
be injured by the moving fan blades.
20_LD_OM_EN_USC_t.book Page 276
Page 282 of 412
280SERVICING AND MAINTENANCE
Under normal operating conditions, the
catalytic converter will not require
maintenance. However, it is important to keep
the engine properly tuned to ensure proper
catalyst operation and prevent possible catalyst
damage. NOTE:
Intentional tampering with emissions control
systems can result in civil penalties being
assessed against you.
In unusual situations involving grossly
malfunctioning engine operation, a scorching
odor may suggest severe and abnormal catalyst
overheating. If this occurs, stop the vehicle, turn
off the engine and allow it to cool. Service,
including a tune-up to manufacturer's
specifications, should be obtained immediately.
To minimize the possibility of catalytic converter
damage:
Do not shut off the engine or interrupt the
ignition when the transmission is in gear and
the vehicle is in motion.
Do not try to start the engine by pushing or
towing the vehicle.
Do not idle the engine with any spark plug
wires disconnected or removed, such as
when diagnostic testing, or for prolonged
periods during very rough idle or malfunc
-
tioning operating conditions. NOTE:
The vehicle exhaust system may be equipped
with an Electronic Exhaust Valve (EEV) system,
if the exhaust system is replaced with after
-
market products a Malfunction Indicator Lamp
(MIL) will illuminate.
COOLING SYSTEM
CAUTION!
The catalytic converter requires the use of
unleaded fuel only. Leaded gasoline will
destroy the effectiveness of the catalyst as
an emissions control device and may seri -
ously reduce engine performance and
cause serious damage to the engine.
Damage to the catalytic converter can result
if your vehicle is not kept in proper operating
condition. In the event of engine malfunc -
tion, particularly involving engine misfire or
other apparent loss of performance, have
your vehicle serviced promptly. Continued
operation of your vehicle with a severe
malfunction could cause the converter to
overheat, resulting in possible damage to
the converter and vehicle.
WARNING!
You or others can be badly burned by hot
engine coolant (antifreeze) or steam from
your radiator. If you see or hear steam coming
from under the hood, do not open the hood
until the radiator has had time to cool. Never
open a cooling system pressure cap when the
radiator or coolant bottle is hot.
Keep hands, tools, clothing, and jewelry
away from the radiator cooling fan when
the hood is raised. The fan starts automati -
cally and may start at any time, whether the
engine is running or not.
When working near the radiator cooling fan,
disconnect the fan motor lead or turn the
ignition to the OFF mode. The fan is
temperature controlled and can start at any
time the ignition is in the ON mode.
20_LD_OM_EN_USC_t.book Page 280
Page 283 of 412
SERVICING AND MAINTENANCE281
Coolant Checks
Check engine coolant (antifreeze) protection
every 12 months (before the onset of freezing
weather, where applicable). If the engine
coolant (antifreeze) is dirty, the system should
be drained, flushed, and refilled with fresh OAT
coolant (conforming to MS.90032) by an
authorized dealer. Check the front of the
radiator for any accumulation of bugs, leaves,
etc. If dirty, clean by gently spraying water from
a garden hose vertically down the face of the
condenser.
Check the coolant recovery bottle tubing for
brittle rubber, cracking, tears, cuts, and
tightness of the connection at the bottle and
radiator. Inspect the entire system for leaks. DO
NOT REMOVE THE COOLANT PRESSURE CAP
WHEN THE COOLING SYSTEM IS HOT.
Cooling System — Drain, Flush And Refill
NOTE:
Some vehicles require special tools to add
coolant properly. Failure to fill these systems
properly could lead to severe internal engine
damage. If any coolant is needed to be added to
the system please contact an authorized
dealer. If the engine coolant (antifreeze) is dirty or
contains visible sediment, have an authorized
dealer clean and flush with OAT coolant
(antifreeze) (conforming to MS.90032).
NOTE:
If equipped with the 6.2L Supercharged engine
the intercooler must be vacuum flushed and
filled. If any coolant is needed to be added to
the system please contact an local authorized
dealer.
Refer to the “Maintenance Plan” in this section
for the proper maintenance intervals.
Selection Of Coolant
Refer to “Fluids And Lubricants” in “Technical
Specifications” for further information.
NOTE:
Mixing of engine coolant (antifreeze) other
than specified Organic Additive Technology
(OAT) engine coolant (antifreeze), may result
in engine damage and may decrease corro
-
sion protection. Organic Additive Technology
(OAT) engine coolant is different and should
not be mixed with Hybrid Organic Additive
Technology (HOAT) engine coolant (anti -
freeze) or any “globally compatible” coolant (antifreeze). If a non-OAT engine coolant
(antifreeze) is introduced into the cooling
system in an emergency, the cooling system
will need to be drained, flushed, and refilled
with fresh OAT coolant (conforming to
MS.90032), by an authorized dealer as soon
as possible.
Do not use water alone or alcohol-based
engine coolant (antifreeze) products. Do not
use additional rust inhibitors or antirust prod
-
ucts, as they may not be compatible with the
radiator engine coolant and may plug the
radiator.
This vehicle has not been designed for use
with propylene glycol-based engine coolant
(antifreeze). Use of propylene glycol-based
engine coolant (antifreeze) is not recom -
mended.
Some vehicles require special tools to add
coolant properly. Failure to fill these systems
properly could lead to severe internal engine
damage. If any coolant is needed to be added
to the system please contact an authorized
dealer.
7
20_LD_OM_EN_USC_t.book Page 281
Page 284 of 412
282SERVICING AND MAINTENANCE
(Continued)
Adding Coolant
Your vehicle has been built with an improved
engine coolant (OAT coolant conforming to
MS.90032) that allows extended maintenance
intervals. This engine coolant (antifreeze) can
be used up to 10 years or 150,000 miles
(240,000 km) before replacement. To prevent
reducing this extended maintenance period, it
is important that you use the same engine
coolant (OAT coolant conforming to MS.90032)
throughout the life of your vehicle.
Please review these recommendations for
using Organic Additive Technology (OAT) engine
coolant (antifreeze) that meets the
requirements of FCA Material Standard
MS.90032. When adding engine coolant
(antifreeze):
We recommend using Mopar Antifreeze/
Coolant 10 Year/150,000 Mile (240,000 km)
Formula OAT (Organic Additive Technology)
that meets the requirements of FCA Material
Standard MS.90032.
Mix a minimum solution of 50% OAT engine
coolant that meets the requirements of FCA
Material Standard MS.90032 and distilled
water. Use higher concentrations (not to exceed 70%) if temperatures below −34°F
(−37°C) are anticipated. Please contact an
authorized dealer for assistance.
Use only high purity water such as distilled or
deionized water when mixing the water/engine
coolant (antifreeze) solution. The use of lower
quality water will reduce the amount of corro
-
sion protection in the engine cooling system.
NOTE:
It is the owner's responsibility to maintain the
proper level of protection against freezing
according to the temperatures occurring in
the area where the vehicle is operated.
Some vehicles require special tools to add
coolant properly. Failure to fill these systems
properly could lead to severe internal engine
damage. If any coolant is needed to be added
to the system, please contact a local autho -
rized dealer.
Mixing engine coolant (antifreeze) types is
not recommended and can result in cooling
system damage. If HOAT and OAT coolant are
mixed in an emergency, have a authorized
dealer drain, flush, and refill with OAT coolant
(conforming to MS.90032) as soon as
possible.
Cooling System Pressure Cap
The cap must be fully tightened to prevent loss
of engine coolant (antifreeze), and to ensure
that engine coolant (antifreeze) will return to
the radiator from the coolant expansion bottle/
recovery tank (if equipped).
The cap should be inspected and cleaned if
there is any accumulation of foreign material on
the sealing surfaces.
NOTE:
Be sure you do not mix the engine coolant
system pressure cap with the intercooler
system pressure cap. These caps are not inter -
changeable.
WARNING!
Do not open hot engine cooling system.
Never add engine coolant (antifreeze) when
the engine is overheated. Do not loosen or
remove the cap to cool an overheated
engine. Heat causes pressure to build up in
the cooling system. To prevent scalding or
injury, do not remove the pressure cap
while the system is hot or under pressure.
20_LD_OM_EN_USC_t.book Page 282